
|
 11-29-2011, 07:49 PM
|
#876 | |
|
Registered User
Join Date: Aug 2010
Location: Hoofddorp, the Netherlands
Posts: 582
|
Re: Over 25 Years Later, Finally My 71 C-10 Truck Build
Quote:
 great story btw. and the truck is awesome!
__________________
Feedback is always welcome! projects: 1969 Chevy C10 1950 GMC 100 1958 Chevy C60 Viking ratrod |
|

|

|
|
11-29-2011, 09:34 PM
|
#877 |
|
GEARHEAD
Join Date: Aug 2003
Location: MN
Posts: 6,126
|
Re: Over 25 Years Later, Finally My 71 C-10 Truck Build
Ummm, no. But I don't think she would freak too much. When she met my dad he was driving a brand new 1969 Mustang Mach 1 with a 390 and 4 speed. He would street race my uncle (her brother) with his new 1969 GTX with a 440. My dad also had a 1967 GTO with a 400 and 4 speed in the early 70's. She was as mad as me when he sold that car without telling her. My dad had an eye for awesome car styling. He did buy this truck afterall.
__________________
If no one knows what you're doing, they can't tell you you're doing it wrong HG's Dream Car Build - Shelby Cobra Kit Build your own adjustable track bar 71  Long Fleet C/10 Long Fleet C/10 72  Jimmy 4x4 (Junkyard Jimmy) Jimmy 4x4 (Junkyard Jimmy)HG's Plow Truck '78  K35 Dually K35 DuallyBigass Farm Truck HG's thread of miscellaneous stuff |
|
|
|
|
01-16-2012, 08:44 PM
|
#878 |
|
GEARHEAD
Join Date: Aug 2003
Location: MN
Posts: 6,126
|
Re: Over 25 Years Later, Finally My 71 C-10 Truck Build
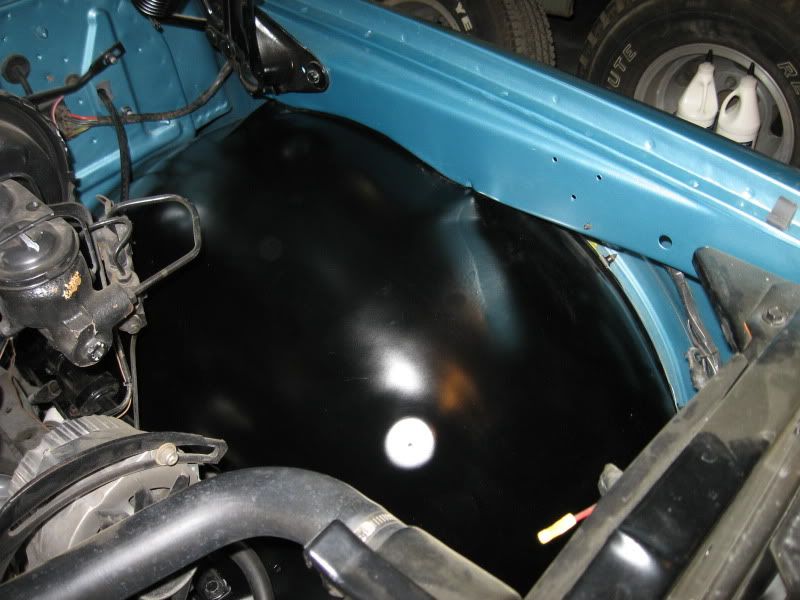
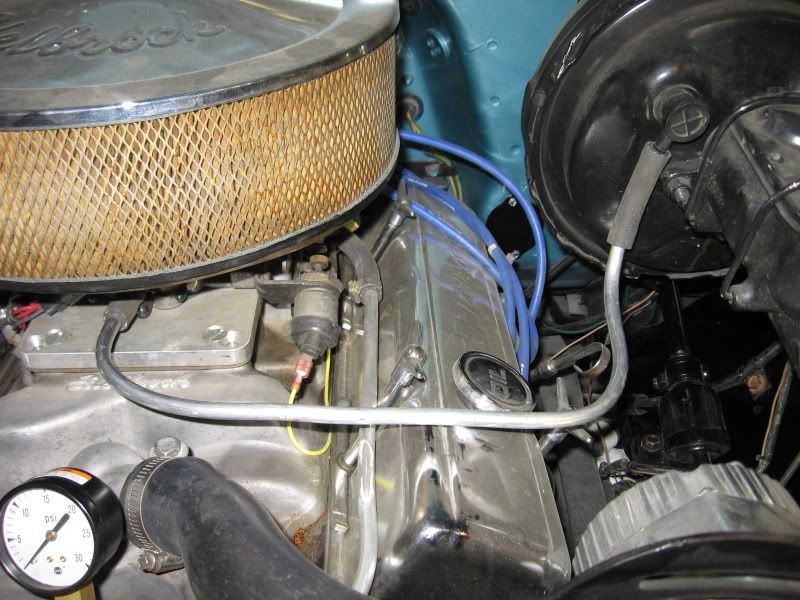
I've been concentrating lately on the Jimmy but decided today that I need to try and finish up some things here too. I installed the driver side inner fender and made a new vacuum line from the carb to the brake booster. I used a section of left over aluminum fuel line and just used a couple bits of hose to connect it together. I think it looks a lot nicer than my ratty old hose it replaced.
  Next will be getting the heater box back together and painted up nice, so i can get the other inner fender installed. The other under hood details are the headlight relays, paint touch up on the black bolt heads, etc., installing the new plug wires and wire holders and make a better fan mount and get the windshield washer set up installed.
__________________
If no one knows what you're doing, they can't tell you you're doing it wrong HG's Dream Car Build - Shelby Cobra Kit Build your own adjustable track bar 71 Long Fleet C/10 72 Jimmy 4x4 (Junkyard Jimmy)HG's Plow Truck '78 K35 DuallyBigass Farm Truck HG's thread of miscellaneous stuff |
|
|
|
|
01-17-2012, 08:27 AM
|
#879 |
|
Registered User
Join Date: Mar 2010
Location: Iowa
Posts: 57
|
Re: Over 25 Years Later, Finally My 71 C-10 Truck Build
Glad to see your still keeping at it. Looking great.
|
|
|
|
|
01-21-2012, 11:13 AM
|
#880 |
|
GEARHEAD
Join Date: Aug 2003
Location: MN
Posts: 6,126
|
Re: Over 25 Years Later, Finally My 71 C-10 Truck Build
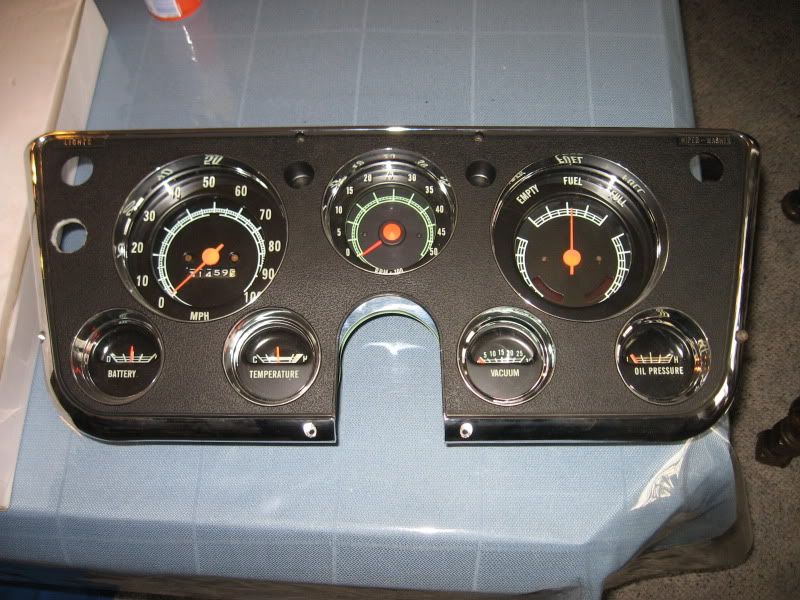
Pulled the gauge cluster out of the truck, brought it inside and did the tach/vac conversion. Pretty simple kit to install. Comes with everything except the little foam pads that go between the lense and bezel, which I bought separately. I'll install it later today, have to take care of other household things first. Looks good though huh?
__________________
If no one knows what you're doing, they can't tell you you're doing it wrong HG's Dream Car Build - Shelby Cobra Kit Build your own adjustable track bar 71 Long Fleet C/10 72 Jimmy 4x4 (Junkyard Jimmy)HG's Plow Truck '78 K35 DuallyBigass Farm Truck HG's thread of miscellaneous stuff |
|
|
|
|
01-21-2012, 02:29 PM
|
#881 | |
|
Registered User
Join Date: Aug 2010
Location: Hoofddorp, the Netherlands
Posts: 582
|
Re: Over 25 Years Later, Finally My 71 C-10 Truck Build
Quote:
__________________
Feedback is always welcome! projects: 1969 Chevy C10 1950 GMC 100 1958 Chevy C60 Viking ratrod |
|
|
|
|
|
01-21-2012, 08:23 PM
|
#882 | |
|
GEARHEAD
Join Date: Aug 2003
Location: MN
Posts: 6,126
|
Re: Over 25 Years Later, Finally My 71 C-10 Truck Build
Quote:
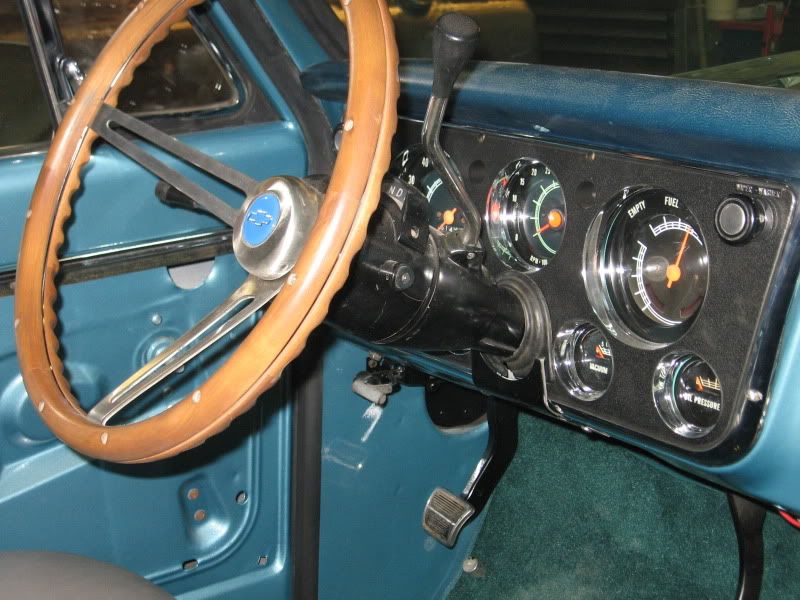 Tach and vacuum working... 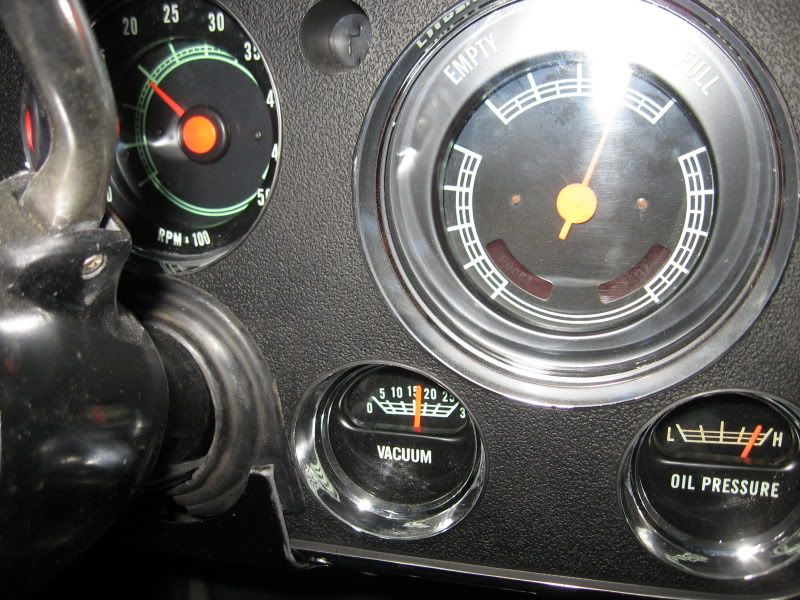 The only issues during the install was having to buy a fitting for the vacuum gauge, 1/4" female pipe thread to hose barb. I routed the vacuum hose through a hole I drilled in the floor just to the left of the heater floor outlet. It goes behind the carpet then ties into the vacuum line to the shift modulator on the tranny. I routed the wire for the tach through the same grommet as the oil pressure line. Looks like I might have to replace some bulbs because the ones on the right side did not seem to be working right. Otherwise no problems with that. Driver side door handle is a problem. I can't believe how crappy the reproduction parts are. My new one I put on this summer broke. The plate that holds the spring in for the button fell out because they just use a small crimp on it to hold it. The new one they sent me is just as much of a piece of $%&+. So my options are to see if I can find a good NOS or like new original, or modify the junk I have now. I have a couple ideas to try, and if any of you readers have made a repair to these, please let me know. Outside of that, progress ended with me cleaning up the heater box. Just need to degrease and scuff it and should be ready for some paint. 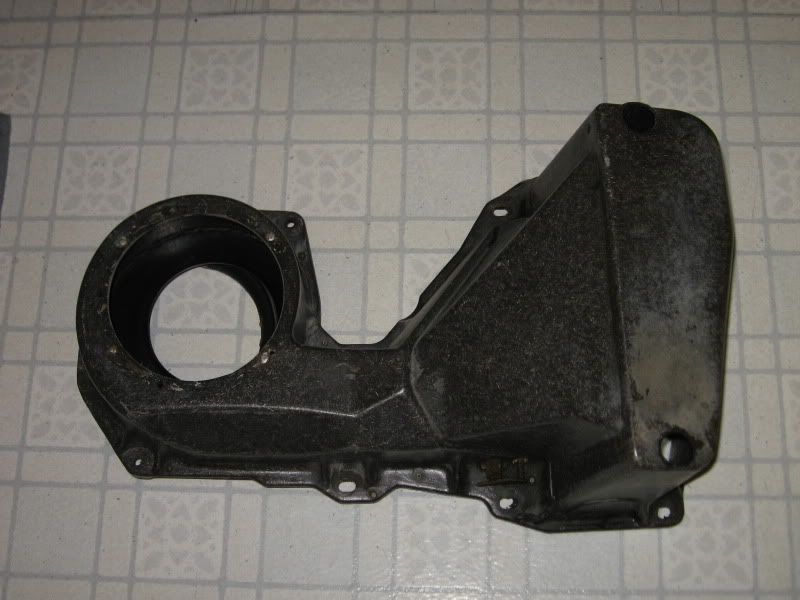
__________________
If no one knows what you're doing, they can't tell you you're doing it wrong HG's Dream Car Build - Shelby Cobra Kit Build your own adjustable track bar 71 Long Fleet C/10 72 Jimmy 4x4 (Junkyard Jimmy)HG's Plow Truck '78 K35 DuallyBigass Farm Truck HG's thread of miscellaneous stuff |
|
|
|
|
|
01-24-2012, 11:30 PM
|
#883 |
|
GEARHEAD
Join Date: Aug 2003
Location: MN
Posts: 6,126
|
Re: Over 25 Years Later, Finally My 71 C-10 Truck Build
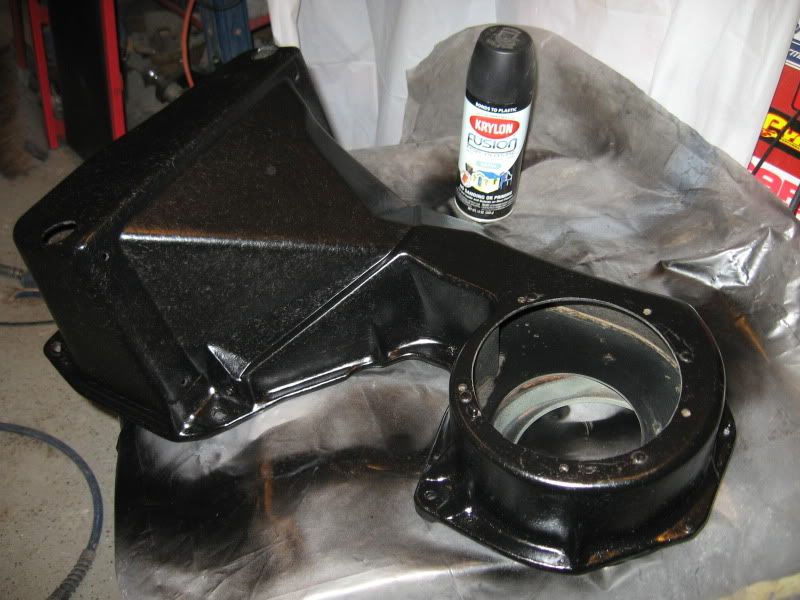
Brief update, just put the second coat of paint on the heater box. The back side was cleaned up and has an etching primer on it. I'll spray that with some black once the front is cured. Should be able to get it back together this weekend, then the inner fender. Just trying to plug away at the punch list.
 Punch list: Polish other wheels heater box adjust e-brake cable horn inner fenders (need new nuts, paint bolts) driver side done Cowl shims Washer pump finish exhaust upholstory recovered alignment
__________________
If no one knows what you're doing, they can't tell you you're doing it wrong HG's Dream Car Build - Shelby Cobra Kit Build your own adjustable track bar 71 Long Fleet C/10 72 Jimmy 4x4 (Junkyard Jimmy)HG's Plow Truck '78 K35 DuallyBigass Farm Truck HG's thread of miscellaneous stuff |
|
|
|
|
01-25-2012, 12:37 AM
|
#884 |
|
Registered User
Join Date: Jan 2012
Location: Del Rio,Tx
Posts: 36
|
Re: Over 25 Years Later, Finally My 71 C-10 Truck Build
Great job! Loving this build
Posted via Mobile Device |
|
|
|
|
01-28-2012, 06:36 PM
|
#885 | |
|
GEARHEAD
Join Date: Aug 2003
Location: MN
Posts: 6,126
|
Re: Over 25 Years Later, Finally My 71 C-10 Truck Build
Quote:
I got the heater box installed today. It's not that complicated, but takes longer than you'd think. First task was to put the heater core in it. Simple enough, but before that I wanted to make sure it wasn't a leaker. There was some green around the bottom nozzle so I cleaned it up, put a short piece of hose on one nozzle, clamped a plug into the end, then sprayed the core with 409 or windex in the joint areas and used some compressed air on the other nozzle. No leaks. Then I pulled out my new gasket set for the heater and got the correct gaskets out for this heater (the kit has stuff for AC trucks also) and used some caulk to hold the gasket to the heater box. Then I found a push on clip thingy for the heater control damper cable. The next part is sort of a PITA, because you have to move the hood hinge forward to work the heater into place. The rubber seal for where the fan blows into the firewall doesn't want to stay in place during this so it's better to leave the blower fan off when installing the box. Also have a pliers handy to help push the cable end onto the pin for the damper. There is just a couple inches to work in here, then push the little clip onto the pin to secure it. With that done you can set the box in position on the 2 studs sticking out of the firewall. I put the stamped nuts on those studs and started the bolts on the heater core side of the box. Then I worked the rubber seal back onto the flange from the inside where the blower goes. It's not to hard, once thats done then tighten everything down. Now the blower fan can be installed, there is a gasket in the kit for that also. A few dabs of black silicone will help hold the gasket in position. The hood hinge needs to be out of the way for this step also. There are 2 flat sides of the fan flange, one goes up the other in the 3 o'clock position. I also tested the fan before I installed it, test sat. There is a ground wire for the fan that goes on the top right screw for the fan, the other end goes to the bolt holding the heater box to the firewall just behind it. Don't forget it, the box is fiberglass or some other composite so the fan will not run without a ground. Then just re-install the hood hinge, plug the fan wire in and hook up the hoses. I still need to do those last couple things, but it may be a while before I actually hook the hoses up to it. The gasket kit also has a couple foam gaskets for the heater core nozzles coming through the holes in the box, I got those in. Now I'm ready to install the other inner fender, at least after I get some bolts cleaned and painted and a few more clip on nuts for it. 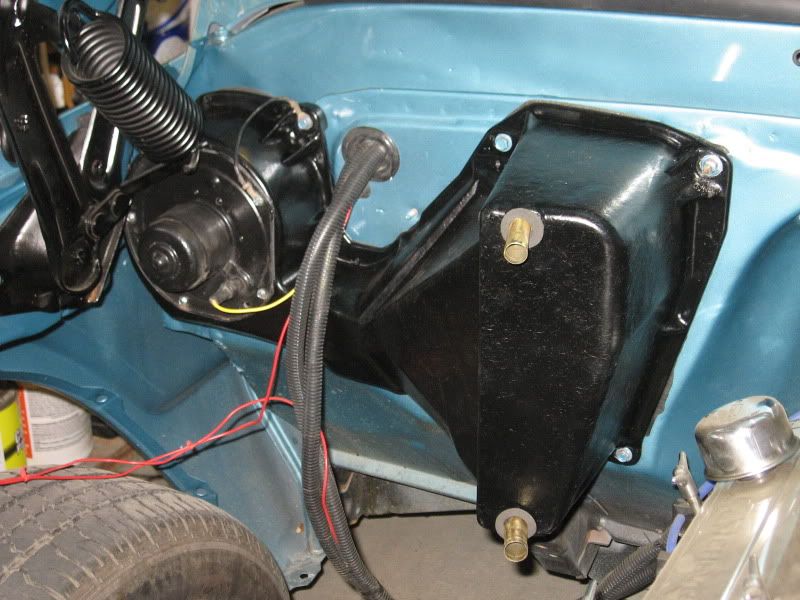 Also worked on my driver side door handle. Not having much luck finding a good original or an NOS one, so I decided to try a fix on the reproduction. There is just a small crimp on there to hold it from the factory and it can come loose easy enough. Dont bother trying to recrimp it, the tabs will break off (ask me how I know). I have found a few handles on parts trucks that had holes drilled through the back and wires ran around the little plate that holds the spring and guides the button. It looks funky but it works and is not seen anyway. But I wanted to do something different. I cleaned up the area with a wire wheel and some brake cleaner, then mixed up a small amount of body panel adhesive (I suppose epoxy could work also) and put that over the area where the spring retainer plate meets the body of the handle. As long as it doesn't chip off it will at the very least keep that little plate from moving around and popping off. Once it hardens up for a couple days I'll get it back on the door. I had 2 handles and I did this to both of them. Ready spare. 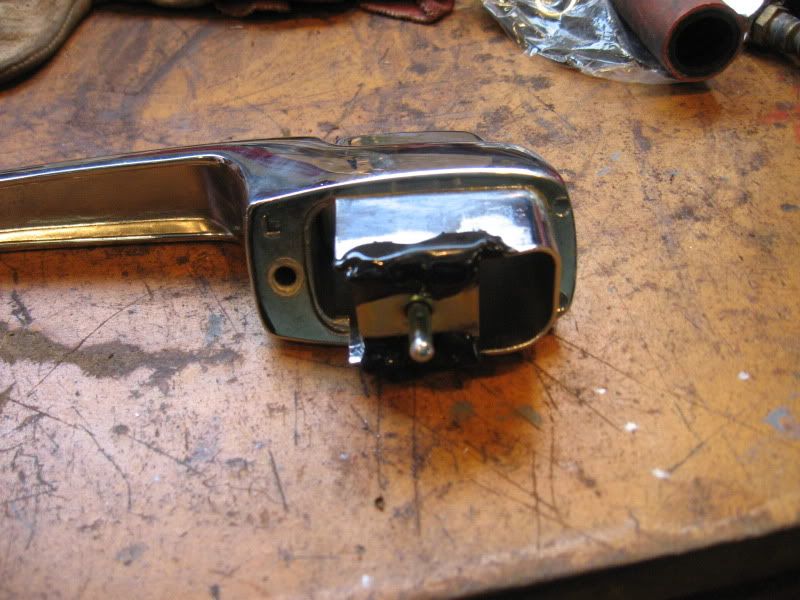
__________________
If no one knows what you're doing, they can't tell you you're doing it wrong HG's Dream Car Build - Shelby Cobra Kit Build your own adjustable track bar 71 Long Fleet C/10 72 Jimmy 4x4 (Junkyard Jimmy)HG's Plow Truck '78 K35 DuallyBigass Farm Truck HG's thread of miscellaneous stuff |
|
|
|
|
|
01-28-2012, 07:02 PM
|
#886 |
|
VA72C10
 Join Date: Mar 2008
Location: Midlothian, VA
Posts: 25,267
|
Re: Over 25 Years Later, Finally My 71 C-10 Truck Build
Dash and heater box look great!
__________________
Looking for a 67-72 swb or blazer project in or around VA. 
|
|
|
|
|
01-29-2012, 05:59 PM
|
#888 | ||
|
GEARHEAD
Join Date: Aug 2003
Location: MN
Posts: 6,126
|
Re: Over 25 Years Later, Finally My 71 C-10 Truck Build
Quote:
Quote:
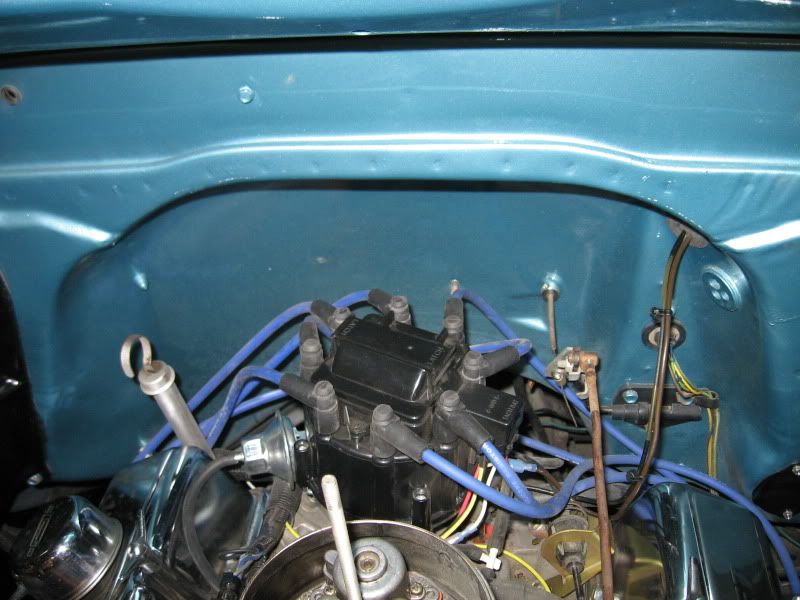
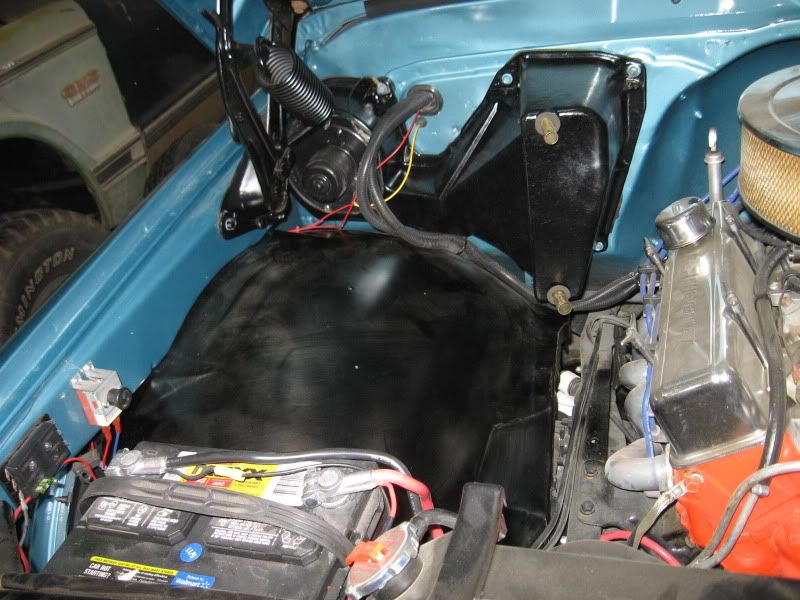 Now I just need to tidy up the wiring and clean it up. See the dust? The hazards of storing in the same garage where I'm stripping paint and sanding on my other project. Just saw signs of a small oil leak from the front of the intake manifold. Not bad, I'll just keep an eye on it for now. Here's a few glamour shots... Ignore the snowblower, hazards of living up north. 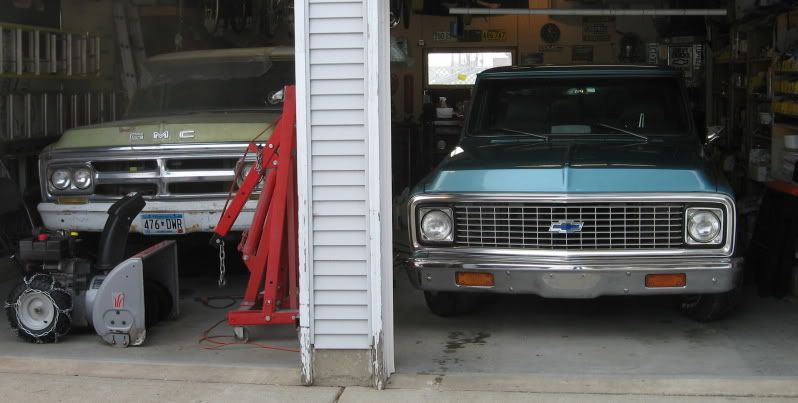 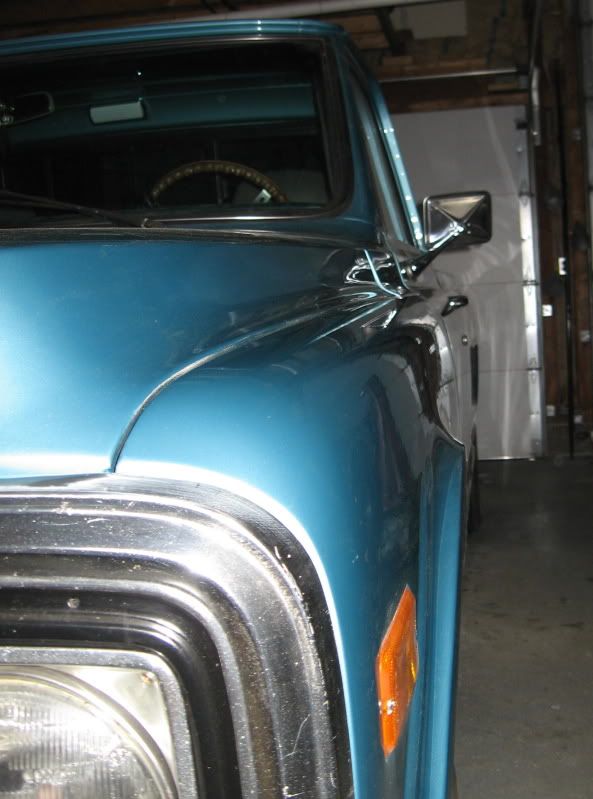 
__________________
If no one knows what you're doing, they can't tell you you're doing it wrong HG's Dream Car Build - Shelby Cobra Kit Build your own adjustable track bar 71 Long Fleet C/10 72 Jimmy 4x4 (Junkyard Jimmy)HG's Plow Truck '78 K35 DuallyBigass Farm Truck HG's thread of miscellaneous stuff |
||
|
|
|
|
01-29-2012, 06:06 PM
|
#889 |
|
VA72C10
Join Date: Mar 2008
Location: Midlothian, VA
Posts: 25,267
|
Re: Over 25 Years Later, Finally My 71 C-10 Truck Build
The dust is a real pain, isn't it? I remember when finishing my blazer how annoyed I'd get with the sanding dust....even after putting plastic and taping off the finished engine bay it was covered by the time I un-taped it....and it's not like pollen or normal dust...it sticks to it and smears...fun stuff
Nice looking pair of vehicles
__________________
Looking for a 67-72 swb or blazer project in or around VA.
|
|
|
|
|
01-29-2012, 06:16 PM
|
#890 |
|
GEARHEAD
Join Date: Aug 2003
Location: MN
Posts: 6,126
|
Re: Over 25 Years Later, Finally My 71 C-10 Truck Build
It is a nice pair isn't it? I'm very fortunate, beyond this pair of projects.
I'm thinking swiffer for dusting.
__________________
If no one knows what you're doing, they can't tell you you're doing it wrong HG's Dream Car Build - Shelby Cobra Kit Build your own adjustable track bar 71 Long Fleet C/10 72 Jimmy 4x4 (Junkyard Jimmy)HG's Plow Truck '78 K35 DuallyBigass Farm Truck HG's thread of miscellaneous stuff |
|
|
|
|
01-29-2012, 06:38 PM
|
#891 |
|
VA72C10
Join Date: Mar 2008
Location: Midlothian, VA
Posts: 25,267
|
Re: Over 25 Years Later, Finally My 71 C-10 Truck Build
swifter will help. I actually used a cheap version of those california car duster wand things on mine in between thorough cleanings and it did fairly well and never scratched the paint or chrome...
__________________
Looking for a 67-72 swb or blazer project in or around VA.
|
|
|
|
|
01-29-2012, 06:56 PM
|
#892 |
|
Registered User
Join Date: Jul 2011
Location: Des Moines, Iowa
Posts: 3,016
|
Re: Over 25 Years Later, Finally My 71 C-10 Truck Build
In between segments - an air hose w/gun works nice too.
__________________
project: "my happy mess" |
|
|
|
|
02-04-2012, 11:44 AM
|
#893 |
|
GEARHEAD
Join Date: Aug 2003
Location: MN
Posts: 6,126
|
Re: Over 25 Years Later, Finally My 71 C-10 Truck Build
No major update, just details. Replaced the spark plug wires on the driver side so I could route them through the loom properly and around the back like the other side is.
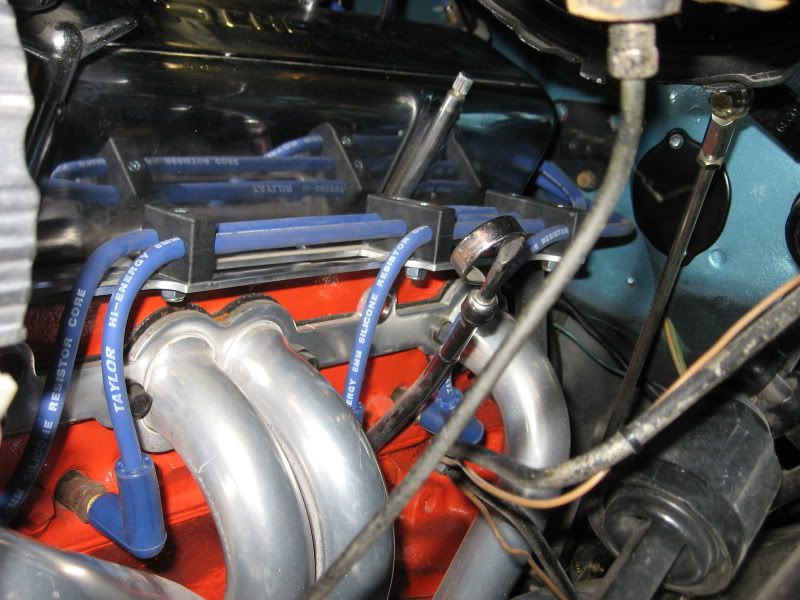 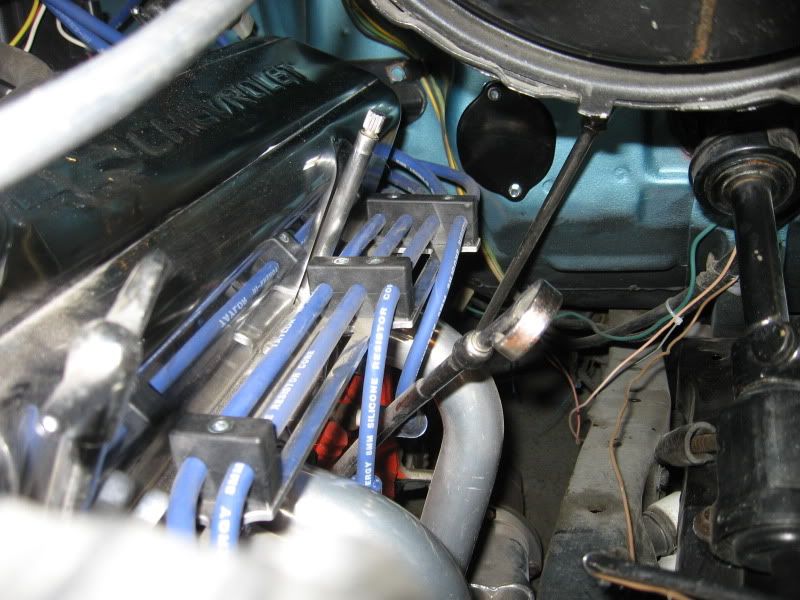  The swiffer worked pretty good picking up the dust where ever I could fit it. Under the hood I have some details to take care of yet. Need to paint the bolt ends and scratches in the black paint, wrap some wires, paint the throttle linkage rod, get a nicer looking air cleaner, etc. The biggest projects there are building/buying a good fan mount and rewire the headlights and fans with relays. I'm going to upgrade the headlights to the newer style like this or one similar... http://www.summitracing.com/parts/HLA-002395301/ Punch list: Polish other wheels headlight upgrade fan/headlight wiring upgrade adjust e-brake cable horn Cowl shims Washer pump finish exhaust install closed loop sensor upholstory recovered alignment air cleaner touch up paint under hood replace grill and front bumper stereo (eventually)
__________________
If no one knows what you're doing, they can't tell you you're doing it wrong HG's Dream Car Build - Shelby Cobra Kit Build your own adjustable track bar 71 Long Fleet C/10 72 Jimmy 4x4 (Junkyard Jimmy)HG's Plow Truck '78 K35 DuallyBigass Farm Truck HG's thread of miscellaneous stuff Last edited by hgs_notes; 02-04-2012 at 11:49 AM. |
|
|
|
|
02-04-2012, 06:28 PM
|
#894 |
|
Registered User
Join Date: Dec 2011
Location: Germanton, NC
Posts: 61
|
Re: Over 25 Years Later, Finally My 71 C-10 Truck Build
I like the headlights! Do you have to run a relay or will the factory wiring suffice? Your truck is coming together fast and its sweet!!!
__________________
Link to my 69 Camaro 6.0/T56 swap: http://ls1tech.com/forums/conversion...69-camaro.html |
|
|
|
|
02-04-2012, 06:54 PM
|
#895 |
|
Registered User
Join Date: Mar 2006
Location: massachusetts
Posts: 180
|
Re: Over 25 Years Later, Finally My 71 C-10 Truck Build
I just came across your restoration. Nice work. Your story is not much different than mine. My father bought my truck new in 72 and gave it to me when I was 16. He is gone now but I was determined to bring it back the way he bought it. Here is my build. It is not quite complete but plan on finishing it this spring.
http://www.flickr.com/photos/waltsprojects/
__________________
I know I can! I know i can! 72 K20 Restoration |
|
|
|
|
02-04-2012, 09:51 PM
|
#896 | ||
|
GEARHEAD
Join Date: Aug 2003
Location: MN
Posts: 6,126
|
Re: Over 25 Years Later, Finally My 71 C-10 Truck Build
Quote:
Quote:
__________________
If no one knows what you're doing, they can't tell you you're doing it wrong HG's Dream Car Build - Shelby Cobra Kit Build your own adjustable track bar 71 Long Fleet C/10 72 Jimmy 4x4 (Junkyard Jimmy)HG's Plow Truck '78 K35 DuallyBigass Farm Truck HG's thread of miscellaneous stuff |
||
|
|
|
|
02-05-2012, 06:33 AM
|
#897 |
|
Registered User
Join Date: Mar 2006
Location: massachusetts
Posts: 180
|
Re: Over 25 Years Later, Finally My 71 C-10 Truck Build
I was wondering since you have put it back together was there an order of operations that worked in the restoration. What I mean is that My truck is basically naked besides the engine and trans, body work is done,what should I do next or does it matter?
__________________
I know I can! I know i can! 72 K20 Restoration |
|
|
|
|
02-05-2012, 10:04 AM
|
#898 | |
|
GEARHEAD
Join Date: Aug 2003
Location: MN
Posts: 6,126
|
Re: Over 25 Years Later, Finally My 71 C-10 Truck Build
Quote:
One of the biggest things to remember is painting the hardware. Basically every part you put back on has to have the bolts and screws found, cleaned and possibly painted. If I had it to do over again I would get a large piece of cardboard, pop holes in it to hold every bolt I was going to need painted and clean and spray them all at once. Don't use rustoleum if you plan on assembling the part that day, it takes too long to cure. I used another brand that had a faster set time. I ususally started by cleaning every bolt on the wire wheel of my bench grinder holding them with a vise grips, then put them in a cup or bowl and sprayed with brake cleaner. Then put them on the cardboard and sprayed them. Wait a couple hours and then I could assemble. Tedious work no matter how you do it. I considered getting a rock tumbler from harbor freight for cleaning the bolts and I still ight do that for a future build. In the cab I worked from the firewall outward. Sound deadener, then the heater, wiper motor wire, wire harness and heater hoses, then the rest of the dash. Remember the radio goes in before the ash tray and heater controls. The dash pad is easier to bolt down with the glove box and gauge cluster out. Steering column is hanging loose until the end. Then you do the shifter linkage if column mounted. Glass is last. The doors are kind of a pain, the wing window is the hard part. Getting it in without scratching the new paint. Use tape on the edges, layers of it. I have the steps listed back in the thread somewhere. I think the hardest part of the build for me was panel alignment. I did the doors before paint and was happy with the fit. It took a day or so to get it right. I didn't take them off for painting. The front fenders I punched small alignment marks on the cowl before I pulled them off for paint. I kept the radiator support loose on the frame until I was fitting the hood. The cowl was a pain for alignment, but needs to be on for the hood to reference from. Then the grill and the bumpers last. These trucks are pretty simple and its not that hard to go back and drop something out to get to another part. Many days I just did what I could where I wouldn't get too dirty, or because I just wanted to finish a particular area up. Another tip on the wiring, you need good grounds and everything is painted, so don't forget to scratch some off where the grounds go. It took me a weekend to dismantle it and I'm still working on assembly since August.
__________________
If no one knows what you're doing, they can't tell you you're doing it wrong HG's Dream Car Build - Shelby Cobra Kit Build your own adjustable track bar 71 Long Fleet C/10 72 Jimmy 4x4 (Junkyard Jimmy)HG's Plow Truck '78 K35 DuallyBigass Farm Truck HG's thread of miscellaneous stuff |
|
|
|
|
|
02-05-2012, 11:28 AM
|
#899 | |
|
Registered User
Join Date: Mar 2006
Location: massachusetts
Posts: 180
|
Re: Over 25 Years Later, Finally My 71 C-10 Truck Build
Quote:
Walt
__________________
I know I can! I know i can! 72 K20 Restoration |
|
|
|
|
|
02-05-2012, 02:31 PM
|
#900 | |
|
GEARHEAD
Join Date: Aug 2003
Location: MN
Posts: 6,126
|
Re: Over 25 Years Later, Finally My 71 C-10 Truck Build
Quote:
__________________
If no one knows what you're doing, they can't tell you you're doing it wrong HG's Dream Car Build - Shelby Cobra Kit Build your own adjustable track bar 71 Long Fleet C/10 72 Jimmy 4x4 (Junkyard Jimmy)HG's Plow Truck '78 K35 DuallyBigass Farm Truck HG's thread of miscellaneous stuff |
|
|
|
|
 |
| Bookmarks |
|
|


 Linear Mode

