
|
 10-12-2008, 03:49 AM
|
#926 |
|
Registered User
Join Date: Oct 2008
Location: central point oregon
Posts: 115
|
Re: Joined the Short Wheelbase Club *69 Tahoe Project*
deleted
Last edited by ak's-r-us; 11-29-2008 at 03:13 AM. |

|

|
|
10-12-2008, 07:46 AM
|
#927 |
|
The LuvShack Garage
Join Date: Jan 2004
Location: Maple Grove, TN (West Side)
Posts: 30,475
|
Re: Joined the Short Wheelbase Club *69 Tahoe Project*

__________________
Owner/Op: "TN Classic Transport Carriers" The Toy: "Square Vette" 72 Hybrid Blazer Toy Barn: "LuvShack" 40 x 60 x 20 Shop Big Piggy: "Goliath" 07 Kodiak C4500 Lil Piggy:"Maddy" 88 Silverado 3500 Hauler: "Feathers" 14 Aluma 8218T |
|
|
|
|
10-19-2008, 10:51 AM
|
#928 |
|
Registered User
 Join Date: Aug 2005
Location: Hillsboro Oregon
Posts: 6,449
|
Re: Joined the Short Wheelbase Club *69 Tahoe Project*
Thanks guys. ak's-r-us you should do it. We know you have the skills!
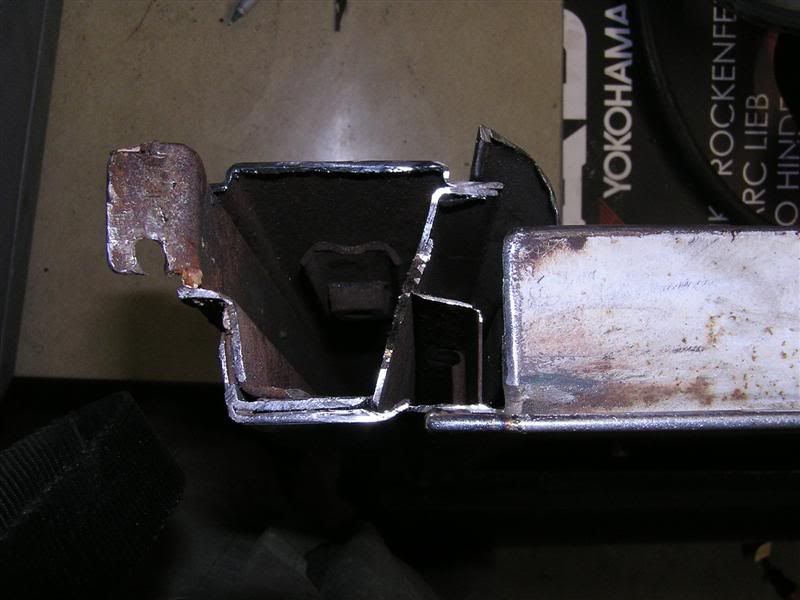
My angle grinder got loose in the shop again and I am powerless against it's will...  The first few pics are grainy (no flash), but then I got it together  Glass removed 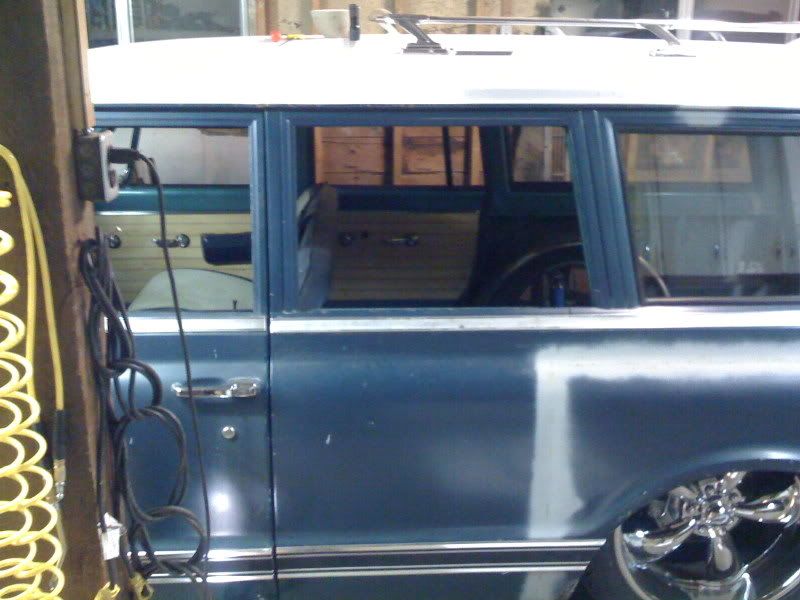 The "dummy" window frame is held in place by screws/nut-plates and seam sealer. As you can see it took some convincing to remove without damaging 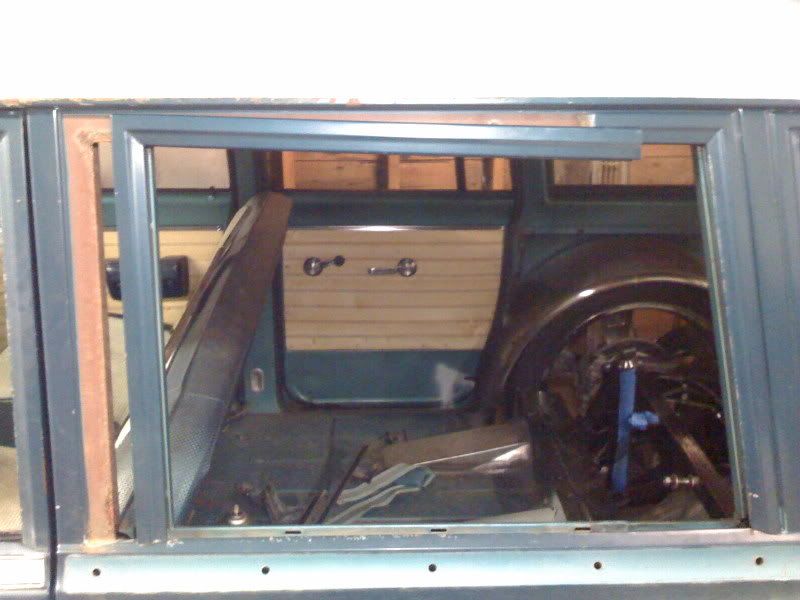 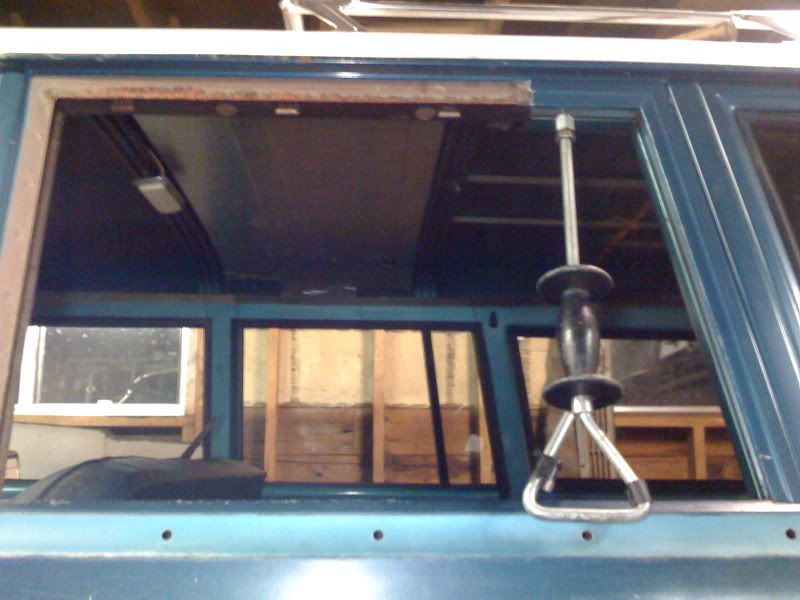 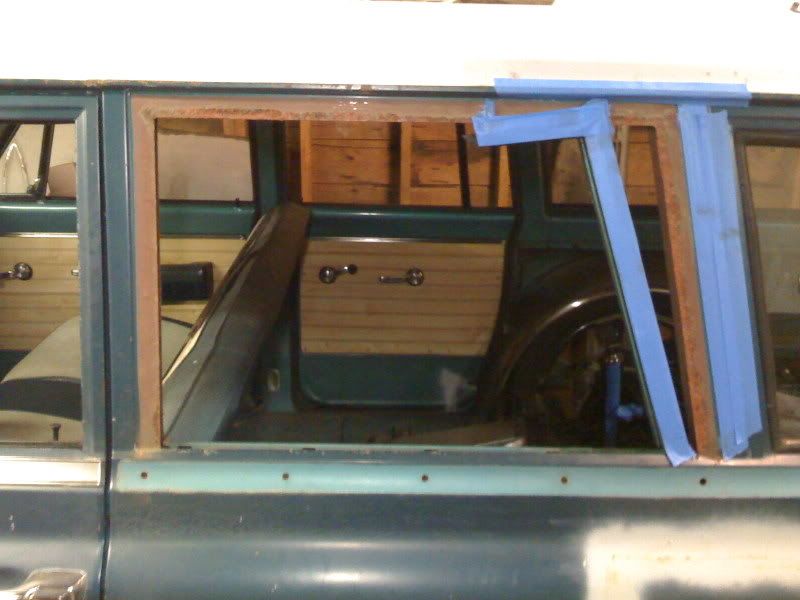 What may look like rust is actually reddish/brown seam sealer 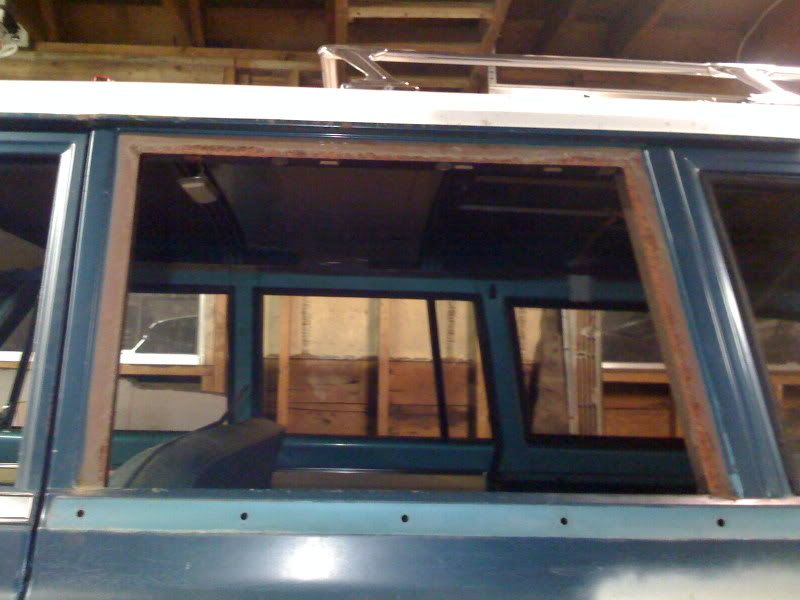 prep'ing for the cut-off wheel 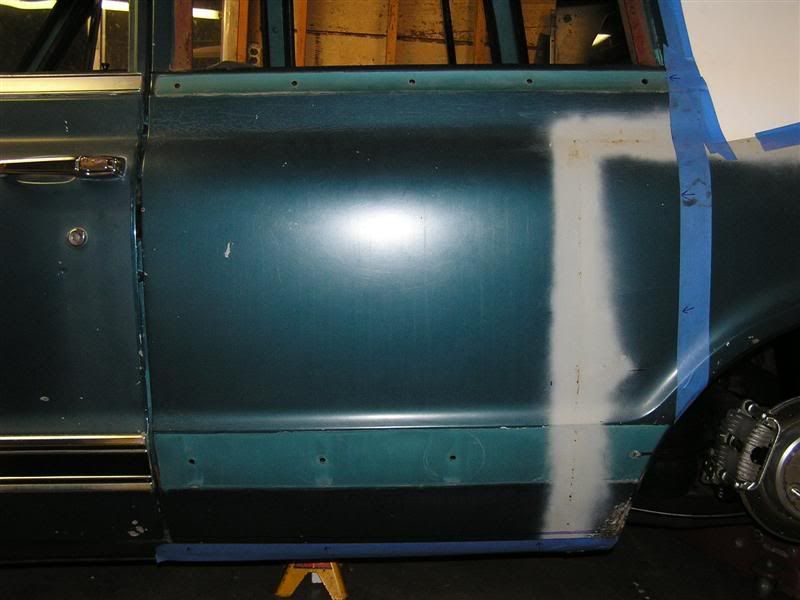 First slice inflicted 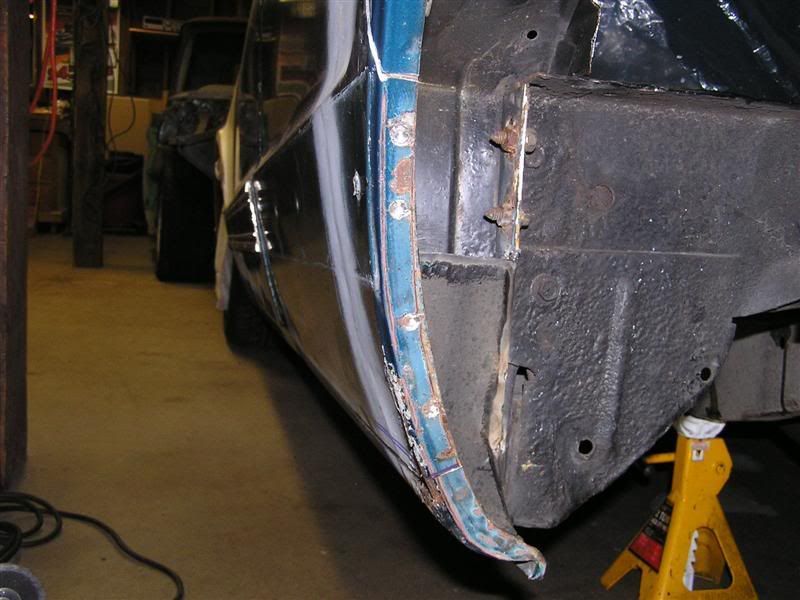 Drilled out the first of what seems like hundreds of spot welds in order to remove the dummy door while keeping the sections I plan on using intact 
Last edited by Frizzle Fry; 10-20-2008 at 09:06 PM. |
|
|
|
|
10-19-2008, 11:00 AM
|
#929 |
|
Registered User
Join Date: Aug 2005
Location: Hillsboro Oregon
Posts: 6,449
|
Re: Joined the Short Wheelbase Club *69 Tahoe Project*
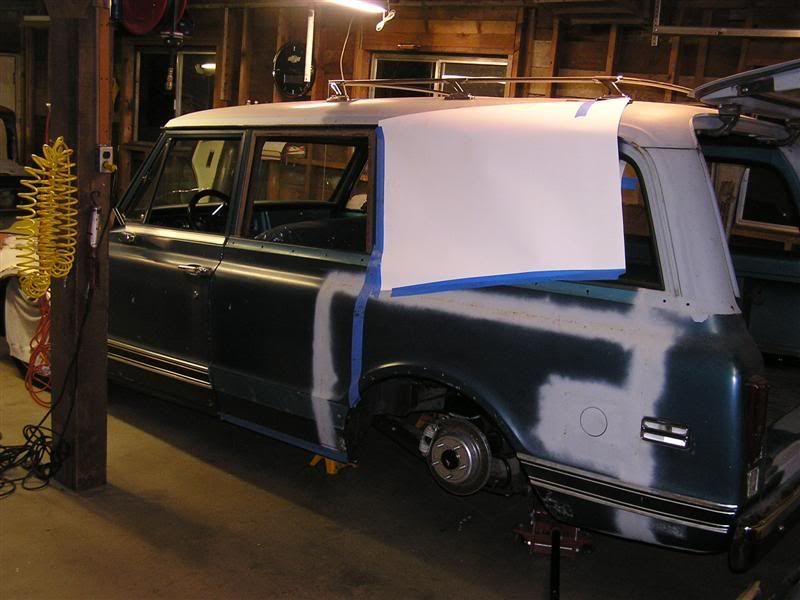
Rear wheels removed and quarter glass protected
 Laying out the cut line for what will become the inside of the upper weather-strip pinch-weld (will be flattened vertical) 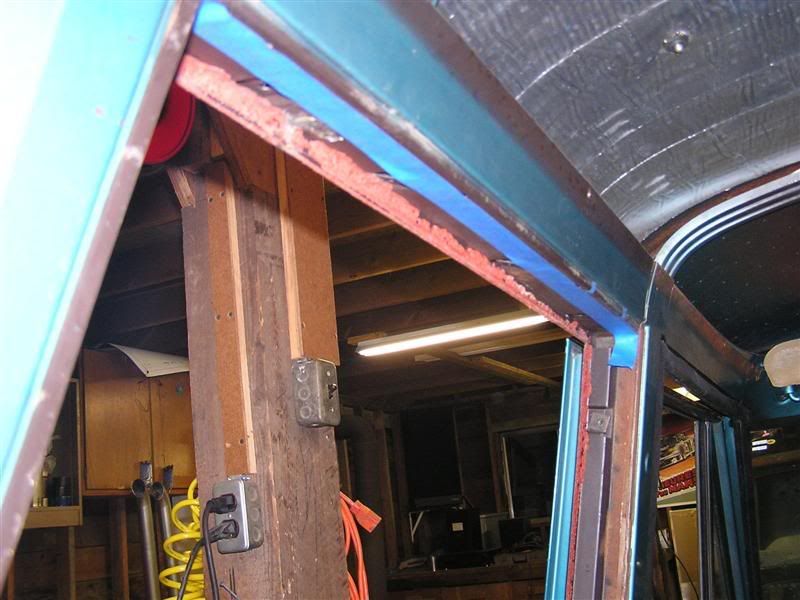 Cut made. You can see it needs to be straightened into a flat flange 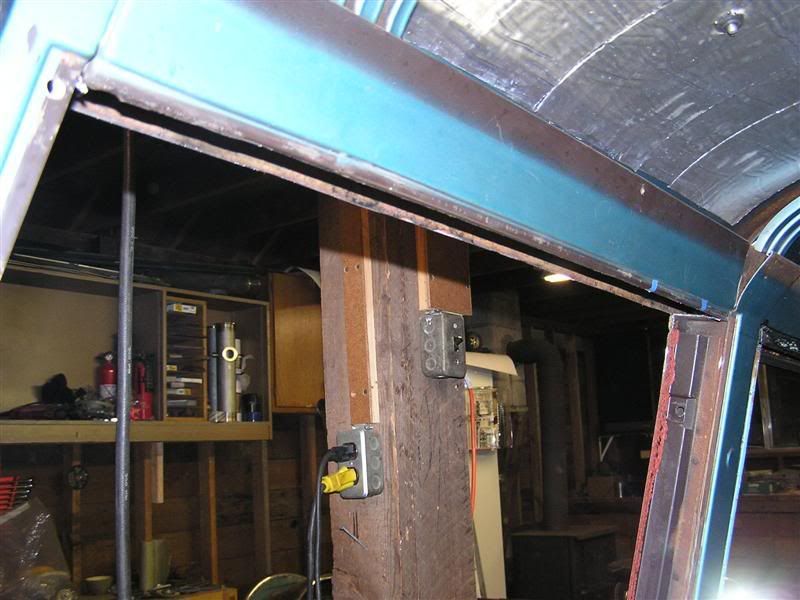 More slicing. This cut was made at 33 1/4" from the back edge of the front door  More spot welds defeated. The inner skin here will remain fixed as part of the wheel-well  I have a spare PS B-Pillar thanks to Brad and CG, so here I marked the existing C-Pillar to be sliced in half. The removed section will be replaced by half of the donor B-Pillar (these bends cannot be made in a single piece on a conventional brake) 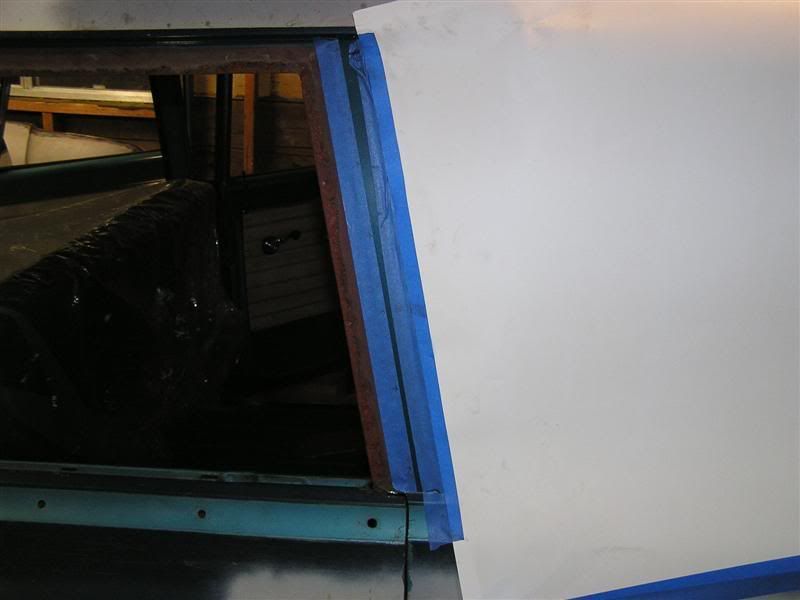 Cut 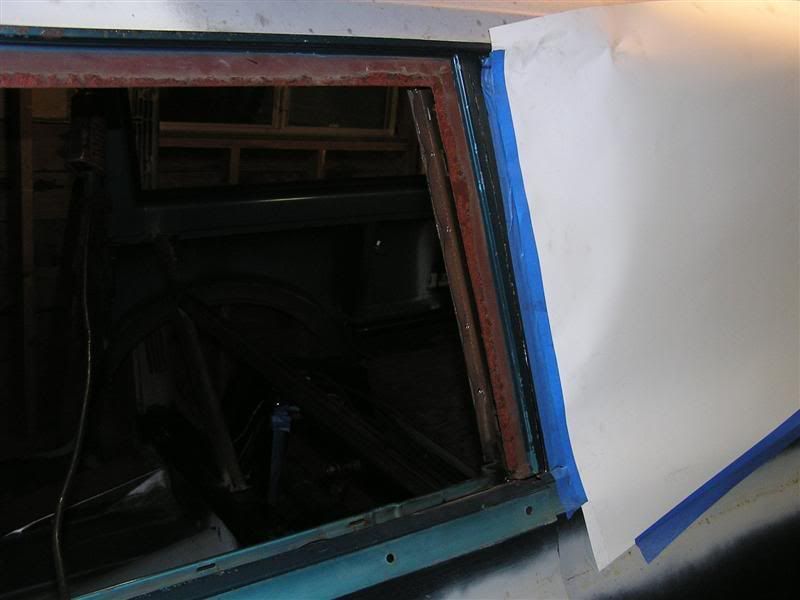 Removed  I left some material at the top because the donor B-Pillar is shorter than the C-Pillar. Shouldn't be too hard to fill in that small section in the upper corner. 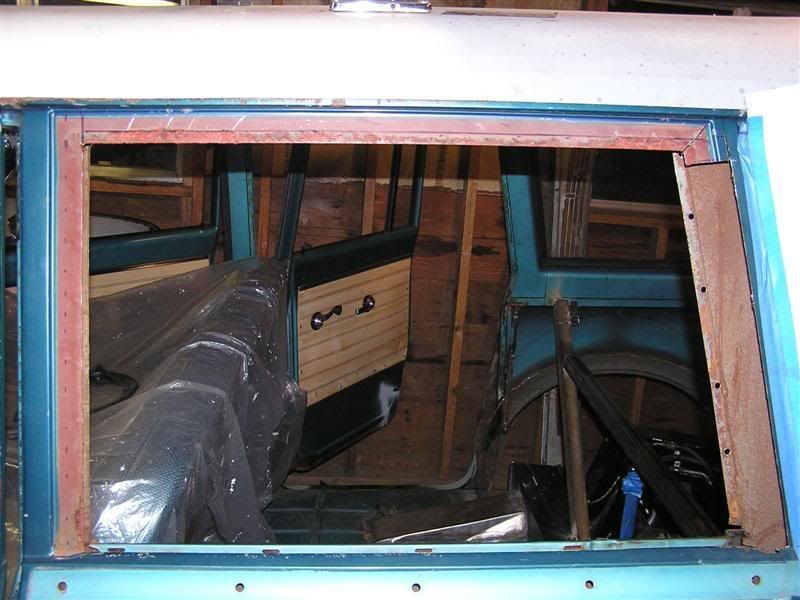 Donor B-Pillar 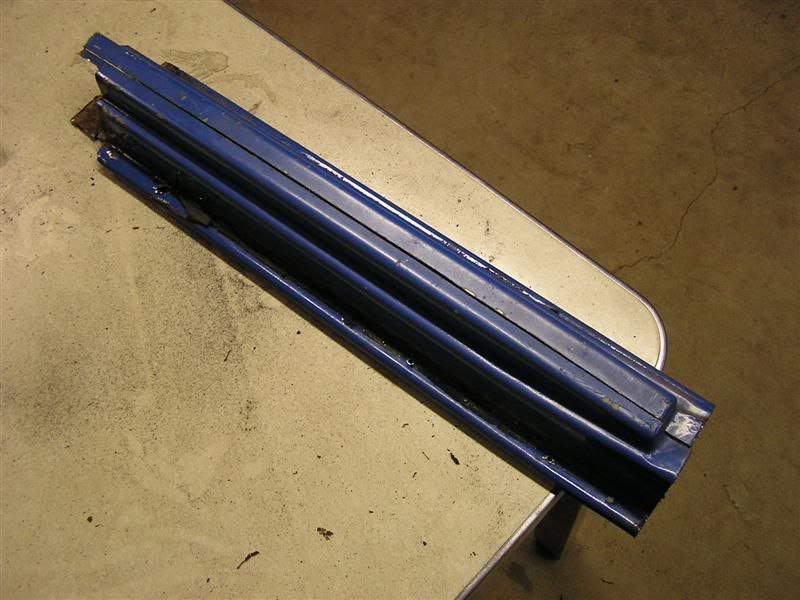
Last edited by Frizzle Fry; 10-20-2008 at 09:18 PM. |
|
|
|
|
10-19-2008, 11:09 AM
|
#930 |
|
Registered User
Join Date: Aug 2005
Location: Hillsboro Oregon
Posts: 6,449
|
Re: Joined the Short Wheelbase Club *69 Tahoe Project*
Bracing to keep everything in place (looks familiar...)
 More slices and tape to protect the drip rail 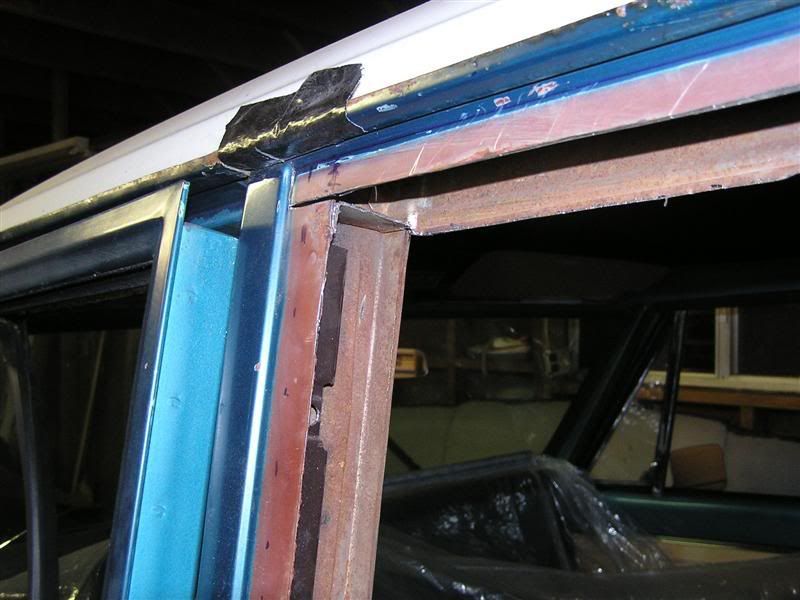 Inner flange had been flattened 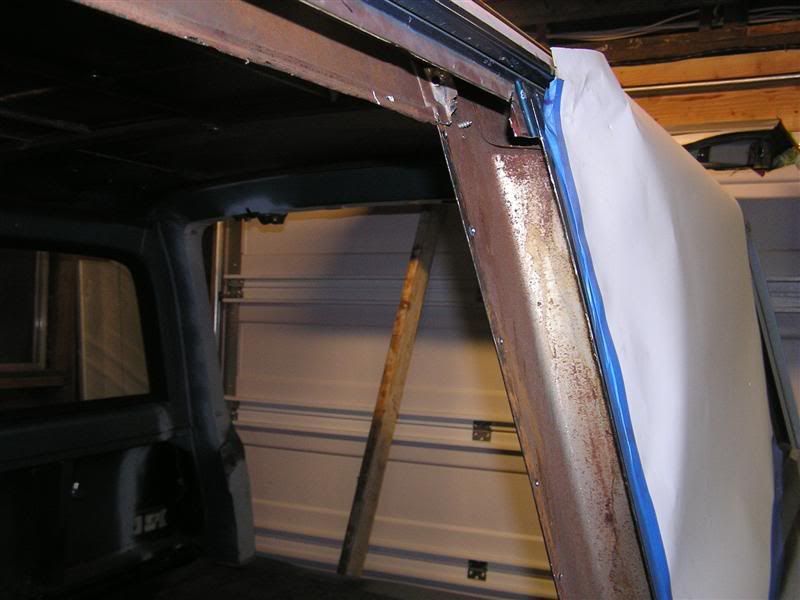 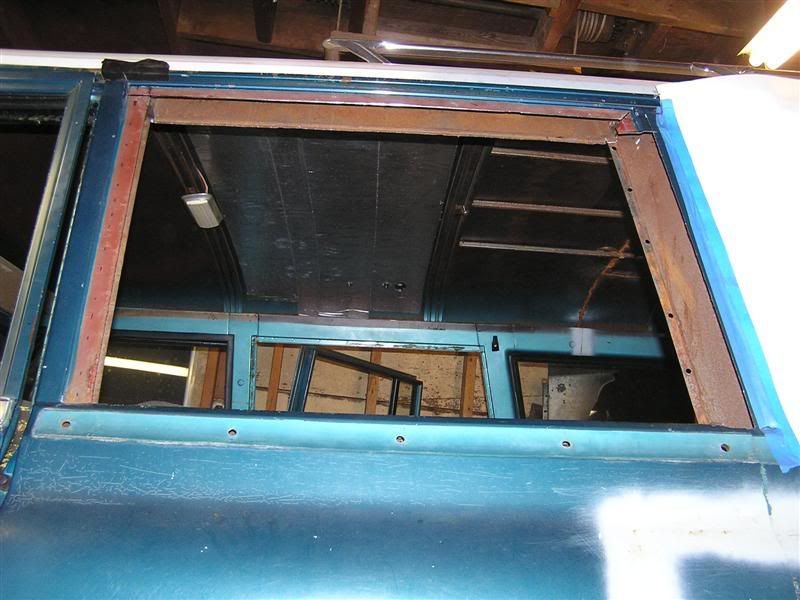 A good place to cut the inner skin. This will be under the inner panel when done. Aft of this point is "Dummy-Door" specific and will be replaced with the rear section from a truck door. 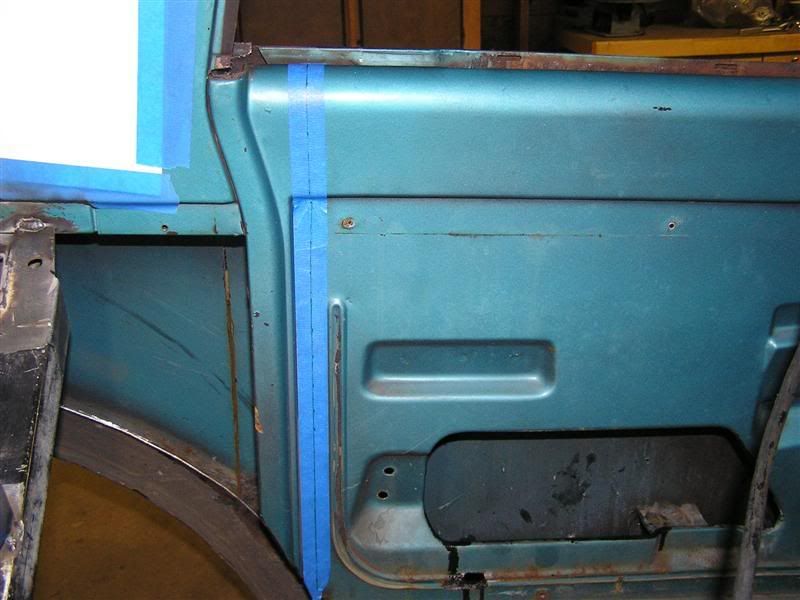 Cut locations for the top of the B-Pillar  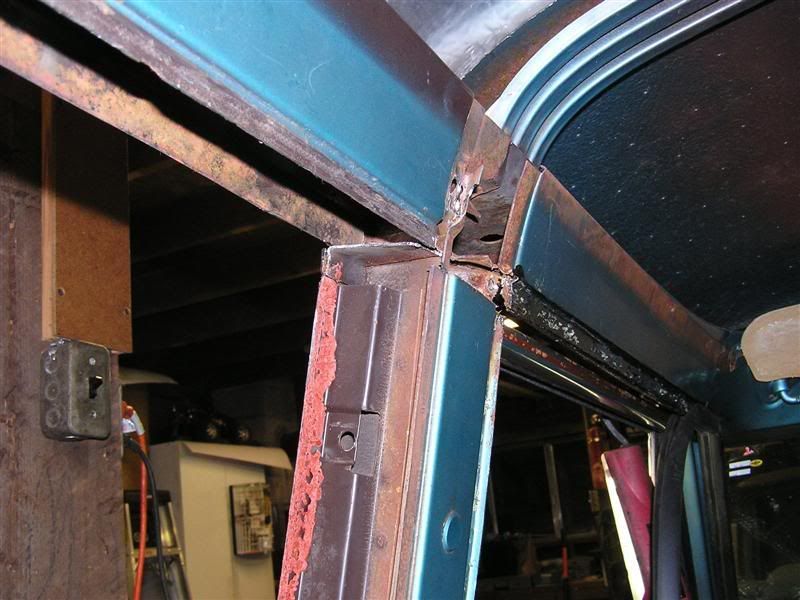 Coming loose and supported by a strap 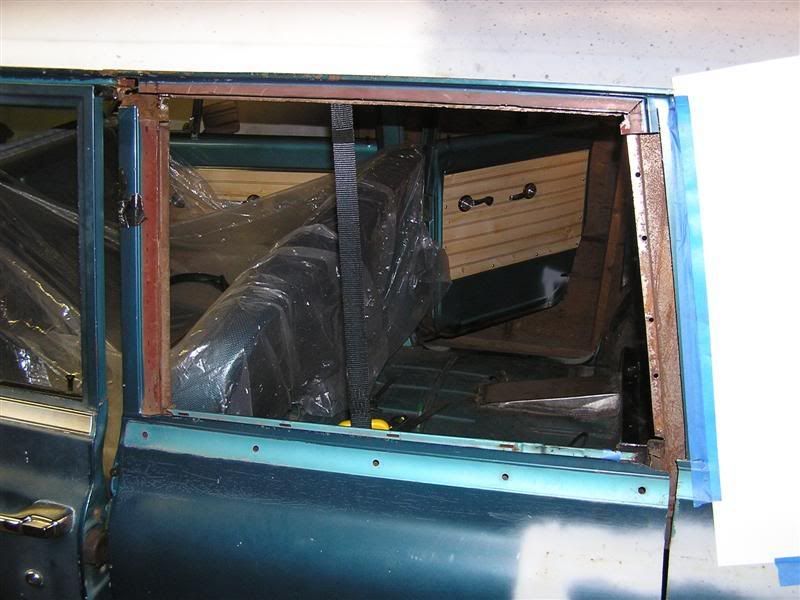 
Last edited by Frizzle Fry; 10-20-2008 at 09:27 PM. |
|
|
|
|
10-19-2008, 11:13 AM
|
#931 |
|
Registered User
Join Date: Aug 2005
Location: Hillsboro Oregon
Posts: 6,449
|
Re: Joined the Short Wheelbase Club *69 Tahoe Project*
It took quite a bit of work to get the B-Pillar detatched without destroying parts of it I may need.
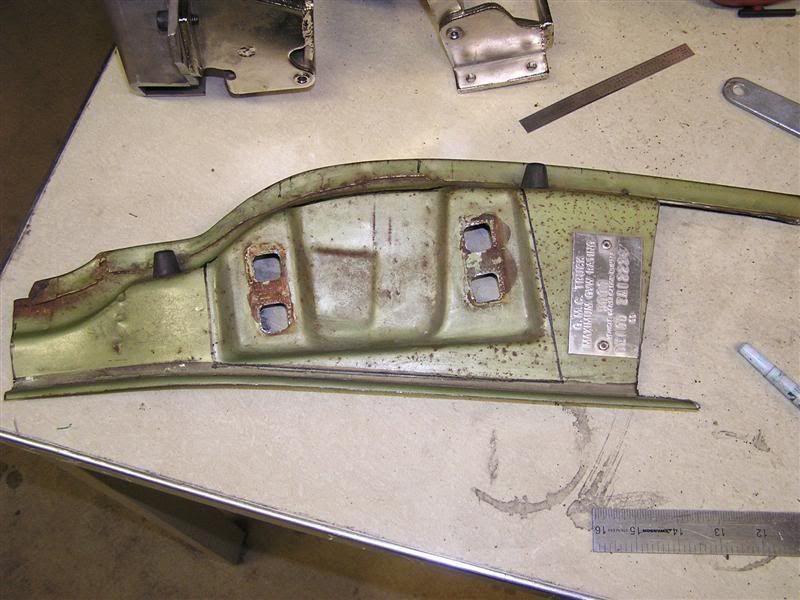
 Probably not a good time to change my mind...  I can't tell you how nice it is to be able to get in from this side instead of going around to the back or PS every time! 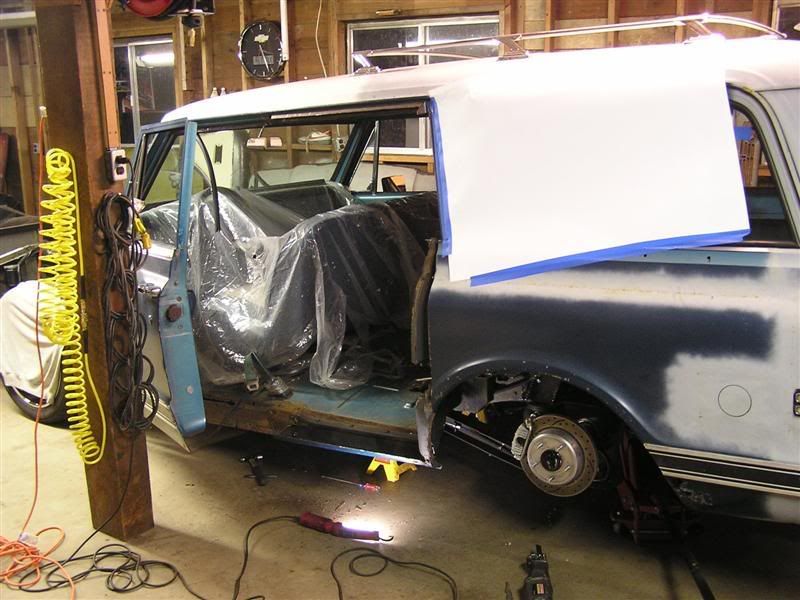 The real reason for the hole... 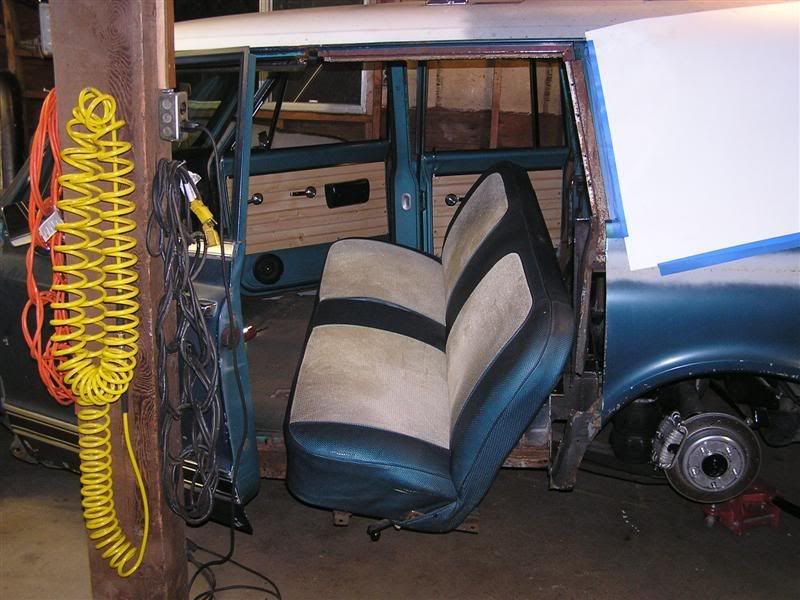 The front floor edge needs some repair but the majority of the floor is pristine. OG floor mats foam and sound deadener still in place 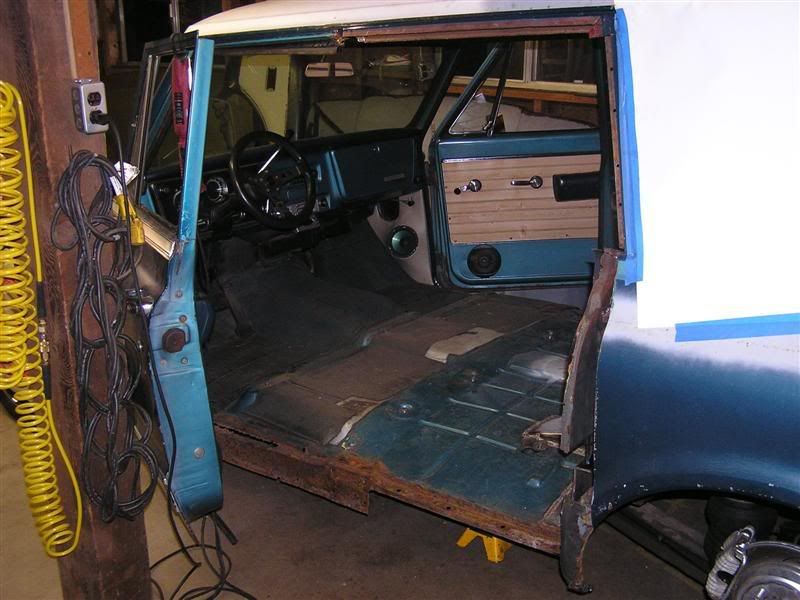 Just showing what the inner structure looks like 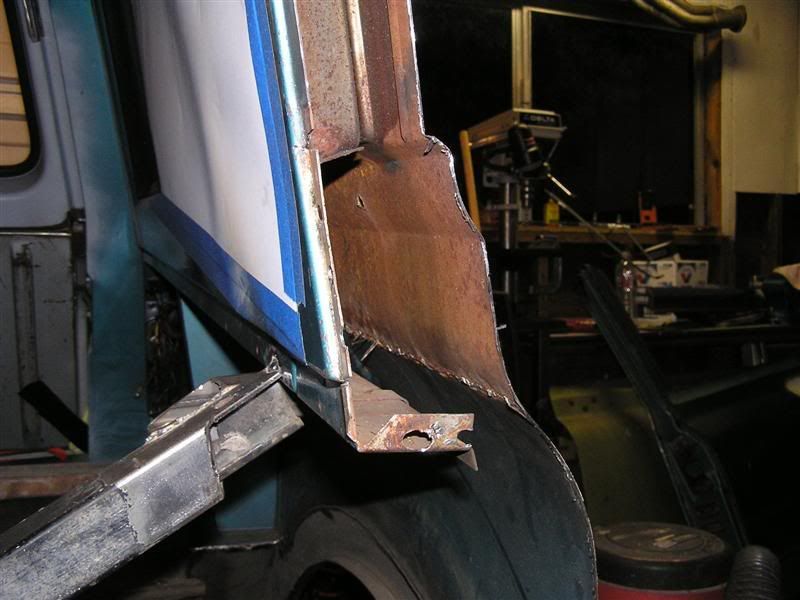 More donor parts  Prepping to cut the donor jamb to be shortened for where the tubs come through   Marked for an additional 3/4" to come off while leaving the arch section in place 
Last edited by Frizzle Fry; 10-20-2008 at 09:35 PM. |
|
|
|
|
10-19-2008, 11:16 AM
|
#932 |
|
Registered User
Join Date: Aug 2005
Location: Hillsboro Oregon
Posts: 6,449
|
Re: Joined the Short Wheelbase Club *69 Tahoe Project*
I did end up removing the inner wheel-well section because it needs to be relocated slightly. Also removed the dummy rocker which I plan to use as the bottom of the 4th rocker by adding just the top section of a front DS rocker.
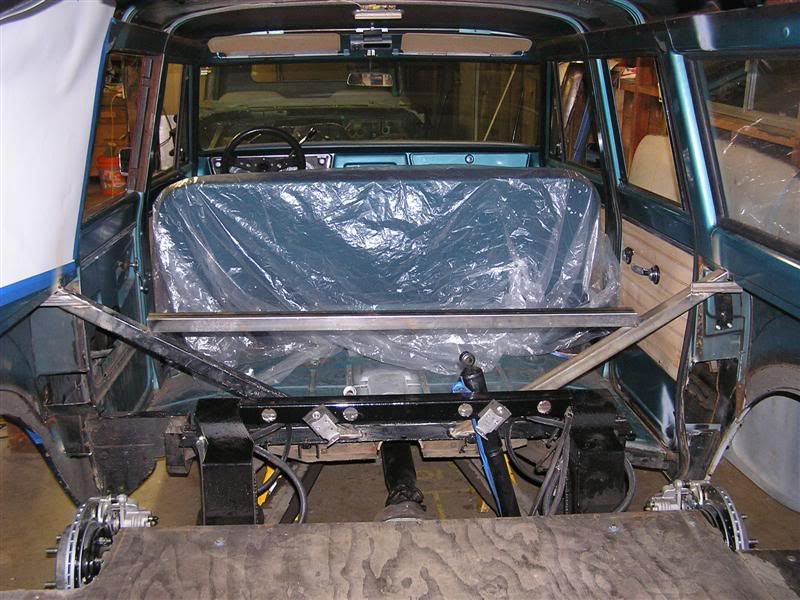
 The additional 3/4" removed to make room for the truck jamb 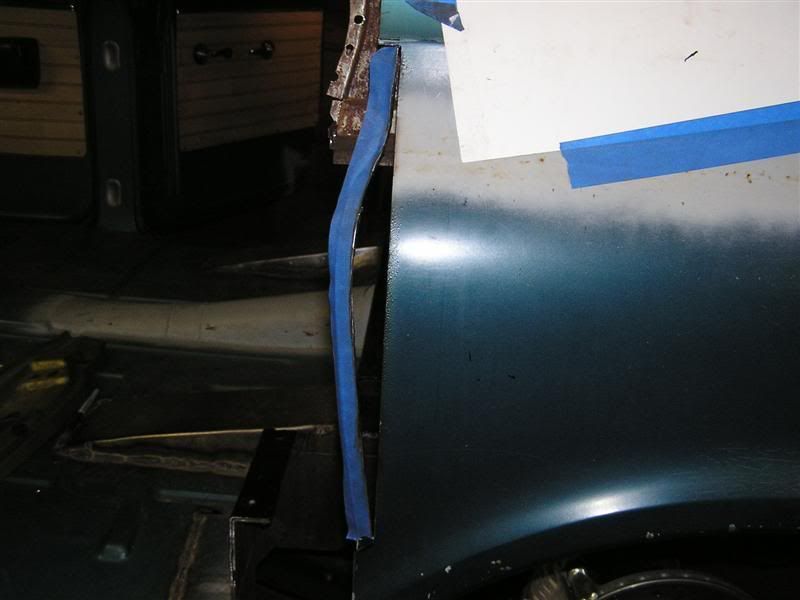 Truck jamb and B-Pillar sections roughing in 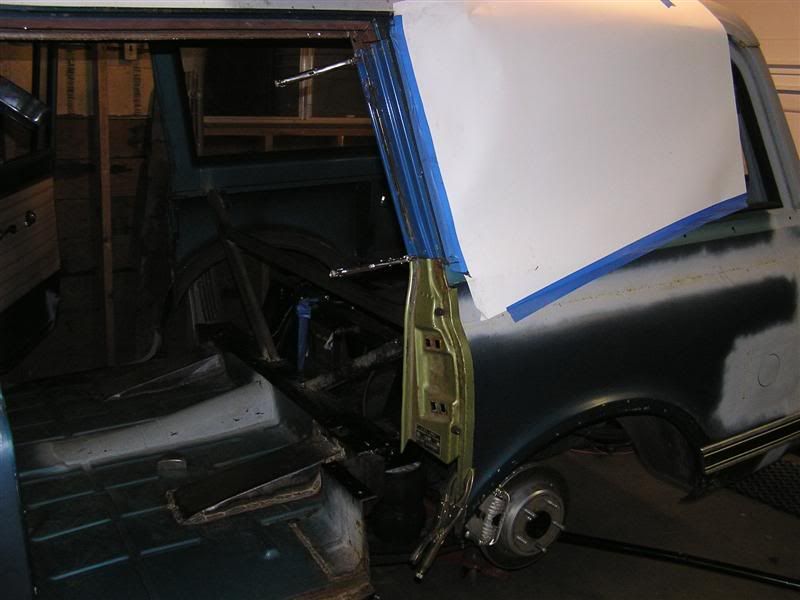  Because of the wheel-wells notching into the 3rd and 4th doors and the fact that I plan to run suicide rear doors, a conventional two-hinge set up won't work (no room). So I had no choice but to step up to these burly chunks: 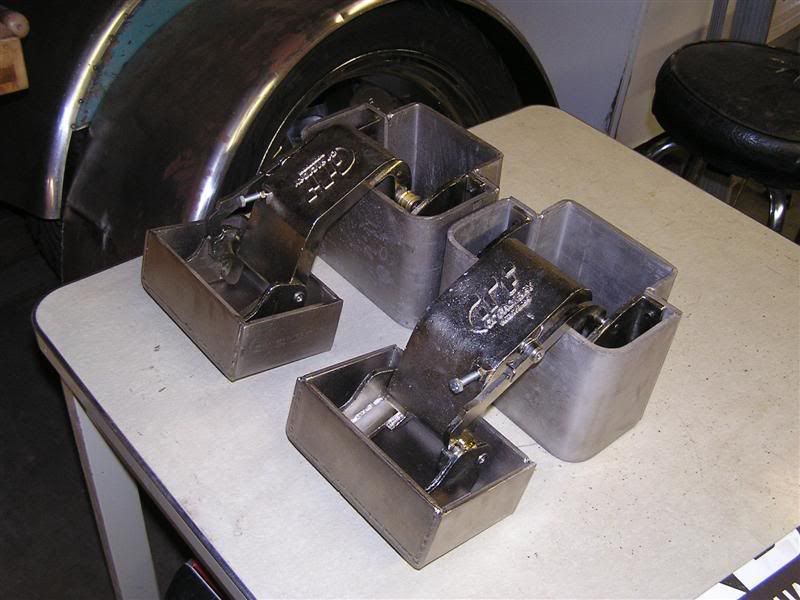 They must weigh 40 Lbs each! 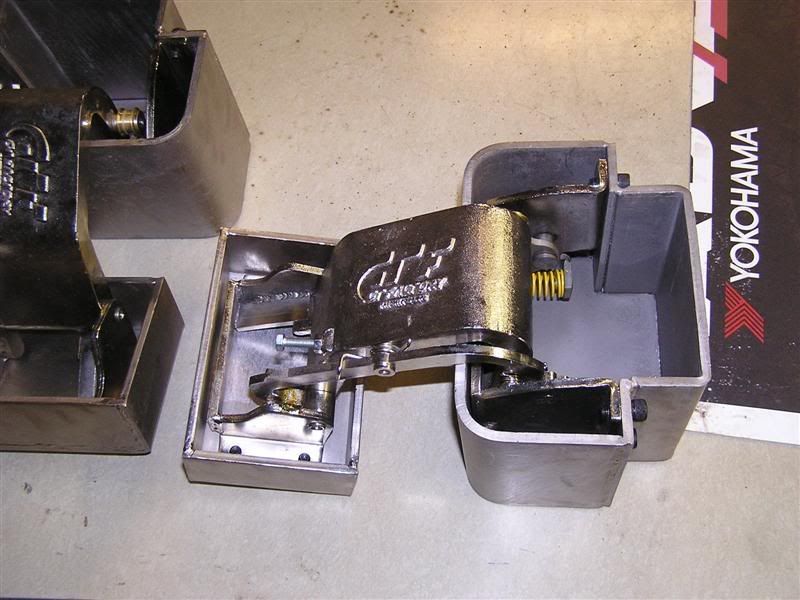 An idea of scale 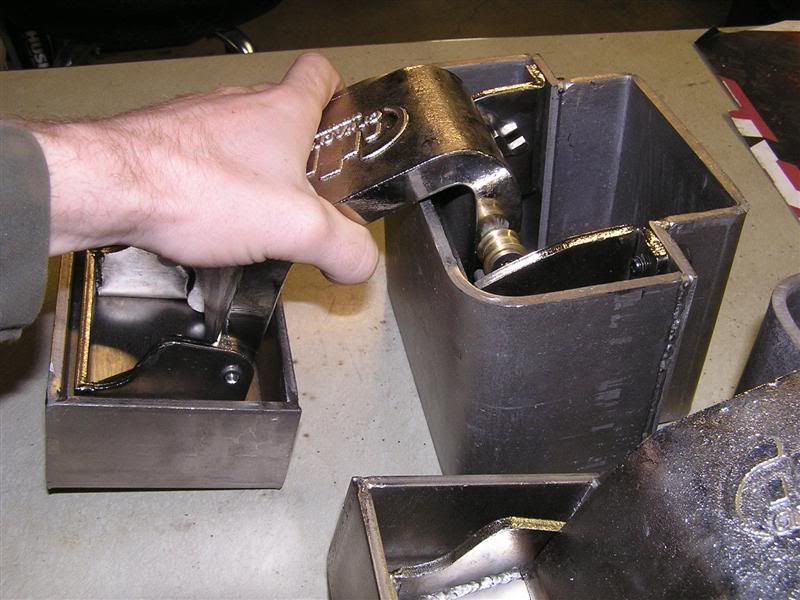 Those big 'ol boxes are designed to allow the installer to cut/modify as needed (and they will be heavily modified) 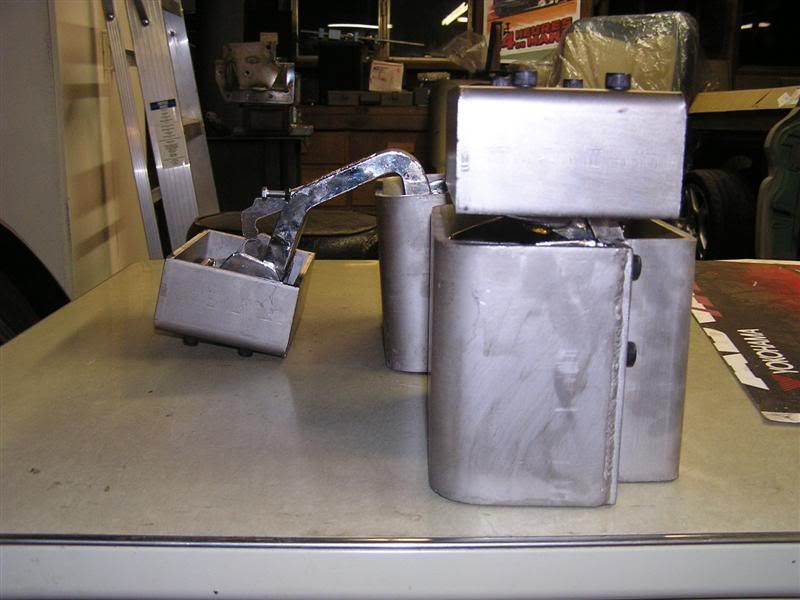 They open 180 degrees via a double hinge design. There is a locking mechanism which only allows one fulcrum to pivot at a time. I'm not overly excited about the 180 aspect, but these were the right size and price for the job 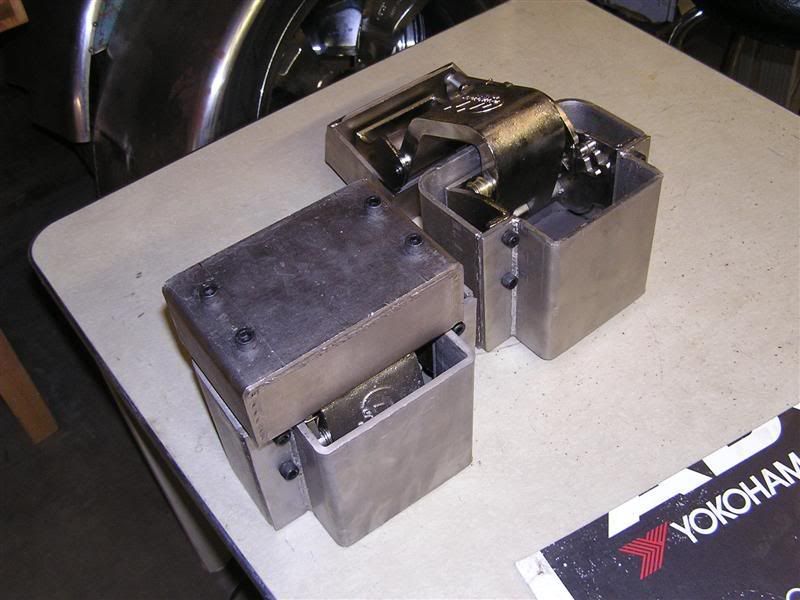 I ended up removing the front of the 4th window frame I made in order to use the front of the dummy frame like this 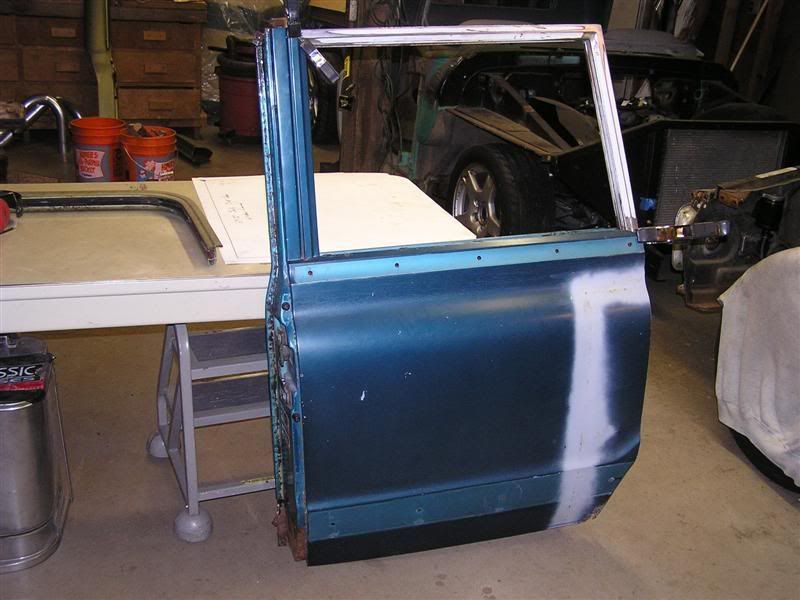
Last edited by Frizzle Fry; 10-20-2008 at 11:45 PM. |
|
|
|
|
10-19-2008, 11:22 AM
|
#933 |
|
Registered User
Join Date: Aug 2005
Location: Hillsboro Oregon
Posts: 6,449
|
Re: Joined the Short Wheelbase Club *69 Tahoe Project*
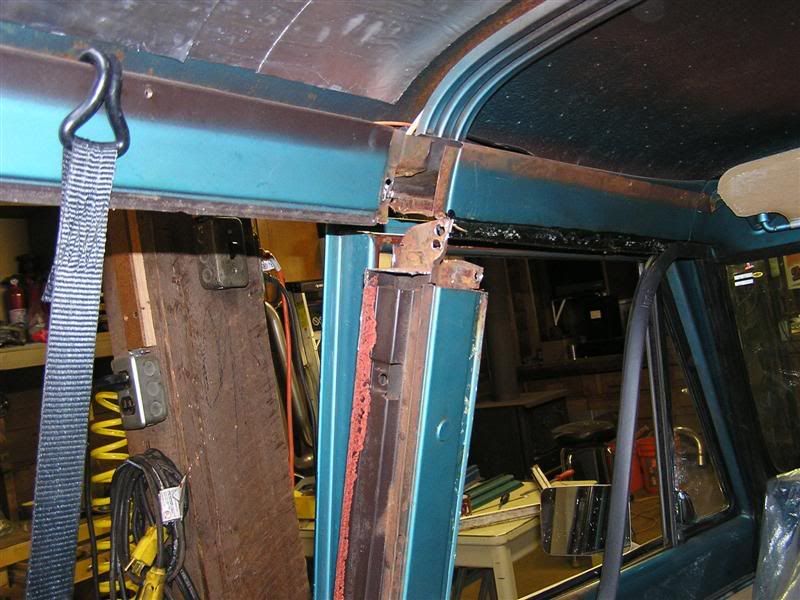
Looking down from the top of the B-Pillar:
 The weather-stripping on the cab will run uninterrupted from the A to the C pillar. So the upper window frame needs to extend forward to the front of the pillar. Here's the template for that: 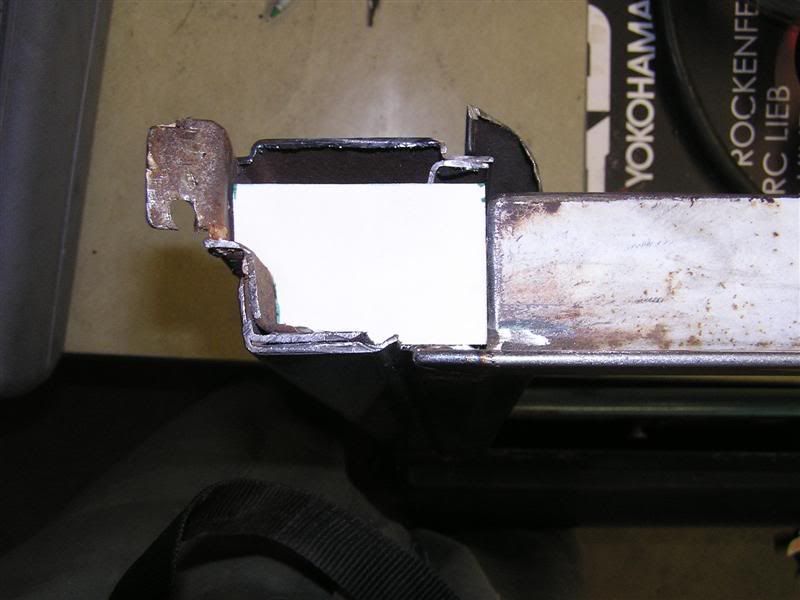 And a piece from the donor door in place. The rest will be boxed in once I test fit the door and figure out clearances: 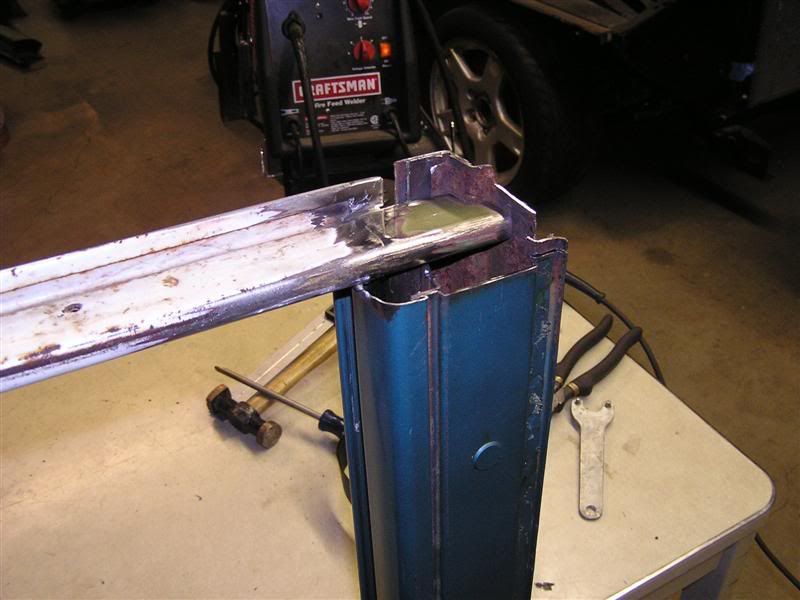 5' of 3/16x1.25"x1.25" angle iron which will be plug-welded in place above the upper jambs running from A to C: 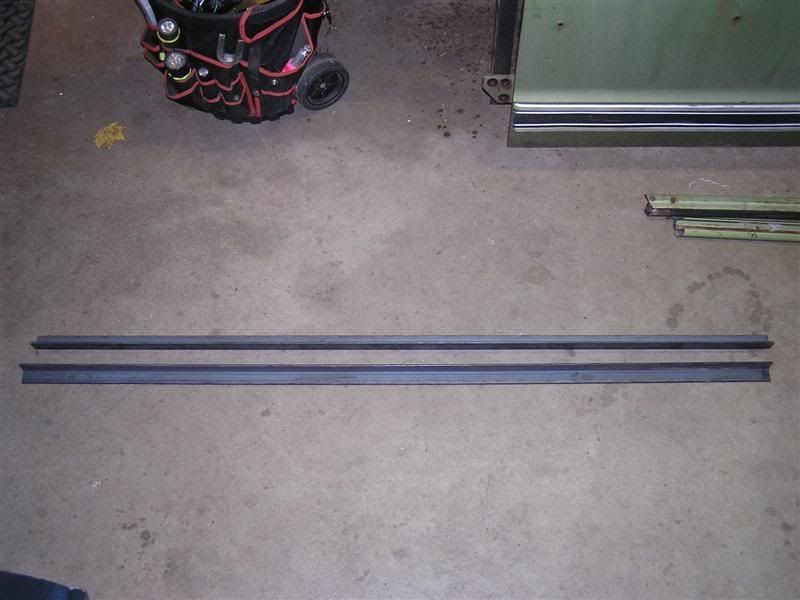 Test fitting. This will regain some of the structural integrity lost when removing the B-Pillar and provide a strong mounting point for the striker: 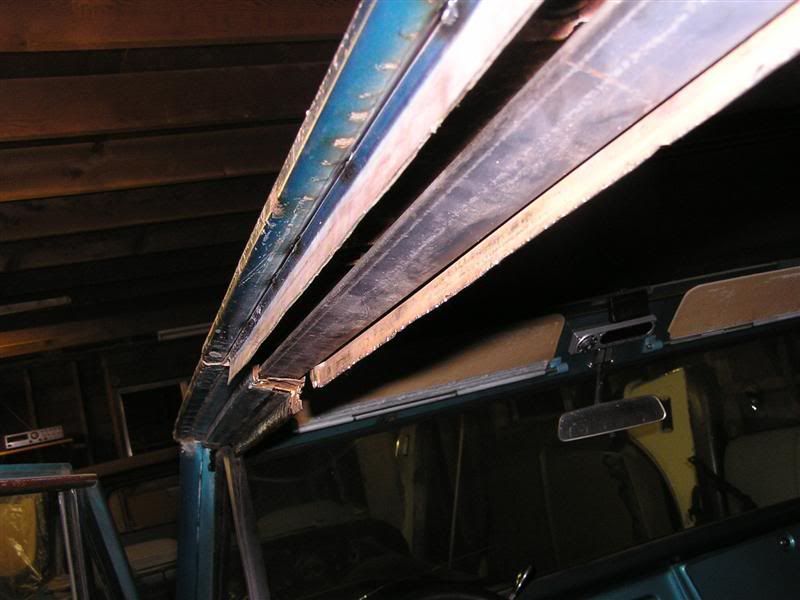 Kinda dim... Showing 3/16"x2x2 running inside the C-Pillar: 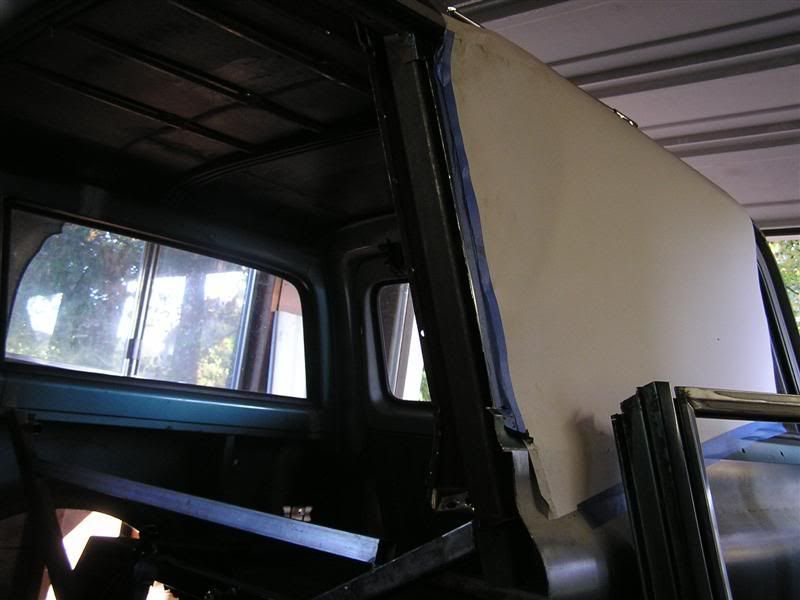 Upper mount for the 2x2 bolts in a factory hole location which runs through a few layers into a nut-plate above. The angle iron will also tie into this later: 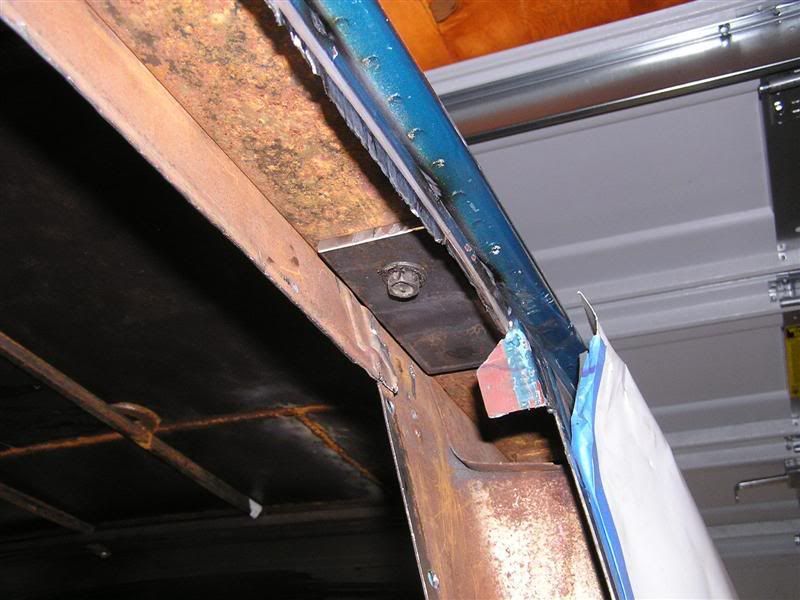 Another shot of the 2x2 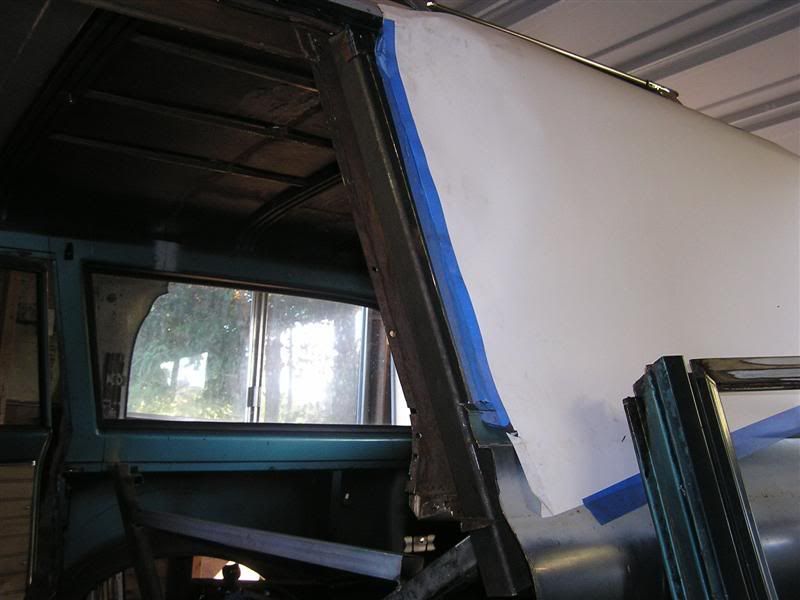 The hinge mounts cut down and additional welding complete. They tie into the 2x2 and will also be welded to a doubled section of the tubs below: 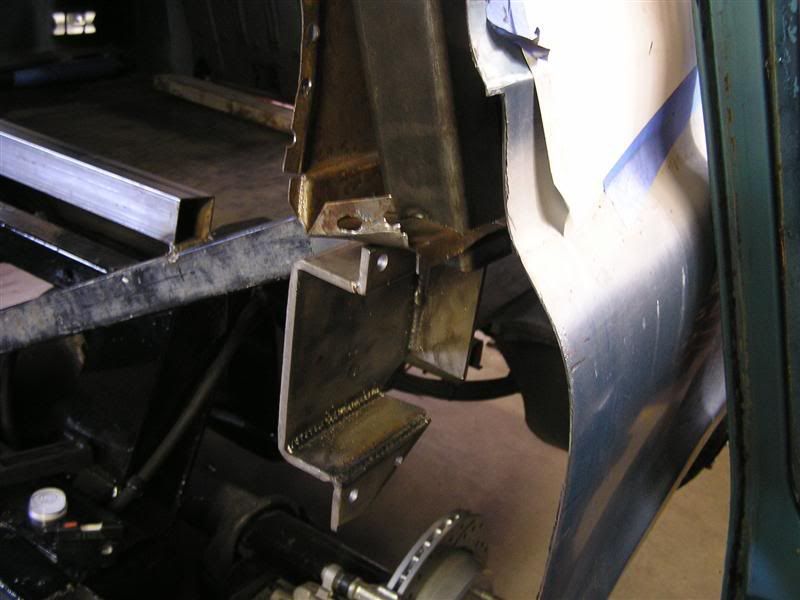
Last edited by Frizzle Fry; 10-20-2008 at 11:59 PM. |
|
|
|
|
10-19-2008, 11:29 AM
|
#934 |
|
Registered User
Join Date: Aug 2005
Location: Hillsboro Oregon
Posts: 6,449
|
Re: Joined the Short Wheelbase Club *69 Tahoe Project*
Factory striker area contours to be removed:
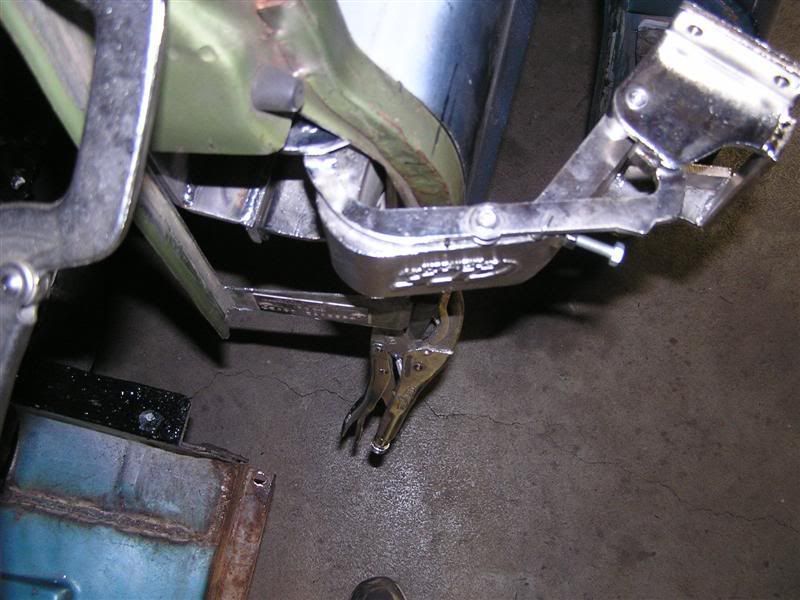
 Cut out to fit over the hinges. The hole size will be reduced and some contours added once everything is in its final position: 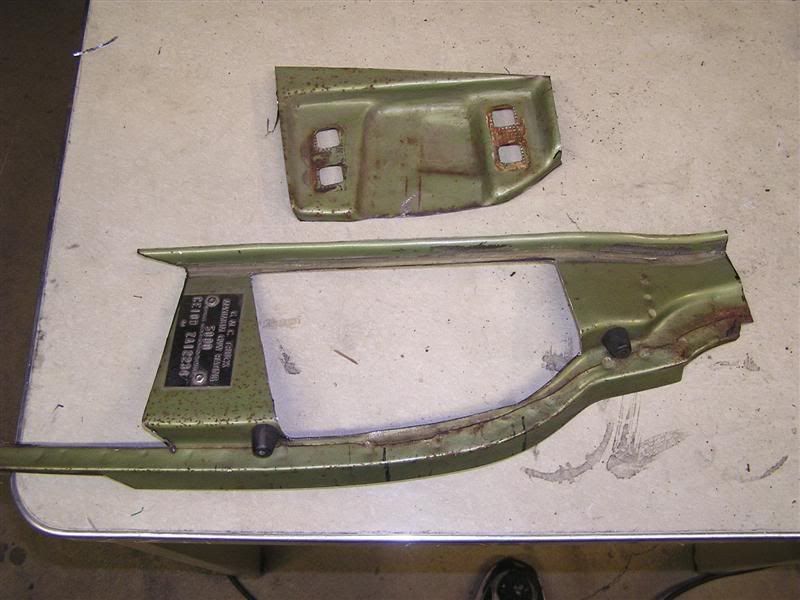 Leveling the truck for reference when welding the hinge mounts (a little out of order here...) 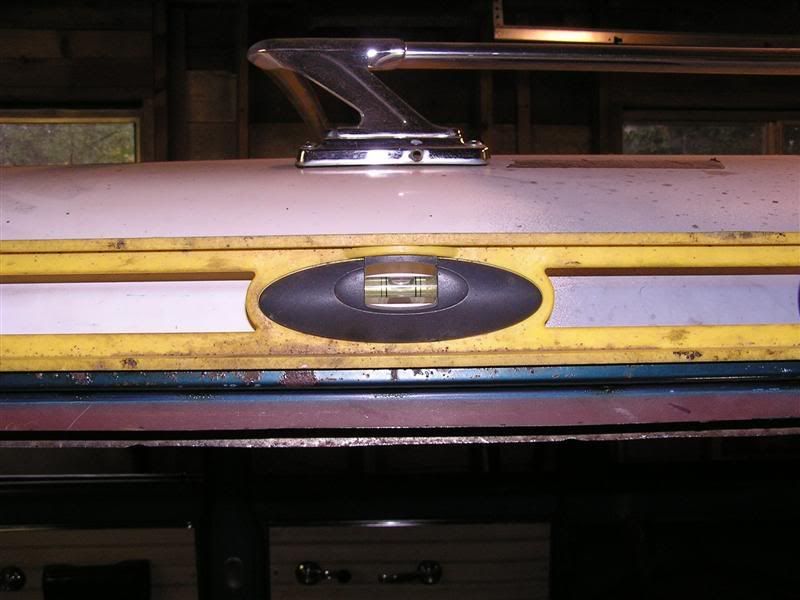 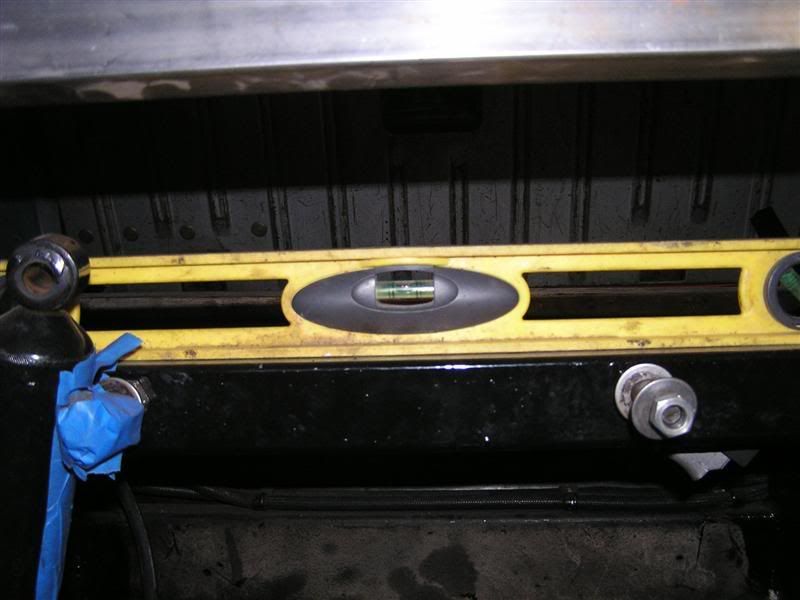 Another shot of the hinge mount in place:  Hinge bolted to hinge mount. There will be some adjustability here via shims/hole-size should I need to tweak it in the future:  I purposely pre-set the hinges slightly high to the front and to the outside to overcome any slight sag induced by the weight of the door You can also see to the right where I marked the hinge body for more trimming (did I mention it's a tight fit?  ): ):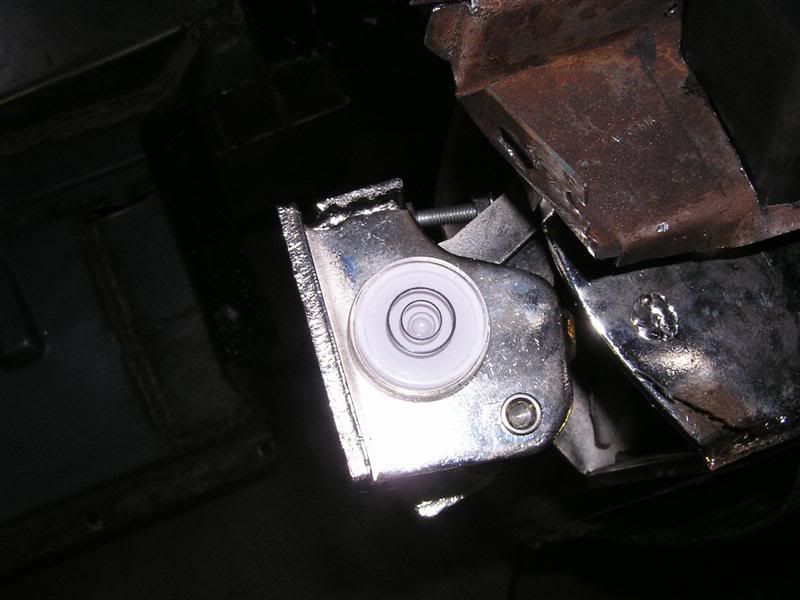 Here's how tight on space it is. The arched line in the background represents where the tub will be:  Jamb section in place. I the background you can see the extra trailer fender I bought for doubling the front of the tubs: 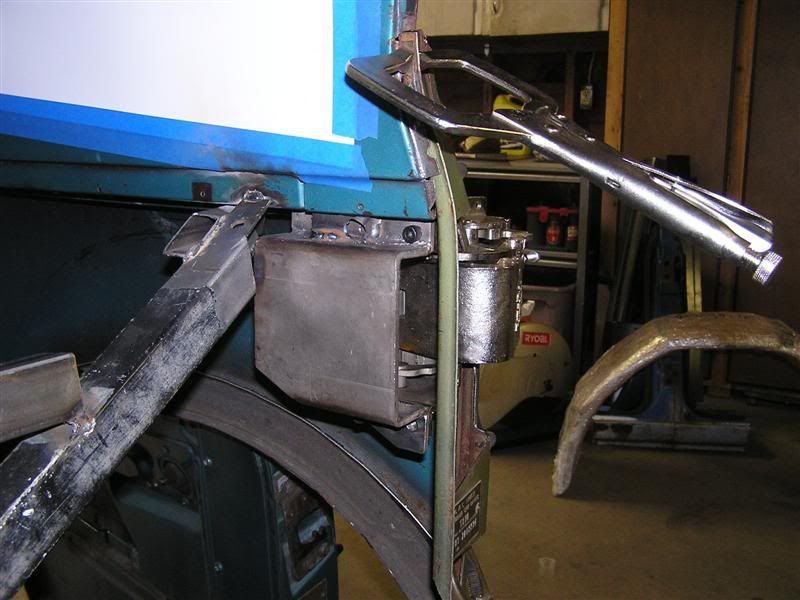
Last edited by Frizzle Fry; 10-21-2008 at 12:14 AM. |
|
|
|
|
10-19-2008, 11:31 AM
|
#935 |
|
Registered User
Join Date: Aug 2005
Location: Hillsboro Oregon
Posts: 6,449
|
Re: Joined the Short Wheelbase Club *69 Tahoe Project*
Last one for now showing the hinge opened (secondary not fully rotated):
Last edited by Frizzle Fry; 10-21-2008 at 12:16 AM. |
|
|
|
|
10-19-2008, 12:08 PM
|
#936 |
|
Senior Member
Join Date: Jul 2005
Location: Winters Ca. 95694
Posts: 4,843
|
Re: Joined the Short Wheelbase Club *69 Tahoe Project*
WOW is about all I can say. You are so detailed in your pre planing it almost makes me sick! Very well thought out plan..
Kevin LFD Inc. |
|
|
|
|
10-19-2008, 12:13 PM
|
#937 |
|
Senior Member
Join Date: Jul 2005
Location: Winters Ca. 95694
Posts: 4,843
|
Re: Joined the Short Wheelbase Club *69 Tahoe Project*
Now in going back over your pics I really like how you reinforced the C pillar. Also your choice in re-using the B-post along with the fake door skin should give you great results. Again very impressive!
So for the right side are you going to graft on a truck jamb to the front of the 3dr door to get the same look as the left side? You know you really suck! I have bad enought A.D.D. with only my own thoughts and then you go and do this to me Kevin LFD Inc. Last edited by Rokcrln; 10-19-2008 at 12:17 PM. |
|
|
|
|
10-19-2008, 12:54 PM
|
#938 |
|
Señor Member
Join Date: May 2002
Location: Edge of the world
Posts: 5,367
|
Re: Joined the Short Wheelbase Club *69 Tahoe Project*
Those hinges looked purty until I saw your hand on one. That's when I realized they look purty.
Also, see that thing in the middle of this pic. This is the source of your grinder's mysterious energy. Disconnect it, hop in the car, and come my way, please. There is much work for that grinder here.
__________________
|
|
|
|
|
10-19-2008, 02:22 PM
|
#939 |
|
Senior Member
 Join Date: Aug 2006
Location: Atascadero, CA
Posts: 1,152
|
Re: Joined the Short Wheelbase Club *69 Tahoe Project*
Hey Frizzle
 . I need to make a special trip up to oregon just to come check out that bad a$$ tahoe!!!! Love your work!!!! I agree with Rokcrln about how well you are planning stuff out! . I need to make a special trip up to oregon just to come check out that bad a$$ tahoe!!!! Love your work!!!! I agree with Rokcrln about how well you are planning stuff out!Josh
__________________
(Project truck) 1970 C10 under complete transformation My current build thread http://67-72chevytrucks.com/vboard/s...d.php?t=212871 Other project: C5 corvette swap into 70 c10 http://67-72chevytrucks.com/vboard/s...=1#post2413517 On Hold |
|
|
|
|
10-19-2008, 05:57 PM
|
#940 |
|
State of Confusion!
 Join Date: Jul 2002
Location: Gulfport, MS USA
Posts: 46,751
|
Re: Joined the Short Wheelbase Club *69 Tahoe Project*
Great looking work!
__________________
Bill 1970 Chevy Custom/10 LWB Fleetside 2010 Toyota Tacoma PreRunner SR5 Double Cab - DD Member of Louisiana Classic Truck Club (LCTC) Bill's Gallery Life isn't tied with a bow, but it's still a gift. Live simply. Love generously. Care deeply. Speak kindly. Leave the rest to God! |
|
|
|
|
10-19-2008, 06:12 PM
|
#941 |
|
Eat My Rust
Join Date: Jan 2007
Location: Cypress, Texas
Posts: 3,362
|
Re: Joined the Short Wheelbase Club *69 Tahoe Project*
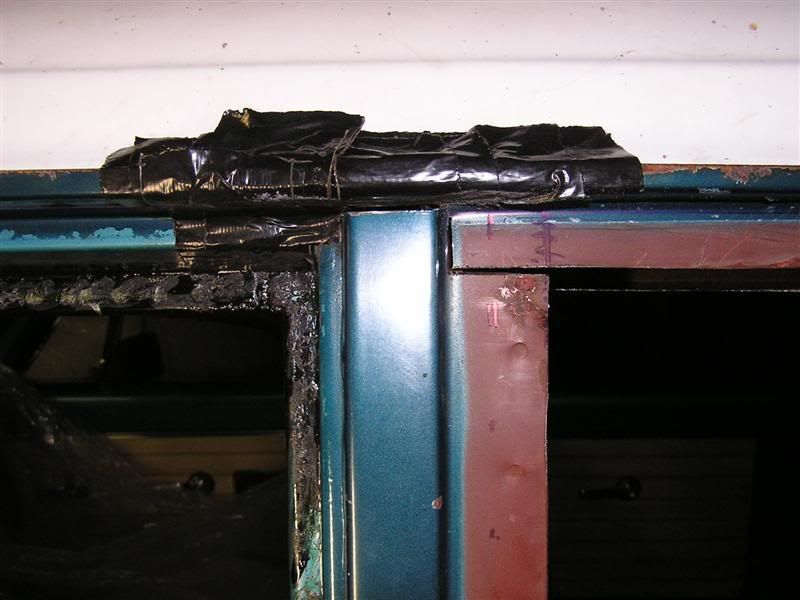 Oh no, he's getting lazy! Duct tape! |
|
|
|
|
10-19-2008, 07:00 PM
|
#942 |
|
Registered User
Join Date: Oct 2008
Location: central point oregon
Posts: 115
|
Re: Joined the Short Wheelbase Club *69 Tahoe Project*
deleted
Last edited by ak's-r-us; 11-29-2008 at 03:10 AM. |
|
|
|
|
10-19-2008, 07:43 PM
|
#943 |
|
*************
Join Date: Apr 2005
Location: Pensacola, FL
Posts: 17,837
|
Re: Joined the Short Wheelbase Club *69 Tahoe Project*
Outstanding as usual...........
 . .
__________________
Rob - https://www.instagram.com/hart_rod_c10 As Iron Sharpens Iron, So One Man Sharpens Another. Proverbs 27:17 FOR SALE: DBW pedal bracket - http://67-72chevytrucks.com/vboard/s...d.php?t=651123 FOR SALE: Hood Brackets http://67-72chevytrucks.com/vboard/s...d.php?t=679945 1987 Silverado SWB - 34.5K original miles http://67-72chevytrucks.com/vboard/s...d.php?t=801834 1969 SuperBurb - http://67-72chevytrucks.com/vboard/s...d.php?t=200387 1968 Farm truck - http://67-72chevytrucks.com/vboard/s...d.php?t=358692 1968 SWB - http://67-72chevytrucks.com/vboard/s...d.php?t=551258 1948 Chevy - http://67-72chevytrucks.com/vboard/s...=122164&page=3 Last edited by Hart_Rod; 10-19-2008 at 11:03 PM. |
|
|
|
|
10-19-2008, 10:10 PM
|
#944 |
|
Senior Member
Join Date: Jul 2005
Location: Winters Ca. 95694
Posts: 4,843
|
Re: Joined the Short Wheelbase Club *69 Tahoe Project*
Hey Mike does that single hinge have link so it is double actuated? You know so as you close it the door will swing right back around and close like a standard door. The one's I was talking with you about did not have that upper link and they were a pain and if not done just right it would get real expensive on the paint. These look good, what is the weight rating on them?
Kevin LFD Inc. |
|
|
|
|
10-19-2008, 10:58 PM
|
#945 | ||||||||
|
Registered User
Join Date: Aug 2005
Location: Hillsboro Oregon
Posts: 6,449
|
Re: Joined the Short Wheelbase Club *69 Tahoe Project*
Quote:
Yes you nailed it with the PS door jam matching the DS; it will. A.D.D. rocks Quote:
Quote:
 Quote:
Quote:
Quote:
Quote:
There's video out there somewhere I can't seem to find at the moment, but they appear to work very smothly and close like conventional hinges (no added pushing on the hinged side required). Here's what their site syas about them: The New GT Factory 180° Door System, revolutionizing the industry with a design that is sure to fit most cars trucks and SUVs. Its single hinge design is perfect for sedans which have a hump for the wheel well in the rear however strong enough to keep a heavy truck door in its place. Industry leading technical support is what made customers rave about our Diablo Door System and we will provide the same outstanding customer service with our 180° door system. 50% weld-on/ 50% bolt-on universal application for all cars, trucks and SUV's -Exclusive 180 degree patent pending dual stage left and right hinges with GTF logos -10x the strength of traditional suicide hinges allowing use of one hinge per door (essential for sedans with the rear door located half way over the rear wheel) -A huge swingarm designed to clear all unibody chassis vehicles (unlike the common hot rod style hinge kits only suitable for 2" thick doors) -Stay put operation allows infinite opening angle up to 180 degrees -pressed hinge pins on both stages with expanded one piece end caps -Infinite angle adjustments for open and closed positions -Locking mechanism to separate each hinge stage - Nickel plated finish on all parts -Heavy duty car side and door side housings for both hinges -Alignment shims & grade 8.8 mounting hardware -Four FMVSS approved two stage latches and four strikers -Special high density packaging to support the heavy parts -Step by step picture instructions on CD -Lifetime warranty -Industry leading technical support Last edited by Frizzle Fry; 10-19-2008 at 11:00 PM. |
||||||||
|
|
|
|
10-19-2008, 11:22 PM
|
#946 |
|
*************
Join Date: Apr 2005
Location: Pensacola, FL
Posts: 17,837
|
Re: Joined the Short Wheelbase Club *69 Tahoe Project*
__________________
Rob - https://www.instagram.com/hart_rod_c10 As Iron Sharpens Iron, So One Man Sharpens Another. Proverbs 27:17 FOR SALE: DBW pedal bracket - http://67-72chevytrucks.com/vboard/s...d.php?t=651123 FOR SALE: Hood Brackets http://67-72chevytrucks.com/vboard/s...d.php?t=679945 1987 Silverado SWB - 34.5K original miles http://67-72chevytrucks.com/vboard/s...d.php?t=801834 1969 SuperBurb - http://67-72chevytrucks.com/vboard/s...d.php?t=200387 1968 Farm truck - http://67-72chevytrucks.com/vboard/s...d.php?t=358692 1968 SWB - http://67-72chevytrucks.com/vboard/s...d.php?t=551258 1948 Chevy - http://67-72chevytrucks.com/vboard/s...=122164&page=3 |
|
|
|
|
10-19-2008, 11:33 PM
|
#947 |
|
Registered User
Join Date: Jun 2007
Location: Saskatoon, Saskatchewan,:
Posts: 2,901
|
Re: Joined the Short Wheelbase Club *69 Tahoe Project*
That is some MAD skills you got there, everytime i look at your pages, there always seems to be a big hole. lol
__________________
James 1968 GMC "HAVOC" 1986 GMC "Frank" J.J.R.H. Design & Consulting My 68`Rebuild "HAVOC": http://67-72chevytrucks.com/vboard/s...d.php?t=316300 A 58' chev build thread: http://www.67-72chevytrucks.com/vboa...d.php?t=311238 1969 Camaro Pro Touring http://67-72chevytrucks.com/vboard/s...61#post3513361 Swiss Cheese: http://67-72chevytrucks.com/vboard/s...d.php?t=384390 Adjustable Trailing Arm How-To: http://67-72chevytrucks.com/vboard/s...d.php?t=321100 1968 Ford Farm Truck: http://67-72chevytrucks.com/vboard/s...=1#post6555587 |
|
|
|
|
10-20-2008, 01:17 AM
|
#948 |
|
A new C10 Addict!
Join Date: Oct 2008
Location: Vancouver, Wa
Posts: 105
|
Re: Joined the Short Wheelbase Club *69 Tahoe Project*
Progress is looking good, I really cant wait to see this finished
|
|
|
|
|
10-20-2008, 09:42 AM
|
#949 |
|
I'M TRUCK CRAZY!
Join Date: Oct 2006
Location: Sachse, TEXAS
Posts: 1,737
|
Re: Joined the Short Wheelbase Club *69 Tahoe Project*
Lookin great
|
|
|
|
|
10-20-2008, 10:13 AM
|
#950 |
|
Hittin E-Z Street on Mud Tires
Join Date: Nov 2004
Location: Greenville, SC
Posts: 23,090
|
Re: Joined the Short Wheelbase Club *69 Tahoe Project*
I was always hoping to see a 4th door on this... awesome, just awesome!
__________________
Jesse James 1967 C10 SWB Stepside: 350/700R4/3.73 1965 Ford Mustang: 289/T5-5spd/3.25 Trac-Loc 1968 Pontiac Firebird: Project Fire Chicken! 2015 Silverado Double Cab 5.3L Z71 2001 Jeep Wrangler Sport 4.0L 5spd 2020 Chevrolet Equinox Premium 2.0L Turbo 2011 Mustang V6 ~ Wife's ride American Born, Country by the Grace of God  1967 CST Shop Truck Rebuild! My 1967 C-10 Build Thread My Vintage Air A/C Install Project "On a Dime" Trying my hand at Home Renovation! 1965 Mustang Modifications! |
|
|
|
 |
| Bookmarks |
|
|


 Linear Mode

