
|
|
|
 02-28-2013, 09:41 PM
|
#1 |
|
Registered User
 Join Date: Nov 2007
Location: NLR, AR
Posts: 1,387
|
Re: Junkyard Jimmy Super Low Buck Build Thread
Looks great to me. Cant wait for mine to look this good.
I think I have already spent more on my beater then you have on this. So your doing great for a "beater" |

|

|
|
03-01-2013, 12:32 AM
|
#2 | |
|
GEARHEAD
Join Date: Aug 2003
Location: MN
Posts: 6,122
|
Re: Junkyard Jimmy Super Low Buck Build Thread
Quote:
Took a few minutes to sand down the filler tonight. Turned out pretty good. Just need to fill some pinholes and sanding scratches, sand the top of the rail a bit and it's ready for the next (LAST) layer of primer. Maybe this weekend. On another note, I found out tuesday that I'm getting a raise and earned my bonus for this year. Not much of that will get dumped onto this project, (super low buck remember) unless I break something or something fails once I get it back on the road. But I should be finishing up some things on my C-10. I found a source for the right material for the interior and really want to get that done. Also may look at adding AC to it. But that's a story for another day and the other build thread. It's just nice to get some more breathing room in the old checking account if you know what I mean. 
__________________
If no one knows what you're doing, they can't tell you you're doing it wrong HG's Dream Car Build - Shelby Cobra Kit Build your own adjustable track bar 71  Long Fleet C/10 Long Fleet C/10 72  Jimmy 4x4 (Junkyard Jimmy) Jimmy 4x4 (Junkyard Jimmy)HG's Plow Truck '78  K35 Dually K35 DuallyBigass Farm Truck HG's thread of miscellaneous stuff |
|
|
|
|
|
03-01-2013, 10:29 PM
|
#3 |
|
GEARHEAD
Join Date: Aug 2003
Location: MN
Posts: 6,122
|
Re: Junkyard Jimmy Super Low Buck Build Thread
Finished up the sanding on the passenger side. You would not believe how long it takes to finish all the little nooks and crannys by hand, like that little radius on the edge of the wheel arch, around the front of the fender and tail light areas, etc. Especially when it was bumpy as all hell like mine was because I ignored those areas until now.
 I filled a few little pinholes, retaped around the wheel arch on the front fender (had to remove the tape to sand it properly  ) I have it degreased and its ready to spray. ) I have it degreased and its ready to spray.I borrowed a DA sander from the body shop. They had one that they had borrowed out to a guy who banged the edges of the pad up real bad. I told them I wouldn't make it any worse. That thing is the BOMB! I have a random orbital sander and use it for knocking down the filler with course paper, but it's just too much action and too heavy for light sanding. The DA is great for the finer grits. Wish I had tried it out when I was doing my C-10, would have saved me hours, if not days of work. So the plan is to spray primer on the hood and passenger side, maybe in the morning. Then DA with 320. Then start the other side and get the cowl and tailgate prepped. I'll probably wet sand with 400-600 once the other side is ready as the last step before sealer and paint. I don't have to work any weekends this month, but next month I have to almost every weekend. So I'm really going to push to finish the paint in March. Wish me luck, I'm going to need a ton of it. 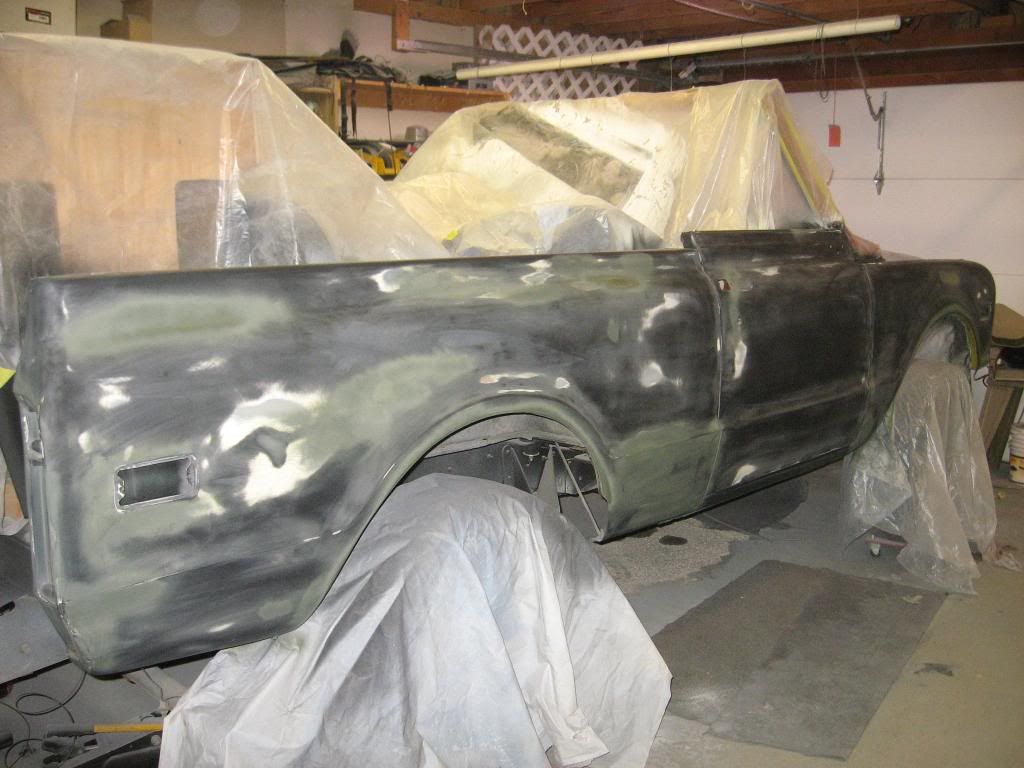 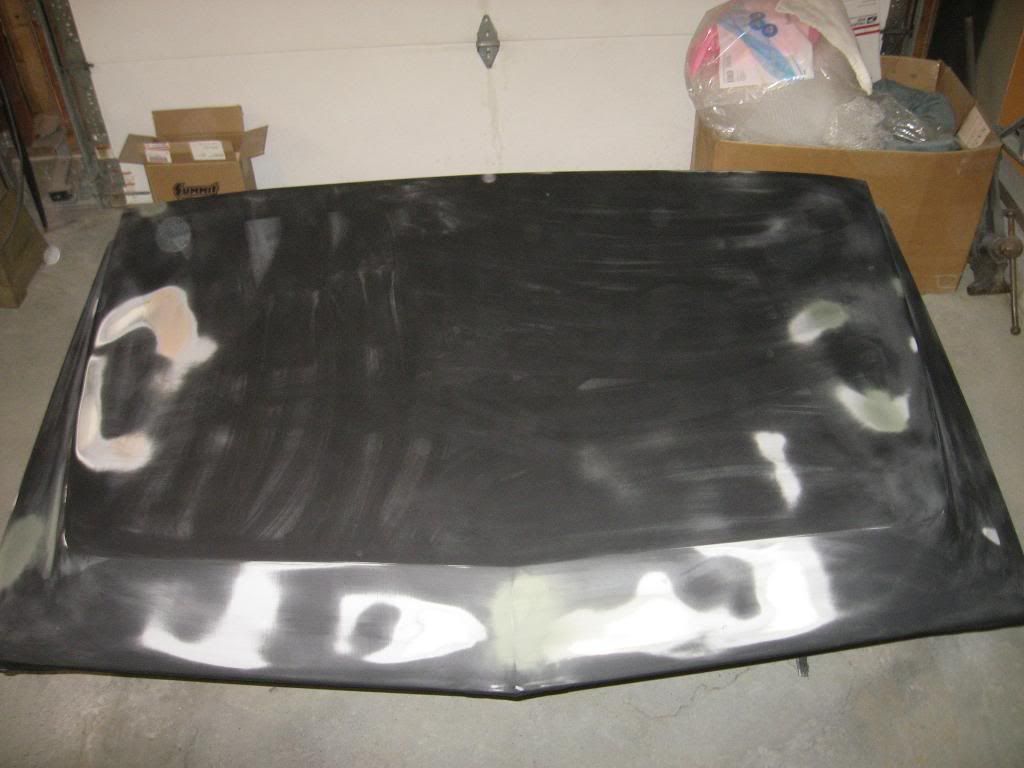
__________________
If no one knows what you're doing, they can't tell you you're doing it wrong HG's Dream Car Build - Shelby Cobra Kit Build your own adjustable track bar 71 Long Fleet C/10 72 Jimmy 4x4 (Junkyard Jimmy)HG's Plow Truck '78 K35 DuallyBigass Farm Truck HG's thread of miscellaneous stuff |
|
|
|
|
03-01-2013, 11:43 PM
|
#4 |
|
Registered User
Join Date: Dec 2004
Location: Gypsum Kansas 67448
Posts: 1,681
|
Re: Junkyard Jimmy Super Low Buck Build Thread
im sure ready to see some color on it...keep it up brotha
__________________
21 2500hd duramax 58 apache HILLJOB GRAPHIX--for all your graphic needs My build thread http://67-72chevytrucks.com/vboard/s...d.php?t=542497 LS ENGINE SWAP INFORMATION THREAD http://67-72chevytrucks.com/vboard/s...d.php?t=377348 4l60 to an NP205 http://67-72chevytrucks.com/vboard/s...43#post3697343 |
|
|
|
|
03-02-2013, 12:41 AM
|
#5 |
|
Registered User
Join Date: Apr 2011
Location: .
Posts: 3,104
|
Re: Junkyard Jimmy Super Low Buck Build Thread
Good luck Man
You can do it. Coffee lots and lots of coffee. |
|
|
|
|
03-02-2013, 05:05 PM
|
#6 |
|
GEARHEAD
Join Date: Aug 2003
Location: MN
Posts: 6,122
|
Re: Junkyard Jimmy Super Low Buck Build Thread
Got it sprayed with primer. Its all black again. Used a little more acetone in the mix than last time and it sprayed much better. About 3 oz added to 16 oz of primer.
__________________
If no one knows what you're doing, they can't tell you you're doing it wrong HG's Dream Car Build - Shelby Cobra Kit Build your own adjustable track bar 71 Long Fleet C/10 72 Jimmy 4x4 (Junkyard Jimmy)HG's Plow Truck '78 K35 DuallyBigass Farm Truck HG's thread of miscellaneous stuff |
|
|
|
|
03-03-2013, 07:33 PM
|
#7 |
|
GEARHEAD
Join Date: Aug 2003
Location: MN
Posts: 6,122
|
Re: Junkyard Jimmy Super Low Buck Build Thread
I got the hood sanded with 320 today. I tried the DA with it, still loaded up fast. So switched to wet sanding, and believe it or not that even loaded up some until I cut through the top skin of the primer. This featherfill is good for filling and cures real hard, but its a pain to sand.
Looks like a snow storm is rolling in tonight. If there is too much on the ground in the morning I'll cancel my inspection appointment for the day and sand some more.
__________________
If no one knows what you're doing, they can't tell you you're doing it wrong HG's Dream Car Build - Shelby Cobra Kit Build your own adjustable track bar 71 Long Fleet C/10 72 Jimmy 4x4 (Junkyard Jimmy)HG's Plow Truck '78 K35 DuallyBigass Farm Truck HG's thread of miscellaneous stuff |
|
|
|
|
03-10-2013, 04:47 PM
|
#8 |
|
GEARHEAD
Join Date: Aug 2003
Location: MN
Posts: 6,122
|
Re: Junkyard Jimmy Super Low Buck Build Thread
I finished wet sanding the passenger side this morning with 320. I figured out how to sand this primer without it loading up the paper so bad. I started by wet sanding with 220. That got the outer skin off and the orange peel or anything else off quick. Then did the 320 and had no problems. Other than its messy. But a different kind of mess. No piles of dust all over but dirty water on the floor. When it warms up this spring I'll have to use the pressure washer on the floor.
I did the cowl with the 220 also, but might need to spray more primer on that, it was pretty thin. I'll touch it up and finish it with the 320 soon. Then get it turned around to do the driver side. So close right now. No pics. Looks like black primer, same as before, just smoother.
__________________
If no one knows what you're doing, they can't tell you you're doing it wrong HG's Dream Car Build - Shelby Cobra Kit Build your own adjustable track bar 71 Long Fleet C/10 72 Jimmy 4x4 (Junkyard Jimmy)HG's Plow Truck '78 K35 DuallyBigass Farm Truck HG's thread of miscellaneous stuff |
|
|
|
|
03-24-2013, 10:43 PM
|
#9 |
|
GEARHEAD
Join Date: Aug 2003
Location: MN
Posts: 6,122
|
Re: Junkyard Jimmy Super Low Buck Build Thread
Its been 2 weeks since I had an update, That sucks. There have been some huge changes in my life that began on 3/2, and I'm not going to go into it here on a public forum. Lets just say that my life is in transition right now, not really sure where it'll end up, but I'm making the best out of a bad situation. I'm doing fine really, but it has not been a good month to say the least.
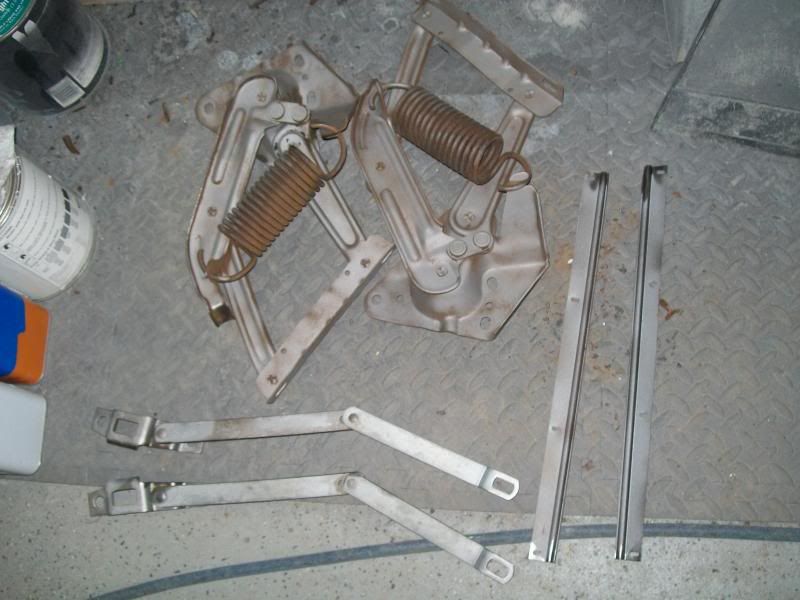
Enough of that though. Today I made a garage day for myself and it felt damn good. When I left off last time I needed to block sand the driver side. Well that still needs to be done. Today I went a different direction because I just needed to. I started out by painting the edges of the hood. I did this so I can mount it for painting to keep the color consistent. 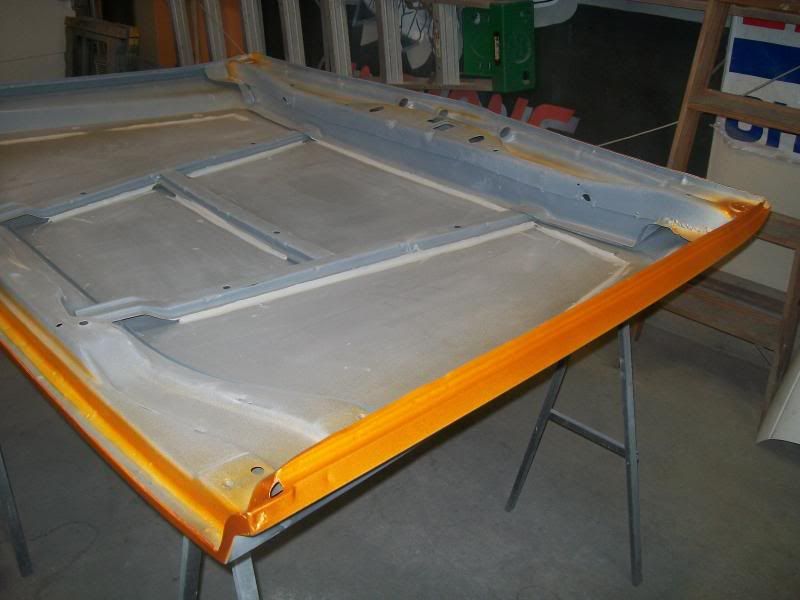 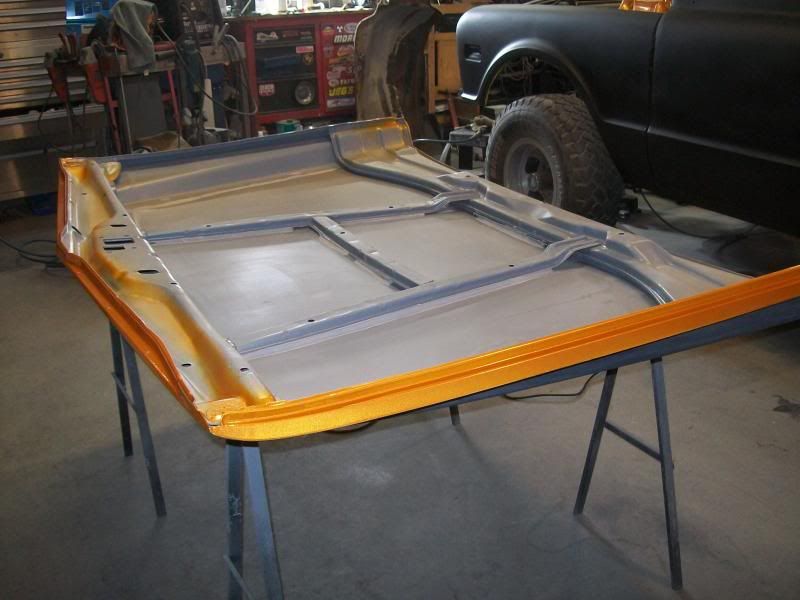 I did that before I painted the underside of the hood simply because it made taping easier. So yeah, I also painted the underside of the hood black. I had some left over chassis black paint which is a 2 part mix that is durable, and I already had it, so kinda like free. 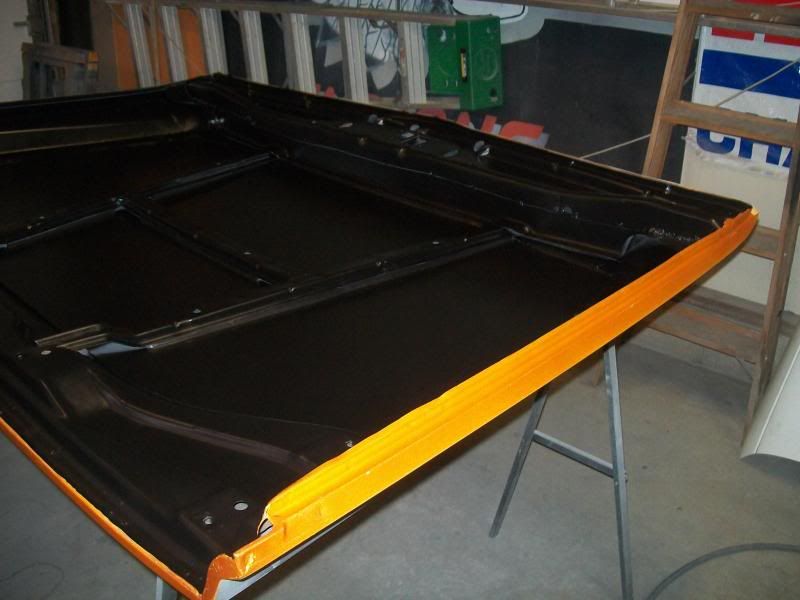 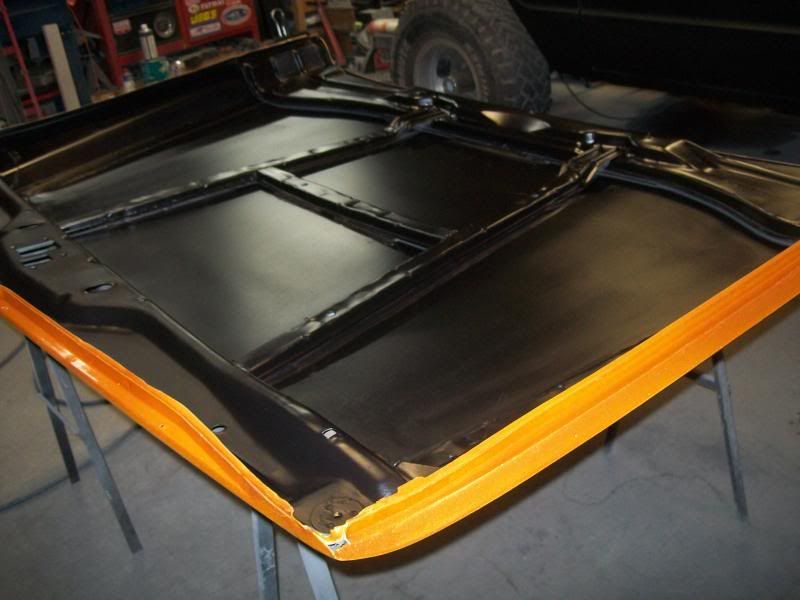 While I was contemplating all this I thought there was a chance that I would have enough of that black paint to do the inner fenders also. Turns out I didn't, but no biggie. The passenger side is a new part, just needs scuffed and sprayed. The driver side one was mostly solid, except for one spot. 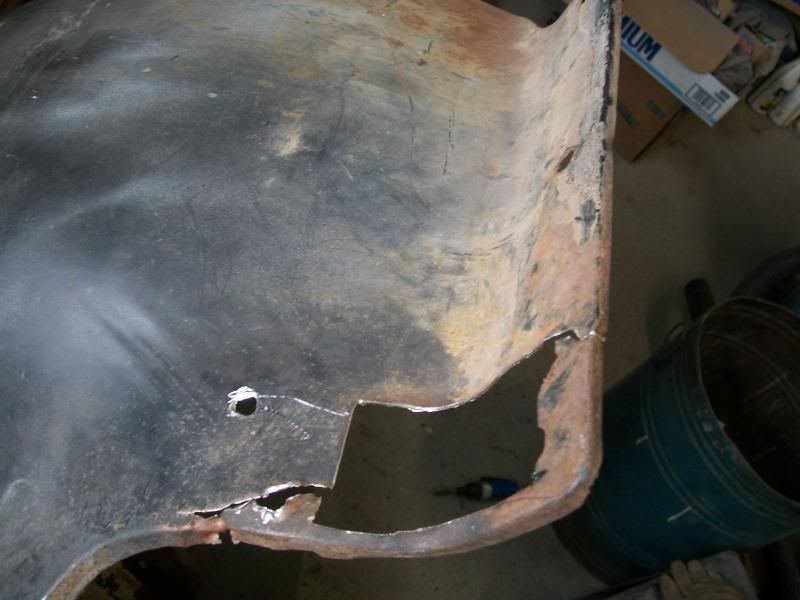 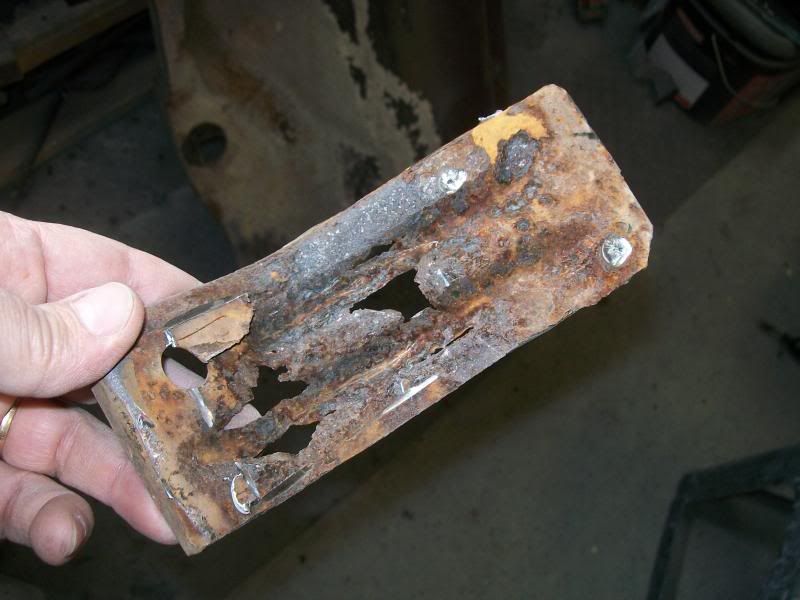 It was rusting between the little corner reinforcement piece and the fender skin. The rust on the brace piece was too bad to fix, so I found a piece of heavy gauge scrap and made one. It's not all fancy ribbed like the original, but so what. It will do the job just fine. 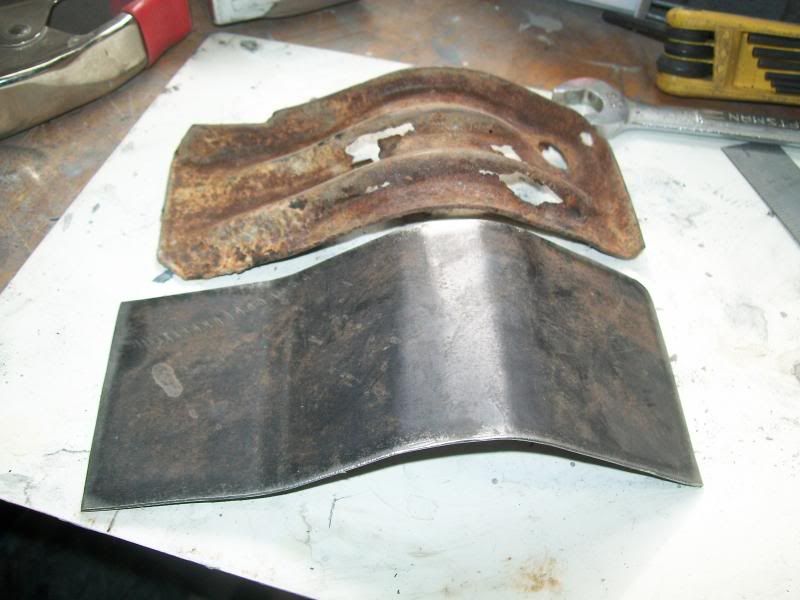 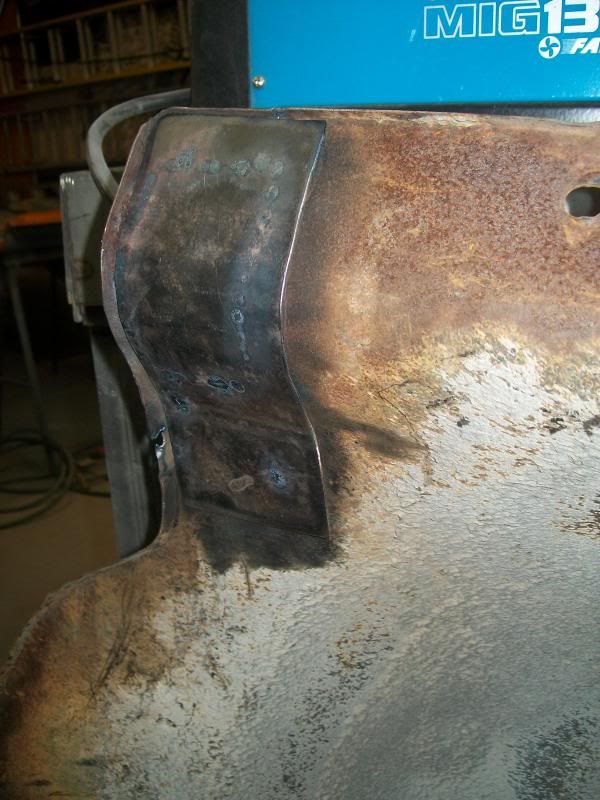 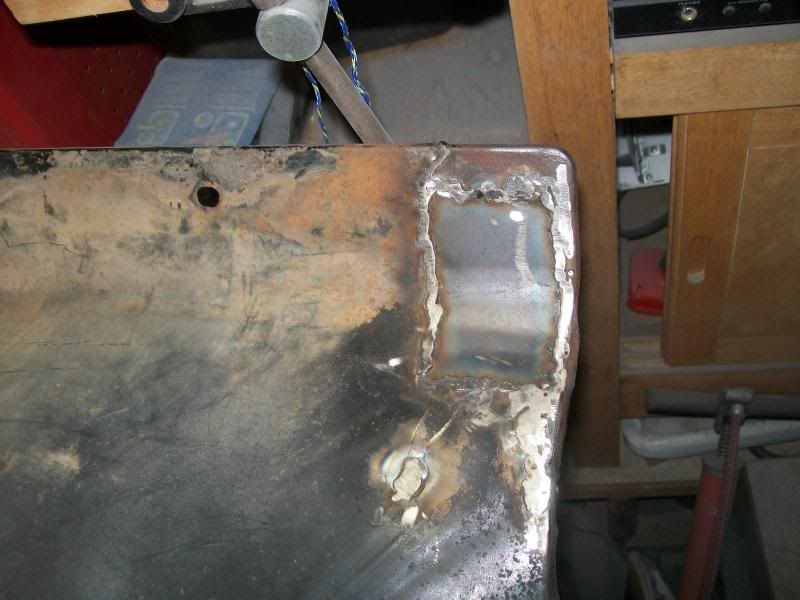 The inners are wiped down and pretty much ready to spray. I need to sandblast the hood hinges and spray those. I need to spray paint on the edges on the tailgate and in the bedsides where the tailgate mounts and the cowl cover so those can get mounted before paint. Still need to block the driver side. So probably wont get the whole thing painted before the end of the month, but I'm ok with that considering the circumstances. On another note, my youngest turned 16 last week, bought her first car, and got her driver license the next day. Very proud of my kids. They all bought their own first car. All are beaters, but with some help from me, they keep getting them around from A to B without a monthly payment and no worries about fender bender accidents. The latest low buck beater find is a 94 Buick Le Sabre with just over 200k on it for $700. Needed new front tires and brakes and rotors, battery was replaced under warranty, still need to find a radio and fix the heater controls and paint the fender I found for it to replace the broken one, but it runs good and rides nice.
__________________
If no one knows what you're doing, they can't tell you you're doing it wrong HG's Dream Car Build - Shelby Cobra Kit Build your own adjustable track bar 71 Long Fleet C/10 72 Jimmy 4x4 (Junkyard Jimmy)HG's Plow Truck '78 K35 DuallyBigass Farm Truck HG's thread of miscellaneous stuff |
|
|
|
|
03-25-2013, 09:43 AM
|
#10 |
|
Senior Member
Join Date: Nov 2003
Location: Brookings, SD
Posts: 10,497
|
Re: Junkyard Jimmy Super Low Buck Build Thread
Good job on the progress Mike.
Also glad to read about first cars. It's no fun when the bank owns your car. I played that game for a long time before I wised up. Putting new front tires and brakes on it is reassuring too, now you know exactly what is there.
__________________
Some people are like slinkies, they aren't good for anything, but you can't help but smile when you see one tumble down the stairs. |
|
|
|
|
03-25-2013, 09:07 PM
|
#11 |
|
Registered User
Join Date: Apr 2011
Location: .
Posts: 3,104
|
Re: Junkyard Jimmy Super Low Buck Build Thread
Nice work on the hood. Hope all is going in better directions.
Keep up the great work Man!!!! |
|
|
|
|
03-25-2013, 10:10 PM
|
#12 |
|
GEARHEAD
Join Date: Aug 2003
Location: MN
Posts: 6,122
|
Re: Junkyard Jimmy Super Low Buck Build Thread
Had a pretty good day today. Got my work done. Had some fun. Got a few minutes to get the sandblaster out and clean a few parts that will need to be painted soon.
 I have to go out of town for a couple days for work, but I hope to get some more time later in the week or this coming weekend. Need to get that damn sanding done, paint the hood hinges and mount the hood and edge the tailgate stuff so I can mount that. I can see the little night light way off in the distance, but it is there and growing brighter.
__________________
If no one knows what you're doing, they can't tell you you're doing it wrong HG's Dream Car Build - Shelby Cobra Kit Build your own adjustable track bar 71 Long Fleet C/10 72 Jimmy 4x4 (Junkyard Jimmy)HG's Plow Truck '78 K35 DuallyBigass Farm Truck HG's thread of miscellaneous stuff |
|
|
|
|
03-25-2013, 10:11 PM
|
#13 |
|
GEARHEAD
Join Date: Aug 2003
Location: MN
Posts: 6,122
|
Re: Junkyard Jimmy Super Low Buck Build Thread
Double post.
__________________
If no one knows what you're doing, they can't tell you you're doing it wrong HG's Dream Car Build - Shelby Cobra Kit Build your own adjustable track bar 71 Long Fleet C/10 72 Jimmy 4x4 (Junkyard Jimmy)HG's Plow Truck '78 K35 DuallyBigass Farm Truck HG's thread of miscellaneous stuff Last edited by hgs_notes; 04-30-2013 at 09:54 PM. |
|
|
|
|
03-25-2013, 11:30 PM
|
#14 |
|
Registered User
Join Date: Apr 2003
Location: Indep, MO
Posts: 5,893
|
Re: Junkyard Jimmy Super Low Buck Build Thread
Looks great! Keep Rollin!
Posted via Mobile Device
__________________
Boppa's Old Yeller Truck Build, Old Yeller's New Heart! Project Buzz Bomb Flyin' Low! |
|
|
|
|
03-28-2013, 06:58 PM
|
#15 |
|
Registered User
Join Date: Dec 2012
Location: Athens, Tennessee
Posts: 1
|
Re: Junkyard Jimmy Super Low Buck Build Thread
This build has inspired me and my 14 yr old son to start a build for his first ride. We found a decent 65 short step that we are keeping basic stock with rust repair paint tires brakes all done by he and I. Our budget is 3000 and we spent a third of that on the original purchase. Thanks for the inspiration
Posted via Mobile Device |
|
|
|
|
03-28-2013, 08:29 PM
|
#16 | |
|
GEARHEAD
Join Date: Aug 2003
Location: MN
Posts: 6,122
|
Re: Junkyard Jimmy Super Low Buck Build Thread
Quote:
And speaking of my C-10, I finally got it out of storage today. First drive since November. Posted via Mobile Device
__________________
If no one knows what you're doing, they can't tell you you're doing it wrong HG's Dream Car Build - Shelby Cobra Kit Build your own adjustable track bar 71 Long Fleet C/10 72 Jimmy 4x4 (Junkyard Jimmy)HG's Plow Truck '78 K35 DuallyBigass Farm Truck HG's thread of miscellaneous stuff |
|
|
|
|
|
03-28-2013, 07:35 PM
|
#17 |
|
I miss this truck.
Join Date: Dec 2001
Location: Lexington, KY U.S.A.
Posts: 2,863
|
Re: Junkyard Jimmy Super Low Buck Build Thread
Mingram,
Welcome to the board. Nice first post!! When you get a chance, mosey on over to the '65 section and let us see what you're starting with.
__________________
'07 GMC Acadia SLT. Sweet ride. '08 Crew Cab Z-71 short bed. Really like this truck A LOT. |
|
|
|
|
03-29-2013, 08:52 AM
|
#18 |
|
Registered User
Join Date: Nov 2007
Location: NLR, AR
Posts: 1,387
|
Re: Junkyard Jimmy Super Low Buck Build Thread
Nice to see a full shot of that c10, rather then snap shots of it behind the jimmy. Very nice looking. Is that an original color on it?
|
|
|
|
|
03-29-2013, 09:18 AM
|
#19 | |
|
GEARHEAD
Join Date: Aug 2003
Location: MN
Posts: 6,122
|
Re: Junkyard Jimmy Super Low Buck Build Thread
Quote:
__________________
If no one knows what you're doing, they can't tell you you're doing it wrong HG's Dream Car Build - Shelby Cobra Kit Build your own adjustable track bar 71 Long Fleet C/10 72 Jimmy 4x4 (Junkyard Jimmy)HG's Plow Truck '78 K35 DuallyBigass Farm Truck HG's thread of miscellaneous stuff |
|
|
|
|
|
03-29-2013, 10:02 AM
|
#20 |
|
Registered User
Join Date: Nov 2007
Location: NLR, AR
Posts: 1,387
|
Re: Junkyard Jimmy Super Low Buck Build Thread
ha, I never looked at the build thread.

|
|
|
|
|
04-11-2013, 02:15 AM
|
#21 |
|
Registered User
Join Date: Jun 2007
Location: Saskatoon, Saskatchewan,:
Posts: 2,901
|
Re: Junkyard Jimmy Super Low Buck Build Thread
Hey bud, just checking in on ya and your truck< I am so happy that you were able to get your truck out of storage, makes me a little jealous, havoc still has about 4 feet of snow on her
of well, and the jimmy is coming along really good. really like all the subtle mods you have done so far. keep it up and quite eating at arby's, that place will be the death of ya!!!!
__________________
James 1968 GMC "HAVOC" 1986 GMC "Frank" J.J.R.H. Design & Consulting My 68`Rebuild "HAVOC": http://67-72chevytrucks.com/vboard/s...d.php?t=316300 A 58' chev build thread: http://www.67-72chevytrucks.com/vboa...d.php?t=311238 1969 Camaro Pro Touring http://67-72chevytrucks.com/vboard/s...61#post3513361 Swiss Cheese: http://67-72chevytrucks.com/vboard/s...d.php?t=384390 Adjustable Trailing Arm How-To: http://67-72chevytrucks.com/vboard/s...d.php?t=321100 1968 Ford Farm Truck: http://67-72chevytrucks.com/vboard/s...=1#post6555587 |
|
|
|
|
04-11-2013, 06:36 AM
|
#22 |
|
Registered User
Join Date: Apr 2003
Location: Indep, MO
Posts: 5,893
|
Re: Junkyard Jimmy Super Low Buck Build Thread
Mmmm..... Arby's. Hope you're well.
Posted via Mobile Device
__________________
Boppa's Old Yeller Truck Build, Old Yeller's New Heart! Project Buzz Bomb Flyin' Low! |
|
|
|
|
04-30-2013, 10:23 PM
|
#23 | ||
|
GEARHEAD
Join Date: Aug 2003
Location: MN
Posts: 6,122
|
Re: Junkyard Jimmy Super Low Buck Build Thread
Quote:
Quote:
But being a (sorta) single dad, taking care of the house, daily chores, etc., plus my workload has been up lately, has taken its toll on garage time. Today I finally got some progress. I started with some 150 grit 3M paper that is supposed to prevent load up. I just used it on a small flexible block to do the top of the bed rail and around the wheel arches. Then I wet sanded the rest of the driver side with 220 grit. This knocked off the top layer of the primer which I had so much trouble with because it would load up the paper in seconds. Once I cleaned up that mess and it dried off I started to block it out with 180 on my long board. It worked great. No load up problems at all. I did almost the whole bed side with one sheet of paper on the block.  By that time I was tired and had to stop sanding. During the sanding time I would take a rest and was taking care of the hood hinges. I got them sprayed with etching primer...  Then a couple coats of rattle can semi flat black.  I almost forgot to spray the bolts again. Always do that, but I remembered as I was doing the 2nd coat on the hinges. Tragedy avoided...  I only have a few small spots so far that need a little skim coat to smooth it out. A little touch up with the primer here and there and it should be good. Probably another 4 hours or so of sanding and I'll be getting it fired up for the drive over to the body shops paint booth to spray it.
__________________
If no one knows what you're doing, they can't tell you you're doing it wrong HG's Dream Car Build - Shelby Cobra Kit Build your own adjustable track bar 71 Long Fleet C/10 72 Jimmy 4x4 (Junkyard Jimmy)HG's Plow Truck '78 K35 DuallyBigass Farm Truck HG's thread of miscellaneous stuff |
||
|
|
|
|
04-30-2013, 10:43 PM
|
#24 |
|
Registered User
Join Date: Apr 2003
Location: Indep, MO
Posts: 5,893
|
Re: Junkyard Jimmy Super Low Buck Build Thread
Great progress! That G2 levels it all out nice, and you can go from there. Glad to see light at the end of the tunnel.
Sorry about the troubles. I hope it all evens out with a minimum of damage to all involved. It's hard to be the first one to shove, even in a bad situation, but someone's gotta do it. I'm glad you told us, I've been wondering and worrying about ya. Please know we're all here for ya. Hey, spring's a-comin! Get that sucker ready for top-off motoring! (and really, who doesn't enjoy that?)
__________________
Boppa's Old Yeller Truck Build, Old Yeller's New Heart! Project Buzz Bomb Flyin' Low! |
|
|
|
|
05-03-2013, 11:47 PM
|
#25 | |
|
GEARHEAD
Join Date: Aug 2003
Location: MN
Posts: 6,122
|
Re: Junkyard Jimmy Super Low Buck Build Thread
Quote:
Brief update. I got the hood hinges on. Whoop-de-do, I know. But hey, it's something. And I'm still a dummy when it comes to painting the bolts. I remembered to paint enough to mount the hinges to the fenders, but forgot to do the ones for the hood to the hinges.   So after painting 4 more bolts, I decided to take care of a duplicate e-brake cable problem. There was one on the chassis that was hooked up to the brakes. Another on the tub that was hooked to the foot pedal. I figured the one on the chassis was the better option to keep, which meant removing the one from under the dash. That is NOT a fun job. I feel like a straightened out pretzel right now. Stupidest pic in the thread here. Showing a single e-brake cable for all you pic lovers that just can't get enough.  That job isn't quite done. Need to re-adjust it underneath and install the new rubber grommet. The hard part is over though. The hood should go on tomorrow. I'd like to get the cowl edges painted and the tailgate edges and hinge parts also. At that point all of the body parts will be edges and installed. Just more blocking and get it running for the drive over to the body shop for paint. Maybe this month yet. I can dare to dream.
__________________
If no one knows what you're doing, they can't tell you you're doing it wrong HG's Dream Car Build - Shelby Cobra Kit Build your own adjustable track bar 71 Long Fleet C/10 72 Jimmy 4x4 (Junkyard Jimmy)HG's Plow Truck '78 K35 DuallyBigass Farm Truck HG's thread of miscellaneous stuff |
|
|
|
|
 |
| Bookmarks |
|
|


 Hybrid Mode
