
|
|
|
 09-18-2018, 09:29 PM
|
#1 |
|
Registered User
Join Date: Nov 2014
Location: Yuba City, CA.
Posts: 678
|
Re: Wife's 48
Robert
Here are the pictures of the running board mounts you asked for of hussey's.I modified his so that the running boards could easily be removed. I used 1x2 tubing for both the L bracket that mounts to the frame and the runnng board bracket. I did also weld a piece of 1/8 inch plate to one side of the L bracket that mounts to the frame for strength(I'm a bit of a wide body myself). Hussey I believe used two brackets and I used three. I did have to notch the original running board brace so that the forked end could slide over the running board brace. After I had everything fit together I drilled a hole through the forked bracket and tapped the upper fork and installed a bolt from underneath.
__________________
Jan's 53 |

|

|
|
09-19-2018, 05:02 PM
|
#2 |
|
Senior Member
 Join Date: Sep 2017
Location: Bryan, Texas
Posts: 2,309
|
Re: Wife's 48
Thanks Jan, those help.
|
|
|
|
|
09-22-2018, 09:58 AM
|
#3 |
|
Senior Member
Join Date: Sep 2017
Location: Bryan, Texas
Posts: 2,309
|
Re: Wife's 48
Friday was a good day in the shop.
First off, a big thank you to NorCalGal for the hinge plates.  IMG_2063 by Robert Moorman, on Flickr IMG_2063 by Robert Moorman, on FlickrThey are great, thank you. Then I started cutting parts from the really bad 54 cab to use on the better 54 cab. I started by cutting a patch to cover the gas filler hole in the cab. I went to the drivers side and cut the patch.  IMG_2059 by Robert Moorman, on Flickr IMG_2059 by Robert Moorman, on FlickrI put it over the hole and it seems to match the contours. I will cut it to fit once I get the filler hole removed. Then I have some issues on the cowl. The top cutout is to repair a spot where it looks like they put an antenna. Just below that and toward the front I cut a patch to use over the mirror damaged area, sort of like what I left in the picture and then I cut a larger patch that I am thinking about using over the gills on the riders side. Haven't decided on that, whether to remove the gills or not. 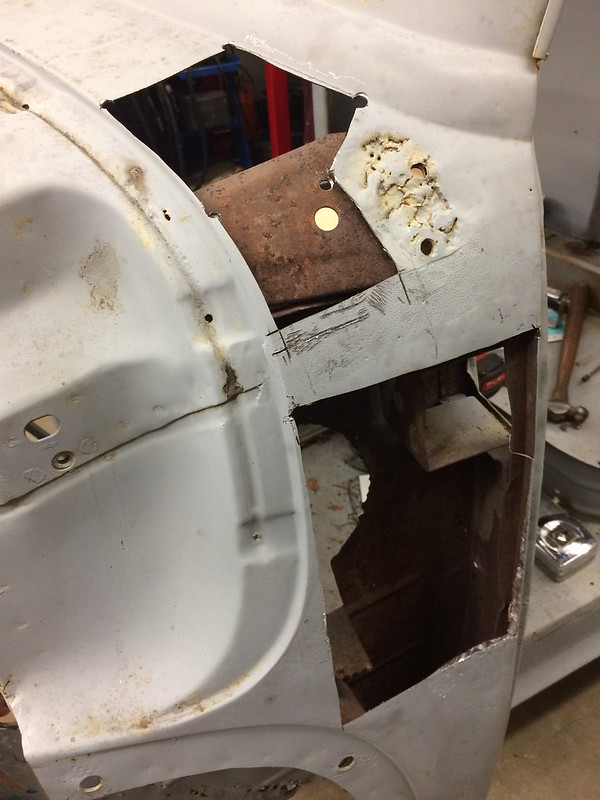 IMG_2060 by Robert Moorman, on Flickr IMG_2060 by Robert Moorman, on FlickrNotice on the bottom of the lower hole, the metal is thicker. I think that is where they leaded an old dent, I don't know, but it is definitely thicker and that corner is heavy. Going out today to start work on the dash. I'll get pictures later, and hopefully some repair work will be included. |
|
|
|
|
09-22-2018, 06:58 PM
|
#4 |
|
Senior Member
Join Date: Sep 2017
Location: Bryan, Texas
Posts: 2,309
|
Re: Wife's 48
Since I had the hinge plates for the door hinges I decided to dissemble them today. It only took about 6 hours, no I'm not that slow, I ran into a little problem. First off, can anyone tell the difference in these two rider's side upper hinge bases?
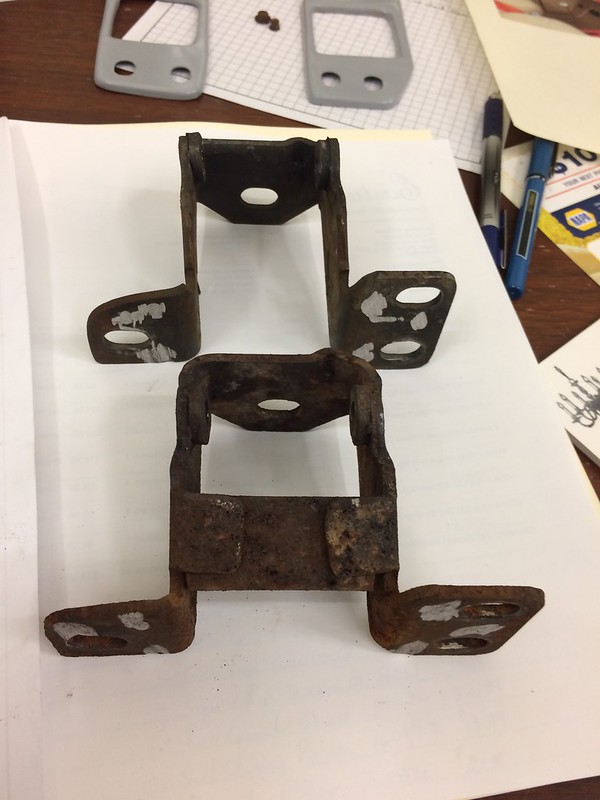 IMG_2064 by Robert Moorman, on Flickr IMG_2064 by Robert Moorman, on FlickrThe top one was from the 54 cab and I had planned on using it. The cross piece was actually cut off. I have no idea why, and I didn't notice until I had completely dissembled it. I was about to panic when I remembered I had another rusty upper rider's side hinge from a really rusty door. So I had to take it apart too. Here are the remnants. 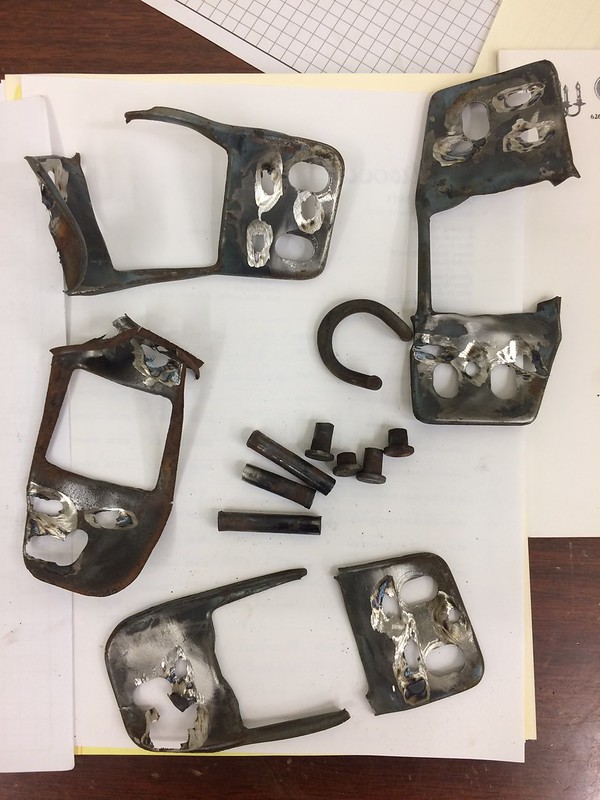 IMG_2065 by Robert Moorman, on Flickr IMG_2065 by Robert Moorman, on FlickrThe rest of the hinge parts are waiting for me to get some rebuild kits, clean them up and reassemble them. |
|
|
|
|
09-22-2018, 11:29 PM
|
#5 |
|
Senior Member
Join Date: Mar 2011
Location: West Plains, Missouri
Posts: 7,557
|
Re: Wife's 48
Robert, nice you have old stuff to cut up for repairs. I filled in the gills on the passenger side, didn't want water getting inside, and I also added air...Jim
__________________
my build thread: http://67-72chevytrucks.com/vboard/s...d.php?t=459839 Jimbo's long bed step build:http://67-72chevytrucks.com/vboard/s...t=464626<br /> |
|
|
|
|
09-23-2018, 10:09 AM
|
#6 |
|
Senior Member
Join Date: Sep 2017
Location: Bryan, Texas
Posts: 2,309
|
Re: Wife's 48
Jim, I would have liked to save that cab, but the truth is every panel has rust throughs. The roof skin not only had a rust through, it looked like the truck had a tree fall on it and they fixed it with bondo. So after a lot of back and forth, I gave up on it.
If anyone needs a piece of skin, let me know and I'll see if there is enough left to make a patch. |
|
|
|
|
10-14-2018, 02:36 PM
|
#7 |
|
Senior Member
Join Date: Sep 2017
Location: Bryan, Texas
Posts: 2,309
|
Re: Wife's 48
Well, I got to work on the 48 today.
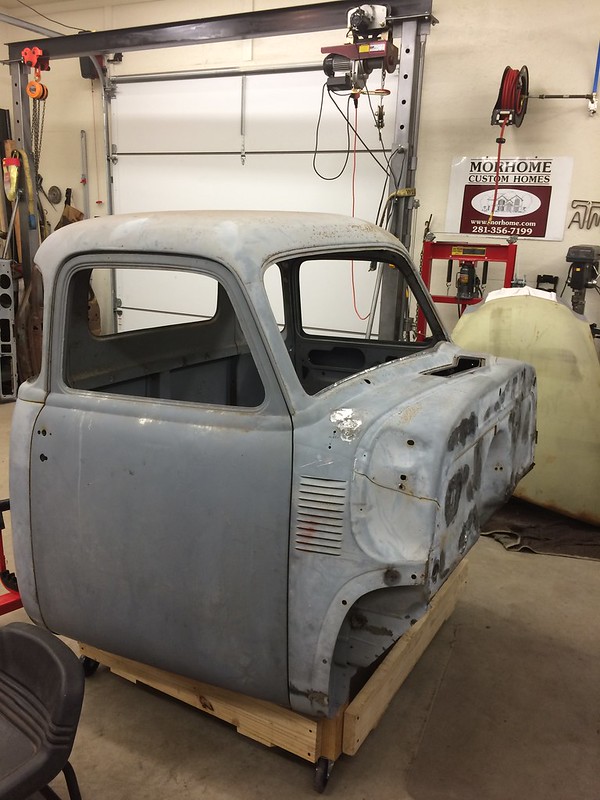 IMG_2081 by Robert Moorman, on Flickr IMG_2081 by Robert Moorman, on Flickr1st time the doors have been on it in at least 6 years. They need some adjustment, but I got them on by myself. It looks like they need to go up some, but they are pretty straight and other than the top gap they look pretty good. Then I started on the dash for the 54. First I cut the ashtray supports off the back. 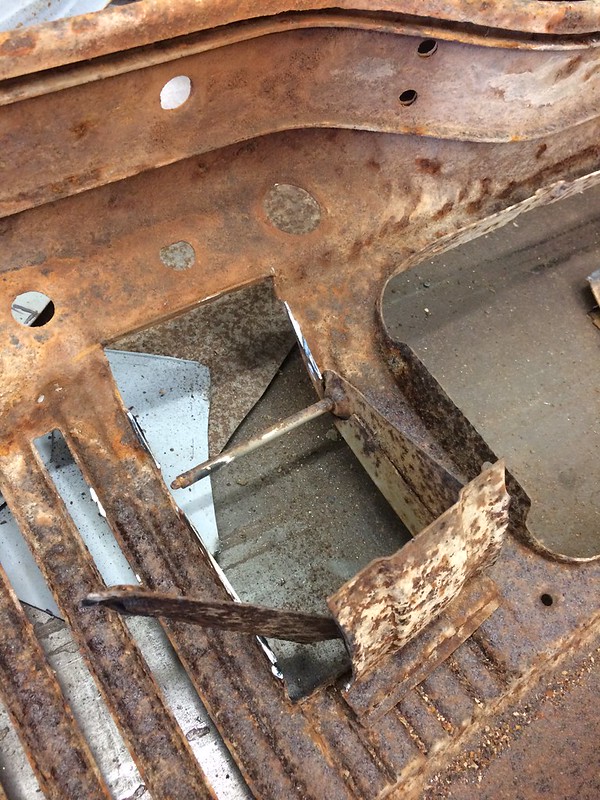 IMG_2078 by Robert Moorman, on Flickr IMG_2078 by Robert Moorman, on FlickrThen I took the front metal off of the ashtray and fit it to the dash to check it. 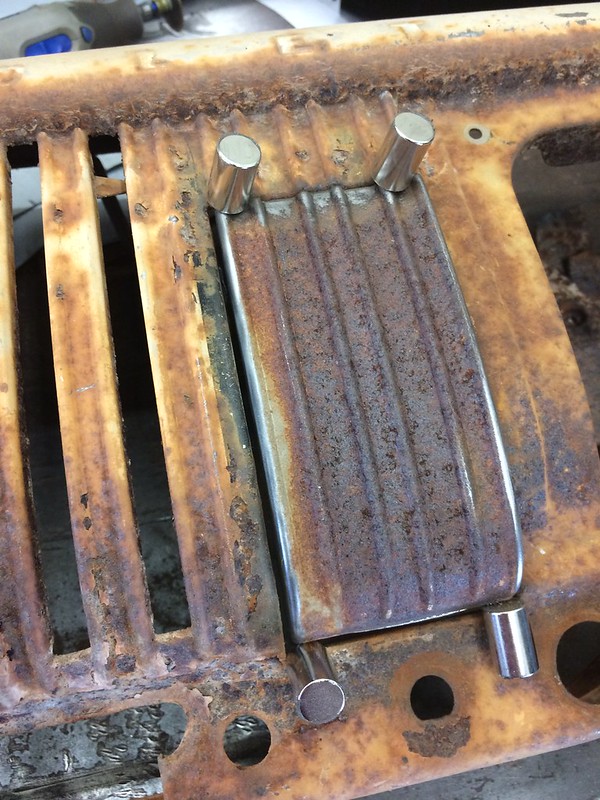 IMG_2079 by Robert Moorman, on Flickr IMG_2079 by Robert Moorman, on FlickrI am going to weld it into the dash and then cut out a hole for an AC vent on both sides of the old speaker location. And finally I got the hinges blasted clean and drilled the holes in the new plates so I can plug weld them on. 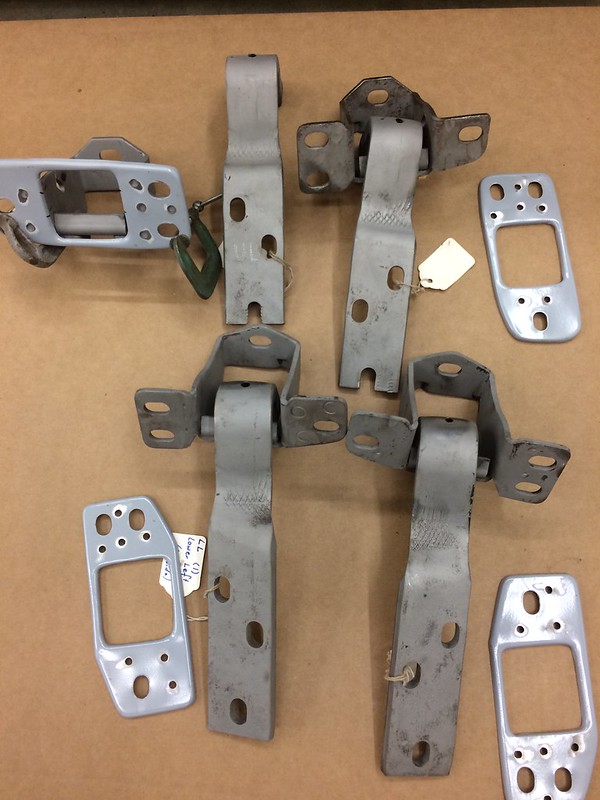 IMG_2080 by Robert Moorman, on Flickr IMG_2080 by Robert Moorman, on FlickrSorry about the holes Jan, but I have to weld them on. Nothing is going to happen for a while due to life, but at least I feel good today.
__________________
8man-aka Robert 1948 on a S10 Frame, small block with a carb 1954 Cab, 53 Front and Bed, 50 Doors, S10 Frame, Power TBD Build thread: "]http://67-72chevytrucks.com/vboard/showthread.php?t=746899&highlight=wife%27s+48[/URL] [/URL]http://67-72chevytrucks.com/vboard/showthread.php?t=840204 |
|
|
|
|
10-22-2018, 02:55 AM
|
#9 |
|
Senior Member
 Join Date: May 2007
Location: Doodah Kansas
Posts: 7,773
|
Re: Wife's 48
looking good, life is what happens in between truck work, so enjoy it!
__________________
the mass of men live lives of quiet desperation if there is a problem, I can have it. new project WAYNE http://67-72chevytrucks.com/vboard/s...d.php?t=844393 |
|
|
|
|
11-02-2018, 05:27 PM
|
#10 |
|
Senior Member
Join Date: Sep 2017
Location: Bryan, Texas
Posts: 2,309
|
Re: Wife's 48
My buddy came over today and we got a good 6 hours in on his truck.
I have to say it goes REALLY slow when it's the first time you do something, at least for me. 6 hours and we got the steering column mounted where he liked it, the brake pedal mounted where he wanted and the Vintage Air mock up unit mounted and the bracket fabbed for the front VA bracket (not in the following pictures). Here is the placement for the Vintage Air unit. 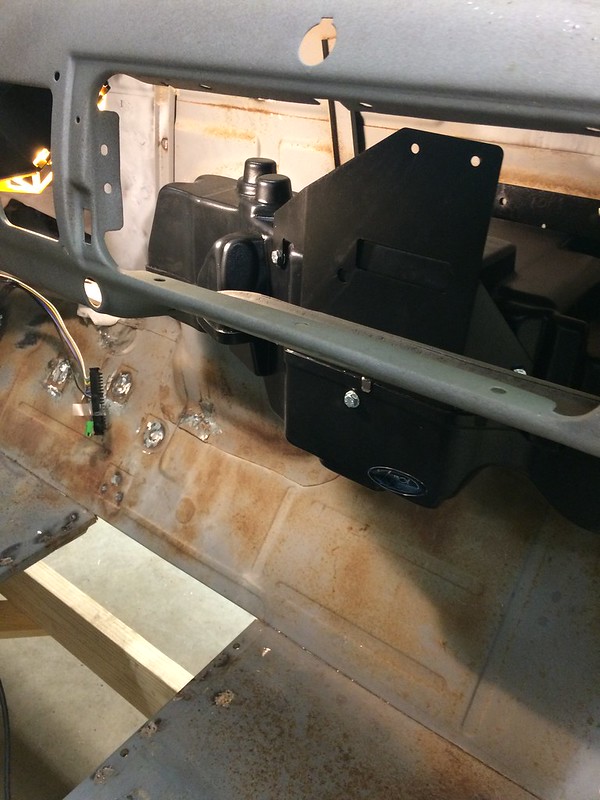 IMG_2086 by Robert Moorman, on Flickr IMG_2086 by Robert Moorman, on FlickrThat was as high as we could get it on the firewall and still be on flat firewall steel. If it's too high or low, please let me know. We know the glove box will be cut down, but other than that we had no reason to think it wouldn't work. Then the steering column was installed.  IMG_2085 by Robert Moorman, on Flickr IMG_2085 by Robert Moorman, on FlickrAnd a shot of the brake pedal assembly from the top. 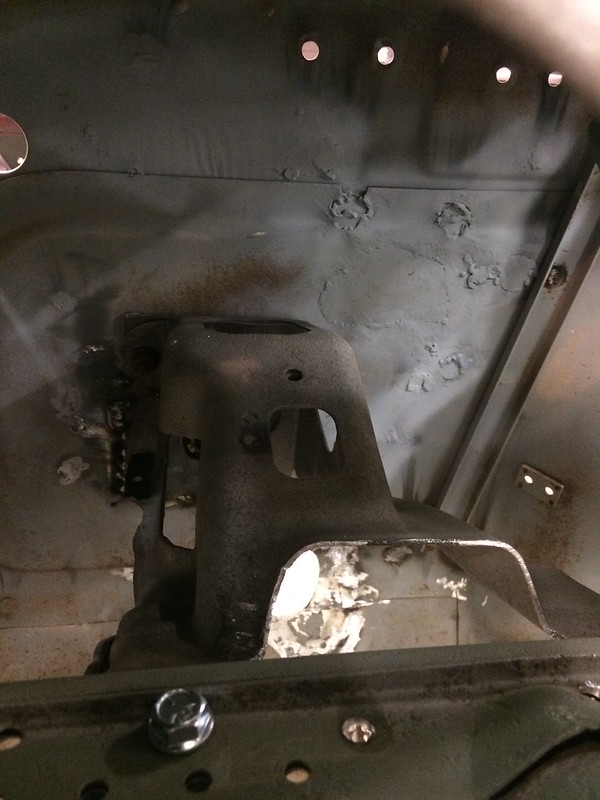 IMG_2083 by Robert Moorman, on Flickr IMG_2083 by Robert Moorman, on FlickrWe bolted the booster on to see how it fit, and it doesn't bolt all the way up against the firewall. He cut the hole small 2 1/2" so the large tube around the brake shaft fits up against the hole and doesn't slide through the hole. 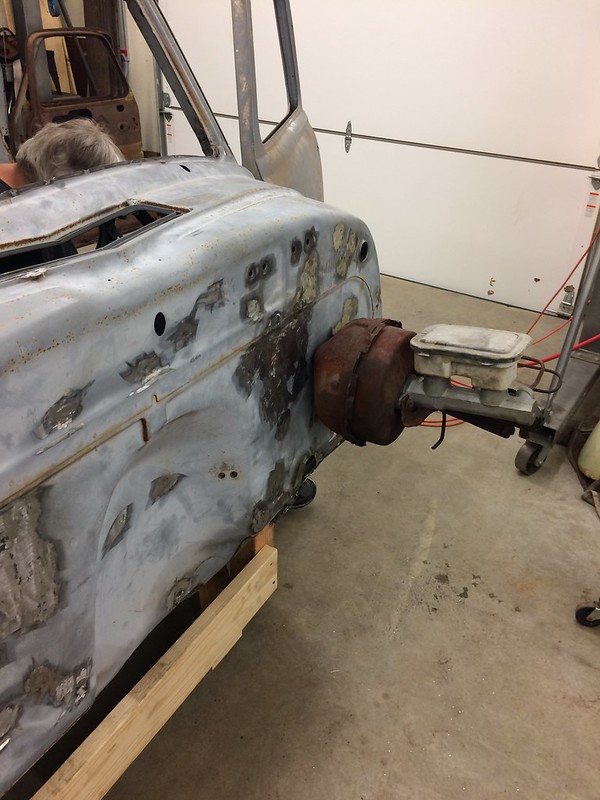 IMG_2082 by Robert Moorman, on Flickr IMG_2082 by Robert Moorman, on FlickrI really thought it should have been made larger so the master cylinder sleeve would go through the firewall. As it is there is about 1/2" of threads showing on the master cylinder. Is that right? This one shows the location of the steering wheel (NOT the actual steering wheel, just the only one I had in the junk pile to put on the column to see how it sits). 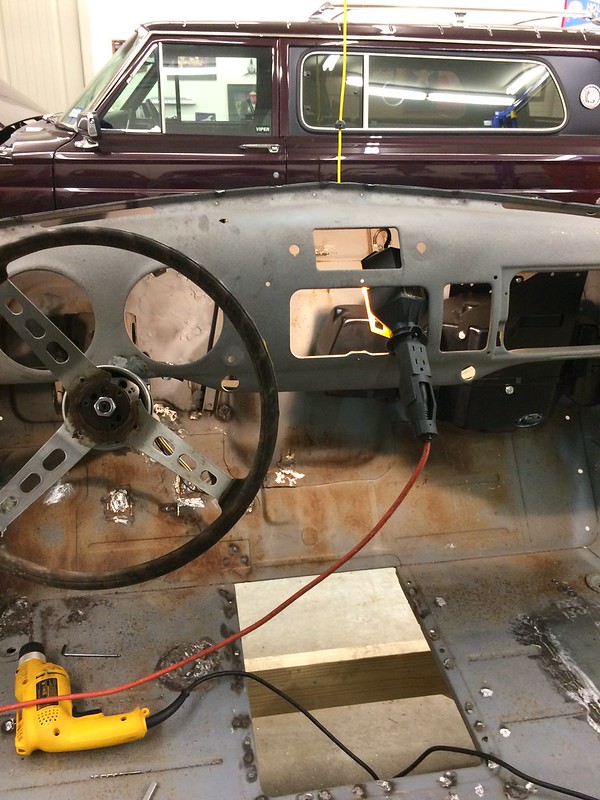 IMG_2087 by Robert Moorman, on Flickr IMG_2087 by Robert Moorman, on FlickrHe took the fenders home to start blasting and priming, so I did get some stuff out of the shop. Now to get that frame and cab to his house and start on my truck! Not this month though...
__________________
8man-aka Robert 1948 on a S10 Frame, small block with a carb 1954 Cab, 53 Front and Bed, 50 Doors, S10 Frame, Power TBD Build thread: "]http://67-72chevytrucks.com/vboard/showthread.php?t=746899&highlight=wife%27s+48[/URL] [/URL]http://67-72chevytrucks.com/vboard/showthread.php?t=840204 |
|
|
|
|
11-10-2018, 12:33 AM
|
#11 |
|
Senior Member
Join Date: May 2007
Location: Doodah Kansas
Posts: 7,773
|
Re: Wife's 48
nice work, its fun working when things go your way, makes it hard to stop.
you may find the firewall is a little flexy when you get a pedal on there. there is a factory firewall to dash brace I dont see in yours. if you do have more flex than you want you might throw the brace in and triangulate to it.
__________________
the mass of men live lives of quiet desperation if there is a problem, I can have it. new project WAYNE http://67-72chevytrucks.com/vboard/s...d.php?t=844393 |
|
|
|
|
11-10-2018, 09:20 AM
|
#12 |
|
Senior Member
Join Date: Sep 2017
Location: Bryan, Texas
Posts: 2,309
|
Re: Wife's 48
Thanks Joe. I hadn't even thought about that. It does flex. I did put in a plate like suggested in Skymangs S10, but forgot about the braces.
__________________
8man-aka Robert 1948 on a S10 Frame, small block with a carb 1954 Cab, 53 Front and Bed, 50 Doors, S10 Frame, Power TBD Build thread: "]http://67-72chevytrucks.com/vboard/showthread.php?t=746899&highlight=wife%27s+48[/URL] [/URL]http://67-72chevytrucks.com/vboard/showthread.php?t=840204 |
|
|
|
|
11-14-2018, 02:57 PM
|
#13 |
|
Registered User
Join Date: Oct 2014
Location: Kitchener, Ontario, Canada
Posts: 3,254
|
Re: Wife's 48
Dash brace is the way to go nice and solid.
__________________
http://67-72chevytrucks.com/vboard/s...d.php?t=648459 https://67-72chevytrucks.com/vboard/...d.php?t=769441 1951 MG TD 1967 Jeep CJ5 1.9L TDI 33X13.5X15 Mud Grapplers. 1952 GMC 9700 p/u 7.3L diesel on air, dually |
|
|
|
|
11-16-2018, 02:09 AM
|
#14 |
|
Senior Member
Join Date: May 2007
Location: Doodah Kansas
Posts: 7,773
|
Re: Wife's 48
here is an article on installing a hanging pedal and the pictures have good angles of the brace.
https://www.hotrod.com/articles/1947...chevy-pickups/ if thats not enough I can take some pictures of mine
__________________
the mass of men live lives of quiet desperation if there is a problem, I can have it. new project WAYNE http://67-72chevytrucks.com/vboard/s...d.php?t=844393 |
|
|
|
|
11-16-2018, 10:58 AM
|
#15 |
|
Senior Member
Join Date: Sep 2017
Location: Bryan, Texas
Posts: 2,309
|
Re: Wife's 48
Thanks Joe! That helped a lot.
I do have ONE (1) of the flat braces that goes from the dash to the firewall. That's enough to do one of the trucks. Now to find that brace for the other truck...
__________________
8man-aka Robert 1948 on a S10 Frame, small block with a carb 1954 Cab, 53 Front and Bed, 50 Doors, S10 Frame, Power TBD Build thread: "]http://67-72chevytrucks.com/vboard/showthread.php?t=746899&highlight=wife%27s+48[/URL] [/URL]http://67-72chevytrucks.com/vboard/showthread.php?t=840204 |
|
|
|
|
11-27-2018, 08:00 PM
|
#16 |
|
Senior Member
Join Date: Sep 2017
Location: Bryan, Texas
Posts: 2,309
|
Re: Wife's 48
Got some time in the shop today with my buddy. Since he is taking the 48, he did some of the work, and I got some pics of him actually working. We got the bed torn down and drilled out the side angles, getting it ready for blasting and prime.
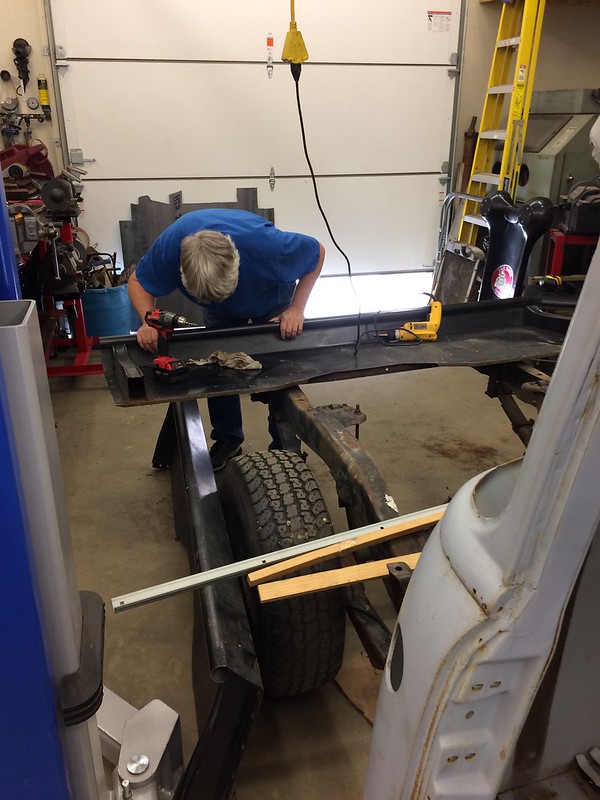 IMG_2097 by Robert Moorman, on Flickr IMG_2097 by Robert Moorman, on FlickrWe drilled out the spot welds, and then used a seam buster to get them off. They had rusted on. The sides were straightened and the new angles were test fit to the sides. The rear cross brace was welded to the bed sides. That complicated taking it all apart. Question: Is it recommended to weld the sides to the rear cross brace? Or just use the bolts? My plan is to prime the angles and bed sides and then plug weld the angles to the side. I will clean off the primer where the plug welds will be and then touch up the primer. Then we finally took the time to tack the body mounts in place. I am using the frame to store the cab I'm cutting up for pieces that I need on my wife's 54. 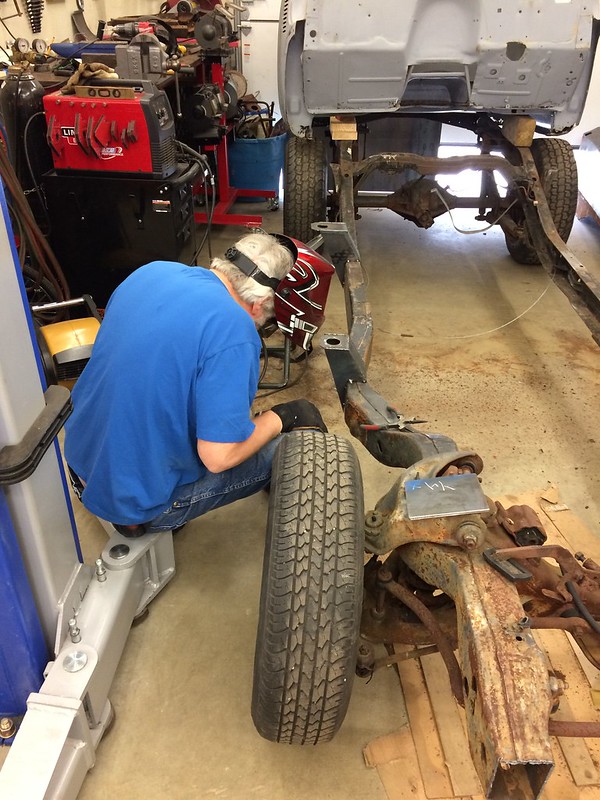 IMG_2098 by Robert Moorman, on Flickr IMG_2098 by Robert Moorman, on FlickrSince this is my first truck build, we measured and re-measured several times before we tacked them in place. When we set the mounts on the frame, one looked taller than it's opposite, so we got a 4' level, and sure enough, the mounts are the same, the frame isn't level. We have not rebuilt the front end and then we measured the tires, and the difference was in the junk tires. It'll level out with the correct tires. 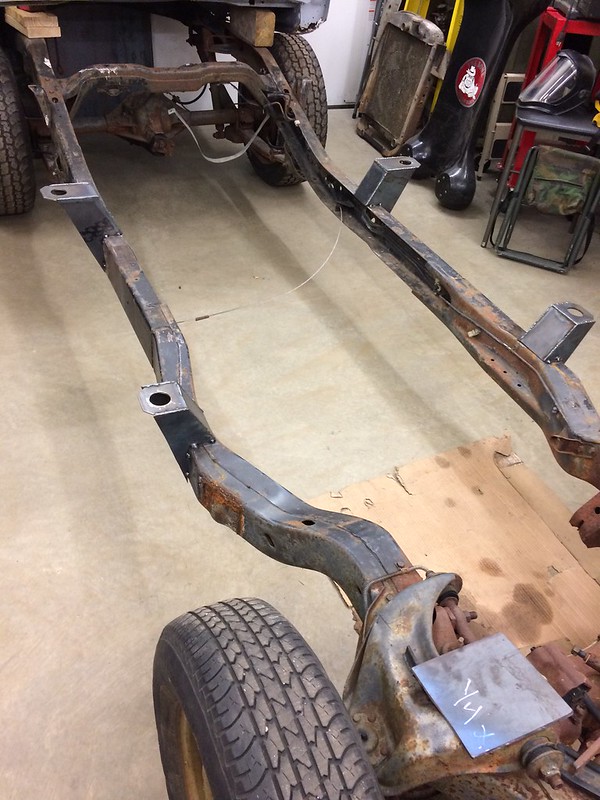 IMG_2099 by Robert Moorman, on Flickr IMG_2099 by Robert Moorman, on FlickrOk, another question. As I understand it, we should NOW rebuild the front end. Once the front end has been rebuilt, we can test fit the cab on the mounts that have been tacked in place. Once the cab is sitting on the frame, we then get the motor and tranny put in place to make sure everything is working together. Once it is in, we put the front back on and then can start on the radiator bracket and the front bumper mounting system. At that point we dissemble the whole thing and start cleaning and priming, or did I miss another step? I know, I'm using Skymangs work as a bible, just measuring twice...
__________________
8man-aka Robert 1948 on a S10 Frame, small block with a carb 1954 Cab, 53 Front and Bed, 50 Doors, S10 Frame, Power TBD Build thread: "]http://67-72chevytrucks.com/vboard/showthread.php?t=746899&highlight=wife%27s+48[/URL] [/URL]http://67-72chevytrucks.com/vboard/showthread.php?t=840204 |
|
|
|
|
11-27-2018, 08:10 PM
|
#17 |
|
Registered User
Join Date: Dec 2000
Location: Boise, Idaho
Posts: 6,003
|
Re: Wife's 48
I am so torn on whether to replace the bed sides or strip and blast and re-do all the work I did 38 years ago, or just fake it and lean them up and prime over the work I did 38 years ago. A complete new bed is about a grand, that is a lot of my life for a grand.
Brian
__________________
1948 Chevy pickup Chopped, Sectioned, 1953 Corvette 235 powered. Once was even 401 Buick mid engined with the carburetor right between the seats! Bought with paper route money in 1973 when I was 15. "Fan of most anything that moves human beings" |
|
|
|
|
12-08-2018, 10:27 AM
|
#18 |
|
Senior Member
Join Date: Sep 2017
Location: Bryan, Texas
Posts: 2,309
|
Re: Wife's 48
I am repairing the bedsides for the 48, but I got a complete new bed from Mar-K for the 54, although the bed is for the earlier model, Laura didn't want the good 54 bed I already have.
Daughter and family came in for the weekend, but I got a little time in the shop before they arrived Friday. 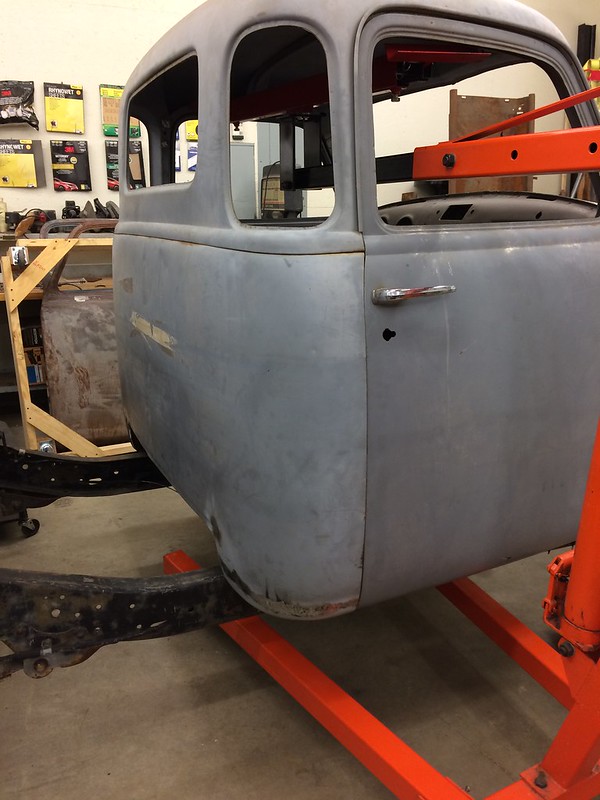 IMG_2103 by Robert Moorman, on Flickr IMG_2103 by Robert Moorman, on FlickrI got the 48 sitting on the cab mounts I made. The clearance from the cab to the frame is the same on both sides. I have a question: with the S10 body mounts on Skymangs version 2 cab mounts for the 48, what is the distance from the front cab floor pan to the frame and from the rear floor pan to the frame? I backed off to look at it and the drivers side front tire is smaller than the riders side, so the cab was listing. So I jacked the frame up to the same distance from the floor as the riders side and it looks pretty good. 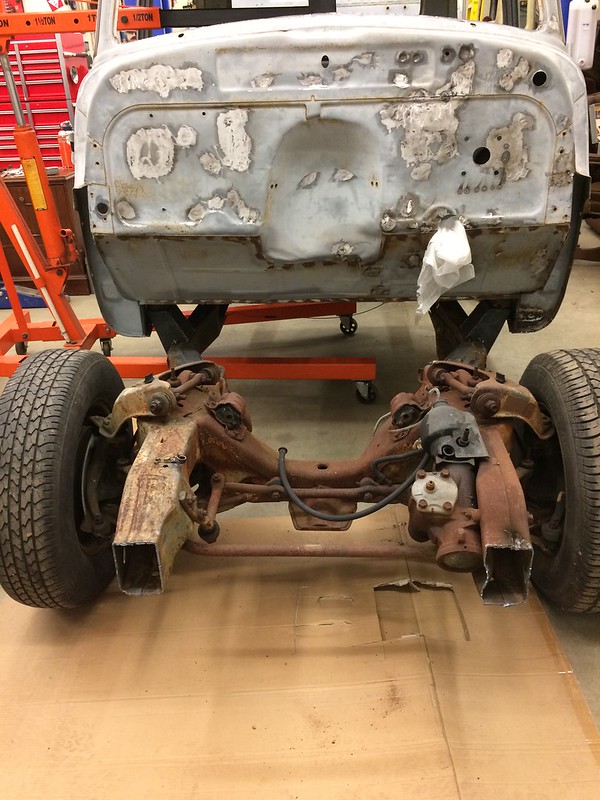 IMG_2104 by Robert Moorman, on Flickr IMG_2104 by Robert Moorman, on FlickrI had drilled some holes in the cab for the Juliano's 3 point seat belts. Wouldn't you know, two of the holes come down exactly on top of the side of a body mount. The next time I get some shop time I'll see if I can move the seat belt mounting hole or if I have to modify the cab mount. I'm hoping for the first one. I swear, one of these days I'm going to start work on the 54, just as soon as I can get the 48 out of the shop. I think I'm going to have to retire from my real job to make it happen, but I think I'll be a lot happier in the shop.
__________________
8man-aka Robert 1948 on a S10 Frame, small block with a carb 1954 Cab, 53 Front and Bed, 50 Doors, S10 Frame, Power TBD Build thread: "]http://67-72chevytrucks.com/vboard/showthread.php?t=746899&highlight=wife%27s+48[/URL] [/URL]http://67-72chevytrucks.com/vboard/showthread.php?t=840204 |
|
|
|
|
12-18-2018, 07:04 PM
|
#19 |
|
Registered User
Join Date: Aug 2012
Location: Northeast KS
Posts: 1,777
|
Re: Wife's 48
That is the first drum brake ZR2 I have seen.
__________________
1999 GMC Suburban K2500 SLT, 454/4L80E 1991 Z/28, 6.0L/T56 1949 GMC 250, S10 Frame, 6.0L/4L80E Instagram @aceshighspeedshop |
|
|
|
|
12-18-2018, 08:25 PM
|
#20 |
|
Senior Member
Join Date: Sep 2017
Location: Bryan, Texas
Posts: 2,309
|
Re: Wife's 48
Outlaw, I was a little surprised by the brakes too. It was still in the 98 ZR truck, and the guy checked the VIN for me to make sure. I almost didn't buy it because it wasn't disc brake. But since this will be a cruiser, not a race truck or a daily driver, I figured the disc/drum combo has worked great for years, and besides, I wanted that little extra that axle brings with it.
__________________
8man-aka Robert 1948 on a S10 Frame, small block with a carb 1954 Cab, 53 Front and Bed, 50 Doors, S10 Frame, Power TBD Build thread: "]http://67-72chevytrucks.com/vboard/showthread.php?t=746899&highlight=wife%27s+48[/URL] [/URL]http://67-72chevytrucks.com/vboard/showthread.php?t=840204 |
|
|
|
|
12-19-2018, 01:00 AM
|
#21 |
|
Senior Member
Join Date: May 2007
Location: Doodah Kansas
Posts: 7,773
|
Re: Wife's 48
disc brakes on the rear are a marketing item. they have almost no practical advantage on a daily driver. they look nice on wheels with big windows though.
looks like a nice unit! I agree you probably wont need the panhard
__________________
the mass of men live lives of quiet desperation if there is a problem, I can have it. new project WAYNE http://67-72chevytrucks.com/vboard/s...d.php?t=844393 |
|
|
|
|
12-19-2018, 09:03 PM
|
#22 |
|
Registered User
Join Date: Oct 2014
Location: Kitchener, Ontario, Canada
Posts: 3,254
|
Re: Wife's 48
Wouldn't we all be happier to be in our shops full time? That axle should work great.
__________________
http://67-72chevytrucks.com/vboard/s...d.php?t=648459 https://67-72chevytrucks.com/vboard/...d.php?t=769441 1951 MG TD 1967 Jeep CJ5 1.9L TDI 33X13.5X15 Mud Grapplers. 1952 GMC 9700 p/u 7.3L diesel on air, dually |
|
|
|
|
12-20-2018, 11:49 AM
|
#23 |
|
Senior Member
Join Date: Sep 2017
Location: Bryan, Texas
Posts: 2,309
|
Re: Wife's 48
Thanks guys, and Lower50's, you are so right!
__________________
8man-aka Robert 1948 on a S10 Frame, small block with a carb 1954 Cab, 53 Front and Bed, 50 Doors, S10 Frame, Power TBD Build thread: "]http://67-72chevytrucks.com/vboard/showthread.php?t=746899&highlight=wife%27s+48[/URL] [/URL]http://67-72chevytrucks.com/vboard/showthread.php?t=840204 |
|
|
|
|
12-22-2018, 02:05 PM
|
#24 |
|
Senior Member
Join Date: Sep 2017
Location: Bryan, Texas
Posts: 2,309
|
Re: Wife's 48
The 48 is sitting on the frame, waiting on bushings for the cab so my buddy and I can go to the next step. So I started working on the 54 cab. Since there isn't enough room in the shop for the 48 sitting on it's frame, the 54 cab and the S10 to be dissembled for the 54, I started working on the 54 cab. I thought I'd get the cab as ready as possible for the frame while my buddy gets his priorities worked out.
When I bought the 54 I knew there was some bondo on the drivers side in front of the door. 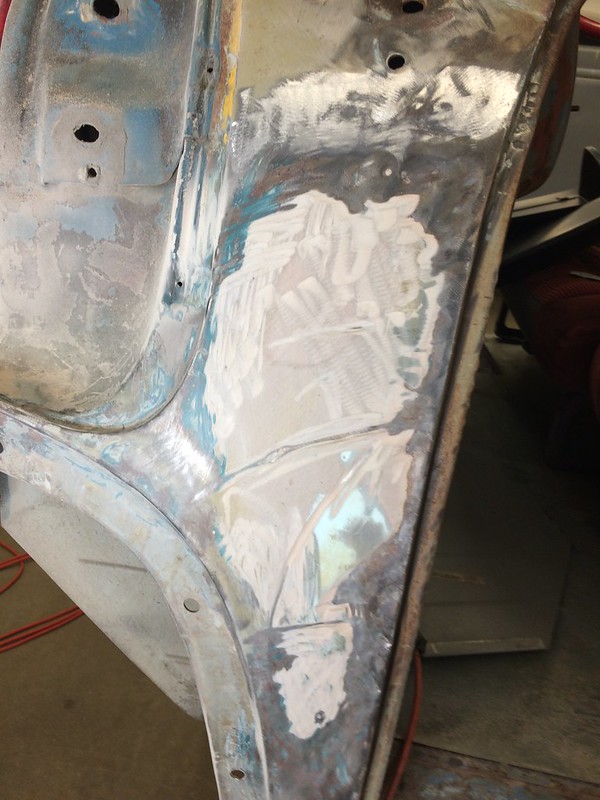 IMG_2110 by Robert Moorman, on Flickr IMG_2110 by Robert Moorman, on FlickrIt is at least 3/8" thick in places. I took a wire wheel to it to see what I had and got fed up. I'm replacing it. Then I cut the first patch. 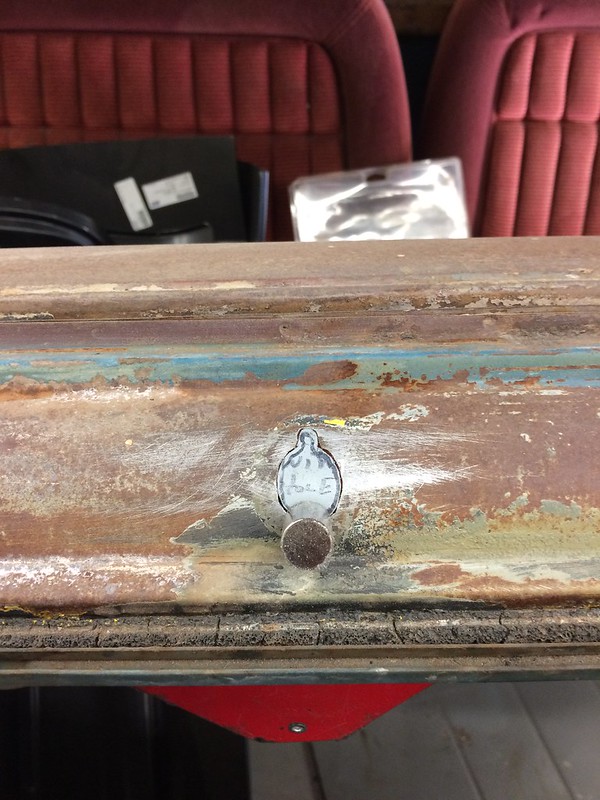 IMG_2111 by Robert Moorman, on Flickr IMG_2111 by Robert Moorman, on FlickrYes, that's a 3rd windshield wiper hole. The PO built some wiper contraption that used that hole. The riders side was just bondo'd up. Funny story, I took the time to clean the shop before I started on the 54 cab. Now, after the wire wheel on the bondo, it's not too clean any more! That pink dust is everywhere.
__________________
8man-aka Robert 1948 on a S10 Frame, small block with a carb 1954 Cab, 53 Front and Bed, 50 Doors, S10 Frame, Power TBD Build thread: "]http://67-72chevytrucks.com/vboard/showthread.php?t=746899&highlight=wife%27s+48[/URL] [/URL]http://67-72chevytrucks.com/vboard/showthread.php?t=840204 |
|
|
|
|
12-23-2018, 03:12 AM
|
#25 |
|
Senior Member
Join Date: May 2007
Location: Doodah Kansas
Posts: 7,773
|
Re: Wife's 48
ugh. props to the guys who like filler and sanding dust. not for me, ever. two strokes and bodywork, I dont want to work on either haha.
good job keeping busy though!
__________________
the mass of men live lives of quiet desperation if there is a problem, I can have it. new project WAYNE http://67-72chevytrucks.com/vboard/s...d.php?t=844393 |
|
|
|
 |
| Bookmarks |
|
|


 Dang you Robert, LOL. Naw, you gotta do what you gotta do.


 Hybrid Mode
