
|
|
|
 08-28-2015, 09:33 PM
|
#1 |
|
Registered User
Join Date: Jul 2015
Location: Shreveport, LA
Posts: 209
|
Re: "Albert" -- 1949 AD, S10 Chassis
Interesting solution on the transmission cross member. I like it! I used one of the Transdapt universal cross members on mine, and the Energy Suspension transmission mount as well. I think that the urethane bushings and mounts are the way to go.
What drafting program are you using? Is that something you do for a living? |

|

|
|
08-28-2015, 10:07 PM
|
#2 | |
|
Registered User
Join Date: May 2013
Location: Kansas City
Posts: 572
|
Re: "Albert" -- 1949 AD, S10 Chassis
Quote:
What do you use? I saw your 3D drawings of the latches in your post. I've never used urethane mounts in anything else before, guessing they're just more firm and hold up better? Last edited by HUSSEY; 08-28-2015 at 10:13 PM. |
|
|
|
|
|
08-30-2015, 09:43 AM
|
#3 |
|
Registered User
Join Date: Jul 2015
Location: Shreveport, LA
Posts: 209
|
Re: "Albert" -- 1949 AD, S10 Chassis
Great to hear that your in Engineering! The attention to detail shows in your truck! Mechanical?
I'm an Engineering supervisor in a pump manufacturing facility. I work with our Hydraulic Engineer designing single and multistage centrifugal pumps. I use Solidworks for the 3D modeling and drafting. |
|
|
|
|
08-30-2015, 10:49 PM
|
#4 | |
|
Registered User
Join Date: May 2013
Location: Kansas City
Posts: 572
|
Re: "Albert" -- 1949 AD, S10 Chassis
Quote:
|
|
|
|
|
|
09-11-2015, 02:51 PM
|
#5 |
|
Registered User
Join Date: May 2013
Location: Kansas City
Posts: 572
|
Re: "Albert" -- 1949 AD, S10 Chassis
Ive started working on my front core support mounts. I did some final trimming on the inner fender wells. It was a little tedious, fit, trim, fit, trim, a little at a time. I was trying to keep the gaps and fit as tight and consistent as possible.
   
|
|
|
|
|
09-11-2015, 02:55 PM
|
#6 |
|
Registered User
Join Date: May 2013
Location: Kansas City
Posts: 572
|
Re: "Albert" -- 1949 AD, S10 Chassis
I’d seen this method of attaching the core support in many other builds and I thought it worked out really well. I welded an 11 GA 2x1 in. rectangular tube between the front frame ends. Also, I attached two 11 GA 2x1 in. risers with supports attached to the top of the risers made out of 1/8 in. 2x2 in. angle.
On the bottom of the core support I welded a 3/16 in. 3x2 in. piece of angle with the 3 in. side on the horizontal. The bottom of the core support rests on the feet of the risers. To insulate it I used a couple large diameter rubber washers I found at the hardware store. The radiator is from summit, P/N SUM-381324 and the fan is a Spal, P/N IX-30100400. The Spal fan was about the thinnest I could find at ~2.0 in. I like how well the radiator ended up fitting in the core support; it almost has a factory look. If I had gone any lower with my body mounts the radiator would not have been able to be tucked into the core support the way it is, I would have had to further trim the top of the core support. Some pictures are probably more descriptive… Below, I trimmed down the channels to fit my 22 in. wide radiator. The bottom of the core support was cut to fit my radiator height, this also allowed for clearance with the steering gear box. There was also a little trimming to clear the radiator cap.  Below shows the 3/16 in. 3x2 in. angle welded in with the 3 in. side on the horizontal.     I installed some weather stripping foam from the hardware store to cushion the radiator. I also split some small vacuum line and put it on the bottom of the radiator and core support sides. The radiator simply sits down onto the lower 3x2 in. angle, I attached a piece of aluminum angle to keep it from sliding out. At the top, I used some small bolts and lock nuts to gently snug it up to the foam weather stripping.     For slitting the hose I found it was easiest to tape it to the bench.            
Last edited by HUSSEY; 09-11-2015 at 05:18 PM. |
|
|
|
|
09-05-2020, 04:56 PM
|
#7 |
|
Registered User
Join Date: Aug 2008
Location: atlanta GA
Posts: 73
|
Re: "Albert" -- 1949 AD, S10 Chassis
Hey,
Quick question about your core support . . . . mine is shifted to left with a quick mock up with the fenders and the hood In this pic you looks slightly left ( towards pass side ), is this correct ? Or am i going crazy ha ! Thanks man !!!
|
|
|
|
|
09-06-2020, 01:56 PM
|
#8 | |
|
Senior Member
 Join Date: Sep 2016
Location: Hershey, PA
Posts: 1,004
|
Re: "Albert" -- 1949 AD, S10 Chassis
Quote:
__________________
Current Build Thread 1930 Ford Model A Modern Twist: Ford Model A Rat Rod With a Modern Twist Build Thread Phase 1 "The Swap": 1949 3100 with S10 swap. Beginner build with ambition! Build Thread Phase 2 "The Drop": Beginner Build with Ambition gets Air Ride |
|
|
|
|
|
09-06-2020, 02:27 PM
|
#9 | |
|
Registered User
Join Date: Aug 2008
Location: atlanta GA
Posts: 73
|
Re: "Albert" -- 1949 AD, S10 Chassis
Quote:
From the outside of the frame rails to the center of the radiator / Core support im pretty centered, . . . but looking straight on at the radiator it doesn't look centered because the frame rails are not the same with per side ( so it looks like off to one side ) Does that make sense ? I will throw a Tram gauge on it once it have it a bit more squared up I've added a ****ty drawing 
|
|
|
|
|
|
09-06-2020, 02:38 PM
|
#10 |
|
Registered User
Join Date: Aug 2008
Location: atlanta GA
Posts: 73
|
Re: "Albert" -- 1949 AD, S10 Chassis
Ok, . . i see now
I didn't realize those rails are shaped so diiferent in their width/shape ( 1-1/4' difference ) |
|
|
|
|
09-11-2015, 03:38 PM
|
#11 |
|
Senior Member
Join Date: Mar 2011
Location: West Plains, Missouri
Posts: 7,557
|
Re: "Albert" -- 1949 AD, S10 Chassis
Nice job...Jim
__________________
my build thread: http://67-72chevytrucks.com/vboard/s...d.php?t=459839 Jimbo's long bed step build:http://67-72chevytrucks.com/vboard/s...t=464626<br /> |
|
|
|
|
09-11-2015, 04:52 PM
|
#12 |
|
Registered User
Join Date: Aug 2012
Location: West Side of the valley, CA
Posts: 878
|
Re: "Albert" -- 1949 AD, S10 Chassis
looking really good!
|
|
|
|
|
09-12-2015, 12:20 PM
|
#13 |
|
Registered User
Join Date: Jul 2014
Location: Dallas, TX
Posts: 155
|
Re: "Albert" -- 1949 AD, S10 Chassis
Hussey,
I will be using the same type engine and accessory/belt set up as you, so the radiator info is perfect. Question - How far off the ground is it at the rear of the front fender? This will help me gauge how it will sit based on your cab mount height. It is hard to tell in the pic because the truck is on ramps. JRD |
|
|
|
|
09-12-2015, 02:40 PM
|
#14 | |
|
Registered User
Join Date: May 2013
Location: Kansas City
Posts: 572
|
Re: "Albert" -- 1949 AD, S10 Chassis
Quote:
I haven't had it off the ramps yet so I don't know on height from the fender to the ground. I'll take a tape measure to it and subtract out the height of the ramps when I'm out in the garage later today. But, for setting the height of the cab, I'd use the 4.25 in. as the reference. One thing I do know is that I'd like to get it a little lower. I'll probably go with some 2 in. drop coil springs. Good luck with your build! |
|
|
|
|
|
09-12-2015, 09:39 PM
|
#15 | |
|
Registered User
Join Date: May 2013
Location: Kansas City
Posts: 572
|
Re: "Albert" -- 1949 AD, S10 Chassis
Quote:
*****EDIT***** After getting most of the swap fabrication done and the truck sitting on the ground with the wheel/tire combination I'm using (245-45R18), the front bumper is riding at 5-1/2 in. off the ground. Having driven it around a bit, I don't think I would want to go any lower on a static stance. ************** Last edited by HUSSEY; 01-11-2017 at 10:24 PM. |
|
|
|
|
|
09-12-2015, 06:26 PM
|
#16 |
|
Senior Member
 Join Date: May 2007
Location: Doodah Kansas
Posts: 7,773
|
Re: "Albert" -- 1949 AD, S10 Chassis
looks amazing! we used a similar mount on the core support of my 47, it is very strong mounted that way.
__________________
the mass of men live lives of quiet desperation if there is a problem, I can have it. new project WAYNE http://67-72chevytrucks.com/vboard/s...d.php?t=844393 |
|
|
|
|
09-12-2015, 09:49 PM
|
#17 | |
|
Registered User
Join Date: May 2013
Location: Kansas City
Posts: 572
|
Re: "Albert" -- 1949 AD, S10 Chassis
Quote:
|
|
|
|
|
|
09-12-2015, 11:51 PM
|
#18 |
|
Registered User
Join Date: Jul 2015
Location: Shreveport, LA
Posts: 209
|
Re: "Albert" -- 1949 AD, S10 Chassis
Looks like you've been busy. The truck is looking great!
|
|
|
|
|
09-13-2015, 08:05 PM
|
#19 |
|
Registered User
Join Date: Jul 2007
Location: Lufkin Texas
Posts: 213
|
Re: "Albert" -- 1949 AD, S10 Chassis
Just wondering if you got around to doing your front brake lines on the brake caliper conversion and if so what did you do to make it work
|
|
|
|
|
09-14-2015, 04:19 PM
|
#20 | |
|
Registered User
Join Date: May 2013
Location: Kansas City
Posts: 572
|
Re: "Albert" -- 1949 AD, S10 Chassis
Quote:
|
|
|
|
|
|
10-01-2015, 01:54 PM
|
#21 |
|
Registered User
Join Date: May 2013
Location: Kansas City
Posts: 572
|
Re: "Albert" -- 1949 AD, S10 Chassis
I got the radiator all plumed up, upper and lower hoses, and the transmission cooler lines. My first attempt at the radiator hoses was bending a coat hanger to the shape I wanted then picking out a handful of hoses at the parts store, I finally gave up on that approach not being able to find one that would fit and went with a flexible hose. The upper house is a Gates Vulco-Flex II, 20 in. long. The lower is a 19 in. Gates green strip Vulco-Flex, 19 in. long. I like the Vulco-Flex II better, it has a coil spring inside it and is easier to bend, but some reason, Gates doesnt make them with 1-3/4 in. outlets on each end of the hose. I also installed a thermostat housing that has a swivel head to provide a better fit of the upper radiator hose.
The transmission cooler lines were plumbed with 90 degree brass fittings I found at the hardware store. I pulled hard transmission cooler lines off a 90s Chevy 1/2-ton which are plumbed to the transmission. I cut and bubble flared the hard lines just below the radiator. Rubber transmission lines link up the radiator to the hard lines.  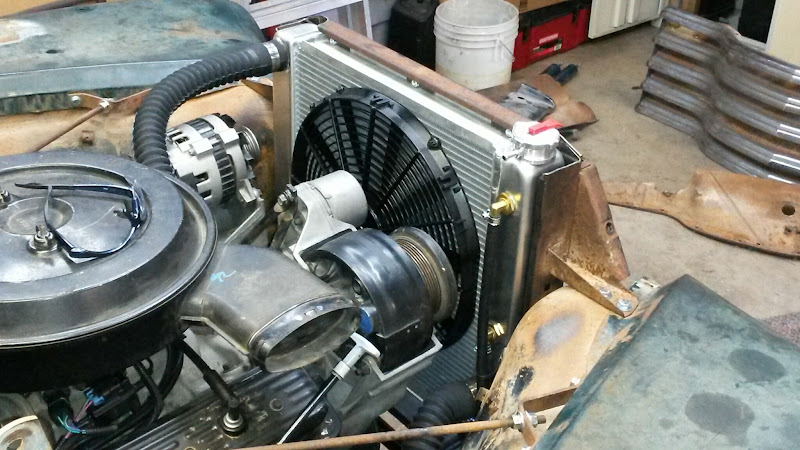     
|
|
|
|
|
10-02-2015, 04:45 PM
|
#22 |
|
Registered User
Join Date: May 2013
Location: Kansas City
Posts: 572
|
Re: "Albert" -- 1949 AD, S10 Chassis
The low pressure line is no big deal but I couldn’t get the high pressure line I had off my donor S10 to work out to my liking. I ended up assembling the high pressure line from AN fittings. This was the first time I used AN fitting and was impressed how well everything went together. This is what I needed:
-- Earls Power Steering Hose -6AN Fitting 90 Degrees, EAR134606ERL -- Earls Power Steering Hose -6AN Fitting 45 Degrees, EAR139106ERL -- Earls Power Steering Hose O-Ring 16 mm to -6AN Adapter, EAR961955ERL -- Earls Power Steering Hose O-Ring 18 mm to -6AN Adapter, EAR961956ERL -- XRP Power Steering Hose -6AN, Marked as Aeroquip Air Brake Hose (only black hose I could find) -- Lower Pressure Hose 16 mm O-Ring Fitting 45 Degree     
|
|
|
|
|
10-02-2015, 05:57 PM
|
#23 |
|
Senior Member
Join Date: Jul 2012
Location: Oblong, Illinois
Posts: 7,028
|
Re: "Albert" -- 1949 AD, S10 Chassis
That worked well. Very clean!
|
|
|
|
|
10-05-2015, 07:29 PM
|
#24 |
|
Registered User
Join Date: Dec 2009
Location: San Angelo, Texas
Posts: 268
|
Re: "Albert" -- 1949 AD, S10 Chassis
Hussey, got your PM. Thanks for your comment. Your build depicts valuable information to me and I am sure others. Thanks, Clay
|
|
|
|
|
11-03-2015, 04:05 PM
|
#25 |
|
Registered User
Join Date: May 2013
Location: Kansas City
Posts: 572
|
Re: "Albert" -- 1949 AD, S10 Chassis
Man, I’ve been dragging lately, about the only thing I’ve accomplished in the past month is get the hood mounted and front somewhat aligned. Oh, I also installed a new passenger side lower door hinge and got my doors aligned to where they open and close like they should, guess that’s something too.
Hope to get to the metal store over lunch sometime this week so I can get the front bumper and running boards mounted up.   Last edited by HUSSEY; 11-03-2015 at 09:27 PM. |
|
|
|
 |
| Bookmarks |
|
|


 Hybrid Mode
