
|
|
|
 03-22-2009, 06:13 AM
|
#1 |
|
I had a V-8
Join Date: May 2003
Location: Phoenix AZ
Posts: 1,116
|
Re: The Story Of A Suburban (Lots Of Pics)
I have been getting several requests/demands for an update, so here it goes. I have been working on the wiring lately and it is about as exciting as watching paint drying on grass that is growing. That, and, I make very slow progress so taking pics just drags out the process, but I did take a few, so here they are:
I guess I should give a bit of background on how I wire my vehicles. I use factory terminals, connectors, crimping tools, wire (thermal cross-linked polyethylene jacketed) and the factory high-temp loom when I build a harness. When I am done I require it to have the appearance, durability, longevity, and servicability of a factory wiring harness. This is no easy feat. All of the equipment listed is expensive and most is not readily available. If I run out of loom for example, I can not run down to the local parts store and pick some up. Some terminals and even a couple connectors are available, but that is about it. I started this strange obsession years ago when I put an injected 5.7L in my '71 Nova. I wanted to replace the engine control harness due to age, but I couldn't bring myself to pay the rediculous amount of money that they cost, just to cut it up and throw most of it away. At that point I started accumulating the factory terminals and connectors. Somewhere along the way I felt rich and bought three factory crimping tools for about $125.00 each. As time went by, I found more and more terminals and now I have three bin drawers full (way over-stuffed would be a much more accurate term) of the oe terminals with several boxes of factory connectors both Weather Pack and non-sealed (56 &59 series). I have one bin drawer of typical generic terminals (mostly ring terminals) that rarely get used. When I do use them, I pull the plastic off the end, then crimp, solder and apply heat shrink to seal them. Ok, now that boredom has completely set-in, here is a few pics. I needed a different temp switch for the cold start timing advance, so I ordered one from Cummins. The switch was different than the one that I had, so it required the use of a new harness. It wasn't terribly priced (about $25.00). 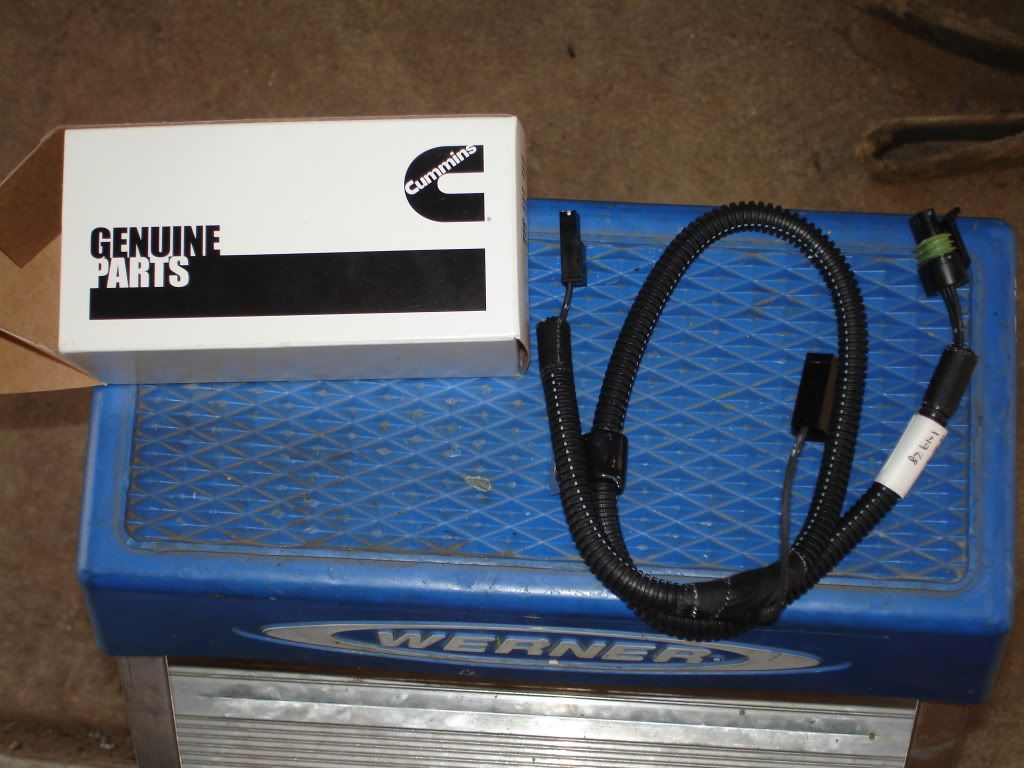 The problem is I was going to have to cut up half of it to make it work with my setup. I did some checking with my suppliers and found the correct connector body. The connector body uses pull-to-seat terminals (put the wire through the connector body, crimp the terminal on the wire then pull it back into the connector to lock the terminal in place) and I was out of this particular series (fairly common--just forgot to re-order when I used the last one). If I cut up the Cummins harness, I still needed the terminals because I do not splice wires. I remove the terminal from the connector and run my own wire into it. I got the connector body and a pack of 20 terminals for about $7.00. 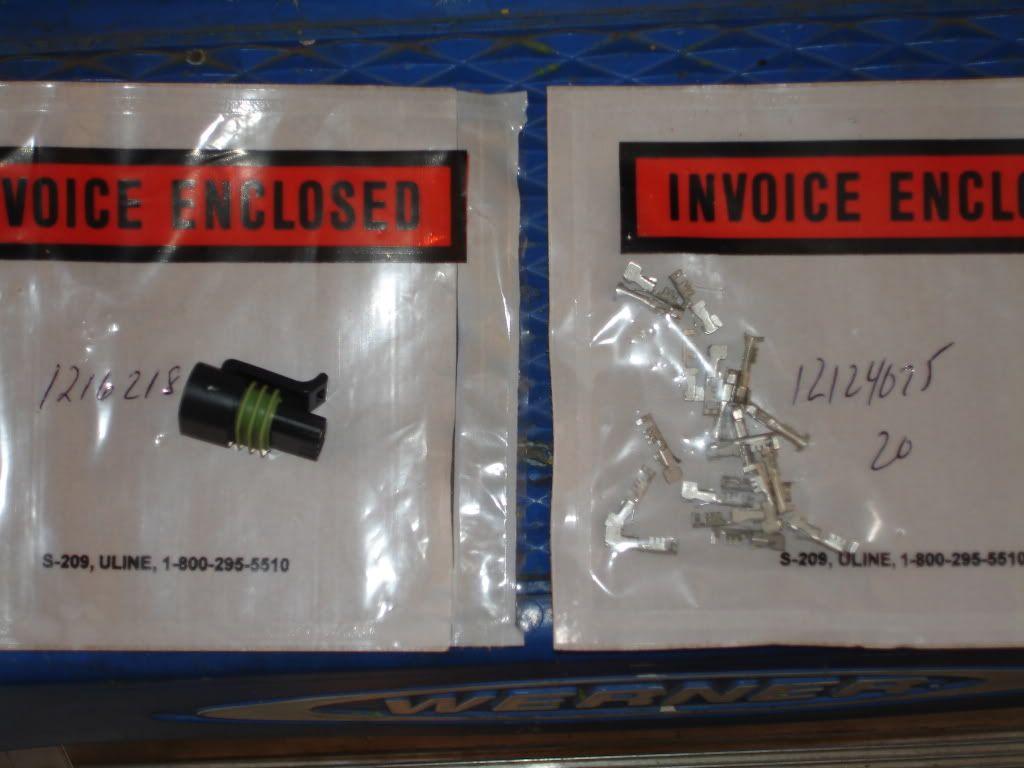 Being this motor was originally in a Dodge, there were several Dodge connectors on it. I was able to convert all but one to GM connectors. The only one that I could not convert was the connector for the fuel heater. Refusing to splice wires, I searched for and found some oe Dodge terminals. 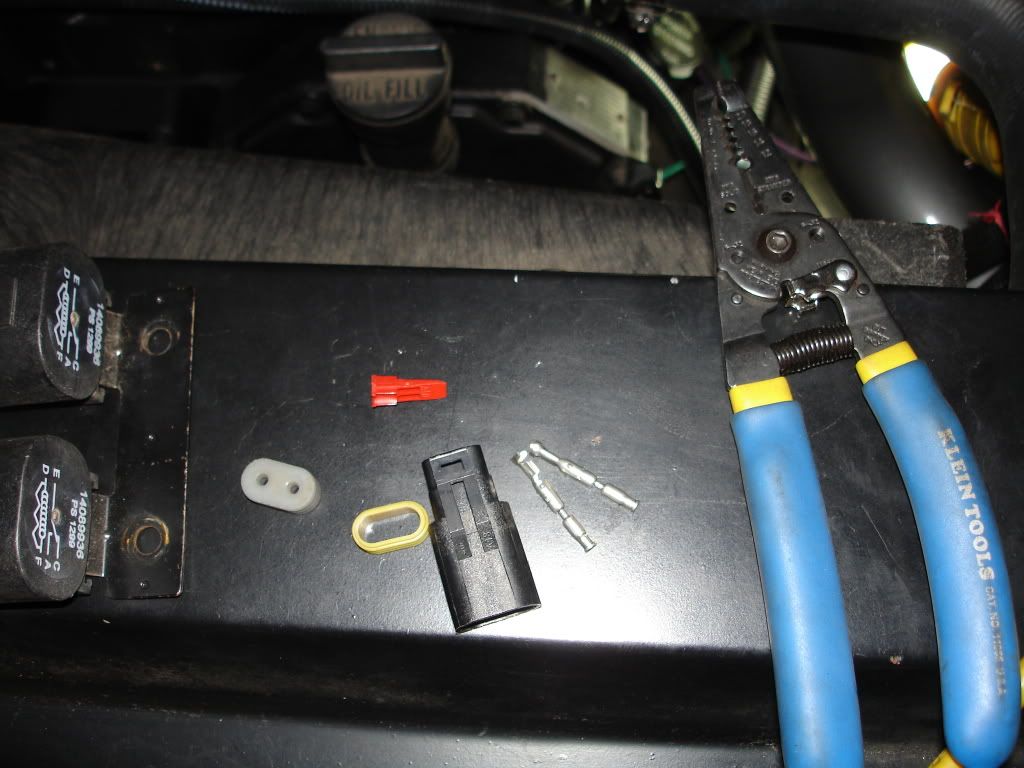 The story goes on and on, but here is a pic of the fan relays and fuses. I had a time figuring out a place to put them, so I put them on the inside of the fender next to the battery. It keeps them out of the way, but yet they can still be accessed if necessary. The jumbled mess of wire in the core support was not finished yet.  I decided to replace the lift pump with a better unit. It looks like the one off of a P-pump motor, but it is different--to the tune of double the money :eek1:. The P-pump lift pump puts out too much pressure to use on my motor. This new pump keeps pressure and volume up at high engine loads where the original design falters. 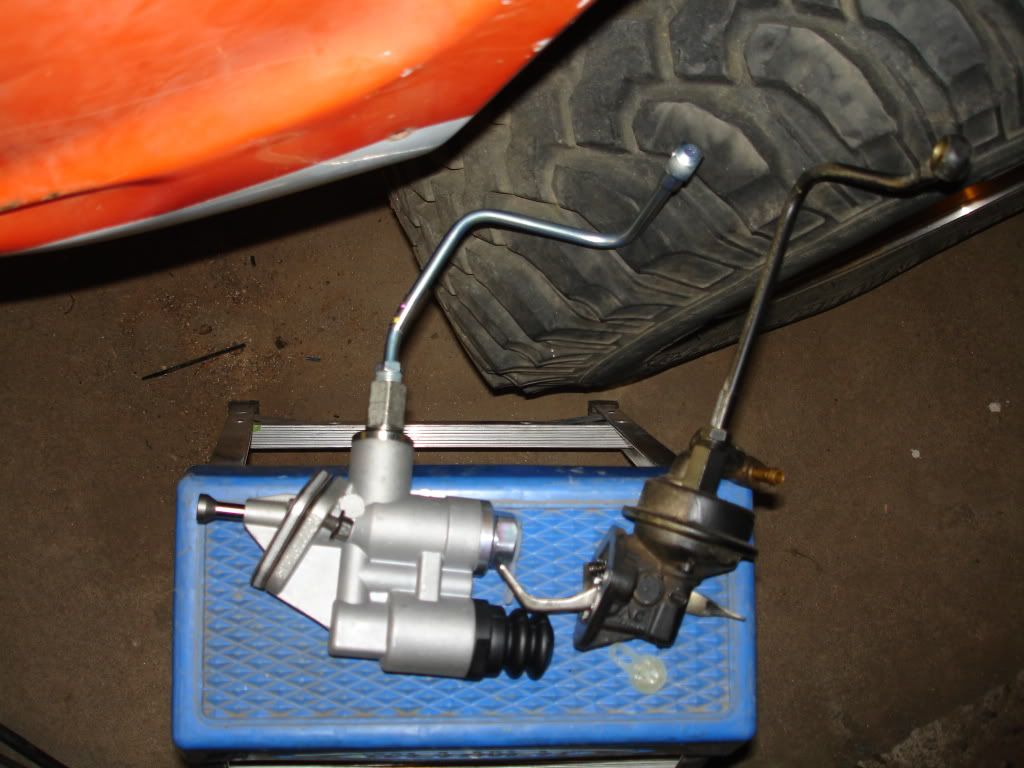 So there you have it. Not much to look at, but it sure is nice to have most of it done. I have to take a couple pics of a few things in the interior that I did. With this stuff done, I'm very close to starting functional electrical tests.
__________________
1972 K20 Suburban, 5.9L Cummins, Banks Power Pack, NV4500HD, NP205, H.A.D., D60/14FF ARB Link To Build: HERE. Last edited by mosesburb; 03-25-2009 at 04:48 AM. |

|

|
|
03-25-2009, 05:00 AM
|
#2 |
|
I had a V-8
Join Date: May 2003
Location: Phoenix AZ
Posts: 1,116
|
Re: The Story Of A Suburban (Lots Of Pics)
Since this project has taken longer than expected, I decided I had better put an A/C compressor on it now rather than wait. I am glad I decided to do it this way as I did not realize how much work it was going to take.
I went shopping through an A/C parts book and found a compressor off of a Sterling class 8 Tractor that looked like it would work great. I got it and installed it then instantly came to the realization that most of the work I spent on the accessory drive belt and lower hose was going to have to be re-done. Swell. The location of the compressor, directly under the alternator, created a situation that would have the belt coming off of the alternator and just barely glancing off of the compressor clutch. This would result in the belt screaming when the compressor engages. Not good. The problem is, there is not enough backside idler pullies in the system to re-route the belt and keep enough wrap on other vital components. I needed to add another backside idler, but there is no room to do it--none. I got an idea to try moving the compressor away from the engine. This worked rather well. It gave me some room to work with, but it also put the fittings for the compressor into the intercooler tube. I can deal with the intercooler tube later, but I need the clearance for a pulley now. I had Russ machine me up four 1.25" spacers for the compressor to make the room for the new pulley. I used the same pulley that is used on the tensioner to keep things simpler. I fabbed up a bracket to mount the pulley, but there were a couple problems with it. The major problem was the tensioner could swing down and make contact with it. First bracket fail: 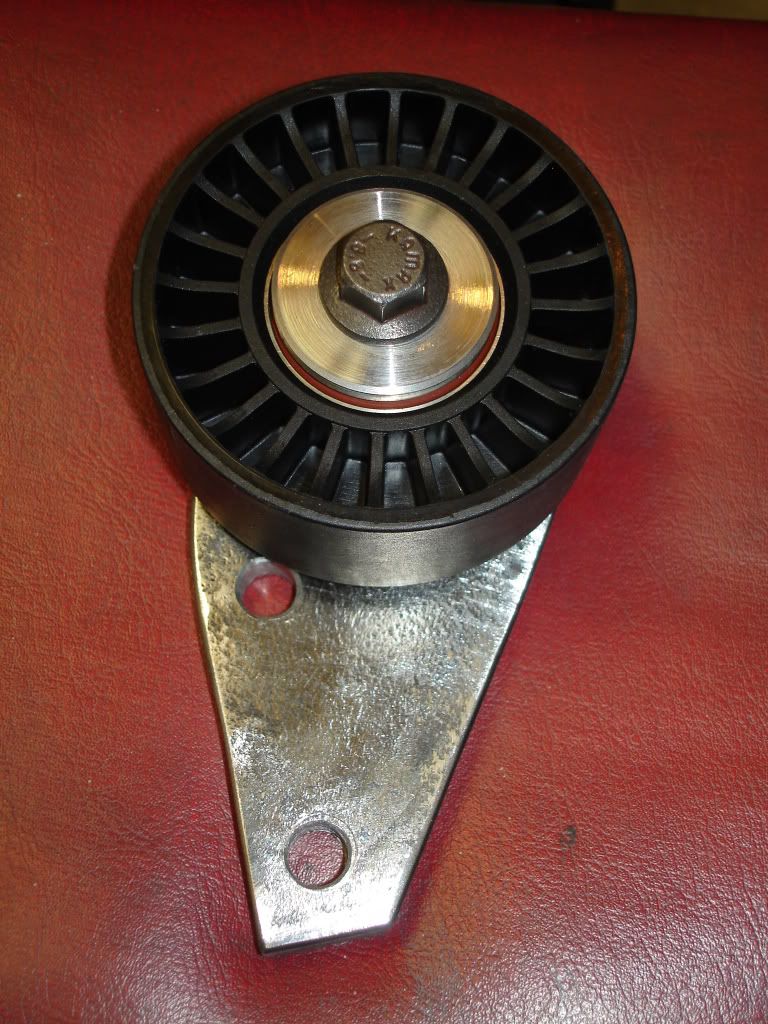 The back of the holes it mounts to can kind of be seen it this pic. They are the shiny ones on the back of the front face. The lower set of holes have bolts in them:  It kind of sucked that this did not work as it was fairly quick to make and it looked good, but oh well. So I got to messing around with pulley location and found that the pulley needs to be mounted almost directly over one the top mounting hole of my first bracket. I could use that hole to mount the pulley to but it is only 8mm 1.25. I do not want to go any smaller than 10mm 1.5. So I came up with a bracket that used the bottom hole on the upper mounting pad and the two holes on the lower mounting pad. This allowed me to put a bolt hole where I need it without having to bore out the casting. The only problem with using the upper and lower pads is that they are on two different planes. I measured them out to be off by .250". Easy enough, just weld a piece of 1/4" flat stock to the back of my idler bracket. 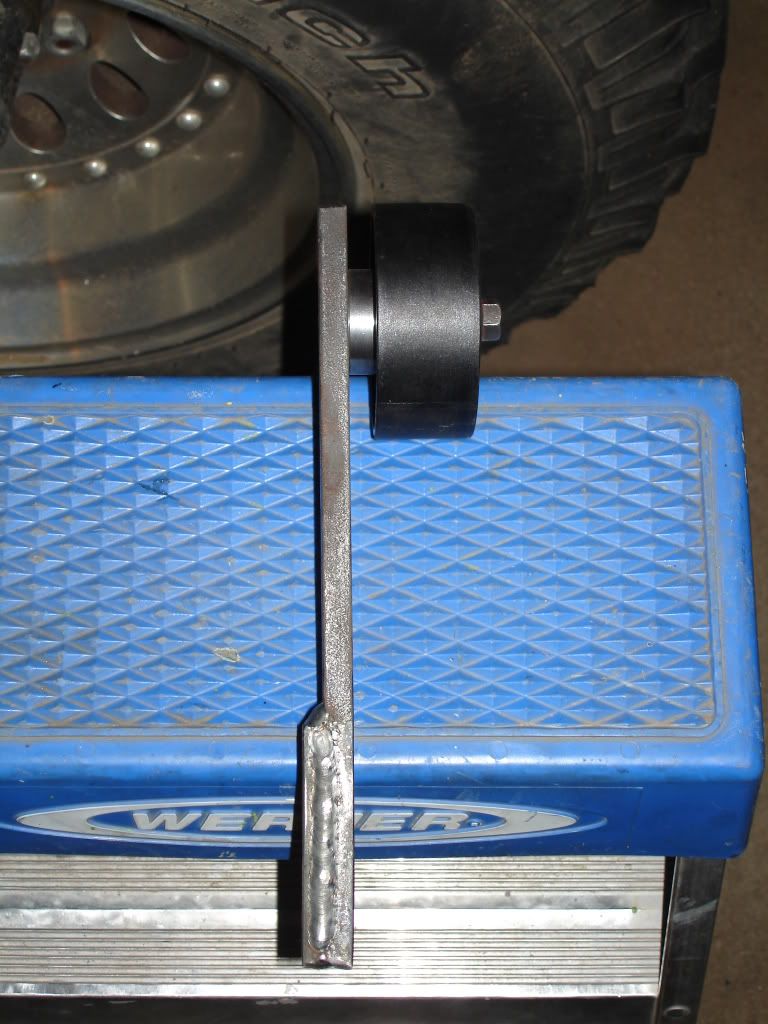 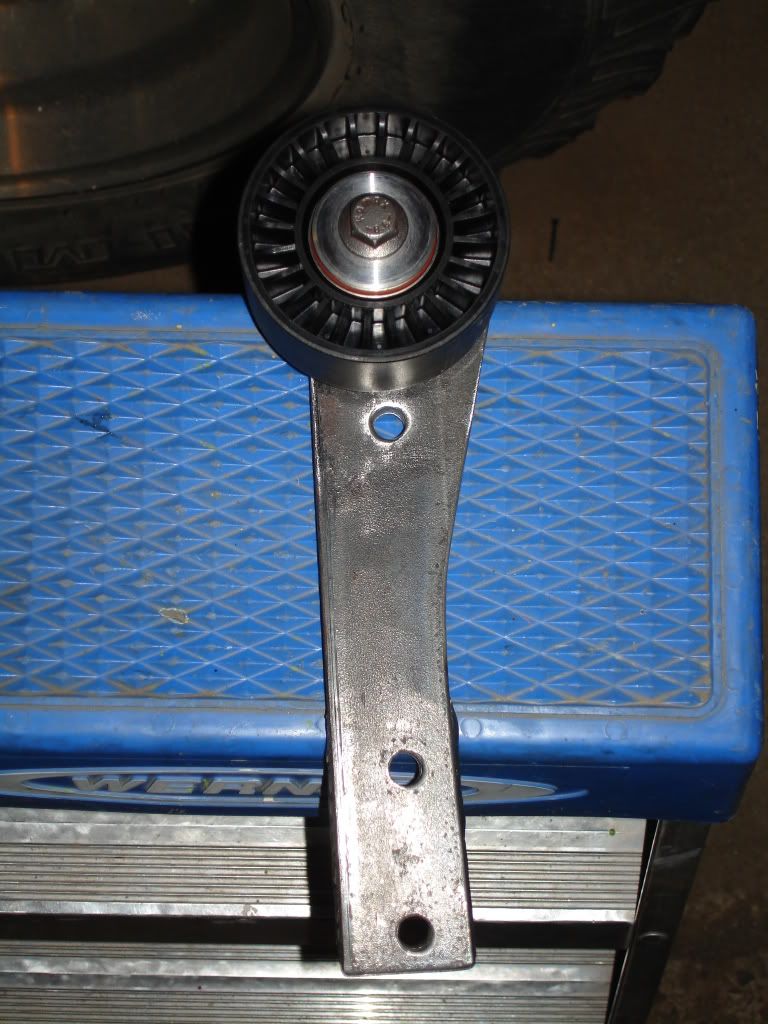 I called on Russ's 24/7 Machine Shop to make a couple pulley bushings for this. I had him basically duplicate the mounting bushing for a 4.3L (same as a 5.0L and 5.7L TBI) idler pulley, but making the base thicker so the pulley is spaced correctly for proper alignment. While he was at it I requested a "washer" for the front of the pulley. Once again, he delivered in first class style exactly what was needed. 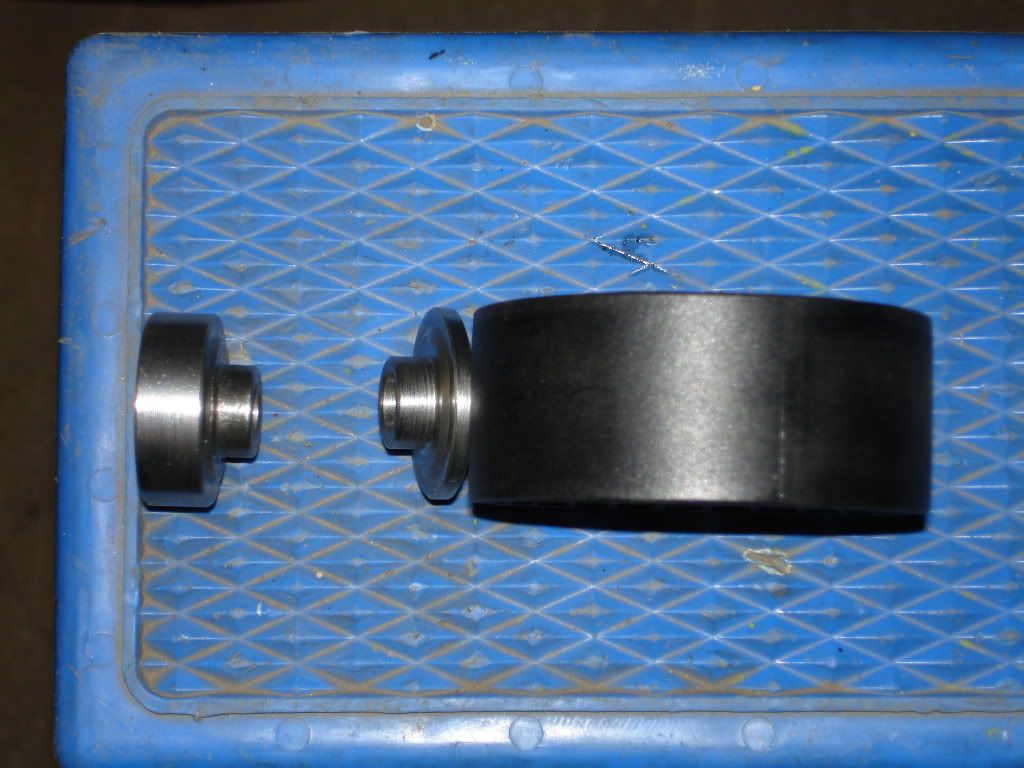 So with all of this, I was able to mount everything up and see what works. After several(!!) attempts at finding the correct belt length, I finally found one. One thing I learned through this is that changing a belt on this is an absolute royal hemorrhaging pain in the ass (putting it very mildly). That being the case, I do not want to do it again. I decided to go with one of Gates' HD serpentine belts. These are going over 100K in the new Class 8 trucks that had been cooking off standard belts in 10-30K. I figure if it will go 100K on a Class 8 with EGR, it should last forever in my truck. The only issue I have with it is its nasty color. Now mind you my favorite color is green, but this just does not do it for me. Oh well, I will deal with the ugly color to not have to deal with changing it again anytime soon. In this pic the spacers for the compressor are visible and it shows the belt wrap on the compressor (well over 180*). There should be no issues with squeal on any component now. It looks like the belt is real close to touching between the new idler and the water pump pulley, but there is actually about 3/8" clearance between them. 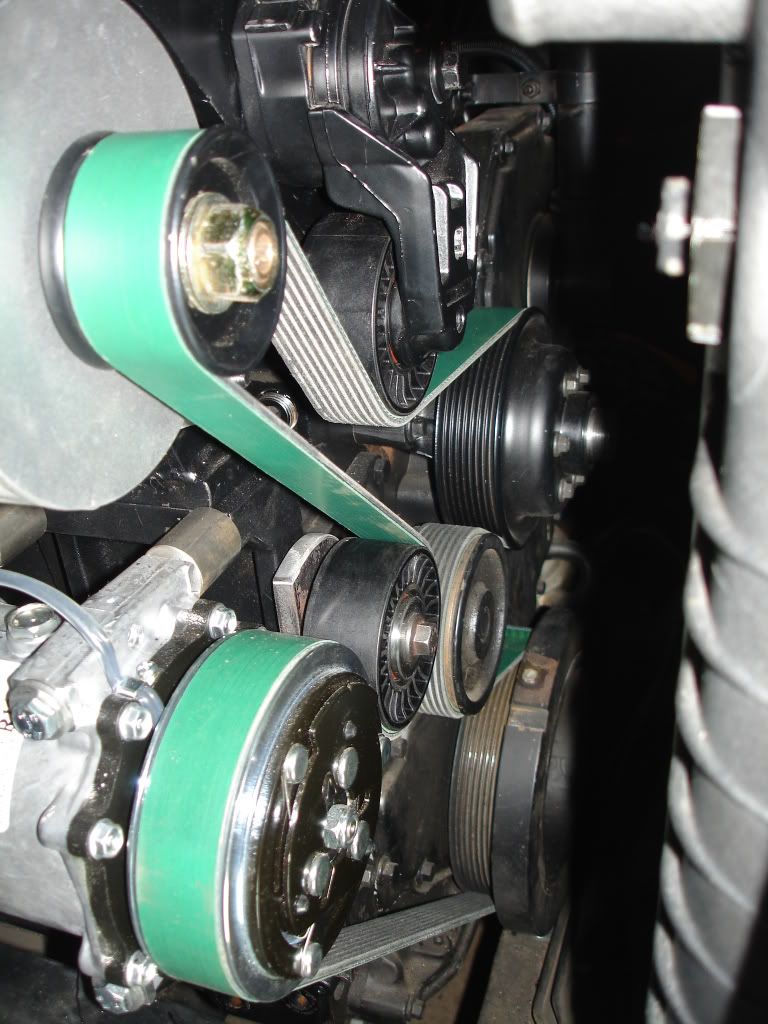 So I found a compressor for a Peterbilt application that should work good. I just have to pick it up and get everything back together. I am getting farther away, but closer.....
__________________
1972 K20 Suburban, 5.9L Cummins, Banks Power Pack, NV4500HD, NP205, H.A.D., D60/14FF ARB Link To Build: HERE. |
|
|
|
|
03-25-2009, 08:59 AM
|
#3 |
|
high-Tech Red Neck
Join Date: Feb 2008
Location: Livingston, MT/On my boat WA/BC/AK
Posts: 2,294
|
Re: The Story Of A Suburban (Lots Of Pics)
I tell you what man, it is a lot of work, but you are doing it right, and in the end, that is what will make the ole burb enjoyable to you when you can thumb your nose at the guy with a 55,000.00 excursion or escalade who is broke down on the side of the road, and you are out tooling on bye blowing a little black smoke their way.
I am pretty impressed with your install, I know when I get to putting the Cummins in my Dually I will be taking some very serious notes.
__________________
"He used to be a pretty nice feller, now he's a welder!" |
|
|
|
|
03-30-2009, 04:09 PM
|
#4 |
|
I had a V-8
Join Date: May 2003
Location: Phoenix AZ
Posts: 1,116
|
Re: The Story Of A Suburban (Lots Of Pics)
Thanks man!!
I have gotten a few more things done lately. I figured out where my windshield washer reservoir needed to be located. I had some room left under the passenger battery tray, behind the headlight. I had a time trying to find a reservoir to fit in the allotted space and finally ended up with another '91 V3500 part. It fit the space great and met the requirements of having an integral electric pump. I got the reservoir and every other component, so I can get rid of the metal nozzles and go with wet arms. Just FYI, if anyone is thinking of trying this, the wiper arms from the later-body trucks are too long for these trucks. 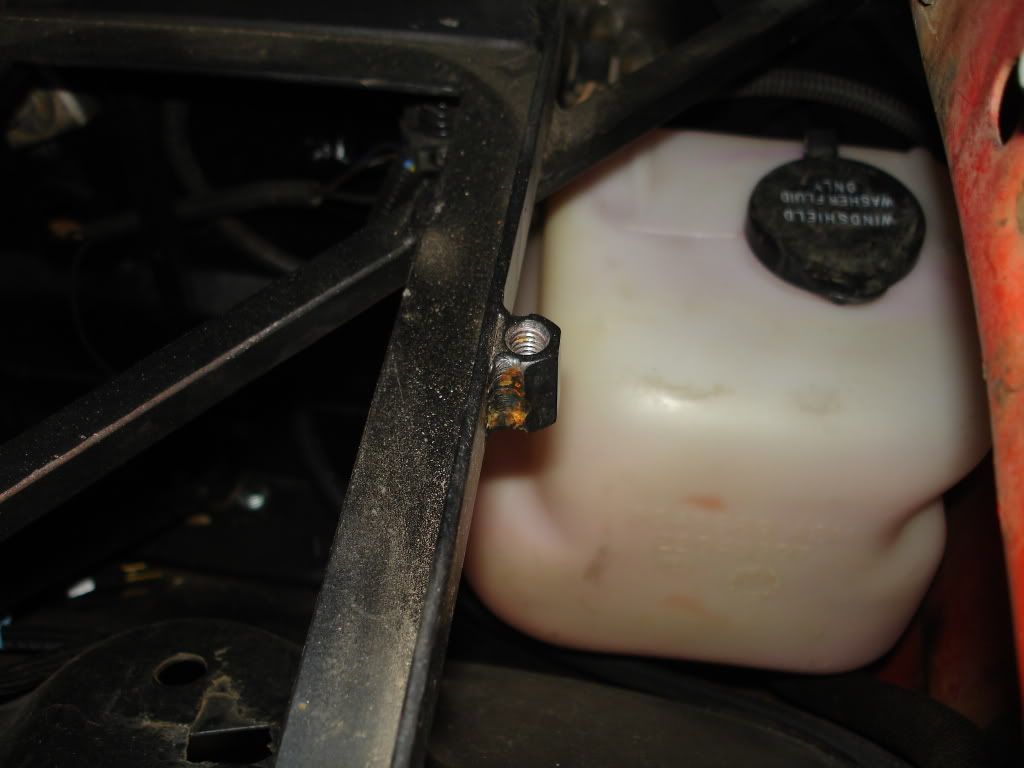 In addition to three underdash/floor lamps, I also added a rear view mirror from a '93 S10. It has the two lamps that come on with the door jamb switches and stay on for 15 seconds or the key is turned to the run position (whichever comes first). I fished the wires up the "A" pillar and then across the panel above the windshield. I thought fishing wires up the "A" pillar was a ***** until I started fishing them across the panel above the windshield. Man, did that ever bring the suck. I finally succeeded and it is a pretty cool feature. The pic makes the wires look like they are hap-hazardly routed, but in real-life they look pretty clean. 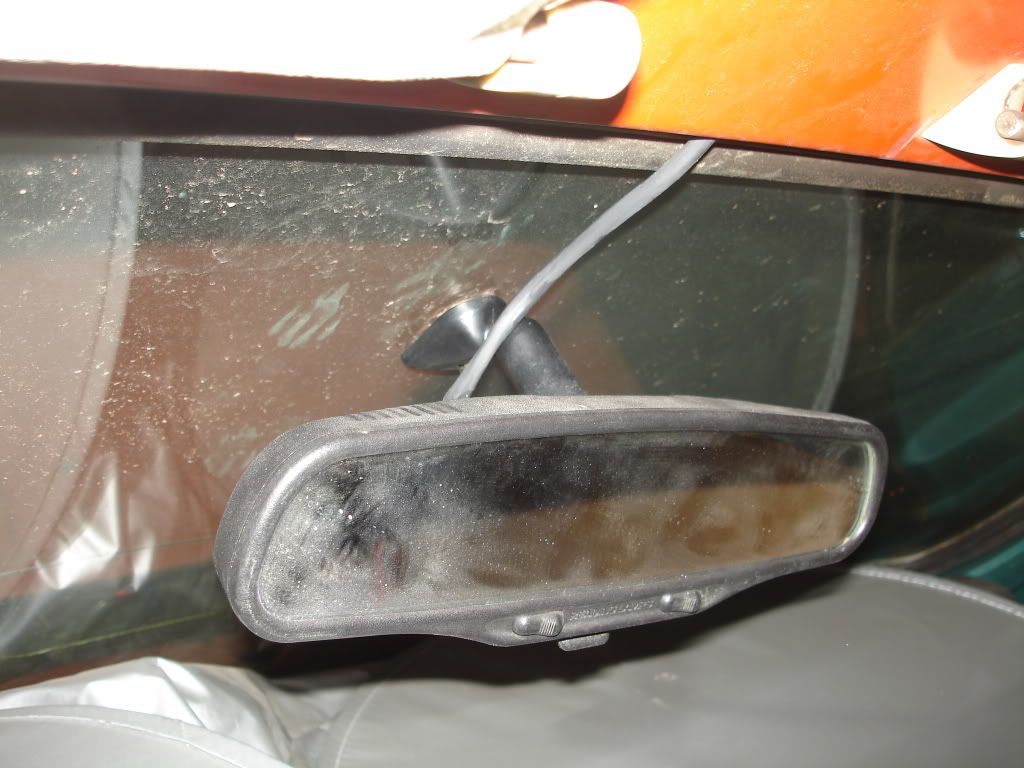 I also figured out where my auxilliary (tach, EGT, and boost) gauges have to go. I wanted them in front of me, but with the way they did the defroster ducts, it would have left me with no defrost on my side. I had to put them to the right of the defrost duct, partially covering the speaker grille in the dash. Unfortuantely, I will not be able to run center speakers now, but oh well. 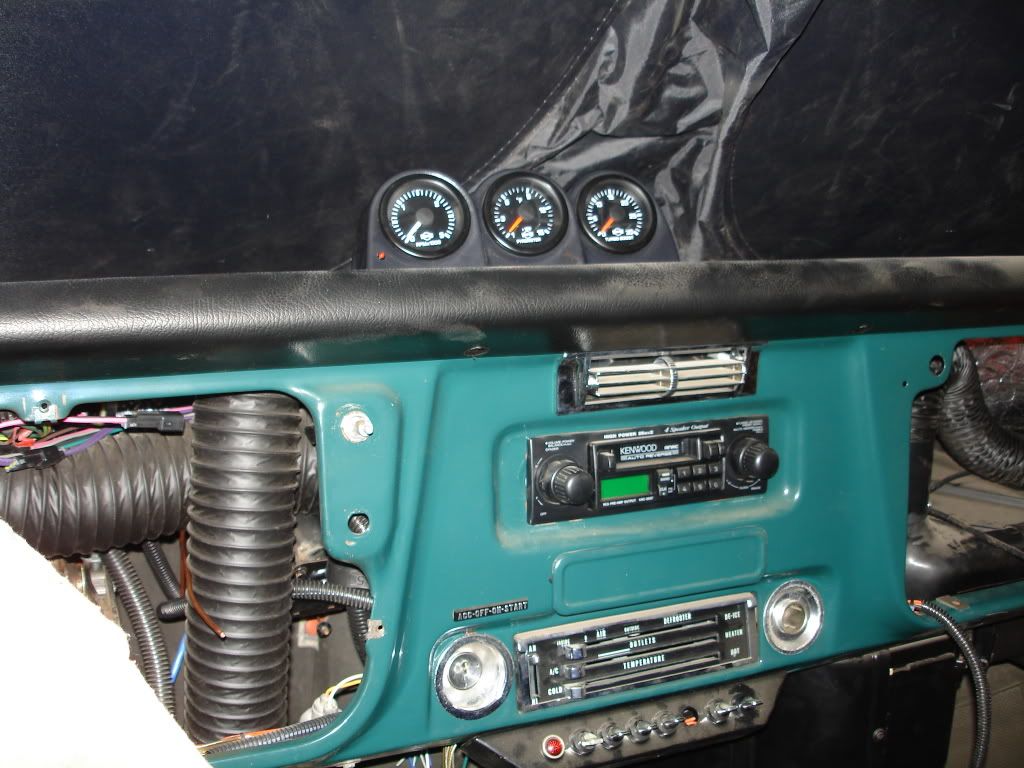 As of now, I have performed functional electrical tests and after taking care of a couple glitches, everything operates as intended. It's getting close, real close.....
__________________
1972 K20 Suburban, 5.9L Cummins, Banks Power Pack, NV4500HD, NP205, H.A.D., D60/14FF ARB Link To Build: HERE. |
|
|
|
|
03-30-2009, 08:07 PM
|
#5 |
|
Registered User
 Join Date: Dec 2008
Location: K.C. Missouri
Posts: 1,024
|
Re: The Story Of A Suburban (Lots Of Pics)
Where's the CB go?
|
|
|
|
|
03-30-2009, 09:25 PM
|
#6 | |
|
high-Tech Red Neck
Join Date: Feb 2008
Location: Livingston, MT/On my boat WA/BC/AK
Posts: 2,294
|
Re: The Story Of A Suburban (Lots Of Pics)
Quote:

__________________
"He used to be a pretty nice feller, now he's a welder!" |
|
|
|
|
|
03-30-2009, 09:24 PM
|
#7 |
|
high-Tech Red Neck
Join Date: Feb 2008
Location: Livingston, MT/On my boat WA/BC/AK
Posts: 2,294
|
Re: The Story Of A Suburban (Lots Of Pics)
So now that you have done all this work to the truck, are you going to be getting it painted? And what color you have in mind if you do?
__________________
"He used to be a pretty nice feller, now he's a welder!" |
|
|
|
|
03-30-2009, 11:25 PM
|
#8 | |
|
I had a V-8
Join Date: May 2003
Location: Phoenix AZ
Posts: 1,116
|
Re: The Story Of A Suburban (Lots Of Pics)
Quote:
I have not decided yet. I hate body work with a passion, but I refuse to pay anybody to do it for me. I think I will try to drive the wheels off of this thing before I start any new projects on it.
__________________
1972 K20 Suburban, 5.9L Cummins, Banks Power Pack, NV4500HD, NP205, H.A.D., D60/14FF ARB Link To Build: HERE. |
|
|
|
|
|
04-02-2009, 06:23 PM
|
#9 |
|
I'm a poor spectator
Join Date: Aug 2006
Location: San Antonio, Tx
Posts: 2,287
|
Re: The Story Of A Suburban (Lots Of Pics)
Just got caught up on your project, nice.
__________________
2006 Jeep Unlimited IMPACT ORANGE 1993 Chevy 2500 4x4 ExCab LWB 454/NV4500 Tow rig  1977 Ford F100 2x4 LWB 1st truck I owned, still have it!!! 1979 Ford F150 4x4 SWB Built Ford Tough!!!  1971 Chevy Blazer 350 / SM465 / NP205 UNDER CONSTRUCTION Soon to have a LQ4 6.0!!! |
|
|
|
|
04-10-2009, 04:14 PM
|
#10 |
|
Registered User
Join Date: Dec 2004
Location: Northern AZ
Posts: 7,271
|
Re: The Story Of A Suburban (Lots Of Pics)
Hurry up and get it done, I need my Burb back!! Just kiddin' this is the Burb I have wanted to build and next weekend I take one step closer to doing that as I am picking up a nice 2wd Burb while I am down there. I'll hopefully get to meet up w/ya and get to see this in person and pick up the the intake and shroud!
PM me? |
|
|
|
|
04-14-2009, 12:34 AM
|
#11 |
|
Registered User
Join Date: Jul 2005
Location: Kernersville, NC
Posts: 599
|
Re: The Story Of A Suburban (Lots Of Pics)
sat here and read the whole thing. one heck of a build. looks like your doin a dang good job. cant wait to see some videos of this thing once ya get done. chris.
__________________
its a work in progess. 71 c-10 lwb, in the middle of frame off restoration. 69 c-10 swb, drag truck, 406 sbc, balanced, comp 292 cam, ported, polished, gasket matched, and bowl blended pro comp 210cc heads, 2.02/1.60 ferrea valves,1.6 roller rockers, re curved hei with msd 6al box, 2-step rev limter, accel 300+ wires, ported victor jr intake, holley 750 double pumper carb, dynomax 1 5/8 headers, 4 spd munci m-20 with super case and iron midplate, mr. gasket vertigate shifter, 5.38 pro gears with full spool, 33 spline moser axles and c-clip elimators, line-loc, 5 gal fuel cell, holley blue pump.   7.807 @ 88.37mph 1.60 60FT 80 g-20 van, tow rig, cammed 305, th350, 10 bolt 88 jeep wrangler, dd, 258, ax-15 swap, 4.5" lift, 33x12.50's, lockers, 3.55's |
|
|
|
|
04-14-2009, 03:27 PM
|
#12 |
|
Engine n00b
Join Date: Feb 2008
Location: Austin
Posts: 1,031
|
Re: The Story Of A Suburban (Lots Of Pics)
great thread - subscribing.
|
|
|
|
|
04-15-2009, 02:43 AM
|
#13 | ||||
|
I had a V-8
Join Date: May 2003
Location: Phoenix AZ
Posts: 1,116
|
Re: The Story Of A Suburban (Lots Of Pics)
Quote:
Quote:
Quote:
Quote:
Well, no new pics to show, but there is news here. I got it running last week!! I bled the injectors and tried cranking for oil pressure to no avail, so I turned the fuel on and it lit up like it had run yesterday--oil pressure came right up after it started. Sounds *****in'!! Of course, that may have something to do with only having 12" of pipe hanging off of the turbo, but I'm diggin it nonetheless. My neighbors now have a complete understanding of what I have been doing under the hood of this thing for the past year now, hehehe. I let it run for awhile, doing functional tests on components and everything seems cool. The only problems I had were a leaking coolant reservoir (new GM part) and no power steering/braking assist. I chased that monkey for about a week and a half until I finally found the problem in the pump. I got that straightened out and everything works great. I got the NP205 torn down and cleaned up with the guts ready to go into my housing and started working on my NV4500 also. Everything looks good, just need to clean the parts and get it together. I'm looking forward to driving this thing now!! So everything is going well until I was at my Mom's house last weekend doing some electrical work for her and managed to put myself out of comission for awhile.  The white diagonal line near the top of the thumb is NOT supposed to be there. I was cutting a piece of conduit with my 28V Sawzall (nowhere near as smooth as my corded Super Sawzall) and the material pinched the blade and was moving with the blade. Well, sometime in there my thumb somehow managed to get between the material and the shoe on the Sawzall and BANG, BANG, BANG, BANG, BANG, BANG, BANG, BANG, etc. I ended up with a purple fingernail and lost a dime sized chunk of skin on the fingerprint side. Now, I'm no stranger to the Band-Aid box (I carry my own stash at all times), but this had to rank in the top one or two most painful injuries in recent memory. I waited a couple days and went and got it checked out because it was hurting well below the injured area. Doc couldn't explain why it hurt where it hurt, but informed me that I had done more damage that I initially thought. Swell. Now I get to sit home and do basically nothing. No work (not good), no work in the shop, nothing. Grrr. I'm really close, but I can't do a damn thing about it....
__________________
1972 K20 Suburban, 5.9L Cummins, Banks Power Pack, NV4500HD, NP205, H.A.D., D60/14FF ARB Link To Build: HERE. |
||||
|
|
|
|
04-15-2009, 07:49 AM
|
#14 |
|
Registered User
Join Date: Mar 2007
Location: Ben Wheeler,Texas
Posts: 992
|
Re: The Story Of A Suburban (Lots Of Pics)
Brings back memories of the finger between the trailer ball and tounge of the trailer and stupid me deciding "pull" was the best option at the time! Glad you got her breathing black smoke!
__________________
05 2500HD 6.0 excab 69 LWB-Gone but not forgotten! 68 Dodge Charger 383/727 69 Dodge Charger-440/4spd |
|
|
|
|
04-15-2009, 03:36 PM
|
#15 |
|
Registered User
Join Date: Dec 2008
Location: K.C. Missouri
Posts: 1,024
|
Re: The Story Of A Suburban (Lots Of Pics)
Damn, That sucks!!! Sorry to hear it, glad to hear another Suburbans running though,
|
|
|
|
|
04-15-2009, 04:10 PM
|
#16 |
|
Registered User
Join Date: Dec 2004
Location: Northern AZ
Posts: 7,271
|
Re: The Story Of A Suburban (Lots Of Pics)
Looks like I'll be there this weekend, so if you can handle the pain, I'd love to hear her run!!
|
|
|
|
|
04-18-2009, 01:34 AM
|
#17 |
|
I had a V-8
Join Date: May 2003
Location: Phoenix AZ
Posts: 1,116
|
Re: The Story Of A Suburban (Lots Of Pics)
I have had a couple requests for information regarding my fuel tank installation and seeing as how I can't do much productive work with only one opposable thumb and all, I figured this was a good time to give a few details on the swap.
As was previously stated, I used a fuel tank from azblazer/K5NUTT's 79 K5. Now, we all realize that these tanks have the fuel fill pipe on the passenger side and our fill is on the driver's side. I remedied this by rotating the tank 180* front to back. The only problem I see with this is reduction of departure angle. This is something to consider, seeing as how Suburbans have an extremely horrible departure angle to start with. I decided to roll the dice and give it a shot anyways. That being said, if I were to do it again, I would take a good look at a similar vintage van. They had similar capacities and the fuel fill pipe is already on the driver's side. I am not sure if the dimensions work or not, but if they do and they have the taper at the rear, this may just be the hot ticket. Now, I stated "similar vintage". There is a reason for this. Our trucks use what is now considered a tiny 1-3/8" fill pipe. Most newer vehicles use 1-1/2" or larger fill pipe. Up to at least 1979, the fill pipe diameter was still 1-3/8". There are ways around this if you opt to use a later model tank (i.e. late model with fuel injection sending unit and internal baffeling for F/I). I have done it. It is not real fun, but it can be done. It involves welding a "bushing" onto the end of the existing fill pipe that matches the diameter of the fill pipe on the tank. One benefit to doing this is it gets you into a larger diameter hose which is easier to find. Gates now makes fuel fill hose with 45* and 90* bends, but they do not make it in 1-3/8". The nuts and bolts of the swap are pretty straightforward. In the back, I used a piece of 5/16" x 4" flat stock laid across and bolted to the top of the frame rails spaced up by a piece of 5/16 x 2" flat stock. In the front, I used a piece of 3/8" x 3" flat stock. This is what the top of the tank will be loaded against when installed. I used this strange combination of material to avoid using a channel type material to keep from running into interference with the body. After all was said and done, I realize this was not necessary as there was room to have support ribs, but what I made works, so there it stays. I made two crossmembers out of 2x2x.187 wall angle stock for the straps to mount to. For the straps, I used stock GM replacement straps for a '79 K5. They lend themselves well to adapting to a project like this because they have a hook on one end and a threaded stud on the other. For vibration isolation/abrasion resistance, I used 60lb roofing felt for the strap iinsulators and upper tank cushions. It works great and is readily available if you have recently replaced a roof. I guess some pics are in order. This is the rear upper mounting. The spcers under the plate can be seen. 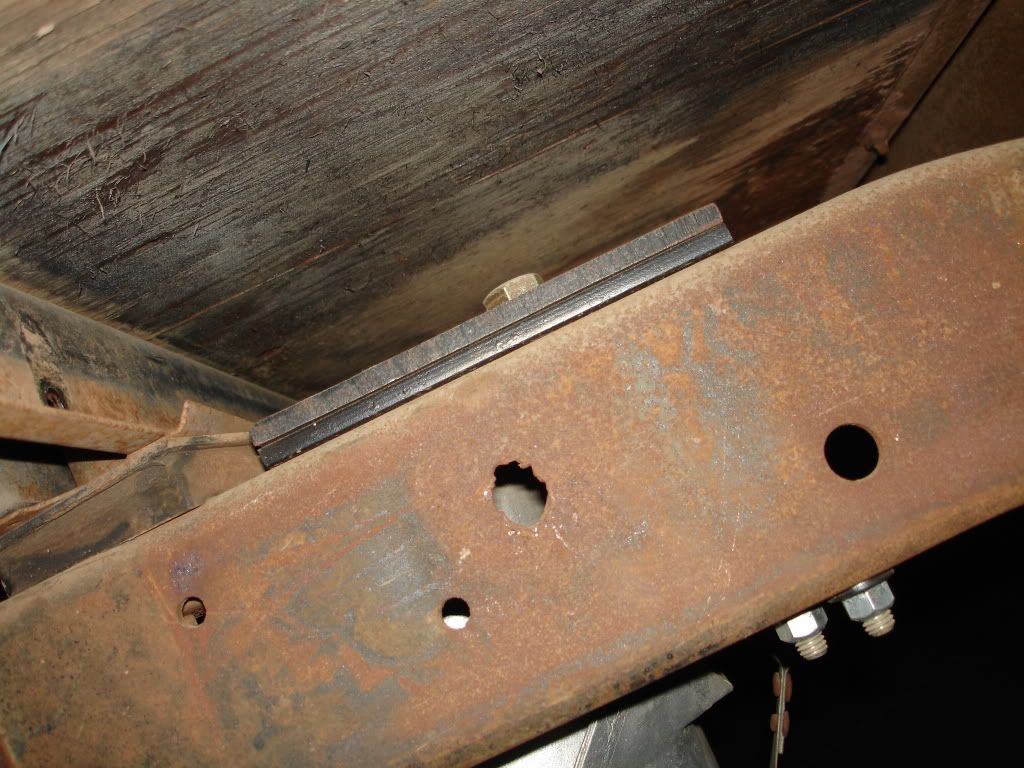 This is the front upper mounting. It also illustrates the location of the front of the tank relative to the frame/body. 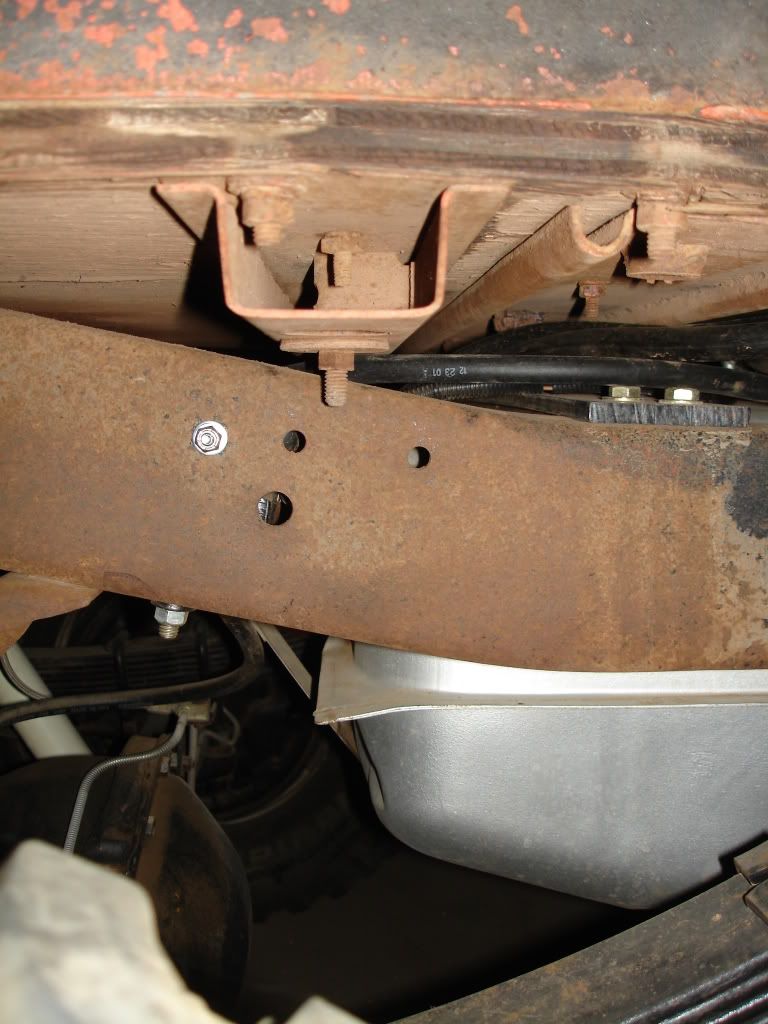 This is the forward crossmember for mounting the straps: 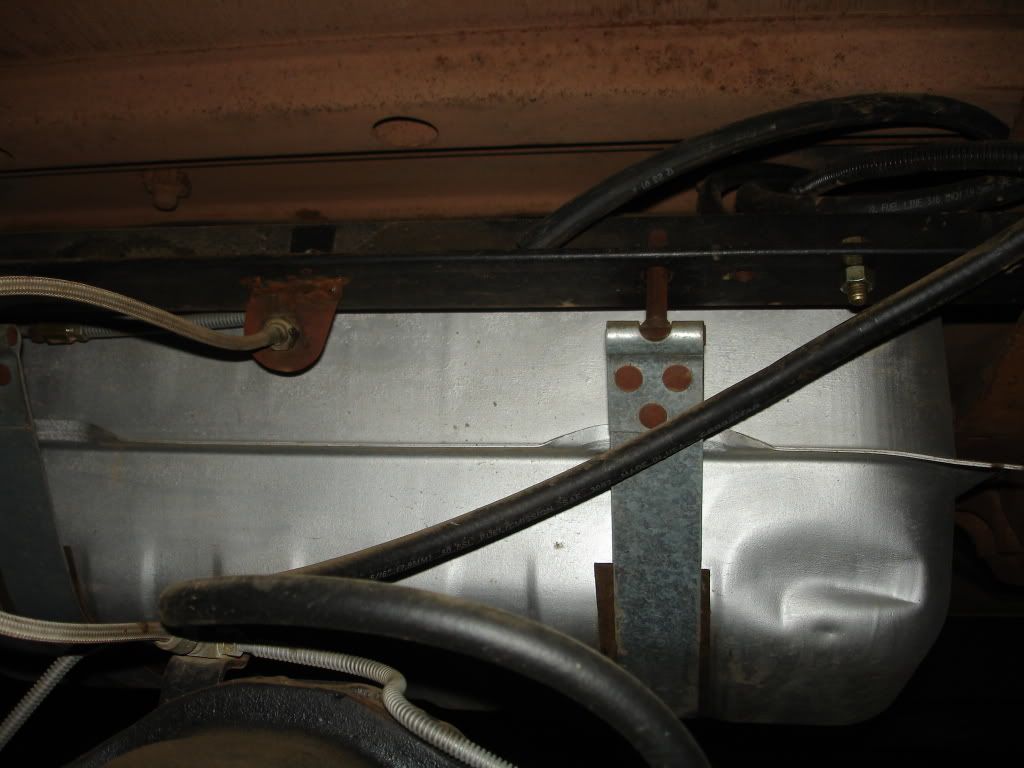 This is the rear crossmember: 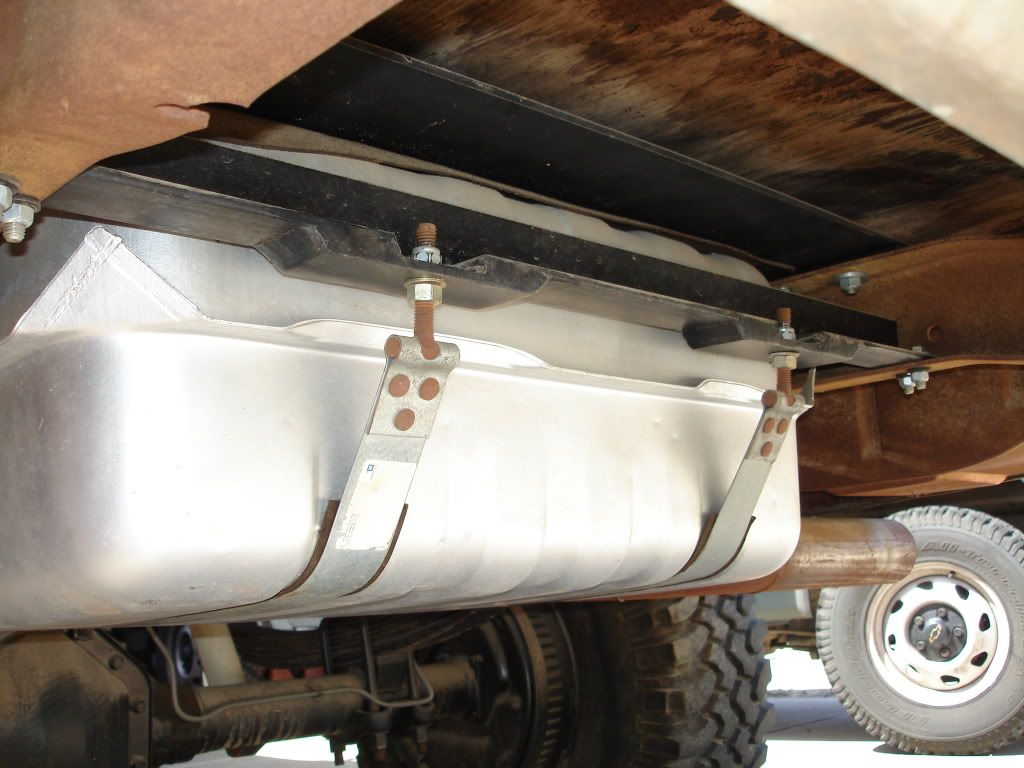 So that shows the basic mounting of the tank. If I had it to do over, I would probably change a few things, but this is what I have for now. In my opinion, there are many advantages to doing this swap over a custom tank. One being cost. Finding a tank in a wrecking yard is cheap, the mounting steel is cheap, the straps from GM are not terribly cheap, but not too terribly expensive either. Another advantage is it is all GM. Go to the parts store and get a sending unit or a tank seal or a sending unit strainer etc--readily available cheap parts. The sending unit, whether you use an old tank or a fuel injection tank will be the same 0-90 ohm range as your original gauge--not some aftermarket only range that renders your oe gauge useless. I feel it is also a clean swap. The tank looks like it belongs in the truck. It is not an angular, welded unit. It is a clean, smooth, radiused unit. Maybe that's not worth much, but I think it keeps the clean look going on. So there you have it. This is how I did mine. I am sure there are many other ways to obtain the same end result, but I wanted to show how I did mine to hopefully answer some questions of give a visual or two on what one way to do it is. Man, typing with only one thumb in an interesting endeavour. It doesn't seem like it should make much difference, but it sure takes alot longer.
__________________
1972 K20 Suburban, 5.9L Cummins, Banks Power Pack, NV4500HD, NP205, H.A.D., D60/14FF ARB Link To Build: HERE. |
|
|
|
|
04-18-2009, 10:14 PM
|
#18 |
|
I had a V-8
Join Date: May 2003
Location: Phoenix AZ
Posts: 1,116
|
Re: The Story Of A Suburban (Lots Of Pics)
So, technically I am released to go back to work tomorrow night. I figured I should take the structure off of my thumb and see what I can actually do with it. May as well do something on the Sub right??
I decide the project of the day will be bending up some 1-1/4" x .187" flat stock to serve as a support for the air filter/intake plumbing. Good thing to do with a questionable thumb I figure. So I get to bending the flat stock up and things are going pretty good. Every once in awhile I get a friendly reminder through my central nervous system that I have an injured thumb, but not as often as I thought I would. So I get the bracket made (had to use a Sawzall twice) and get it painted. In the mean time I clean up my "hose connectors" and prepare them for installation. Around now, my wife comes out and says she's going somewhere to meet up with one of her friends to shop, eat, something. So, I put some RTV that I got from the International Truck store in the ends of the tubes and install the connectors. I wanted to use this RTV because it has weapons grade strength--unbelievable stuff--it is like ten part epoxy or something. I get it in there and install the connectors and put clamps on. I put the filter on and the pre-filter cover also. I look at it, liking what I see, and decide I need to run the motor--just to make sure everything is good-to-go of course. Well, my boy likes to push the button on the remote starter under the hood and make the engine run, so I locate him in the front yard and invite him over to make it run. He comes over and hits the switch and it rattles to life with no effort at all. I set the manual throttle to 1200rpm and let it run. Well, the one thing i did not realize was that the front door on the house was open. The screen door was closed, but the inside door was wide open. I came in after it had been running for around 15min and whoa, my house had the heavenly aroma of pre-burned diesel fuel. Oh noez!! I have the silly suspicion that my wife is not going to have the same appreciation for the scent of the air inside the house as I do. Sooo, as I sit here typing this I have all the doors open with my cooler running in warp drive trying to clear the air before she gets home. I hope I am successful...... If I make no future posts here, you will know the answer.
__________________
1972 K20 Suburban, 5.9L Cummins, Banks Power Pack, NV4500HD, NP205, H.A.D., D60/14FF ARB Link To Build: HERE. |
|
|
|
|
04-19-2009, 04:18 PM
|
#19 |
|
I had a V-8
Join Date: May 2003
Location: Phoenix AZ
Posts: 1,116
|
Re: The Story Of A Suburban (Lots Of Pics)
Well, I pulled it off. Got the house cleared out before she got home. I did tell her about it because I knew what was going to happen today. Sure enough, I hear my boy throwing me under the bus explaining what went on while she was away. He did take some undeserved blame in telling her that HE had forgotten to close the door, so good on him for that one.
Anyways, I realized that I had not posted any overview pics of the engine bay since I finished it up. So, without further delay, here are a couple: 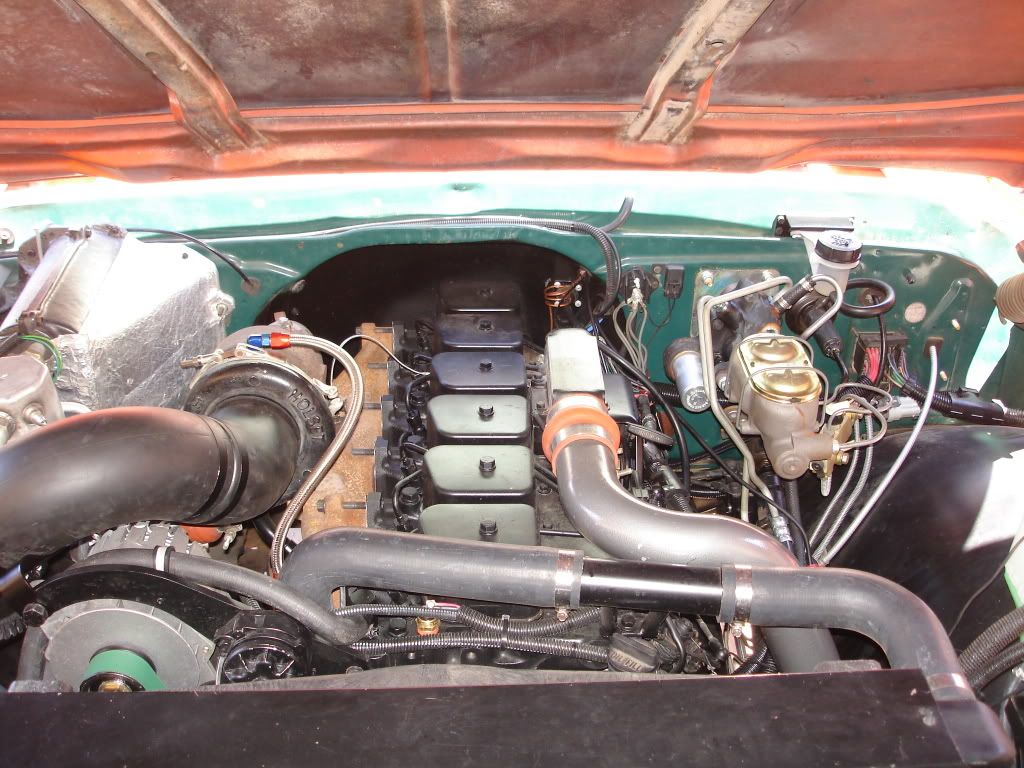 And: 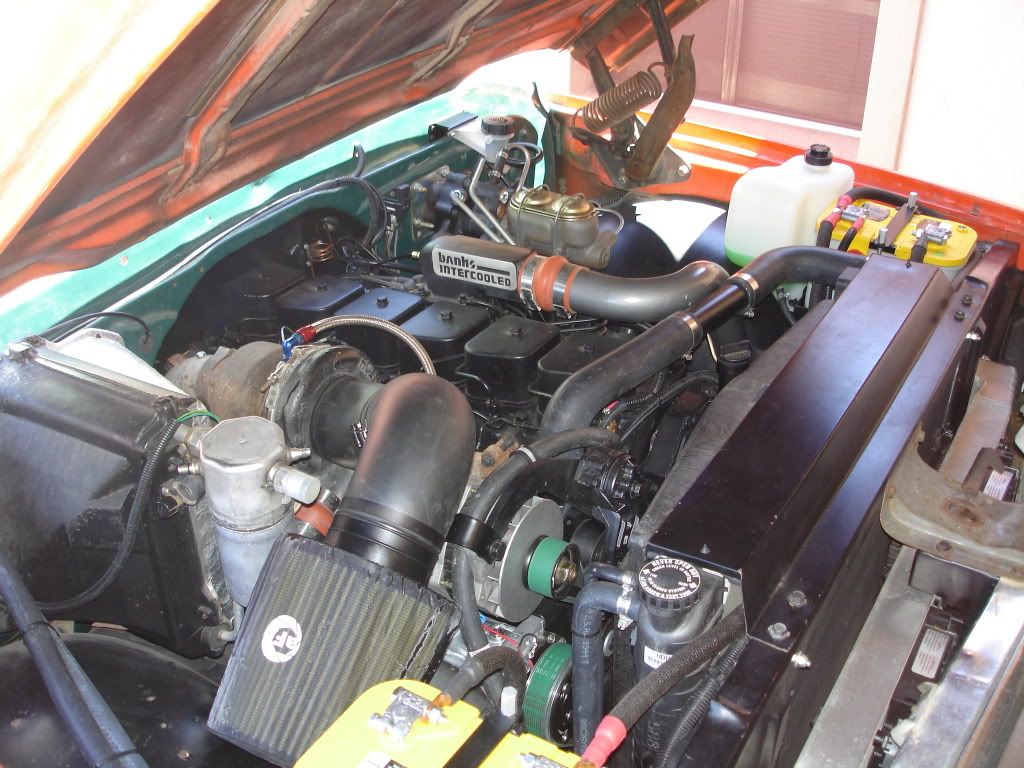
__________________
1972 K20 Suburban, 5.9L Cummins, Banks Power Pack, NV4500HD, NP205, H.A.D., D60/14FF ARB Link To Build: HERE. |
|
|
|
|
04-19-2009, 04:41 PM
|
#20 |
|
PROJECT 7DEUCE
Join Date: Dec 2002
Location: GRANTS PASS OR
Posts: 21,607
|
Re: The Story Of A Suburban (Lots Of Pics)
It almost looks factory.. Job very well done..
__________________
GO BIG GREEN GO DUCKSMEMBER #6377 72 k-5 daily driver 6'' lift 35'' 350-350-205 slowly getting rust free. Project "7DEUCE" check out my build http://67-72chevytrucks.com/vboard/s...d.php?t=267665 Tim Powell..R.I.P EastSideLowlife..... R.I.P.. |
|
|
|
|
05-31-2009, 05:11 AM
|
#21 |
|
I had a V-8
Join Date: May 2003
Location: Phoenix AZ
Posts: 1,116
|
Re: The Story Of A Suburban (Lots Of Pics)
Progress has been occurring lately, but I have not shown any pics to prove it. I pulled my temporary "bellhousing crossmember" out amd installed the empty transmission and transfer case to see what was going to work or, in my case, not work. I figured doing this part with empty components would be better seeing as how I can't lift either component when they are loaded with more iron. The components actually fit fairly well. I did have to modify the floor pan a bit to get them up high enough. I had a cutoff of a 4 x 14 glue-lam that I put on my floor jack and ran up into the floor behind the trans hump. I applied some upward force to it, then I got inside with a heavy rubber hammer and beat the outer edges of the former flat area down to form a nice raised section behind the hump to produce a very factory appearing raised area. Directly behind the hump and in front of my modification is a very low valley. This had to go. I cut it out then I laid some sheet metal over the hole and formed it to make an extended trans hump. I welded it to the removable hump and screwed it to the floor behind the hole so the hump could be removed if necessary. All this resulted in me being able to install the trans and case fairly level in the chassis.
 A little side note about the transfer case. I had been searching everywhere for a round pattern '205 to no avail. I had found an empty, NOS housing on ebay and I emailed the seller to find out what shipping would be, then went out in the shop to get some more work done. Well, in the mean time, my wife and boy got home. I realized that they had been home awhile and my boy had not come out in the shop yet. Hmmm, what is he doing?? So I go in the house, walk past the computer room and HOLY COW!!!! There are a bazillion error messages on the screen and my boy is sitting in front of it. I figure I should try to undo whatever he got into. I start closing the error messages and get into a whole bunch of ebay messages stating something to the effect of: "Sorry the item you wanted to buy now has already been sold" Cool, I really did not want any....Dana 60 knuckles for a Ford. I close about twenty of these message windows and come to the last one that states "Congratulations, you won this item!!" Oh no!! What did you just buy me?!? It turns out, he clicked the buy it now button on the NOS round pattern housing. Well, I hope shipping isn't too much there boy. Turns out the shipping wasn't too bad, but the case was a bit higher than I would have liked to paid. Oh well, I have it now. So with my floor modified, it was time to start assembling the components. Mainshaft stack-up: 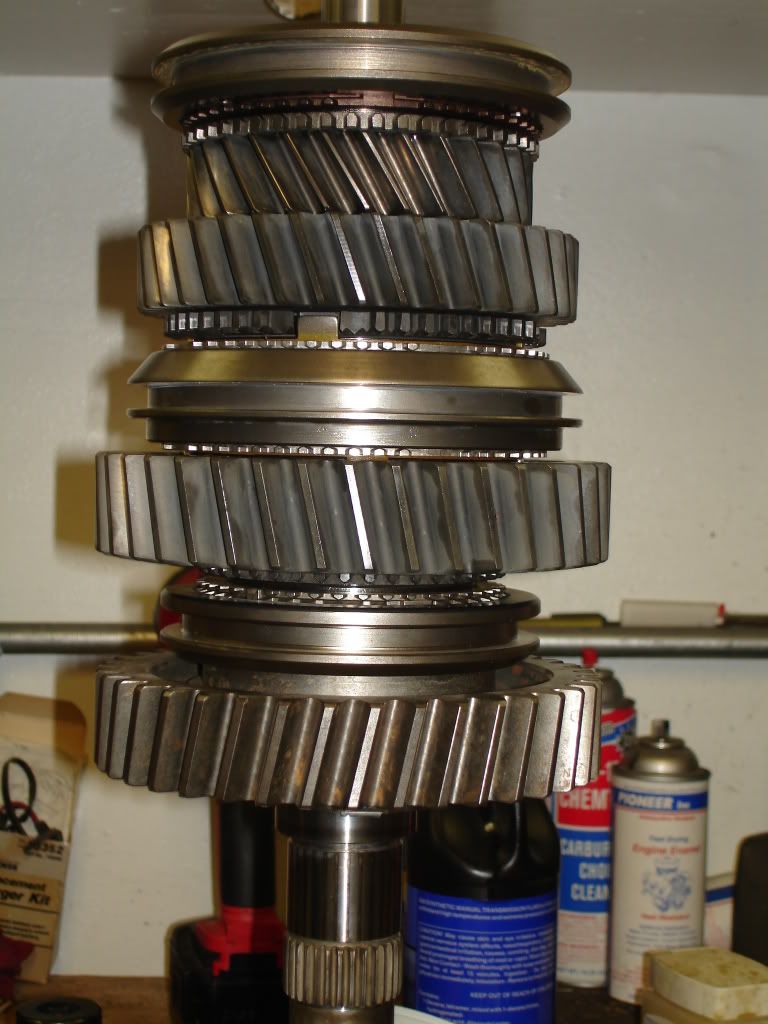 Major parts in: 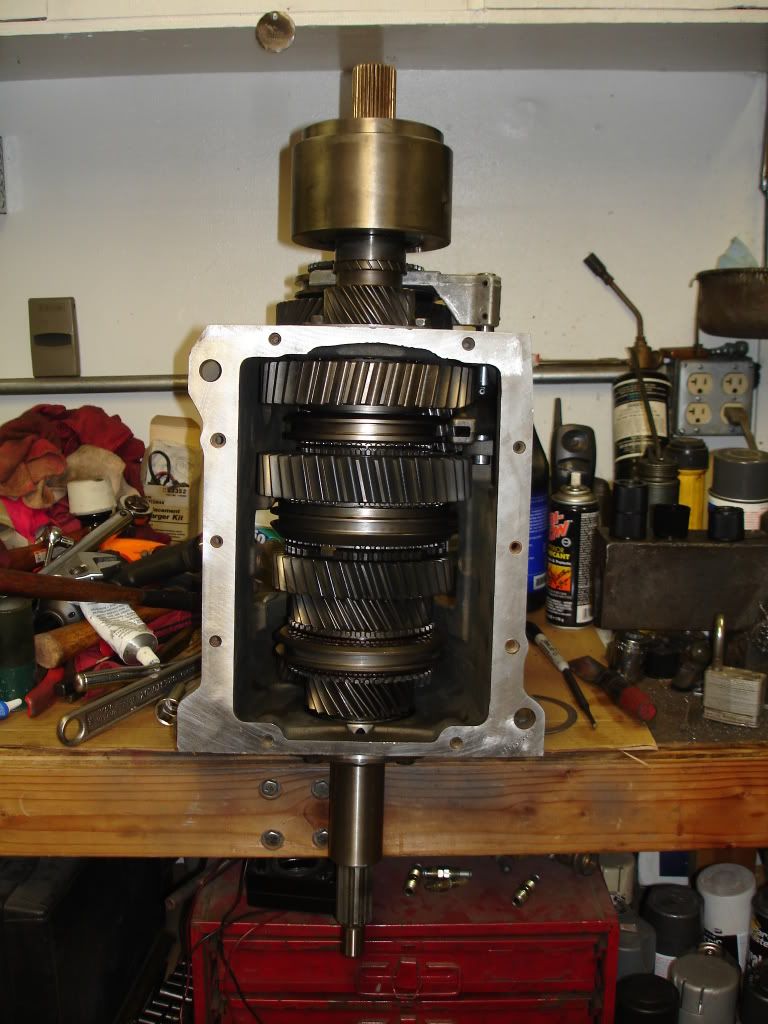 South Bend clutch and Advance Adapters bellhousing installed: 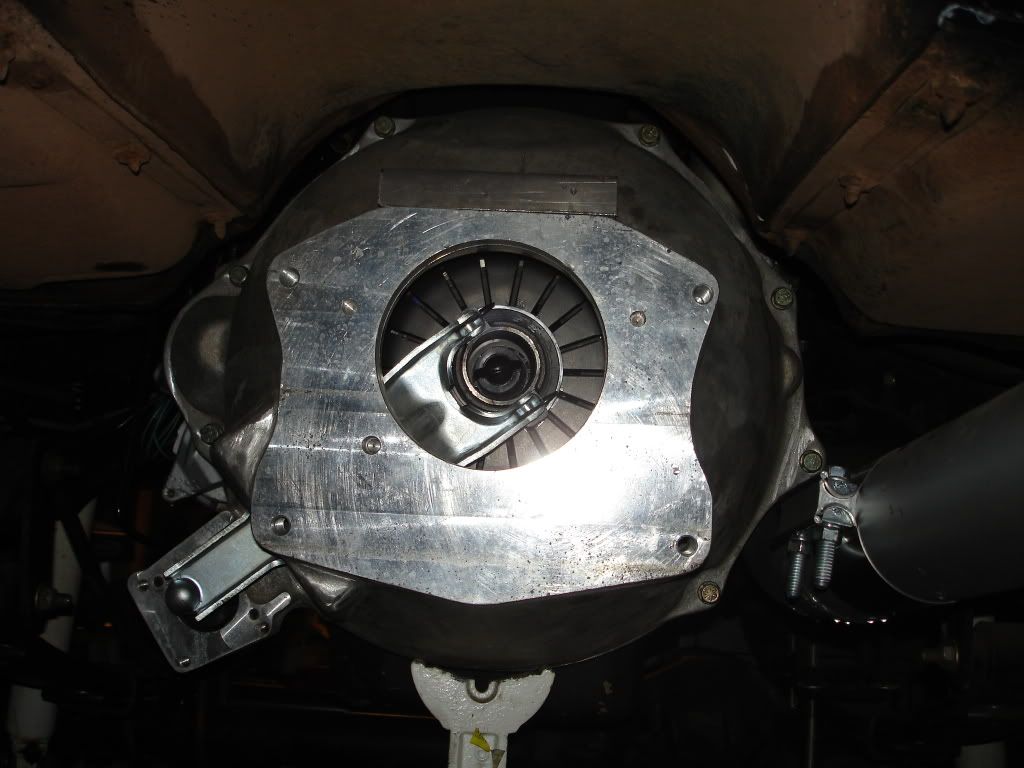 I tried a couple factory crossmembers that did not work--of course. So I ended up making my own with two pices of 1" round tubing and plated with 1/4" flat plate. The part the trans mount bolts to is what is left of a piece of 2 x 3 .188 wall tubing cut to fit the angle the crossmember sits at. Here is an installed pic: 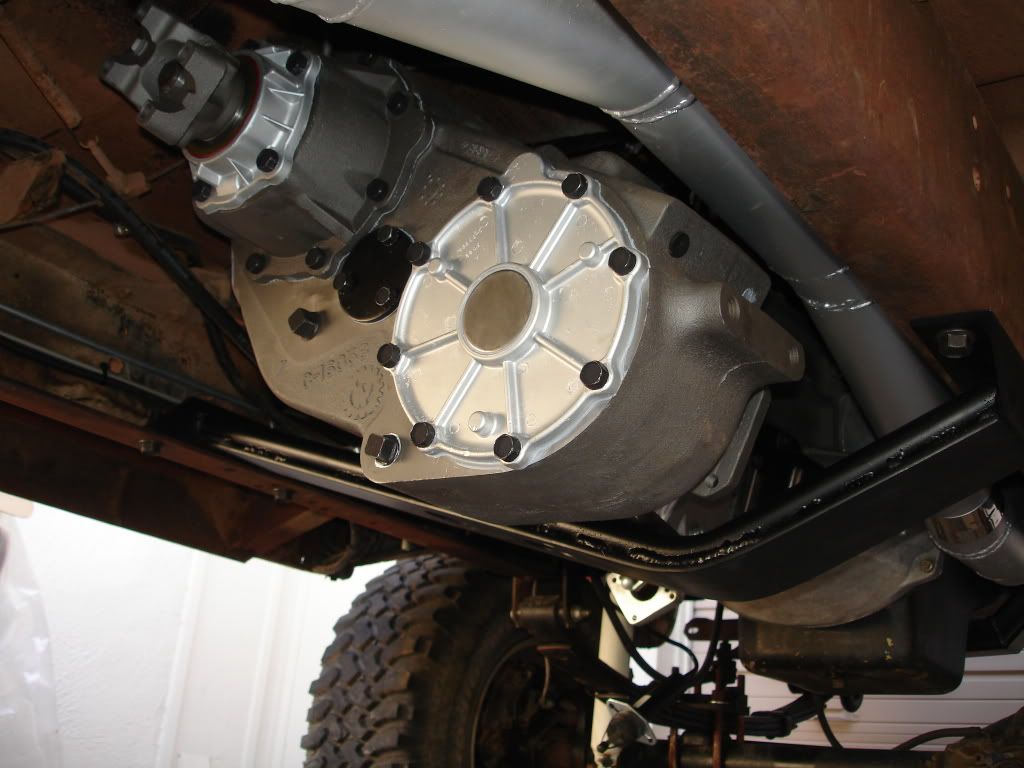 Somewhere in amongst all this, I built the exhaust system. It is a 3.5" mandrel bent system. I got some straight pipe and 180* U-bends and went to town. It turned out pretty good. I wish I could have found some smaller radius bends than I had, so the little "pie" cuts would have had some more curve to them. They look like little pieces of straight pipe when they are installed. Hell, I probably should have just made them out of straight pipe--it would have been alot easier than cutting a specific size piece out of a bent pipe. While I was making the system, I decided to punish myself a bit more and make one section of it twice--one witha muffler and one without. That way I can remove the muffler and offend at will whenever I feel like it. The sections look different, but they are actually the same as one is standing straight up and the other is leaning against the wall.  Someone mentioned exhaust pipe clearance around the transfer case. I ended up with about 1.5" above and below in this pic (although it does not show it too well). 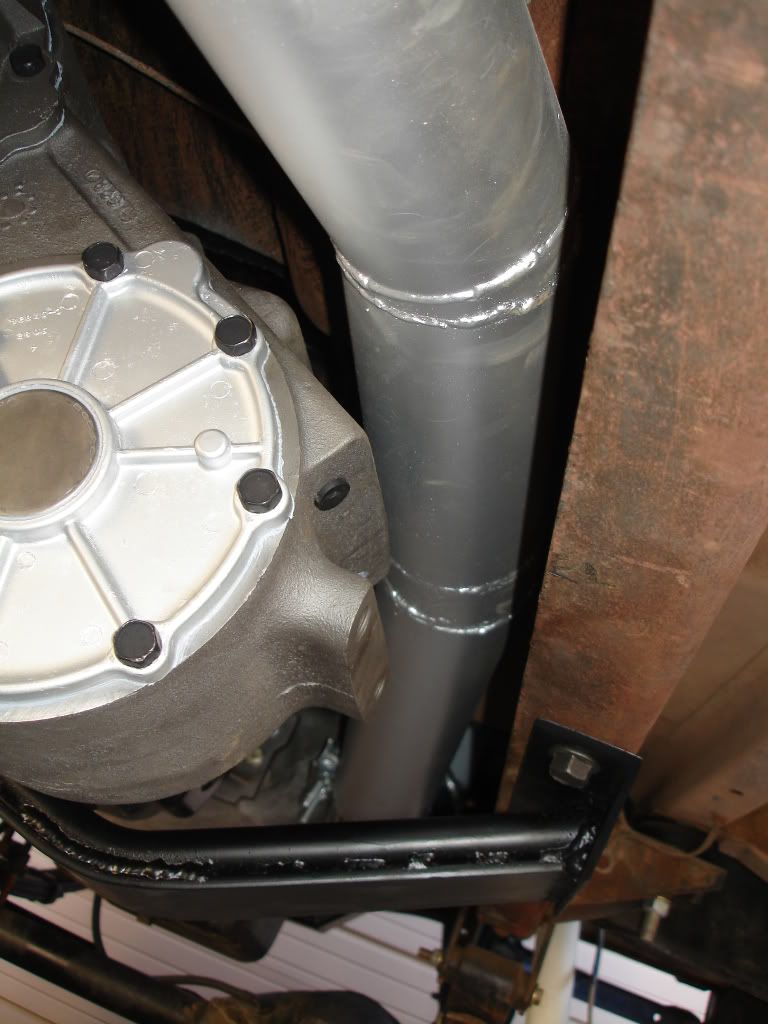 In my initial plan, I was going to need a two piece drive shaft due to length. Well, as it worked out, I had to run a one piece because I had a lot less room than I initially thought I would have. No biggie, other than I had bought a super-nice two piece shaft out of a late model. I really did not want to scrap this shaft so I found the driveshaft company that I have used for the past 18-20 years. They had moved, but I located them and one of the guys still worked there. I explained what I wanted to do and he said it could be done. What I had him do was take the front half of the two piece, swap it end-for-end, knock the carrier bearing off and machine the ends so it could be re-tubed with the heavier .083 tubing. It worked out perfect and he said the factory Spicer u-joints were still in great shape, so he left them in rather than selling me new ones. Here is what I ended up with: 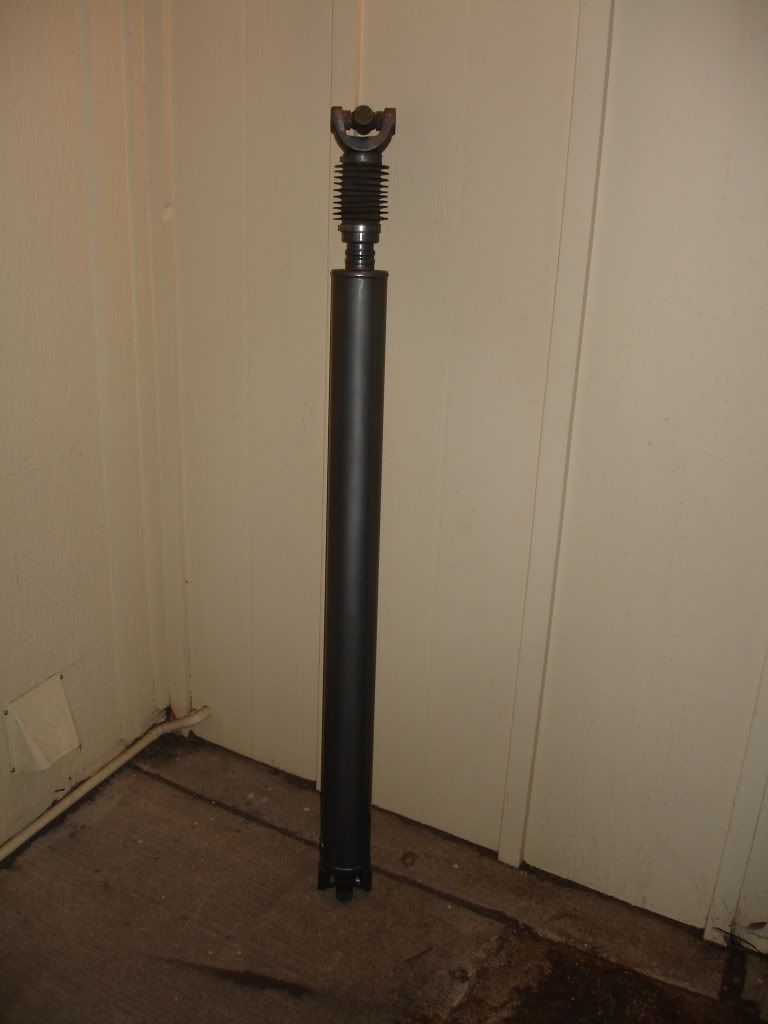 Here is a close-up of the slip joint. The inner race of the carrier bearing had to be left on for the slip joint bootie to fit correctly. It is a sealed bootie, so no dust/mud will be able to enter. 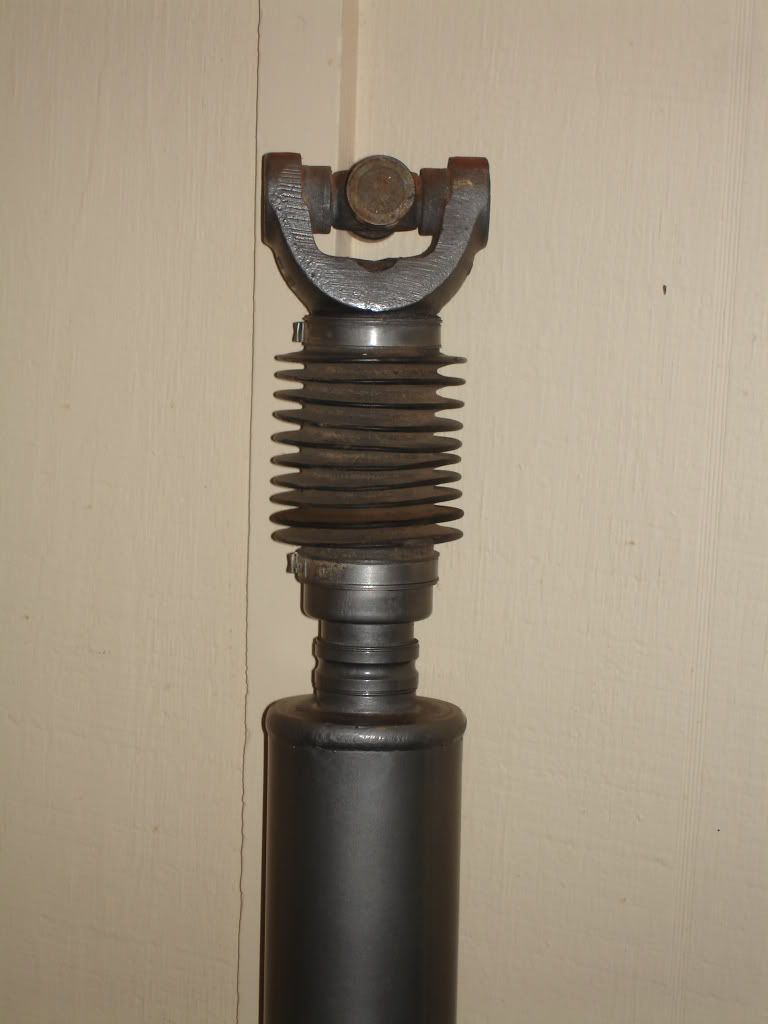 So, some of you keeping score at home may have realized that the necessary components required for this yard ornament to move under its own power are present. Now, for legal reasons, I can't say that it has been driven even around the block once [cough] or six times [/cough], but if I had I bet it would have ridden pretty damn rough for the first lap with those tires being so flat-spotted. The second lap probably would have found the tires to be more round and be able to feel out the vehicle a bit better. The third through sixth laps, I would assume, would have been very enjoyable with a contest between me and my boy to see who could fit a bigger smile on their face and knowing my boy, he would have asked to go fast again. Now of course the interior is basically missing, with the seats sturdily retained by the awesome power of gravity and there are a pile of seatbelts in there, so it would have been wise to stay in the immediate vicinity of my house, never leaving the nighborhood and never going past third gear, but I would never do such a thing...... Can we go around one more time dad?? Uh,..........OK!!!!
__________________
1972 K20 Suburban, 5.9L Cummins, Banks Power Pack, NV4500HD, NP205, H.A.D., D60/14FF ARB Link To Build: HERE. |
|
|
|
|
05-31-2009, 08:01 AM
|
#22 |
|
State of Confusion!
 Join Date: Jul 2002
Location: Gulfport, MS USA
Posts: 46,820
|
Re: The Story Of A Suburban (Lots Of Pics)
Nice. Been there done that. One of my neighbors used to be a local law enforcer. His eyes would sort of just close and make some comment about dreaming that something was on the road that shouldn't have been and he knows will disappear when he wakes up.
")
__________________
Bill 1970 Chevy Custom/10 LWB Fleetside 2010 Toyota Tacoma PreRunner SR5 Double Cab - DD Member of Louisiana Classic Truck Club (LCTC) Bill's Gallery Life isn't tied with a bow, but it's still a gift. Live simply. Love generously. Care deeply. Speak kindly. Leave the rest to God! |
|
|
|
|
05-31-2009, 10:44 AM
|
#23 |
|
Registered User
Join Date: Dec 2008
Location: K.C. Missouri
Posts: 1,024
|
Re: The Story Of A Suburban (Lots Of Pics)
Quality time with your boy, can't get any better than that.
|
|
|
|
|
06-16-2009, 11:02 AM
|
#24 |
|
Registered User
Join Date: Feb 2009
Location: Surprise, AZ
Posts: 490
|
Re: The Story Of A Suburban (Lots Of Pics)
This is awesome work. I'm constantly intrigued by dropping a diesel into my '72 k-20, but haven't worked up enough courage to do the conversion yet. I'm in the Phoenix area as well, and would love to see the work that you've done, as well as hear it run.
|
|
|
|
|
07-26-2009, 06:10 AM
|
#25 |
|
I had a V-8
Join Date: May 2003
Location: Phoenix AZ
Posts: 1,116
|
Re: The Story Of A Suburban (Lots Of Pics)
I have been getting a few things done here and there. It is tough getting the gumption up to head outside when the temp is 287 degrees F in the shade. The needle on my swamp-ass-o-meter broke off a couple months ago and its done nothing but get hotter. I have been working on the vinyl floor and other interior type stuff, but I will discuss that once I have it figured out and/or done.
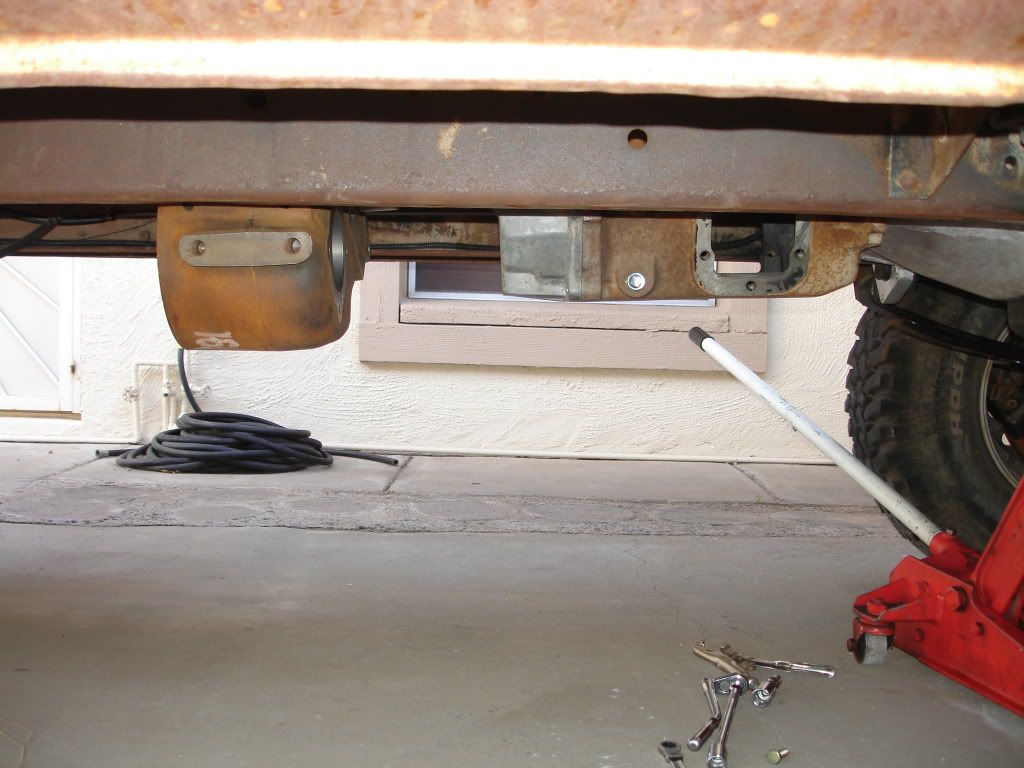
I got a front bumper on it. Mine was pretty destroyed from the frame shop, so I picked up a similarly weathered unit that looks like it has been on there for years. I did discover that it had to be notched to clear the '73-'80 tow hooks that I put on it. I knew it would need to be notched, but it was more than I expected. It ended up being about a one inch notch. No biggie for me, but if someone is viewing this as a cost effective alternative to the gold-plated correct hooks, just know that the bumper will need clearancing. The parking brake cables on the 14FF were not going to work with the lift and the '72 brackets. I need to address this issue because I need a parking brake. The pinion seal has needed replacing for many years and I need to swap the original G80 Gov-Lock unit for an open carrier with a Detroit Locker in it. I guess it is time to tear into the rear axle. 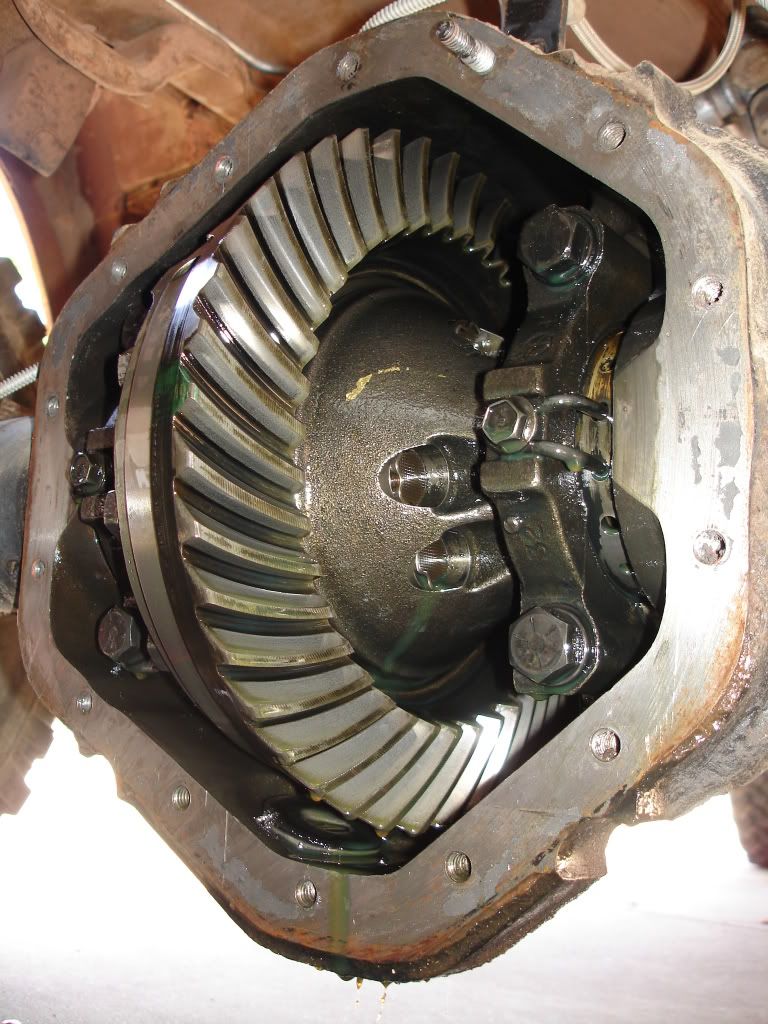 I was glad to see the ring and pinion were in fantastic shape. The backlash was in spec, so no need to replace them. I pulled the carrier out and was going to go after the pinion seal. I was going to check the pinion preload, but decided against it because it woud have been a waste of time. There was some, but nowhere near enough to bother checking. Luckily, I had enough foresight to realize this would probably be the case and I had all the pinion bearings on hand. As I was pulling the pinion support out, the UPS dude showed up with my two crush sleeves and shim kit. I always have two crush sleeves on hand so I can get the preload right the first time. I found out years ago that if I have only one, I go past the specified preload and have to go get another crush sleeve. I got the pinion support assembled and installed. I got the Detroit installed, set the backlash and sealed it up. Then I started on the parking brake cables. Years ago while killing time thumbing through a Delco catalog, I bought the longest brake cables with the two-bolt mounting that the 14 bolt uses. The are about five inches longer than the ones I have. I tried sizing them up, but they would not work. I had entertained the idea of converting to the crossover cable that the '83 and up use, but figured out a way to get these to work. Length comparison: 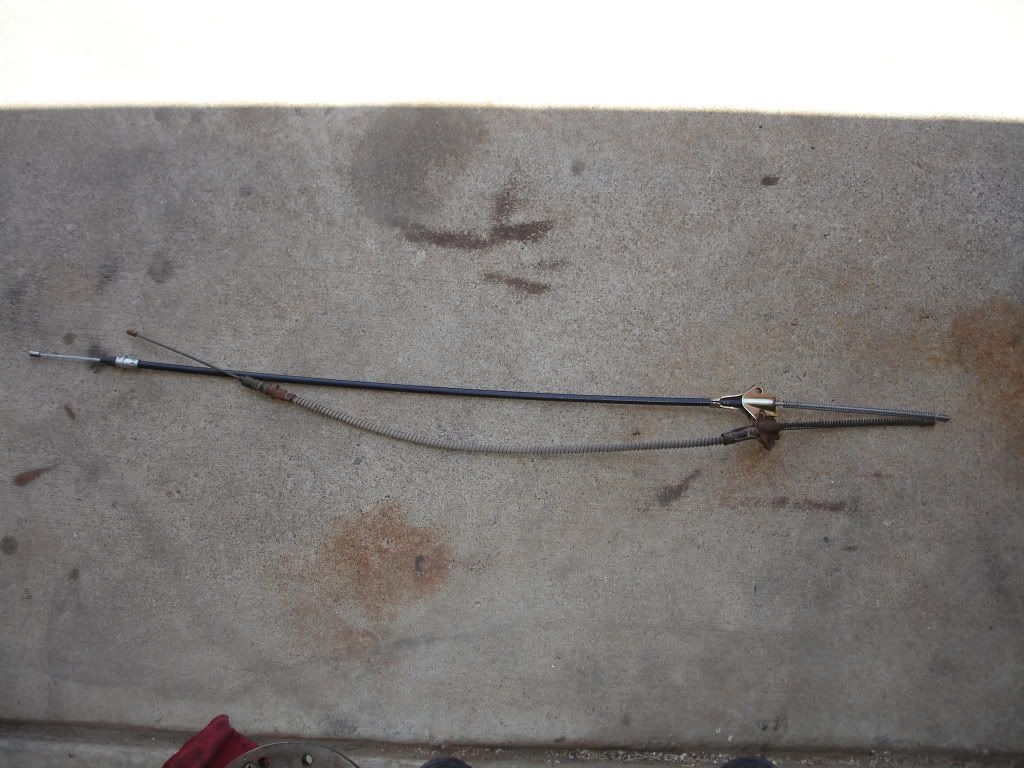 I took the bracket that was bolted to the upper flange of the frame rail and was trying to figure out a way to make it work. It was not working well until I too the one from the right frame rail and tried it on the left side. BAM!! Right there. Perfect. A little bit of cutoff whell action with some welding thrown in and I have a bracket location that nets me about 13-14" of droop before the cable becomes a limiting strap. These springs will not be capable of anywhere near 14" of droop, so it should be fine. 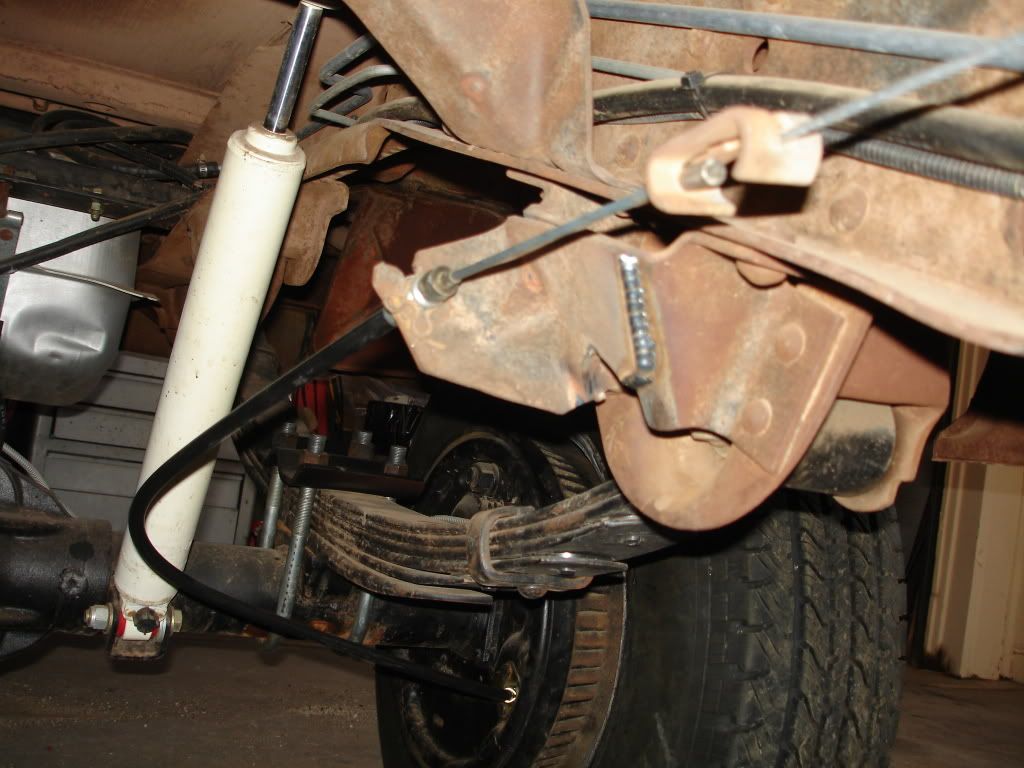 While I was in there I changed out the one ton spring mounting plates and u-bolts for 3/4 ton plates/u-bolts. 3/4 Ton units can be seen in previous pic. 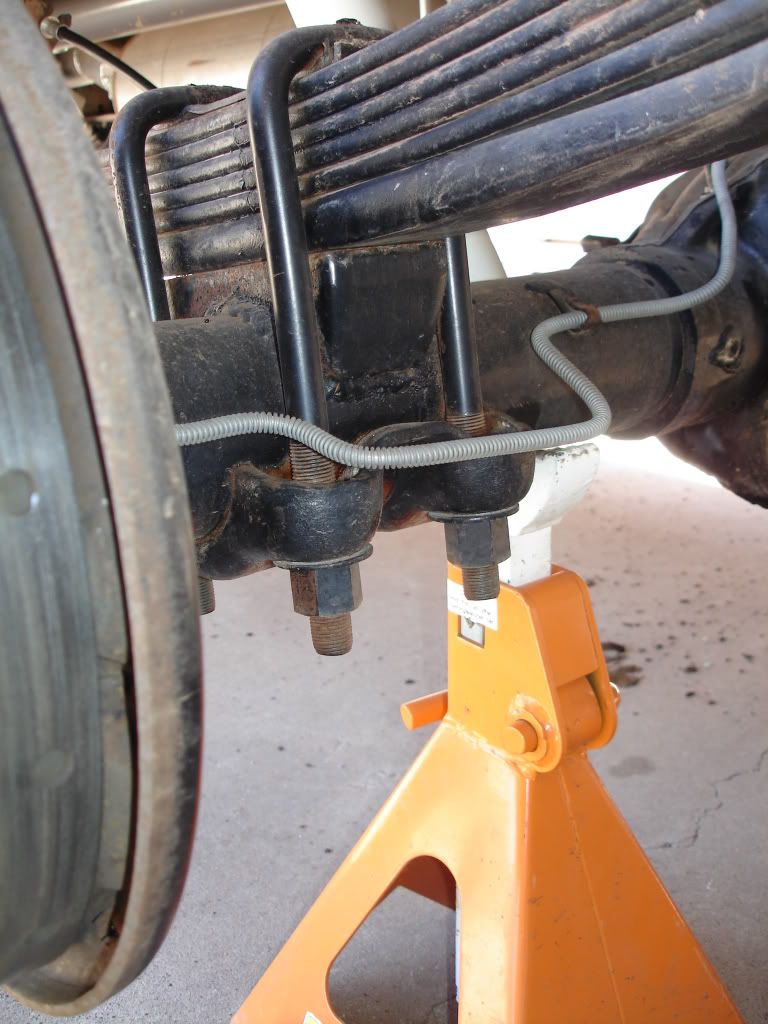 So, nothing too exciting, but progress is being made--I can park it on a surface that is not flat now!!
__________________
1972 K20 Suburban, 5.9L Cummins, Banks Power Pack, NV4500HD, NP205, H.A.D., D60/14FF ARB Link To Build: HERE. |
|
|
|
 |
| Bookmarks |
|
|


 Hybrid Mode
