
|
Register or Log In To remove these advertisements. |
|
|
|
|||||||
 |
|
|
Thread Tools | Display Modes |
|
|
 07-16-2013, 02:58 PM
|
#1 |
|
Registered User
Join Date: Jun 2010
Location: Kelowna, BC, Canada
Posts: 184
|
Re: 'Wintergreen' 1969 GMC Build
Pretty picture time!
 Got the fuel rails, injectors, etc on the intake. Hopefully tonight I can start routing my new spark plug wires.
__________________
My Build: http://67-72chevytrucks.com/vboard/s...d.php?t=547706 |

|

|
|
08-28-2013, 01:22 PM
|
#2 |
|
Registered User
Join Date: Jun 2010
Location: Kelowna, BC, Canada
Posts: 184
|
Re: 'Wintergreen' 1969 GMC Build
Alright, time for a bit of an update.
I started to dig into the fuel delivery situation. I'm trying to work with what I have, which might not have been the best idea, but I think i've got it worked out. My tank is a 16gal RCI fuel cell. It fits nicely in the rear under the bed. and since I won't be lowering the truck, I'm able to mount it a bit lower to give me room to route the fill line, possibly even without notching the cross sills. My plan is to rig up the DS rear taillight so that I can just push it in and it will swing out exposing the filler. Still some thinking to do there, but first I need to rig up the fuel cell with an in-tank pump. Rather than messing around with foam baffles and whatnot, I decided to fab up a fuel pump sump of sorts to mount the pump in. So here we go... I started by cutting out a plate to mount my supply and return bulkheads.   Then I needed to build the sump itself. I had some 22ga sheet so I drew up a flat pattern to cutout.  After cutting out, I bent it up and welded the corners and the top plate to it. The corner welds are a hack job, the metal is too thin for my skills/welder. I should have just taken the scraps from cutting out and wrapped the corners and just used rivets. might still do that yet. we'll see.  I bought a walboro 255lph in-tank pump that came with the assembly from jeep. So I hacked that up and used what I could. Also cutout a second plate to mount on the outside and sandwich the wall of the cell.  Here is the pump inside the sump. It should work well the keep fuel supplied to the pump. I might drill some small holes in the side walls so the fuel can slowly escape and fill up just so that if the tank level does drop below the wall height (although I would hope I don't run it that low), it will be able to replenish itself. 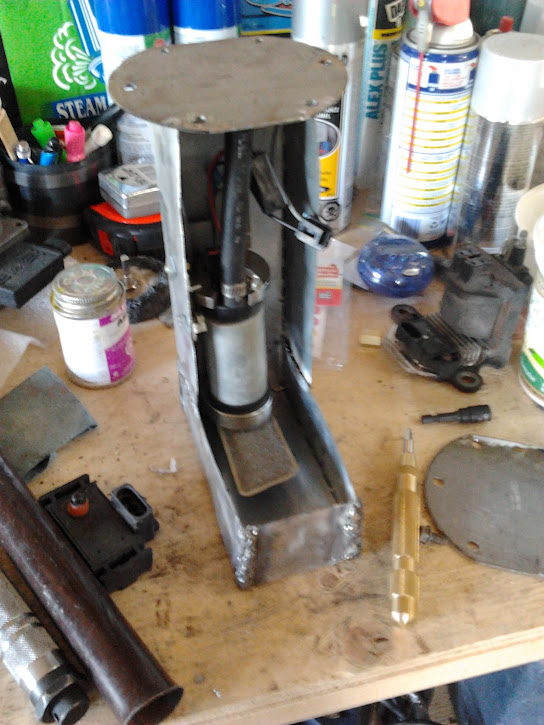 Feel free to give your opinions on this setup. Like I say I'm just trying to work with what I have. Also, was wondering whether or not to coat it with something, and if so, suggestions as to what. I was considering some kind of 2 part epoxy paint, or I know hobby shops have the 'fuel proof' paint... not sure. Thanks in advance for any advice.
__________________
My Build: http://67-72chevytrucks.com/vboard/s...d.php?t=547706 |
|
|
|
|
08-28-2013, 01:28 PM
|
#3 |
|
Registered User
Join Date: Jun 2010
Location: Kelowna, BC, Canada
Posts: 184
|
Re: 'Wintergreen' 1969 GMC Build
Also, I sold my boat, so I decided to I needed to buy another less expensive toy...
 Its a 1974 Honda Elsinore MT250. I've never had a bike before, in fact I've never ridden anything bigger than a 50. Pretty stoked to get out on the trails with this beauty. It runs great and is in pretty good shape for the vintage. It will be my next project after the truck. Until then it'll be a great bike to learn on, and enjoy some of the back country around here.
__________________
My Build: http://67-72chevytrucks.com/vboard/s...d.php?t=547706 |
|
|
|
|
11-18-2013, 12:58 PM
|
#4 |
|
Registered User
Join Date: Jun 2010
Location: Kelowna, BC, Canada
Posts: 184
|
Re: 'Wintergreen' 1969 GMC Build
First post since August. Not very impressive. Oh well at least this one has a bit of an update on the truck! I seem to get more done in the winter months anyway. One of my projects this fall involved getting the garage well insulated, so it should be pretty comfortable to work in there right through the cold season.
I got the accessory bracket cleaned up, painted, and bolted on.  Having issues with th alternator. Not only do the holes not line up (bracket bent maybe?) but it interferes with the valve cover. This is do to the fact that I'm using the corvette accessory bracket and the impala valve covers. More LT1 Fun! Guess I'll try to track down some corvette valve covers. I've heard of guys notching the alternator, but I don't like the sounds of that. Could also swap the valve cover left for right. The Right side is notched for the impala alternator, but then the breather holes are on the wrong side. So I'll weigh my options there I guess. Also got the rear brakes put together...  Thats always fun. Hopefully more soon!
__________________
My Build: http://67-72chevytrucks.com/vboard/s...d.php?t=547706 |
|
|
|
|
11-18-2013, 03:13 PM
|
#5 | |
|
Senior Member
 Join Date: Dec 2012
Location: Allen, TX
Posts: 519
|
Re: 'Wintergreen' 1969 GMC Build
Quote:
Edit: ahh...I see now--PCV and oil cap in the RT and nothing in the left. A pic is worth a thousand words!
__________________
JK Last edited by jkeating1; 11-18-2013 at 03:19 PM. Reason: none |
|
|
|
|
|
01-21-2014, 02:37 PM
|
#6 | |
|
Registered User
Join Date: Jun 2010
Location: Kelowna, BC, Canada
Posts: 184
|
Re: 'Wintergreen' 1969 GMC Build
Quote:
Managed to find a alternator at picknpull that fit without modificating. Its 105amp so should be enough for what I'm doing. Now that I know it fits, I'll pick up a rebuild kit and give it a coat of paint, it'll be like new. 
__________________
My Build: http://67-72chevytrucks.com/vboard/s...d.php?t=547706 |
|
|
|
|
|
11-19-2013, 12:54 AM
|
#7 |
|
Registered User
Join Date: Oct 2010
Location: Kelowna B.C.
Posts: 743
|
Re: 'Wintergreen' 1969 GMC Build
Lookin good buddy !

__________________
Always a place in my heart for old Chevy trucks  : :My build thread-project truck dream 65" http://67-72chevytrucks.com/vboard/s...d.php?t=510863 |
|
|
|
|
01-21-2014, 02:33 PM
|
#8 | |
|
Registered User
Join Date: Jun 2010
Location: Kelowna, BC, Canada
Posts: 184
|
Re: 'Wintergreen' 1969 GMC Build
Quote:
__________________
My Build: http://67-72chevytrucks.com/vboard/s...d.php?t=547706 |
|
|
|
|
|
01-21-2014, 02:47 PM
|
#9 |
|
Registered User
Join Date: Jun 2010
Location: Kelowna, BC, Canada
Posts: 184
|
Re: 'Wintergreen' 1969 GMC Build
Started running the ignition wires (again). At least I know there won't be any length issues (bought the cut to fit kit, and a set of LT1 terminals/boots. Left bank was easy:
 Also got the coil bracket cleaned up/painted, new thermal paste between the module and heatsink, and new ignition coil installed. Right bank requires a little more thought to get around the accessory bracket. I think I've got it figured, but will have fab up a couple little brackets, it really is slim pickings out there for simple 4 wire brackets. 
__________________
My Build: http://67-72chevytrucks.com/vboard/s...d.php?t=547706 |
|
|
|
|
01-21-2014, 02:54 PM
|
#10 |
|
Registered User
Join Date: Jun 2010
Location: Kelowna, BC, Canada
Posts: 184
|
Re: 'Wintergreen' 1969 GMC Build
Also got my Rear sway bar installed. I followed the detailed ADDCO directions to a tee.
1. Assemble Sway bar and endlinks. 2. Position swar bar and mark hole locations. 3. Drill holes 4. Bolt in place. 5. Tighten Bolts. Should work... In theory. 
__________________
My Build: http://67-72chevytrucks.com/vboard/s...d.php?t=547706 |
|
|
|
|
01-21-2014, 03:12 PM
|
#11 |
|
Registered User
Join Date: Jun 2010
Location: Kelowna, BC, Canada
Posts: 184
|
Re: 'Wintergreen' 1969 GMC Build
I've almost got my exhaust mocked up. I bought the Pypes kit from summit. Its decent quality, all stainless and mandrel bends. it is definitely taking a bit of massaging to get in there though. The directions are similar to that of the rear sway bar. Which I get as no 2 trucks are created equal, especially in the custom world.
  I'm going to have to get the pieces between the transmission cross member and header collector made up locally. Then I'll just have the collectors welded on to that.  I think I'm going to add a slight bend to the outside on the straight section behind the mufflers. Otherwise clearance to the fuel tank is only about 1/2 an inch on either side. I'd be more comfortable with an inch.
__________________
My Build: http://67-72chevytrucks.com/vboard/s...d.php?t=547706 |
|
|
|
|
01-28-2014, 01:23 PM
|
#12 |
|
Registered User
Join Date: Jun 2010
Location: Kelowna, BC, Canada
Posts: 184
|
Re: 'Wintergreen' 1969 GMC Build
Got the exhaust to the point I could on my own. I had some trouble with the passenger side tailpipe. Between the track arm and the fuel tank it just wasn't going to get enough clearance. Will have to get something bent up for that as well.
I pulled my driveshaft apart, cleaned it up and painted it. Then installed new u-joints and a new carrier bearing assembly. AND THEN! I put the cab on!   Still nee to do fuel lines and airlines, but those are things that I need to run partially on the cab.
__________________
My Build: http://67-72chevytrucks.com/vboard/s...d.php?t=547706 |
|
|
|
|
02-03-2014, 02:10 PM
|
#13 |
|
Registered User
Join Date: Jun 2010
Location: Kelowna, BC, Canada
Posts: 184
|
Re: 'Wintergreen' 1969 GMC Build
Finally got my ignition wires finished. The drivers side was the tricky part. I made a little bracket out of some leftover stainless exhaust hanger. That combined with the routing of the wires keeps everything away from the headers.
   
__________________
My Build: http://67-72chevytrucks.com/vboard/s...d.php?t=547706 |
|
|
|
|
03-07-2014, 03:11 PM
|
#14 |
|
Registered User
Join Date: Jun 2010
Location: Kelowna, BC, Canada
Posts: 184
|
Re: 'Wintergreen' 1969 GMC Build
Another LT1 Hurdle defeated. Since I was using the impala valve covers with the corvette accessory bracket, the alternator fitment was a bit of a squeeze (no indentation in the valve cover). So I went on a mission to Pick n pull. Armed with the dimensions I needed to make it fit and tape measure I was able to find a candidate from a 1993 Buick regal.
 Output on this model is 105 Amp. Should be plenty for what I am running. There was no way I was going to put this ugly piece on my motor, and without knowing its overall condition, I decided a I'd rebuild it. So started taking it apart.  Had some trouble separating the stator leads from the diodes, and all the twisting and pulling on the old leads caused them to eventually break. So along with a rebuild kit I had to spring for a new stator. Here are all the old parts layed out 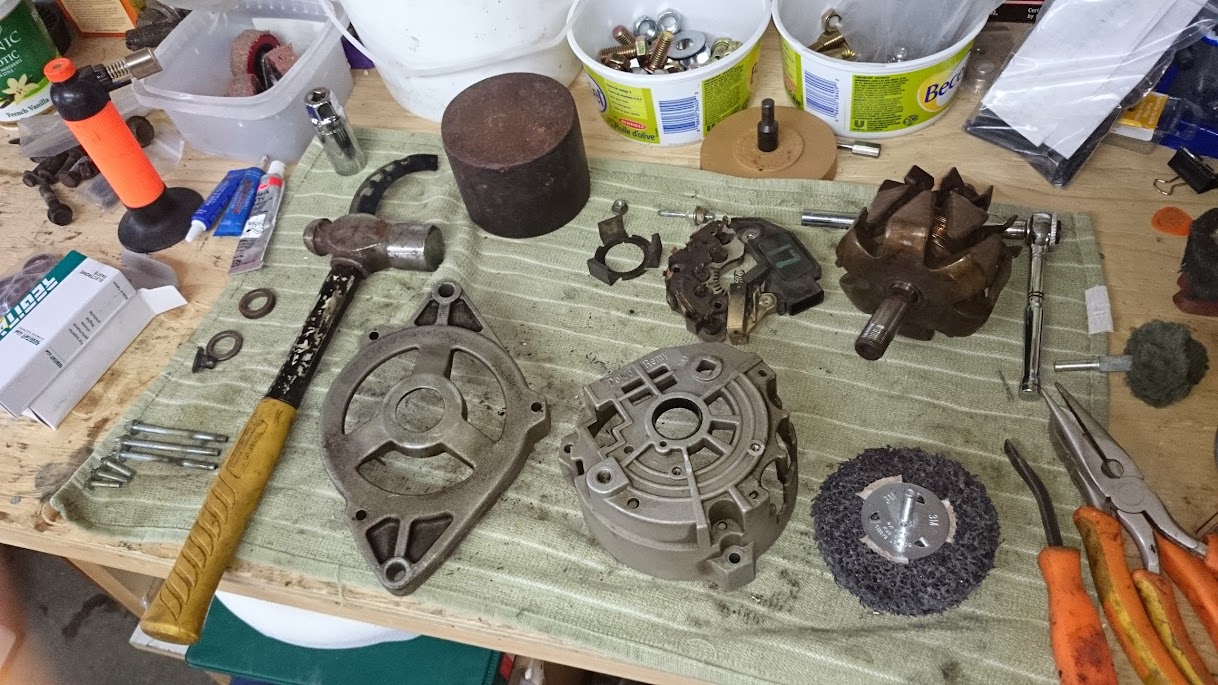 And the new parts, I was going to polish the casing, but about 3 hrs into sanding and buffing the front face, i decided that was ridiculous. so I kind of half-assesd finished the face, then wire wheeled the rest. Then I gave it a thick coat of clear. I really liked the way it turned out. Very new looking...  New bearing in the rear:  New diode trio, regulator, brushes, etc:  New Stator, I trimmed the leads and Crimped them in place. I chose not to solder them as I think the crimping will be enough and if I ever want to rebuilding it again I won't have to deal with the solder ( the reason I had trouble with the original stator):  new bearing in the front:  And voila, pretty well new alternator that fits!  I was able to find a polished stainless shroud on ebay that covers the alternator and ac compressor. So it'll be covered up for the most part, but at least it'll look good until that gets installed!
__________________
My Build: http://67-72chevytrucks.com/vboard/s...d.php?t=547706 |
|
|
|
|
03-10-2014, 12:03 AM
|
#15 |
|
Registered User
Join Date: Feb 2014
Location: Kelowna BC
Posts: 73
|
Re: 'Wintergreen' 1969 GMC Build
Looks nice
Been meaning to call, need to look at your trim pile, as all the trim is missing off mine Barry |
|
|
|
|
04-13-2014, 10:26 AM
|
#16 |
|
Registered User
Join Date: Jun 2010
Location: Kelowna, BC, Canada
Posts: 184
|
Re: 'Wintergreen' 1969 GMC Build
For sure Barry, give me a call, I've got a decent amount left.
Not too much to update. Pulled the airbags off and installed there fittings then started running the lines.  Had the rad support, battery tray, etc sand blasted then gave them a coat of paint. Here is the rad support installed. 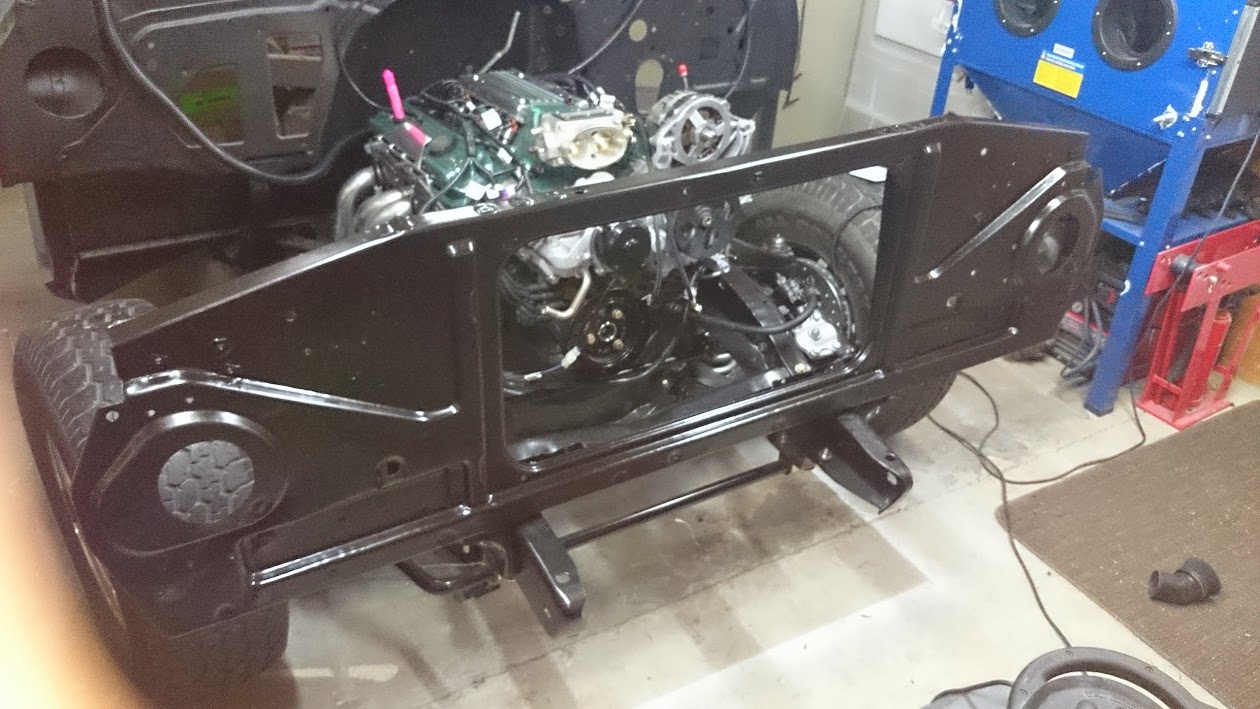 Started to layout the engine wiring harness. Wanted to make sure everything fit properly. Unfortunately it was close but no cigar. The wiring harness was made to work for the impala/camaro/firebird LT1 and since I had upgraded to the corvette accessory bracket, some of the electrical components, mainly the ignition module/coil, had jumped to the opposite side of the engine. So I had to rip apart my nice new wiring harness to fix that. So that's done know, but I still need to install all the sensors on the engine to make sure everything else is good.
__________________
My Build: http://67-72chevytrucks.com/vboard/s...d.php?t=547706 |
|
|
|
|
04-29-2014, 01:14 PM
|
#17 |
|
Registered User
Join Date: Jun 2010
Location: Kelowna, BC, Canada
Posts: 184
|
Re: 'Wintergreen' 1969 GMC Build
Well not too much to report on the build. I've been over in Sweden the past few weeks. Finishing body work as begun though, and hopefully I'll have a painted truck sometime by the end of May.
I did however make another awesome purchase.  1972 3/4 ton Custom Camper. Runs and drives great, everything works, plenty of rust to go around. Bought it site unseen for $700. Drove it home from Vernon last night (~30miles) without issue. Its going to be my yardwork, reno, dump runner. I'll fix it up a bit as I go. The best part is, the guy I bought it off has the original camper it came with in 1972. Hes happy to give it to me for next to nothing, I just have to find somewhere to put it where my better half won't have to look at it!
__________________
My Build: http://67-72chevytrucks.com/vboard/s...d.php?t=547706 |
|
|
|
|
06-05-2014, 08:27 PM
|
#18 |
|
Senior Member
Join Date: Dec 2012
Location: Allen, TX
Posts: 519
|
Re: 'Wintergreen' 1969 GMC Build
what's happening w the 20? or the main build?
__________________
JK |
|
|
|
|
06-09-2014, 12:36 PM
|
#19 | |
|
Registered User
Join Date: Jun 2010
Location: Kelowna, BC, Canada
Posts: 184
|
Re: 'Wintergreen' 1969 GMC Build
Quote:
So new floor is in now:   Also patched up a the spot around the windshield (properly)  Still a couple more things to be done to the cab, but will hopefully be sprayed by the end of the week and I can start putting it together.
__________________
My Build: http://67-72chevytrucks.com/vboard/s...d.php?t=547706 |
|
|
|
|
|
07-07-2014, 12:33 PM
|
#20 |
|
Registered User
Join Date: Jun 2010
Location: Kelowna, BC, Canada
Posts: 184
|
Re: 'Wintergreen' 1969 GMC Build
Cab is painted! I ended up changing the paint last minute, going to a Matrix Base and Dupont Clear. I changed colours a bit as well, dropping the metallic from the green lightening it a bit, glad I did. The colours are woodland green and bright artic white, kinda goes with the whole wintergreen thing.
  Hopefully have the cab back on the chassis today, and start putting the interior together sometime this week.
__________________
My Build: http://67-72chevytrucks.com/vboard/s...d.php?t=547706 Last edited by rusty_67; 07-07-2014 at 12:34 PM. Reason: Fix Image |
|
|
|
|
07-07-2014, 07:17 PM
|
#21 |
|
Senior Member
Join Date: Dec 2012
Location: Allen, TX
Posts: 519
|
Re: 'Wintergreen' 1969 GMC Build
Looks great! Good choice.
I have wished my defroster vents had been painted when the dash was. The black stands out against my red painted dash--you can really see them through the windshield. If that will bother you, you might want to paint a pair of them green while the paint is out.
__________________
JK |
|
|
|
|
06-05-2014, 10:55 PM
|
#22 |
|
Registered User
Join Date: Feb 2014
Location: Kelowna BC
Posts: 73
|
Re: 'Wintergreen' 1969 GMC Build
Cool yard truck
|
|
|
|
|
07-09-2014, 09:11 AM
|
#23 |
|
2WD Jimmy
Join Date: Mar 2005
Location: Davis County, Utah
Posts: 2,563
|
Re: 'Wintergreen' 1969 GMC Build
Beutiful Color!
|
|
|
|
|
07-15-2014, 04:23 PM
|
#24 | ||
|
Registered User
Join Date: Jun 2010
Location: Kelowna, BC, Canada
Posts: 184
|
Re: 'Wintergreen' 1969 GMC Build
Quote:
Quote:
Spruced up my instrument cluster a bit. New bezel, new whitface gauge stickers, and painted a few parts. I like how the white brightens it up a bit. This was a pretty simple job all said and done and I think it came out great.   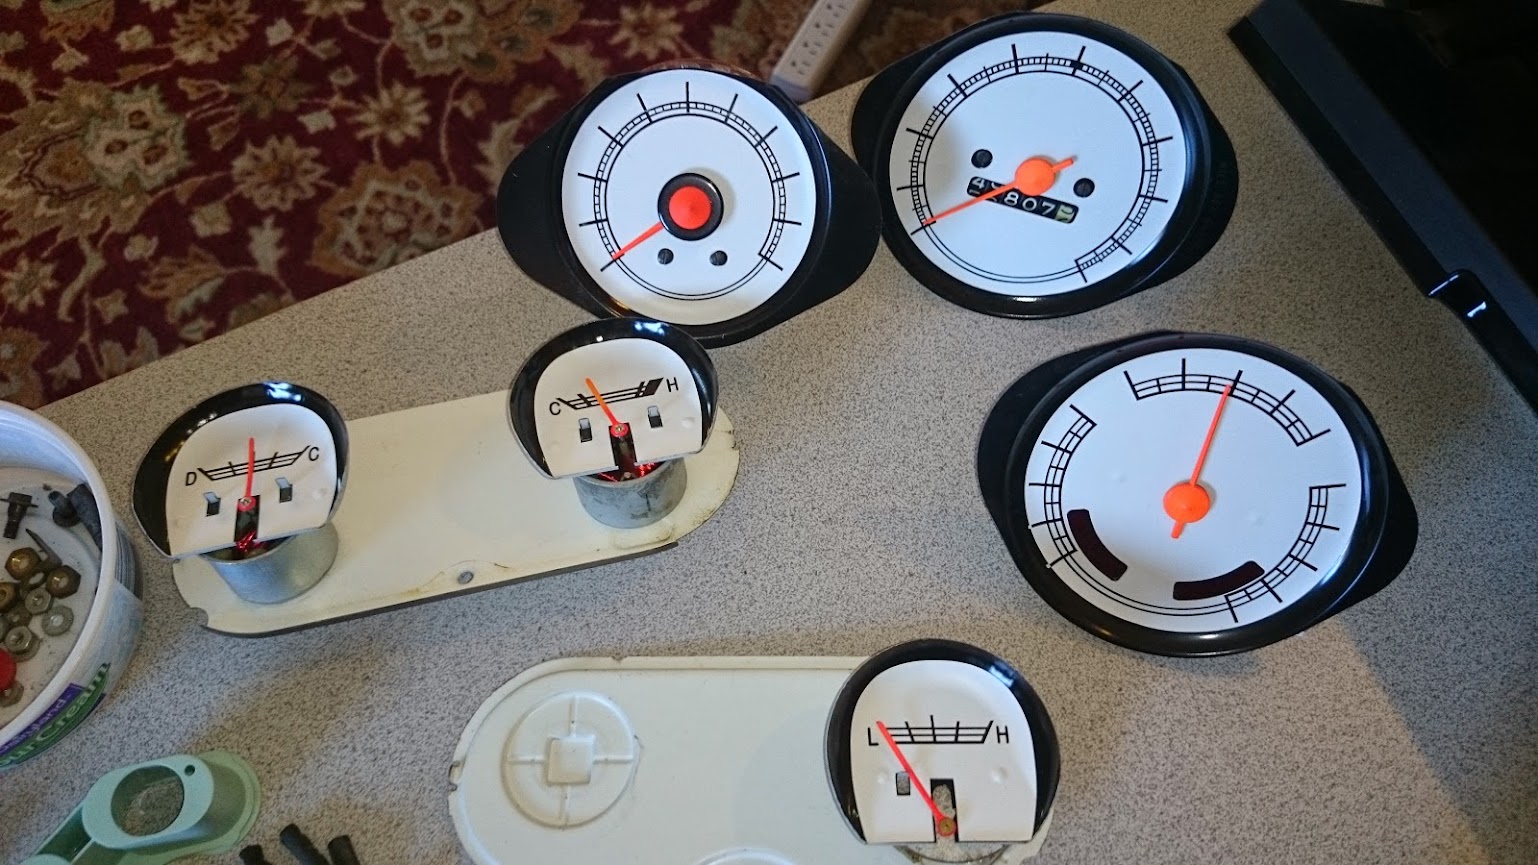  
__________________
My Build: http://67-72chevytrucks.com/vboard/s...d.php?t=547706 |
||
|
|
|
|
07-15-2014, 06:46 PM
|
#25 |
|
Registered User
Join Date: Aug 2012
Location: Topeka Kansas
Posts: 2,655
|
Re: 'Wintergreen' 1969 GMC Build
Great job on the instrument cluster it looks very nice.
|
|
|
|
|
| Bookmarks |
|
|


 Hybrid Mode
