
|
 10-14-2014, 02:49 PM
|
#76 |
|
Registered User
Join Date: Apr 2014
Location: Phoenix, AZ
Posts: 13
|
Re: The pusher
I know I said it before up the line, but this truck has a "presence" that I don't normally see in trucks. See, truth be told, my forte is very traditional stuff such as Model "T", Model "A", and '32-'40 stuff, and honestly "late model" stuff doesn't normally register... 'Till this one!
When Grant picked it up the other night, it was just about dark under a typically awesome Arizona "The sky is on fire" type sunset, and he pulled out of my driveway and up next his awesome wife's truck to talk before their 40 mile jaunt back home. I sat and just looked at this thing sitting in my narrow turn of the century street out front in awe... Under the lights it just looks b1tchin'!! Sounds b1tchin' too! I've been honored to be a part of this build. Last edited by need louvers ?; 10-14-2014 at 03:12 PM. |

|

|
|
10-14-2014, 03:11 PM
|
#77 |
|
Registered User
Join Date: Apr 2014
Location: Phoenix, AZ
Posts: 13
|
Re: The pusher
Grant had said some one was asking about which crank pulley I used in this installation. That was a bit of an odyssey on this one. See, for some reason, this truck was equipped with a rudimentary batch of smog controls from the factory in '64.... I know that doesn't sound even reasonable, but every body that I have talked to about this and shown it to simply scratches their head and wonders, too. It was ALL factory, as well. But the lower pulleys that came on this truck were like no other Chevy stuff that I or any body had seen, and were slightly different off set than others that I had here. All had Chevy part numbers. So, long story short, I used the stock cast lower three grove pulley, but needed a to groove upper. I found what was supposed to match via a Chevy truck parts guy in California via E-bay, but when it arrived it matched the other "standard" Chevy short pump two groove pulleys I had around, which put it about 3/8" off from the lower.
I lucked out in finding a guy in far east Mesa that runs a small business parting these trucks, that didn't wrinkle his nose and tell me I was nuts as I told him what was up... And he just happened to have another "oddly" equipped '64 in.... with a two groove water pump pulley! All matched and was well. I used a Vintage Air direct fit kit on this truck, and would recommend it to anybody, but I do have to mention that due to things such as the fresh air inlet hoses on Grant's truck, I did end up modifying lots of it. About the biggest was the compressor mount. When we did the engine earlier this year, I noticed that the "Corvette" style 2 1/2" ram's horns that Speedway is reproducing had accessory mount on both sides as opposed to the standard's driver's side only. Taking advantage of this fact, instead of running the Vintage Air semi kinda ugly self supporting compressor bracket, I made up one that would utilize that Corvette ram's horn's mounts... Hard to see in photos, but it looks like it belongs there since the beginning of time. |
|
|
|
|
10-14-2014, 03:25 PM
|
#78 |
|
Registered User
Join Date: May 2013
Location: Scottsdale, AZ
Posts: 373
|
Re: The pusher
If you live in Phoenix and you want quality custom work done then Chip is probably your guy.
|
|
|
|
|
10-14-2014, 04:55 PM
|
#79 |
|
Registered User
Join Date: Aug 2007
Location: clifton tx
Posts: 209
|
Re: The pusher
i would love to hear more on the pvc system plus more pics
|
|
|
|
|
10-14-2014, 09:35 PM
|
#80 |
|
Registered User
Join Date: Apr 2014
Location: Phoenix, AZ
Posts: 13
|
Re: The pusher
Okay, let's see if I can remember how to post pictures in V-bulletin!
Basically, what I did was take a brand new Edelbrock RPM manifold, and had a buddy cut an oil fill hole on his mill for me. The next thing I did was to find a spot back behind the carb that had a boss adjacent on the underside, but would also end up low profile enough to fit under the air cleaner. After much deliberation, a counter bored hole was made in just the right spot. I wish that I had photographed the way I cut the concentric holes, as it was the first time I use a new technique to me. What I did was to take deep 5/8" hole saw, and my shallow 1" hole saw and thread them on the same mandrel. I drilled a 1/4" hole in the "right spot", and used that to pilot the hole saws. The 5/8" cut through first leaving a nicely machined hole for the grommet to seat on. as the 5/8" went through, the 1" registered and cut a perfect counter bore for the seal to drop into and out of sight. Easy-peasy! And damn near perfect! The next problem was, that if the PCV was allowed to run unshielded in the lifter valley, it would be susceptible to picking up airborne oil vapor and pulling it through the induction... Not gonna happen on my watch! so flipped the manifold over, found that adjacent undrilled boss, centered it, drilled it with a starter bit, drilled to size, then tapped 1/4-20. Next came the baffle or "well" for the PVC to sit in. That was handled with a stray piece of .090 3003 aluminum. The softer grade aluminum is important, as it resists work hardening with the engine's vibrations over time. Cut it out, drill some random oil return holes, bolt it in place with an aircraft grade 1/4 allen with a drop of Loctite to prevent the securing screw from dropping into engine hell... I couldn't find a picture of the finished deal, but it is plumbed right into the carb's manifold vacuum port on the backside of the engine with a couple of small cuffs of rubber hose, and another hand formed hard line.... Done! Kinda. |
|
|
|
|
10-14-2014, 09:41 PM
|
#81 |
|
Registered User
Join Date: Apr 2014
Location: Phoenix, AZ
Posts: 13
|
Re: The pusher
One last one... The other end is a tube welded into the fill tube that has a hard line that attaches into the air filter base with rubber hose cuffs at either end. Simple, kinda factory lookin', done.
|
|
|
|
|
10-14-2014, 09:46 PM
|
#82 |
|
Registered User
Join Date: Apr 2014
Location: Phoenix, AZ
Posts: 13
|
Re: The pusher
Hope Grant doesn't scalp me for this one, but I ran across the only picture I took of the engine compartment the day I started... This was a very well preserved, but very, very dirty engine compartment!
|
|
|
|
|
10-15-2014, 01:07 AM
|
#83 | |
|
Registered User
Join Date: May 2013
Location: Scottsdale, AZ
Posts: 373
|
Re: The pusher
Quote:
|
|
|
|
|
|
10-15-2014, 11:28 PM
|
#84 |
|
Registered User
 Join Date: Mar 2005
Location: apple valley, ca
Posts: 2,670
|
Re: The pusher
I am a huge fan of this truck, and I am so impressed at how it turned out. I have the honor of knowing Chip personally, and I can attest to his abilities. He is a crafty dude, who has a very fertile imagination and the mechanical ability to make it happen. I have always thought that if the show "Junkyard Wars" ever came back on TV, I would have Chip on my team. He and I have the same mindset. To me, ordering from a catalog is my last option. I would rather build something from parts I already have, or hit the swap meets and wrecking yards and with a little homework and some crafty fabrication, end up with a part that even the fools the experts.
I love the PVC idea! The trick with the holesaws was brilliant. It looked like it was done with a mill. I have a feeling that someday soon, Chip will have a truck project and a build thread on this site.
__________________
Check out my latest endeavor: https://roundsixpod.com My build threads: '55 Chevy: http://67-72chevytrucks.com/vboard/s...d.php?t=247512 '64 C-20: http://67-72chevytrucks.com/vboard/s...d.php?t=446527 |
|
|
|
|
10-15-2014, 11:36 PM
|
#85 |
|
Registered User
Join Date: May 2014
Location: Western ND
Posts: 198
|
Re: The pusher
Im gonna do something like that, but i am going to use the OG Baffle for the Road draft tube and put the PCV in the Hole in the block behind the intake. Run a hardline under the dizzy and to the back of the carb.
yours is probably more concealed.
__________________
Current Project : 1962 Chevy SWB Fleetside Others, 1958 Edsel Villager Station Wagon 1926 Ford Model T Roadster Hotrod www.suedescarclub.com |
|
|
|
|
10-16-2014, 03:24 PM
|
#86 |
|
Senior Enthusiast
Join Date: Feb 2007
Location: Spokane Valley, WA
Posts: 8,356
|
Re: The pusher
Thanks Chip for taking the time to explain and share the pictures. Looks like artwork! I've had a lot of people ask me about making another setup like mine. On future requests I'm sending them to this thread. I don't know that it's any less work, but the end result is much simpler design. That engine is so beautiful I just didn't want to see anything bad happen to it. Regards, Mark.
__________________
My Build Thread: http://67-72chevytrucks.com/vboard/s...d.php?t=444502 |
|
|
|
|
10-17-2014, 06:36 AM
|
#87 |
|
Registered User
Join Date: Apr 2008
Location: Md
Posts: 2,460
|
Brilliant, (machine work) as for the truck Awesome....
|
|
|
|
|
10-20-2014, 05:28 PM
|
#88 |
|
Registered User
Join Date: May 2013
Location: Scottsdale, AZ
Posts: 373
|
Re: The pusher
I finally got around to using CLR to remove the rust from the tailgate. I need to get it all pretty for Dino's party next month. Here are before and after pics.
 
|
|
|
|
|
10-20-2014, 05:33 PM
|
#89 |
|
Registered User
Join Date: May 2013
Location: Scottsdale, AZ
Posts: 373
|
Re: The pusher
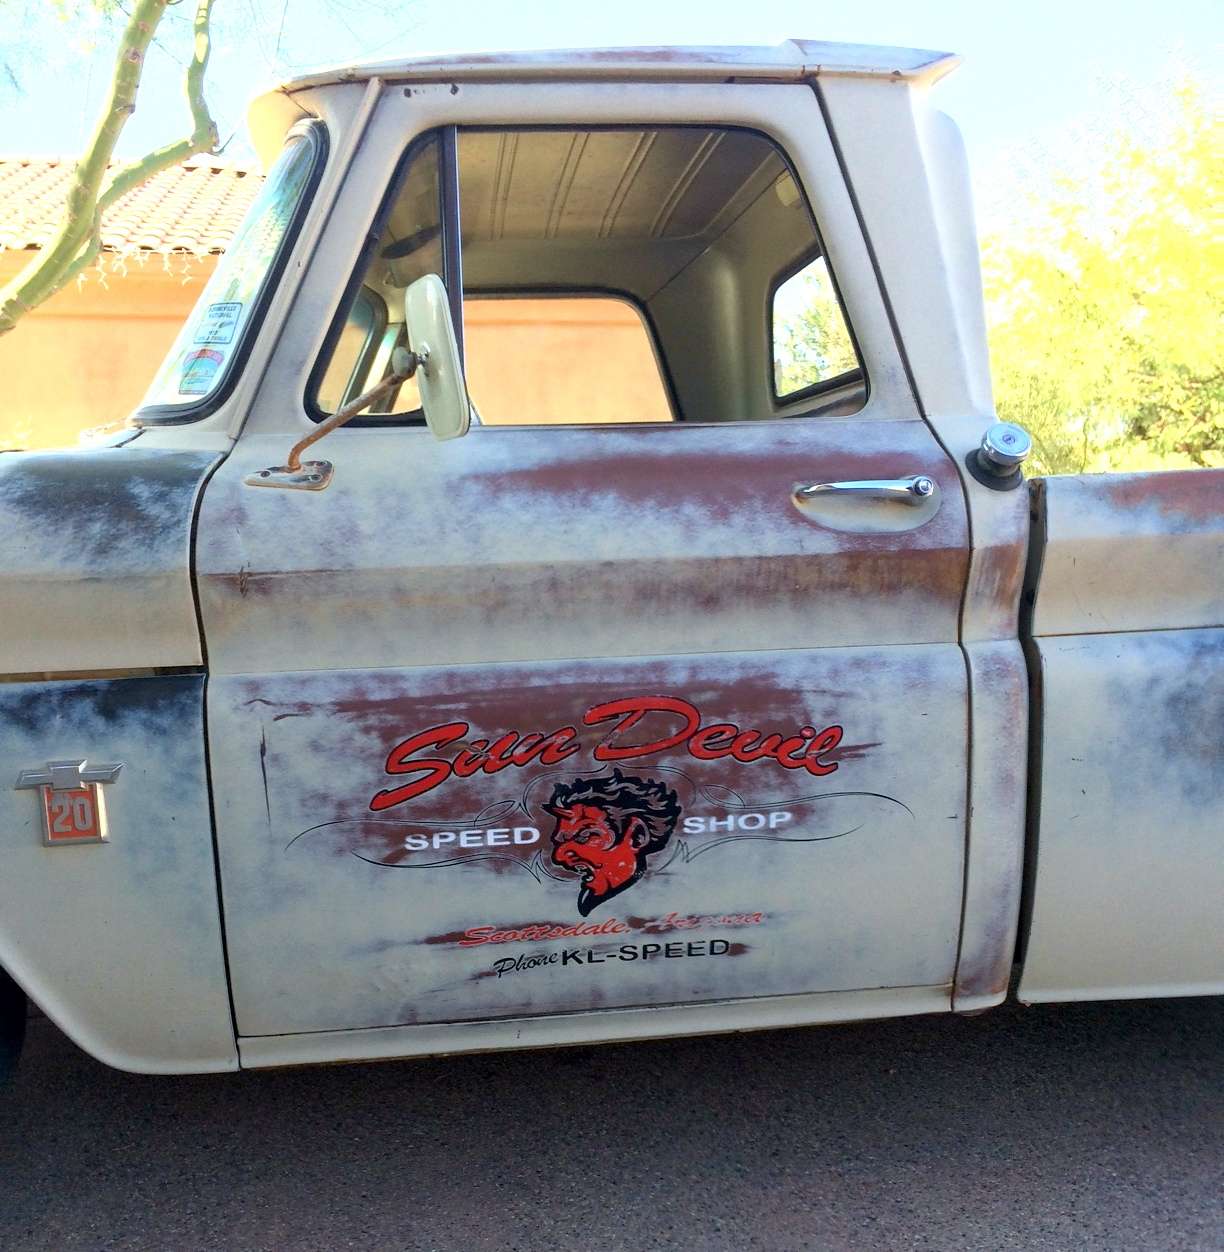
I also did the same to the grill. It has been suggested that I powder coat the front bumper and the grill with white paint to make them "pop." What do you all think? Leave it as-is or do a little powder coating?

|
|
|
|
|
10-20-2014, 10:06 PM
|
#90 |
|
Registered User
Join Date: Nov 2013
Location: Richmond Virginia
Posts: 69
|
Re: The pusher
Hello,
I have been following thread for a while, what a phenominal build! I personally like the way that the grill looks after you applied the CLR and it looks "Great" with the rest of the body. I also like the way that the white lettering stands out in the grill - looks wonderful. Do you have any plans for a rear bumber(paint or chrome maybe)and if so, would you be able to find one that has a similar patina to the front bumper and grill? Just a thought. My truck has powdercoating but has a little different paint scheme. Good luck with your decision.......It's a "Great Truck". |
|
|
|
|
10-21-2014, 12:05 AM
|
#91 |
|
Registered User
Join Date: May 2013
Location: Scottsdale, AZ
Posts: 373
|
Re: The pusher
Thank you everyone for the positive compliments on the build. I discovered this forum right after I had bought the truck. I bought the truck because it was for sale down the street and it looked cool with the patina and was a rust-free survivor. At that time I had never owned a C10 and had no idea what to do with it. I did know Chip from a previous build and he introduced me to guys like Alex (Chevyrestoguy) and Dino. I also read all the build threads n this forum and learned a lot. Over time my vision of doing the truck as if it was a vintage Bonneville-style pusher truck was shaped and it that vision that guides the steps. First was making it reliable and equipping it for modern speed limits. Second was making it comfortable in the cab. Next will be disk brakes, lowering it and swapping the rear-end for better gearing. After that will come interior work to make it more soundproof.
- G |
|
|
|
|
10-23-2014, 10:58 AM
|
#92 |
|
Registered User
Join Date: Apr 2014
Location: Phoenix, AZ
Posts: 13
|
Re: The pusher
Well, you know how I stand on the bumper grill question!
When Bodi did his grill/bumper in white a couple of years ago, I absolutely couldn't believe the difference it made on his also "patina" truck. It seems to subtly "clean" the overall look of the truck up without looking too "blingy" and overdone... You know, not contrived. Kinda the same way putting a nice set of tires and wheels changes things for the better. If your truck had all the Custom Cab trim and such, I'd be the first to say chrome, but I think in this case keeping it "unluxe" and clean would keep the vibe that stirs my soul.... I dig Bodi's front bumper on the back idea, too. I might still have that number for the aluminum grill on my desk somewhere, too. I could still see that brushed to match the caps with white bumpers, too. |
|
|
|
|
10-28-2014, 03:31 PM
|
#93 |
|
SIR
Join Date: Apr 2005
Location: grants pass oregon,usa
Posts: 658
|
Re: The pusher
found some "push-truck" photos from "back in the day"....great truck!!
__________________
66long low fleet http://community.webshots.com/user/LVNR66 |
|
|
|
|
10-28-2014, 03:39 PM
|
#94 | |
|
Registered User
Join Date: May 2013
Location: Scottsdale, AZ
Posts: 373
|
Re: The pusher
Quote:
|
|
|
|
|
|
11-18-2014, 09:48 PM
|
#95 |
|
Registered User
Join Date: May 2013
Location: Scottsdale, AZ
Posts: 373
|
Re: The pusher
I found a local guy who does some good hammer and dolly work for cheap money. My truck had some major dents and creases in both doors. I don't intend to paint it or do any body work as I love the original look but I felt that the truck could still look a little better. I knew it wouldn't come out perfect but I am very satisfied with the results and the job cost was extremely low. PM me if you are in Phoenix area and want a referral for inexpensive metal work. Here is a before and after pic. I will tell you that the "before" pic does not really do justice to how deep the dent was or how heavily it was creased. The two vertical creases below the mirror are completely gone even though the marks left are still there. This was all done while the doors remained on the truck.
|
|
|
|
|
11-19-2014, 01:26 AM
|
#96 |
|
Registered User
Join Date: Apr 2014
Location: Phoenix, AZ
Posts: 13
|
Re: The pusher
Wow! Much better!
|
|
|
|
|
11-19-2014, 07:04 AM
|
#97 |
|
Registered User
Join Date: Nov 2013
Location: Richmond Virginia
Posts: 69
|
Wow, pretty awsome! Does he travel to Virginia?

|
|
|
|
|
04-13-2015, 04:23 PM
|
#98 |
|
Registered User
Join Date: May 2013
Location: Scottsdale, AZ
Posts: 373
|
Re: The pusher
I have had a pretty hectic schedule the last few months so I haven't had time to post much but I wanted to provide an update on my truck.
Firstly, I have put over 3,500 miles on it since Chip built the motor and it has been fairly seamless. I did have to replace the distributor some time ago because the original wasn't properly retarding and the truck would sometimes idle too high when stopped at an intersection and other times it would bog and stall (usually right when the light turned green.) Every stop light I approached (and we have a million here in Phoenix) was an adventure. Since then, it has been flawless and it has a noticeable pick-up in power. I love the 5-speed. Chip told me to go Tremec and it was the best decision made. I did neuter it a bit. It is no longer really a C20. It has brand new front-end with disk brakes and the rear end is now a 1971 12-bolt with 3.73 gears and a posi. The 3.73 gears make all the difference in the world over the 4.56s in the Easton. It still launches like a demon thanks to the posi and the low first gear in the TKO500 but it can now cruise at 75 all day long with the AC cranking nice and cold. The cab floor is now covered in Dynamat and a rubber mat has been installed on top of it. It isn't whisper quiet but it blocks a lot of noise and all the heat that was coming off the firewall and tranny tunnel. The AC is far more efficient now. Here are some recent pics: New stance:  With the moon discs remounted: [IMG]  [/IMG] [/IMG]The interior:  Found that one badge I was missing: [IMG]  [/IMG] [/IMG]Resting after a day of work: [IMG]  [/IMG] [/IMG]Making friends: [IMG]  [/IMG] [/IMG]Scoring chicks: 
|
|
|
|
|
04-13-2015, 05:02 PM
|
#99 |
|
Registered User
Join Date: May 2013
Location: Scottsdale, AZ
Posts: 373
|
Re: The pusher
Forgot one more thing: The only "moment" I had with the truck in the last few months was when the crank pulley took off on me and headed into the desert. It made a quite a racket on the way out and as far as I can tell the bolt that held the pulley onto the crank must have backed out. There were a few sheared threads at the end that came out looking like little metal onion rings when I put my finger into the hole in the crank but other than that all was fine. O'Reilly Auto Parts was luckily close by so I limped in. A new bolt for the crank plus three more to attach it to the harmonic balancer for good measure and I was on my way. It was by far the most complex roadside repair I have ever undertaken and I was pretty proud to get it all sorted out without calling in air support.
|
|
|
|
|
04-13-2015, 09:44 PM
|
#100 |
|
Registered User
Join Date: Sep 2014
Location: New River AZ
Posts: 135
|
Re: The pusher
I have had the pleasure to see this truck in person and it is one sweet truck!! You guys did a great job Grant.
|
|
|
|
 |
| Bookmarks |
|
|


 Linear Mode

