
|
|
|
 12-21-2007, 03:49 PM
|
#1 | |
|
Registered User
Join Date: Aug 2007
Location: Hays, Kansas
Posts: 7
|
Re: Ackattack's Pro touring restoration thread
Quote:
|
|

|

|
|
12-21-2007, 04:04 PM
|
#2 |
|
Senior Member
Join Date: Aug 2002
Location: Valley Center KS
Posts: 3,525
|
Re: Ackattack's Pro touring restoration thread
It's been slow. I got the rear bags mounted, I also am getting a lower control arm shipped to me. I have the week off between christmas and new years and have a list of things I want to get done.
What's been slowing me down is we finished the "bonus room" above the garage....made it into a home theater: 96" screen and 7.1 surround sound 
|
|
|
|
|
01-16-2008, 07:03 AM
|
#3 |
|
Senior Member
Join Date: Aug 2002
Location: Valley Center KS
Posts: 3,525
|
Re: Ackattack's Pro touring restoration thread
Back in business!
I finally got the control arm sand blasted, repainted, and assembled. So once again I have a rolling chasis. I also installed some of the steering linkage. I got new inner and outer tie rods, sleeves, and idler arm. I'm going to clean up and repaint the power steering gear box and see if that will work without leaking.....otherwise I'll replace it later. I also got the whole "cab repair kit" (floor pans, kick panel, cab corner, inner and outer rockers, A-pillar, and cab supports) so now I can start chopping and welding on the cab. |
|
|
|
|
02-03-2008, 02:39 PM
|
#4 |
|
Senior Member
Join Date: Aug 2002
Location: Valley Center KS
Posts: 3,525
|
Re: Ackattack's Pro touring restoration thread
I haven't posted much on here lately....been kinda slow going, though I have been working on the truck.
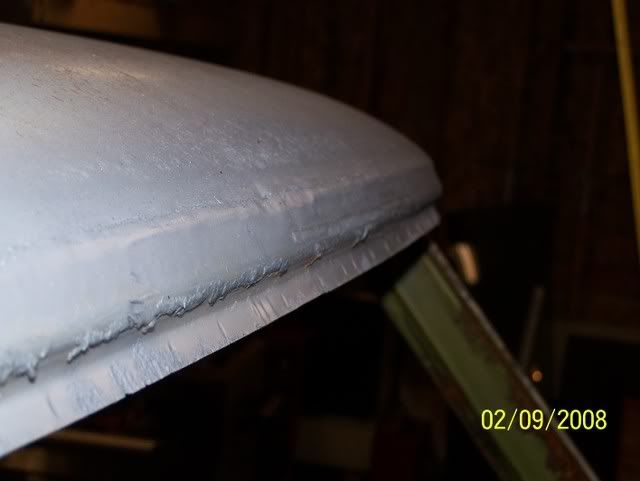
I shaved the drip rail along both sides of the doors, and have started along the top of the cab. It's a slow process of grinding and welding so that the sheets of metal don't seperate. I'll get some better pictures, but here is one of the progress.  I got a new pitman arm, but the pickle fork I borrowed from autozone is too small, so I guess I can't call my steering complete yet. I installed the rear parking brake cables. I used the cables from a camaro to match the calipers. I have the intermediate cable on its way. The brake lines are about ready to go on. I cleaned them up from the parts truck along with the little brackets that bolt them to the frame. I'll need to go get a tubing cutter and some additional tubing. I also need to figure out what I'm going to do to actually connect the lines to the rear calipers. I got the stainless steel brake lines from ECE awhile ago. Oh, I also opened up the hole on the rear rotors so they fully seat on the axle flange. Got the patch panels for the filler neck hole and the 3 for the heater holes welded in. I still have some clean up grinding to do on the firewall as well as fill in a lot more smaller holes. I forgot pictures of that progress though. Then yesterday I started cutting metal out of the floor. I started with the inner rocker/cab piece. This is a real nice piece that runs from the front seam all the way to the back of the cab. I also put in the kick panel patch. Now, I still have some more floor to replace, so that's why the front of this piece looks goofy. I'm not going to have to replace the bottom of the door pillar, so why it was apart I cleaned it up and put on a coate of POR15 to protect it. 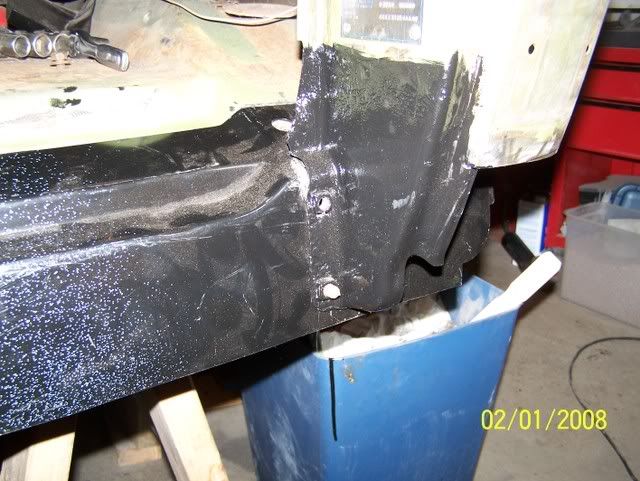 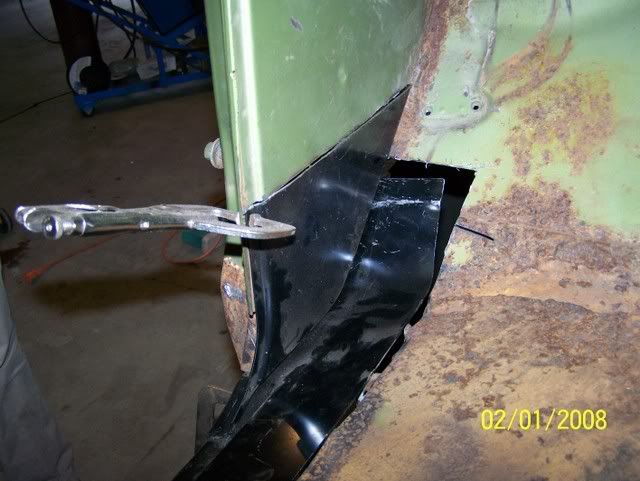 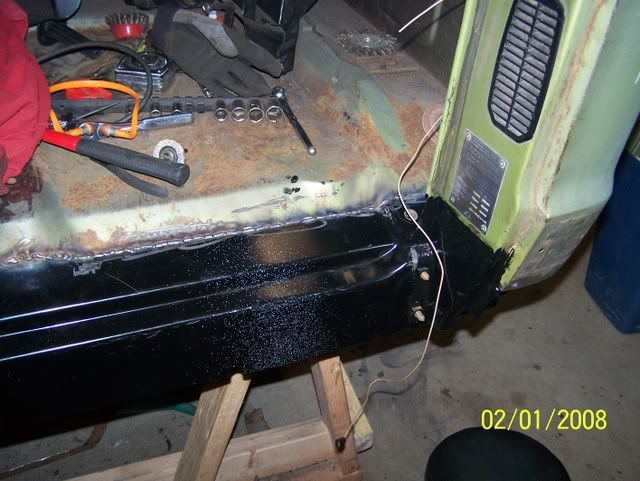
|
|
|
|
|
02-04-2008, 12:11 AM
|
#5 |
|
Senior Member
Join Date: Jul 2005
Location: Winters Ca. 95694
Posts: 4,843
|
Re: Ackattack's Pro touring restoration thread
Looks like good progress you have their! I just saw those inner rockers about 2months ago here on this site. They sure are nicer then the regular flat one that only comes to the top of the flor and stops! I tanked with Stan at ECE and he did some checking and found they call this piece the "outer floor extention" and not just the inner rocker for anyone needing them. From now on this is the only way I will be going, it just makes things that much easier. Keep the pics comming!
Kevin LFD Inc. |
|
|
|
|
02-04-2008, 03:43 AM
|
#6 | |
|
*************
 Join Date: Apr 2005
Location: Pensacola, FL
Posts: 17,846
|
Re: Ackattack's Pro touring restoration thread
Quote:
.
__________________
Rob - https://www.instagram.com/hart_rod_c10 As Iron Sharpens Iron, So One Man Sharpens Another. Proverbs 27:17 FOR SALE: DBW pedal bracket - http://67-72chevytrucks.com/vboard/s...d.php?t=651123 FOR SALE: Hood Brackets http://67-72chevytrucks.com/vboard/s...d.php?t=679945 1987 Silverado SWB - 34.5K original miles http://67-72chevytrucks.com/vboard/s...d.php?t=801834 1969 SuperBurb - http://67-72chevytrucks.com/vboard/s...d.php?t=200387 1968 Farm truck - http://67-72chevytrucks.com/vboard/s...d.php?t=358692 1968 SWB - http://67-72chevytrucks.com/vboard/s...d.php?t=551258 1948 Chevy - http://67-72chevytrucks.com/vboard/s...=122164&page=3 |
|
|
|
|
|
02-04-2008, 04:16 PM
|
#7 |
|
Senior Member
Join Date: Aug 2002
Location: Valley Center KS
Posts: 3,525
|
Re: Ackattack's Pro touring restoration thread
Well, I had every intention of getting a lot of work done today. I go out to the garage, do a little cutting to get the back edge of the piece refered to above to sit down nice and flush. Then I start welding, and the welds look like crap....check the guages on the gas bottle for the MIG....0...doh! So I make a phone call, and find that one of the welding places is open on Saturdays. Meanwhile my wife is on the phone with our friends and they want to meet up to talk about going on a vacation. So we go get the gas, then meet with them and end up eating dinner with them after discussing vacations. On our way home we make a pit stop at autozone to return the pickle fork and got the correct pitman arm puller.
When I got home I pulled off the pitman arm real quick (man it was easy with the right tool). Then I got on the internet to do some reading....I'm in the process of tuning my corvette with HPtuner...so I'm learning (will also apply the same knowledge to the 5.3L when I get it up and running...so it's a good education). So after figuring out what I was doing wrong, we made an ice cream run to test out the new tune. And now I"m back....and its 11pm......maybe tomorrow. Oh yeah, here very shortly progress on the truck is going to slow down even more (is that possible?) I'm taking the Professional Engineers Exam in April, so I'll be spending time studying for that. Oh, and when I'm not studying, I'll be working out cause we're going to Hawaii on our vacation (see above  ) Can't go to Hawaii with the extra winter padding....don't need it for warmth over there. ) Can't go to Hawaii with the extra winter padding....don't need it for warmth over there.Hopefully I'll still be able to get a few hours of work on the truck in on the weekends as a study break.
__________________
Project Bruiser: 68 Pro-Touring C-10 5.3L / 4L60E Project Ironhide: 97 GMC Crew Cab 4x4 Cummins SOLD: '69 GMC 1/2T SWB TBI'd: Project No Buck Assembly Manual Index Sign up Thread!!! Factory Service Manual Index Last edited by Ackattack; 04-08-2008 at 04:38 AM. |
|
|
|
|
02-04-2008, 05:10 PM
|
#8 |
|
1972 Chevrolet SWB
Join Date: Jan 2008
Location: FT Smith AR
Posts: 512
|
Re: Ackattack's Pro touring restoration thread
I really like your project and its progress so far. I am liking your home brew c-notch also and I built mine just like it except higher in the frame for more clearance and boxed the frame on the backside of the notch also.
After seeing all these builds and the air bagged trucks I may just have to convert my 5-8 static drop to air in due time. I will check progress.
__________________
My New thread with pics (not my build thread yet.)  http://67-72chevytrucks.com/vboard/s...46#post2573646 1972 Chevrolet 1/2 ton short wide bed,68 frt clip Project. 1980 Camaro Inherited when father passed,68K Miles 2003 Ford Mach1 FUN as Hell!! 2002 Dodge Ram 5-8 slam Rolling BillBoard (Gone not forgot) 2004 Dodge Ram HEMI 10" lifted on 37's and 2wd. |
|
|
|
|
02-07-2008, 04:08 AM
|
#9 |
|
Senior Member
Join Date: Aug 2002
Location: Valley Center KS
Posts: 3,525
|
Re: Ackattack's Pro touring restoration thread
Picked up a 4l60e last night for $300. Not too bad. It's out of a 98 T/A with 67k miles.
So now I can finally put the engine in, modify the frame rail for cleance for the power steering pully and modify the tranny crossmember for exhaust clearance if needed. First, I have to get me engine hoist back from a guy who I let borrow it
|
|
|
|
|
02-11-2008, 10:13 AM
|
#10 |
|
Senior Member
Join Date: Aug 2002
Location: Valley Center KS
Posts: 3,525
|
Re: Ackattack's Pro touring restoration thread
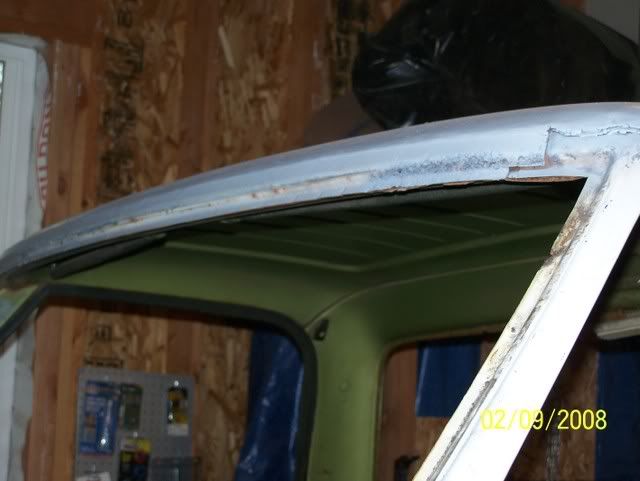
I was able to get a few evenings of work in this week, and then got a few more hours in today. I think shaving the drip rail is done for now. There is still a small hump where all the seams come together that will have to be smoothed out with filler once I get into that phase of body work. Oh, I guess I'll also fill in around the door a little more to make the gaps smaller, but that won't be until after I get more progress done on the rust repair.
   In this one there looks like there is a big dent in the corner of the cab. Well there kinda is. This area had a bunch of lead filler in there, and in the process of welding around there, it melted out....oh...I also had to make a "relief cut" in that area. 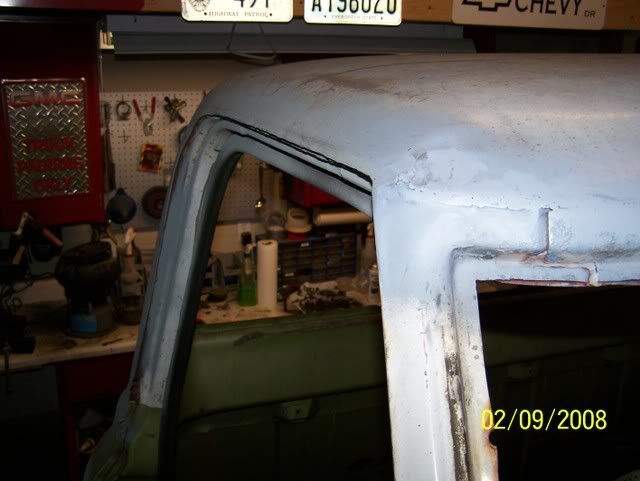 I also cleaned up the welds on the fire wall patches. 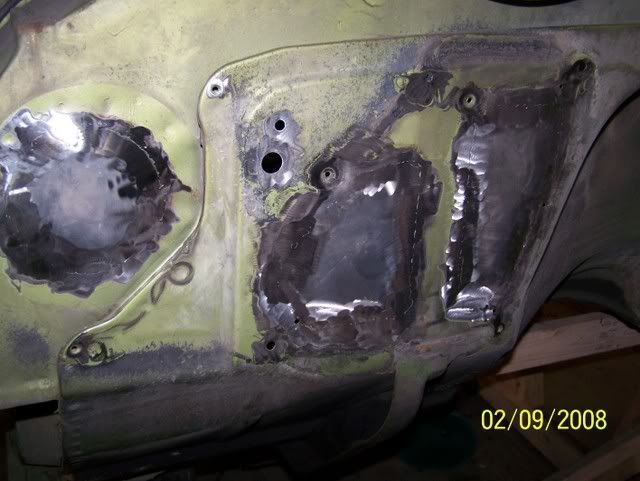 And then took out the back window. 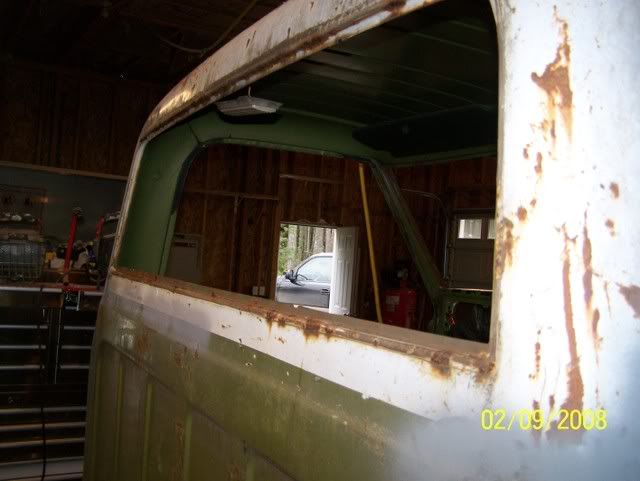
|
|
|
|
|
02-11-2008, 03:26 PM
|
#11 |
|
1972 Chevrolet SWB
Join Date: Jan 2008
Location: FT Smith AR
Posts: 512
|
Re: Ackattack's Pro touring restoration thread
coming along real nice
I have heard most guys who have shaved their drip rails swore to never doing another one if they could help it.
__________________
My New thread with pics (not my build thread yet.) http://67-72chevytrucks.com/vboard/s...46#post2573646 1972 Chevrolet 1/2 ton short wide bed,68 frt clip Project. 1980 Camaro Inherited when father passed,68K Miles 2003 Ford Mach1 FUN as Hell!! 2002 Dodge Ram 5-8 slam Rolling BillBoard (Gone not forgot) 2004 Dodge Ram HEMI 10" lifted on 37's and 2wd. |
|
|
|
|
02-18-2008, 01:26 PM
|
#12 |
|
Senior Member
Join Date: Aug 2002
Location: Valley Center KS
Posts: 3,525
|
Re: Ackattack's Pro touring restoration thread
I finally got the engine and transmission in. At least for now. I'm sure they will come out again at some point.
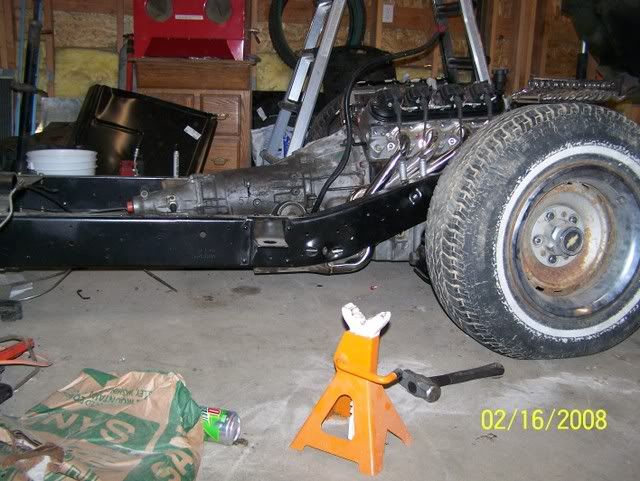 So for now I'm using a stock transmission crossmember, tubular engine stands with the 73+ motor mounts, and then some adapter plates that I made myself. It was a little tight to squeeze the engine down onto the stands, but it fits. The tranny crossmember will even use some of the original holes for mounting it. This is a 4L60e out of a 98 Trans Am. 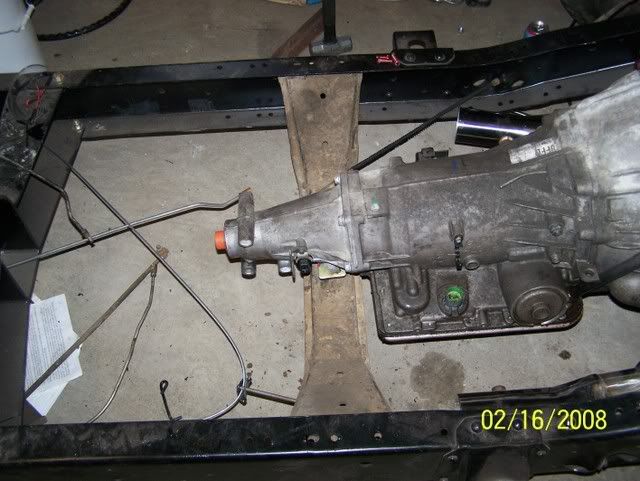 The driver's side header had to be clearanced a little to no hit the lower control arm. I may have to do a little more "clearancing". 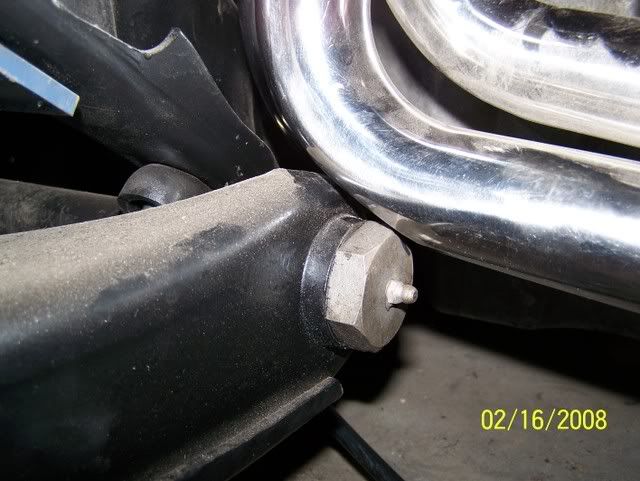 These headers are for a camaro/trans am that I got off of ebay. They're stainless steel. And they were cheap too. I also headers from the same company on my corvette. My complaint with the camaro headers is the bolting flange needs some work, cause the holes aren't lined up quite right. Other than that, these are a really good choice cause the tuck up real well and fit good. I will have to cut the drivers side collector off a bit. On the camaros this side kicks towards the outside, which puts it too close to the frame rail. No biggie though. Here's what the ground clearance looks like.  Speaking of ground clearance, I think I"m going to get a F-body oil pan. I don't like the idea of the oil pan being the lowest part on the front of the truck.  After I got the headers on, I then moved to the front of the engine. If you remember in a post awhile ago, I thought I was going to have to notch the frame rail to clear the power steering pulley with the corvette accessory drive system. Well it fit with plenty of room to spare. 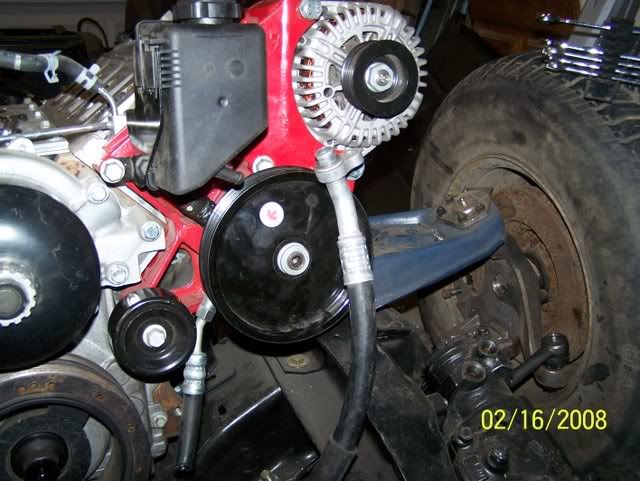 The A/C compressore fits down in the frame rail like it was made to go there. 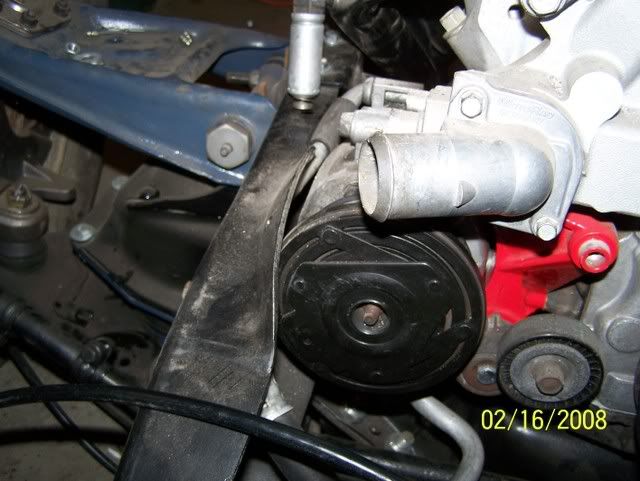 I then moved on to the transmision shifter lever. The header is right in the way of where it need to be. I would like to use the column shifter, but the linkage just won't work. Does any companies make a cable type shifter for columns? 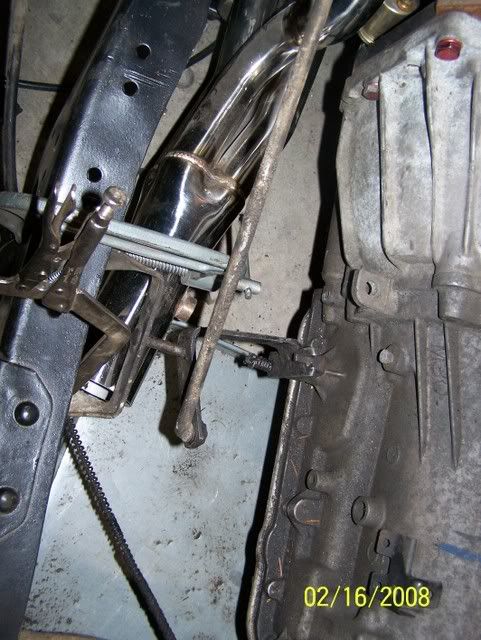 Then as I was trying to determine if the tranny was in park or first, I went and grabbed the driveshaft that came with the truck and shoved it into the tranny. Well what do you know, it fits....as in its the right length too! 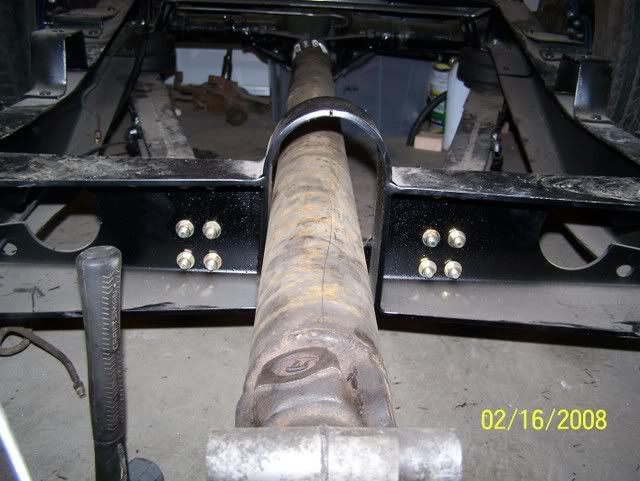 couple of problems with it though. First I switched to larger 1350 u-joint on the pinion yoke. So I'll probably have a new one made anyways with the larger u-joints front and rear (400+ RWHP will be going through this on slicks....so I figure I better upgrade) Next problem is something isn't centered. I didn't have time to take measurements, but the drive shaft was rubbing on the passenger side of the crossmember. I thought about this when I came inside to grab a drink, and realized its probably just the panhard bar not being centered correctly. So I raised the rear and it started to center the drive shaft, but then it was hitting on the bottom of the cross member. So I'll raise the tail shaft of the tranny. The whole engine/tranny looks like its at a little too much of an angle anyway. I'm going to cut some exhaust passages in the tranny crossmember, or just make a new one, so this won't be a big deal (and the reason why I haven't cleaned up the crossmember too .
__________________
Project Bruiser: 68 Pro-Touring C-10 5.3L / 4L60E Project Ironhide: 97 GMC Crew Cab 4x4 Cummins SOLD: '69 GMC 1/2T SWB TBI'd: Project No Buck Assembly Manual Index Sign up Thread!!! Factory Service Manual Index Last edited by Ackattack; 02-18-2008 at 01:28 PM. |
|
|
|
|
02-18-2008, 09:03 PM
|
#13 | |
|
Registered User
Join Date: Sep 2003
Location: Rayne, LA
Posts: 2,782
|
Re: Ackattack's Pro touring restoration thread
Quote:
__________________
Steven "If dogs don't go to heaven, when I die I want to go wherever they went." -- Will Rogers R.I.P. Oscar R.I.P. Ratchet 1967 Pontiac GTO - Dad was the Original Owner 1970 Chevy 2wd SWB "Oscar's Truck" 1970 Chevy 2wd Blazer "Ratchet's Blazer" 2013 Chevy 2500HD Crew Cab Duramax/Allison Z71 LTZ "Brown Sugar" 2017 Chevy Suburban "BDB" 2020 Chevy Blazer Premier "Foxy" Member of Louisiana Classic Truck Club (LCTC) Shop Build |
|
|
|
|
|
02-19-2008, 01:32 AM
|
#14 |
|
Registered User
Join Date: Apr 2001
Location: DALLAS,TX
Posts: 21,980
|
Re: Ackattack's Pro touring restoration thread
What about spacing the motor up 1"? I can't tell how much of an issue that would cause on the a/c comp clearance, but it looks like it would get the headers off of the lower a-arms & might help w/the trans tailshaft vs. the crossmember.
__________________
67SWB-B.B.RetroRod 64SWB-Recycle 89CCDually-Driver/Tow Truck 99CCSWB Driver All Fleetsides @rattlecankustoms in IG Building a small, high rpm engine with the perfect bore, stroke and rod ratio is very impressive. It's like a highly skilled Morrocan sword fighter with a Damascus Steel Scimitar..... Cubic inches is like Indiana Jones with a cheap pistol. |
|
|
|
|
02-18-2008, 01:29 PM
|
#15 |
|
Senior Member
Join Date: Aug 2002
Location: Valley Center KS
Posts: 3,525
|
Re: Ackattack's Pro touring restoration thread
Next problem is with my parking brake cable. I ordered one for a swb (P/N BC92443) but it doesn't seem to be long enough. I'm not sure how I should route it thought the ECE extreme drop member though.
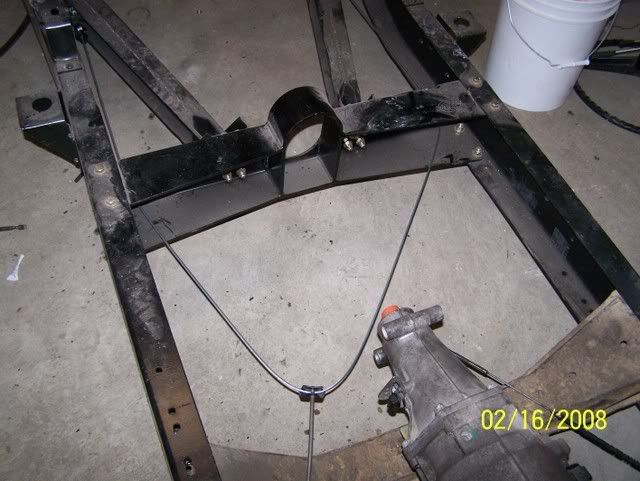 So overall it was a productive day, but I have a few issues to deal with. No biggie though |
|
|
|
|
02-18-2008, 01:51 PM
|
#16 |
|
1972 Chevrolet SWB
Join Date: Jan 2008
Location: FT Smith AR
Posts: 512
|
Re: Ackattack's Pro touring restoration thread
Damn bro,looks like you have quite a few small obstacles to tackle. Hope you get it all figured out. grab that tape measure and start checking things out for sure.
I was looking at someones LS2 install pictures and it looked like their engine was positioned to the drivers side a tad bit,dont know if it was an optical illusion or not but worth checking into. Good Luck.
__________________
My New thread with pics (not my build thread yet.) http://67-72chevytrucks.com/vboard/s...46#post2573646 1972 Chevrolet 1/2 ton short wide bed,68 frt clip Project. 1980 Camaro Inherited when father passed,68K Miles 2003 Ford Mach1 FUN as Hell!! 2002 Dodge Ram 5-8 slam Rolling BillBoard (Gone not forgot) 2004 Dodge Ram HEMI 10" lifted on 37's and 2wd. |
|
|
|
|
02-19-2008, 02:40 AM
|
#17 |
|
A guy with a truck
Join Date: Sep 2005
Location: Germany, for now
Posts: 5,920
|
Re: Ackattack's Pro touring restoration thread
I think spacing the tranny mount up 1" would cure most of your ailments...
__________________
-Chris Instagram _elgringoloco_ '70 Short-Wide How to: Ruin a perfectly good C10 70 Blazer ConversionHow To: Ruin a Perfectly Good 4wd '72 Highlander How To: Ruin a Perfectly Good K/5 (SOLD) '72 Blazer 2WD How to: Ruin a perfectly good Blazer (SOLD) '05 Yukon Daily Driven (not so stock) Yukon (SOLD) 07 Yukon Denali (daily) Members met list: SCOTI, darkhorse970, 67cheby, 67cheby'sGirl, klmore, porterbuilt, n2billet, Fastrucken, classicchev, Col Clank, GSFMECH, HuggerCST, Spray-Bomb, BACKYARD88, 5150, fine69, fatbass, smbrouss70, 65StreetCruiser, GAc10boy |
|
|
|
|
02-19-2008, 03:02 AM
|
#18 | |
|
*************
Join Date: Apr 2005
Location: Pensacola, FL
Posts: 17,846
|
Re: Ackattack's Pro touring restoration thread
Quote:
R
__________________
Rob - https://www.instagram.com/hart_rod_c10 As Iron Sharpens Iron, So One Man Sharpens Another. Proverbs 27:17 FOR SALE: DBW pedal bracket - http://67-72chevytrucks.com/vboard/s...d.php?t=651123 FOR SALE: Hood Brackets http://67-72chevytrucks.com/vboard/s...d.php?t=679945 1987 Silverado SWB - 34.5K original miles http://67-72chevytrucks.com/vboard/s...d.php?t=801834 1969 SuperBurb - http://67-72chevytrucks.com/vboard/s...d.php?t=200387 1968 Farm truck - http://67-72chevytrucks.com/vboard/s...d.php?t=358692 1968 SWB - http://67-72chevytrucks.com/vboard/s...d.php?t=551258 1948 Chevy - http://67-72chevytrucks.com/vboard/s...=122164&page=3 |
|
|
|
|
|
03-12-2008, 09:09 AM
|
#19 |
|
Senior Member
Join Date: Aug 2002
Location: Valley Center KS
Posts: 3,525
|
Re: Ackattack's Pro touring restoration thread
No progress (still studying
 .....4 1/2 weeks until the PE) .....4 1/2 weeks until the PE) But I did sell my 72 GMC today, so I have about $6k to fund this project. We'll see how far that gets me. The GMC will be missed. I had it for 11 years (got it as a Junior in HS). Learned lots with it, and tons of memories. 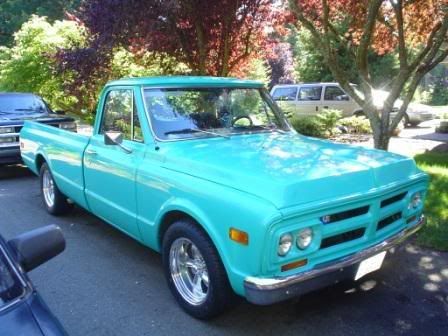 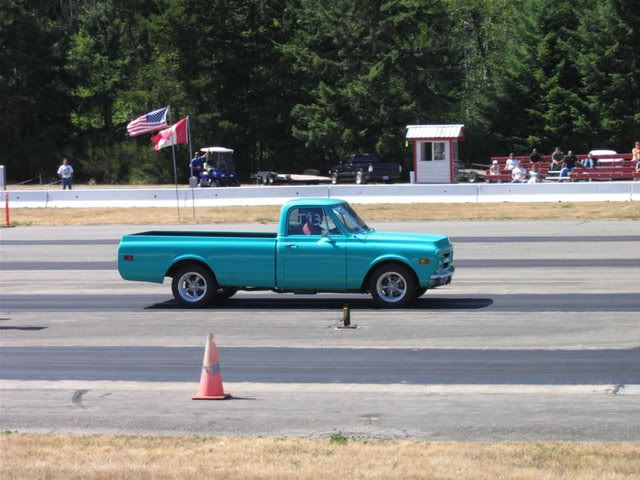
|
|
|
|
|
03-17-2008, 12:16 PM
|
#20 |
|
Senior Member
Join Date: Aug 2002
Location: Valley Center KS
Posts: 3,525
|
Re: Ackattack's Pro touring restoration thread
Today I scored some parts for Bruiser. I got a gas tank from a 2000 Trans Am with the fuel pump. I saw another guy on here have one mounted up, so hopefully it will work well and solves a couple of issues.....blazer tank is awfully close to the ground and I need a baffled fuel tank...and a fuel pump. Best part is it was only $50.
Then I went and got a F-body oil pan since the truck oil pan is too close to the ground for my likings. While I was at the guy's house with the oil pan, I asked about the LS1 block he had sitting there. Basically he bent a connecting rod, so he swapped in an LS6 into his T/A. So I got the LS1 block for $165. It'll take a little work to get it up and running, but I just added .4L and lost about 100 pounds! For the time being, I'm going to keep the 5.3L in the truck until I get it up and running so that I can easily trouble shoot any wiring issues. In the mean time I'm going to work on repairing and building up the LS1. I already contacted another guy about a set of stock pistons and con rods. I'll put in new rod bolts, a different cam and we'll see what else. I don't know if I'll get a set of aftermarket ported heads or just go with a set of stockers for now and the same with an intake manifold. I'll throw on a new set of rings and make sure the rest of the block looks good. The crank may also need a little work too. |
|
|
|
|
03-17-2008, 04:54 PM
|
#21 |
|
State of Confusion!
 Join Date: Jul 2002
Location: Gulfport, MS USA
Posts: 46,924
|
Re: Ackattack's Pro touring restoration thread
Congrats on the score.
__________________
Bill 1970 Chevy Custom/10 LWB Fleetside 2010 Toyota Tacoma PreRunner SR5 Double Cab - DD Member of Louisiana Classic Truck Club (LCTC) Bill's Gallery Life isn't tied with a bow, but it's still a gift. Live simply. Love generously. Care deeply. Speak kindly. Leave the rest to God! |
|
|
|
|
03-17-2008, 08:16 PM
|
#22 |
|
Registered User
Join Date: Aug 2005
Location: Hillsboro Oregon
Posts: 6,449
|
Re: Ackattack's Pro touring restoration thread
Nice score on the LS1. If you're gonna have to procure and/or machine the rotating assembly you might as well stroke it!
|
|
|
|
|
03-18-2008, 09:23 AM
|
#23 | ||
|
A guy with a truck
Join Date: Sep 2005
Location: Germany, for now
Posts: 5,920
|
Re: Ackattack's Pro touring restoration thread
Quote:
Quote:

__________________
-Chris Instagram _elgringoloco_ '70 Short-Wide How to: Ruin a perfectly good C10 70 Blazer ConversionHow To: Ruin a Perfectly Good 4wd '72 Highlander How To: Ruin a Perfectly Good K/5 (SOLD) '72 Blazer 2WD How to: Ruin a perfectly good Blazer (SOLD) '05 Yukon Daily Driven (not so stock) Yukon (SOLD) 07 Yukon Denali (daily) Members met list: SCOTI, darkhorse970, 67cheby, 67cheby'sGirl, klmore, porterbuilt, n2billet, Fastrucken, classicchev, Col Clank, GSFMECH, HuggerCST, Spray-Bomb, BACKYARD88, 5150, fine69, fatbass, smbrouss70, 65StreetCruiser, GAc10boy |
||
|
|
|
|
03-19-2008, 04:21 AM
|
#24 | |
|
Senior Member
Join Date: Aug 2002
Location: Valley Center KS
Posts: 3,525
|
Re: Ackattack's Pro touring restoration thread
Quote:
Looking at the gas tank, it looks like my harness will plug right into it after I extend some wires. This will take care of the purge issue. The slight down side is it looks like I'm going to hae to cut out a portion of the frame to get the tank to fit up in there. The tank is a little wider than the inside frame rail.....I'll get some pictures when I install, but it looks to be pretty easy. |
|
|
|
|
|
04-02-2008, 08:09 PM
|
#25 |
|
14.1 @ 96MPH
Join Date: Jul 2001
Location: Mesa, AZ
Posts: 2,811
|
Re: Ackattack's Pro touring restoration thread
I want to see what you do to those headers, if the collector can be redirected easily I know I'll be picking a set up
__________________
Project1970 - LS1 Swap Complete!
|
|
|
|
 |
| Bookmarks |
|
|


 Well......It's been almost a month now!.....Any new progress??


 Hybrid Mode
