
 |
|
|
#76 |
|
Certified Car Nut
Join Date: Jan 2005
Location: Inglewood, California
Posts: 3,118
|
Re: Kabwe's aka Bam's build
Thanks man, no skills over here just desire and hard work.
This is the No Limit Engineering Kit the latch is stock. Last edited by Kabwe; 01-16-2011 at 05:55 PM. |
|
|

|
|
|
#77 |
|
Registered User
Join Date: Oct 2009
Location: Monson,MA
Posts: 503
|
Re: Kabwe's aka Bam's build
looks great man!
I cannot wait to get one of those No Limit Engineering Kit's. How does it still use the stock latch? thanks
__________________
current project; 1950 GMC "Junk Yard Dawg" http://67-72chevytrucks.com/vboard/s...d.php?t=635960 ___________________________________________ SOLD to "ONEBADFIVEFIVE" http://67-72chevytrucks.com/vboard/s...d.php?t=436406 |
|
|

|
|
|
#78 |
|
Tripple Five Fanatic
Join Date: Sep 2006
Location: USA
Posts: 658
|
Re: Kabwe's aka Bam's build
Master Kabwe, I know you did already but how are you going to attach the bracket that goes under the step and attach to the bed? I want to know becuase that's going to be my next mod when I complete the hood.
I know there are 2 bolts that attach them together. Tri5
__________________
1955 Chevy Stepside/LS1 drive train http://67-72chevytrucks.com/vboard/s...d.php?t=371513 |
|
|

|
|
|
#79 | |
|
Certified Car Nut
Join Date: Jan 2005
Location: Inglewood, California
Posts: 3,118
|
Re: Kabwe's aka Bam's build
Quote:
Drill the hole in the step, install the bolt and grind the head of the bolt off and weld it. Make sure when you install them do not over torque them and you will be fine. Last edited by Kabwe; 01-24-2011 at 04:32 PM. |
|
|
|

|
|
|
#80 |
|
Certified Car Nut
Join Date: Jan 2005
Location: Inglewood, California
Posts: 3,118
|
Re: Kabwe's aka Bam's build
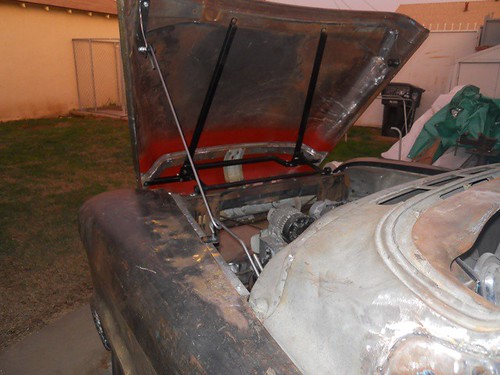
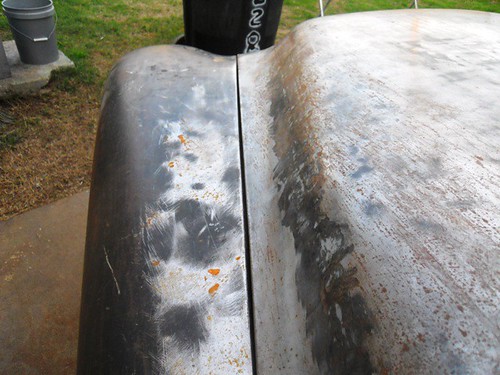
It was not the hood it was me, I installed the bracket upside down.lol This is what happens when you try to beat the moon.lol You rush and do things backwards. Now I can focus all my attention to panel alignment.
Last edited by Kabwe; 01-17-2011 at 07:49 AM. |
|
|

|
|
|
#81 |
|
Certified Car Nut
Join Date: Jan 2005
Location: Inglewood, California
Posts: 3,118
|
Re: Kabwe's aka Bam's build
Because the kit does not change the stock latch it just installs bracket on top of the factory brace. The factory brace and latch remain the same. You just remove the cross brace, and mount the new bracing in the factory holes.
Last edited by Kabwe; 01-18-2011 at 01:26 PM. |
|
|

|
|
|
#82 |
|
Registered User
Join Date: Dec 2008
Location: Nebraska
Posts: 390
|
Re: Kabwe's aka Bam's build
i love how you put the bear claw on the body side. we didnt really think it through on the 38 ford were doing, now we have to find a trick way to put an emergency manual pull on the door. yuck!
you have a great eye for the simple metal fab ideas.. thats going to be one hell of a clean truck! subscribed! good luck with the rest of the build!
__________________
1950 3600. 370cid, th400, 9", billet 80mm turbo under the bed, 4 link coilovers, hoping for a single digit! http://67-72chevytrucks.com/vboard/s...d.php?t=380212 Last edited by nebdrummer; 01-16-2011 at 10:34 PM. |
|
|

|
|
|
#83 |
|
Registered User
Join Date: Sep 2009
Location: Albuquerque, NM
Posts: 540
|
Re: Kabwe's aka Bam's build
How does the rear portion of the hood latch and stay close? Never seen one of these kits so don't understand how someone couldn't walk up to it and pull the rear part of the hood up?
__________________
FAT MIKE My 59 http://67-72chevytrucks.com/vboard/s...d.php?t=400201 My 47 http://67-72chevytrucks.com/vboard/s...d.php?t=386848 Last edited by Fat Mike; 01-16-2011 at 10:36 PM. |
|
|

|
|
|
#84 | |
|
Certified Car Nut
Join Date: Jan 2005
Location: Inglewood, California
Posts: 3,118
|
Re: Kabwe's aka Bam's build
Quote:
Look at the pic of the hood open. Its a bar on the inner fender and on the hood there are rollers and the rear of the hood rolls down into the bar. The hood rolls forward then it can flip up. Last edited by Kabwe; 01-18-2011 at 07:04 PM. |
|
|
|

|
|
|
#85 |
|
Registered User
Join Date: Sep 2009
Location: Albuquerque, NM
Posts: 540
|
Re: Kabwe's aka Bam's build
Sorry about the stupid question but I have to ask. If it is any consolation to you, I am learning thou. Thanxs for the info!
__________________
FAT MIKE My 59 http://67-72chevytrucks.com/vboard/s...d.php?t=400201 My 47 http://67-72chevytrucks.com/vboard/s...d.php?t=386848 |
|
|

|
|
|
#86 |
|
Certified Car Nut
Join Date: Jan 2005
Location: Inglewood, California
Posts: 3,118
|
Re: Kabwe's aka Bam's build
That's not a stupid question.
Last edited by Kabwe; 01-20-2011 at 12:42 PM. |
|
|

|
|
|
#87 |
|
Registered User
Join Date: Jan 2009
Location: kissimmee Florida
Posts: 494
|
Re: Kabwe's aka Bam's build
Glad to see your back working on YOUR project! Seats look great, and allways very detailed.
|
|
|

|
|
|
#88 |
|
Registered User
Join Date: Dec 2009
Location: Ventura, Ca.
Posts: 439
|
Re: Kabwe's aka Bam's build
Kabwe, nice work as usual... when you going to do something exciting !!! lol...
agreement on the seats and the window.... whats the point of the window if your going to cover it up with seats ??? off to get house chores done so maybe I can sneak in some truck stuff......
__________________
http://67-72chevytrucks.com/vboard/s...d.php?t=385404 |
|
|

|
|
|
#89 | ||
|
Certified Car Nut
Join Date: Jan 2005
Location: Inglewood, California
Posts: 3,118
|
Re: Kabwe's aka Bam's build
Quote:
Quote:
Last edited by Kabwe; 01-18-2011 at 01:29 PM. |
||
|
|

|
|
|
#90 |
|
Grand PooBaa Member
Join Date: Jan 2001
Location: LA, CA
Posts: 5,302
|
Re: Kabwe's aka Bam's build
|
|
|

|
|
|
#91 |
|
Grand PooBaa Member
Join Date: Jan 2001
Location: LA, CA
Posts: 5,302
|
Re: Kabwe's aka Bam's build
|
|
|

|
|
|
#92 | |
|
Certified Car Nut
Join Date: Jan 2005
Location: Inglewood, California
Posts: 3,118
|
Re: Kabwe's aka Bam's build
Quote:
This is how I did it I know picture is worth a thousand words so here you go. I drill the holes in the step. 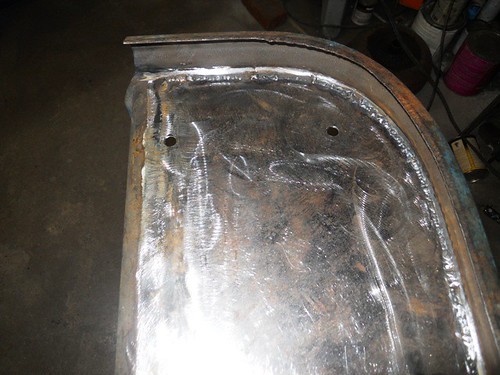 Then I shaved the head off the bolts. The way I did it bolted the bolt to some metal and used a sawzall to cut the head off. 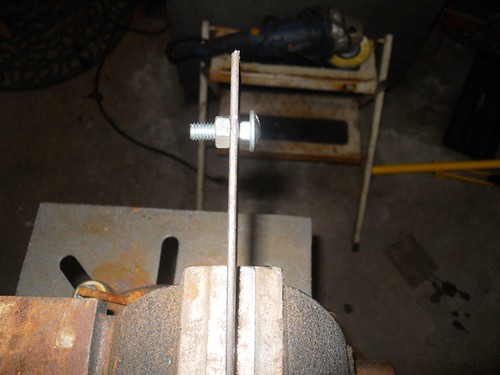 Then I use a washer that was small enough to not let what the remains of the head slip through and welded the washer to the panel 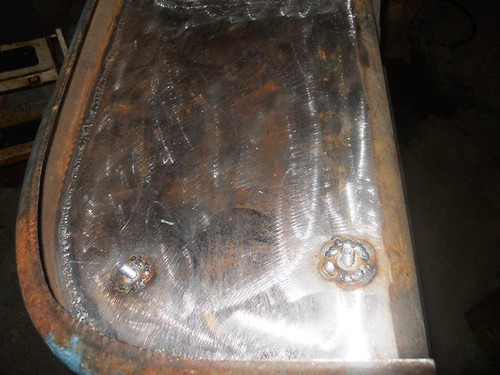 Flipped it over and welded the top and grind it smooth. 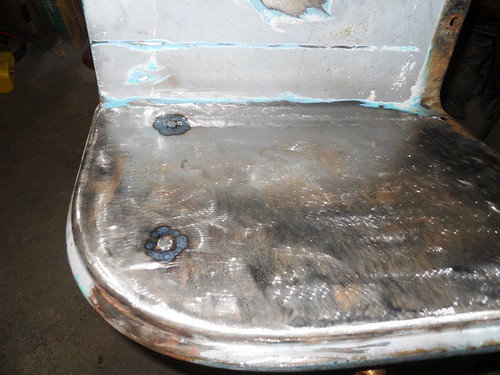 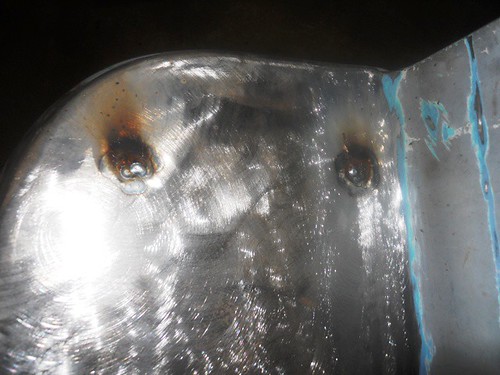 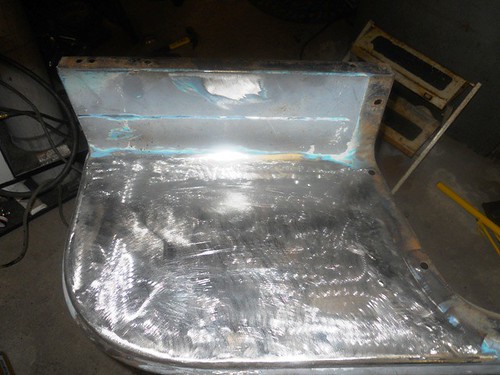 I couple of shot of it installed 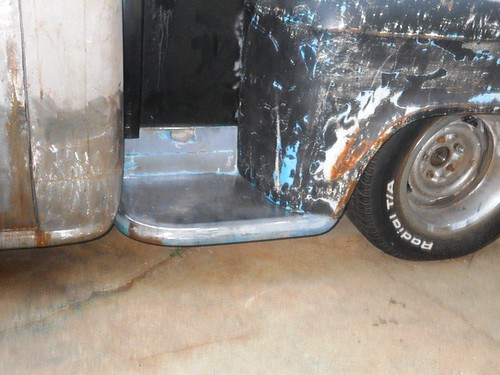 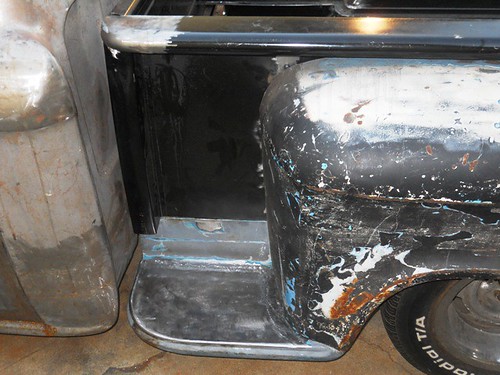 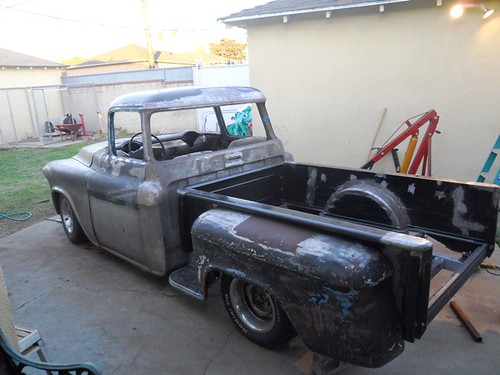
Last edited by Kabwe; 01-18-2011 at 02:13 AM. |
|
|
|

|
|
|
#93 | |
|
Certified Car Nut
Join Date: Jan 2005
Location: Inglewood, California
Posts: 3,118
|
Re: Kabwe's aka Bam's build
Quote:
Its in the garage most the time and we are in cali. I sprayed Picklex20 on it about two years ago and its holding up pretty good. There is only light surface rust and that's happened in the past two weeks since its been outside. Last edited by Kabwe; 01-24-2011 at 04:34 PM. |
|
|
|

|
|
|
#94 |
|
Account Suspended
Join Date: Aug 2010
Location: richmond ill
Posts: 376
|
Re: Kabwe's aka Bam's build
well kabwe it looks great
|
|
|

|
|
|
#95 |
|
56 - autocross
Join Date: Apr 2010
Location: Camarillo, Ca
Posts: 1,121
|
Re: Kabwe's aka Bam's build
Hey Bam: It sure is nice to see your build back. I missed it. the good thing about this build is that I can see everything that you have done in just a few pages. It is good reference for those that need to see what things are suppose to look like. !!!!!!!!!!!!!!!!
|
|
|

|
|
|
#96 | |
|
Certified Car Nut
Join Date: Jan 2005
Location: Inglewood, California
Posts: 3,118
|
Re: Kabwe's aka Bam's build
Thanks a lot man, I'm looking forward to seeing your project.
Quote:
|
|
|
|

|
|
|
#97 | |
|
Registered User
Join Date: Nov 2010
Location: SoCal
Posts: 914
|
Re: Kabwe's aka Bam's build
Quote:
I agree with you 100% hotrod1 and I like your emphasis on all the exclamation marks  , haha, but there are "SOME" folks on here that think cutting up a truck is a terrible thing. Well I don't care for stock. I can appreciate the work that goes into stock restorations but not for me. Kabwe's and Chevyrestoguy's '55 build and CAL 58 GMC & Yukon Rat Rod's '57 have cut up those trucks and they look awesome and have not lost the essence of a gr8 looking classic truck. They are all different but tastefully done. Didn't mean to leave any body out I know there are tons of well executed projects on here. , haha, but there are "SOME" folks on here that think cutting up a truck is a terrible thing. Well I don't care for stock. I can appreciate the work that goes into stock restorations but not for me. Kabwe's and Chevyrestoguy's '55 build and CAL 58 GMC & Yukon Rat Rod's '57 have cut up those trucks and they look awesome and have not lost the essence of a gr8 looking classic truck. They are all different but tastefully done. Didn't mean to leave any body out I know there are tons of well executed projects on here.
__________________
I'm not tail-gating, I'm drafting.  http://67-72chevytrucks.com/vboard/s...d.php?t=432758 Last edited by BC Toy chest; 01-18-2011 at 11:56 PM. |
|
|
|

|
|
|
#98 | |
|
Certified Car Nut
Join Date: Jan 2005
Location: Inglewood, California
Posts: 3,118
|
Re: Kabwe's aka Bam's build
Quote:
|
|
|
|

|
|
|
#99 |
|
Registered User
Join Date: Mar 2009
Location: Vancouver Island, Courtenay B.C. CANADA
Posts: 576
|
Re: Kabwe's aka Bam's build
Kabwe, glad to see your thread is back, truck is looking super nice! That is a really smooth ride.
Mine is on hold while I rebuild and expand a bathroom. Working 2 jobs, a reno and shovelling snow every second day doesn't leave me much time (or energy) for the truck, meanwhile your updates feed my urge to work on it. soon tho....very soon...
__________________
1962 Chevy blue SBFS 1957 Chevy yellow SBSS 1956 GMC red SBSS Nov 2017 ToTM https://www.facebook.com/groups/Cana...geChevyTrucks/ |
|
|

|
|
|
#100 |
|
Certified Car Nut
Join Date: Jan 2005
Location: Inglewood, California
Posts: 3,118
|
Re: Kabwe's aka Bam's build
Bobinbc,
I will soon be doing my bathroom also so life will get in my way also.lol As John Lennon said "Life is what happens when you're busy doing other things". I hope you have time soon but we all understand some things are more important. |
|
|

|
 |
| Bookmarks |
|
|