
|
 11-20-2011, 01:03 PM
|
#76 |
|
Registered User
Join Date: Aug 2011
Location: phoenix az
Posts: 723
|
Re: my 57 revitalized
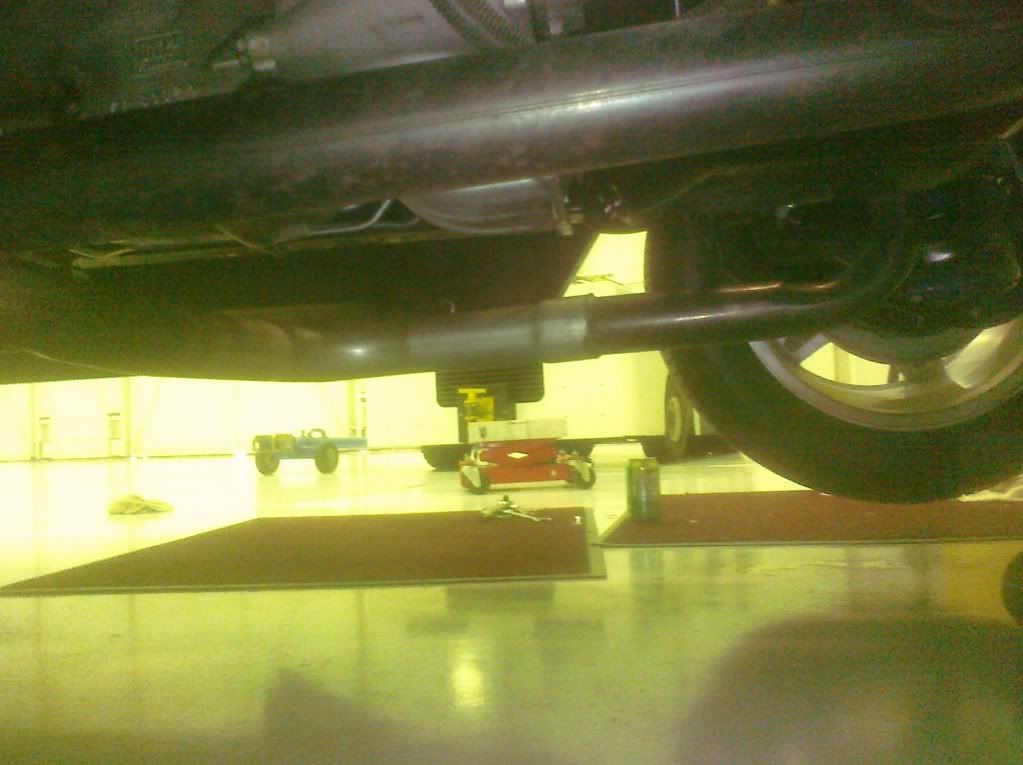
you can see that the pipe has to be fixed, as it is now too low, but I didn't take the truck to the exhaust shop, I just took the pipe and since it was going to be temporary, it will be quiet enough to be able to drive it there and get it done right.
|

|

|
|
11-20-2011, 01:07 PM
|
#77 |
|
Registered User
Join Date: Aug 2011
Location: phoenix az
Posts: 723
|
Re: my 57 revitalized
THis is the intention: to get a nice compact exhaust system out of the way of my hydroboost, gas tank, clutch linkage and the brake lines. You can see my trans cooler under the floor on the right side. It was originally the steering cooler for a 87 corvette. The lines are all over the place, but since Imoved the engine/trans back, I just bent them by hand, and now they look bad. Well, they are 2 " too long now, so I still have to change them.
|
|
|
|
|
11-20-2011, 01:09 PM
|
#78 |
|
Registered User
Join Date: Aug 2011
Location: phoenix az
Posts: 723
|
Re: my 57 revitalized
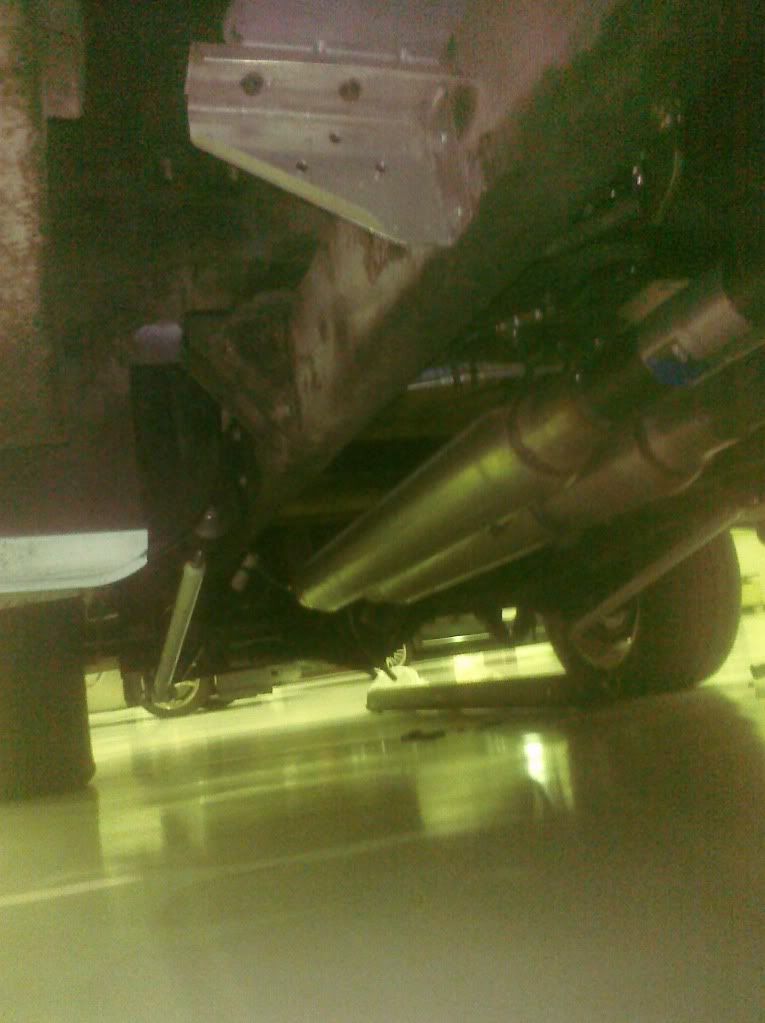
I'm just trying to get it to drive under it's own power, and later will fix things that need to look better. but for now, some of the mods are looking mickey mouse.......like the exhaust. You can see that the little couplings have blue stickers on them. I figure they will burn off with exhaust heat.
 You can see that I didn't drill any holes in the frame for the trans mount since I will be changing the end stubbs, and I have the trans mound held n position by two quik-clamps. When the final stubs are done, I will bolt that sucker on for good! I know, I need to dress up the frame and clean out all the age old grease and oil off of it, but for a 54 year old truck with 334,000 miles on it, it isn't too bad. I tried a pressure washer, but the frames back in the day were all dipped in wax for salt protection, and all the pressure washer did was move the wax around. you can still dig into it with your fingernail and come up with semiflat black paint. The only thing I'm glad about it being so low now is that nobody is going to see how dirty the frame is cause you can't crawl under it. Just a note: you can see the undrside of the steps are a ugly green. That is epoxy aircraft primer. It seems to stick pretty well with rock chips. It was an experiment that went well, I will have to remove the steps and paint them with black paint so they aren't so garish. Last edited by Coupeguy2001; 11-20-2011 at 01:31 PM. |
|
|
|
|
11-20-2011, 01:30 PM
|
#79 |
|
Registered User
Join Date: Aug 2011
Location: phoenix az
Posts: 723
|
Re: my 57 revitalized
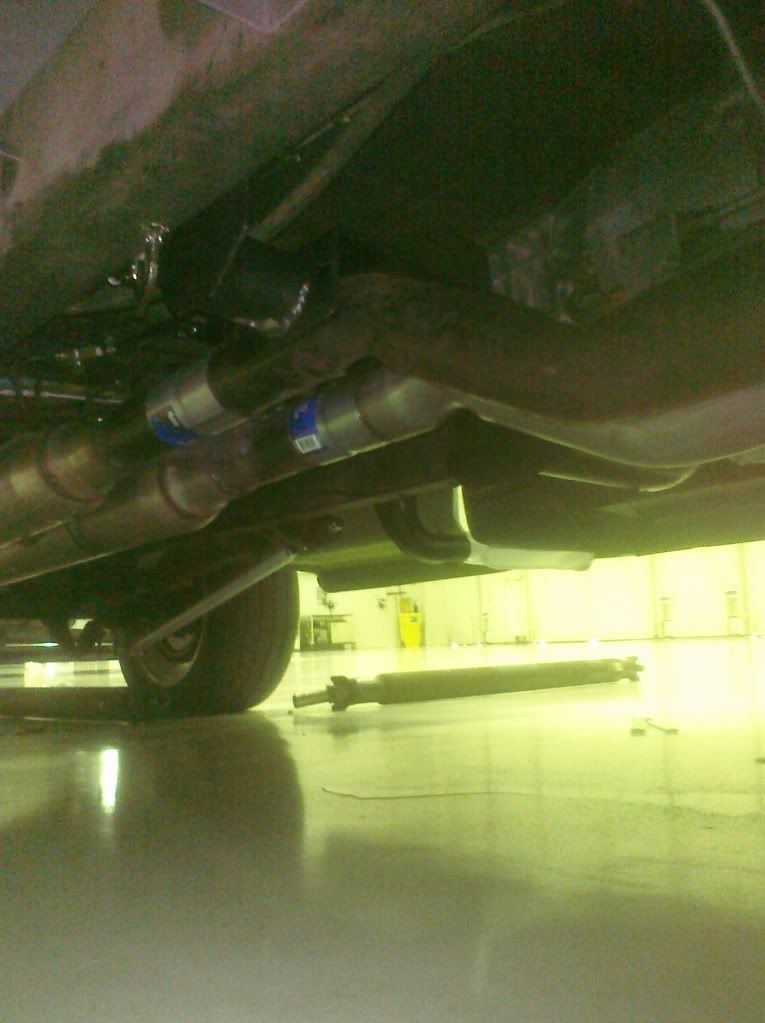
Yes, I have 2 driveshafts........The original driveshaft fit perfectly after the frame modification, but then I moved the engine back 2 inches.
Now the new driveshaft I had shortened is too short, and the original driveshaft is too long. I am either going to have to shorten the original, or lengthen the new one. Either way, it's another $60 for something that nobody will see, but is a significant safety issue. Another note: It was un intentional, but the master cylinder reservoir fill hole seals up tight against the funnel when you add fluid. I had filled the funnel halfway, and was waiting for it to drain when an air bubble popped and sprayed brake fluid over everything in the corner of the firewall. Luckily, I had powdere coated the inner fender panel, and made the mount plate for the reservoir out of bare aluminum, and the rag I had behind the funnel protected the firewall from any spray. SO to prevent the air tight seal, I slipped a wire tie between the reservoir and the funnel, and now the air got out. 1. Perfect justification of the powdercoat expense. nothing happened to the coating! 2. The right stuff gasket sealant seems to be holding in the brake fluid. 3. I painted the frame with black caliper paint. Apparently, caliper paint does not come off with brake fluid! So the trick here I guess, is to powdercoat your frame or paint it in brake fluid prone areas over your painted frame with caliper paint, and the paint won't be compromised when you bleed brakes or get any hose leaks. The caliper paint I used was from O'reilly's. |
|
|
|
|
11-20-2011, 03:20 PM
|
#80 |
|
Registered User
Join Date: Aug 2007
Location: Corona, California
Posts: 7,998
|
Re: my 57 revitalized
You're doing a nice job Coupeguy.
I'm thinking of running both of my exhaust pipes out the passenger side to avoid my hydro-boost also. Kim |
|
|
|
|
11-20-2011, 09:43 PM
|
#81 |
|
Registered User
Join Date: Aug 2011
Location: phoenix az
Posts: 723
|
Re: my 57 revitalized
Thanks Kim, The left pipe goes back to the left side over the rear axle in a gentle bend so there should be no exhaust restriction except for length. It just looks like the left pipe is on the left side.
Originally, I had 48" glasspacks, and finally, the core in the glasspacks rusted out and were rattling. I had them welded back in the glasspacks, and that lasted about 3 years, and they broke loose again. Now they are 36 inchers because 4 foot glasspacks are no longer available, and they make a little more noise than the 4 footers did. Before, I couldn't hear them at all, now, I can feel them rumble at about 75 mph, and hear them at about 65. I guess it was lucky that I changed them before I changed the frame stub, as they were 12 inches longer than these, and I would have had to make a larger trans crossmember mod for the glasspacks body, and then changed the glasspacks. then the crossmember would have looked stupid with just the pipes going through the huge opening. Remember, my tailpipes are about 10 feet away from my ears. Those guys like you with a 6 foot bed will get more noise since you lose 2 feet compared to me. I guess I should take a shot of the rear and show you how they look from the back. They remind me of Yosemite Sam from the cartoon. I always disliked the tail pipes going straight back under the bumper. It always looked to me like whoever did the pipes lacked imagination. But then, I still have the spare under the bed in the original position. Come to think of it, I will have to get a different 15" spare wheel that fits 5 on 5 lug pattern. |
|
|
|
|
11-21-2011, 08:30 PM
|
#82 |
|
A320 Pilot/USAF Retired
Join Date: Mar 2009
Location: Charleston, SC
Posts: 2,629
|
Re: my 57 revitalized
Did you put a check valve on the front as well? I see one on the rear, but not on the front. For discs I believe you need a 10 lb valve and 2 lb for drums.
__________________
JJ My 1957 build: http://67-72chevytrucks.com/vboard/s...d.php?t=334552 http://www.trifive.com/forums/showthread.php?t=22037 Instagram - Chuckdriver57 |
|
|
|
|
11-22-2011, 12:05 AM
|
#83 |
|
Registered User
Join Date: Aug 2011
Location: phoenix az
Posts: 723
|
Re: my 57 revitalized
Chuck, The front check valve stayed on the truck.
Um...... I think you have it slightly turned around. The rear has 10 lb and the front is 2 lb. Remember, the rear shoes have springs that return the shoes to the neutral position, but the calipers have no springs and require less pressure to have the pads remain at the rotors. I had some small setbacks today, the fittings that are still leaking won't seal up. i am going to have to drain the reservoir and replace them. I placed foil pans under the leakers, and I'll drain it tomorrow. The rears have no pressure, so I may have to rebuild the master cyl. while the reservoir is dry. I may have to do something with the proportioning valve, and crack the lines to see if there is pressure at the inlet between the master and the prop valve before I drain the reservoir. Although I noticed the brake lights were on, and the master cyl. isn't returning to full up pedal position. I pulled the stoplight switch wires for now. Could be the hydroboost, I have to get the engine fuel pump wired so the engine will start and the power steering pump builds pressure and the booster will work. More later! |
|
|
|
|
11-23-2011, 05:26 PM
|
#84 |
|
Senior Member
 Join Date: Aug 2010
Location: Shasta Lake, CA.
Posts: 1,624
|
Re: my 57 revitalized
About the plumbing at the Master Cylinder,
The adjustable proportioning valve and 10# check valve are for the rear brake circuit, on the master cylinder the rear brake port is the one farthest from the rod/hydroboost. The front disc brake port is the one nearest the rod/hydroboost unit and wants the 2# check valve. Be sure that the adj. prop. valve is all the way open and that the check valve is installed with the flow toward the brakes not the master. Then bench bleed the master cylinder. When installing the M/C to the hydroboost the rod should not push on the M/C piston it should have a 32nd" of free play. As for "rubber" tubing for brake fluid VW has blue bradded "rubber" tubing for this purpose. They use it for the brake remote reservoir on the Type I , II , III and IV Bug ,Bus, etc. Once you are able to drive your truck adjust the prop. valve so the front brakes lock up before the rear brakes do. Last edited by G&R's57GMC; 11-23-2011 at 05:39 PM. |
|
|
|
|
11-25-2011, 12:09 AM
|
#85 |
|
Registered User
Join Date: Aug 2011
Location: phoenix az
Posts: 723
|
Re: my 57 revitalized
drained the reservoir, and sealed up the reservoir leak, removed the left front brake line and changed the pipe to 1/4" adapter, really cranked on the other two leak points, added a stabilizer bracket for the booster, and remade the trans cross member end stubs.
Then ran the fan positive wire to the inside and grounded the negative terminal. Now I have to mount the fan relay and add a small fuse panel. Alert! Photobucket has several selections to go to the log in page. One of those has a virus. It messed up my computer big time, and took me most of today, off and on, to fix it. |
|
|
|
|
11-26-2011, 01:43 AM
|
#86 |
|
Registered User
Join Date: Aug 2011
Location: phoenix az
Posts: 723
|
Re: my 57 revitalized
front brakes work great. rock hard pedal
|
|
|
|
|
11-29-2011, 01:25 AM
|
#87 |
|
Registered User
Join Date: Aug 2011
Location: phoenix az
Posts: 723
|
Re: my 57 revitalized
Mounted the fuse panel and 3 relays. the 3rd relay is an "arm" relay that will turn the other two relays on and off with the key. This way, no real current goes through the ignition switch. The ignition relay powers the coils on the other two relays, and the ground for the fan relay goes through the temp switch in the head. THe fuel pump relay is grounded next to the fuse panel.
|
|
|
|
|
11-30-2011, 12:53 AM
|
#88 |
|
Registered User
Join Date: Aug 2011
Location: phoenix az
Posts: 723
|
Re: my 57 revitalized
Well, it runs! Sounds ok too.
Finished the wiring, and reconnected the batttery. no smoke, and looks like everything works. Had a minor setback, I had a gasoline leak, and with an electric fuel pump, it just keeps on pouring out gas till you turn off the key. There was gas all over, so I didn't run it more than 10-15 seconds. I had missed tightening one fitting, and Murphy made sure it was the pressure line instead of the suction line. After cleaning it up, there was still plenty of vapors, so I didn't restart it. Besides, it doesn't have any coolant in the engine anyway, so I didn't let the clutch out. Just turned it off. So, tomorrow will be the test after gear oil in the rear end and coolant in the engine. Gotta find some one in Phoenix that can swedge a ball back onto the E brake cable since I shortened it. |
|
|
|
|
11-30-2011, 01:47 PM
|
#89 |
|
Registered User
Join Date: Jun 2006
Location: Idaho
Posts: 8,800
|
Re: my 57 revitalized
When I made my cable I got double swedge fittings from the hardware store. I did a lot of research and rather than buy an expensive tool ended up using my vice to compress them. I put the loop around a nail in the rafters and supported 175# (at that time) from the cable to verify it would not slip. Look for a rigging supply place to have it done for you.
__________________
1959 Chevy Short Fleetside w/ 74 4WD drive train (current project) OrrieG Build Thread 1964 Chevelle Malibu w/ 355-350TH (daily driver) Helpful AD and TF Manual Site Old Car Manual Project |
|
|
|
|
12-04-2011, 03:35 AM
|
#90 |
|
Registered User
Join Date: Aug 2011
Location: phoenix az
Posts: 723
|
Re: my 57 revitalized
Thanks Orrie, I will make the trip to the hardware store on Monday. I hate to drive this thing without the last ditch backup.
I now have the fan activated with the brake pedal, the manual switch and the temp sensor. The corvette / ZZ4 heads are junk if they get overheated, so I am protecting against that. Call me paranoid, but I have a set on my 86 corvette and some here. I got a bigger radiator for the corvette like I did with the truck, and it runs about 30 degrees cooler all year round than before I installed it. Haven't had a problem with them, but the corvette forum members that didn't address the higher temps are singing the blues. Now I have to adjust the clutch, install the headlights, and see what happens. I purged the power steering of air, and I can tell already there's going to be almost no road feel . it is tooooo easy to turn the wheel with the truck not moving. I did get the too long driveshaft installed by removing the u-joint caps, putting the joint in place, and reinstalling the caps. I will preload the springs tomorrow with the traction bars and get about 1/4" more distance on the yoke. It will be about 3/4" total slide for the front yoke. I will see what the wrecking yard gets for a '99 blazer driveshaft. In the mean time, I will be gentle with it. |
|
|
|
|
12-05-2011, 01:32 AM
|
#91 |
|
Registered User
Join Date: Aug 2011
Location: phoenix az
Posts: 723
|
Re: my 57 revitalized
drove it tonight!
I went maybe half a mile in a circle inside an aircraft hangar. It turns right farther than left. I am going to take he pitman arm off, then turn the wheel to the right 1 turn, and reinstall the pitman arm. I must have miscounted the turns of the input shaft when I originally set it up. The brakes don't feel like power, but it stops. The discs are new and the pads are new. The pads haven't bedded in. The fan is not right. I switched the wires, and the fan started turning the right way. I have to flip the fan, and reverse the wires back again.. But it has power steering,and it is waaaay more precise than the old original steering column. I cure the brake problem, and I'll test drive it on asphalt! |
|
|
|
|
12-05-2011, 02:11 PM
|
#92 |
|
Registered User
Join Date: Jun 2006
Location: Idaho
Posts: 8,800
|
Re: my 57 revitalized
Cool you got to drive it, I'm going in circles but on foot. Like the entry from an early American explorers diary "We are hopelessy lost but making good time".
__________________
1959 Chevy Short Fleetside w/ 74 4WD drive train (current project) OrrieG Build Thread 1964 Chevelle Malibu w/ 355-350TH (daily driver) Helpful AD and TF Manual Site Old Car Manual Project |
|
|
|
|
12-07-2011, 12:47 AM
|
#93 |
|
Registered User
Join Date: Aug 2011
Location: phoenix az
Posts: 723
|
Re: my 57 revitalized
WOO HOO!
Drove it up and down the side road that goes by the airport. Readjusted the tie rod ends. I removed the pitman arm from the steering box, and there is no way I could get it out one full turn. So the next thing was to try to align the tie rods a little better. The right tie rod is now bottomed out and the left is adjusted 3/4" from bottomed out. It goes straight, stops straight and doesn't pull to either side. The steering wheel turns 1 1/2 turns plus a little right and left. Now the laundry list is a little shorter. 1. re-adjust the throttle rod from the pedal to the carb 2. emergency brake cable 3. re-bleed the rear brakes 4. hook up lights, stoplights, turn signals 5. flip the fan 6. mount the ignition resistor 7. re route the plug wires 8. plug in the radio antenna coax (have to take the radio out again to do that) 9. install the shifter boot 10. install an alternator light 11. get tires changed 12. drill a hole in the frame on each side for the trans mount 13. preload the traction bars 14. clean and vacuum the truck 15. empty the bed of the truck. after 4 months, it has accumulated a lot of parts, tools, etc. 16. add shims to the right upper control arm adjusting bolts. The top of the right tire tilts out too much. I will get an alignment after the front goes up a little with a spring change. 17. re-clock the steering column shaft on the steering box so the turn signals will cancel correctly, then re-clock the steering wheel Last edited by Coupeguy2001; 12-07-2011 at 01:02 AM. |
|
|
|
|
12-07-2011, 09:23 AM
|
#94 |
|
Senior Member
Join Date: Mar 2011
Location: West Plains, Missouri
Posts: 7,559
|
Re: my 57 revitalized
Congrats....Jim
__________________
my build thread: http://67-72chevytrucks.com/vboard/s...d.php?t=459839 Jimbo's long bed step build:http://67-72chevytrucks.com/vboard/s...t=464626<br /> |
|
|
|
|
12-08-2011, 12:14 AM
|
#95 |
|
Registered User
Join Date: Aug 2011
Location: phoenix az
Posts: 723
|
Re: my 57 revitalized
Thanks Jim.......Here it is so far, notice that it has moved and is turned around from where it has sat for 4 and a half months.
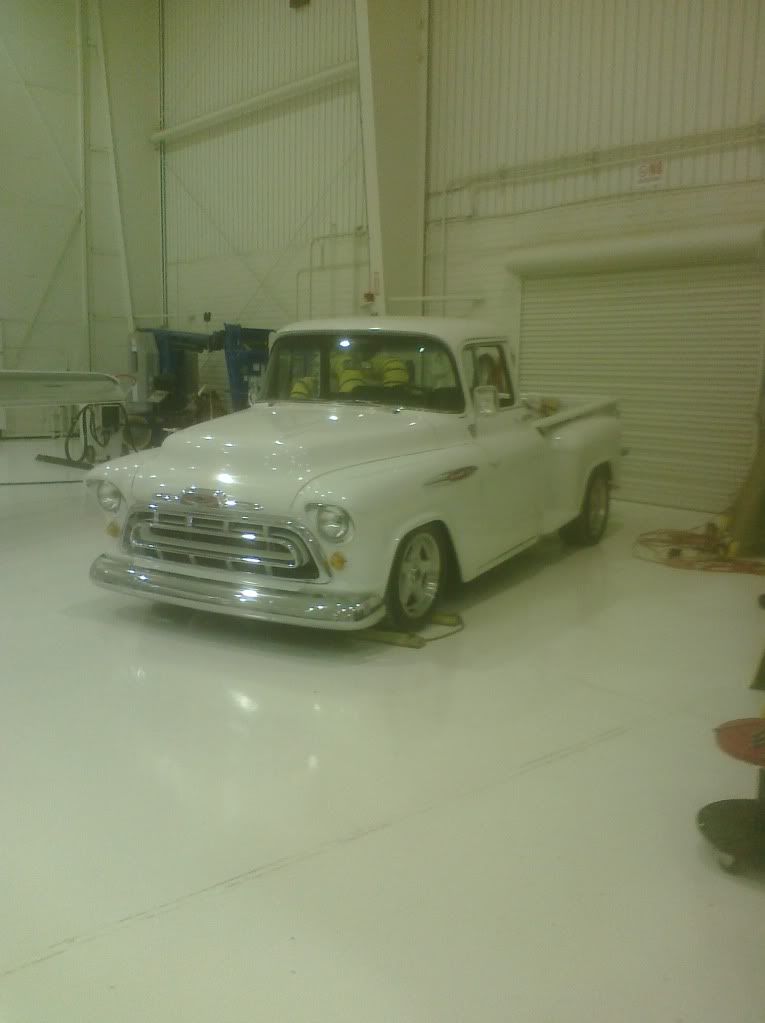 I almost drove it home tonight. Got the lights and turn signals hooked up and the stop lights working. I drove it around for a half hour, steering is good, brakes could be better, but the alternator quit working. I have another one, so I will just rob the back half off of it and install it on my current front half. Changing the front frame is tedious and time consuming. Changing the back half will just take about 15 minutes after I get it off the engine. I just couldn't leave it the way it was, so I got out the glass cleaner, sprayed the rags, and wiped it clean. Just wish the alternator was working. The paint job was done in 1977, it is a 20 footer. It is airplane paint, so it just shines as it ages, but it gets harder and more brittle as time goes on. There is almost as much paint sprayed on it as there are touched up rock chips. After all this time, it just still looks ok until you get really close. ok, just close. After driving it around for 30 minutes, I just have to say, it's easier to drive. It now goes where you point it and you don't break a sweat just turning the wheel. Used to be, you needed a good memory to back up. You memorized where you needed to go, and then turned forward to turn the wheel about the right amount, then looked behind you to see if you were correct as you gave it gas and let the clutch out.... I got it up to 50, and the overdrive works, i have to recheck the fluid level in the overdrive, and then drain and refill the 4 speed. Oh, it's also quieter. No wheel bearing noise, and I changed the rear cab rubber mounts. The steering wheel doesn't transmit any noise either. It's just quieter, that's all. Could also be the different cam in the engine as well. Last edited by Coupeguy2001; 12-08-2011 at 12:28 AM. |
|
|
|
|
12-08-2011, 01:20 AM
|
#96 |
|
Registered User
Join Date: Aug 2007
Location: Corona, California
Posts: 7,998
|
Re: my 57 revitalized
Looks real sharp.
Kim |
|
|
|
|
12-08-2011, 09:37 AM
|
#97 |
|
Senior Member
Join Date: Mar 2011
Location: West Plains, Missouri
Posts: 7,559
|
Re: my 57 revitalized
Like the stance, it looks really good. Rock chips are a "badge of honor", it's been driven....Jim
__________________
my build thread: http://67-72chevytrucks.com/vboard/s...d.php?t=459839 Jimbo's long bed step build:http://67-72chevytrucks.com/vboard/s...t=464626<br /> |
|
|
|
|
12-08-2011, 12:10 PM
|
#98 |
|
Registered User
Join Date: Oct 2011
Location: Roanoke, VA
Posts: 104
|
Re: my 57 revitalized
NICE! I have been following this thread closely, wanted to thank you for all the detail you provide and the great pictures. Helps alot!
|
|
|
|
|
12-08-2011, 09:38 PM
|
#99 |
|
A320 Pilot/USAF Retired
Join Date: Mar 2009
Location: Charleston, SC
Posts: 2,629
|
Re: my 57 revitalized
Great work, it's looking good!
__________________
JJ My 1957 build: http://67-72chevytrucks.com/vboard/s...d.php?t=334552 http://www.trifive.com/forums/showthread.php?t=22037 Instagram - Chuckdriver57 |
|
|
|
|
12-09-2011, 12:32 AM
|
#100 |
|
Registered User
Join Date: Aug 2011
Location: phoenix az
Posts: 723
|
Re: my 57 revitalized
Thanks guys, I appreciate your appreciation and the encouragement.
What I did to my truck, any car guy could do. It's nothing special, just the frame part was so simple, and the rest of the engineering and parts hunting and making parts takes up a lot of time. But.....Anyone could do what I did. I am beginning to think I am operating on the bottom of the front suspension travel area. The shims to align the front end seems excessive. Also, the truck seems to bottom out on dips and bumps in the road. My shocks may be too tall. I have some corvette bilsteins that I will compare the truck shocks with. If the corvette units are much shorter, I will install them. If I raise the front up a little, I have the truck shocks for later. Here's what I did at lunch time today. I needed to finish the alignment, so I got the digital protractor we use to determine the control surface total travel on the airplane. I picked a good flat piece of floor, and put the protractor on the radiator core support. You can see the result............totally level. 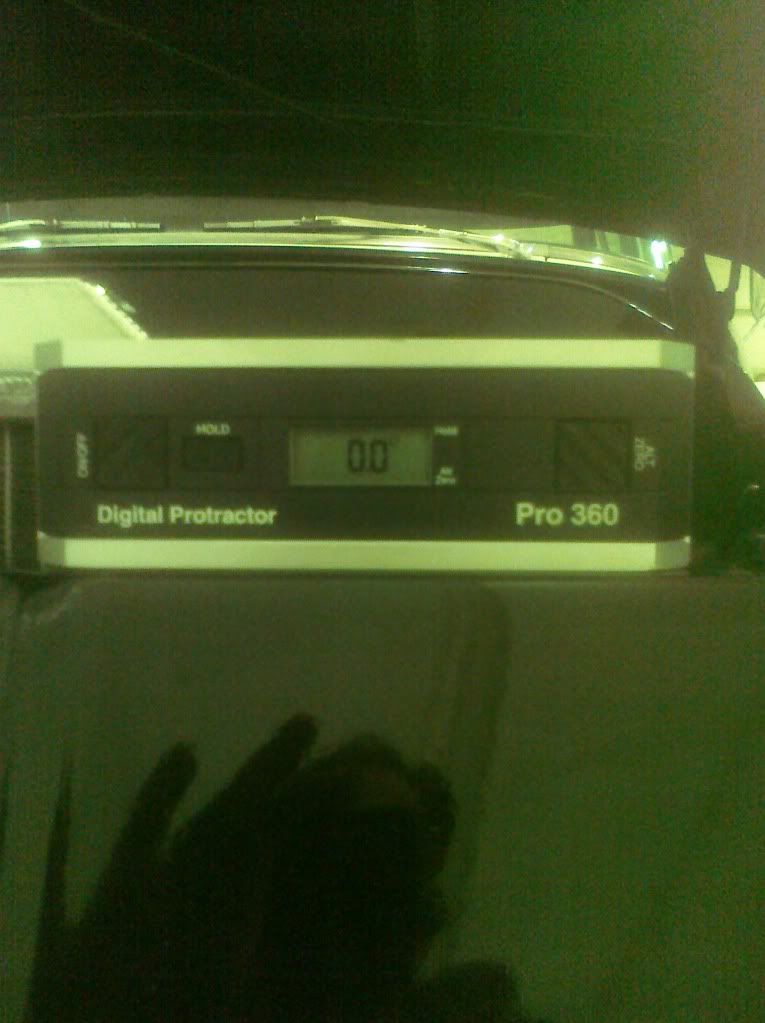 Then I checked the wheel cambers......... They were way out. I went to O'Reilly's and bought 4 packs of body shims, and then unbolted the upper control arm bolts until I got the measurement I wanted. Here's the left, 0.3 of a degree negative camber: 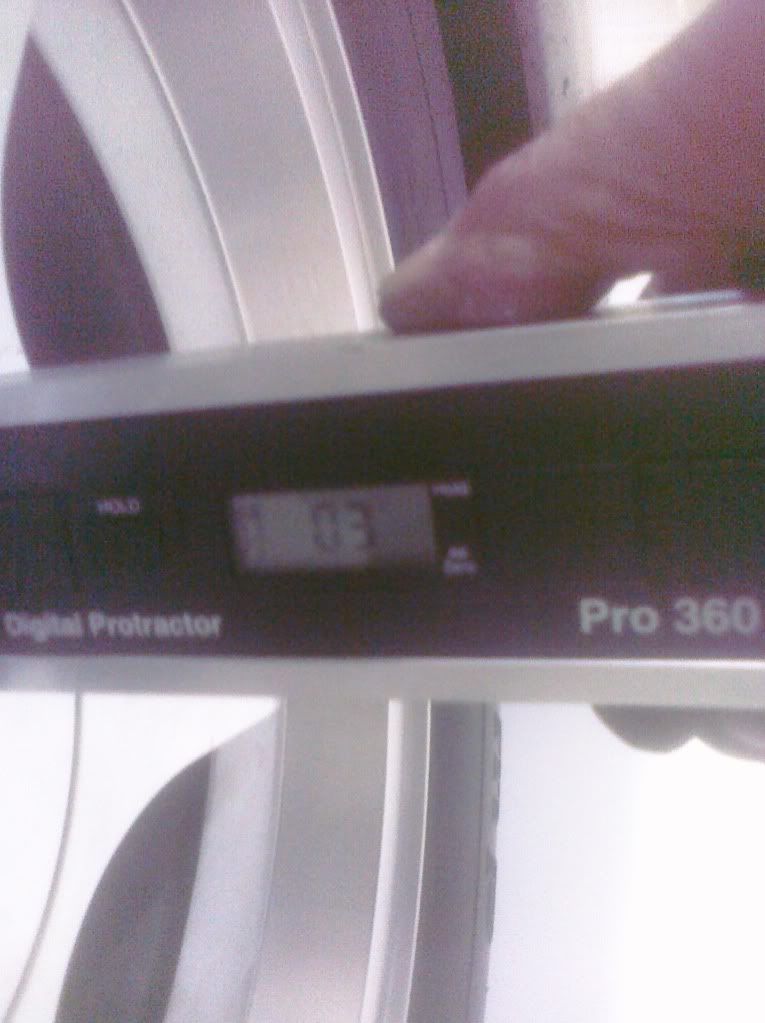 Then the right, 0.3 of a degree of negative camber: 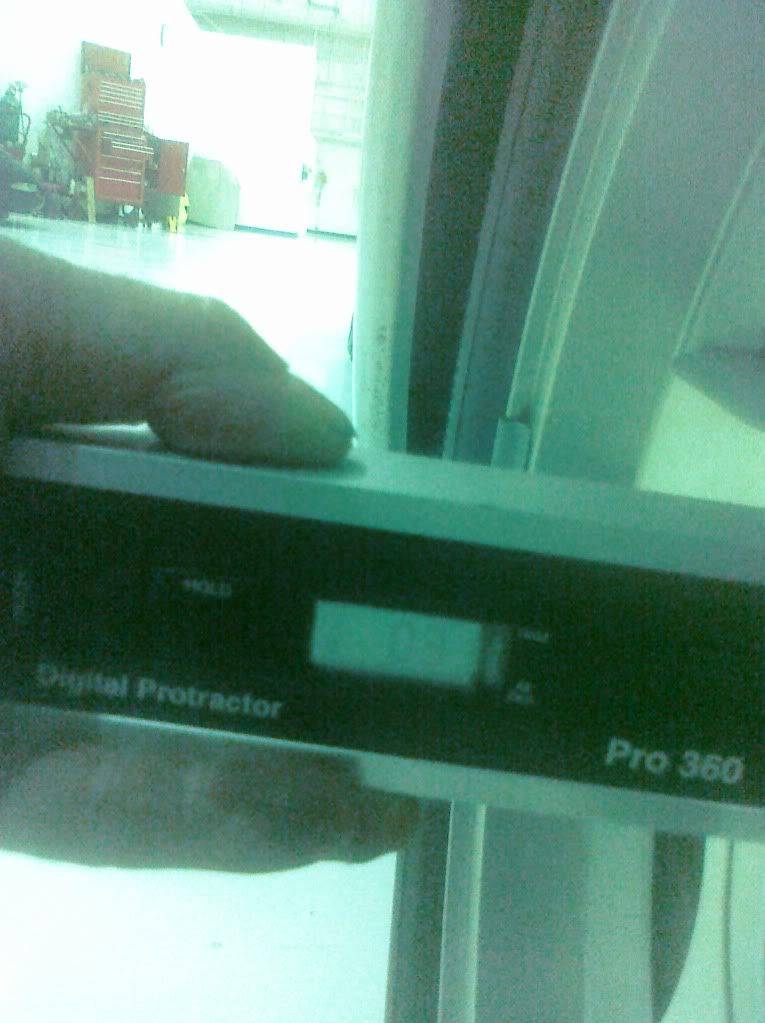 Then when the shims barely went in the spaces created by the undone bolts, I wedged them in, and tightened the bolts. Here is the rear on the left side The shims are the shiny pieces in the middle: 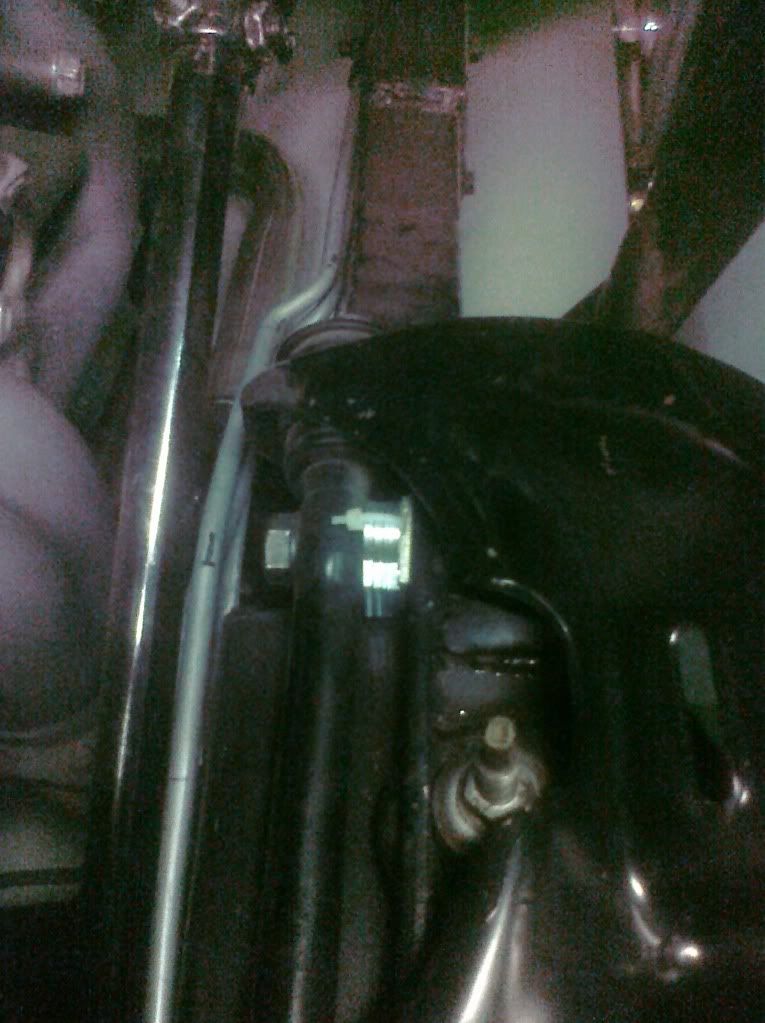 On the subsequent test drive, it seemed more stable and less quirky. The truck is very fast turning, it might be because I want to use the original steering wheel. It may have too much leverage. Last edited by Coupeguy2001; 12-09-2011 at 01:02 AM. |
|
|
|
 |
| Bookmarks |
|
|


 Linear Mode

