
|
|
|
 01-04-2019, 10:50 AM
|
#1 |
|
Senior Member
 Join Date: Mar 2011
Location: West Plains, Missouri
Posts: 7,555
|
Re: 55 Wagon Progress
Very nice...Jim
__________________
my build thread: http://67-72chevytrucks.com/vboard/s...d.php?t=459839 Jimbo's long bed step build:http://67-72chevytrucks.com/vboard/s...t=464626<br /> |

|

|
|
01-08-2019, 01:44 PM
|
#2 |
|
Registered User
Join Date: Jan 2013
Location: Leonardtown, MD
Posts: 1,637
|
Re: 55 Wagon Progress
Thanks guys!!
Dotting the i's, crossing the t's... The insert for the bottom side of the console lid will be held in with a couple of 10-32 screws into a rivet nut. To insure the rivet nut is flush on the outside for the installation of upholstery, we want to provide a slight recess for the rivet nut flange. Here's the punch and die we made for the occasion, the bottom die is machined on the side to keep things from moving when clamped in the vise. South Bend milling machine: 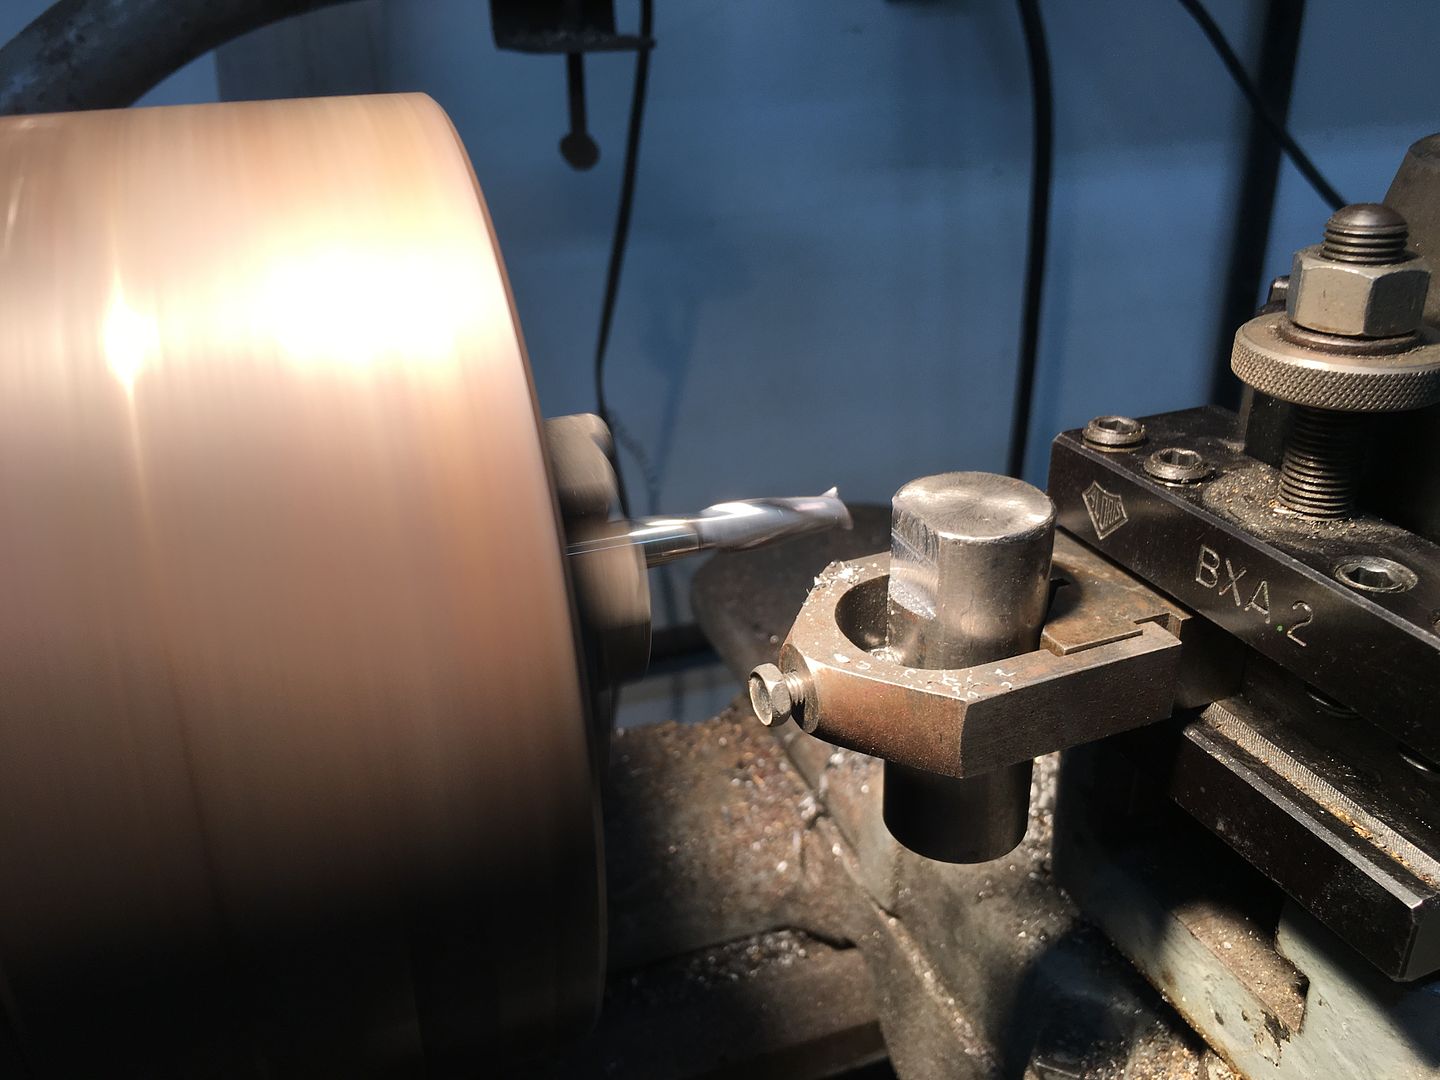 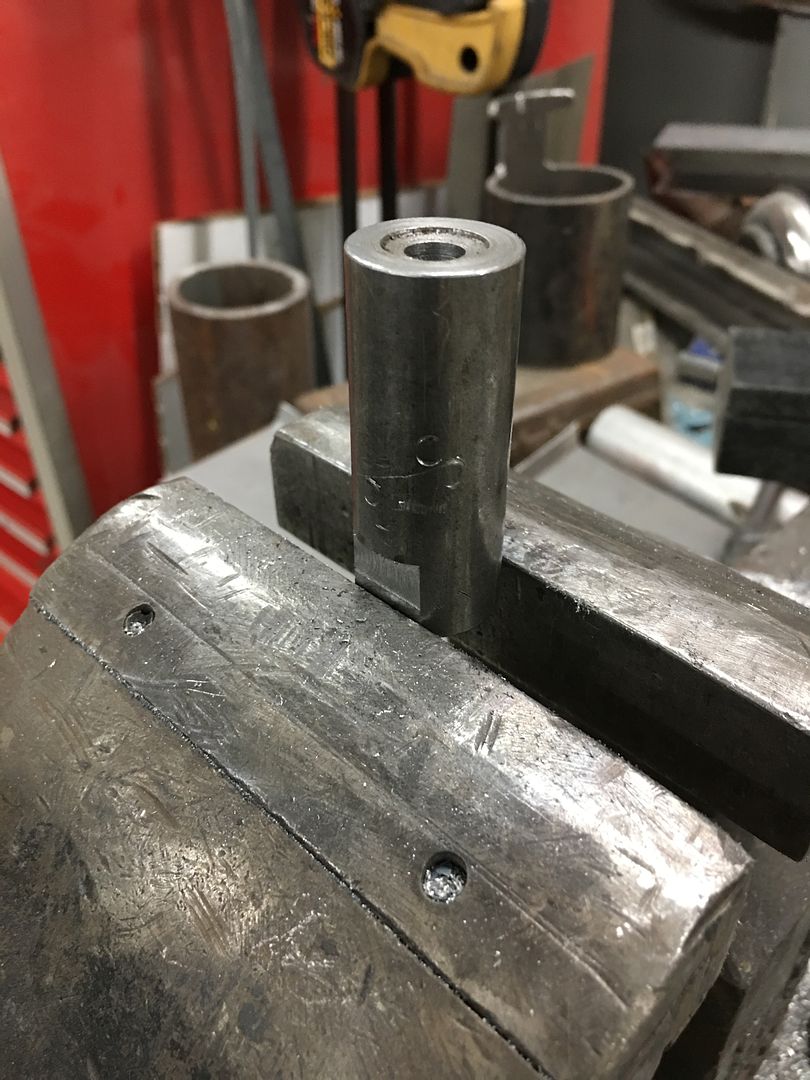 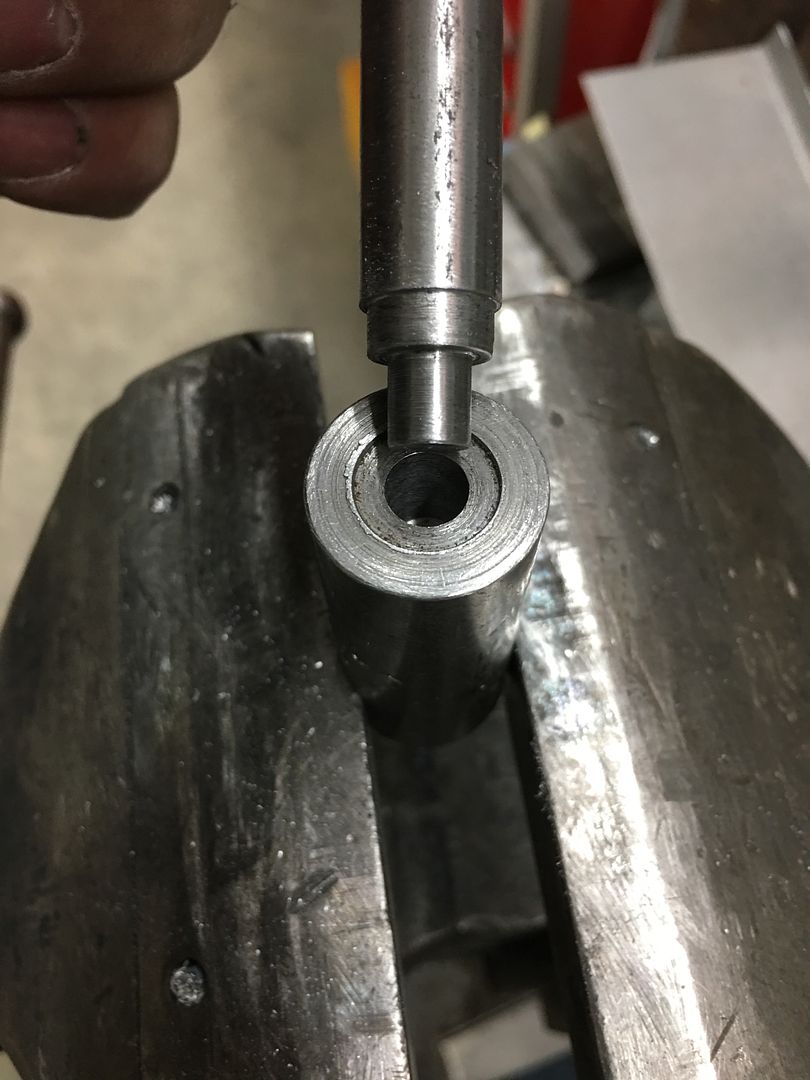 action shot: https://www.youtube.com/watch?v=Z3hS...ature=youtu.be inner parts installed...  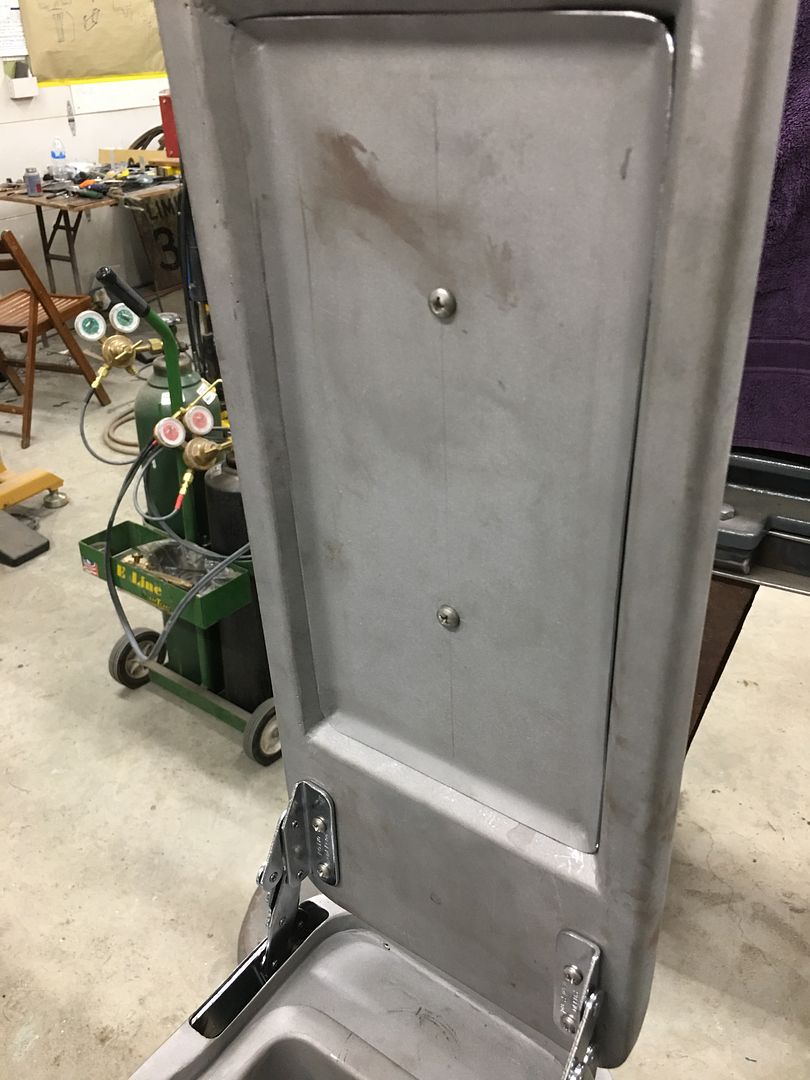 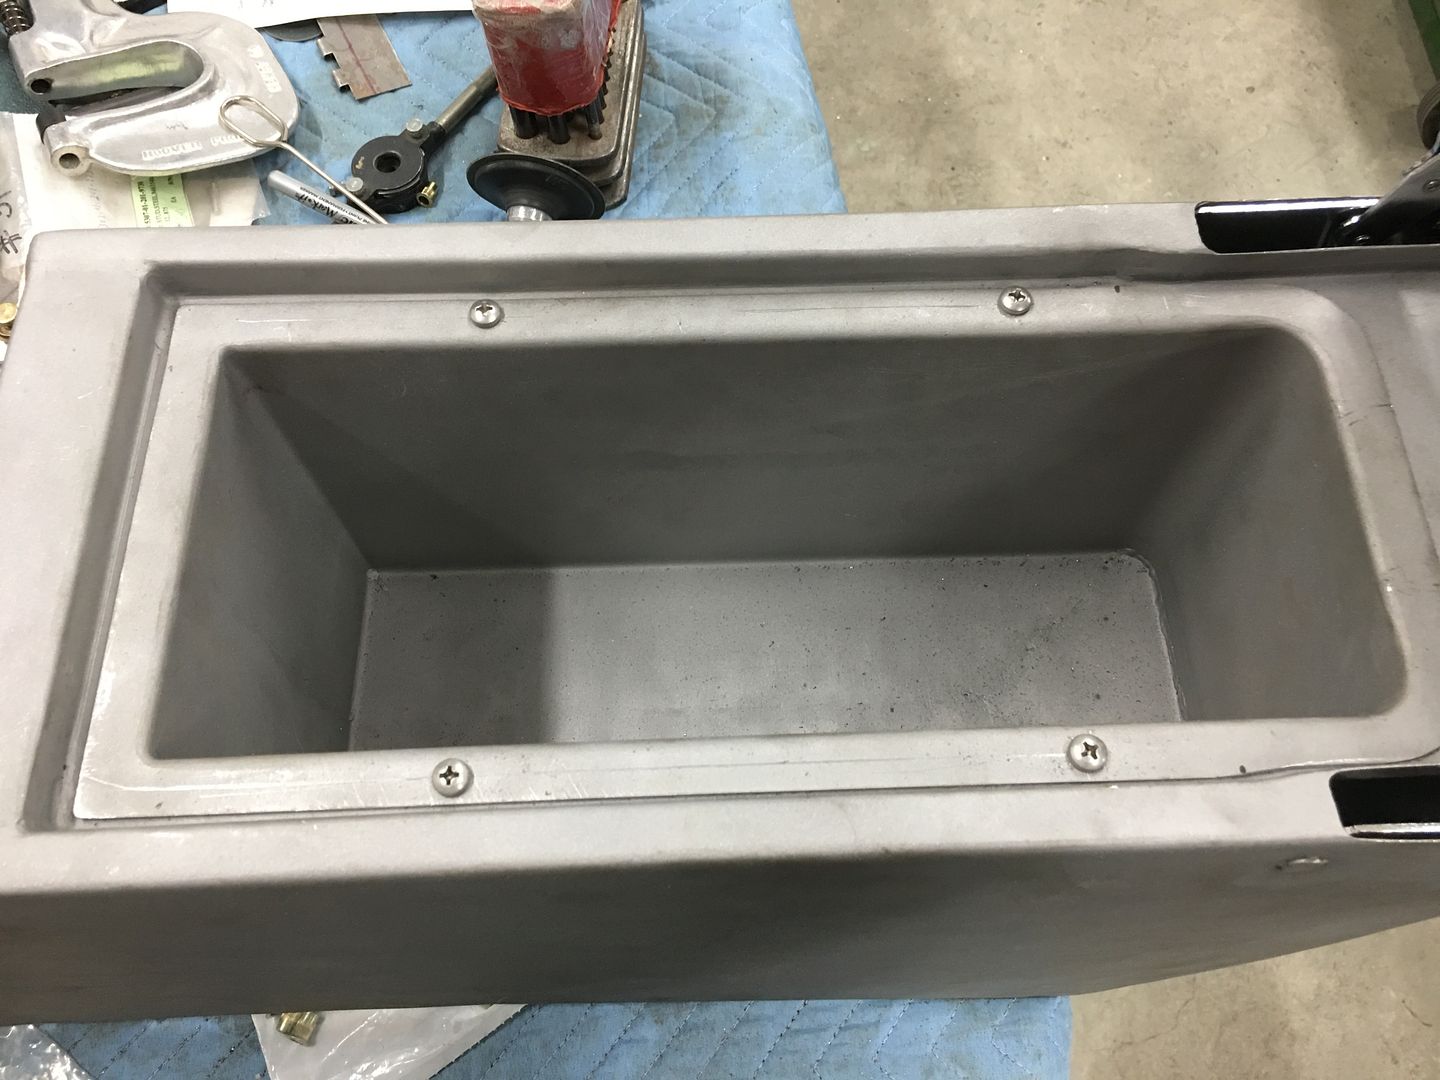 ready for powder coat / epoxy primer, whichever comes first... 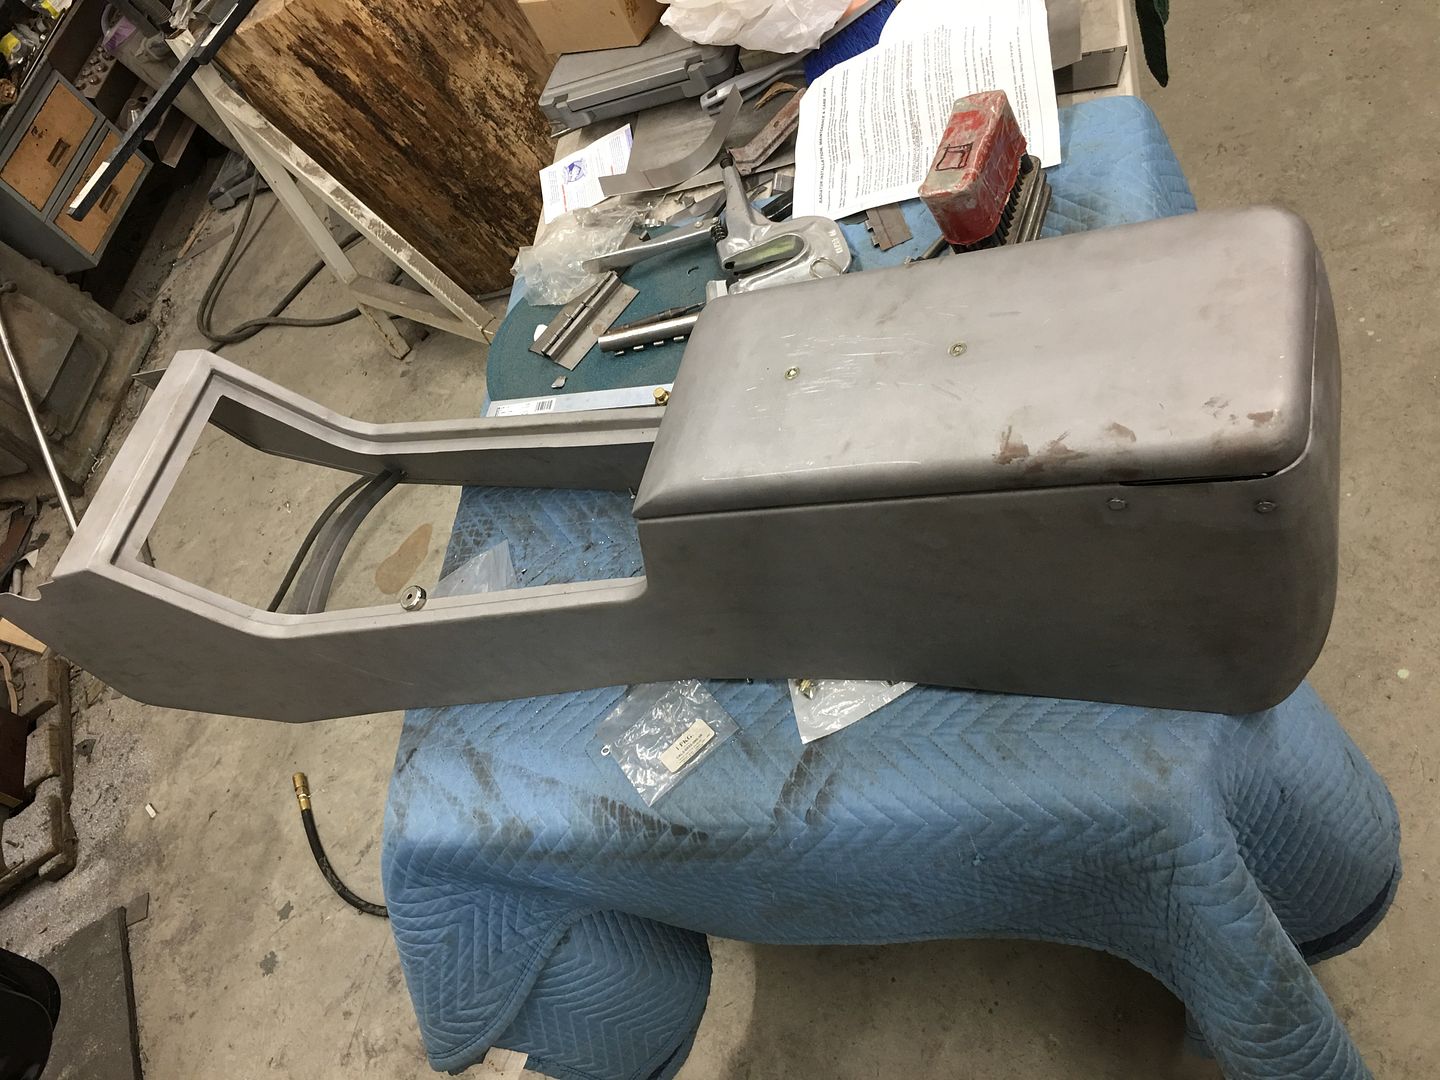
__________________
Robert |
|
|
|
|
01-08-2019, 05:17 PM
|
#3 |
|
Post Whore
 Join Date: May 2015
Location: Alabama
Posts: 14,615
|
Re: 55 Wagon Progress
Looks great...after all those hrs of work it's almost a shame to have to cover it up with fabric
__________________
Mongo...aka Greg RIP Dad RIP Jesse 1981 C30 LQ9 NV4500..http://67-72chevytrucks.com/vboard/s...d.php?t=753598 Mongos AD- LS3 TR6060...http://67-72chevytrucks.com/vboard/s...34#post8522334 Columbus..the 1957 IH 4x4...http://67-72chevytrucks.com/vboard/s...63#post8082563 2023 Chevy Z71..daily driver |
|
|
|
|
01-09-2019, 12:13 AM
|
#4 |
|
Senior Member
Join Date: Mar 2011
Location: West Plains, Missouri
Posts: 7,555
|
Re: 55 Wagon Progress
Robert, one very nice console...Jim
__________________
my build thread: http://67-72chevytrucks.com/vboard/s...d.php?t=459839 Jimbo's long bed step build:http://67-72chevytrucks.com/vboard/s...t=464626<br /> |
|
|
|
|
01-10-2019, 11:59 PM
|
#5 |
|
Registered User
Join Date: Jan 2013
Location: Leonardtown, MD
Posts: 1,637
|
Re: 55 Wagon Progress
Thanks for the comments guys!
Picked up the console from the powder coater, the outside was done in satin black and will be covered in upholstery, the inside parts were done in wrinkle finish, this will be their "covering" 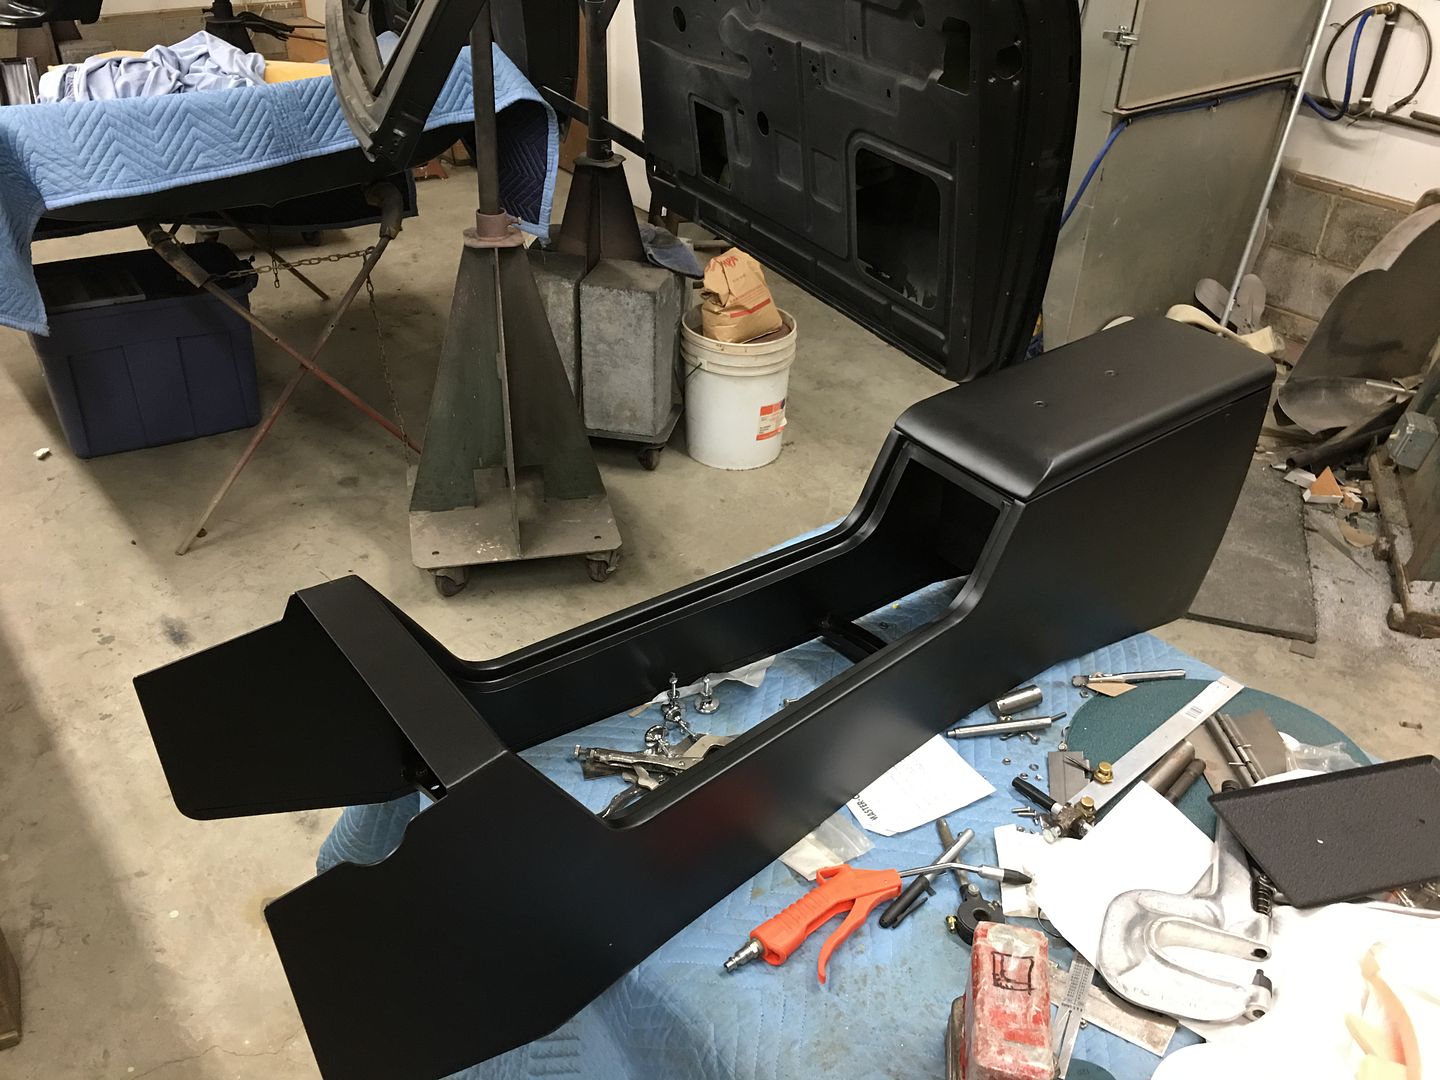   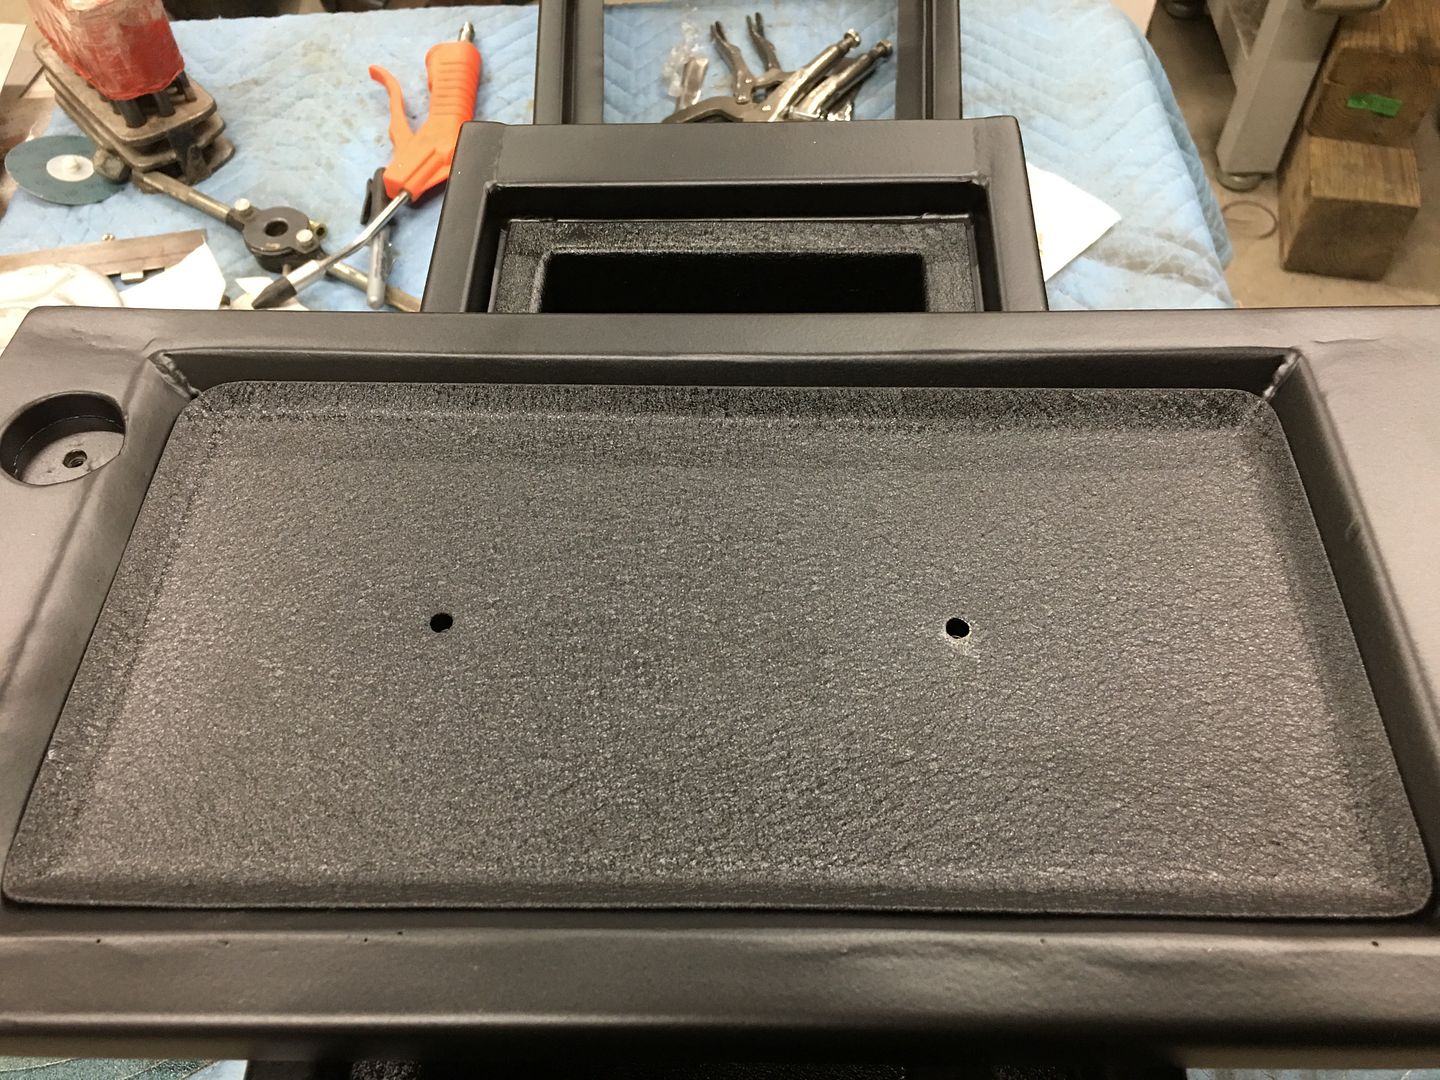 Tonight we worked on some stainless for our seat belt escutcheons.. 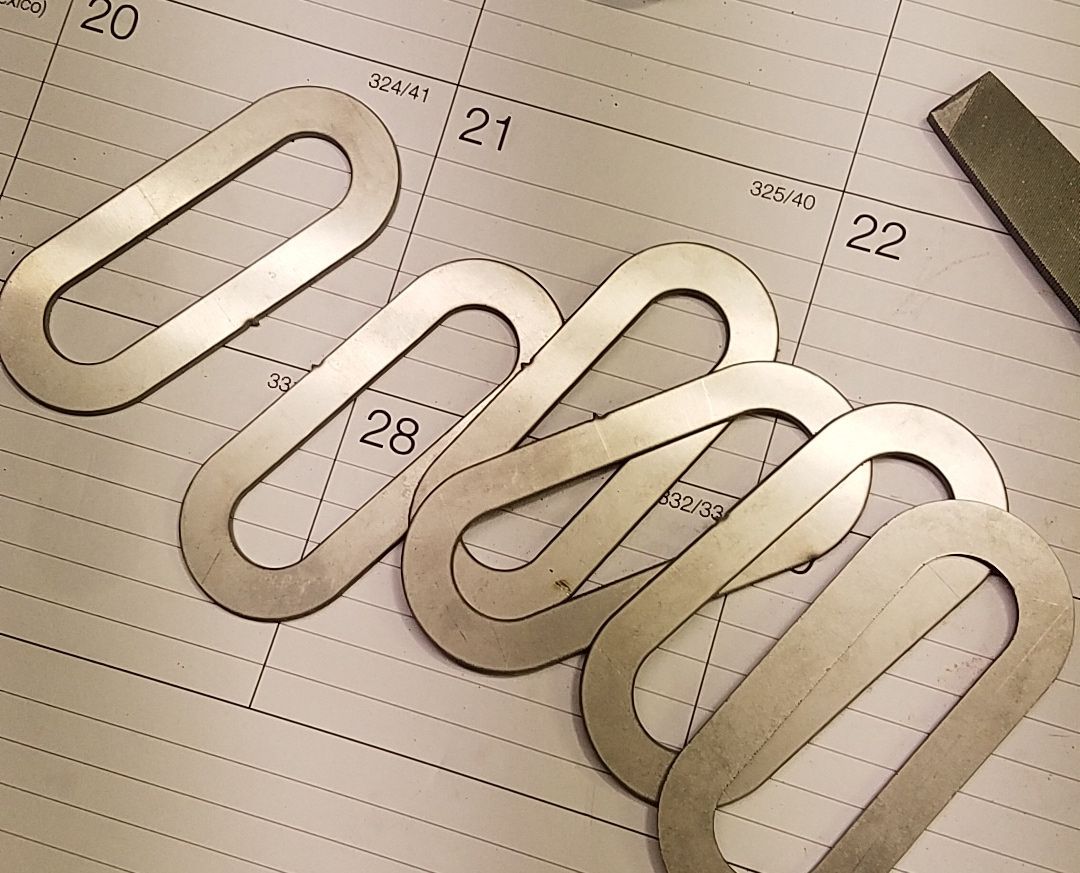 Some measurements and geometry from high school should get us the correct size from the onset... 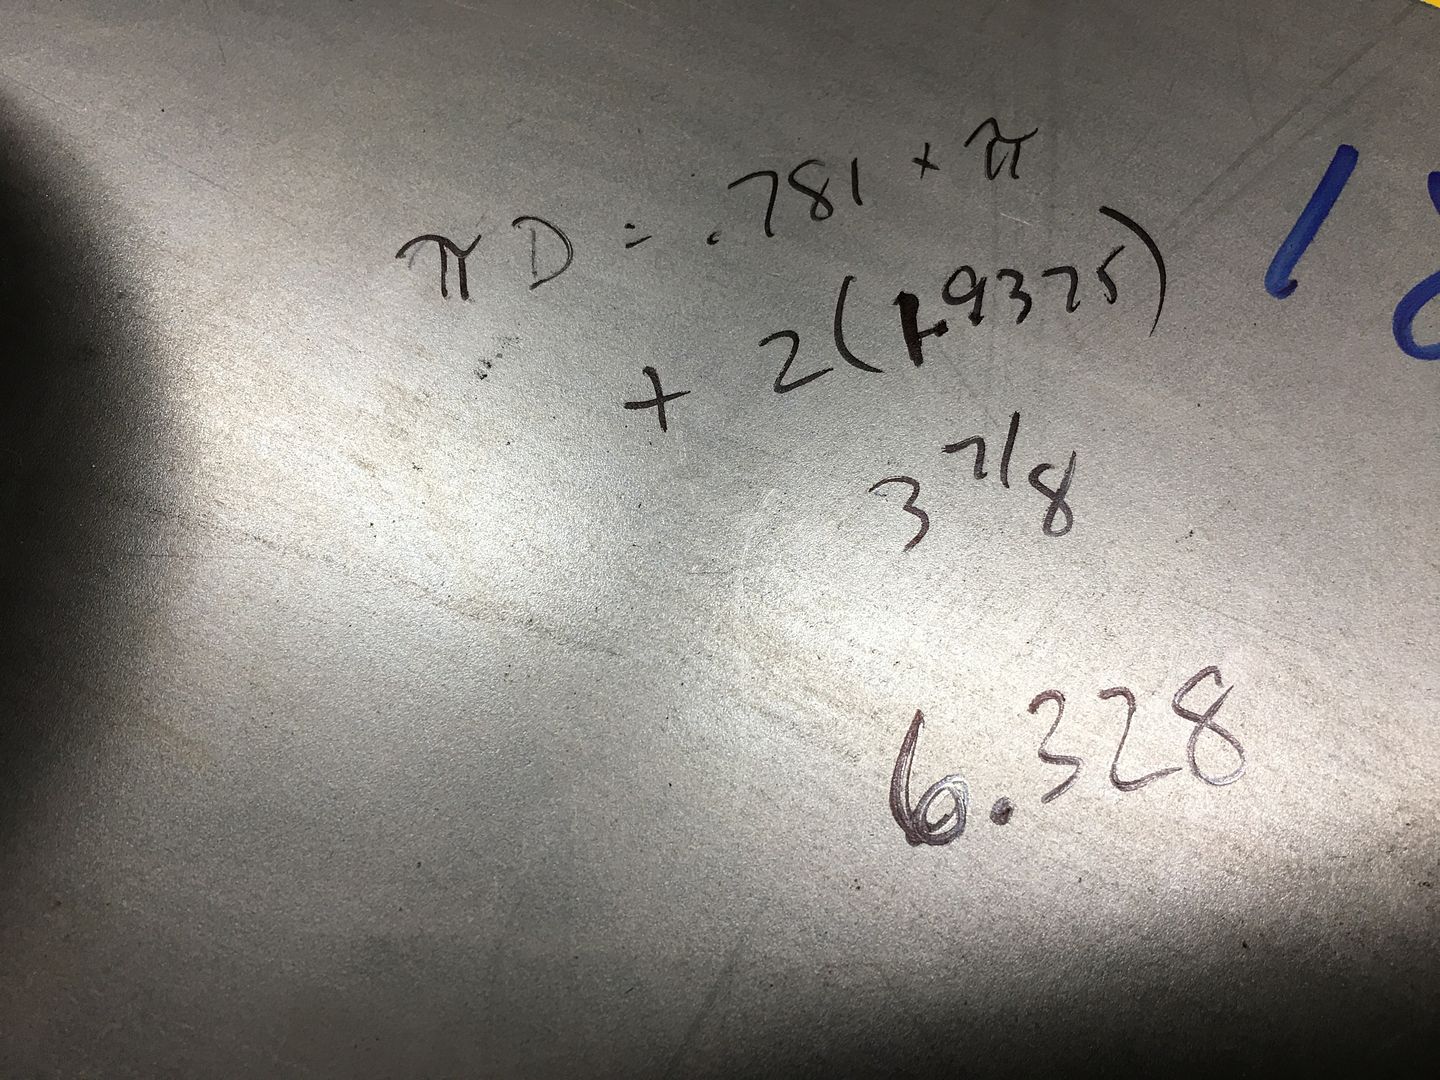 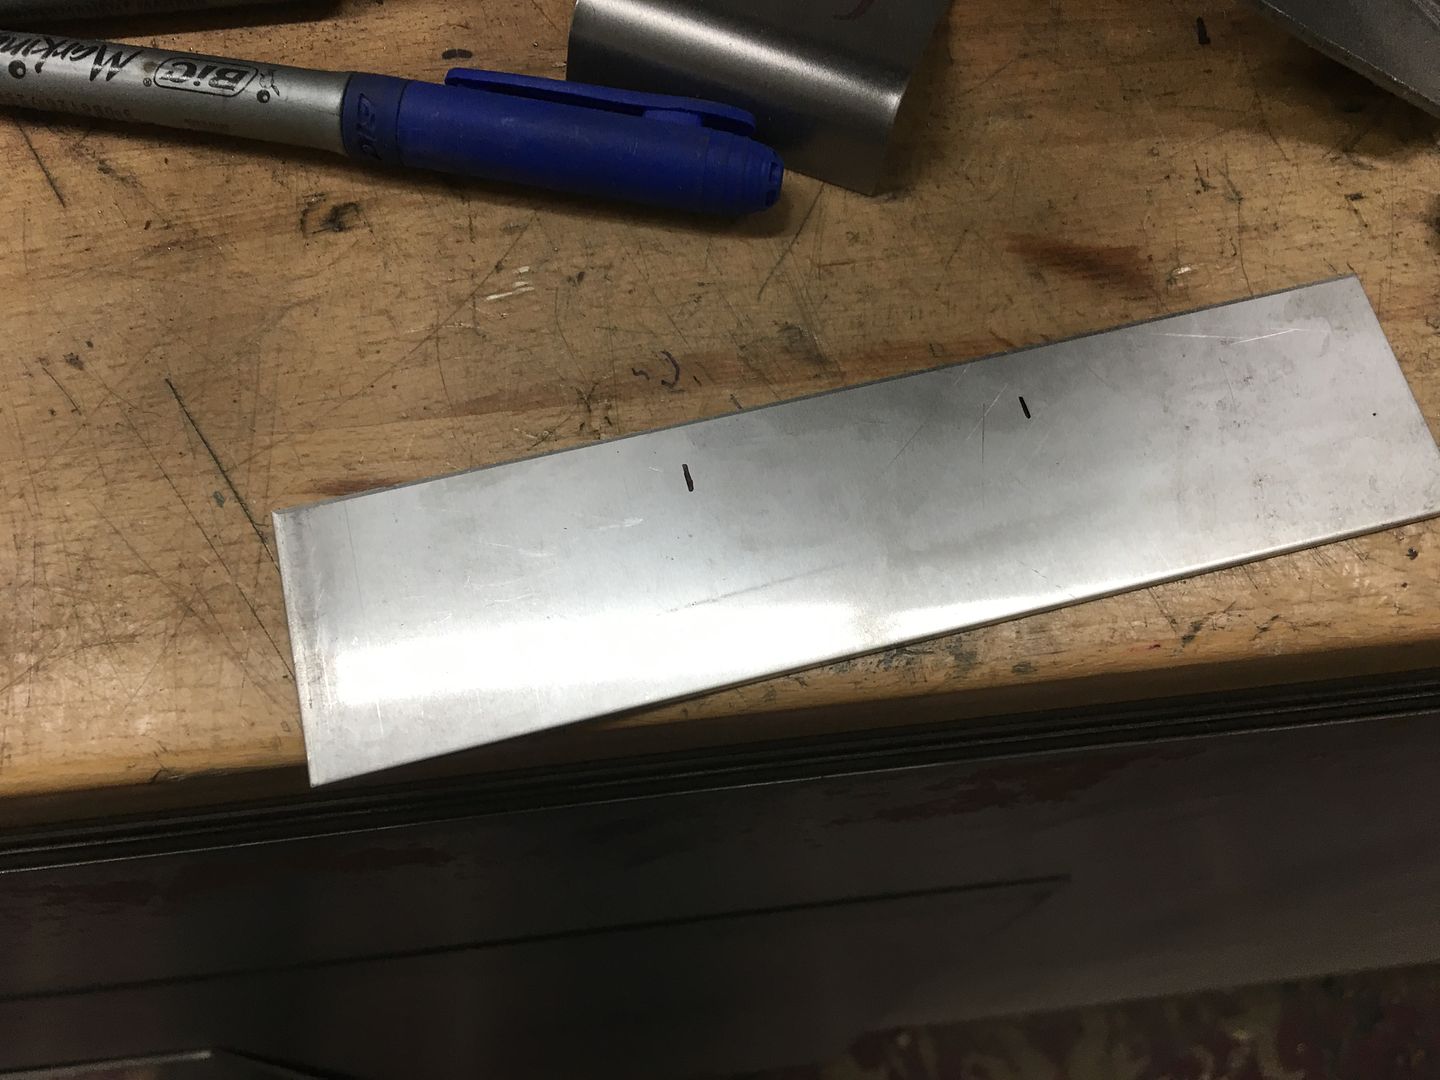 Using the mag brake and a 3/4 tube to bend our radius... 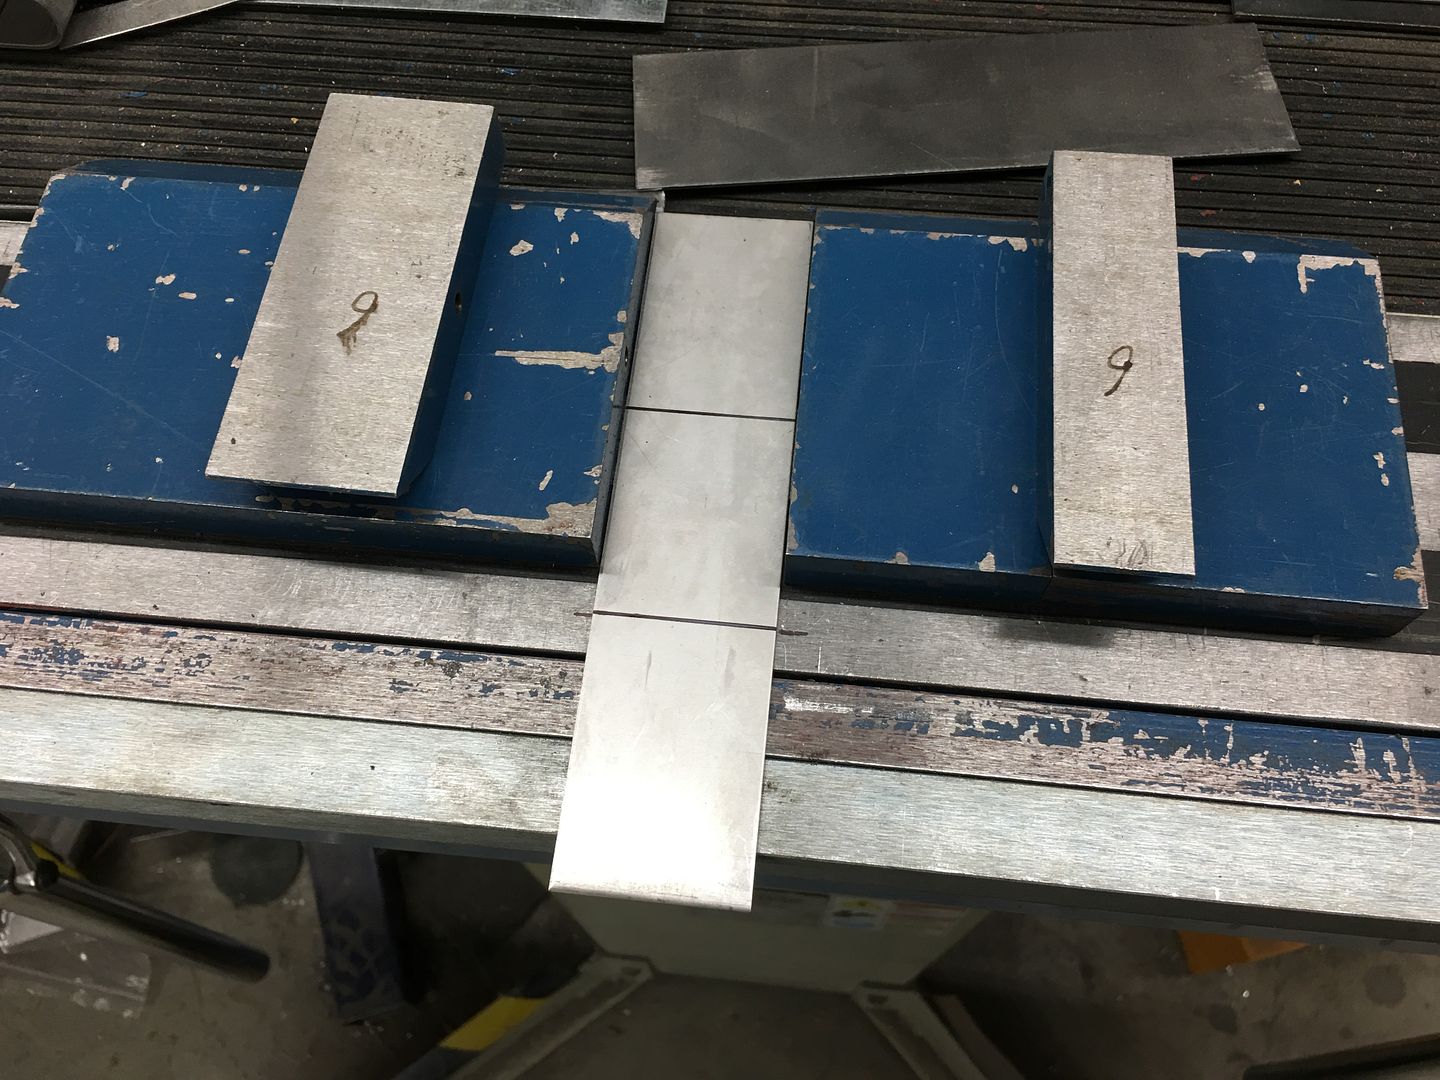 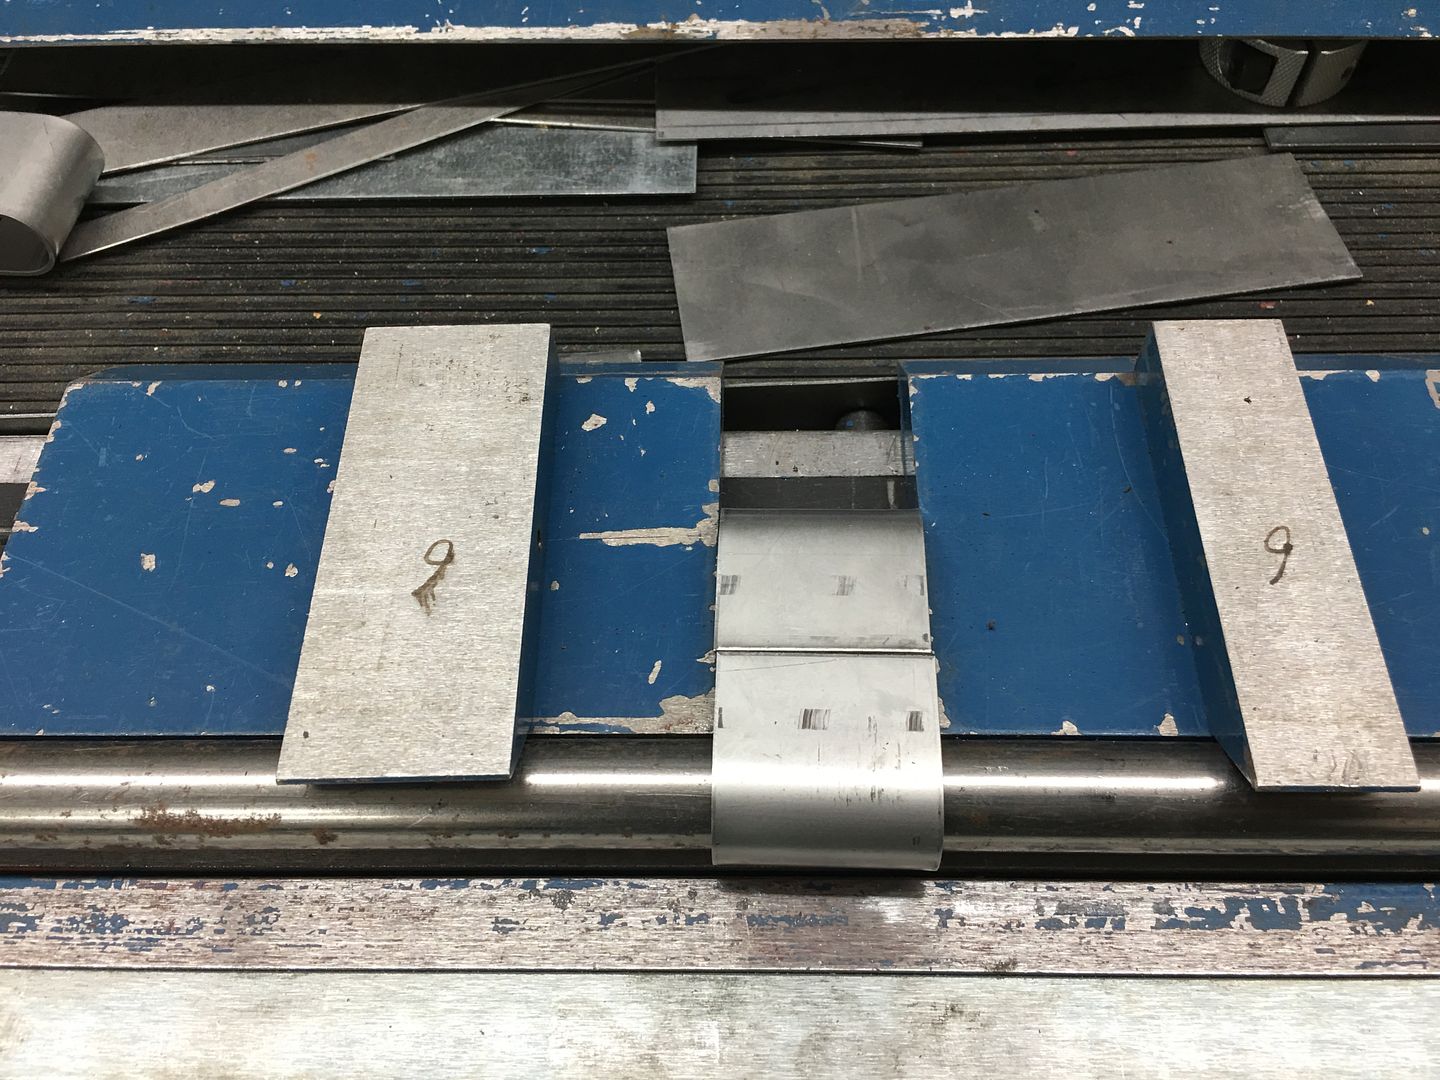 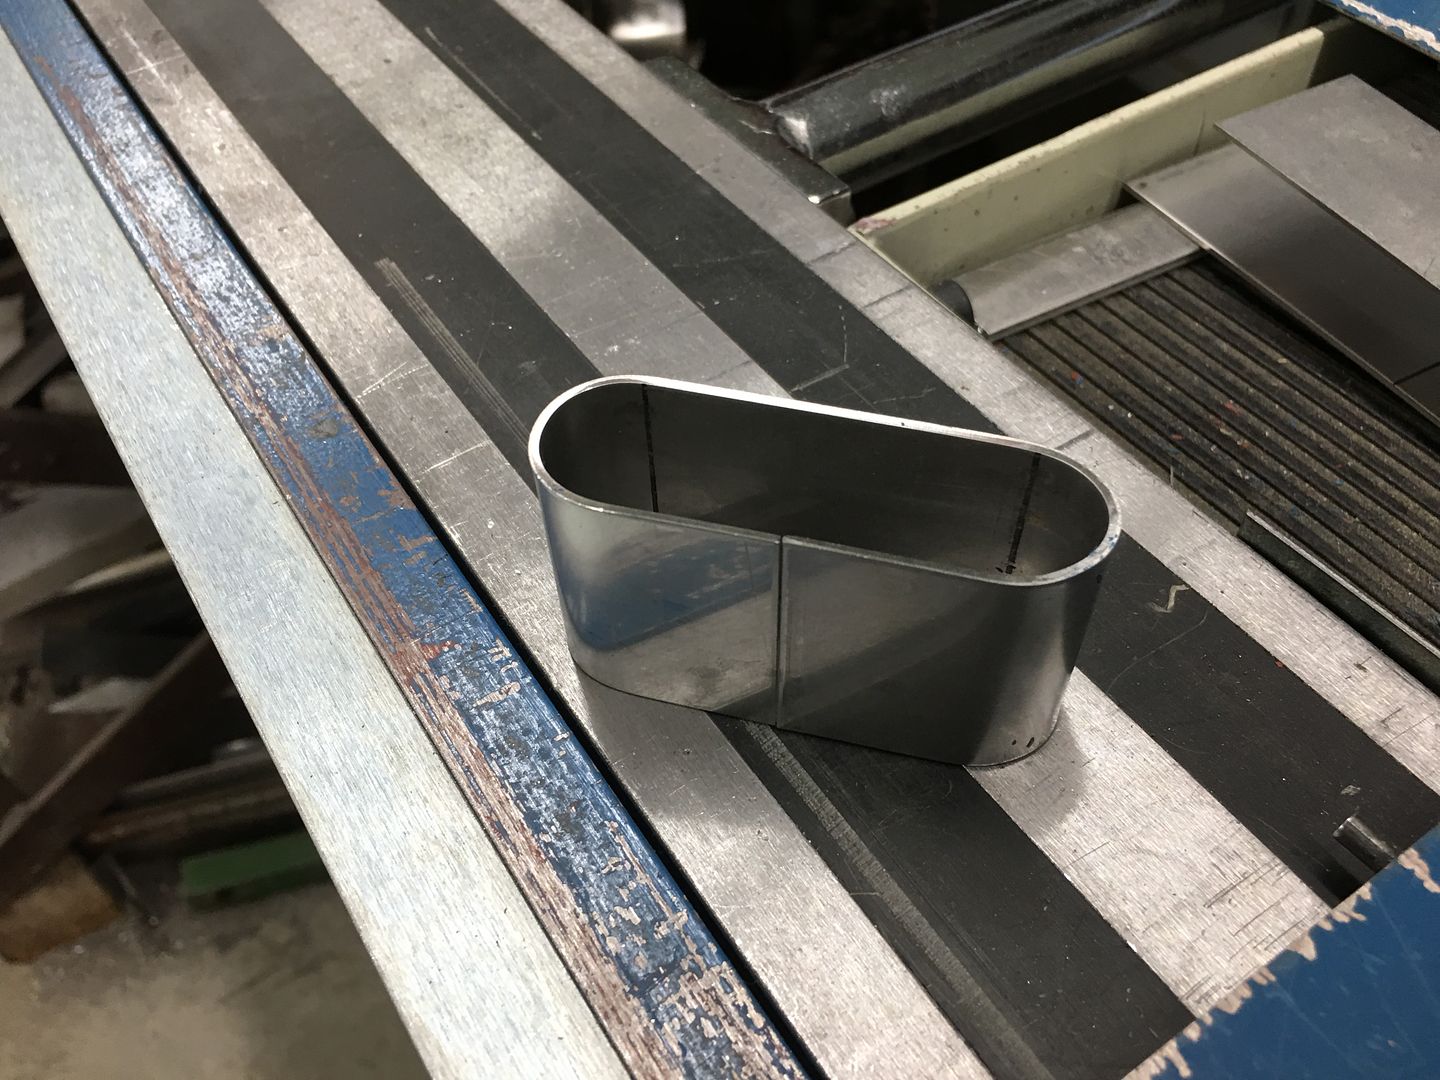 Tacked together using the TIG 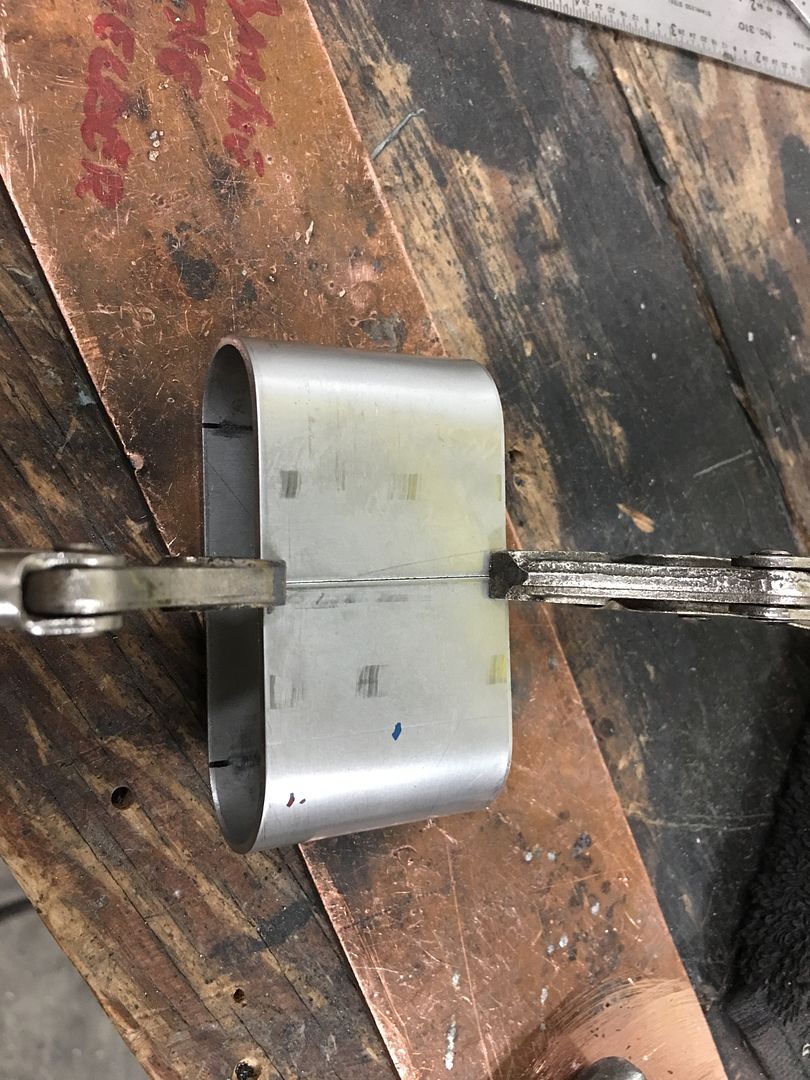  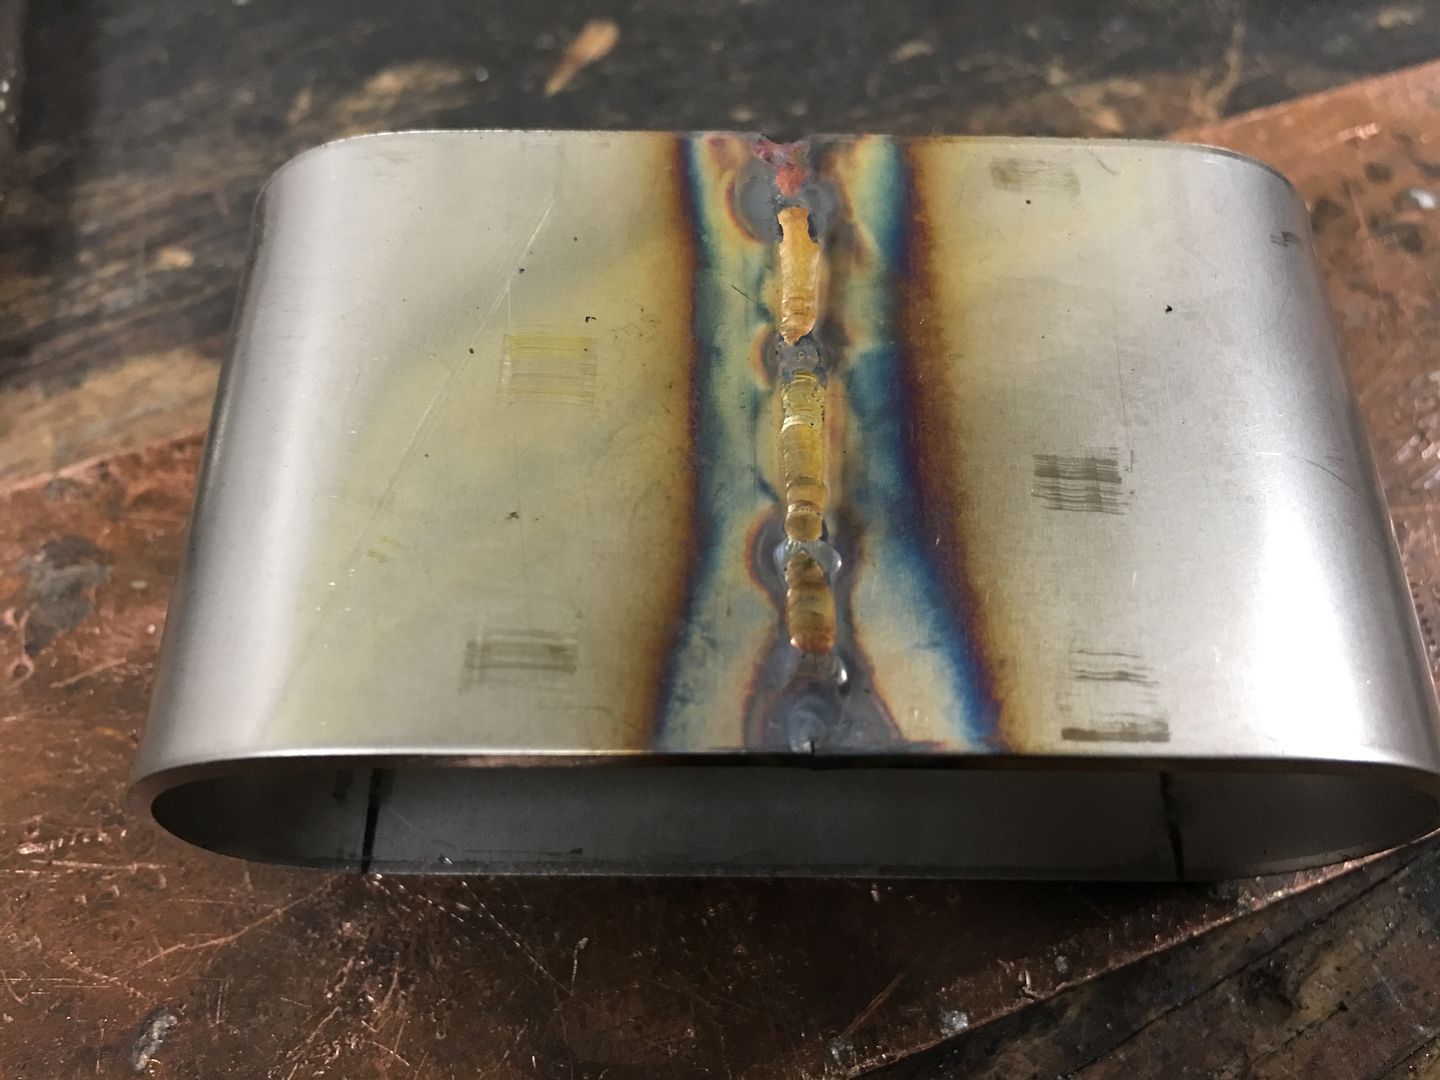 Got running late and missed some pictures, but here's the part welded up and polished.. https://www.youtube.com/watch?v=b48a...ature=youtu.be .
__________________
Robert |
|
|
|
|
01-11-2019, 12:23 AM
|
#6 |
|
Senior Member
Join Date: Mar 2011
Location: West Plains, Missouri
Posts: 7,555
|
Re: 55 Wagon Progress
Robert, very nice, both the console and finish seat belt pieces...Jim
__________________
my build thread: http://67-72chevytrucks.com/vboard/s...d.php?t=459839 Jimbo's long bed step build:http://67-72chevytrucks.com/vboard/s...t=464626<br /> |
|
|
|
|
01-11-2019, 03:18 AM
|
#7 |
|
Registered User
Join Date: Jun 2016
Location: Leatherhead, Surrey
Posts: 15
|
Re: 55 Wagon Progress
Those are stunning!!
__________________
My latest ride: https://bit.ly/2LOIoCZ SWMBO's surprise: https://bit.ly/2ouIJBD What to buy when you love old Chevy's and need an MPV: https://bit.ly/2wCobuV The daily: Now a Ford Ranger Double Cab - First road trip here: https://bit.ly/2owS24d GRIZZ, CRAIG and DENNIS 2018 Humdinger of a USA Road Trip: https://bit.ly/2Ca3jB4 |
|
|
|
|
01-14-2019, 02:07 PM
|
#8 |
|
Registered User
Join Date: Jan 2013
Location: Leonardtown, MD
Posts: 1,637
|
Re: 55 Wagon Progress
Thanks guys! First time at making some of these trim parts, real pleased with how they're turning out!
More progress, Mike installed the driver seat so we could mock up the lap belt for locating the lower escutcheon. 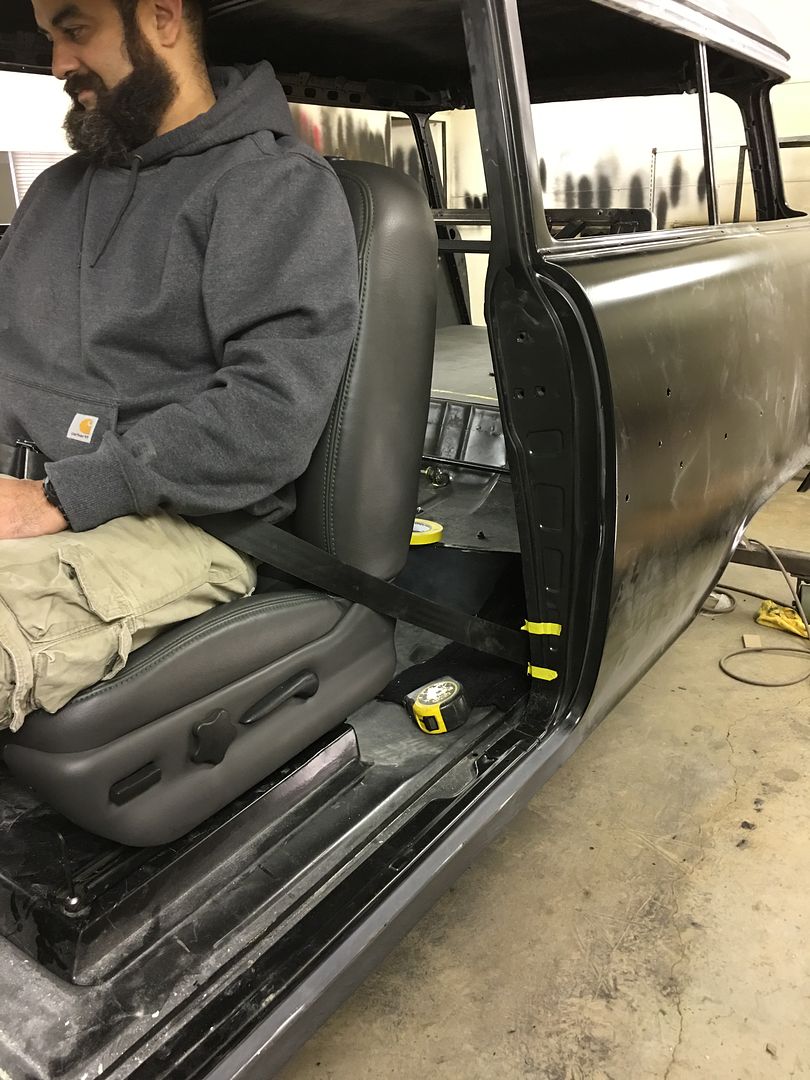 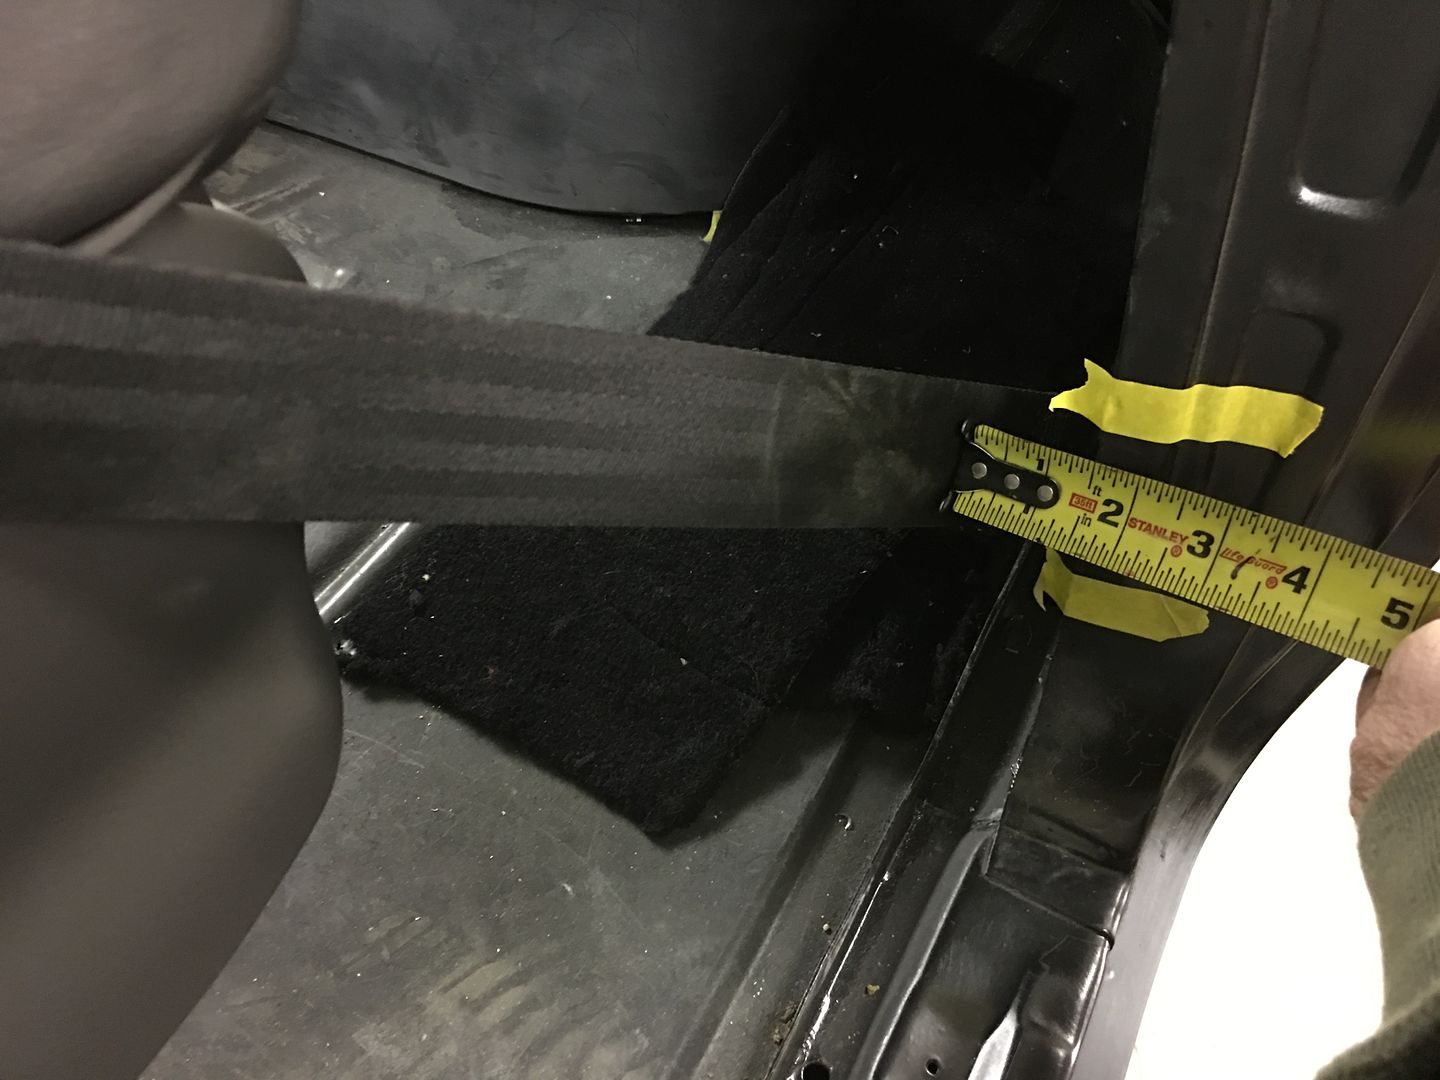 Then we contemplated vertical or parallel.... 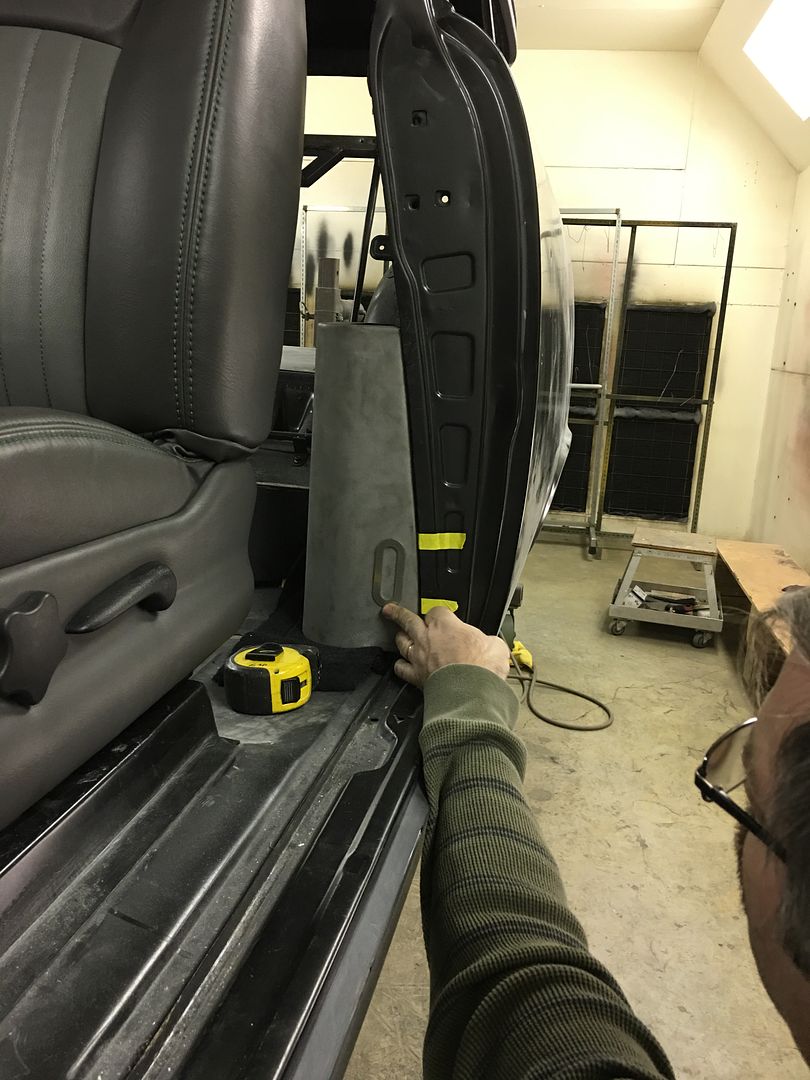 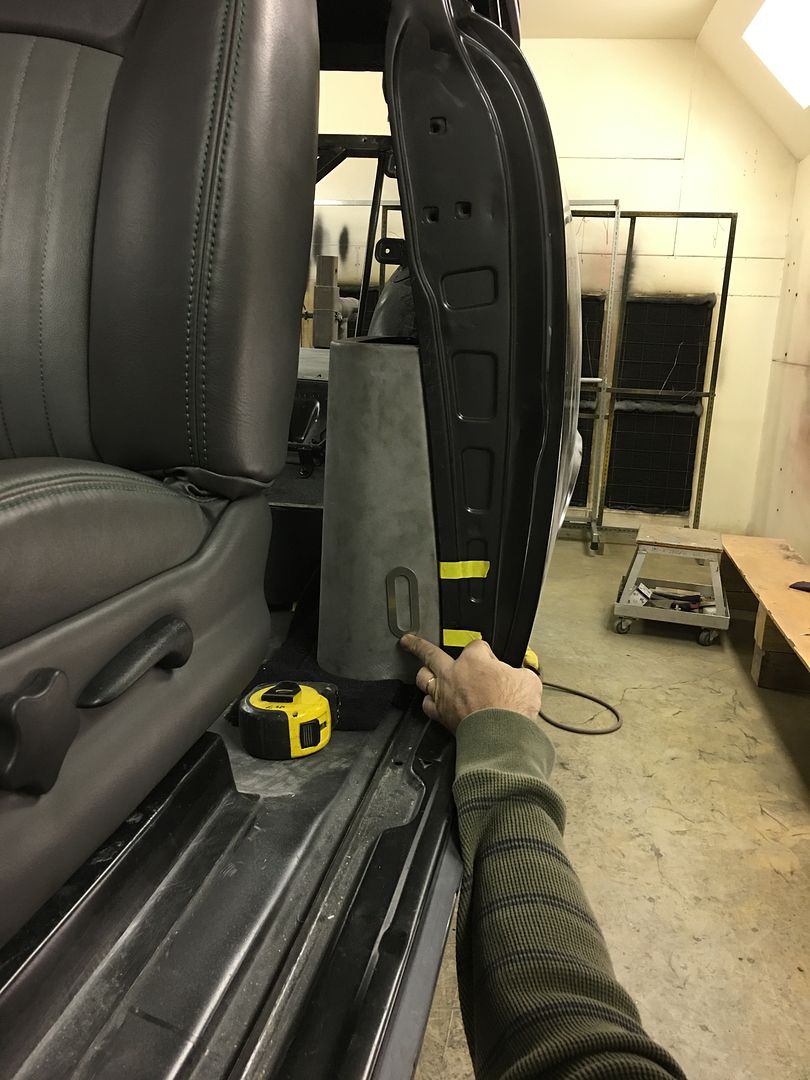 Remaining escutcheons were welded up... 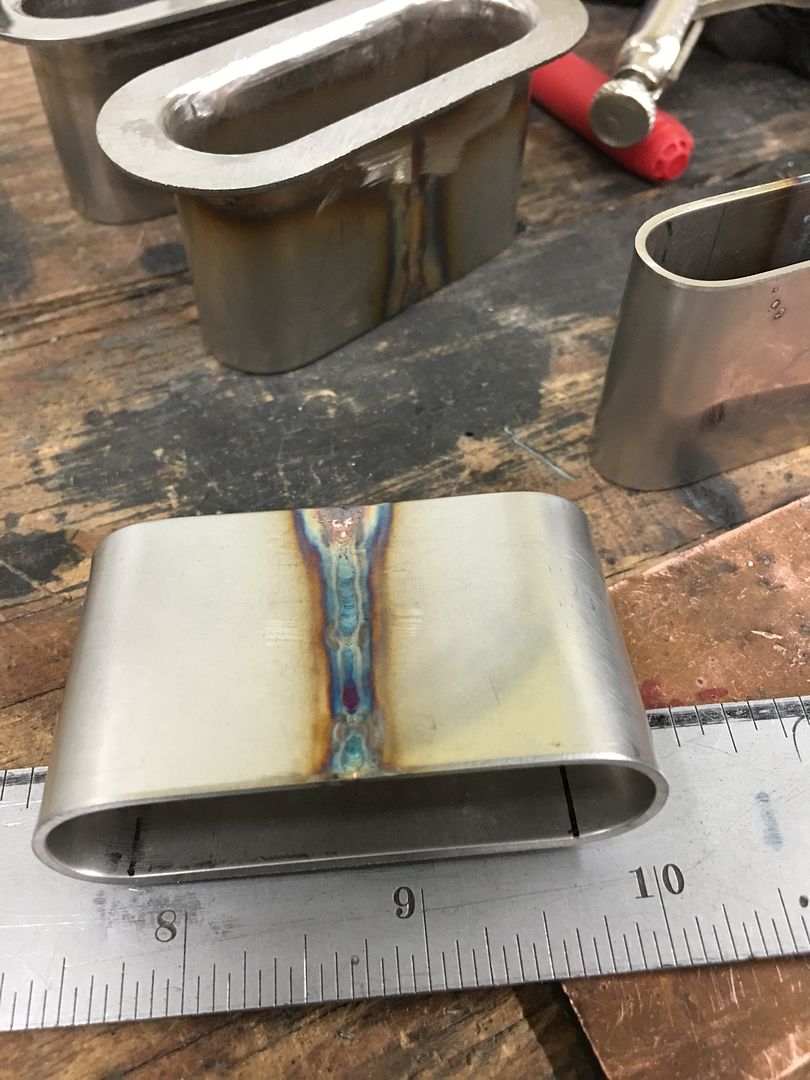 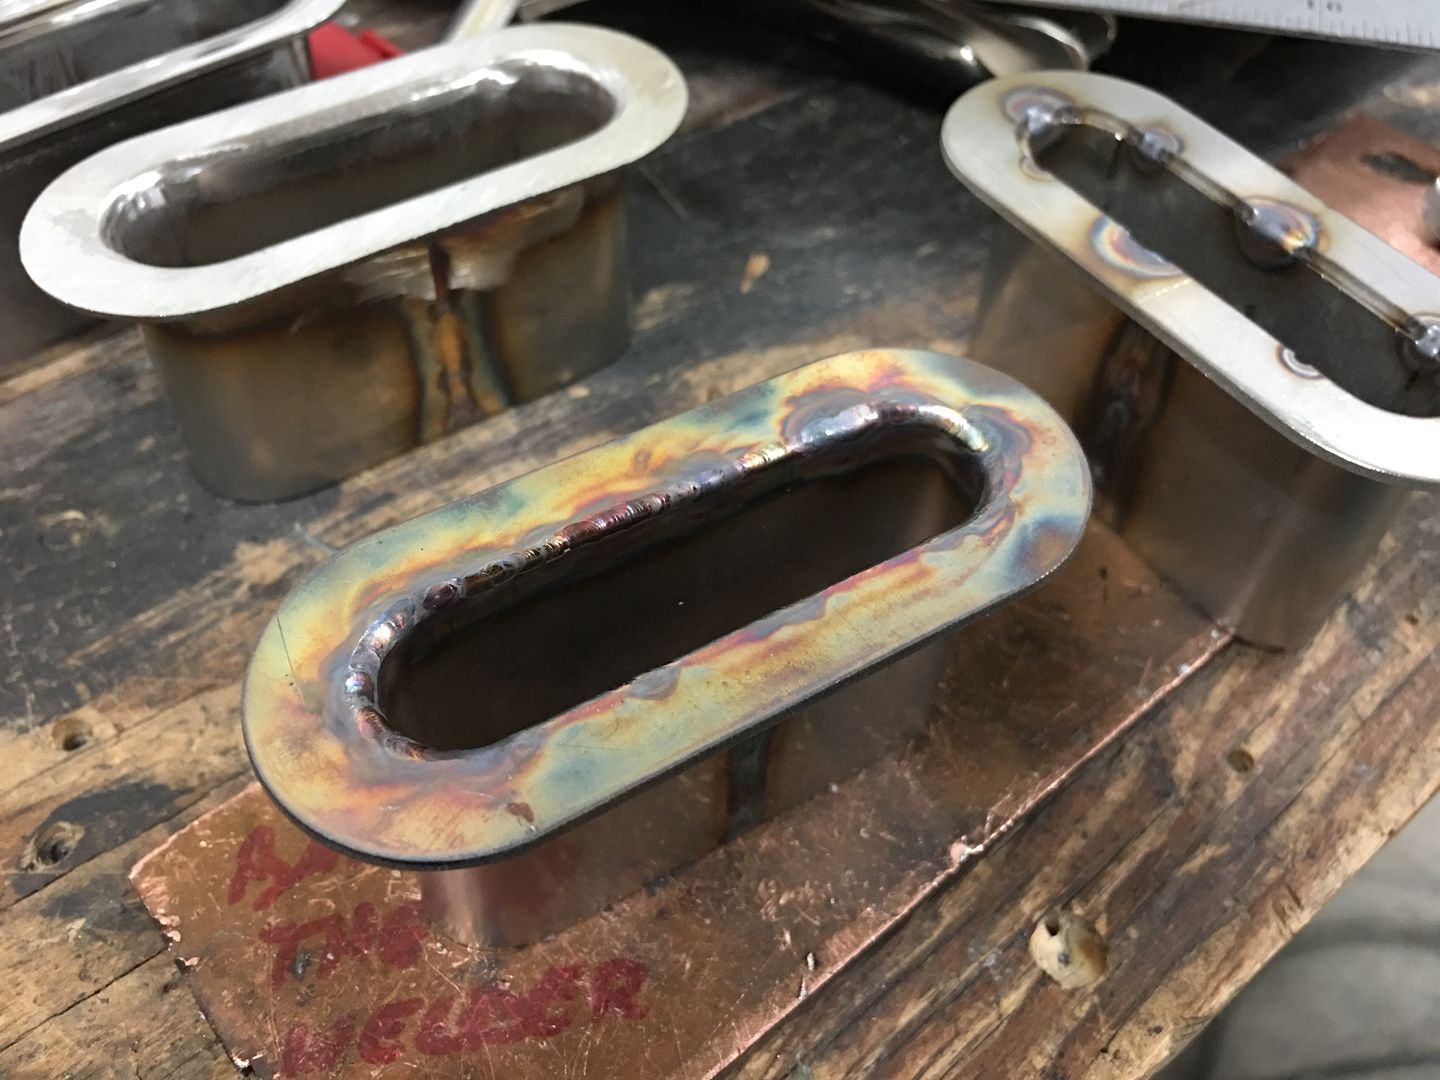 Ideally the inner opening of the ring should rest on the midline of the sleeve. This provides for a good fusion weld and starts the formation of the radius we're looking for around the inside opening. Here's the various stages of welding the escutcheons: https://www.youtube.com/watch?v=jGklrvD4L6o Mike got the remaining openings cut in the arm rest and kick panels for the escutcheons... 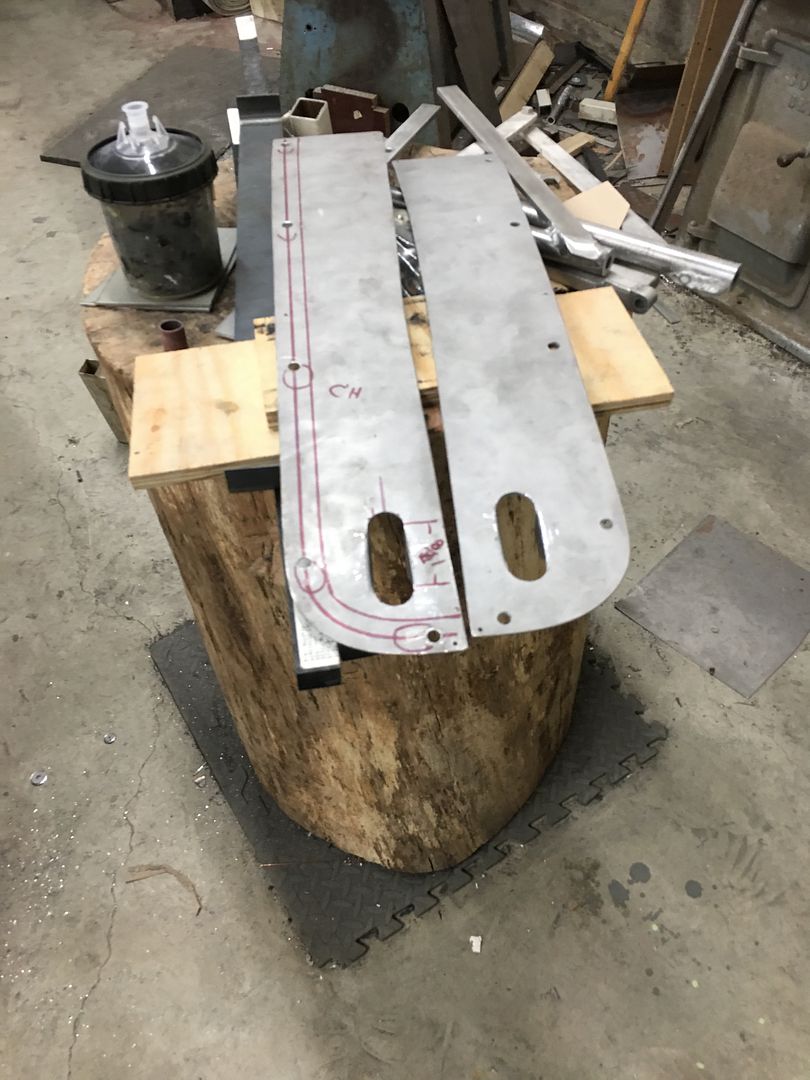 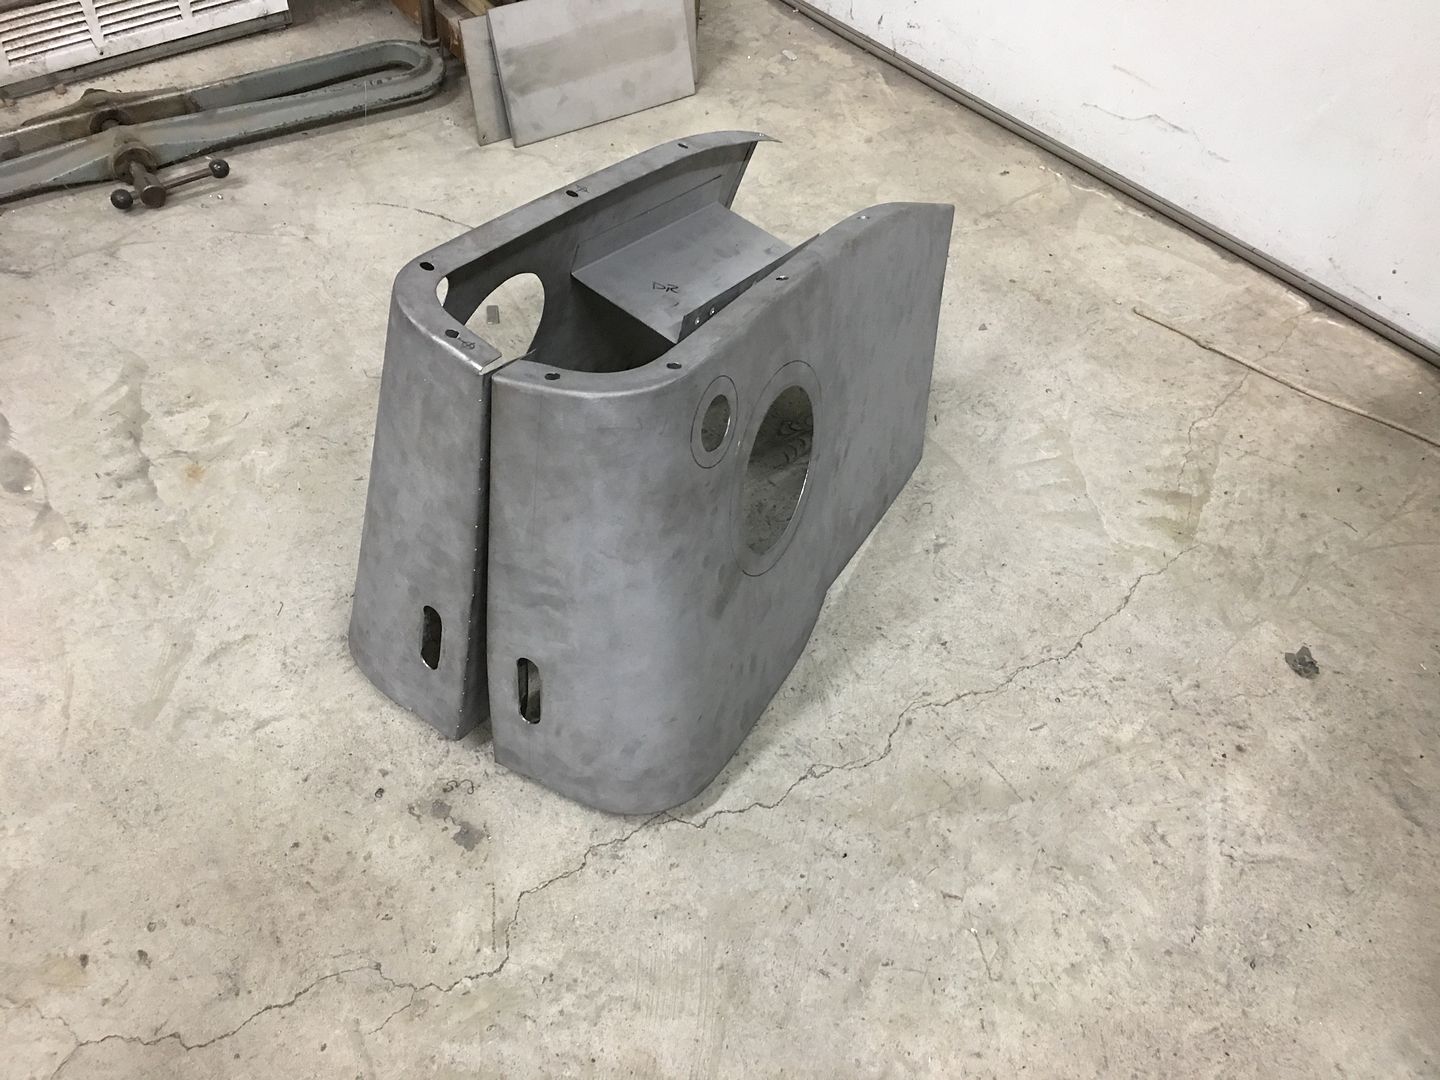 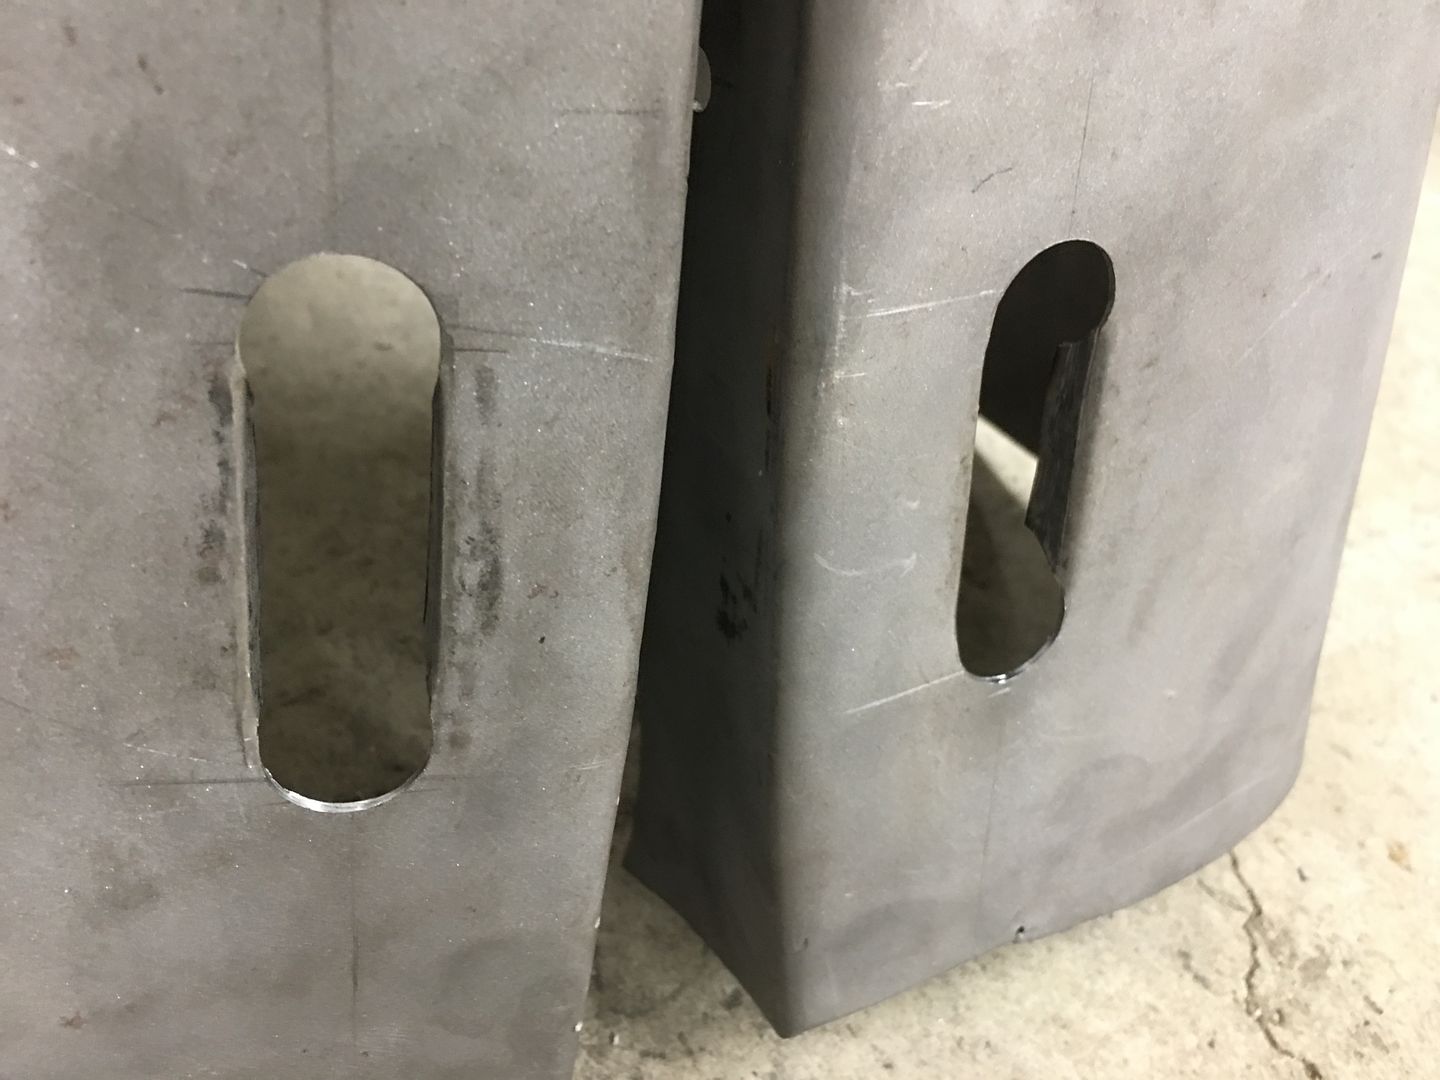 Test fit... 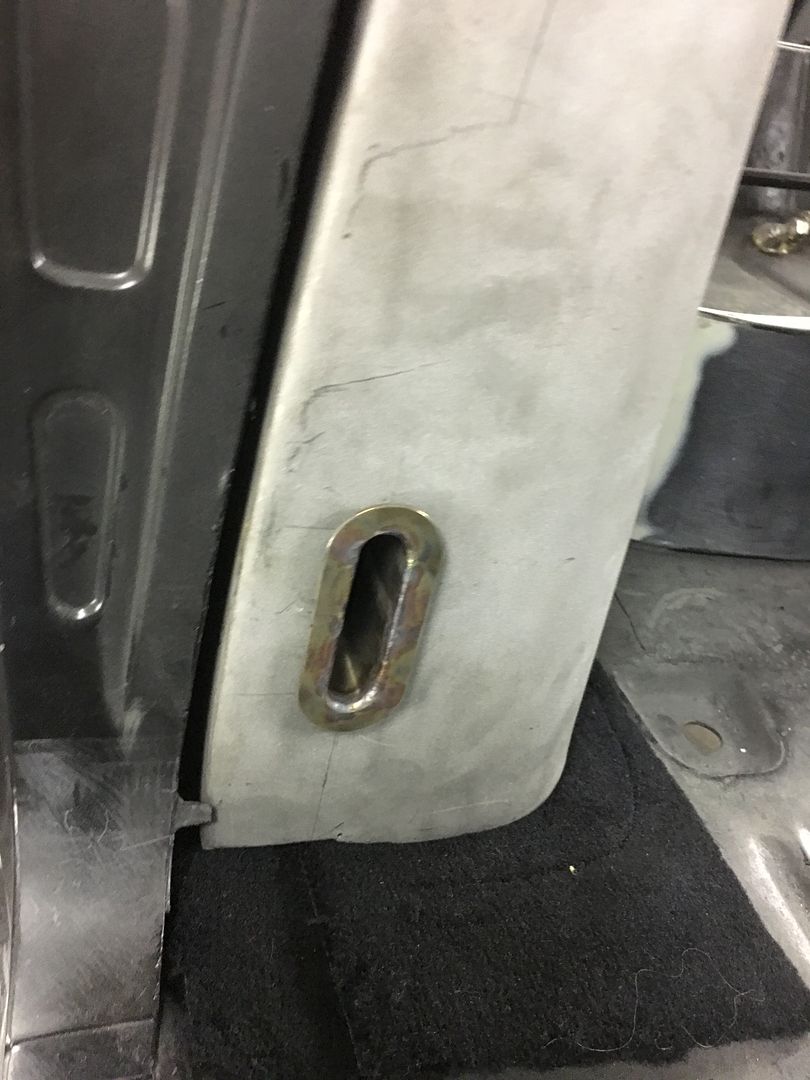 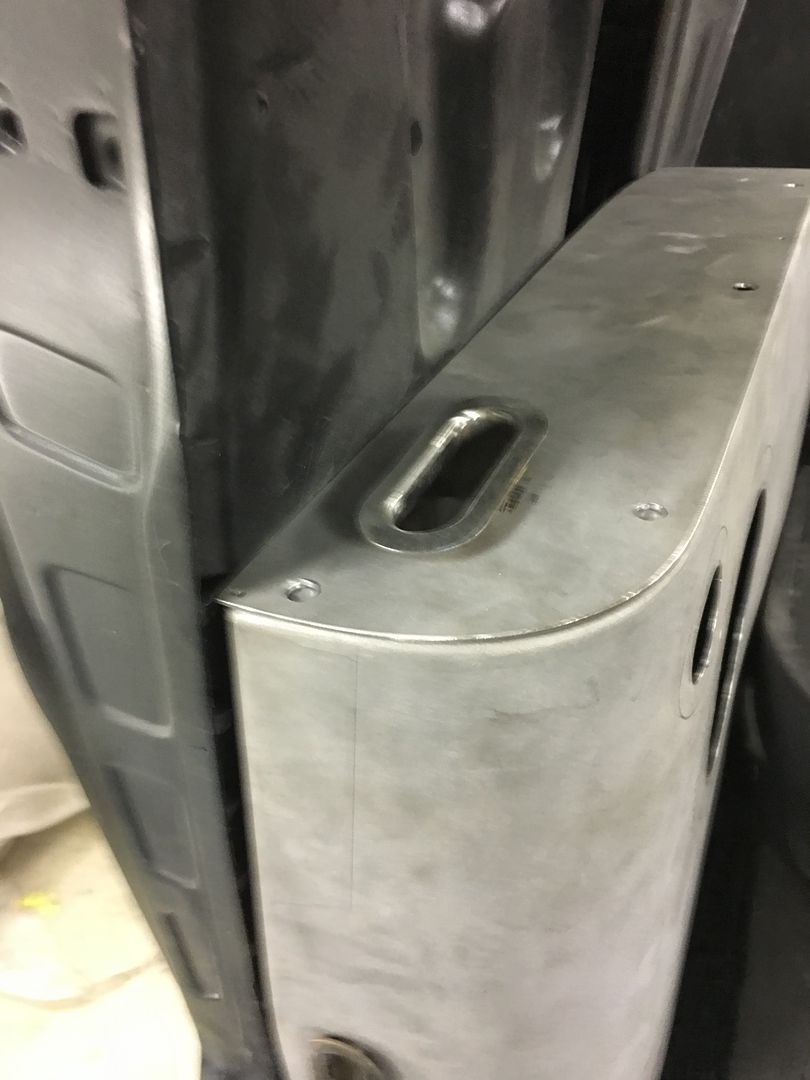 …..and JB got started on the speaker trim rings for us... 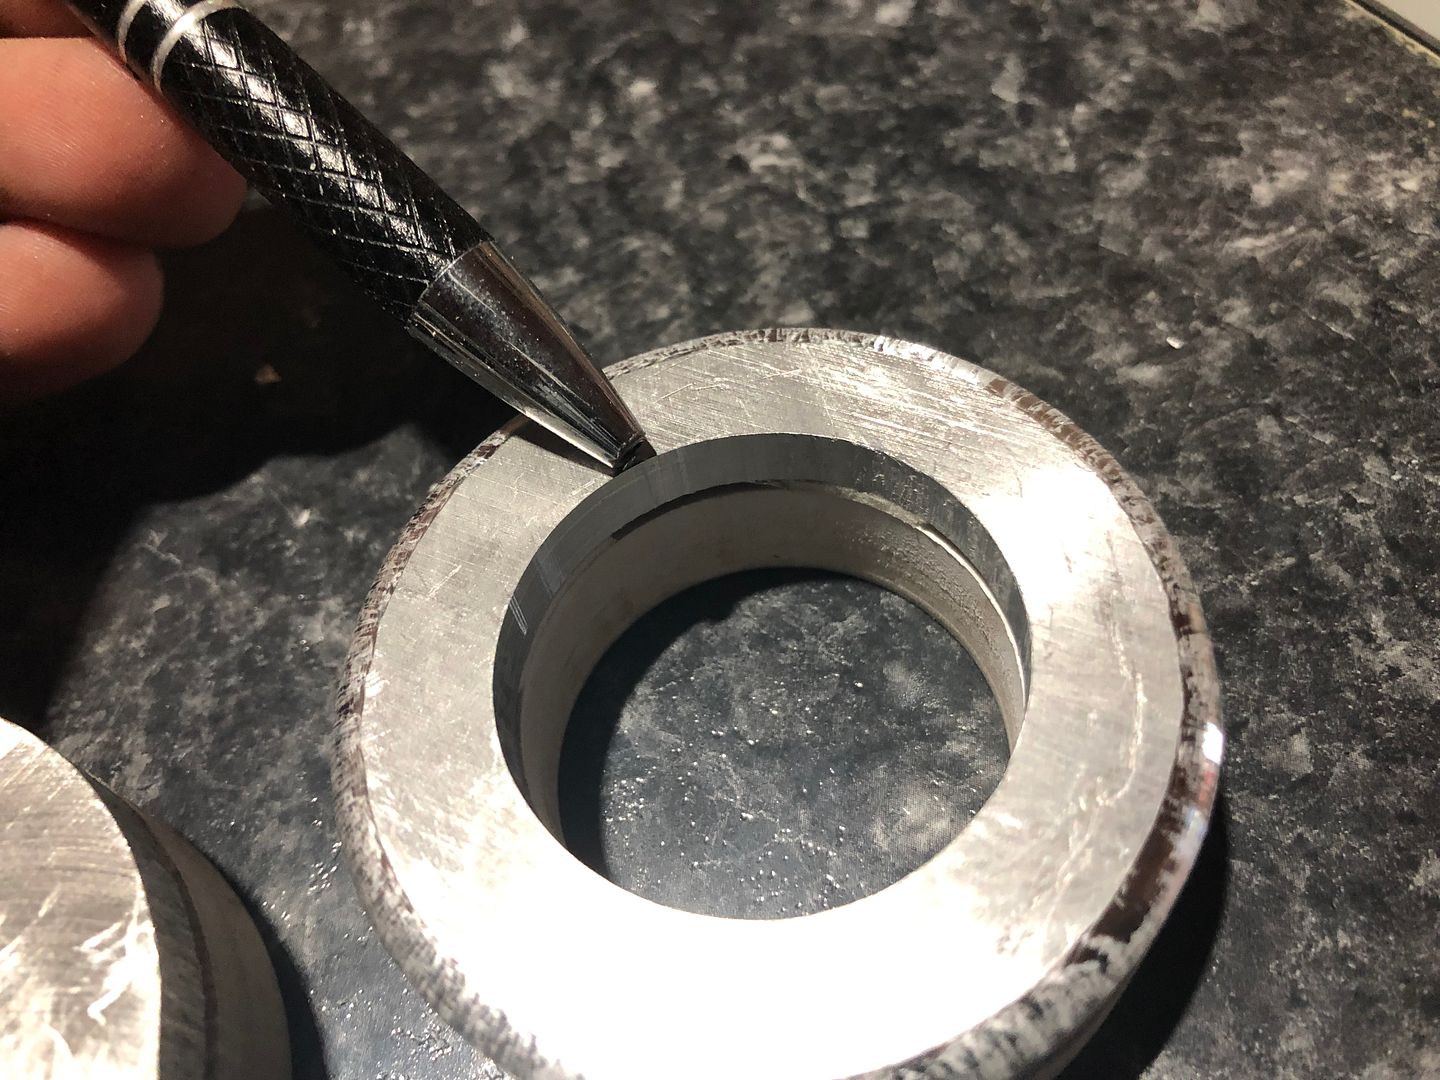 The recess on the rear is for the stainless mesh... 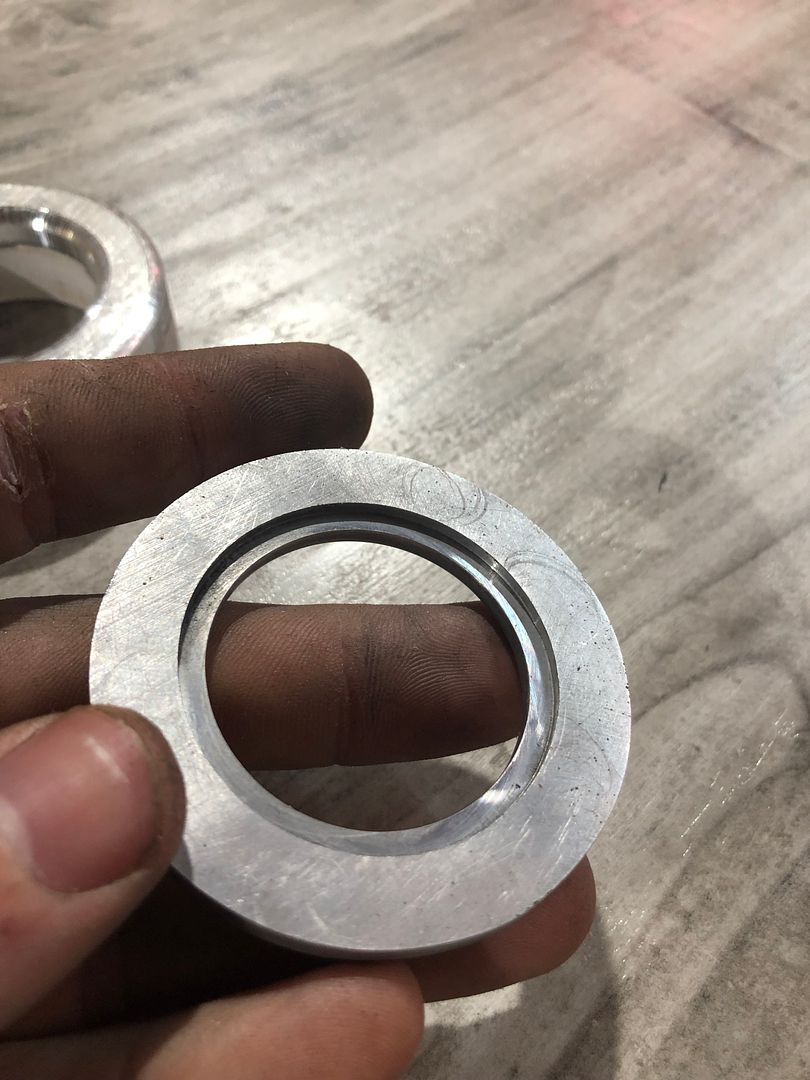  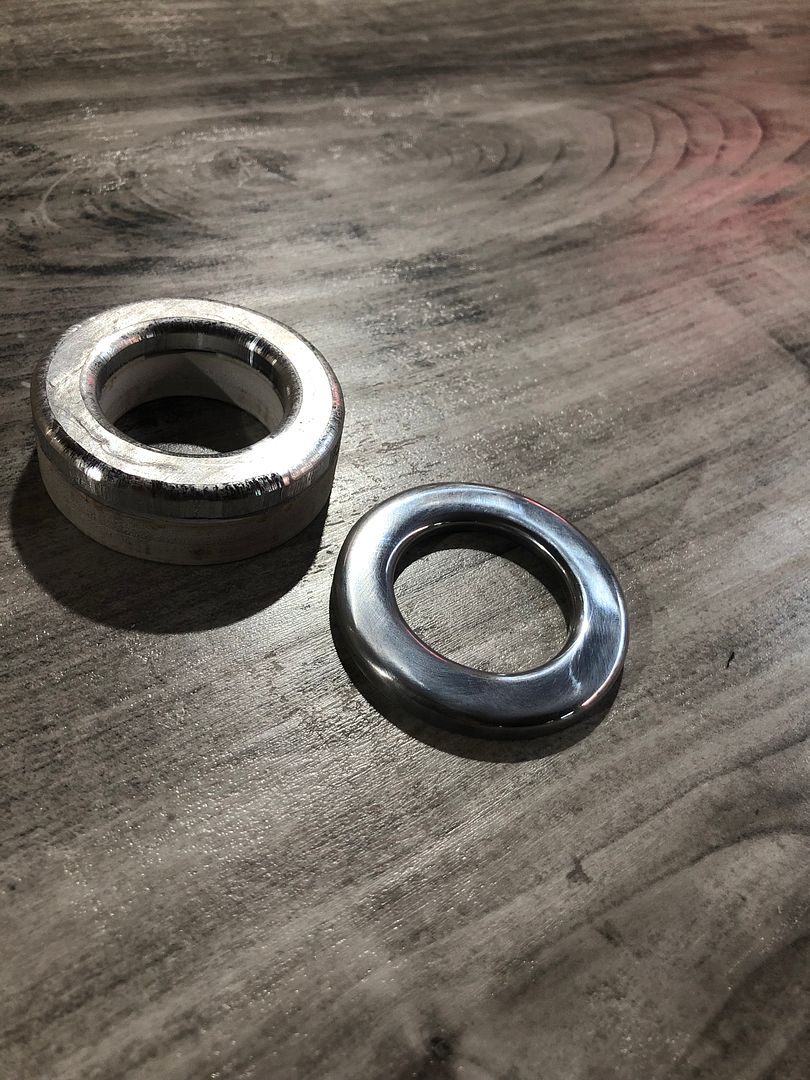
__________________
Robert Last edited by MP&C; 01-14-2019 at 10:01 PM. |
|
|
|
|
01-16-2019, 11:25 AM
|
#9 |
|
Registered User
Join Date: Jan 2013
Location: Leonardtown, MD
Posts: 1,637
|
Re: 55 Wagon Progress
Last night I tried to tackle the wizardry of filming the gas welding with the goal of better visibility of the weld puddle. This is about as close as I can get with using a iPhone camera and a welding helmet lens. Also made use of a Milwaukee LED light to brighten things for less of a change in light.
 These are filmed through the Miller Digital Elite, Weld setting 9, delay 2. sensitivity 6. I think I still need to come up with something better, especially for showing any TIG welding. Are there any Photography guru's that can steer me in the right direction for filming weld processes? Tacking: https://www.youtube.com/watch?v=lo3npncFfDM Weld pass: https://www.youtube.com/watch?v=LL4i0fqr4BE
__________________
Robert |
|
|
|
|
01-16-2019, 04:45 PM
|
#10 |
|
Registered User
Join Date: Apr 2015
Location: Port McNeill, B.C.
Posts: 464
|
Re: 55 Wagon Progress
Your work is truly amazing! I have been watching this build for awhile now and I am always impressed and intrigued by your work and methods. I would love to have your attention to detail and expertise put onto my rig!
Well done! |
|
|
|
|
01-20-2019, 01:25 AM
|
#11 |
|
Registered User
Join Date: Jan 2013
Location: Leonardtown, MD
Posts: 1,637
|
Re: 55 Wagon Progress
Thanks for the kind words!
Did some mockup of the fuel lines so we could get the required fittings identified.. 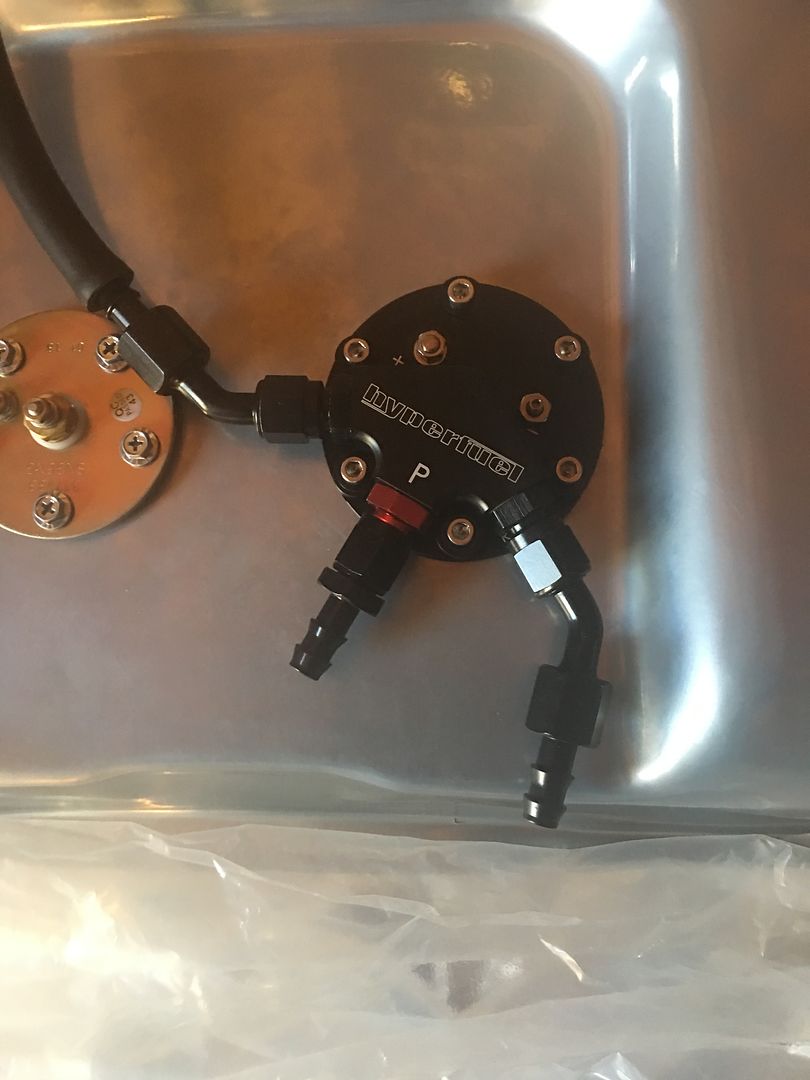 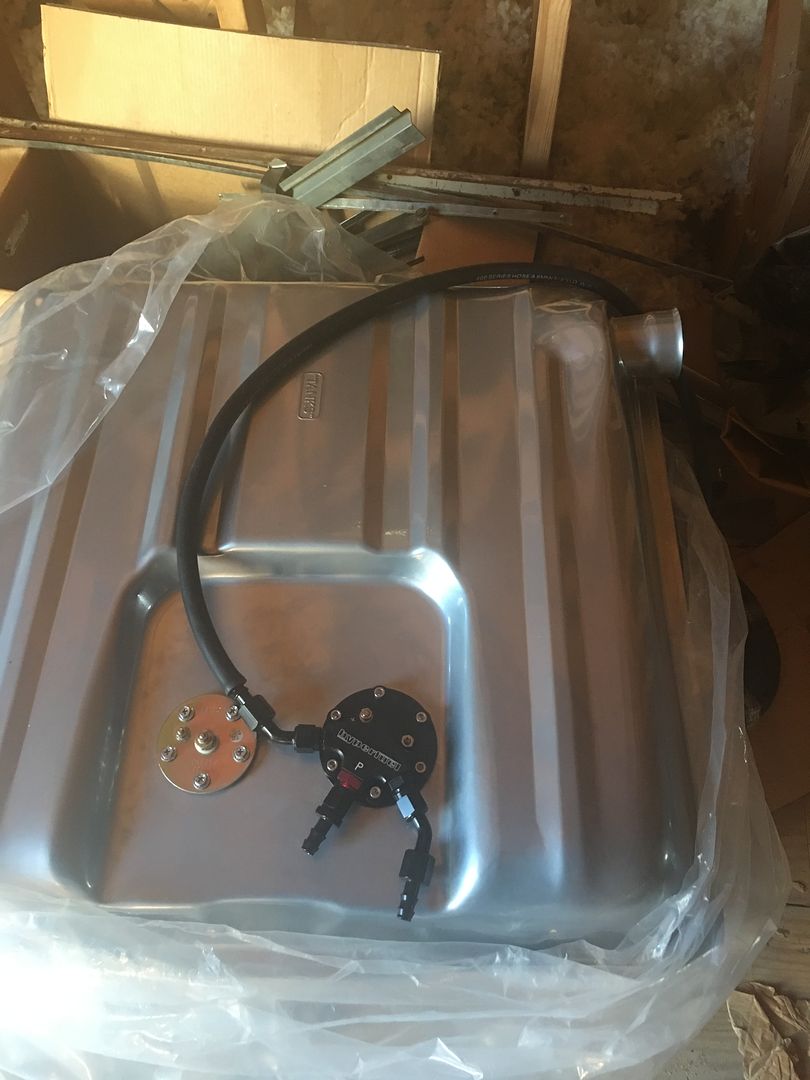  Finishing up the polishing of our seat belt escutcheons.. after using roloc scotchbrite pads to clean up the vixen file marks, we then used 320 dry, 1500 wet, and 3000 trizact damp. Then to the polishing..     https://www.youtube.com/watch?v=zBaVKe1aBhQ Here's the comparison between the 3000 and after polishing.. 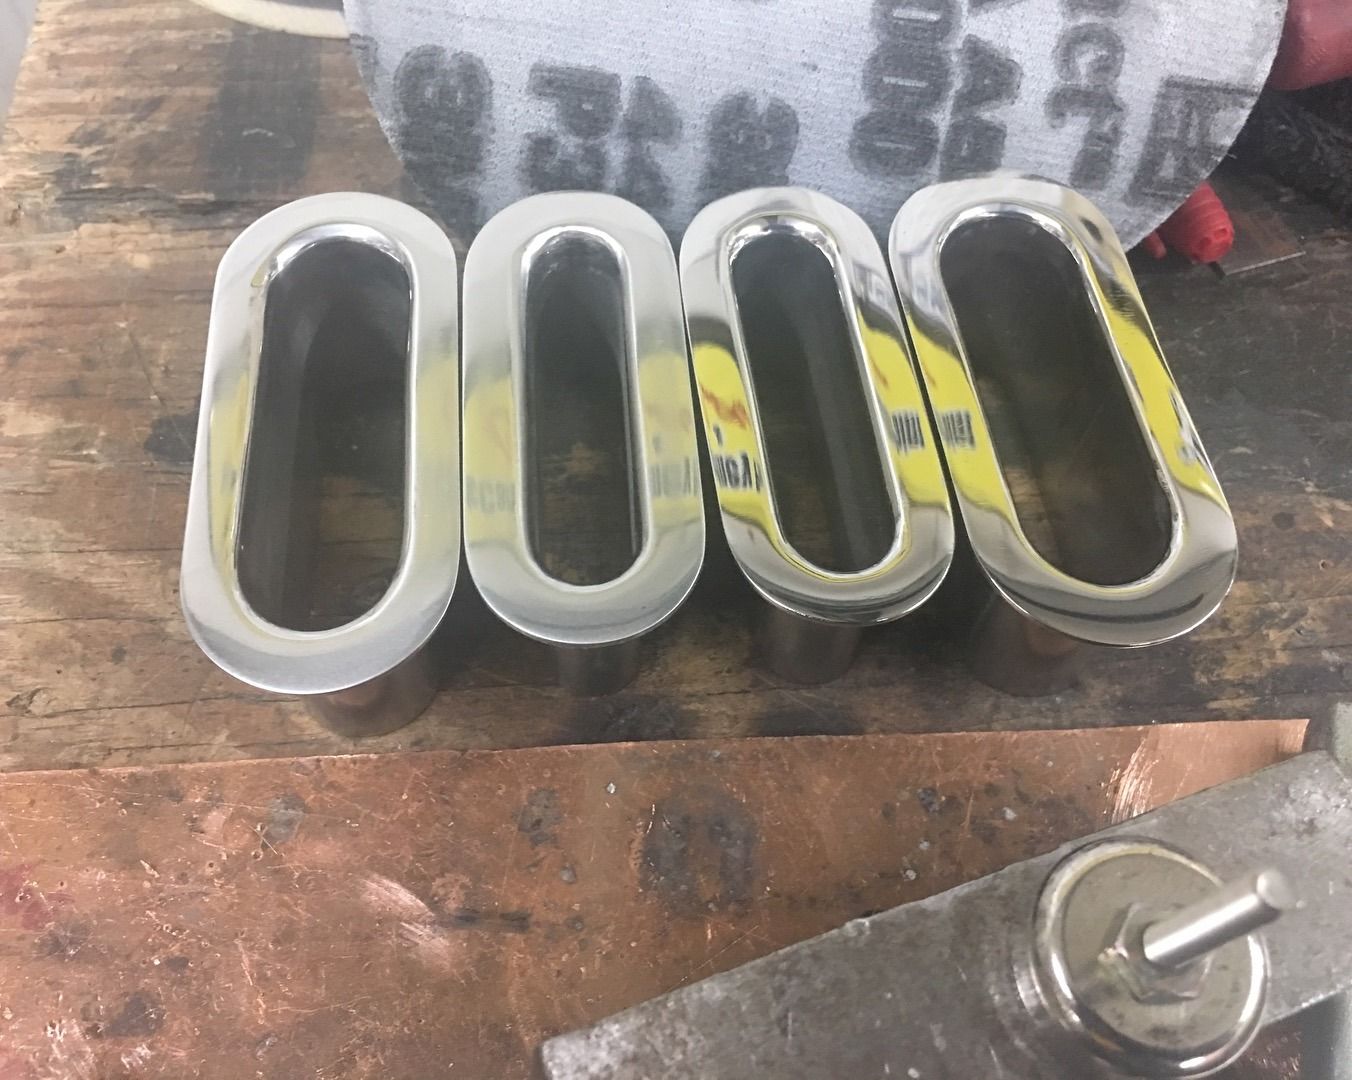 That should do for us..
__________________
Robert |
|
|
|
|
01-20-2019, 10:24 AM
|
#12 |
|
Senior Member
Join Date: Mar 2011
Location: West Plains, Missouri
Posts: 7,555
|
Re: 55 Wagon Progress
Robert, looks great...Jim
__________________
my build thread: http://67-72chevytrucks.com/vboard/s...d.php?t=459839 Jimbo's long bed step build:http://67-72chevytrucks.com/vboard/s...t=464626<br /> |
|
|
|
|
01-20-2019, 05:26 PM
|
#13 |
|
Post Whore
Join Date: May 2015
Location: Alabama
Posts: 14,615
|
Re: 55 Wagon Progress
Those shore are purdy Robert!.......
__________________
Mongo...aka Greg RIP Dad RIP Jesse 1981 C30 LQ9 NV4500..http://67-72chevytrucks.com/vboard/s...d.php?t=753598 Mongos AD- LS3 TR6060...http://67-72chevytrucks.com/vboard/s...34#post8522334 Columbus..the 1957 IH 4x4...http://67-72chevytrucks.com/vboard/s...63#post8082563 2023 Chevy Z71..daily driver |
|
|
|
|
01-27-2019, 12:12 AM
|
#14 |
|
Registered User
Join Date: Jan 2013
Location: Leonardtown, MD
Posts: 1,637
|
Re: 55 Wagon Progress
Thanks guys!
Some progress, doesn't look like much until you look at the floor... 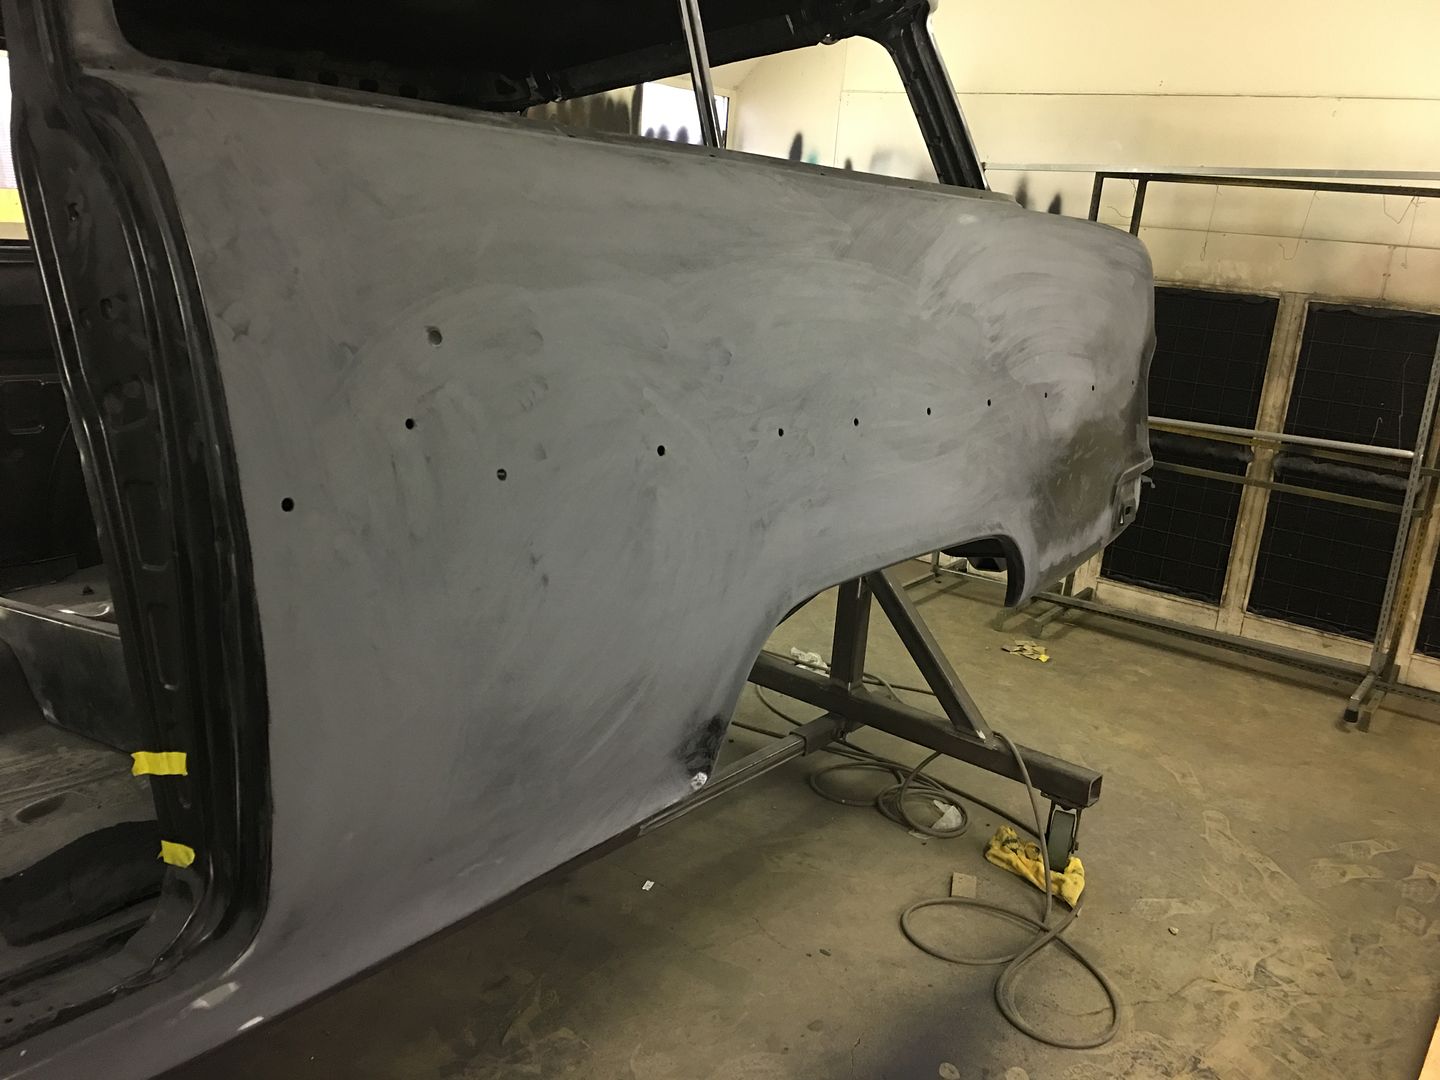 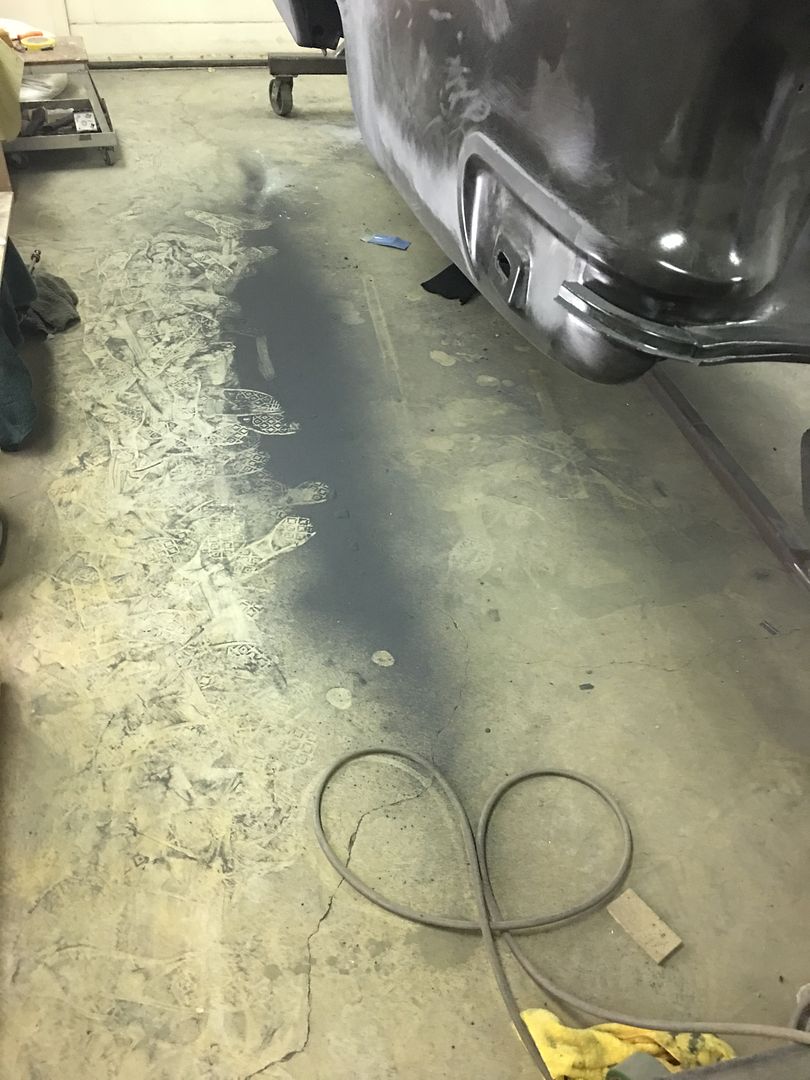 Sometimes these louvers can be a challenge to sand. 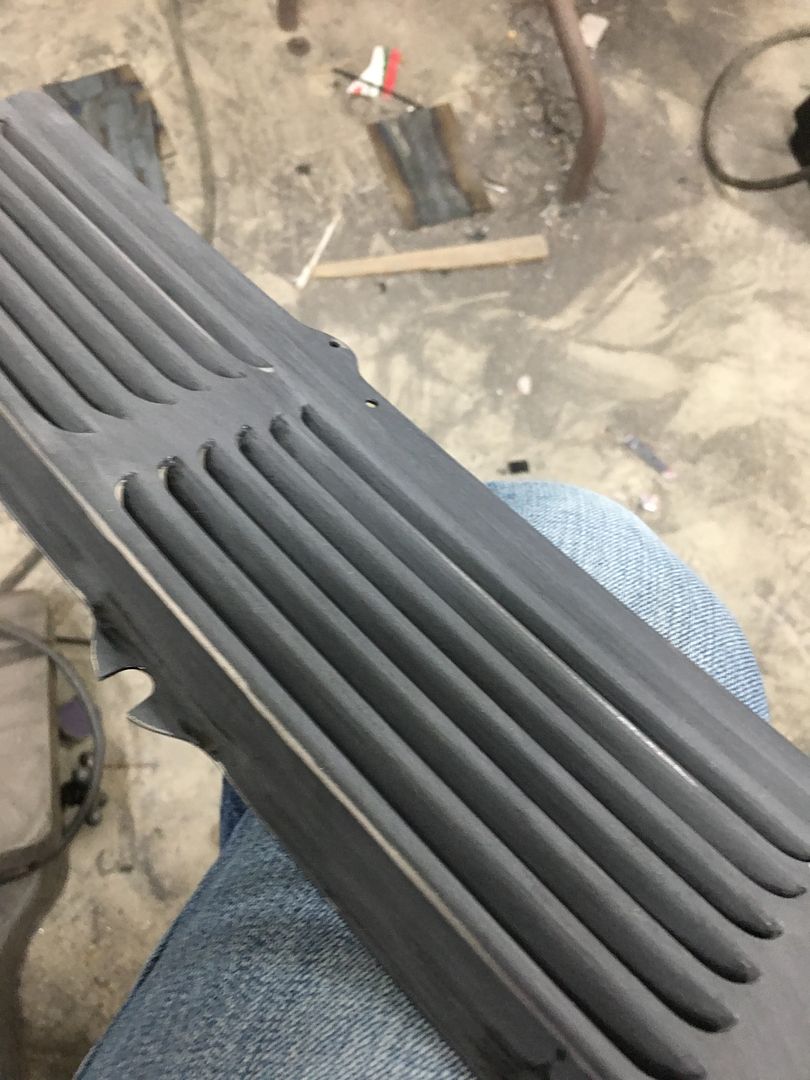 In the spirit of "everything's a tool", a strip of 18 ga steel and a wrap of PSA paper does a good job of getting in the tight spaces. 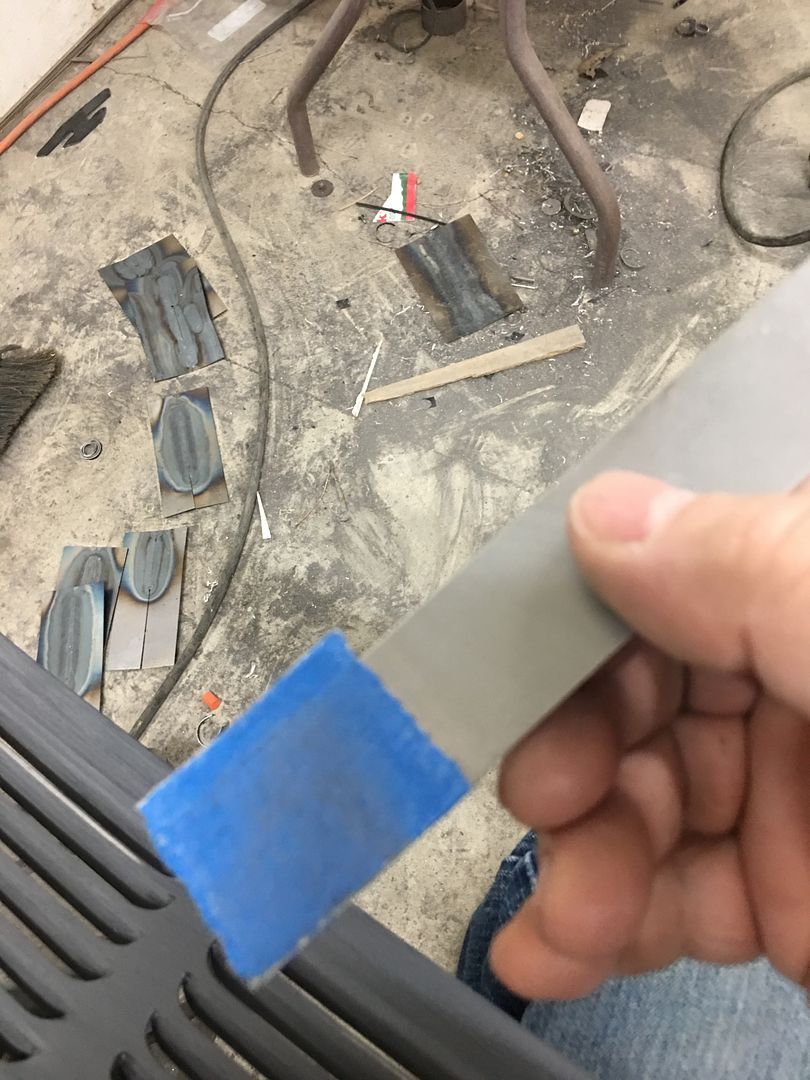 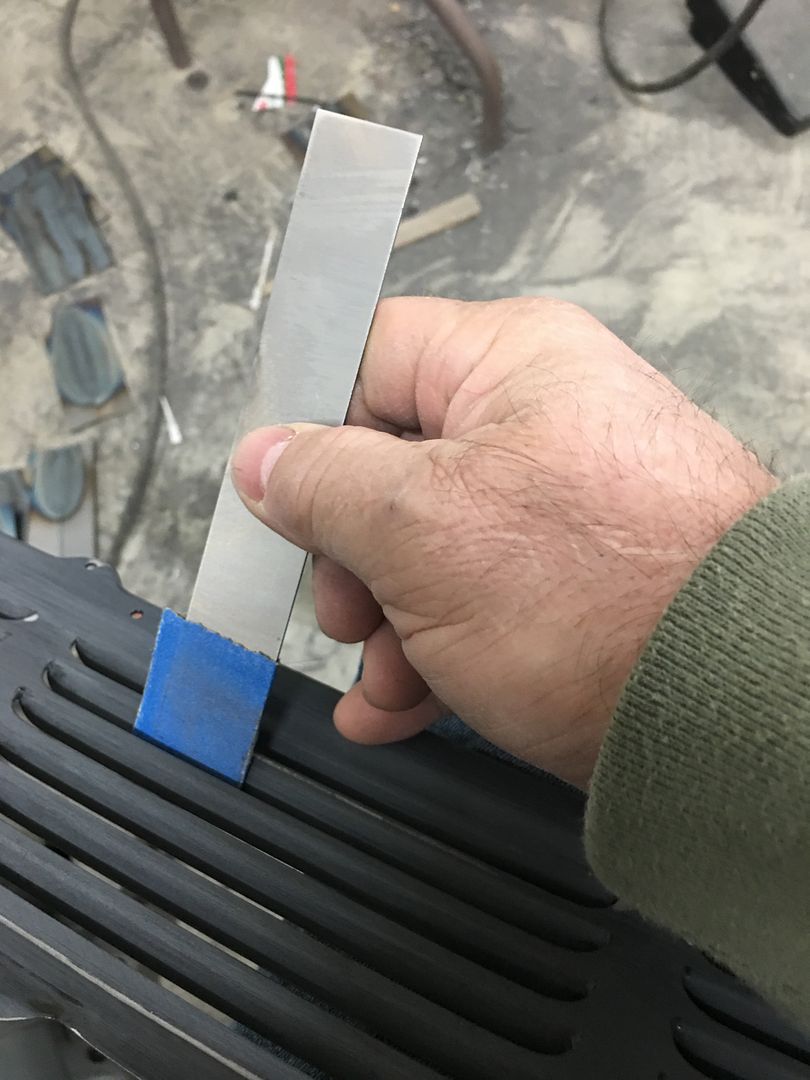 Another shot of the scrap pile before I clean it up, this is what went into fabricating the escutcheons.. 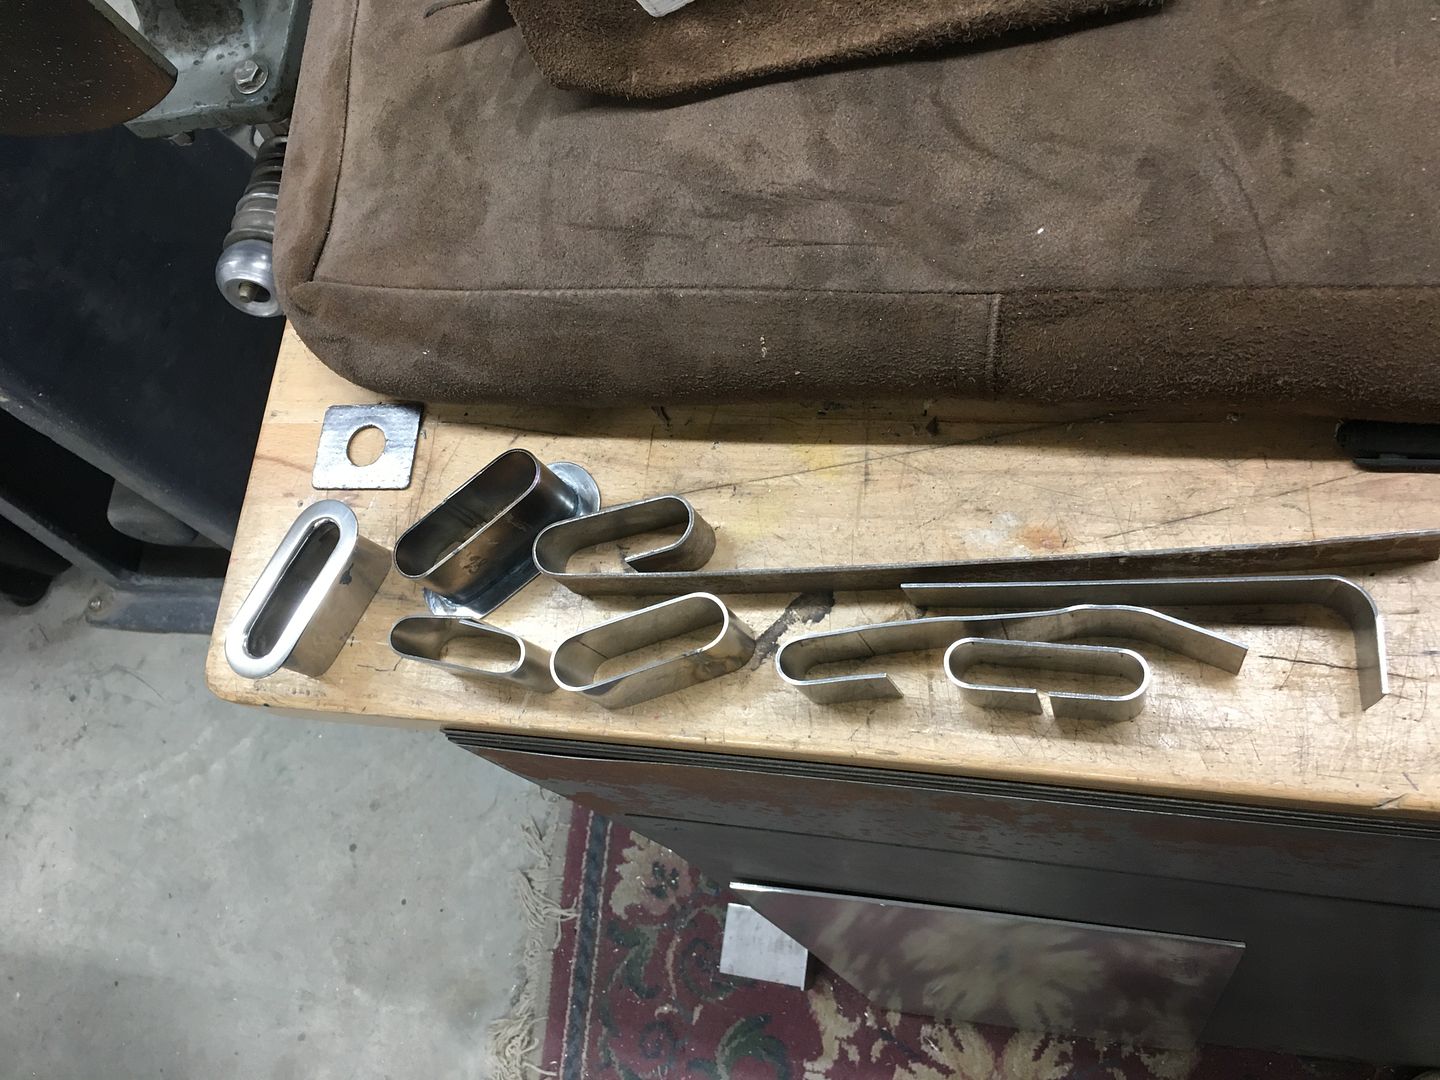 And now for the reason we didn't post earlier this week, had to make a speed run for Taco Tuesday.. even saw a full rainbow in the process.  https://www.youtube.com/watch?v=jWrIkyuUBTs Back in the shop this weekend, but we had a distraction in another Meco torch that showed up for sale not three miles away. So needless to say about the only thing accomplished was more welding practice!! 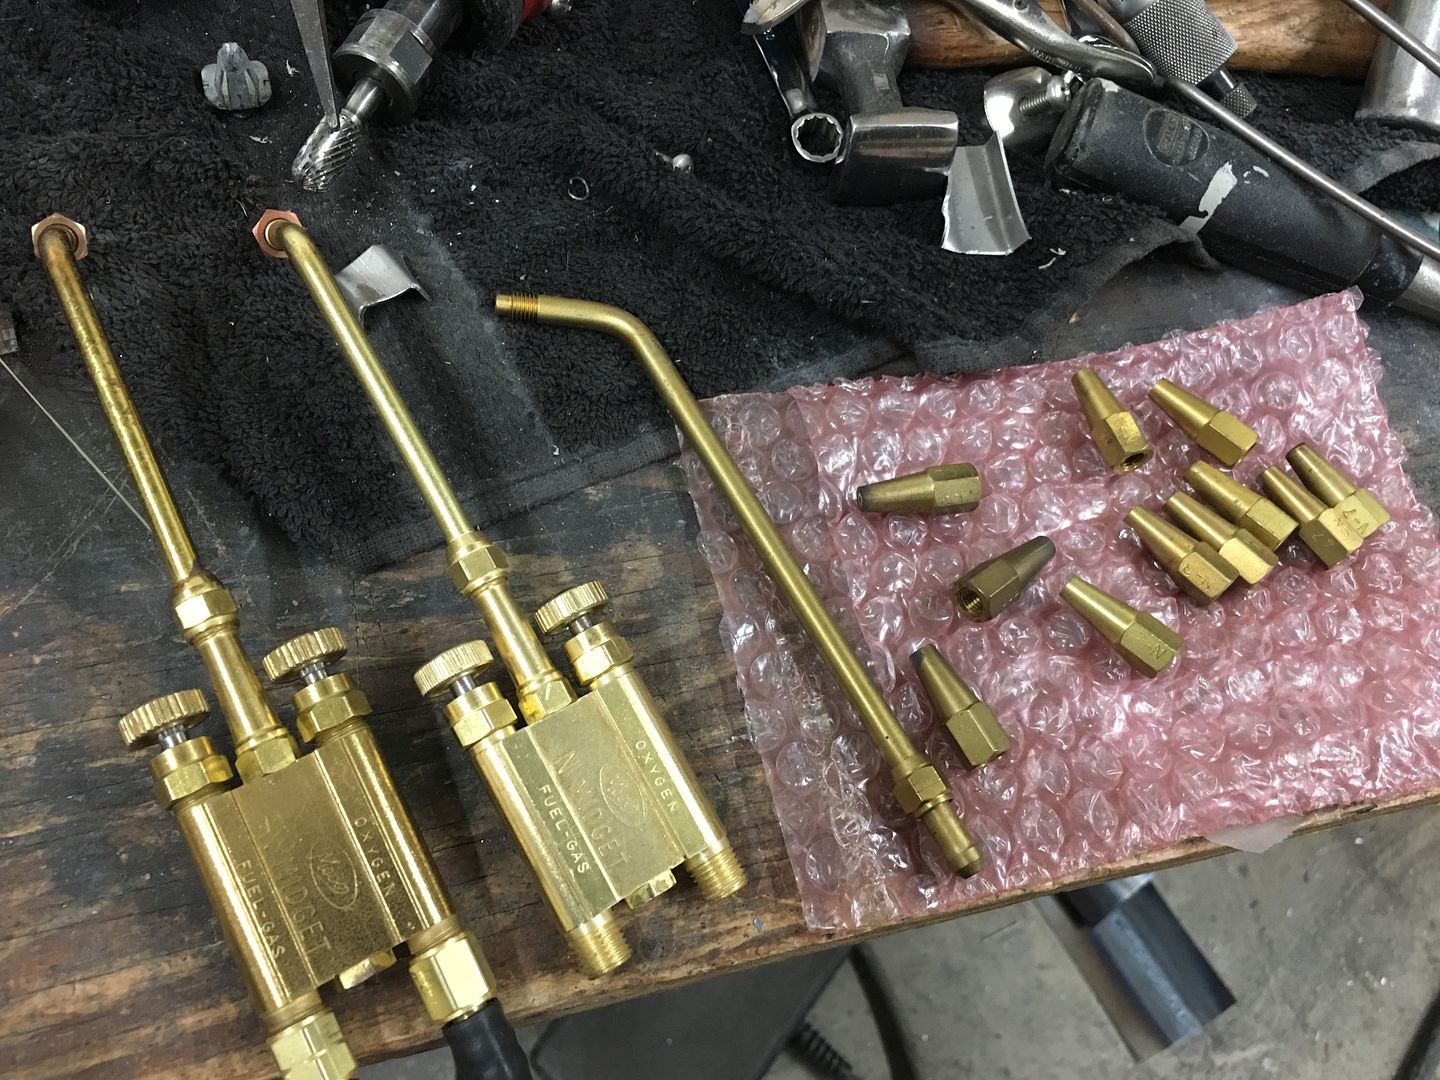 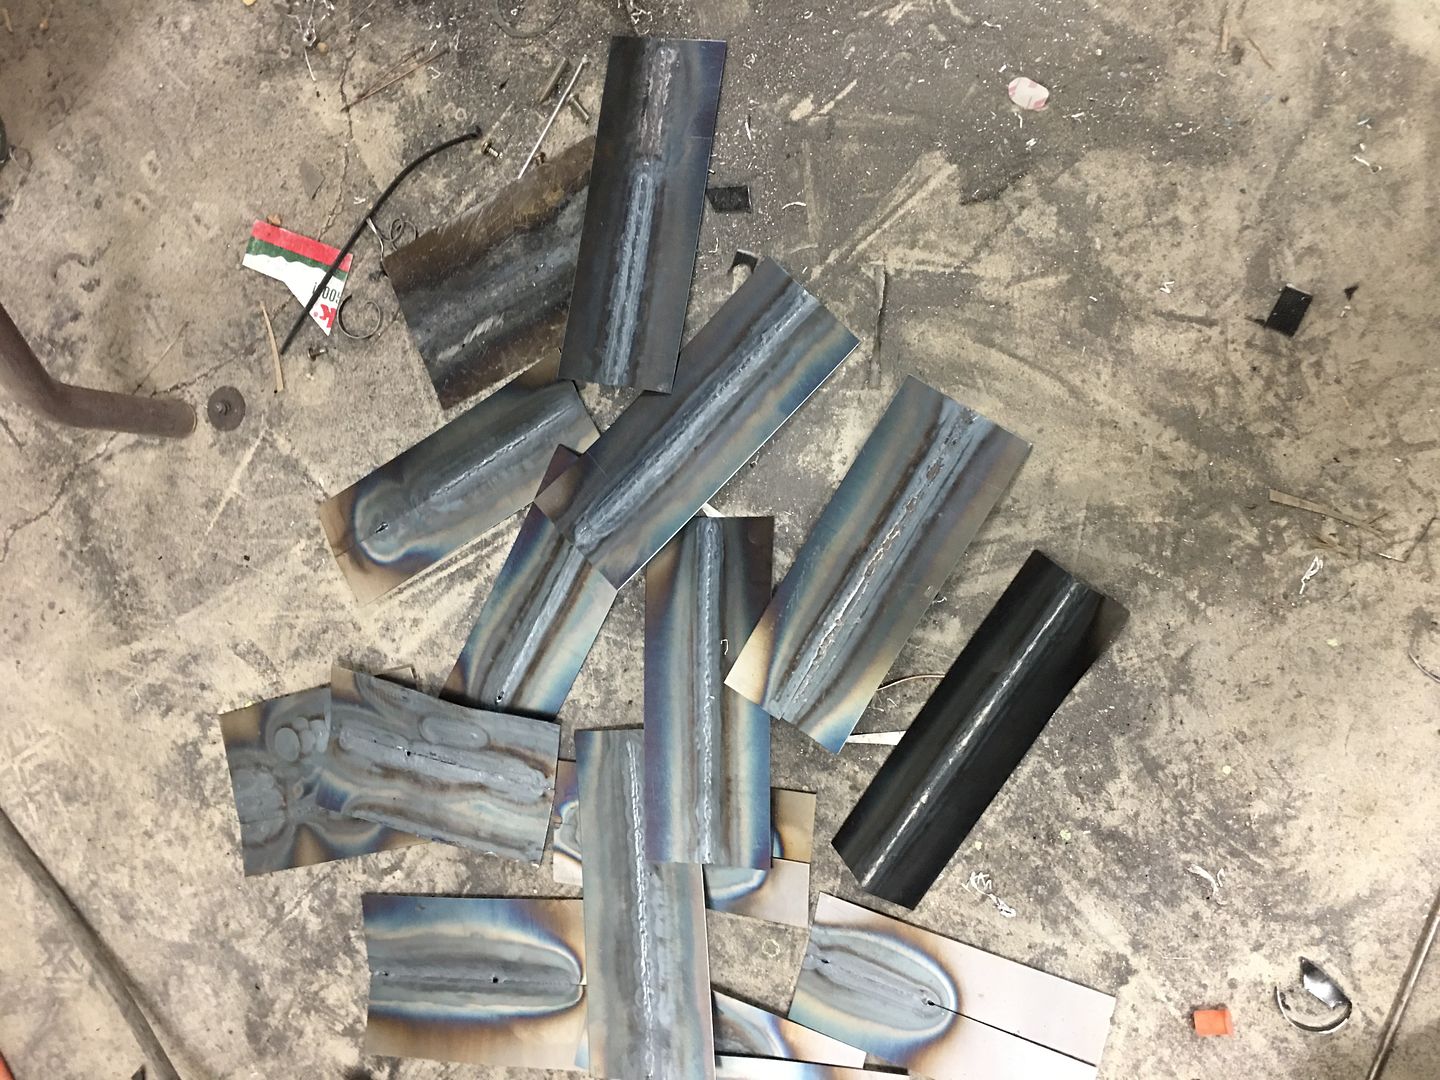 https://www.youtube.com/watch?v=O9Wf1AbzP3c After planishing... https://www.youtube.com/watch?v=BDy82sixbjQ .
__________________
Robert |
|
|
|
|
01-27-2019, 12:23 AM
|
#15 |
|
Post Whore
Join Date: May 2015
Location: Alabama
Posts: 14,615
|
Re: 55 Wagon Progress
Nice score Robert....a rainbow and a meco.......
__________________
Mongo...aka Greg RIP Dad RIP Jesse 1981 C30 LQ9 NV4500..http://67-72chevytrucks.com/vboard/s...d.php?t=753598 Mongos AD- LS3 TR6060...http://67-72chevytrucks.com/vboard/s...34#post8522334 Columbus..the 1957 IH 4x4...http://67-72chevytrucks.com/vboard/s...63#post8082563 2023 Chevy Z71..daily driver |
|
|
|
|
01-27-2019, 07:47 AM
|
#16 |
|
Registered User
Join Date: Dec 2012
Location: Pendleton, Indiana
Posts: 235
|
Re: 55 Wagon Progress
Nice find, I'm looking at getting a Meco. Ihaven't done any gas welding since welding school some 20+ years ago. Just curious what does your tank cart look like and tank sizes? Too small and all you get done going and getting them refilled, but i'm limited by space so can't too large and wife say I'm adding on.
LOL Rick |
|
|
|
|
01-27-2019, 05:24 PM
|
#17 |
|
Registered User
Join Date: Jan 2013
Location: Leonardtown, MD
Posts: 1,637
|
Re: 55 Wagon Progress
Rick, the O2 bottle is just over 3 tall, the handle on the cart about 42
__________________
Robert |
|
|
|
|
01-27-2019, 06:50 PM
|
#18 |
|
Registered User
Join Date: Dec 2012
Location: Pendleton, Indiana
Posts: 235
|
Re: 55 Wagon Progress
Thanks Robert, not too big of a foot print, that I couldn't make room.
Rick |
|
|
|
|
02-03-2019, 06:41 PM
|
#19 |
|
Registered User
Join Date: Jan 2013
Location: Leonardtown, MD
Posts: 1,637
|
Re: 55 Wagon Progress
Glad to help Rick!
More progress on the wagon, we had ordered some 3/8 Stainless fuel line, which comes in a coil... so we needed to be able to straighten it out as I can see me "unbending" and getting it right.. So I placed an order with McMaster Carr for some pulleys designed for 3/8 rope and using 3/8 bolt hole in the bearing. Part number 59475K51. 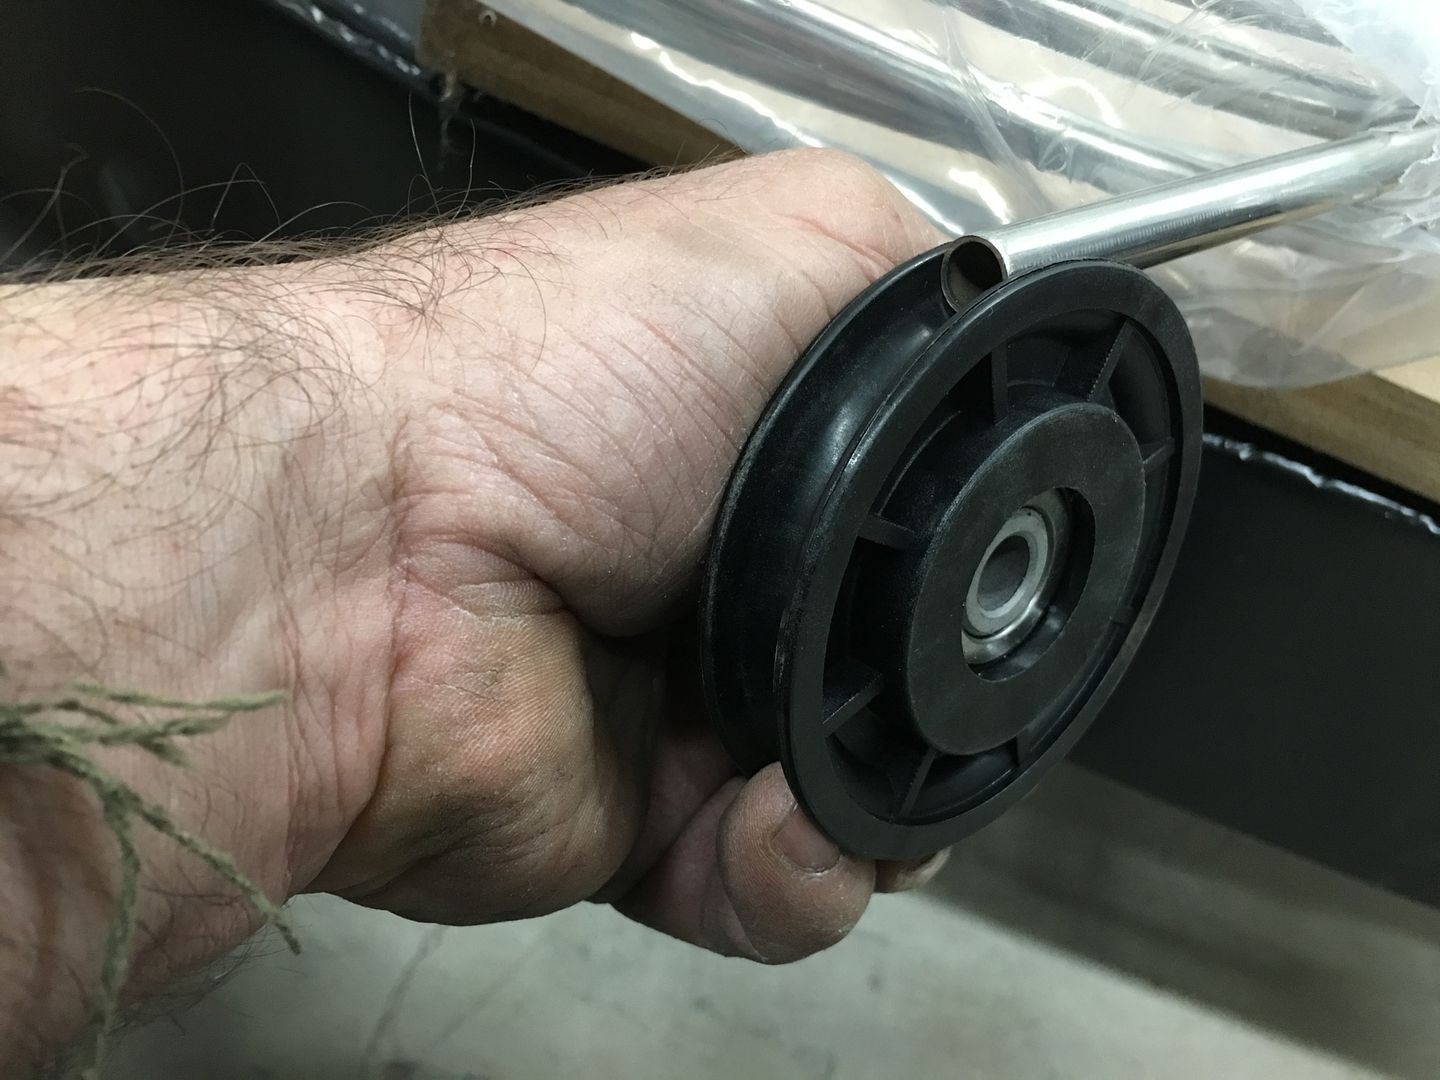 A drive mechanism was made using 3/8-16 stainless all-thread, and the slider was cut and re-welded to better fit the 1" square tubing. 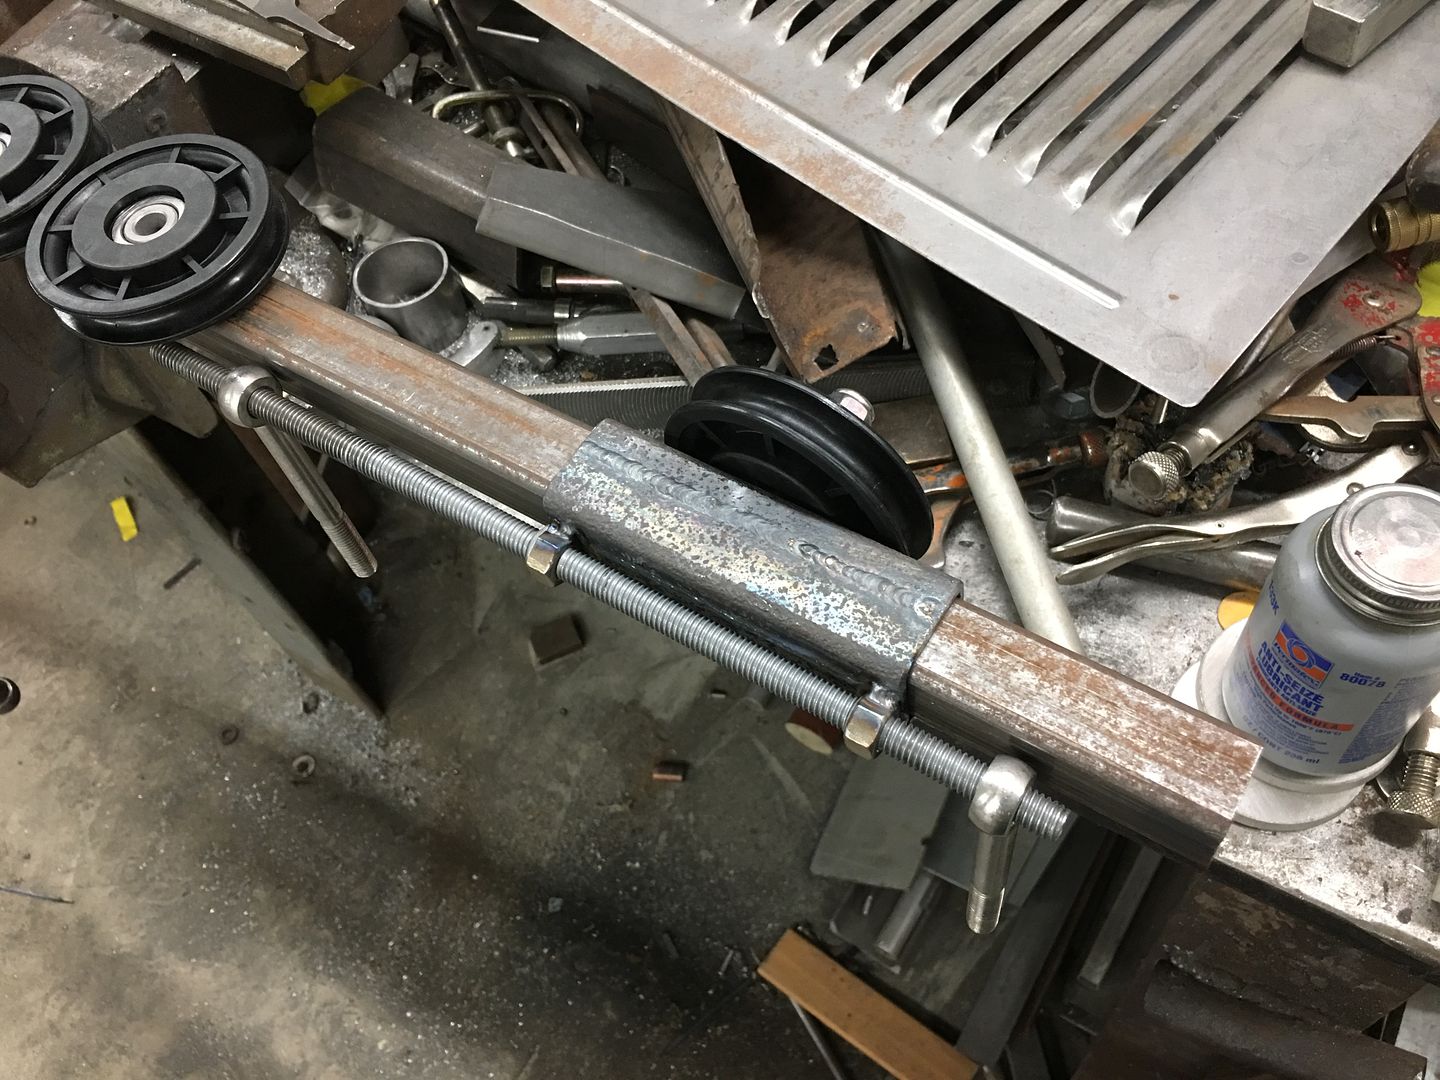 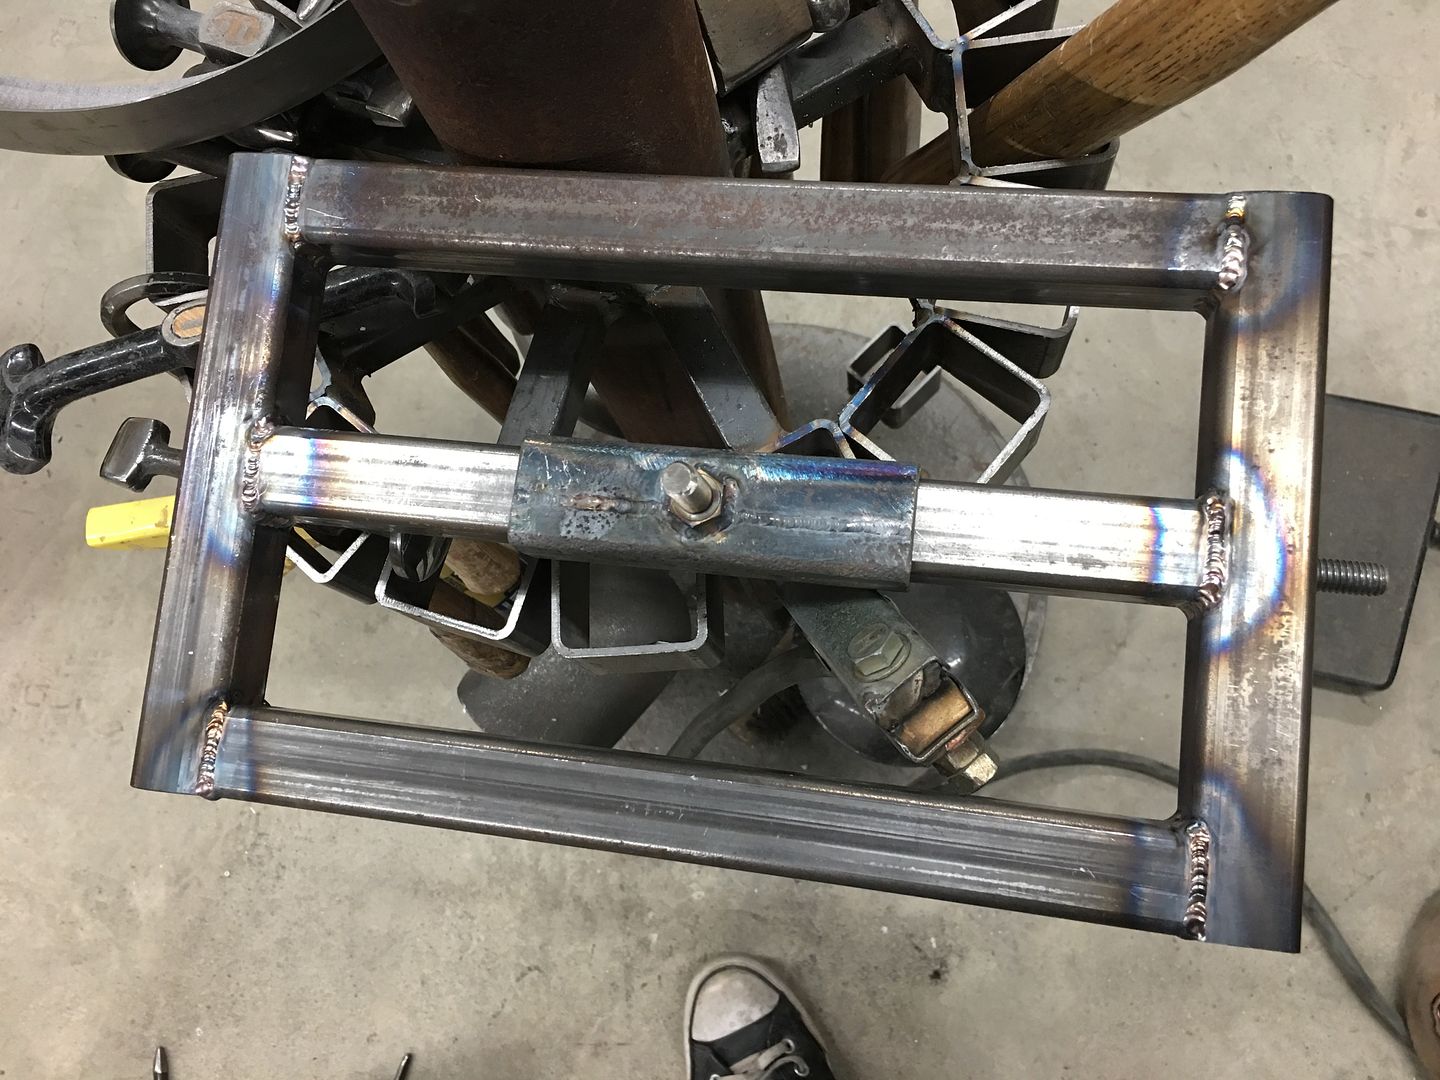 A better view all around of the design, we used three pulleys so this could also serve as a bender as well as straightener.. https://www.youtube.com/watch?v=TpgMekrEA3g Then Mike and I did a test run using copper tubing... https://www.youtube.com/watch?v=FumsneaLJlU Now onto the stainless.... 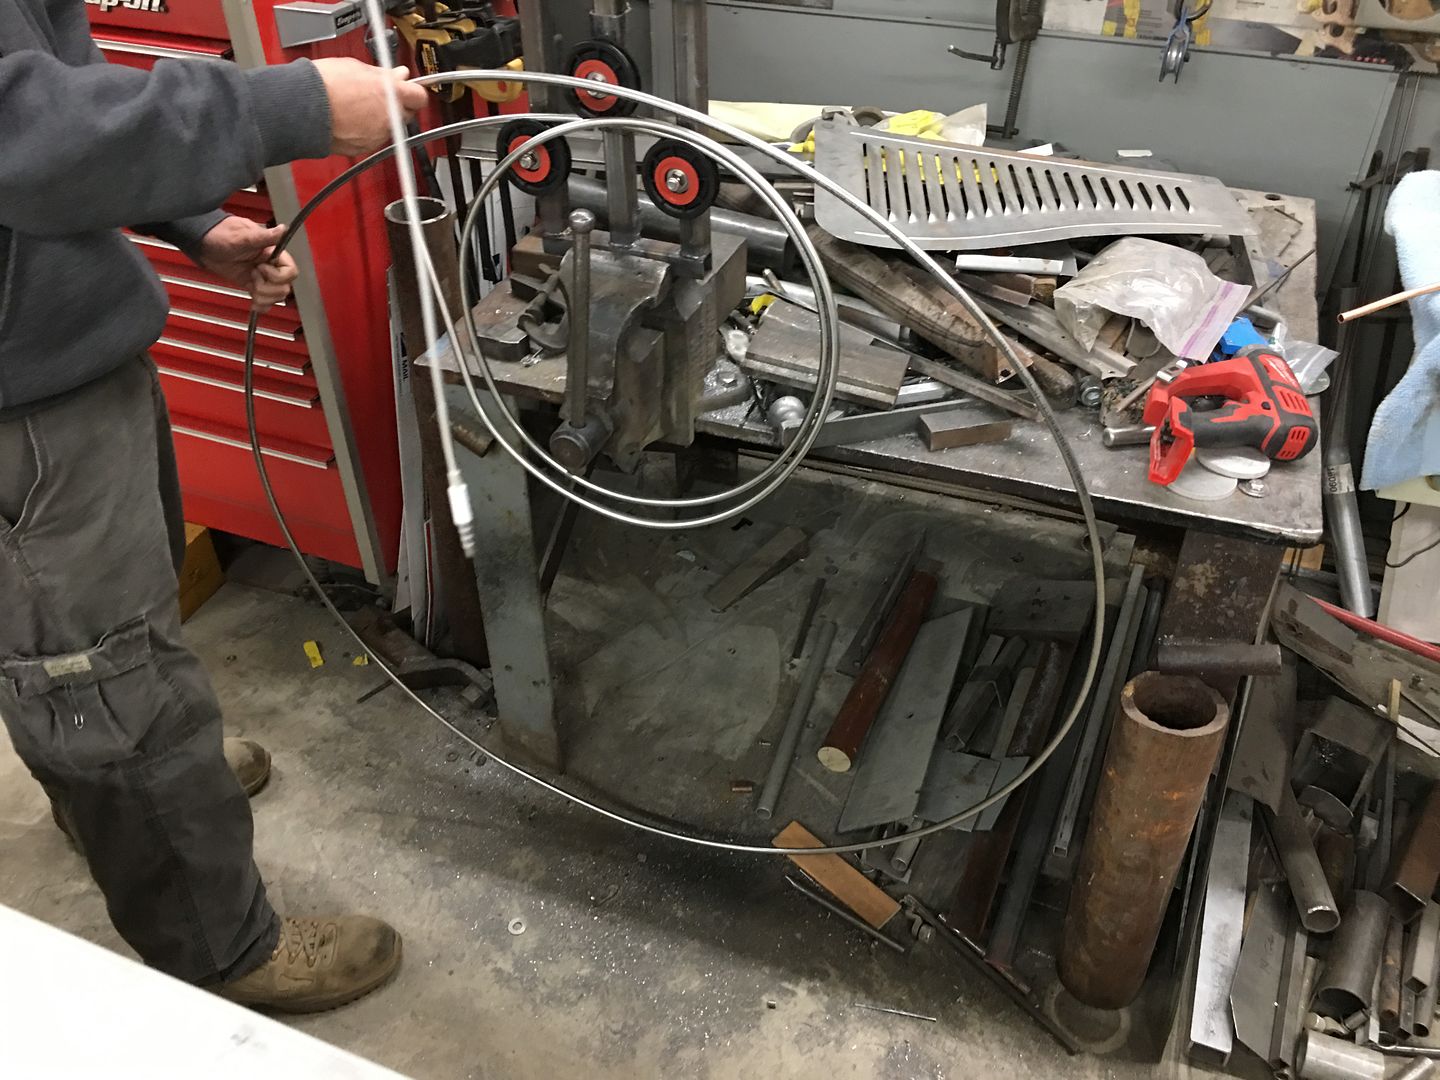  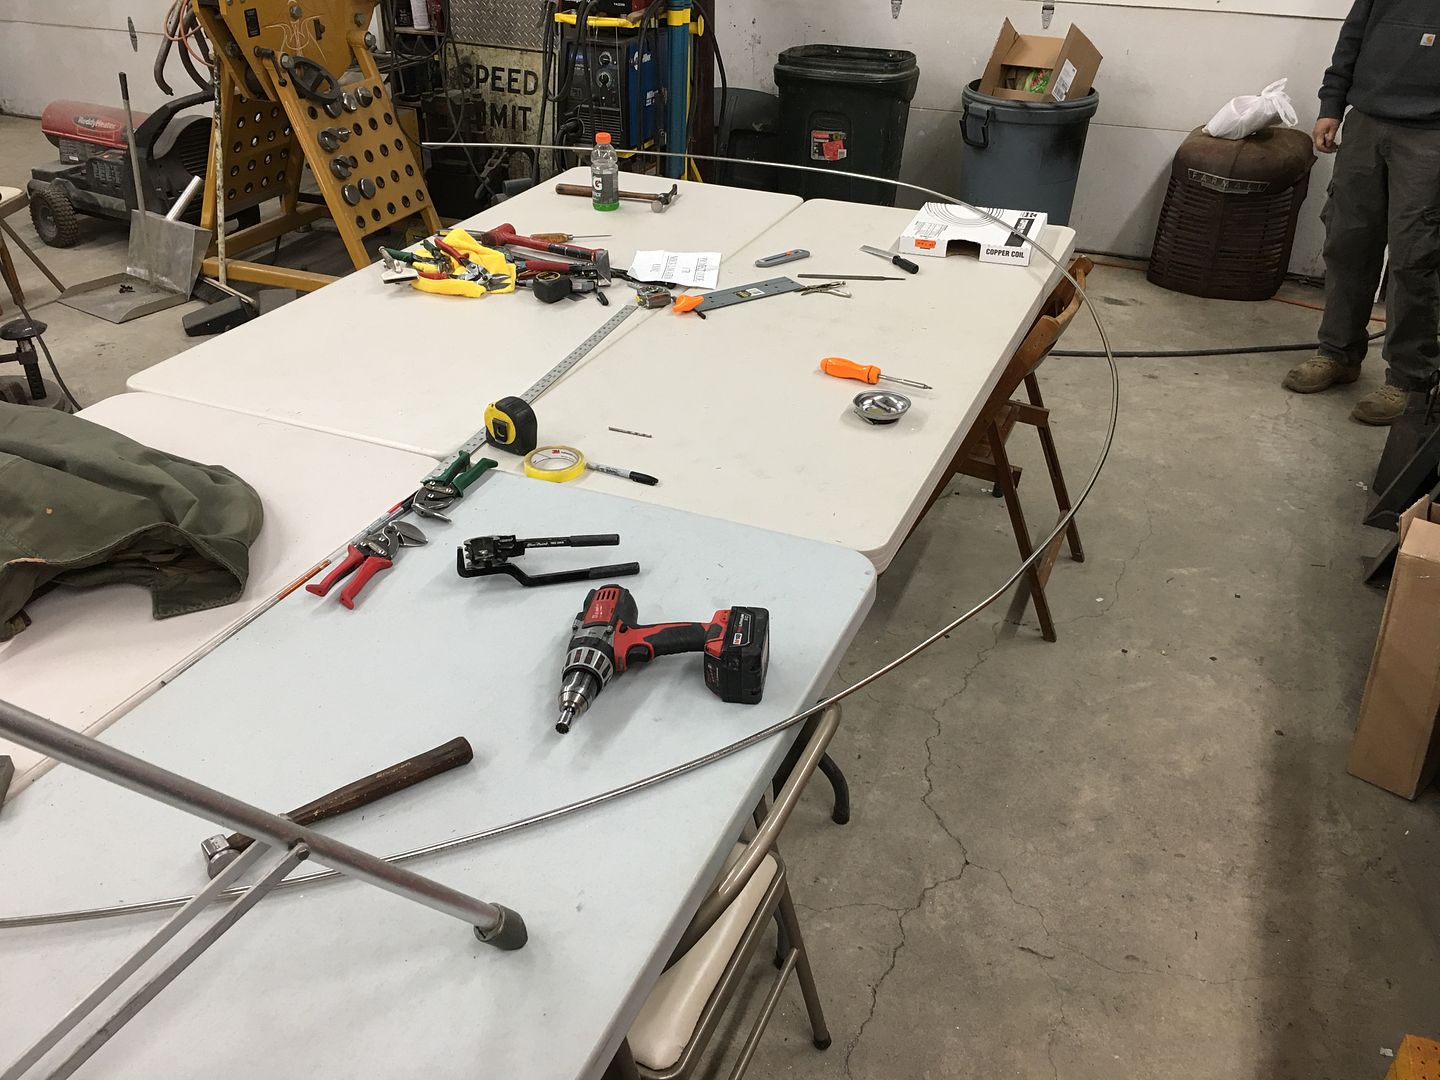 At this point we measured and cut the 20' piece in two so it would be more more manageable. Straightened.... 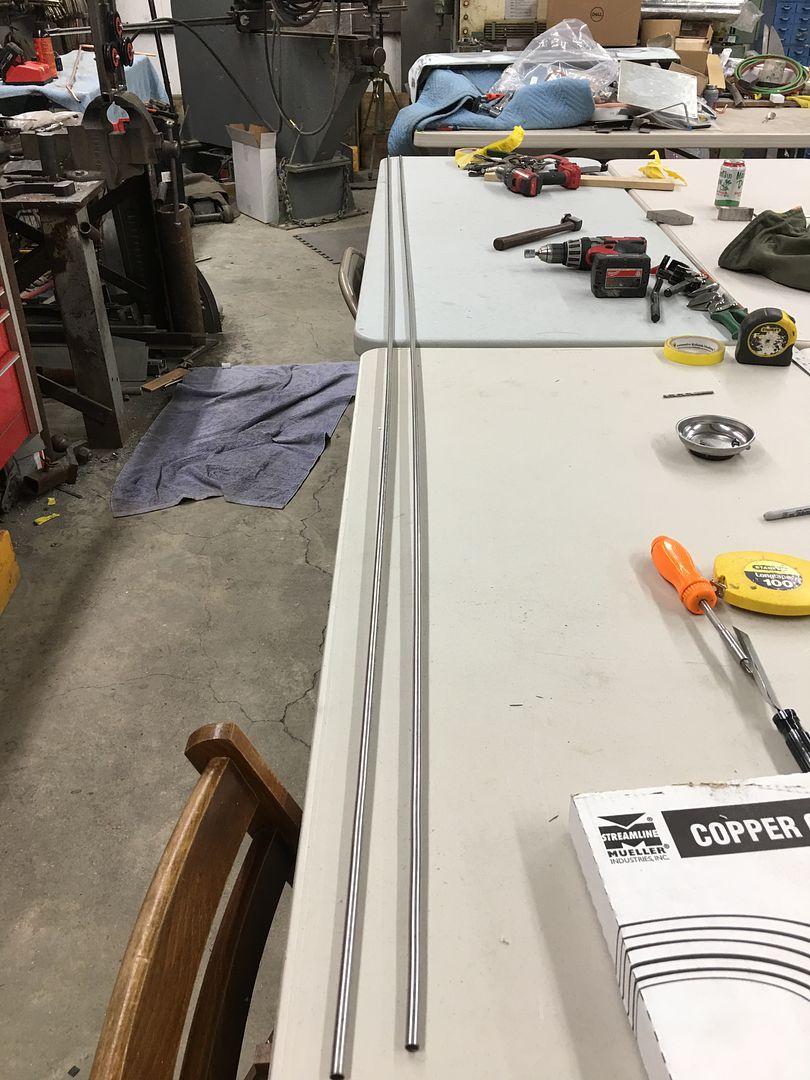 Now we used the adjustable spline to get the curve of the frame for the proper bend on the stainless... 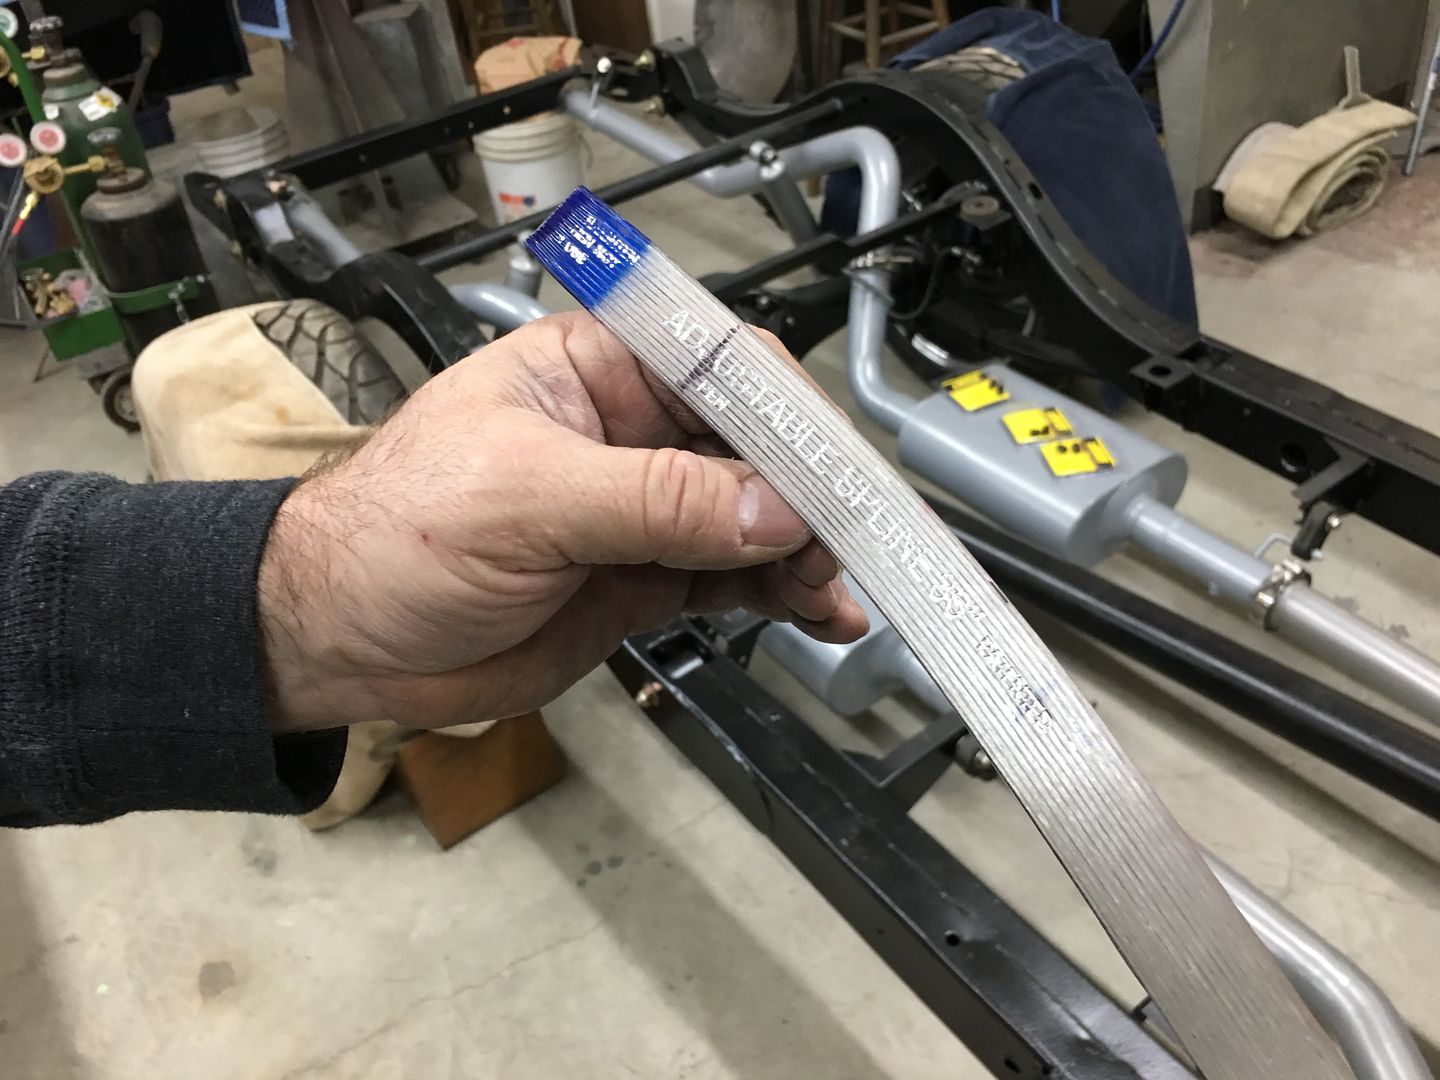 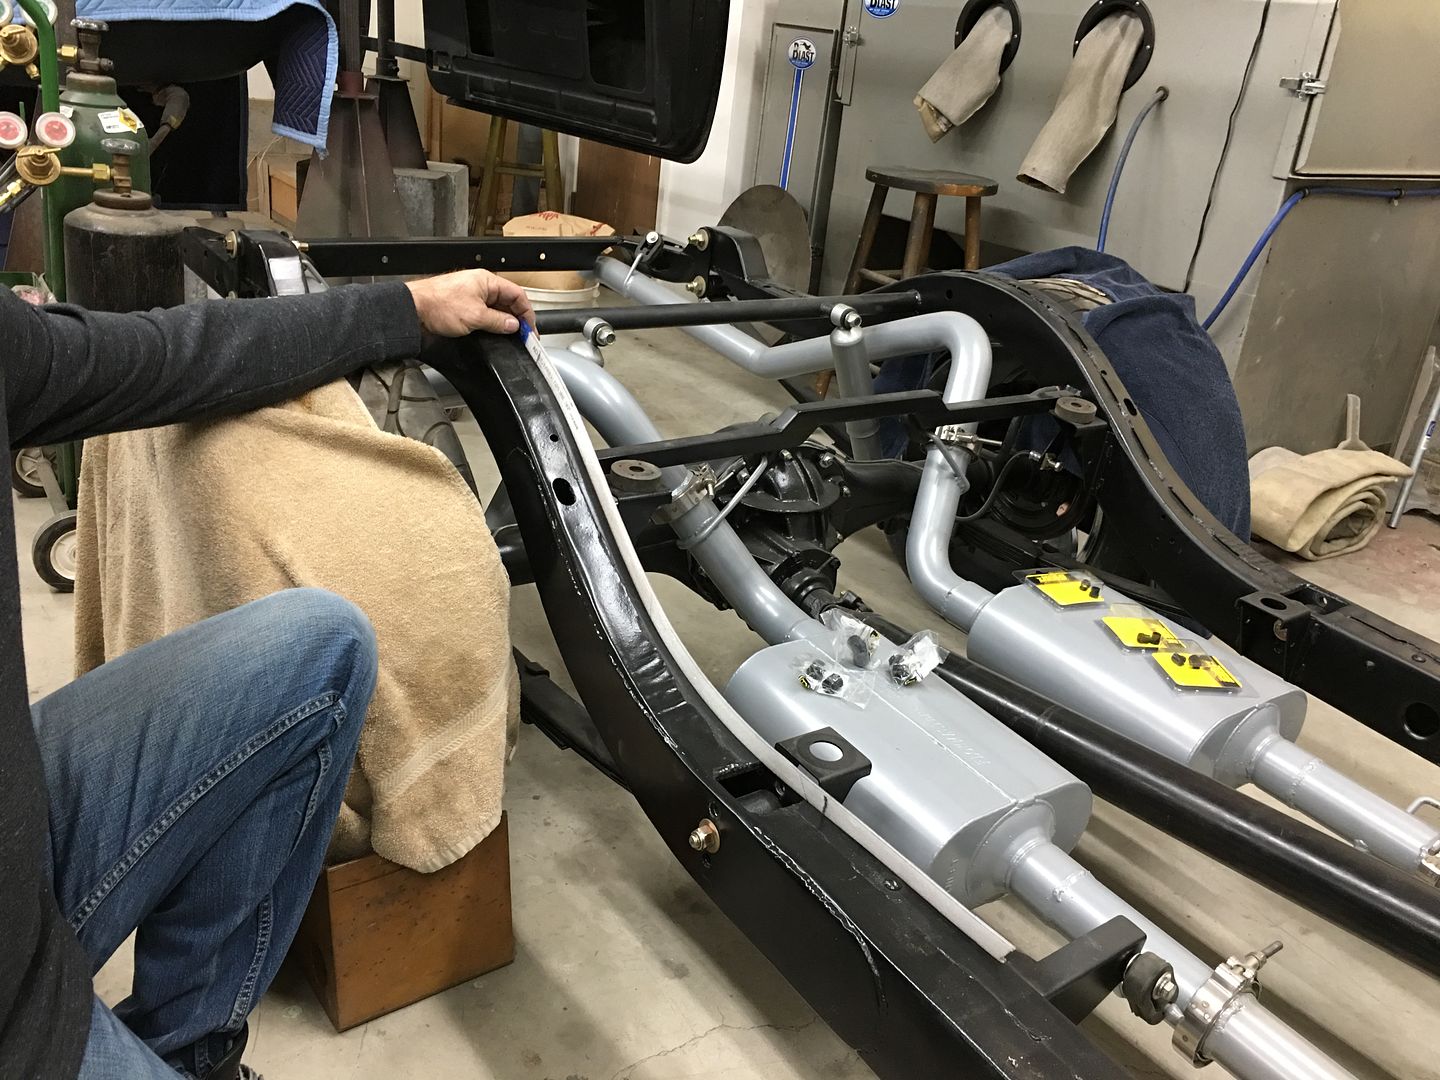 A strip of tape applied helps to lock the shape from moving, and the tubing is marked for the radius distance.. 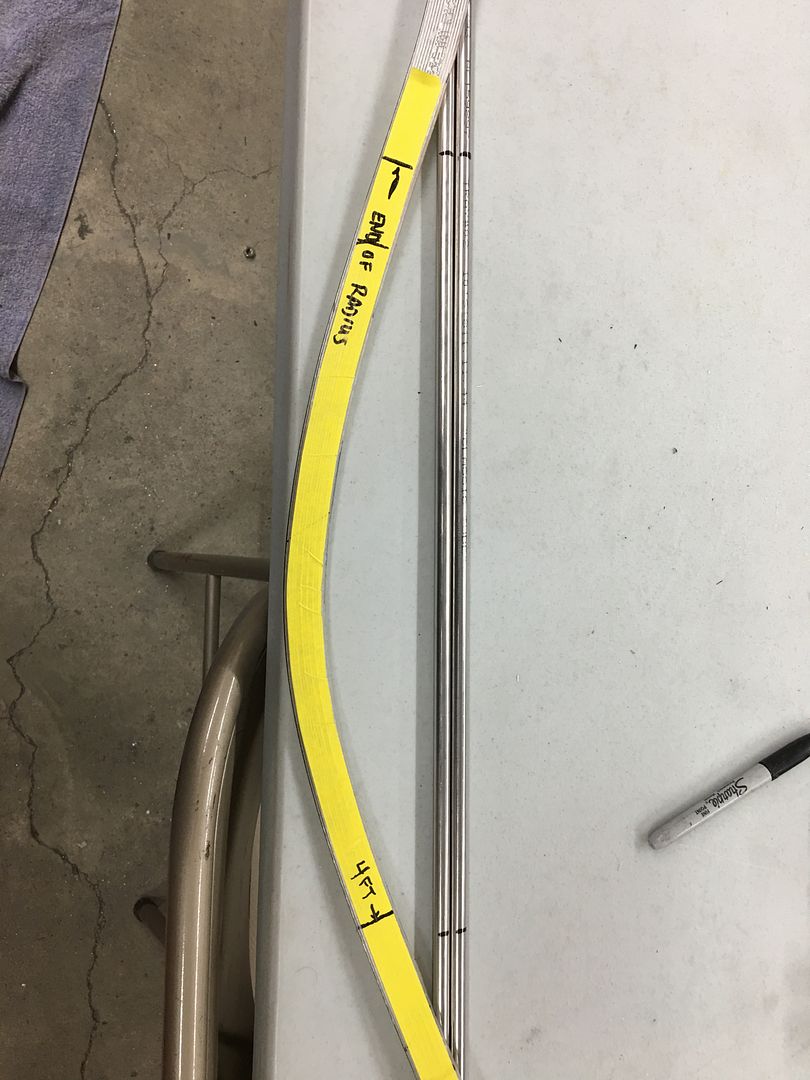 The tube is placed back in the new machine to add the radius to match our profile... 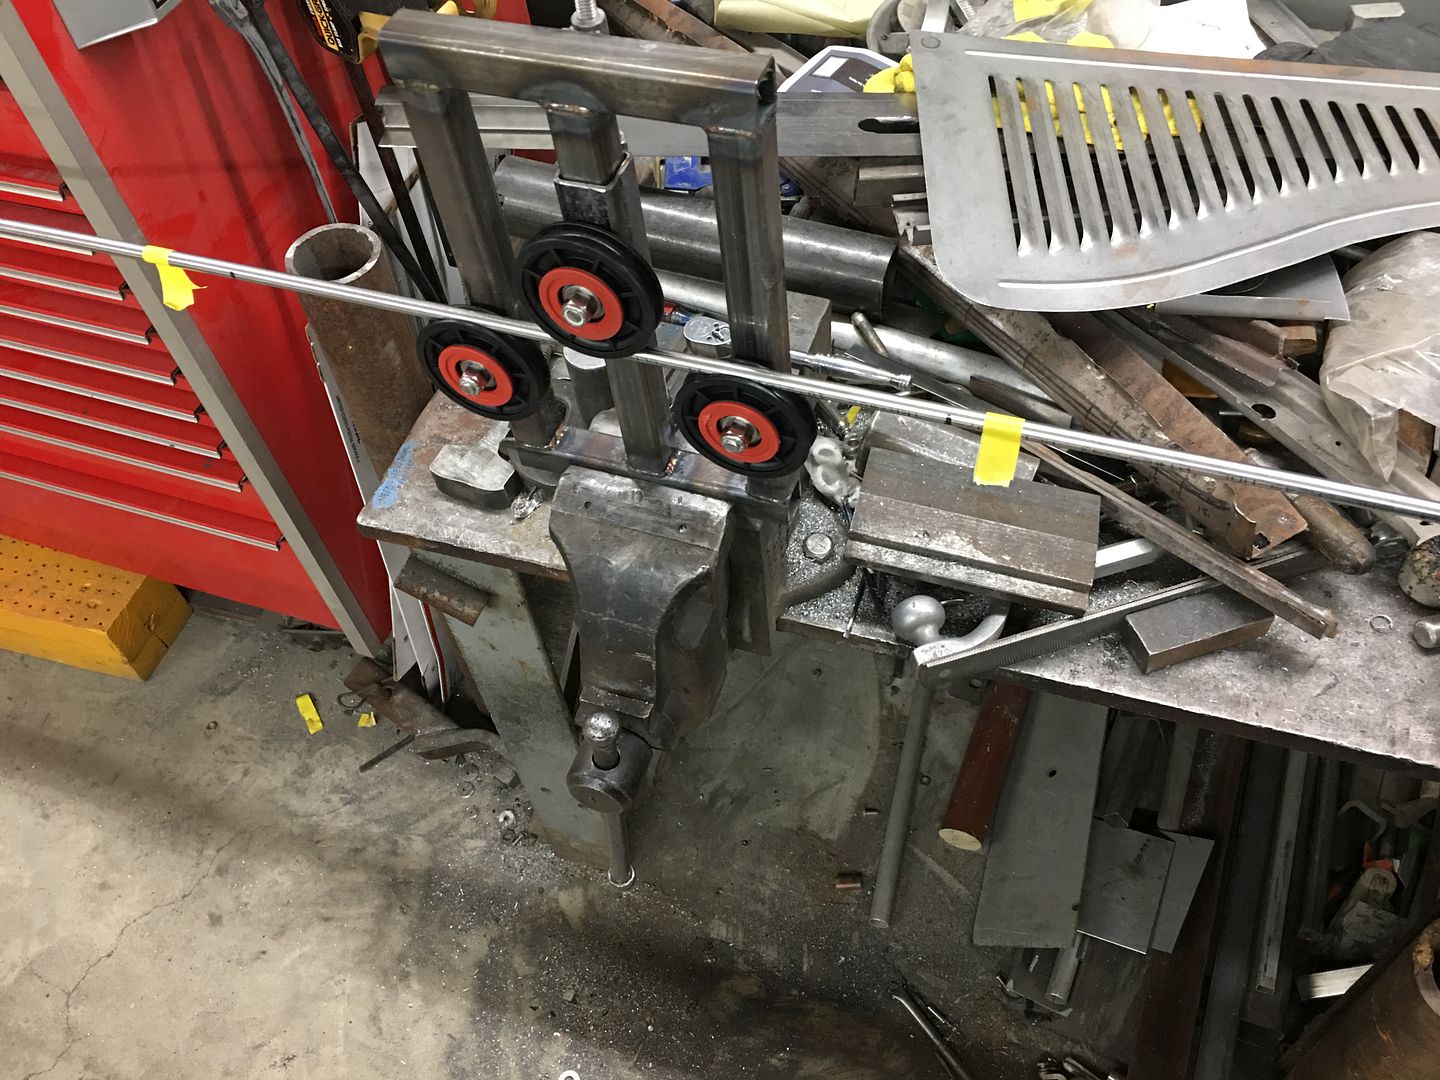 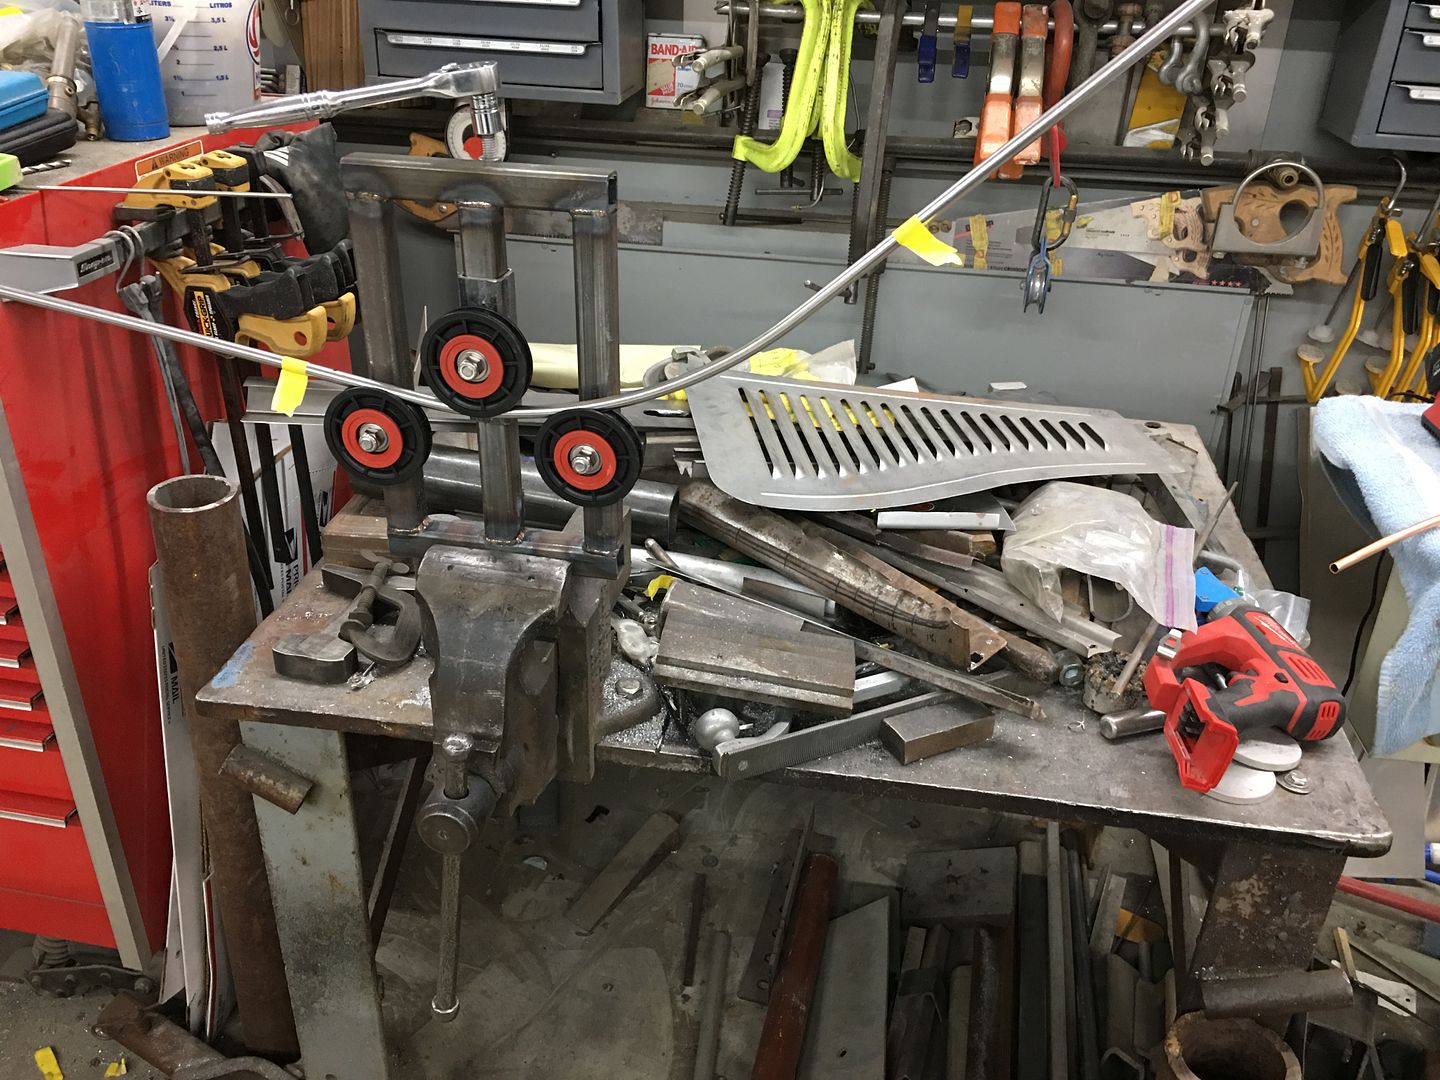 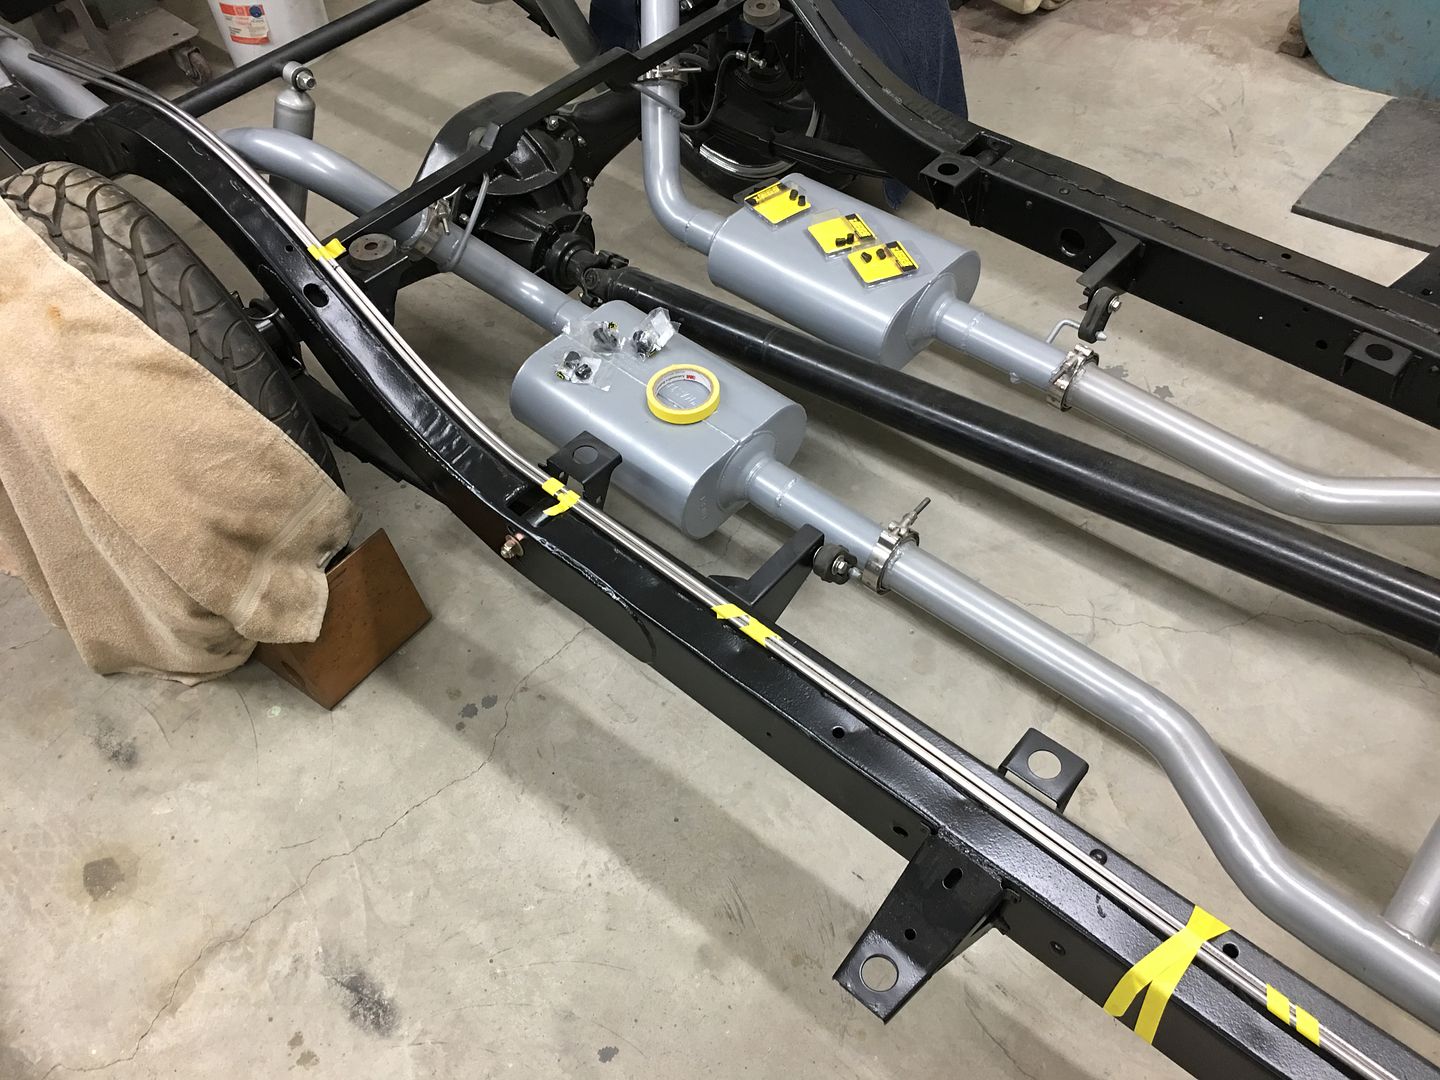 Adding some of the needed bends... 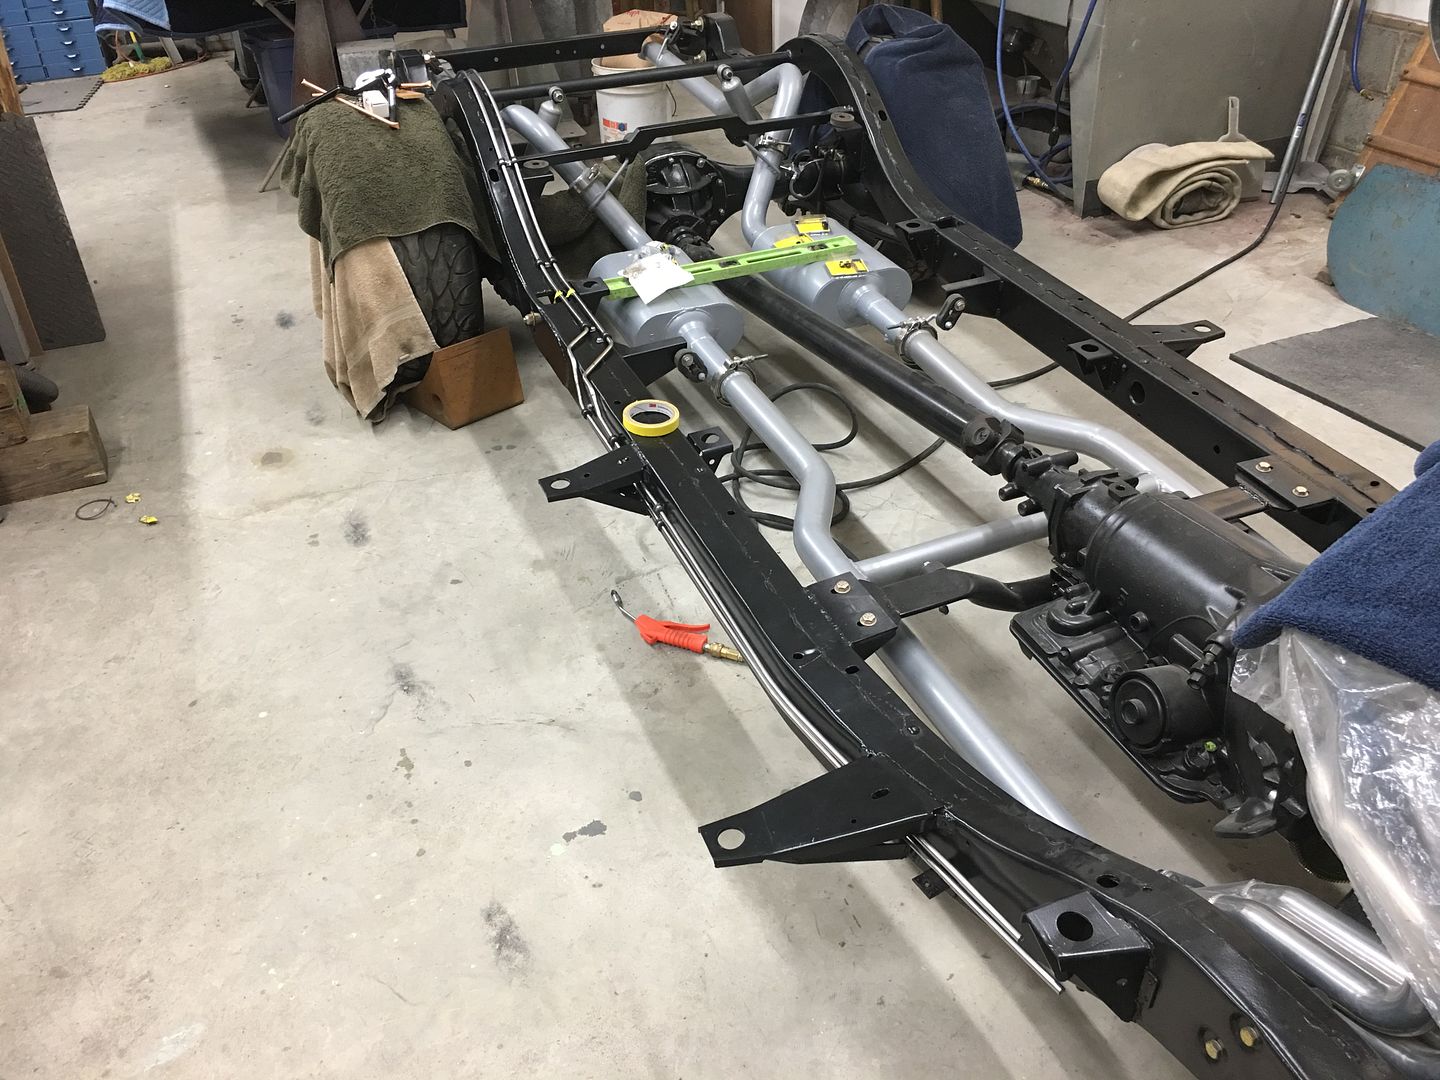 For some of the interior details, we took delivery of the speaker trim rings from my cousin JB, he did a nice job cutting these out for us... They still need holes drilled, stainless mesh cut to fit, and polishing...  ....and our Mopar door clips we were going to use for the rear arm rests turned out to be a bit brittle, most snapped off rather than pull back through the hole. So we ordered the similar GM version, keeping our fingers crossed...  Alas, in my typical Murphy strikes again mode, these were slightly smaller and/or the holes already located in the kick panels were slightly gaping.. We searched the entire shop for a MacGyver solution and found that a 3/8-16 hex nut did a good job of "capturing" the clip, but without the "not letting go" part that a hole in sheet metal provides if the clip rotates slightly while in the hole. So some 3/8 stainless nuts were machined so that they could be welded into the kick panel and yet have the thread grip flush at the surface. 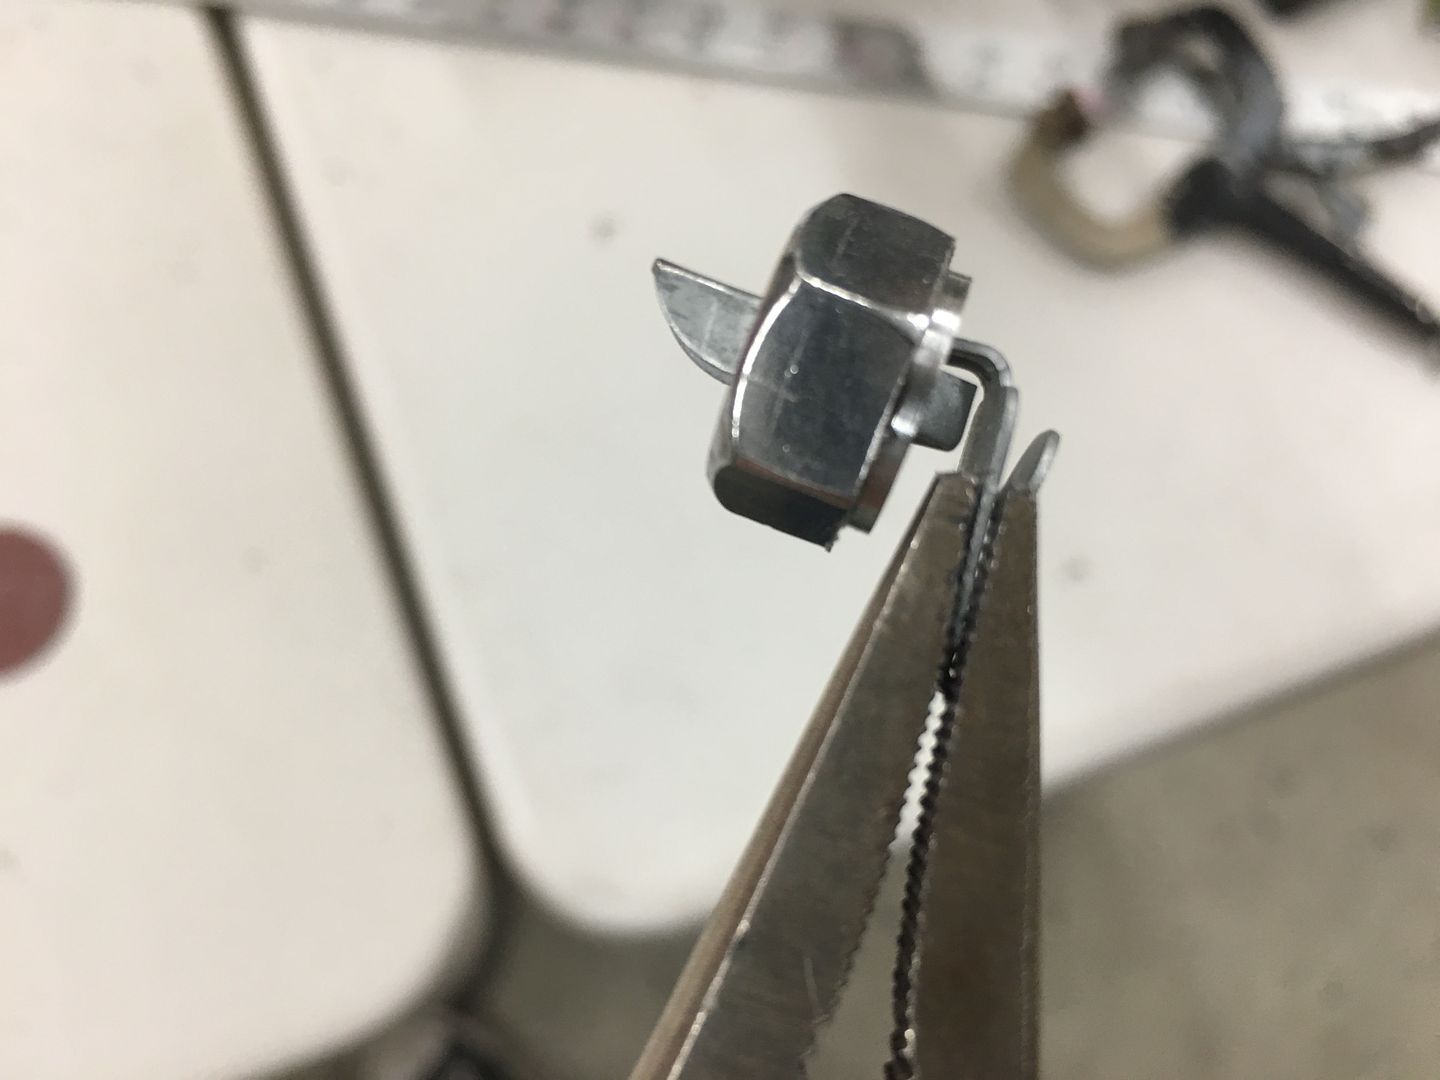 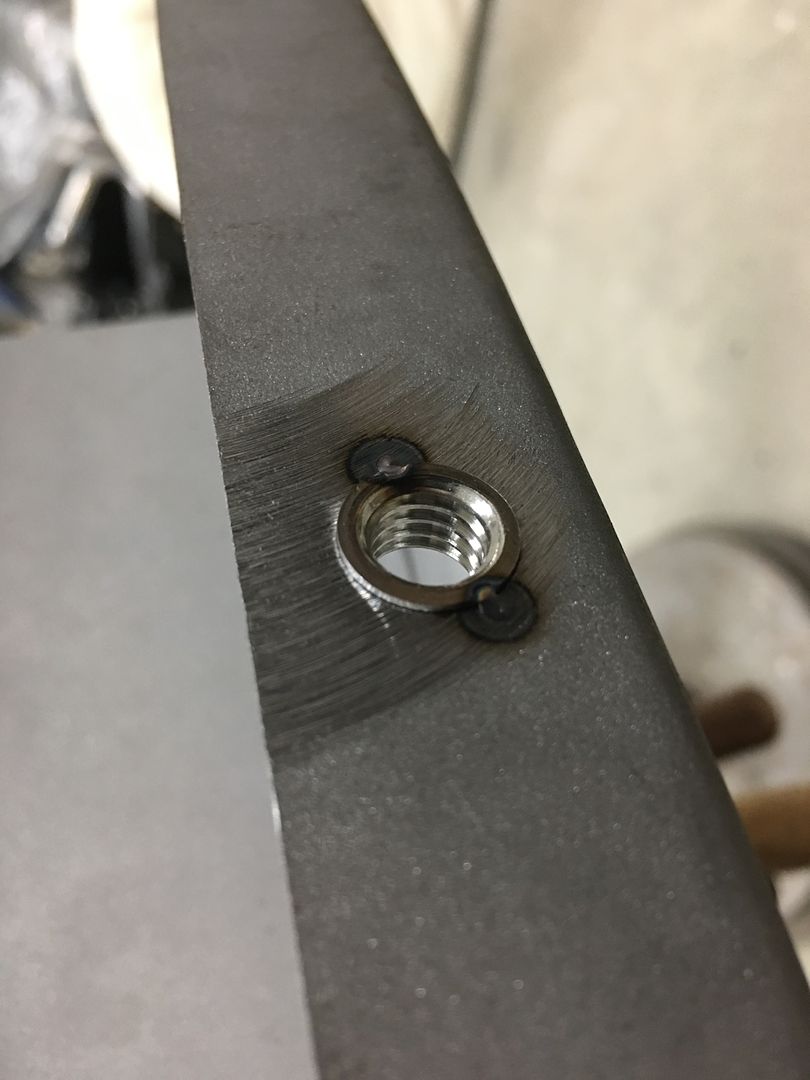 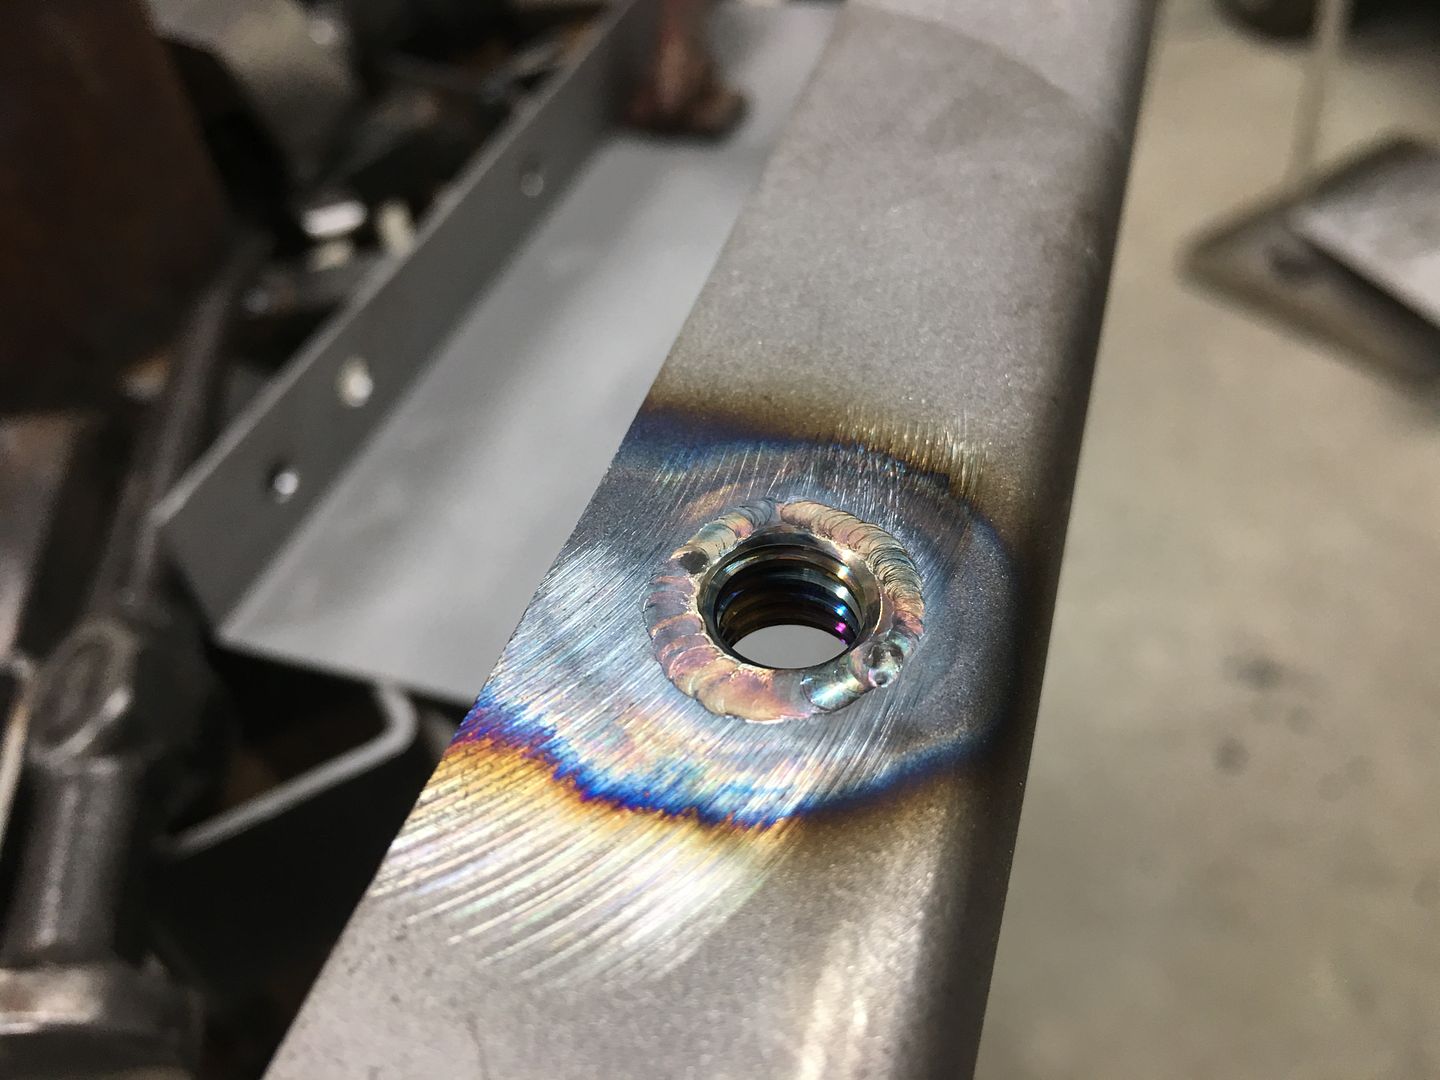 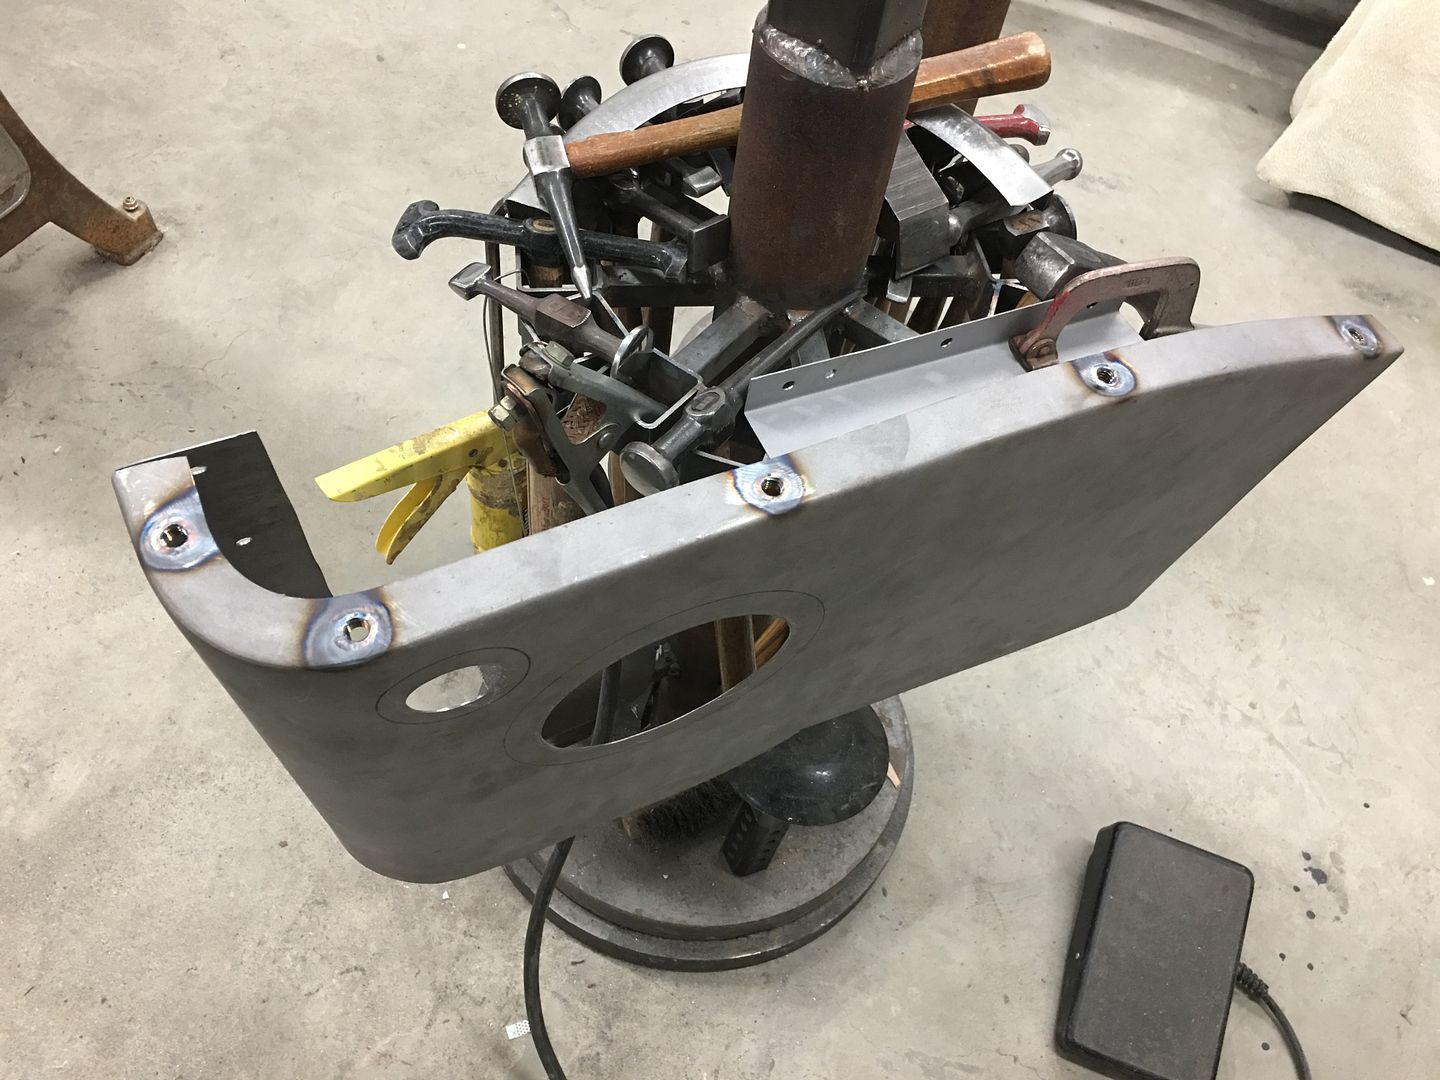
__________________
Robert |
|
|
|
|
02-03-2019, 09:23 PM
|
#20 |
|
Post Whore
Join Date: May 2015
Location: Alabama
Posts: 14,615
|
Re: 55 Wagon Progress
nice job Robert....that tubing jig is a nice touch
__________________
Mongo...aka Greg RIP Dad RIP Jesse 1981 C30 LQ9 NV4500..http://67-72chevytrucks.com/vboard/s...d.php?t=753598 Mongos AD- LS3 TR6060...http://67-72chevytrucks.com/vboard/s...34#post8522334 Columbus..the 1957 IH 4x4...http://67-72chevytrucks.com/vboard/s...63#post8082563 2023 Chevy Z71..daily driver |
|
|
|
|
02-04-2019, 10:31 AM
|
#21 |
|
Registered User
Join Date: Dec 2011
Location: Morris, Alabama
Posts: 184
|
Re: 55 Wagon Progress
That tubing bender/straightener!
 So many great ideas throughout this thread, Robert. |
|
|
|
|
02-11-2019, 01:27 AM
|
#22 |
|
Registered User
Join Date: Jan 2013
Location: Leonardtown, MD
Posts: 1,637
|
Re: 55 Wagon Progress
Thanks guys!
Saturday we got the tank installed so we could get a good reading on where it locates in relation to the body mounts in front of the axle. 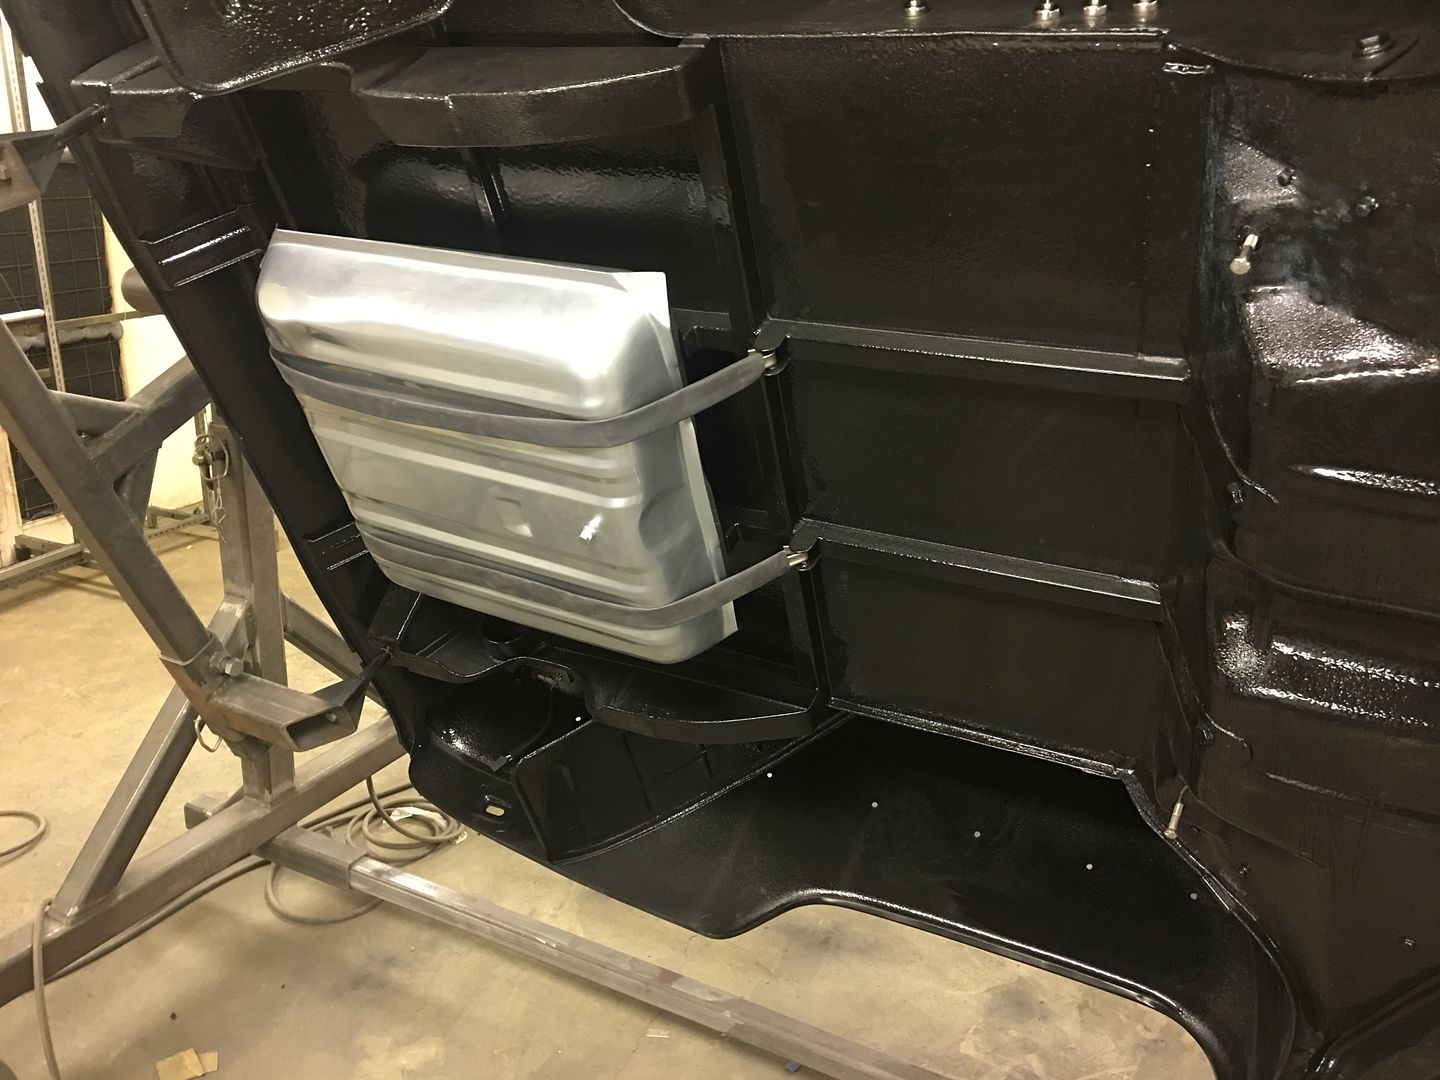 We also pulled a pattern from the body mount so we could bend the lines around it accurately.  Highly technical drawing showing our tank location... 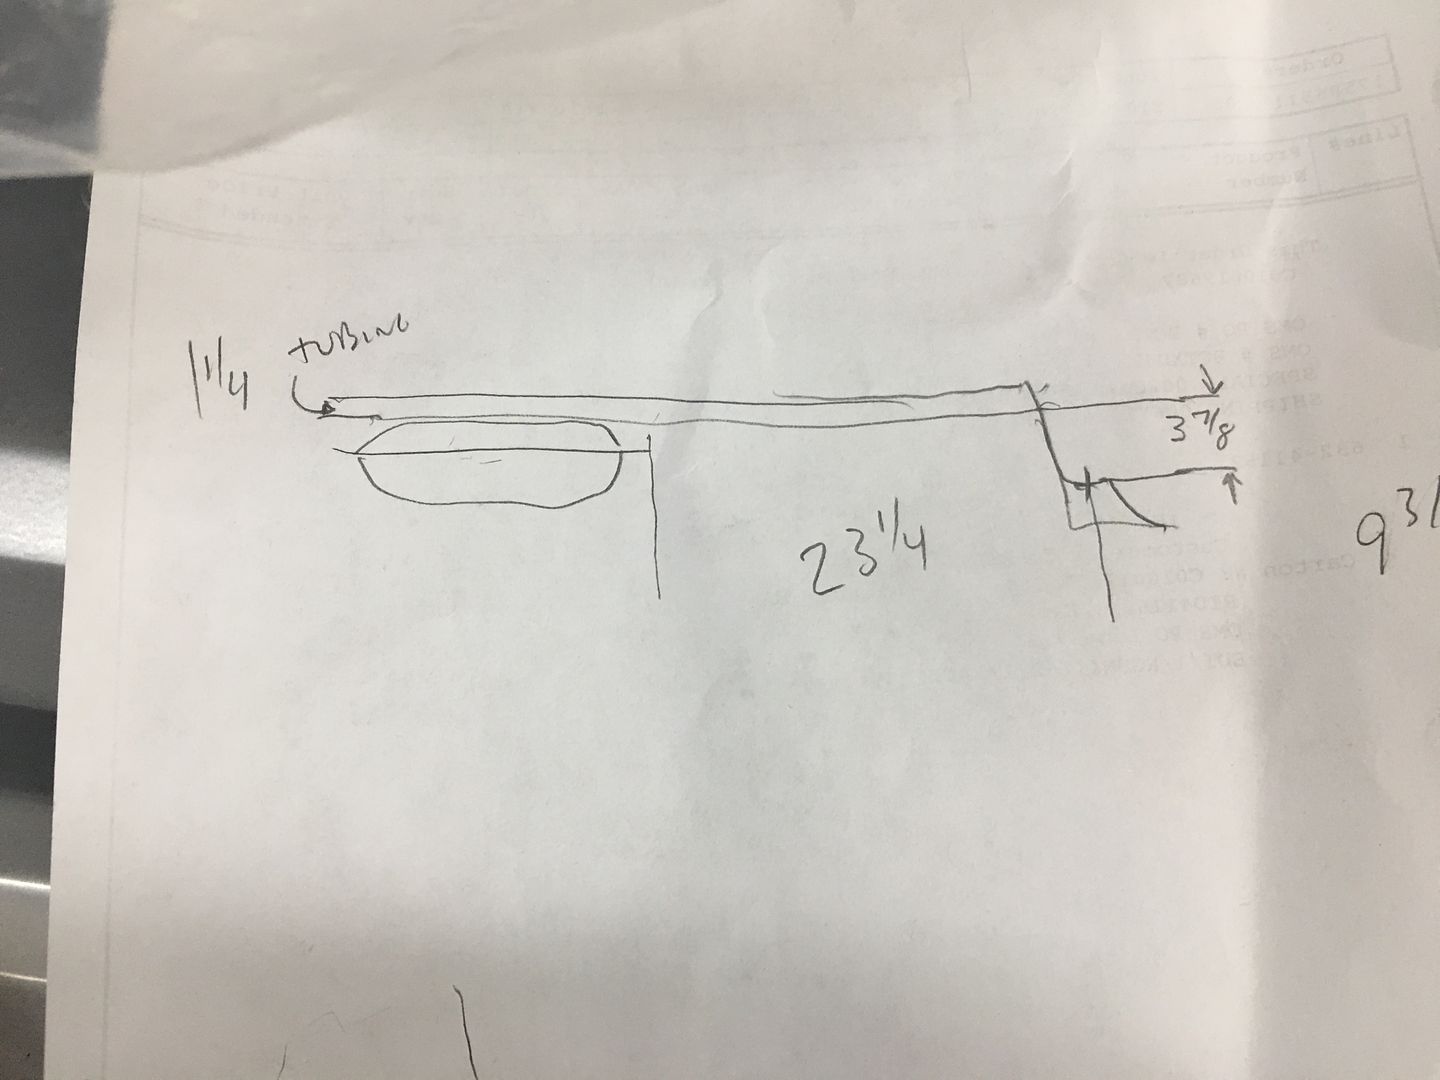 Tank located per our drawing in relation to body mount.. 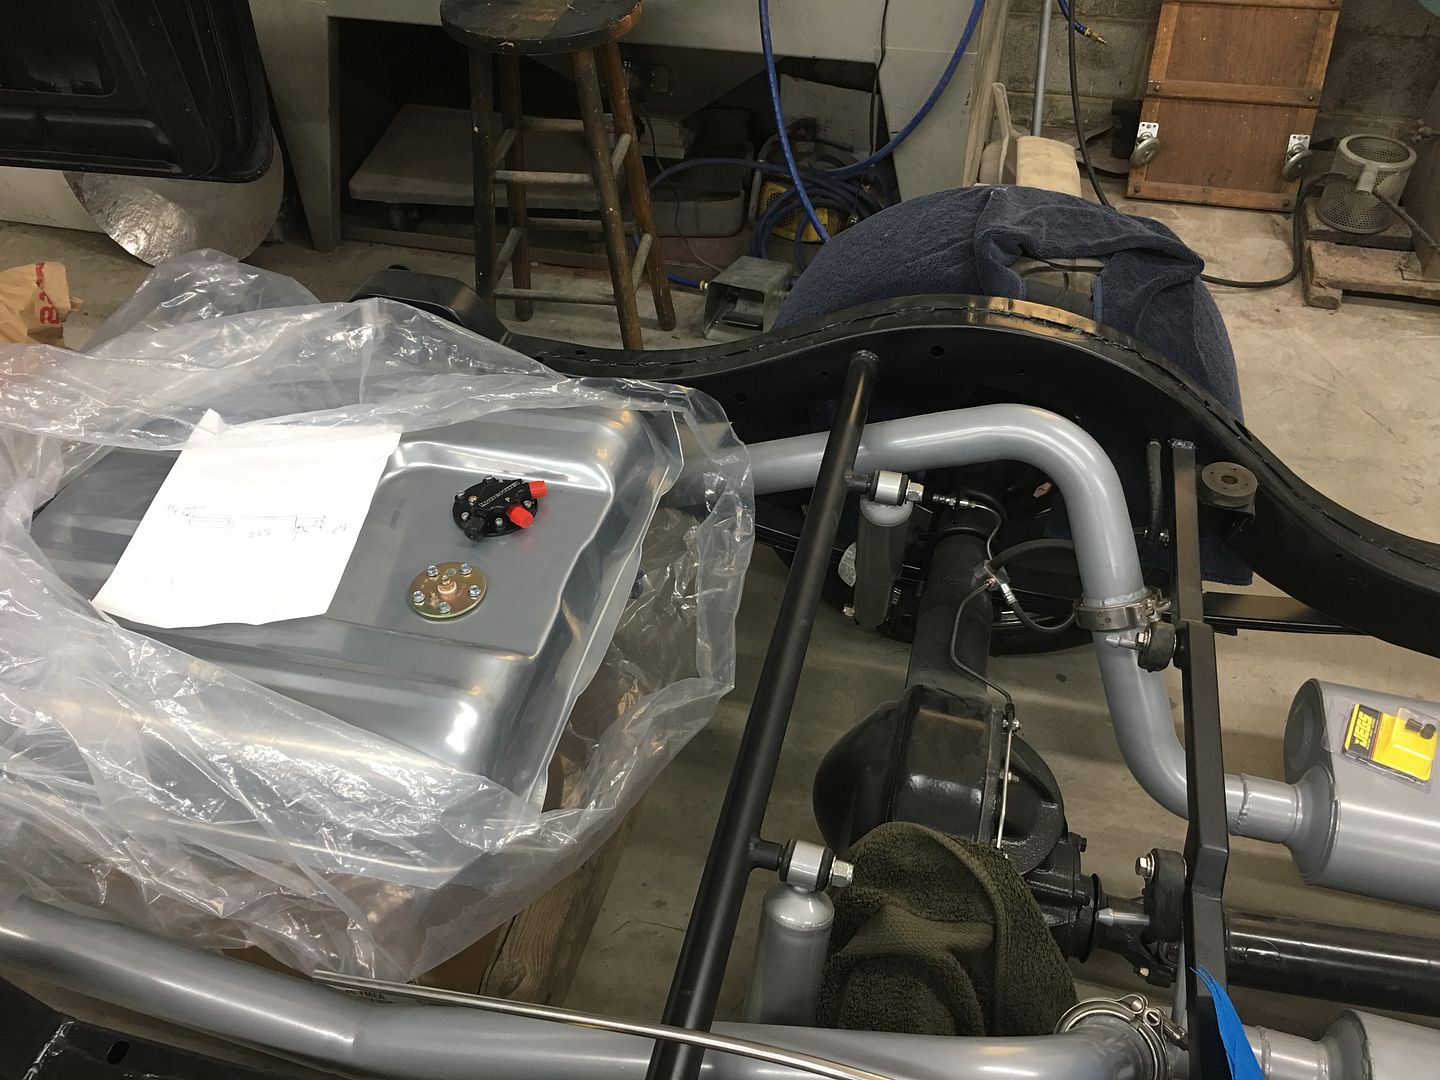 The more I look at this, the less I wanted to use the braided lines between the hard line and the tank. I'm just not comfortable with another fitting in the vicinity of the tail pipes. So back up and punt, looks like we're getting new tubing and bending again. The last lines weren't long enough to make it back to the tank, so we'll chalk them up as practice pieces, learning curve, if you will... Here the Body mount pattern is bolted up, the lines will make a bend behind this body mount, travel across to the middle, and then toward the back where it will attach directly to the tank. 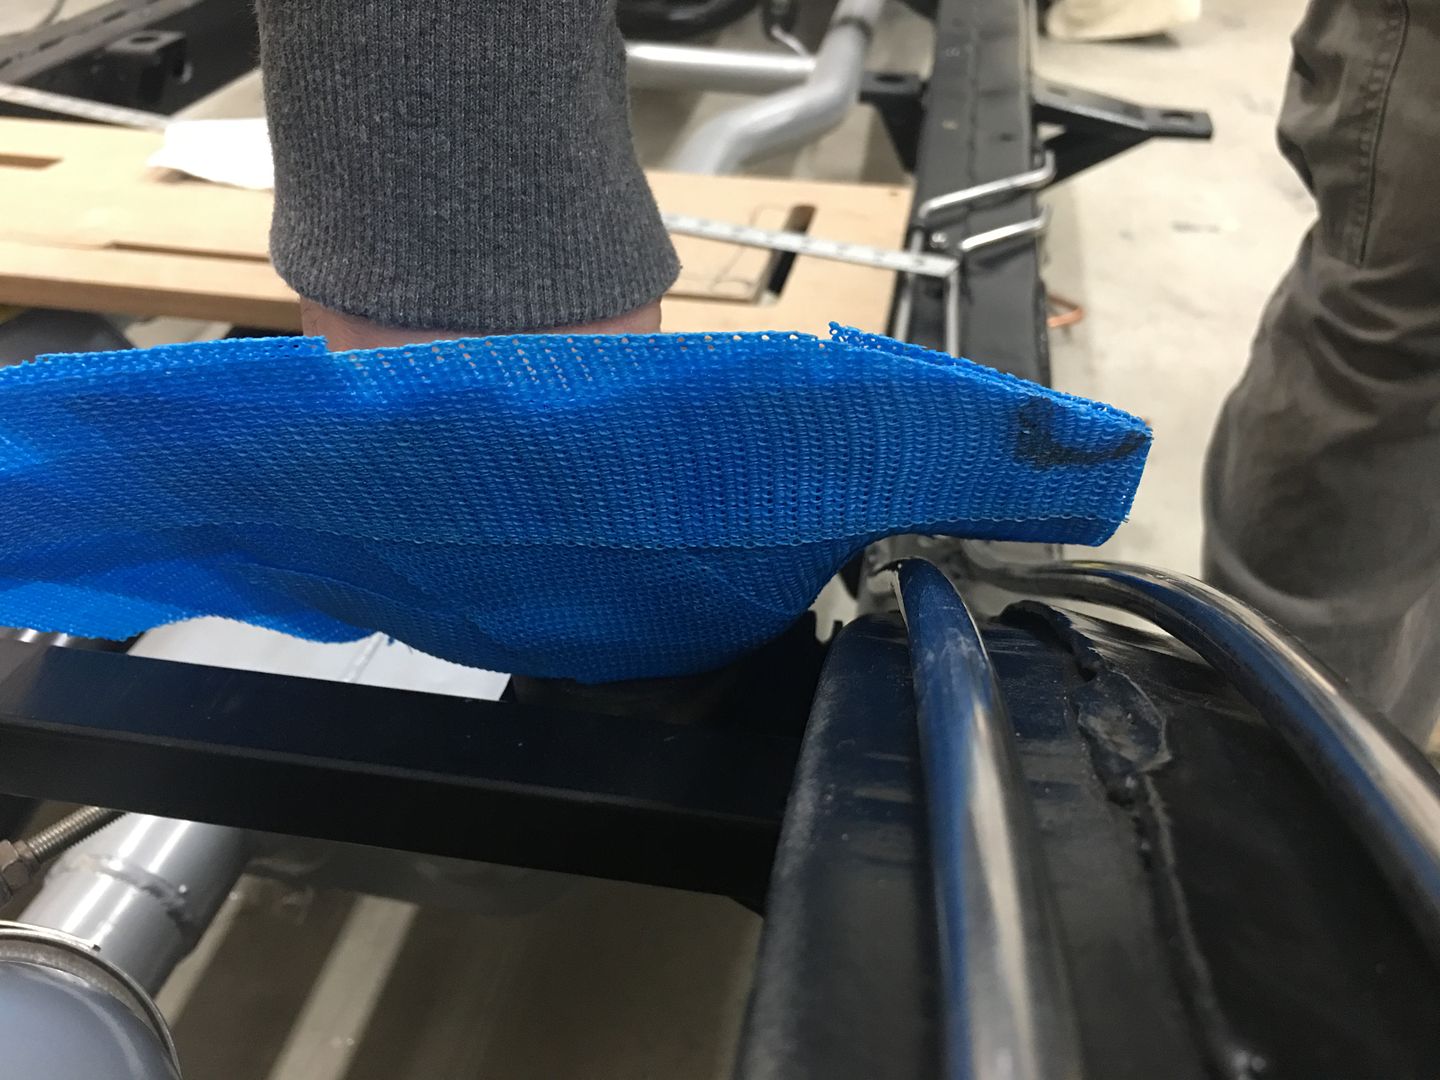 The lines will come close to the passenger tail pipe, so we'll add a heat shield. I visited a local motorcycle shop and picked up a donor... 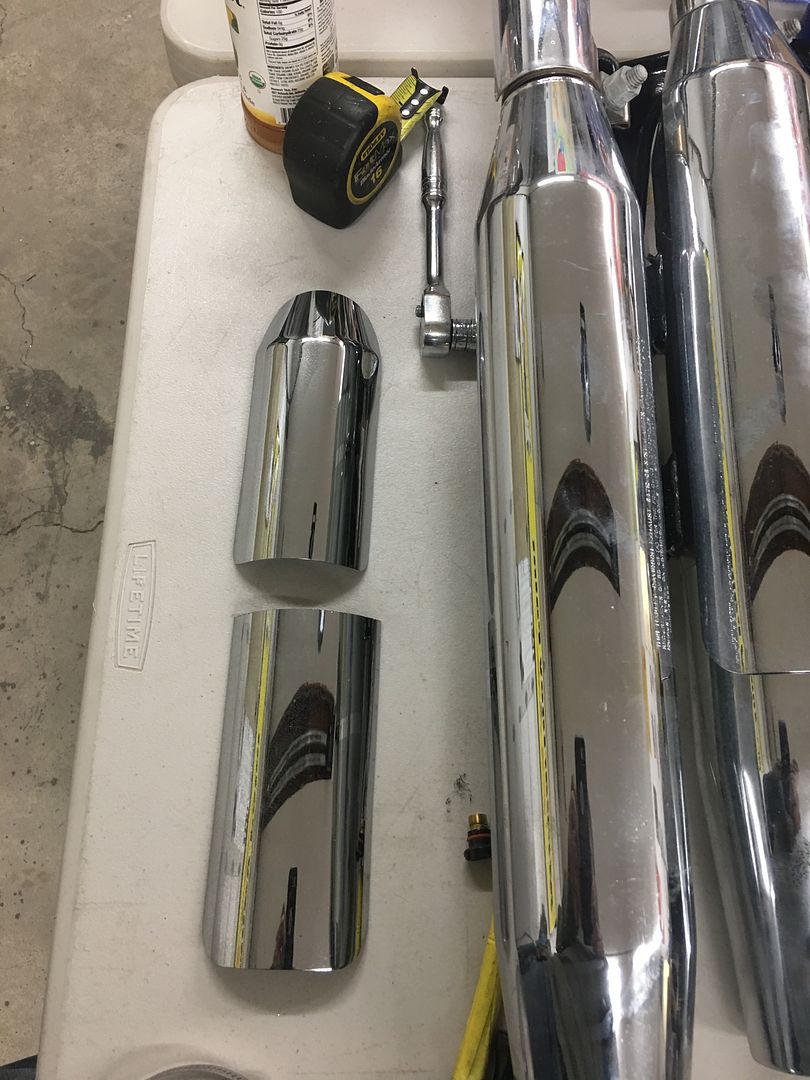 trimmed to fit... 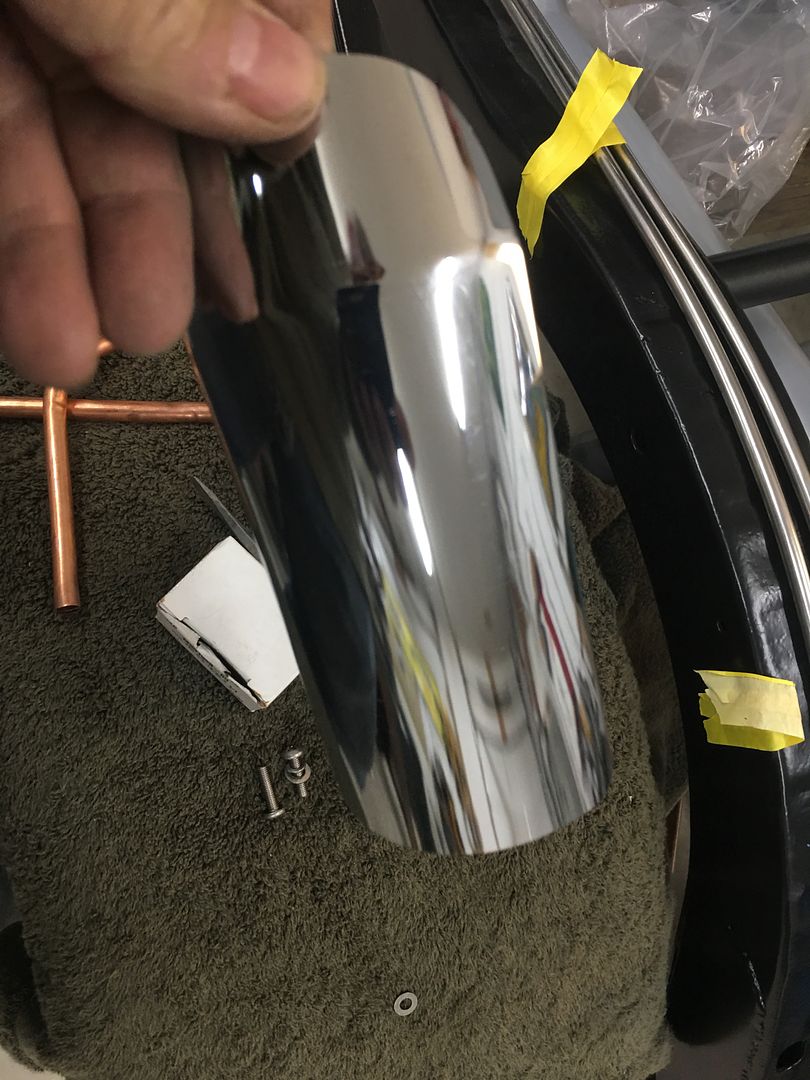 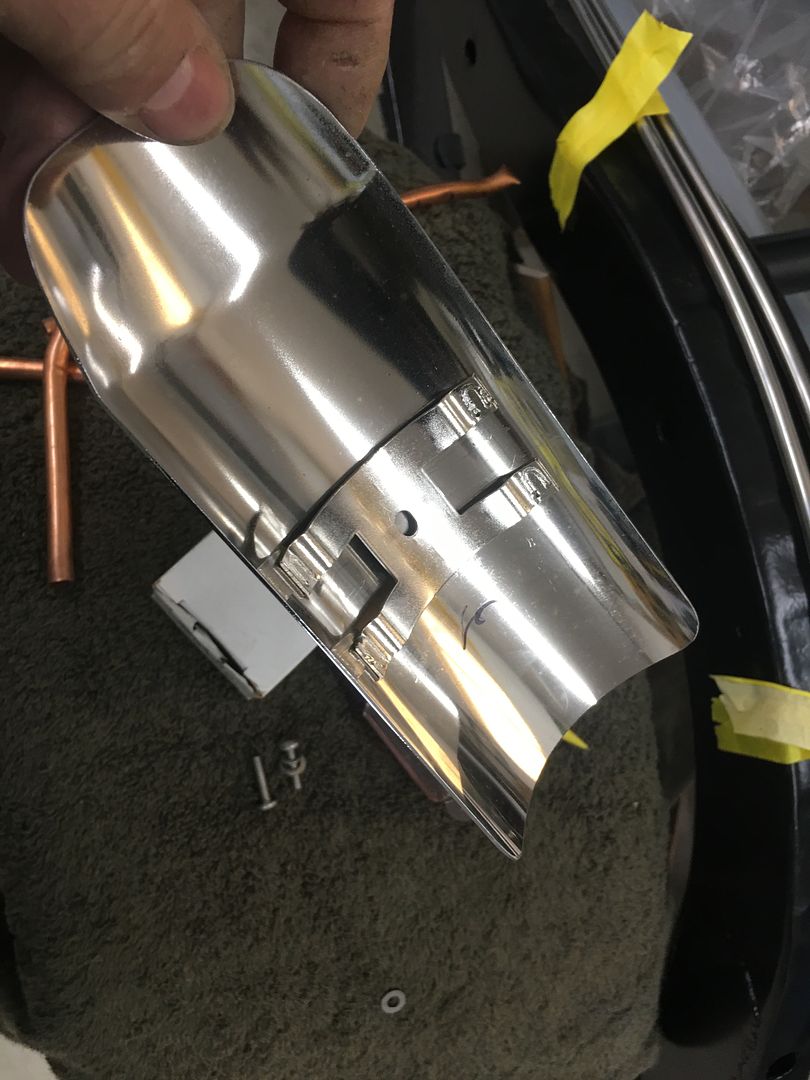 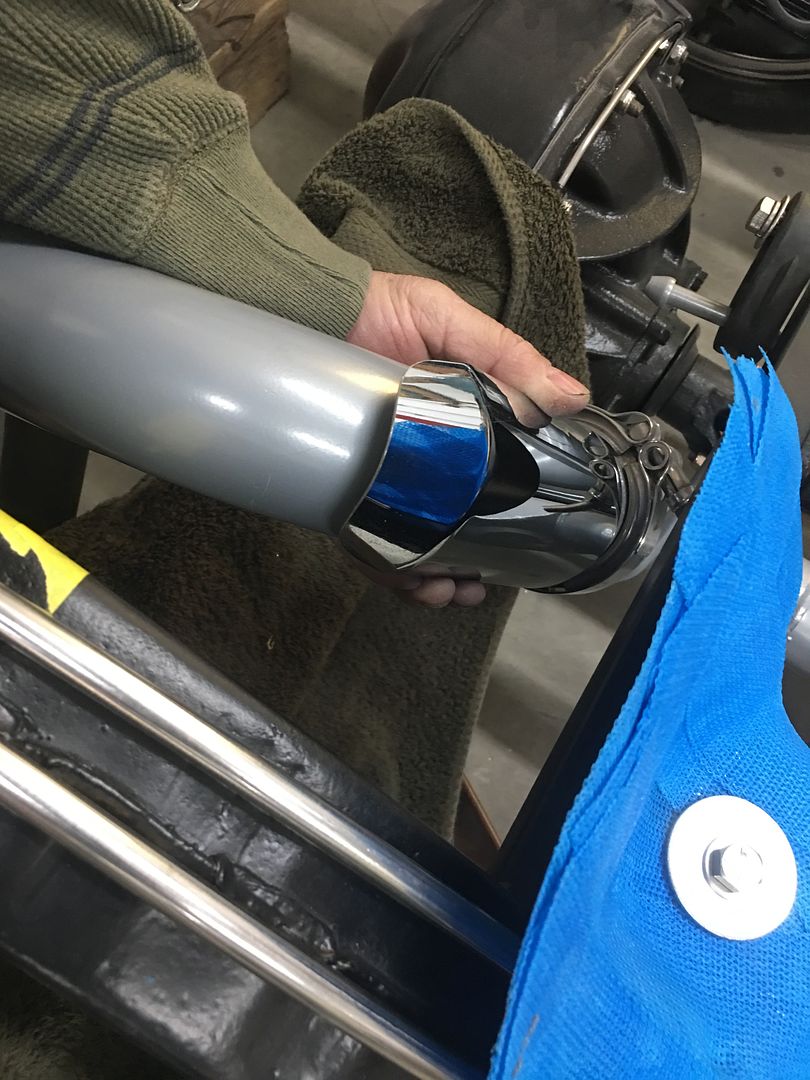 That should do. Next, we need to finish the kick panels for upholstery, which means mounting the speakers. The trim rings from cousin JB will need holes drilled to match the speakers. We have some button head allen screws we plan on using, but didn't really care for the surface mounted look... 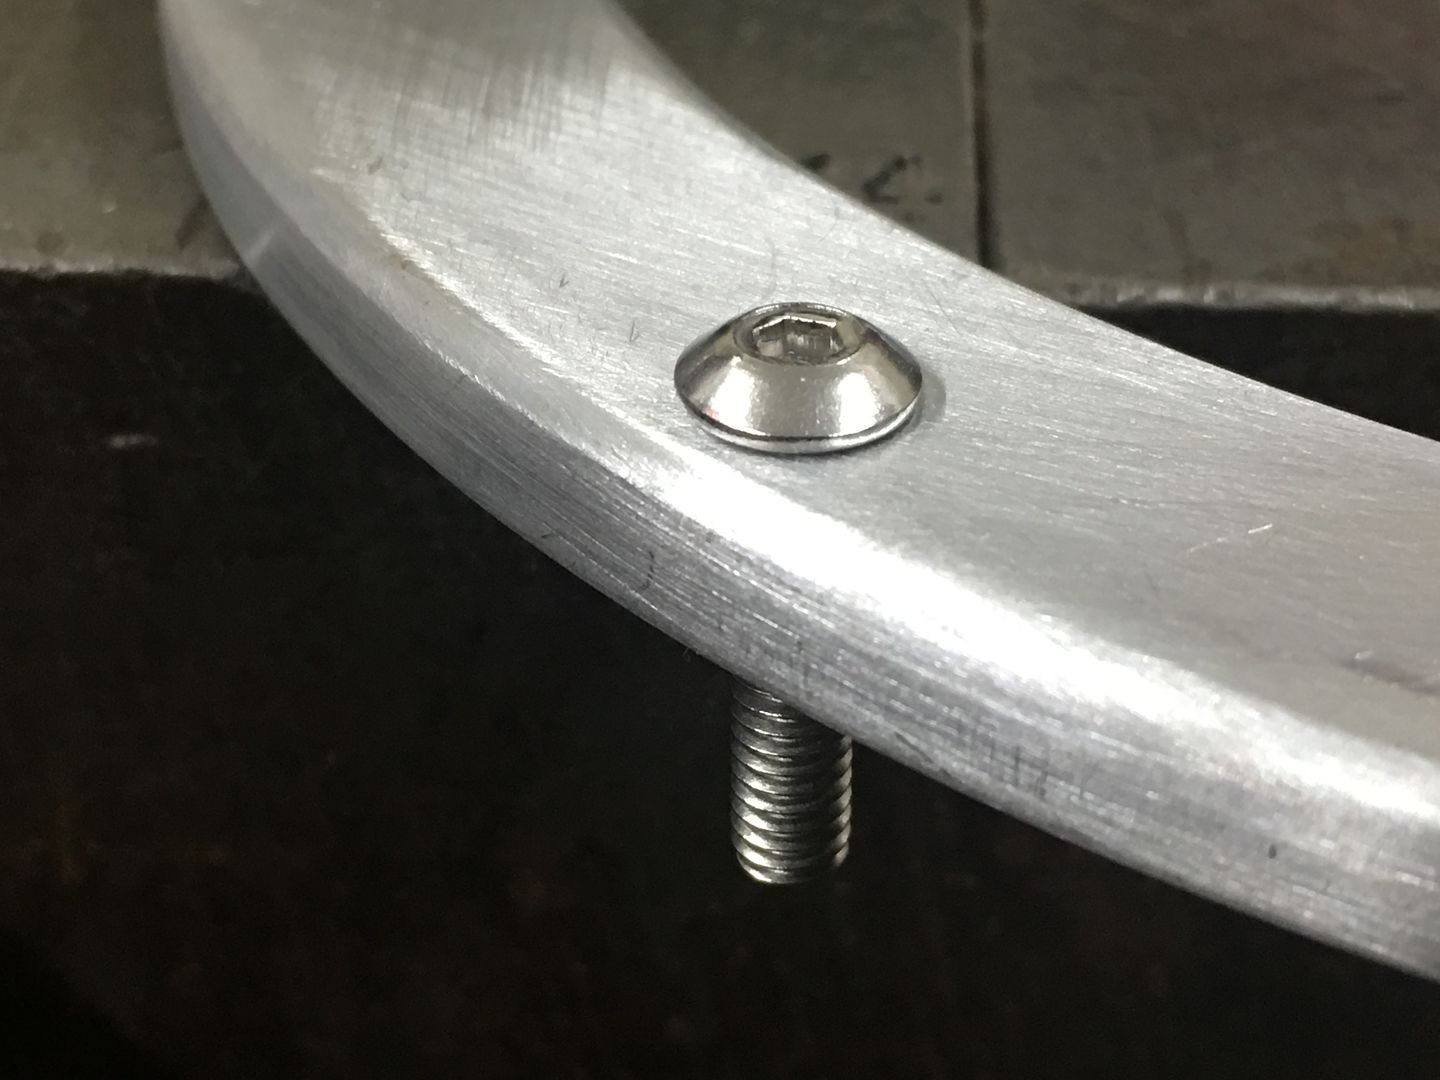 This would look so much better with the details of counterbored holes. Alas, the pitfalls of working on Saturdays without a local source. What's a person to do but make their own. The extended die grinder almost fits the Aloris tool holder too well, like it was made to be. https://www.youtube.com/watch?v=q38H...ature=youtu.be A 120 grit roloc sanding disc does well to backface the cutting edge and we are in business.. 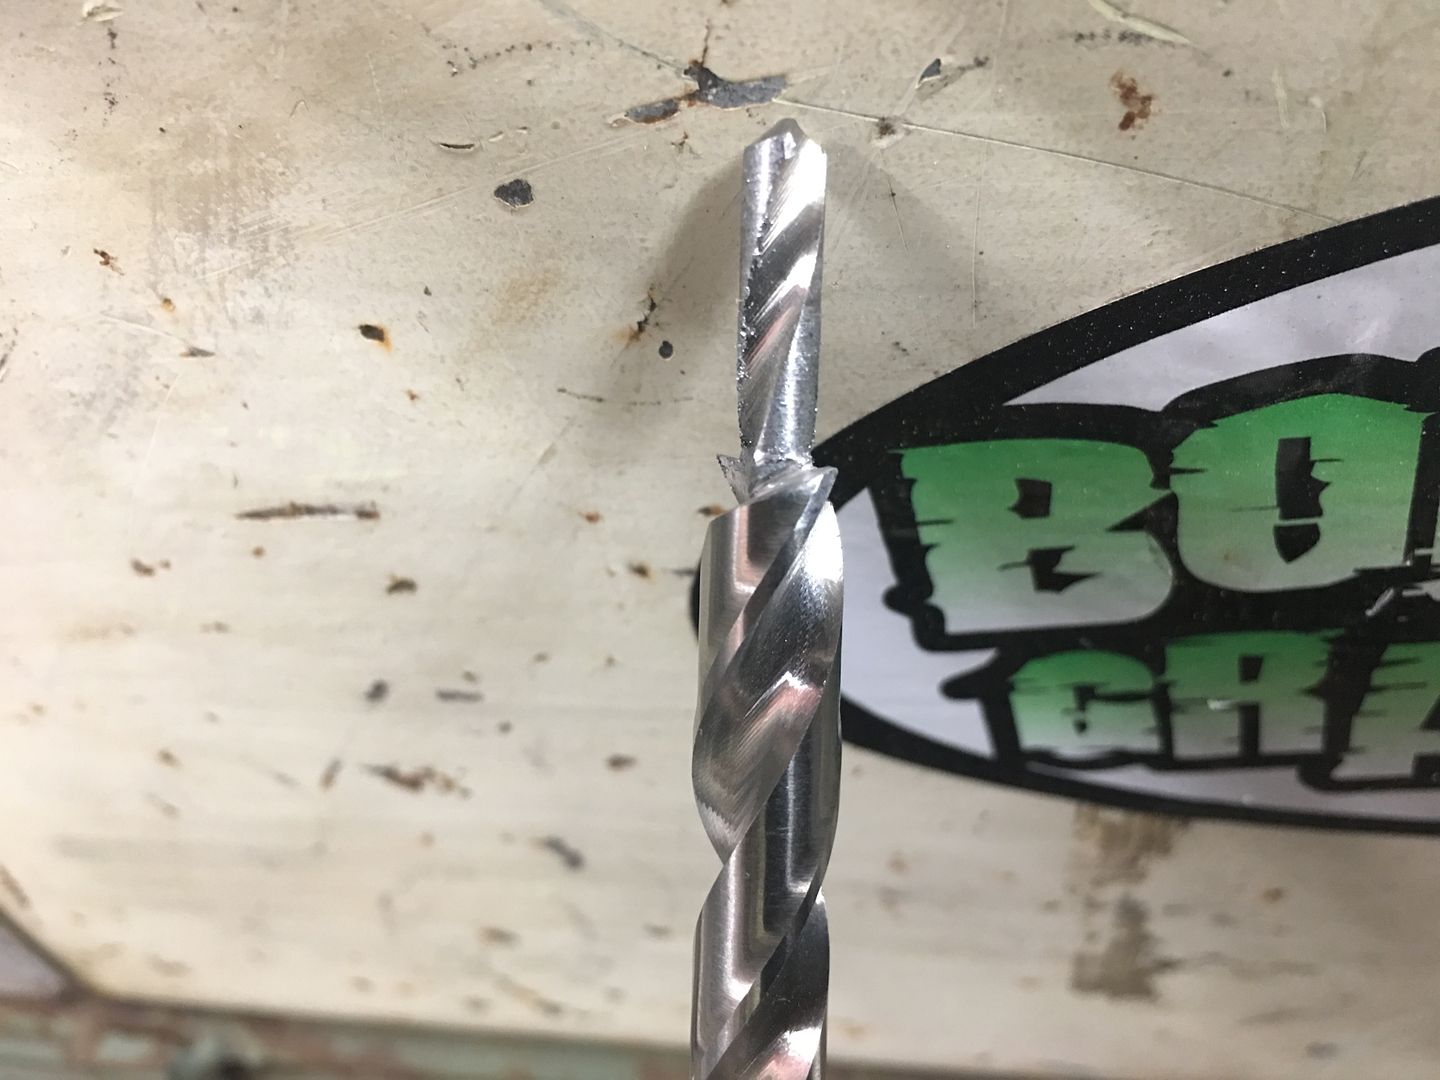 Much better, all in the details.. 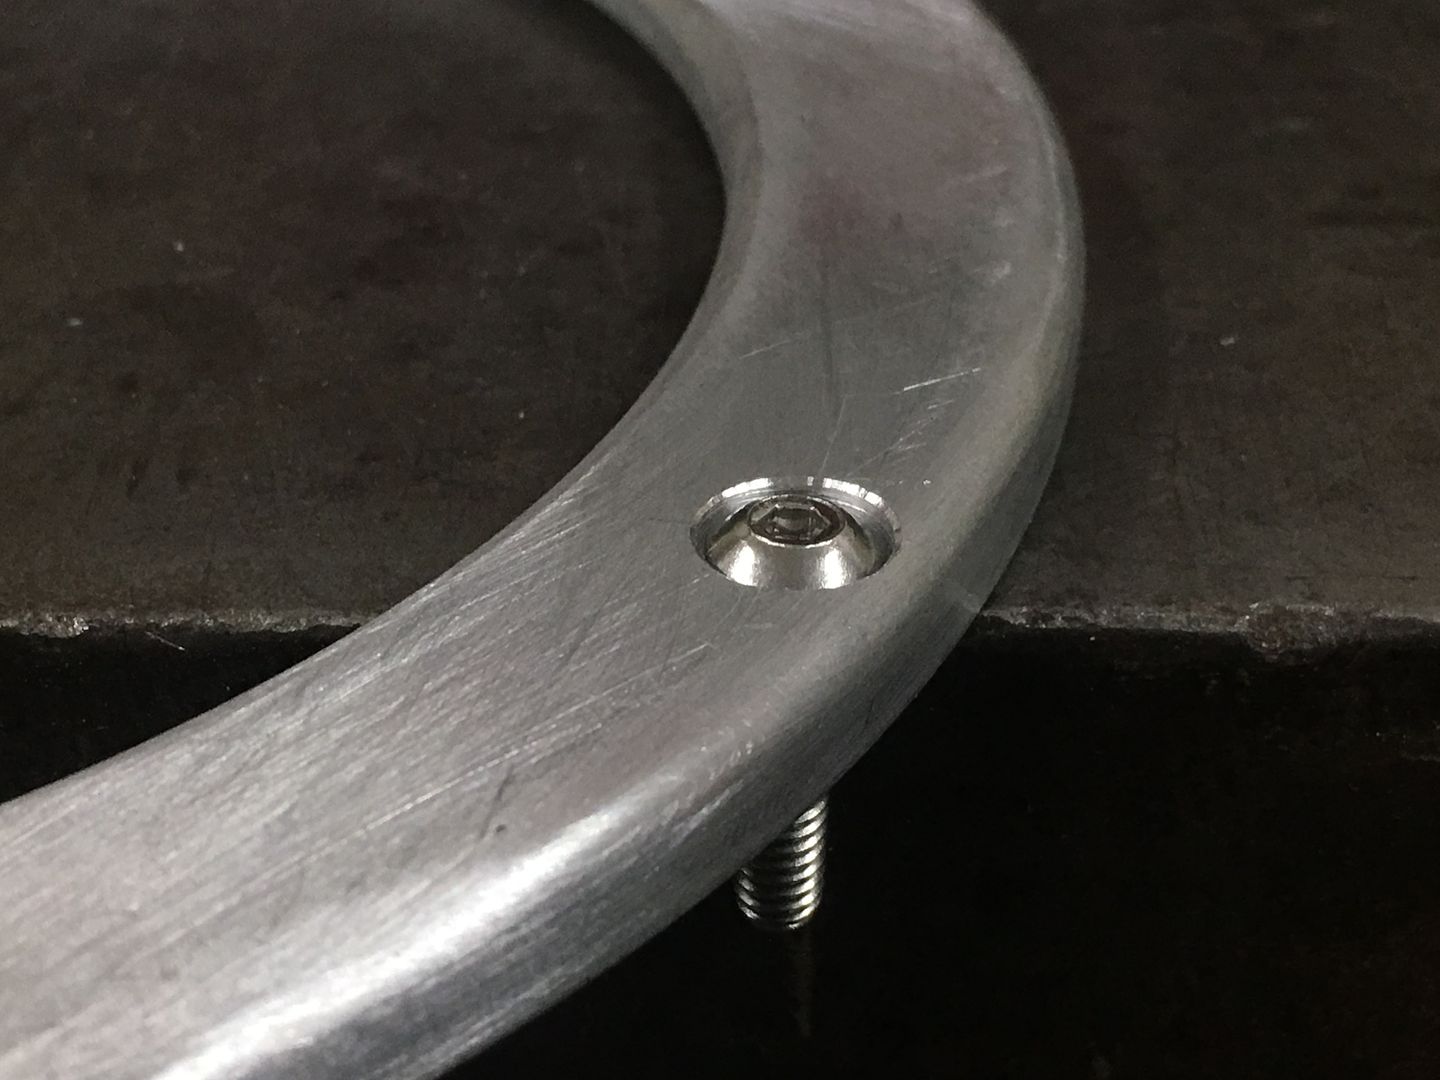 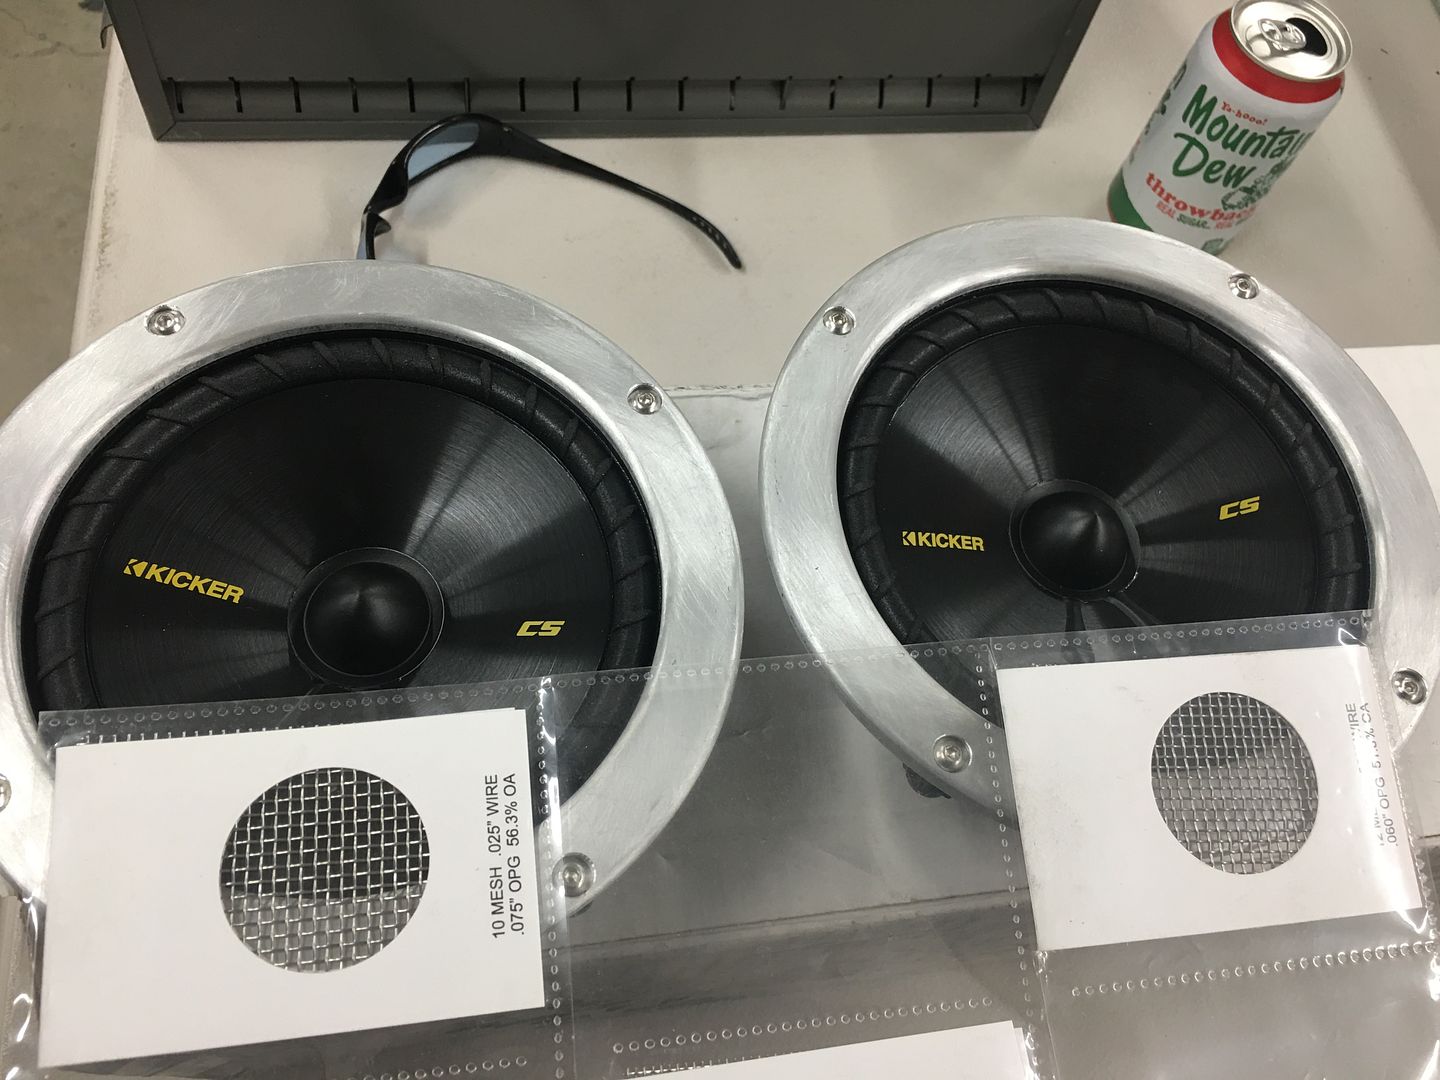 ….and adding the tweeters to the kick panel... 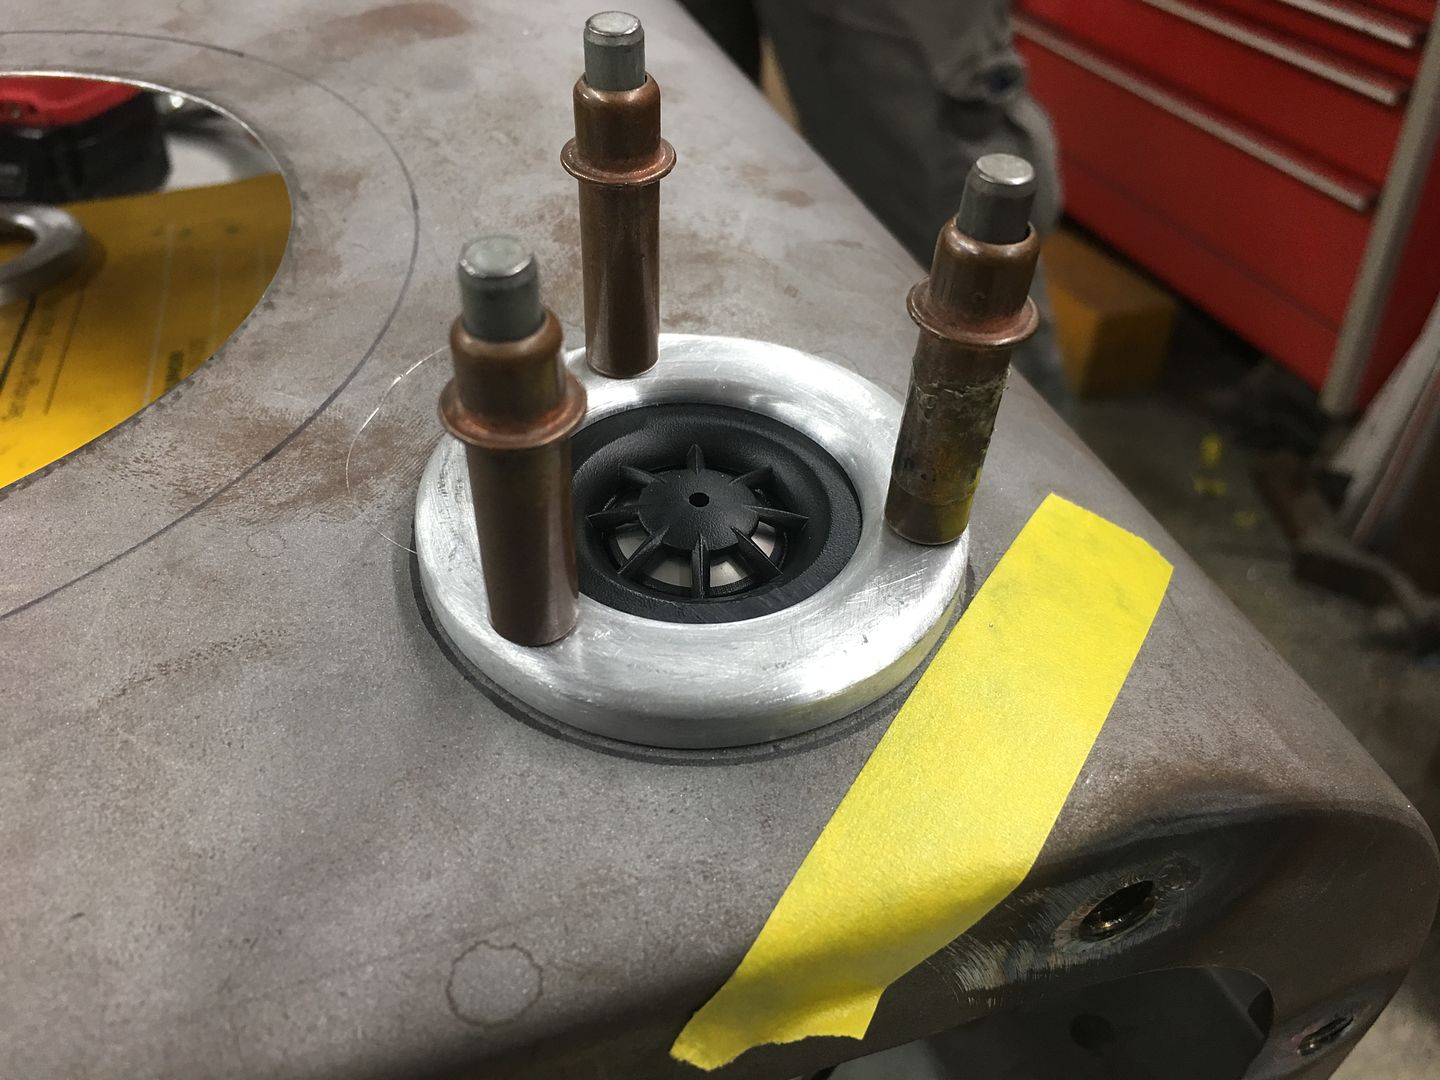
__________________
Robert |
|
|
|
|
02-11-2019, 10:17 AM
|
#23 |
|
Senior Member
Join Date: Mar 2011
Location: West Plains, Missouri
Posts: 7,555
|
Re: 55 Wagon Progress
Very nice as always...Jim
__________________
my build thread: http://67-72chevytrucks.com/vboard/s...d.php?t=459839 Jimbo's long bed step build:http://67-72chevytrucks.com/vboard/s...t=464626<br /> |
|
|
|
|
02-13-2019, 09:53 AM
|
#24 |
|
Registered User
Join Date: Jan 2013
Location: Leonardtown, MD
Posts: 1,637
|
Re: 55 Wagon Progress
Thanks Jim!
Took delivery yesterday of the 304 Stainless mesh for the speaker grills. 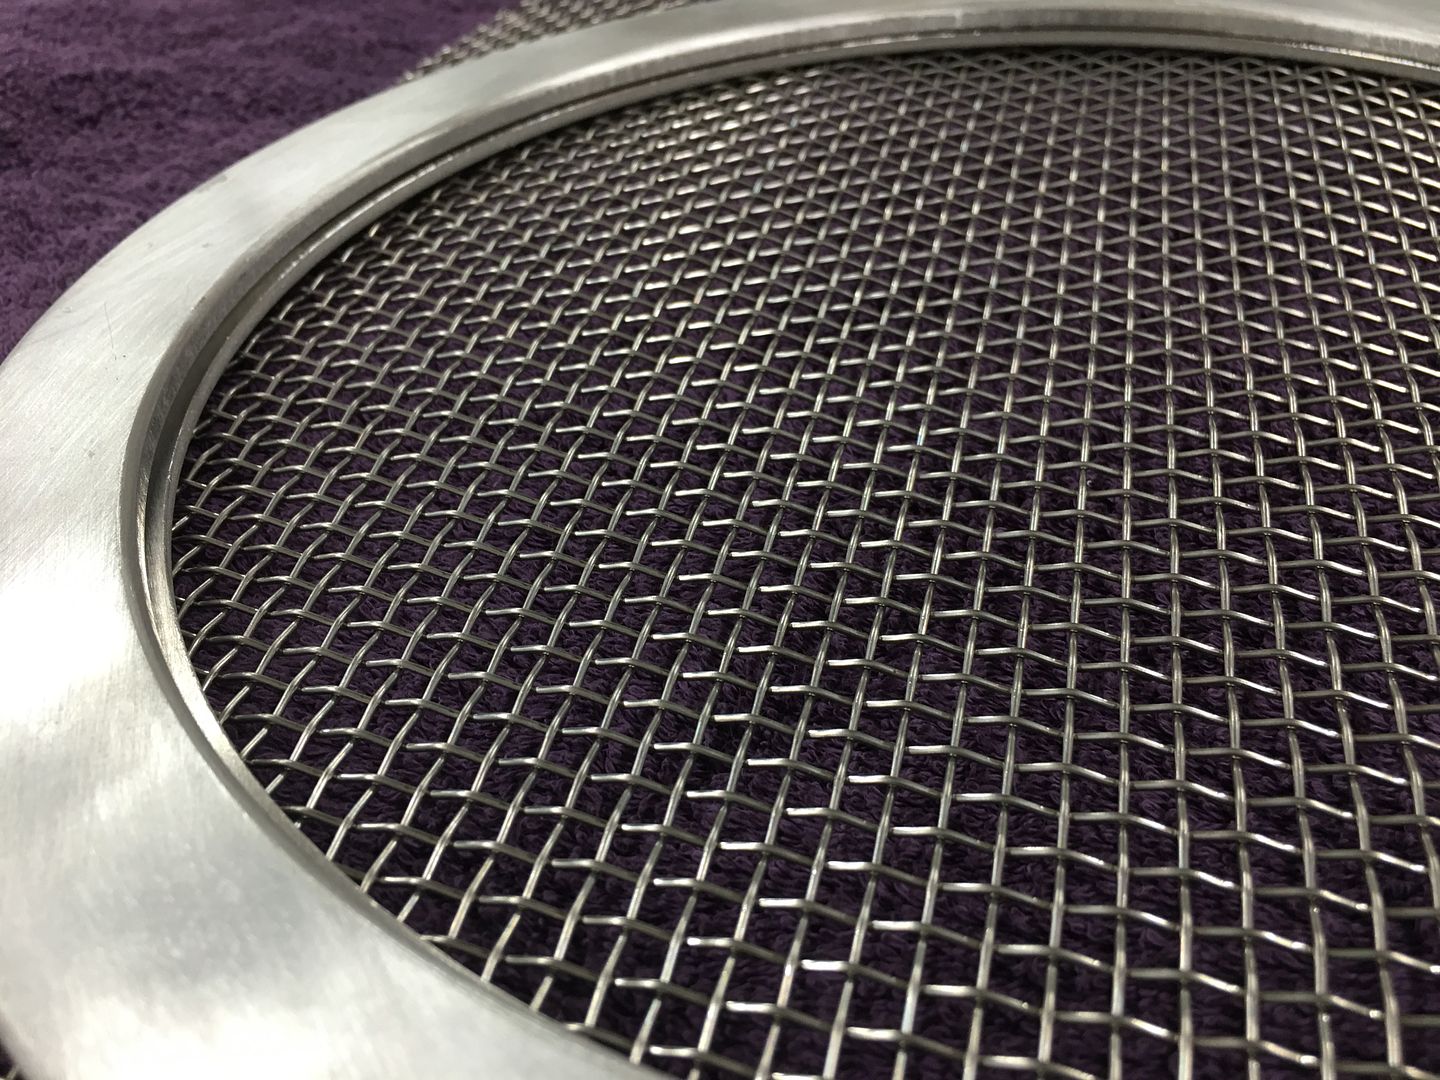 Just like we used different widths on the trim rings so they would be proportional to the diameter, with the mesh we used three different sizes as well.. 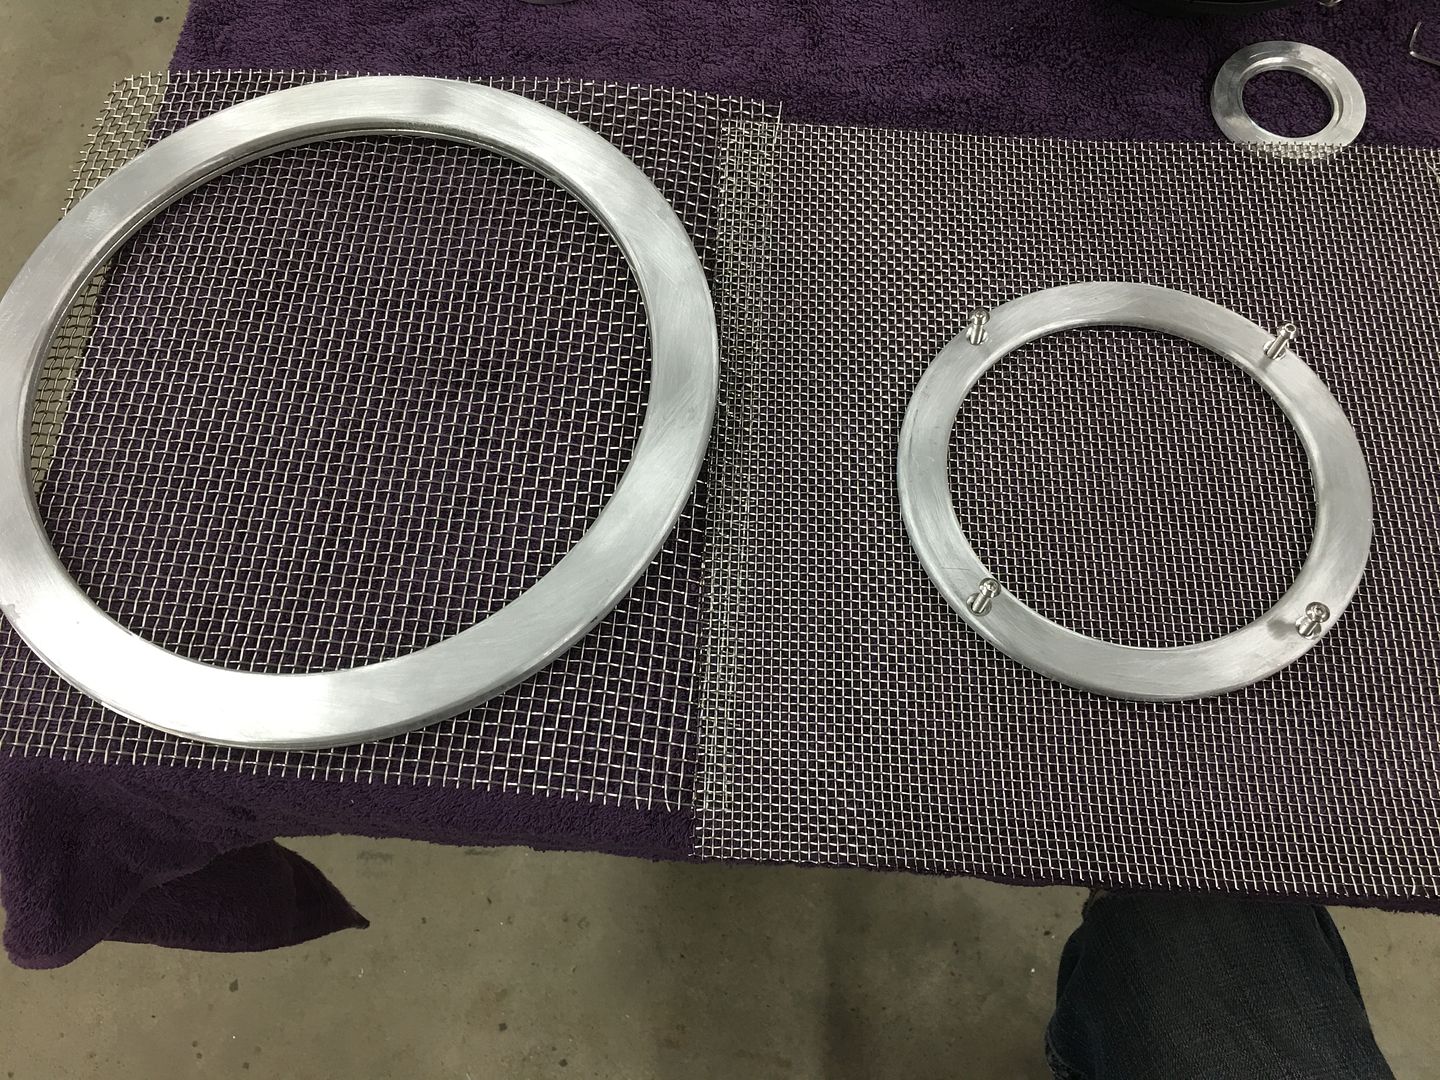  For the bass speaker grill we are also adding a BelAir emblem. The mesh will be recessed for that so the emblem is flush, then the remaining mesh will be pressed outward so it is flush with the surface of the trim ring. (or so) Now for the unofficial poll, would you orient the mesh straight across/up and down, or at a 45 degree rotation?  
__________________
Robert |
|
|
|
|
02-13-2019, 10:30 AM
|
#25 |
|
Registered User
Join Date: Dec 2012
Location: Pendleton, Indiana
Posts: 235
|
Re: 55 Wagon Progress
Robert, I'm going with the 45 degree rotation, but I'm sure the people with OCD will opt for straight.
 Rick |
|
|
|
 |
| Bookmarks |
|
|


 Hybrid Mode
