
 |
|
|
#1026 |
|
Registered User
Join Date: Sep 2012
Location: Leander, TX
Posts: 969
|
Re: Markeb01 Build Thread
Mark.
Love reading your build thread. Thanks for all the detail and photos you do. They are a pain in the ass but we all benefit from them. Any chance you can post more shots of your garage. Love seeing other guys workspaces. Bret
__________________
64' Build Thread http://67-72chevytrucks.com/vboard/s...d.php?t=586955 |
|
|

|
|
|
#1027 | |||
|
Senior Enthusiast
Join Date: Feb 2007
Location: Spokane Valley, WA
Posts: 8,356
|
Re: Markeb01 Build Thread
Quote:
Quote:
Quote:
And speaking of which, after spending the morning having the CRV serviced, my squeeze picked me up an electric carving knife to cut the foam. What a difference compared to shears or knives. I made a template for the button pattern, which will be identical for the backs and bottoms:  The foam was sliced oversize into the four tufting pads (2 backs and 2 bottoms), and marked with the layout pattern. These are the backs:  And these are the bottoms. Before the upholstery is started these foam pads will be trimmed to more precisely fit the seat cushions:  Tomorrow weíll be picking up more Naugahyde and some backing material. Then I get to hold up for a couple of days while I press out a couple hundred more buttons.
__________________
My Build Thread: http://67-72chevytrucks.com/vboard/s...d.php?t=444502 |
|||
|
|

|
|
|
#1028 |
|
Registered User
Join Date: Jun 2012
Location: Selkirk Ontario Canada
Posts: 1,141
|
Re: Markeb01 Build Thread
this is going to look cool
__________________
My 63 GMC Panel Slow Build http://67-72chevytrucks.com/vboard/s...=1#post5457281 63 
|
|
|

|
|
|
#1029 |
|
Senior Enthusiast
Join Date: Feb 2007
Location: Spokane Valley, WA
Posts: 8,356
|
Re: Markeb01 Build Thread
Hereís where the upholstery project sits as of today. 4 more yards of material were acquired. I was lucky they still carried the same exact brand and style so there wonít be any match up problems. With what I already have there will be plenty of surplus in case I figure out a way to do a headliner.
The dots transferred to the foam using the cardboard template were connected with green lines. When the holes are punched into the foam for the buttons, itís the intersection of the lines that are used, not the dots. The template it too imprecise, but serves well to layout the overall pattern.  The profile of the Procar foam seat cushions is vague and inexact. Drawing a line around the back cushion onto the foam resulted in a mess that could not be replicated for the second seat. It was so uneven it also could not insure the tufting would end up centered front to back or side to side when installed. As a result paper templates were created.  Initially these were traced around the cushions, after which the pattern was folded in half lengthwise and matched up for shape. This was fitted to the cushion and trimmed or built up with masking tape until a perfect fit was created, and a final master created. This was used to mark up the blue outline on the foam pads. These are the backs:  A second line was marked outboard as shown above. Iíll explain this shortly. The backside was also marked with the blue outline to be used in cutting the foam. The same process was done for the bottom seat foam. Template created, and foam marked top and bottom:   The foam pads will be sliced to size using the blue line on the reverse side, and the outboard line on the front surface. This results in a pad that sits even with the edges of the cushion, but extends outward at about 45 degrees all around the perimeter of the seat cushion. Having this larger surface on top allows for an invisible blending as the vinyl fabric is folded over the sides of the seat. I have a couple of options on what to do next - trim the foam pads to size, punch the button holes, or mark the fabric. Regardless, the project cannot proceed until I take a day or two and assemble all the buttons needed for the complete job. I can appreciate why diamond tufting cost so much back when it was popular. Just the materials cost a fortune, to say nothing for the hours of prep work before the actual labor begins creating the finished upholstery. In the meantime I determined I can actually get rid of the clunky stock inside door and window handles. Iíll get into the details when it comes to the installation, but I picked up a pair of late 50ís Corvette window winders (chrome knobs), and will match these with standard Chevy door handles:  Because the truck handles are flush on the back and the passenger car handles extend outward, these will move the handles further from the upholstery whether or not I use the ĹĒ extensions. I donít have an arm rest on the driver side of my truck because the factory location is too high and hurts my elbow. With the new tufting, Iím also removing the arm rest on the passenger side. I donít want to rely on yanking the door shut with the door handles, so Iím also adding 1933 Ford inside door pulls like these:  They will be mounted in the area above the door handles on the metal of the door just above the removable panel. Dangling on the tufting they should look pretty cool and be very handy. More to follow!
__________________
My Build Thread: http://67-72chevytrucks.com/vboard/s...d.php?t=444502 |
|
|

|
|
|
#1030 |
|
Registered User
Join Date: Apr 2012
Location: Searcy, AR
Posts: 4,203
|
Re: Markeb01 Build Thread
So cool!!!
 I especially like theDoor Pulls... 
__________________
DON Proverbs 27:17  US Air Force Retarded errr Retired My '65 Stepper Build:http://67-72chevytrucks.com/vboard/s...d.php?t=533920 My '60 Rusty Patina Build:http://67-72chevytrucks.com/vboard/s...66#post7402266 My '72 http://67-72chevytrucks.com/vboard/s...59#post7204359 SOLD |
|
|

|
|
|
#1031 |
|
Registered User
Join Date: Sep 2011
Location: Tacoma, WA
Posts: 2,425
|
Re: Markeb01 Build Thread
I like those door pulls as well !!
I remember well being a kid and having to pull the door closed with the release handle, and never liking that very much. Those are going to look very sharp I think. 
__________________
Michael McMurphy My 66 Stepside My 64 Tow Truck My 66 Tempest Table Of Contents Added to Page1 |
|
|

|
|
|
#1032 |
|
Registered User
Join Date: Aug 2013
Location: Ma.
Posts: 169
|
Re: Markeb01 Build Thread
Looking good, great detail! Looks like they're gonna be sweet! If you're nervous at all about how it's going to come out I'll send you my seats to practice on

__________________
Nice EASY project, no problem....until I get home  why is that? My build: http://67-72chevytrucks.com/vboard/s...d.php?t=595078 why is that? My build: http://67-72chevytrucks.com/vboard/s...d.php?t=595078
|
|
|

|
|
|
#1033 |
|
Registered User
Join Date: Nov 2011
Location: fayetteville nc
Posts: 10,338
|
Re: Markeb01 Build Thread
Ive only done reskins....so interested to see this as well.
__________________
1963 Short bed step side SBW 427 big block and borg warner T-16 HD 3 speed manual http://67-72chevytrucks.com/vboard/s...d.php?t=519869 1963 Short bed fleetside BBW 348 1st gen big block w/Powerglide http://67-72chevytrucks.com/vboard/s...d.php?t=619024 1964 Short bed trailer |
|
|

|
|
|
#1034 |
|
Senior Enthusiast
Join Date: Feb 2007
Location: Spokane Valley, WA
Posts: 8,356
|
Re: Markeb01 Build Thread
The door pulls showed up today, and look great. They fit perfectly where I want to install them, but that will have to wait until after the full size tufted door panels are completed. If I mounted them now they’d be clanging on the upper ridge of the removable door pan.
 Today the pads were angle trimmed to size, followed by punching the 1” button holes:  I’ve purchased professional cutters before, but they didn’t perform nearly as well as a sharpened length of pipe. The O.D. is sharpened on a belt sander, and the I.D. is sharpened with a sanding drum on a Dremel tool:  I always use a cap on top to avoid fragmenting the striking surface of the pipe:  The cap needs to be replaced with almost every job as it takes such a beating, the center eventually fractures out. I’ll probably go through 2 or 3 caps on the door panel project:  To insure maximum life of the cutting edge, the foam is placed on 2 layers of corrugated cardboard above a ĺ” piece of sacrificial plywood. Here’s the best method I have found to insure the cutter is centered exactly over the indication marks; 1. Press down firmly enough with the pipe to leave an impression in the foam. 2. Quickly lift the cutter and double check the positioning of the impression with the marks on the foam. This must be done quickly as the impression will disappear almost immediately. 3. Adjust the position (several times if needed). 4. Once the pipe is perfectly located over the mark, press down as hard as possible with the off hand to compress the foam. This keeps the hole straight up and down. 5. Bash the pipe cap with the hammer in the power hand. I use this 3 pound hammer: 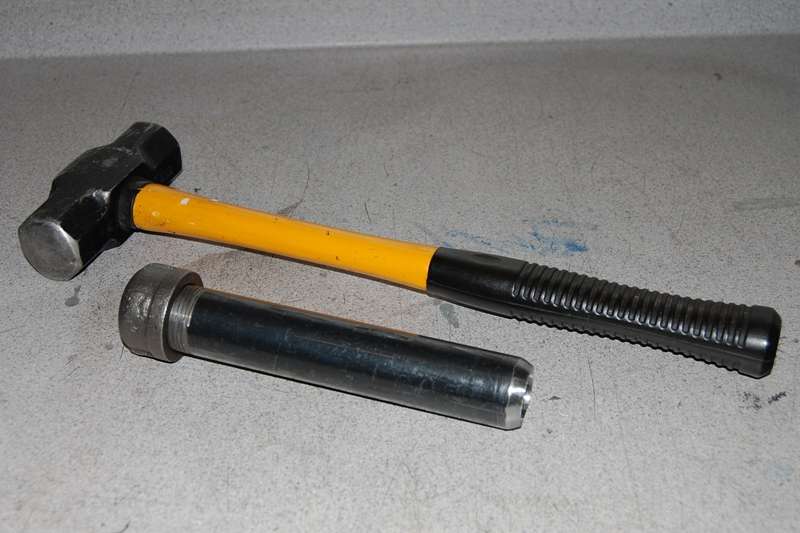 I strike the cap in a circular fashion between 3-5 times for a clean cut, depending on how many holes I’ve already cut and how tired I’m getting. It doesn’t take long to become fatigued holding maximum down force compressing the foam with one hand and swinging the hammer with the other. I’d rather take a few breaks rather than miss the pipe and bust my holding arm with a 3 pound hammer blow. Once the foam was finished, button backers were created out of door panel material:  These will reside behind the foam to retain the prong buttons. They were laid out, marked, cut/trimmed, and punched with ľ” holes using a cheap Harbor Freight hollow punch: 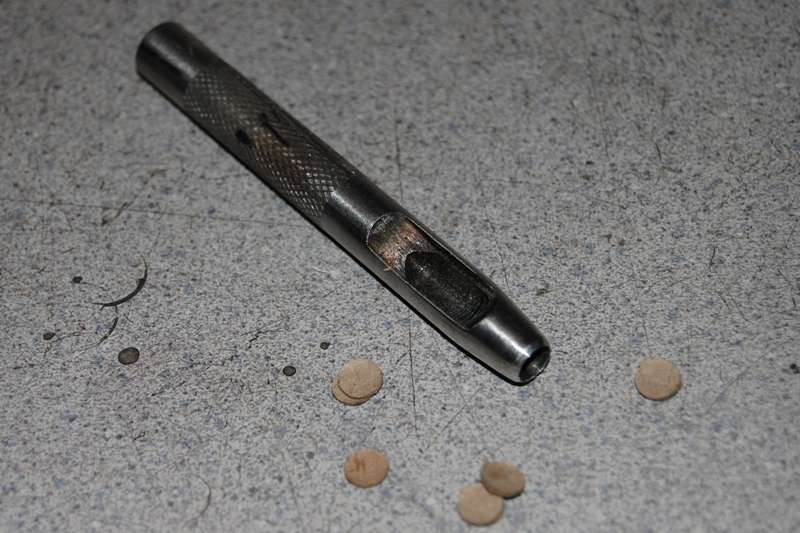 Tomorrow I’ll either start working on the Naugahyde, or fabricate buttons. I’m looking forward to being done with all this prep work and actually get started on the upholstery. I realize most of this information is tedious and boring, but I’m hopeful it will come in handy for the few people that may find enthusiasm once the seats and door panels are completed and the finished result may generate more interest in this process.
__________________
My Build Thread: http://67-72chevytrucks.com/vboard/s...d.php?t=444502 Last edited by markeb01; 10-28-2013 at 10:55 PM. |
|
|

|
|
|
#1035 |
|
Registered User
Join Date: Apr 2012
Location: Searcy, AR
Posts: 4,203
|
Re: Markeb01 Build Thread
Awesome Write-Up per your usual attention to detail...
 Thank You for your diligence! 
__________________
DON Proverbs 27:17  US Air Force Retarded errr Retired My '65 Stepper Build:http://67-72chevytrucks.com/vboard/s...d.php?t=533920 My '60 Rusty Patina Build:http://67-72chevytrucks.com/vboard/s...66#post7402266 My '72 http://67-72chevytrucks.com/vboard/s...59#post7204359 SOLD |
|
|

|
|
|
#1036 |
|
Rollin' Old Skool
Join Date: Jun 2007
Location: Hattiesburg, MS
Posts: 5,371
|
Re: Markeb01 Build Thread
x2...and even if it's something I'll likely never do, it's great to follow the process...I know it'll come in handy for some other fellow forum member(s)
__________________
_____________________________________________ Phillip My Build threads: 1966 Chevy C-10 "Black Betty" shortbed, fleetside, BBW, 327 V8/ Powerglide (under construction) http://67-72chevytrucks.com/vboard/s...ighlight=betty 1997 Chevy Tahoe, 2dr/2wd, mild custom (Daily driver) http://67-72chevytrucks.com/vboard/s...d.php?t=601142 Pics: '66 C-10 https://flic.kr/s/aHsjHWD4h9 '97 Tahoe https://flic.kr/s/aHsjGZ7wKP '93 C-1500 https://flic.kr/s/aHskxdpdnQ '88 S-10 Blazer https://flic.kr/s/aHsjYGx4Md Previous Rides: 1993 Chevy S-10 ext. cab, 4.3L, 4/5 drop (Sold) 1993 Chevy C-1500 short/step Retro-Rod (Sold) 1988 S-10 Blazer 2dr/2wd mild custom (Sold) |
|
|

|
|
|
#1037 |
|
Registered User
Join Date: Jun 2012
Location: Selkirk Ontario Canada
Posts: 1,141
|
Re: Markeb01 Build Thread
Quote:
__________________
My 63 GMC Panel Slow Build http://67-72chevytrucks.com/vboard/s...=1#post5457281 63 
|
|
|

|
|
|
#1038 |
|
Senior Enthusiast
Join Date: Feb 2007
Location: Spokane Valley, WA
Posts: 8,356
|
Re: Markeb01 Build Thread
That's correct however in this application Iím using prong buttons instead of thread and loop buttons. The area between the holes in the foam is what actually support the tufts:
Prong buttons start out as a base and a cap. Covers are cut from the material being tufted, and the components are assembled in a button press:  This is the Osborne manual style press Iím using. Itís tedious to operate but very dependable: 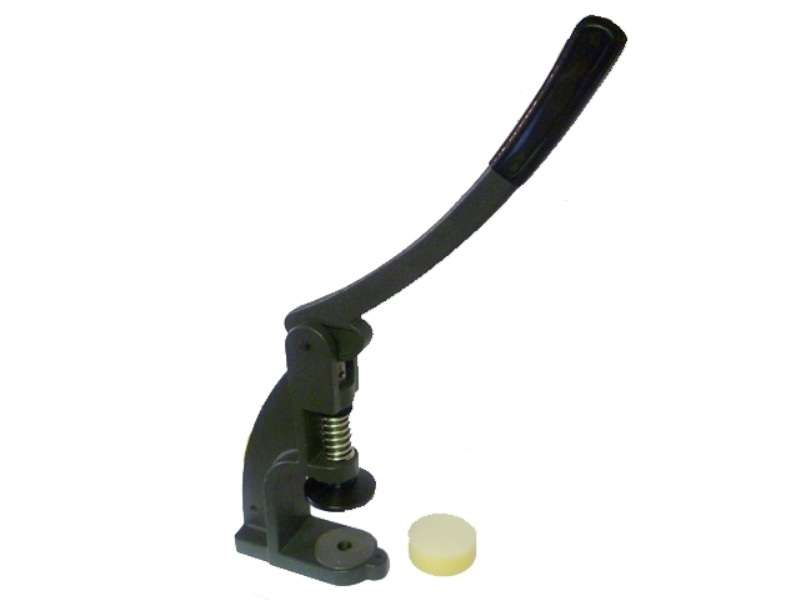 It takes finesse and experience to complete perfect buttons. With vinyl materials tiny portions of the cover tend to stick out from under the cap, leading to eventual button failure. Just the right amount of pressure is required to avoid this defect. This is true for either prong or loop style buttons. This is what prong buttons look like on the backside of a door panel which was backed by ABS sheet:  On the seats the backing material is door panel fiber/cardboard which will conform to the shape of the seat cushion. The method Iím using is referred to as ďtufting off the jobĒ, where the upholstery is attached after the tufting is formed. I prefer this method as the factory seat cushions have depressions and slots molded in which could result in an uneven surface.
__________________
My Build Thread: http://67-72chevytrucks.com/vboard/s...d.php?t=444502 |
|
|

|
|
|
#1039 |
|
Registered User
Join Date: Nov 2011
Location: fayetteville nc
Posts: 10,338
|
Re: Markeb01 Build Thread
I use spent cartridge cases from shooting for all my punches.... .50 for 1/2", .25 for 1/4", but I don't have anything that large. The brass cartridges work great for small stuff though. I like the large punch you made.
__________________
1963 Short bed step side SBW 427 big block and borg warner T-16 HD 3 speed manual http://67-72chevytrucks.com/vboard/s...d.php?t=519869 1963 Short bed fleetside BBW 348 1st gen big block w/Powerglide http://67-72chevytrucks.com/vboard/s...d.php?t=619024 1964 Short bed trailer |
|
|

|
|
|
#1040 |
|
Senior Enthusiast
Join Date: Feb 2007
Location: Spokane Valley, WA
Posts: 8,356
|
Re: Markeb01 Build Thread
I wouldnít have thought of cartridge casings for punches. Sounds like a good idea for smaller projects. Between my son and I we have a variety of 22, 9mm and 45 Long Colt cases.
Yesterday I finished up all the work on the foam pads and started laying out the Naugahyde. I discovered I had underestimated the amount needed for each seat cushion, so we picked up some additional yardage this morning. Before any cutting, all the dimensional data was double checked and reconfirmed:   Centerlines were marked on the back of each of the 4 pieces: Rather than having to measure and mark the tufting pattern on all 4 ďseat coversĒ, another template was created so Iíd only have to do the measuring once:  And hereís the last of the marked up seat covers:  Each of the dots will be pierced with an awl for insertion of the button prongs. In this instance the lines primarily serve as a visual aid when folding the pleats/diamonds. Accuracy validation is secondary, since the holes in the template are very small to keep the marking dots precise. Tomorrow the button factory goes into production! Once theyíre completed I can finally get started on forming the upholstery.
__________________
My Build Thread: http://67-72chevytrucks.com/vboard/s...d.php?t=444502 |
|
|

|
|
|
#1041 |
|
Senior Enthusiast
Join Date: Feb 2007
Location: Spokane Valley, WA
Posts: 8,356
|
Re: Markeb01 Build Thread
Yesterday was consumed with button making. Cutting the covers took about 4 hours, punching approximately 400, five at a time. Once everything was reset it took until 22:15 to assemble just shy of 300 completed buttons. I should have been able to complete about 60 more buttons, but I received a short count on the 720 caps the box was supposed to contain. In any event I have enough finished buttons to complete both seats and both door panels.
Iím not sure if I ever mentioned it before, but a big advantage of tufted upholstery is that no sewing machine is required. This was the primary method of upholstery back in the horse and buggy days, which carried over into brass era cars for the same reason. The biggest change being the use of foam instead of horse hair for stuffing. Following is what is involved in making covered upholstery buttons for anyone who may have interest: The first step is cutting covers from the upholstery material. The cutter is made of hardened tool steel and looks similar to the foam cutting pipe. Here it is seen set up to punch covers out of assorted scrap pieces:  The instructions indicate using a block of wood to support the cut, but I use a piece of Delrin since it doesnít deform (which ultimately messes up the clean edge of the cut pieces.  In order to minimize dulling of the cutting edge, I use multiple pieces of single layer non-corrugated cardboard for a support pad:  This is the type used to make cereal, Kleenex, and soda pop boxes. Many of the postcards in junk mail work well also. Corrugated doesnít work well as it doesnít provide a hard enough surface for a clean cut. When Iím ďin the zoneĒ I can routinely cut through the fabric and stop at the top layer of cardboard. If the holes in the cardboard donít fall out of position, the fabric can be shifted around and new holes punched numerous times before the cardboard disintegrates and must be replaced. Material can be stacked up or folded over to punch multiple covers simultaneously. Iíve found that a group of 5 is the most I can punch for maximum production. This also makes it easy to keep count on how many have been completed, since 2 batches makes one stack of 10. Trying to punch 6 or more and the edge of the covers start to come out frayed. Here the setup is showing matching strips of fabric before and after being punched:  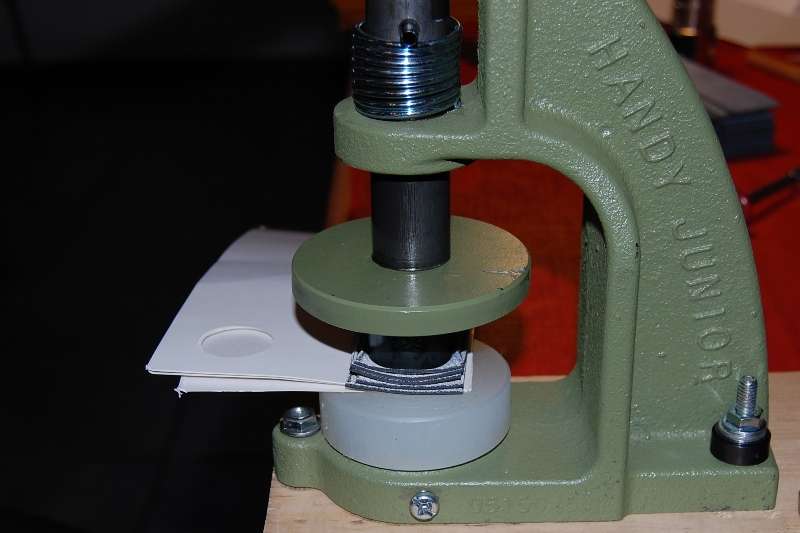 And here a folded piece of vinyl has just been punched:  There are two inherent problems with this method. Itís hard to insure everything is lined up correctly, so itís easy to create defective covers missing a piece of fabric as shown at the bottom of this photo. The other problem is waste. The top piece has been folded while the bottom was one layer of matched strips:  If enough surplus material is available, itís much easier to produce perfect covers if strips of material are cut into matching sizes. My wife happens to have an Olfa cutting wheel and cutting pads which makes fast work of cutting the scrap to size:  And this is the result. It increases speed by about 70% compared to working with odd sized scrap or folding. It also makes it easier to calculate how much material is needed for how many button covers:  Several hours later here are 390+ covers: 
__________________
My Build Thread: http://67-72chevytrucks.com/vboard/s...d.php?t=444502 |
|
|

|
|
|
#1042 |
|
Senior Enthusiast
Join Date: Feb 2007
Location: Spokane Valley, WA
Posts: 8,356
|
Re: Markeb01 Build Thread
Moving on to assembling the buttons, here the Delrin block has been removed from the anvil:
 And this is showing the bottom of the lower die set:  It is slipped into the hole in the anvil and tightened in place:  Next a button back, base, or prong button is inserted into the lower die:   It just drops into place. This is what it looks like fully seated:  It is imperative to check this every time a button is to be assembled, and also to develop and stick with whatever consistent sequence of assembly works. If the button back/base/prong is left out, a cap and cover will wasted when they are seated against an empty hole. This shows the upper half of the die on the right, a 1” socket, the dowel that came with the press, and a ľ” nut driver. The curved depression in the center of the die is where the cover and cap will reside:  And this shows the upper die with the cap plunger extended:  The number 22 is the size of buttons I am making. And this shows the purpose of the socket. Dropping the die into the socket allows the plunger to extend, and provides a sturdy support making it easy to insert the cover and cap. This is a dedicated socket that resides with the button making equipment:  A cover is placed face down on the upper die: 
__________________
My Build Thread: http://67-72chevytrucks.com/vboard/s...d.php?t=444502 |
|
|

|
|
|
#1043 |
|
Senior Enthusiast
Join Date: Feb 2007
Location: Spokane Valley, WA
Posts: 8,356
|
Re: Markeb01 Build Thread
And the edges have been smoothed inside the rim of the die:
 A cap is centered on the cover (I was going quickly taking the pictures. I would never form a button with the cap this far off center. Before inserting into the die they always dead center.): 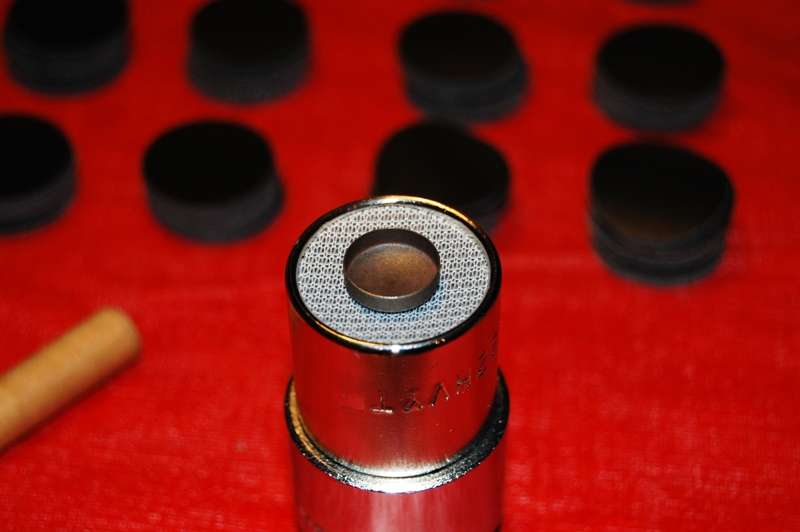 This is the “stick” that comes with the press. I find it hard extremely fatiguing and hard to insure perfect alignment so I don’t use it: 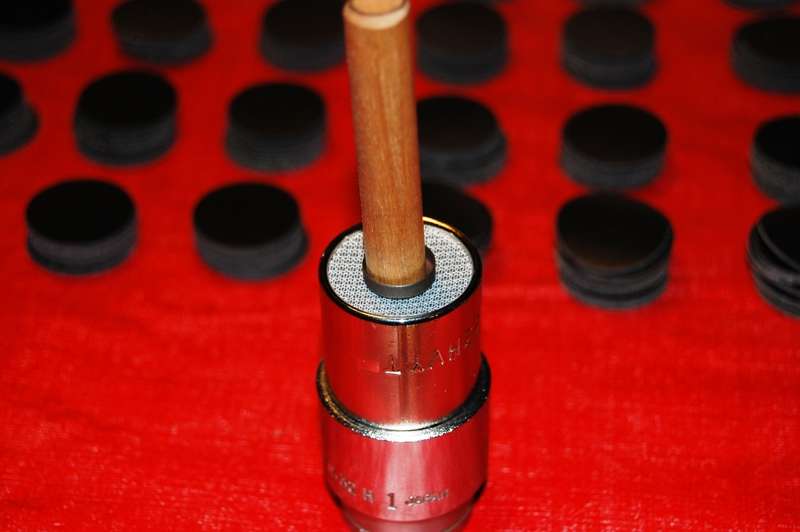 I use a ľ” nut driver instead:  At this point the cover and cap are fully seated. It’s obvious right away if the alignment is bad as more of the cover will be showing on one side:  And this I learned from experience. When the cap & cover are inserted, they generally look like this: 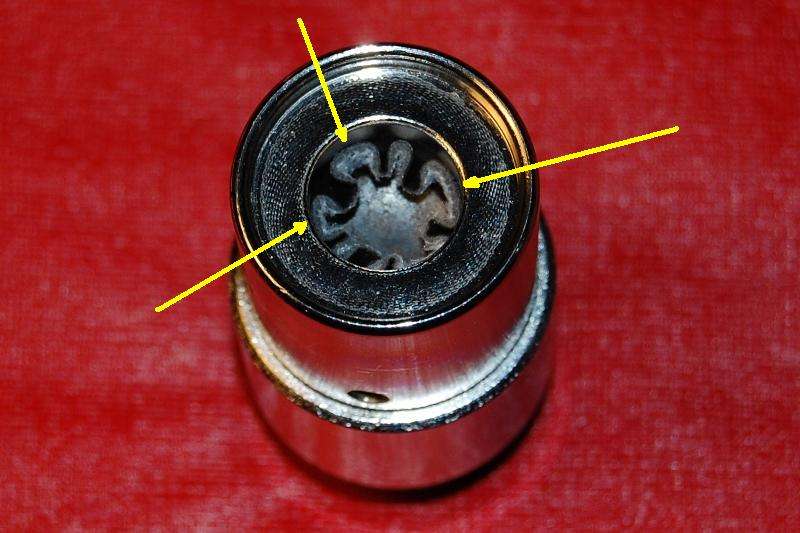 If the button is assembled with the cover looking like this, it will likely have sharp edges/corners around the perimeter of the cap (along the bottom face of the button head) and is likely to fail sometime in the future. In order to prevent this, I take a sharp sewing awl and make little puckers out of all the big ones:  This is tedious, boring, wears my hands out, and adds a tremendous amount of time to the process. It also makes the buttons turn out perfect every time: Now we’re finally ready to make a button. After reconfirming there is a prong back in the lower die, the upper die is placed on top of the lower die:  And the plunger has been depressed, assembling the button:  Too little pressure and the cap may/will come off. Too much pressure will cut the fabric around the bottom of the cap, or can damage the upper surface of the button. I have developed the habit of quickly compressing the springs in the press, then using both hands I give it one steady firm pull straight down. It took quite a while to find that magic sweet spot.
__________________
My Build Thread: http://67-72chevytrucks.com/vboard/s...d.php?t=444502 |
|
|

|
|
|
#1044 |
|
Senior Enthusiast
Join Date: Feb 2007
Location: Spokane Valley, WA
Posts: 8,356
|
Re: Markeb01 Build Thread
With the upper half of the die removed, we see the finished button:
 I make sure to NOT trim my fingernails before making upholstery buttons, as fingernails come in handy extracting the button from the lower die: Here’s the finished product. All this for one button!  And here we have a stack of roughly 300 assembled buttons:   Now I’m really enthusiastic about starting the upholstery, but it may be delayed a day or two while my hands and fingers recover. And since we’re expecting snow in the next day or two I’ll be out putting on snow tires this afternoon! It’s always something.
__________________
My Build Thread: http://67-72chevytrucks.com/vboard/s...d.php?t=444502 |
|
|

|
|
|
#1045 |
|
Rollin' Old Skool
Join Date: Jun 2007
Location: Hattiesburg, MS
Posts: 5,371
|
Re: Markeb01 Build Thread
My wife would never survive! She complains just punching holes in the pumpkin carving template for Halloween.
 ....great work, & I hope your hands recover quickly....those are some pretty buttons...I guess if you get snowed in, at least you have something to keep you busy. ....great work, & I hope your hands recover quickly....those are some pretty buttons...I guess if you get snowed in, at least you have something to keep you busy. 
__________________
_____________________________________________ Phillip My Build threads: 1966 Chevy C-10 "Black Betty" shortbed, fleetside, BBW, 327 V8/ Powerglide (under construction) http://67-72chevytrucks.com/vboard/s...ighlight=betty 1997 Chevy Tahoe, 2dr/2wd, mild custom (Daily driver) http://67-72chevytrucks.com/vboard/s...d.php?t=601142 Pics: '66 C-10 https://flic.kr/s/aHsjHWD4h9 '97 Tahoe https://flic.kr/s/aHsjGZ7wKP '93 C-1500 https://flic.kr/s/aHskxdpdnQ '88 S-10 Blazer https://flic.kr/s/aHsjYGx4Md Previous Rides: 1993 Chevy S-10 ext. cab, 4.3L, 4/5 drop (Sold) 1993 Chevy C-1500 short/step Retro-Rod (Sold) 1988 S-10 Blazer 2dr/2wd mild custom (Sold) |
|
|

|
|
|
#1046 |
|
Senior Enthusiast
Join Date: Feb 2007
Location: Spokane Valley, WA
Posts: 8,356
|
Re: Markeb01 Build Thread
Thatís why I tend to do this type of work in the winter, because I canít go out and do anything else thatís more enjoyable. This type of upholstery is not fun, itís miserable. But the end result is rewarding if it comes out right.
Hereís the first seat back rough tufted: 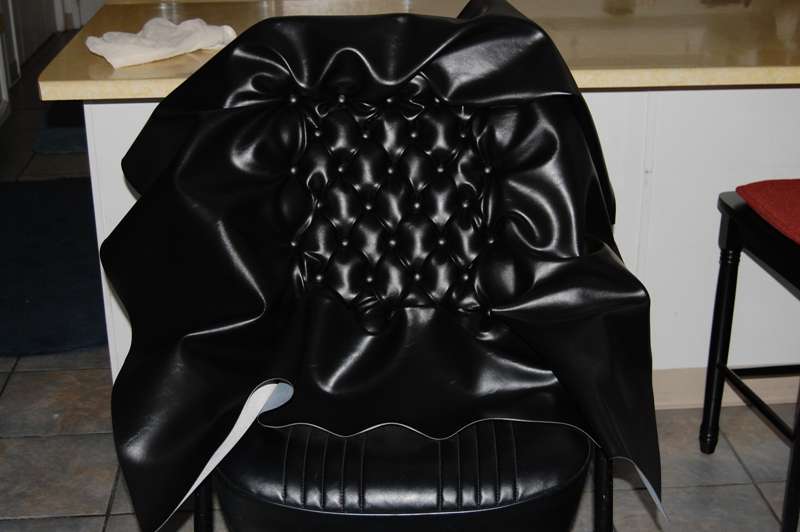 All the buttons are in and the mass of the center diamonds are formed. On a seat back, the 1st row of buttons begins on the bottom and works towards the top. When tufting the seat cushion, the diamonds start at the front and work toward the back. This is to insure that every diamond fold is always facing down or forward. This allows the seat to be wiped clean in a down or forward motion rather than trapping debris if the folds face the other direction. Normally the 1st row of buttons would go in, followed by forming half diamonds when the 2nd row of buttons is installed. When the 3rd row is in place the 1st set of full diamonds can be formed. This process is repeated one row at a time until finished. Because these late 60ís style of diamonds are so small, the individual tufts wonít hold a permanent set until the entire cover is stretched, pleated and fastened in place. This allows me to go ahead and attach all the buttons in one sitting with only minor attention to the diamond folds until Iím done with the buttons. As soon as my hands will permit, the next step is attaching the upholstery to the seat cushion, forming the perimeter diamonds, finishing the side & top pleats, and fabricating/installing a rear panel. Fortunately I have a pair of spare seats, so Iíll upholster them instead of having the truck out of service. Once both seats are completed Iíll simply swap out the seats.
__________________
My Build Thread: http://67-72chevytrucks.com/vboard/s...d.php?t=444502 |
|
|

|
|
|
#1047 | |
|
But Found Her 25yrs Later!
Join Date: Oct 2010
Location: Oregon City, Oregon
Posts: 10,530
|
Re: Markeb01 Build Thread
Quote:
What's your Winter Goal?
__________________
I lost my 65 - Found it 25 years later: http://67-72chevytrucks.com/vboard/s...d.php?t=426650 66 C20 Service Truck: http://67-72chevytrucks.com/vboard/s...d.php?t=428035 |
|
|
|

|
|
|
#1048 |
|
Senior Enthusiast
Join Date: Feb 2007
Location: Spokane Valley, WA
Posts: 8,356
|
Re: Markeb01 Build Thread
I generally focus on one goal at a time, so Iíll be obsessed with completing the seats and door panels before anything else gets in the way. Both seats will be done first, and once theyíre installed Iíll immediately start on the new full size door panels. I have all the materials on hand.
Thereís probably only 40-60 hours of work to complete those two projects, but it may take me until the spring because of the arthritis in my hands. Tufting is a labor of love, but it is really brutal because it requires so much pinching, tugging, stretching, and multi-tasking all at maximum effort. Tonight my right hand looks like itís been smashed with a hammer and I canít close my fingers, so I moved everything back downstairs to avoid being tempted to work on it for a couple of days. Once they normalize again Iíll repeat the cycle. Iím thankful it just takes longer instead of not being able to do the work at all. Once the seats and doors are done, I still havenít given up on a headliner. Iíd like a diamond tufted or diamond stitched presentation, but Iíve also been thinking about how much I loved the chrome headliner bows in my parents 52 Oldsmobile years ago. If I can do something thatís never been done in one of these trucks with smooth Naugahyde and chrome or stainless bows, I might lean in that direction. No matter how long this takes Iíd like to have it all done by spring so I can show it off at a few rod runs next year. In my spare time I want to get more resin people painted for the Universal Diorama, 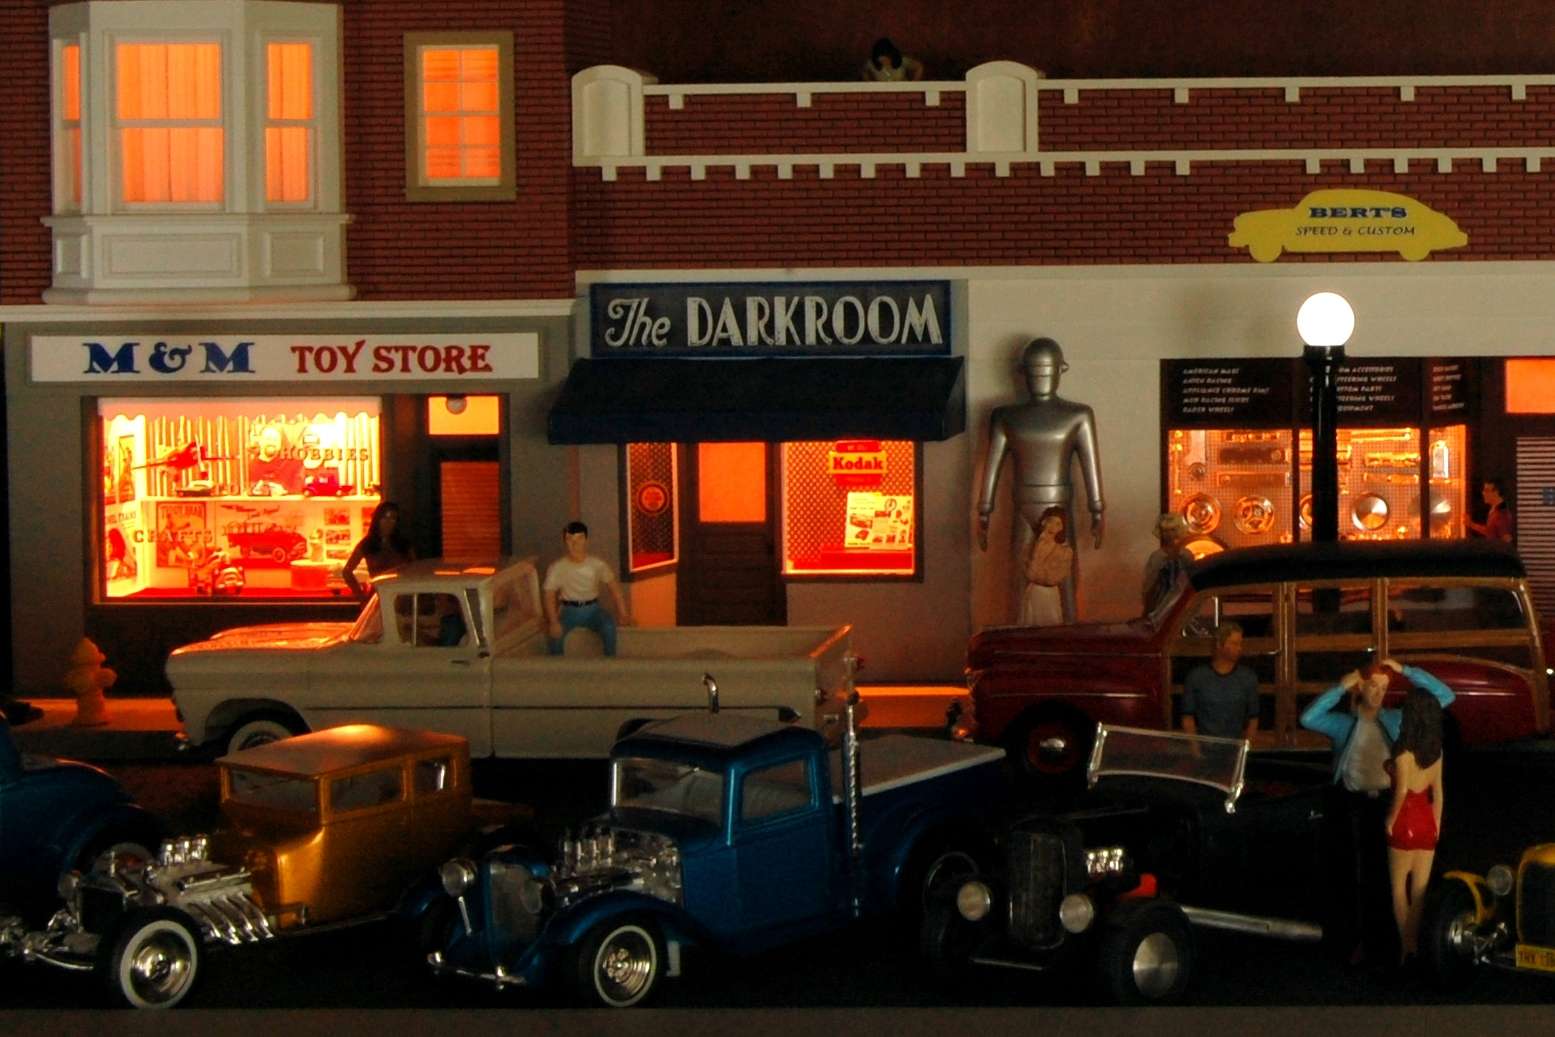 complete more 1/25th cars Iíve been saving up, and perhaps build another couple of variations on the model of my real truck Ė one gasser style and another with a full diamond tufted interior. If I can find a place to put it, Iím also thinking about building another diorama of a drive in theater with a flat screen in front to show real movies to all the patrons! Hopefully that will keep me out of trouble until the weather gets better.
__________________
My Build Thread: http://67-72chevytrucks.com/vboard/s...d.php?t=444502 |
|
|

|
|
|
#1049 |
|
Registered User
Join Date: Dec 2012
Location: Rochester, KENT
Posts: 10,572
|
Re: Markeb01 Build Thread
Mark, if the mental health services were to see my face and hear me cackle here on a Sunday morning, cat on my lap and reading your updates, I would surely be arrested and sectioned under the mental health act, as no one on his own should be having as much fun......
Your updates alwYs amaze me, and as mentioned, thank you so much for the tutorials on various aspects of your build. Your seats and buttons are inspirational. I think I will go out and rake up the leaves in the yard and cut the grass, at least I am a master at that.
__________________
MY BUILD LINK: http://67-72chevytrucks.com/vboard/s...585901]Redneck Express - 1966 C10 Short Fleetside MY USA ROADTRIPS http://forum.retro-rides.org/thread/...2018-humdinger IF YOU CAN'T FIX IT WITH A HAMMER, YOU'VE GOT AN ELECTRICAL PROBLEM MATE. |
|
|

|
|
|
#1050 |
|
Registered User
Join Date: Sep 2012
Location: Leander, TX
Posts: 969
|
Re: Markeb01 Build Thread
Mark,
As Grizz said you posts are very inspirational. Seeing you button making brought back some memories for me. My grandmother had an upholstery shop and always had me making buttons for her. She had about 10 different dyes. And huge boxes of the the buttons. I still remember running my hands threw them. Your scale models and diorama look awesome. I too love scale cars but haven't built any in the last few years. I have all of the different 60-66 models they have. I even built a replica of my father in laws truck before he passed. I also started a scale hot rod garage. Sorry to hear about your hands but as you said at least you are still capable. Look forward to your next post. Bret
__________________
64' Build Thread http://67-72chevytrucks.com/vboard/s...d.php?t=586955 |
|
|

|
 |
| Bookmarks |
|
|