
 |
|
|
#1076 |
|
GEARHEAD
Join Date: Aug 2003
Location: MN
Posts: 6,126
|
Re: Over 25 Years Later, Finally My 71 C-10 Truck Build
Made a trip today to get the new (to me) seat. Its the middle row from a 97 tahoe.
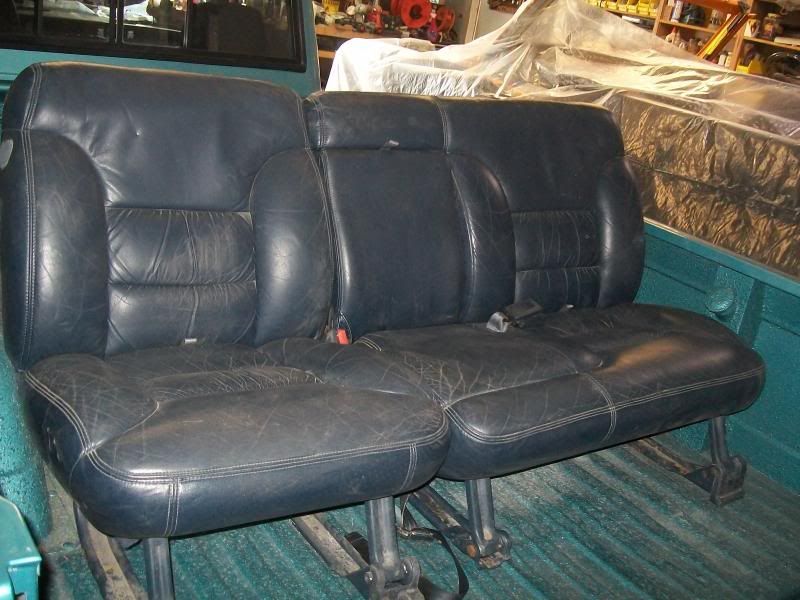 The bottoms flip forward. Dont know for sure if that will work in the cab but I think it will for the passenger side, maybe not all the way with the steering wheel on the driver side. Doesn't matter too much, I will still get it to move enough to grab stuff under or behind it. 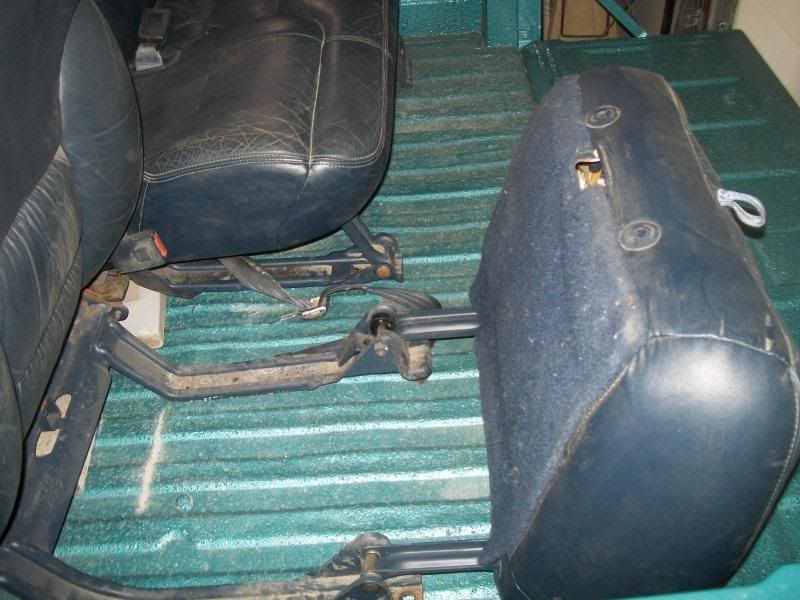 Then the backs fold forward. The seats do not have adjustment slides or anything. I will cut and weld the brackets for the fit I want. 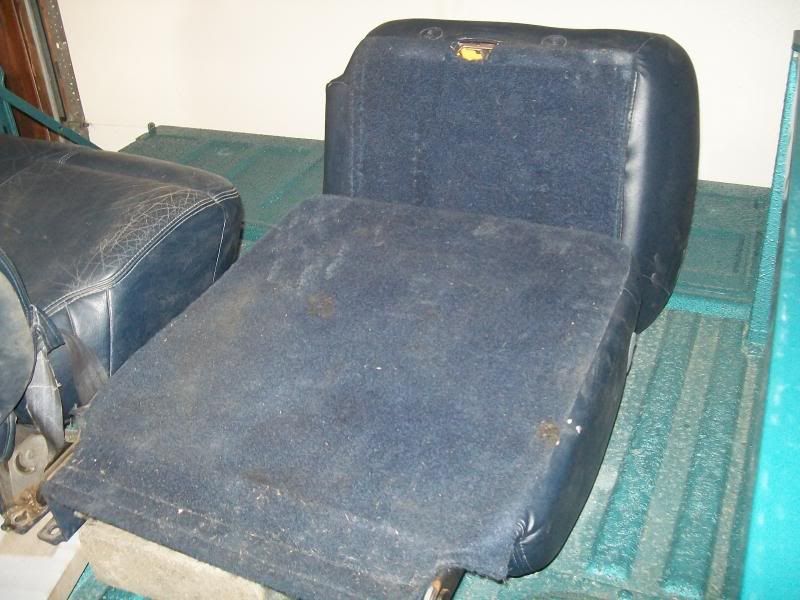 Another bonus is the fold down arm rest with cup holders and even a tissue box, with tissues (double bonus). 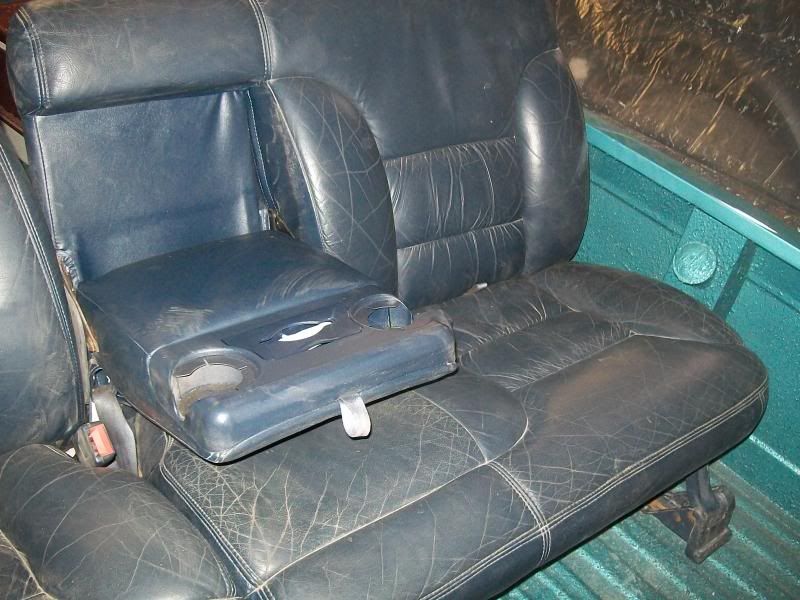 So I paid $100 for an arm rest, cup holders and better access under and behind the seat, and it will fit my recovering plans better. And I have a seat to sell (or 2). Any one looking for an early 90's suburban split bench in great condition or a 67-68 OEM bench (seat back folds forward) that needs a new cover just ask.
__________________
If no one knows what you're doing, they can't tell you you're doing it wrong HG's Dream Car Build - Shelby Cobra Kit Build your own adjustable track bar 71  Long Fleet C/10 Long Fleet C/10 72  Jimmy 4x4 (Junkyard Jimmy) Jimmy 4x4 (Junkyard Jimmy)HG's Plow Truck '78  K35 Dually K35 DuallyBigass Farm Truck HG's thread of miscellaneous stuff |
|
|

|
|
|
#1077 |
|
Registered User
Join Date: Apr 2011
Location: .
Posts: 3,104
|
Re: Over 25 Years Later, Finally My 71 C-10 Truck Build
Nice score on the '97 tahoe seat.
|
|
|

|
|
|
#1078 |
|
GEARHEAD
Join Date: Aug 2003
Location: MN
Posts: 6,126
|
Re: Over 25 Years Later, Finally My 71 C-10 Truck Build
I think so too. I just got the crow bar unstuck from my wallet and ordered the materials for this job. Yikes!
Here is a pic I am basing my seat design off from. Notice top left of the pic? That's the price with shipping for the door panel scrolled material for a 69 Chevy, And the scrolled middle of the seat section, 4 yards of vinyl and 1 yard of the cloth. This is by far the most money I've spent on this truck other than paint, for any one area. The dash pad, arm rests and visors will be re-covered to match. 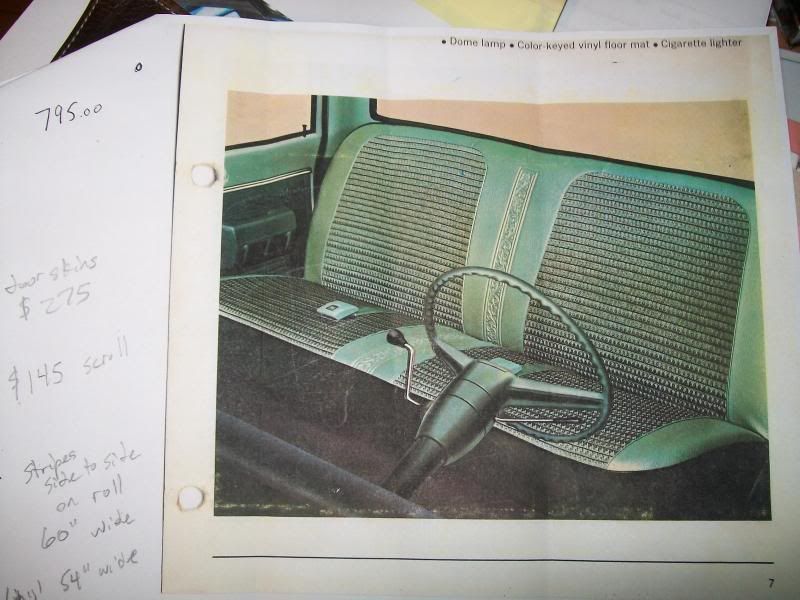 The cloth sections will be much smaller, just the middle areas of the side seating positions. The back part bolstering will probably stay pretty much as is. The bottom bolstering may be beefed up a bit or cut out of the middle some. The scroll will go down the middle of the seat and cover the arm rest in the up position. If there is enough left over I want it on the inside too so you can see it on the arm rest when its down. Dash pad should look like this... http://i1126.photobucket.com/albums/...0/IMG_1111.jpg http://i1126.photobucket.com/albums/...0/IMG_1112.jpg Arm rests something like this... http://i1259.photobucket.com/albums/...s/IMG_1444.jpg Here are pics of the material samples I got from SMS Auto Fabrics. Great to deal with so far. They kept a file from when I requested the samples. I call them up, give them my name and look up exactly what I requested and we both know what the other is referring to. It takes a few weeks to get the scroll work embossing done, so I just have to wait to see what shows up. Hopefully I will like what I see. 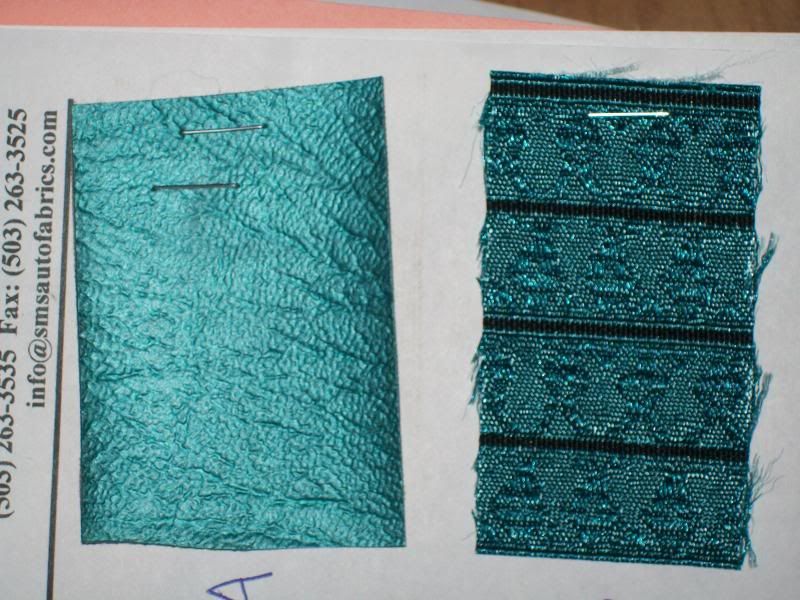 The cloth has a little fish shaped pattern in it which I love. Perfect for me, and perfect for my aquamarine theme I got going. Might be able to see it better in this pic... 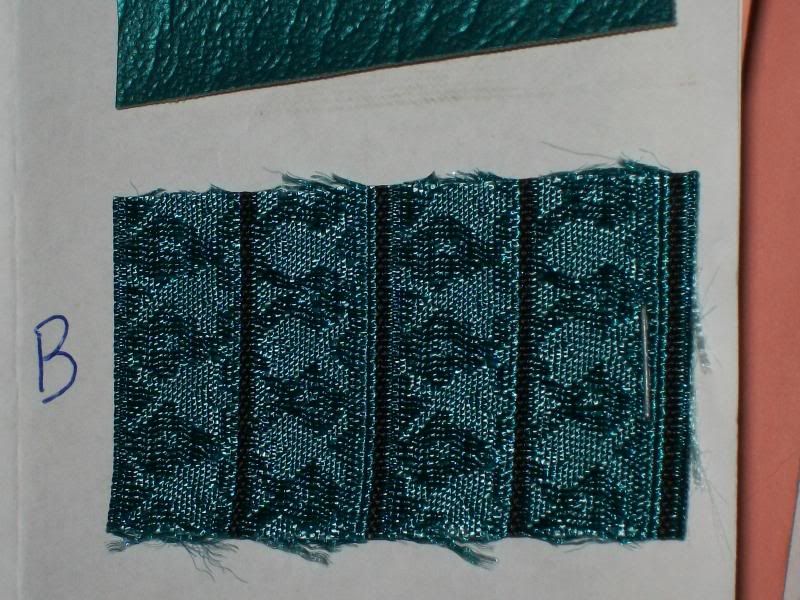
__________________
If no one knows what you're doing, they can't tell you you're doing it wrong HG's Dream Car Build - Shelby Cobra Kit Build your own adjustable track bar 71  Long Fleet C/10 Long Fleet C/10 72  Jimmy 4x4 (Junkyard Jimmy) Jimmy 4x4 (Junkyard Jimmy)HG's Plow Truck '78  K35 Dually K35 DuallyBigass Farm Truck HG's thread of miscellaneous stuff |
|
|

|
|
|
#1079 |
|
GEARHEAD
Join Date: Aug 2003
Location: MN
Posts: 6,126
|
Re: Over 25 Years Later, Finally My 71 C-10 Truck Build
I'm still thinking about taking my truck on a road trip to St. Louis pretty soon. I took the time off, got the invite from my friends, my son is willing, but I need to do something about the exhaust before I take this for that many hours on the road. I have most of the parts on hand, and should be able to get it done in time. So today I dove in and got started. The truck is up on jack stands, almost as high as the Jimmy now, maybe higher.
 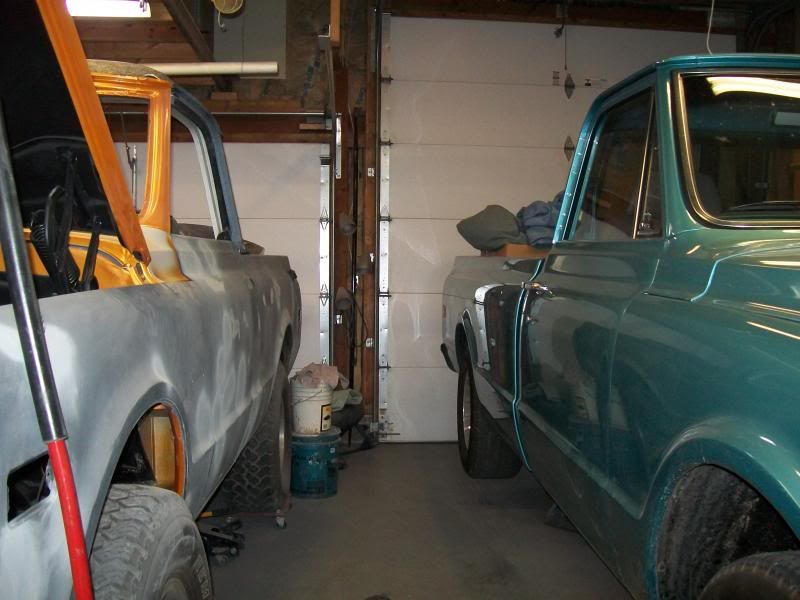 The only thing I had to do to get the existing exhaust out was unbolt the reducer from the header collectors. One of the problems to deal with is that one of my blemished headers I bought for cheap has a crooked collector flange. I took a couple pics, but it's kind of hard to see. The driver side is about 1/4" off straight. 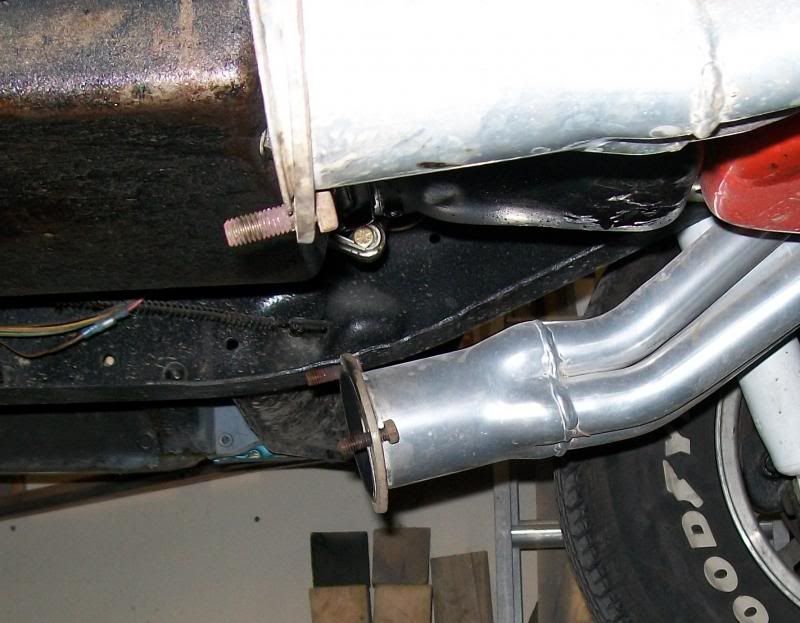  So to fix it I cut and sectioned one of the reducers, then welded it back up. 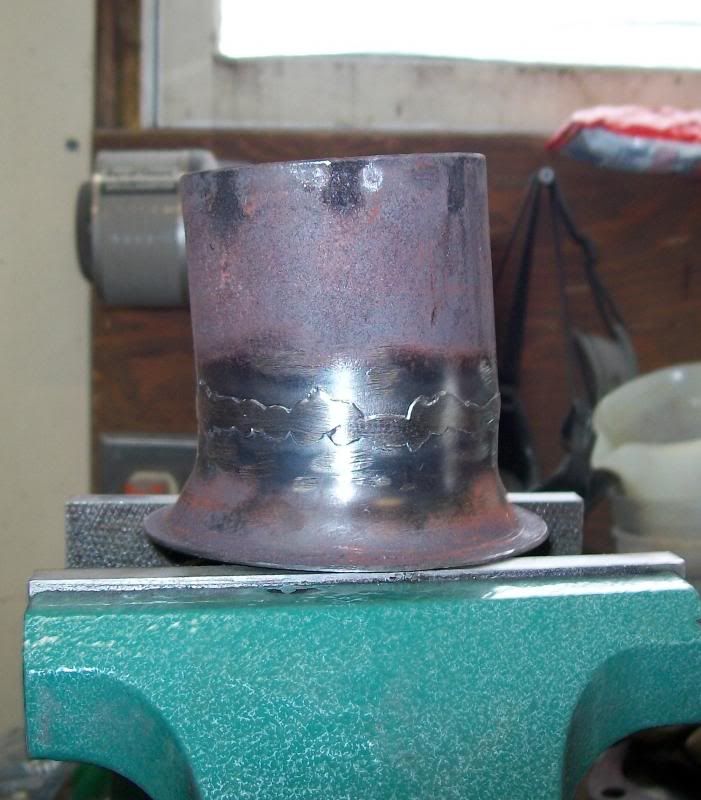 That put it close enough to matching the other side and will get the exhaust up about 1/2" or more from where it was. The next thing was to add the oxygen sensor bung into the reducer for the other side. I set it on the reducer where I wanted it, tapped a centering hole, and drilled it out. It took a 7/8" drill bit and when you have a bit that big in a pretty potent 1/2" drill, hold on tight cause that thing is gonna want to take you for a ride. 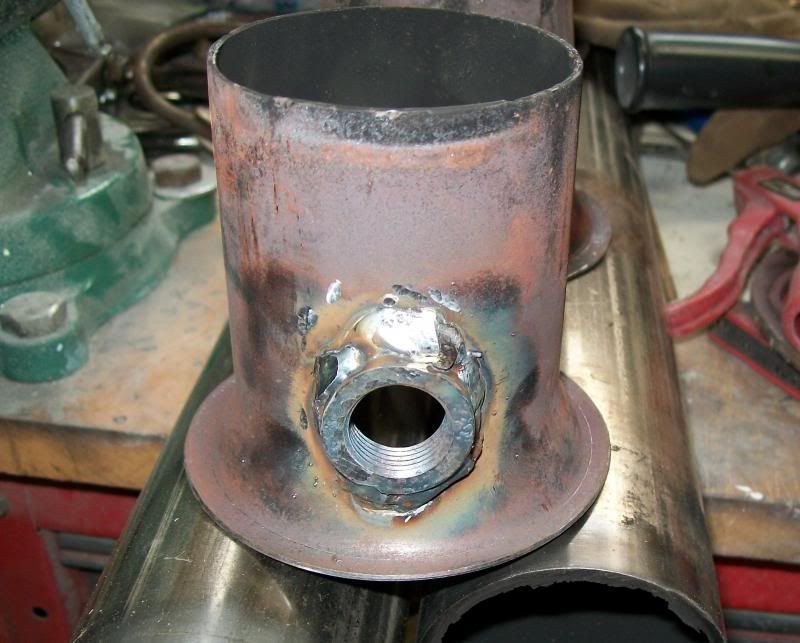 Before I took the exhaust out I was kinda planning how I wanted to route it compared to where it was. As of now I wanted the crossover section back about 6" from where it is. That gives me a little more room to work around the tranny pan. So I cut a couple sections of tube for that. BTW, if you dont have a chop saw or something like it and you want something to cut steel nice and easy, I highly recommend a horizontal band saw. I got mine used at an estate auction for about $50 and the blades are cheap. I think harbor freight sells them too. In this last pic, the top end goes to the header reducers. The bottom end will have tube added to widen it out to outboard the frame rails.  From there I go straight back then up a bit and into the mufflers. Then out of the mufflers and over the axle. I plan on removing the riveted bracket for the bump stop and routing the exhaust pipe right there, then down and out the side behind the tire. I'm almost out of weld gas, so I need to get some of that soon. And my cheapo tubing expander doesn't quite have the power to stretch this tube, so I will take it to a guy I know that has a better one, so I can get the front tubing onto the header reducers. Anyone interested in some barely used flowmasters can PM me.
__________________
If no one knows what you're doing, they can't tell you you're doing it wrong HG's Dream Car Build - Shelby Cobra Kit Build your own adjustable track bar 71  Long Fleet C/10 Long Fleet C/10 72  Jimmy 4x4 (Junkyard Jimmy) Jimmy 4x4 (Junkyard Jimmy)HG's Plow Truck '78  K35 Dually K35 DuallyBigass Farm Truck HG's thread of miscellaneous stuff |
|
|

|
|
|
#1080 |
|
GEARHEAD
Join Date: Aug 2003
Location: MN
Posts: 6,126
|
Re: Over 25 Years Later, Finally My 71 C-10 Truck Build
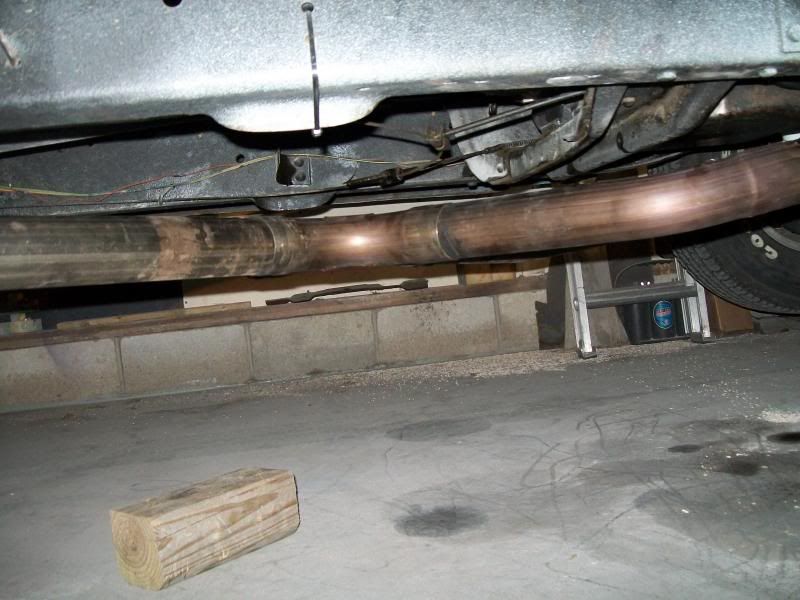
Didn't get hardly any garage time today, but did manage to get the 1st sections of tube expanded to fit the collector reducers. I got those in place and set the cross-over in place. It's hanging about an inch lower than where I want it, so I might section them a bit to raise it. And I got a new tank of weld gas.
 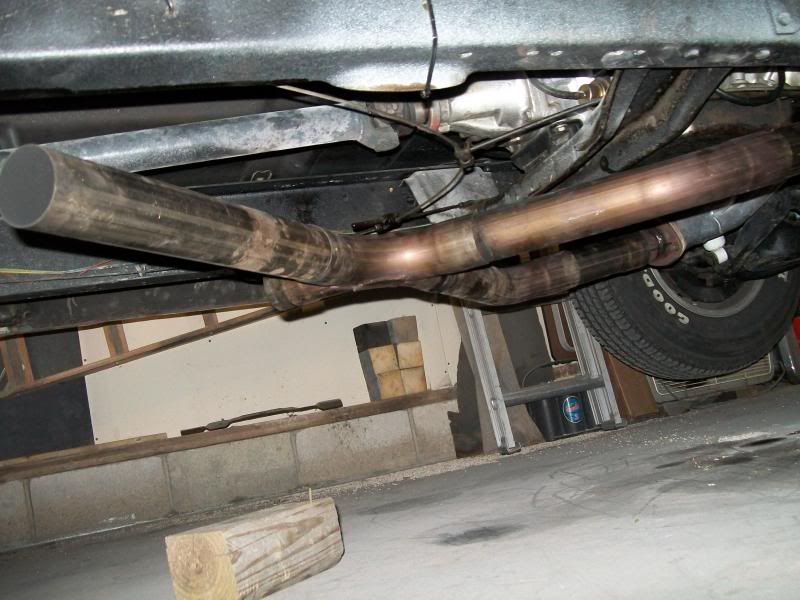 Probably wont get back on it for a couple days. 
__________________
If no one knows what you're doing, they can't tell you you're doing it wrong HG's Dream Car Build - Shelby Cobra Kit Build your own adjustable track bar 71  Long Fleet C/10 Long Fleet C/10 72  Jimmy 4x4 (Junkyard Jimmy) Jimmy 4x4 (Junkyard Jimmy)HG's Plow Truck '78  K35 Dually K35 DuallyBigass Farm Truck HG's thread of miscellaneous stuff |
|
|

|
|
|
#1081 |
|
Registered User
Join Date: Apr 2003
Location: Indep, MO
Posts: 5,893
|
Re: Over 25 Years Later, Finally My 71 C-10 Truck Build
Looks tight! Nice work!
__________________
Boppa's Old Yeller Truck Build, Old Yeller's New Heart! Project Buzz Bomb Flyin' Low! |
|
|

|
|
|
#1082 |
|
Registered User
Join Date: Apr 2011
Location: .
Posts: 3,104
|
Re: Over 25 Years Later, Finally My 71 C-10 Truck Build
Nice work on the exhaust and have fun on your trip.
|
|
|

|
|
|
#1083 |
|
GEARHEAD
Join Date: Aug 2003
Location: MN
Posts: 6,126
|
Re: Over 25 Years Later, Finally My 71 C-10 Truck Build
Thanks, but it's better in the picture.
Acceptable at best. My welding skills have deteriorated from back in the day when I really could weld. Too much tacking sheetmetal and not enough good solid bead runs. Maybe by the time I get this tubing welded the welds will look better. As for the trip, looks like things will work out and it will happen. Just need to make sure the truck is as well prepped as it can be. If there are members viewing this thread between south central MN and about an hour east of St Louis and are interested in meeting to talk about trucks and draining a cold one, please PM me. I haven't decided on a route yet. Will probably avoid interstate and stick to more back routes. Probably will not go there and come back on the same route. I'd like to run down along the Mississippi river valley for a leg of the trip, but I'm open for alternatives. Good scenery and fun roads is the key. Its about 600 miles for the most direct route and I'm planning for 2 days travel each way, but know I could do it in 1 if needed. Hell, I put on 330 today for work and will do another 350 or more tomorrow and about 250 thursday. Its what I do.
__________________
If no one knows what you're doing, they can't tell you you're doing it wrong HG's Dream Car Build - Shelby Cobra Kit Build your own adjustable track bar 71  Long Fleet C/10 Long Fleet C/10 72  Jimmy 4x4 (Junkyard Jimmy) Jimmy 4x4 (Junkyard Jimmy)HG's Plow Truck '78  K35 Dually K35 DuallyBigass Farm Truck HG's thread of miscellaneous stuff |
|
|

|
|
|
#1084 |
|
GEARHEAD
Join Date: Aug 2003
Location: MN
Posts: 6,126
|
Re: Over 25 Years Later, Finally My 71 C-10 Truck Build
I should plan on adding the capability for music for the road trip. To that end I contacted Bigblock73 for a pair of his steel cab corner speaker mount brackets last night and he came through on short notice to meet me near his work in Minneapolis today to pick them up. Saved some shipping and dont have to wait. Bonus. Can be found here...
http://67-72chevytrucks.com/vboard/s...d.php?t=476976 Look like this... 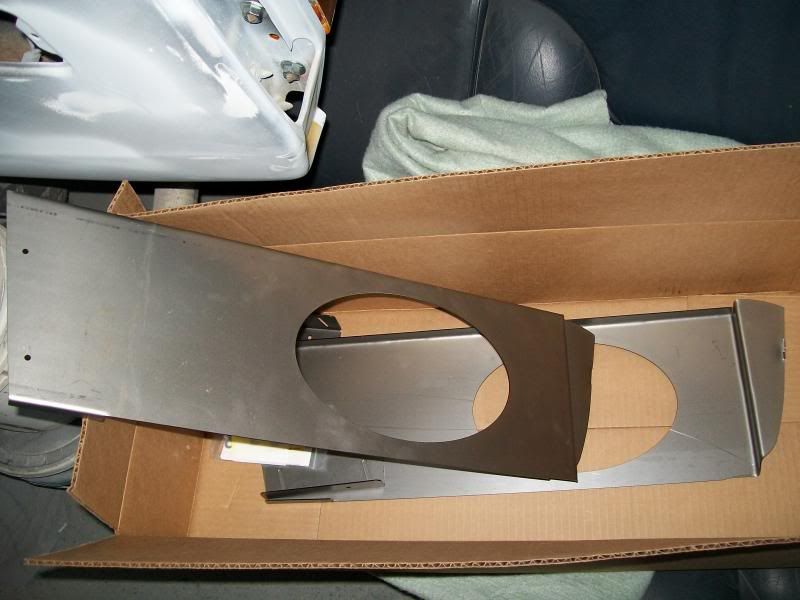 Didn't get to work on any of my own stuff today though. Got home and needed to replace a rear brake line on my youngest ones car cause she ruptured a rusty line tuesday. And then needed to find out why the boy childs blazer was stalling out at random times. Brought it to napa for their electrical system tester because I was suspecting something with the voltage regulator and one of the guys there noticed sparks from under the engine when I revved it. Found the negative battery cable rubbed the insulation off against a piece of suspension and was shorting out. Didn't have time to replace the cable so I just put a piece of rubber fuel line over the wounded wire and tied it with a zip tie. Runs fine now. Spent a total of $25 for new brake line parts to fix to beaters in one evening. Kinda proud of myself. Got a couple ideas bouncing around the cranium for stereo mounting. None of them in or around the dash. We'll see which idea sticks or if another one comes up.
__________________
If no one knows what you're doing, they can't tell you you're doing it wrong HG's Dream Car Build - Shelby Cobra Kit Build your own adjustable track bar 71  Long Fleet C/10 Long Fleet C/10 72  Jimmy 4x4 (Junkyard Jimmy) Jimmy 4x4 (Junkyard Jimmy)HG's Plow Truck '78  K35 Dually K35 DuallyBigass Farm Truck HG's thread of miscellaneous stuff |
|
|

|
|
|
#1085 |
|
Registered User
Join Date: Apr 2003
Location: Indep, MO
Posts: 5,893
|
Re: Over 25 Years Later, Finally My 71 C-10 Truck Build
Don't ya love Cheap Fixes! I'm a fan of that Kicker I-pod hidden hookup deal. Have fun on the trip!
__________________
Boppa's Old Yeller Truck Build, Old Yeller's New Heart! Project Buzz Bomb Flyin' Low! |
|
|

|
|
|
#1086 | |
|
GEARHEAD
Join Date: Aug 2003
Location: MN
Posts: 6,126
|
Re: Over 25 Years Later, Finally My 71 C-10 Truck Build
Quote:
http://www.bestbuy.com/site/JVC+-+50...specifications And found an awesome deal on some quality speakers...
__________________
If no one knows what you're doing, they can't tell you you're doing it wrong HG's Dream Car Build - Shelby Cobra Kit Build your own adjustable track bar 71  Long Fleet C/10 Long Fleet C/10 72  Jimmy 4x4 (Junkyard Jimmy) Jimmy 4x4 (Junkyard Jimmy)HG's Plow Truck '78  K35 Dually K35 DuallyBigass Farm Truck HG's thread of miscellaneous stuff |
|
|
|

|
|
|
#1087 |
|
GEARHEAD
Join Date: Aug 2003
Location: MN
Posts: 6,126
|
Re: Over 25 Years Later, Finally My 71 C-10 Truck Build
Got some welding done and the further along I get the better the welds are looking. Still not pretty, but it'll hold together. The stainless wire with the regular gas mix for mild steel is working fine. A little spatter, but not bad at all. I like the way it welds better than .023 wire on the sheetmetal. I got the front section welded up to the cross-over. Might take a break for the evening, but if my time opens up I might just head back out and fry a few more joints together.
 Pic... 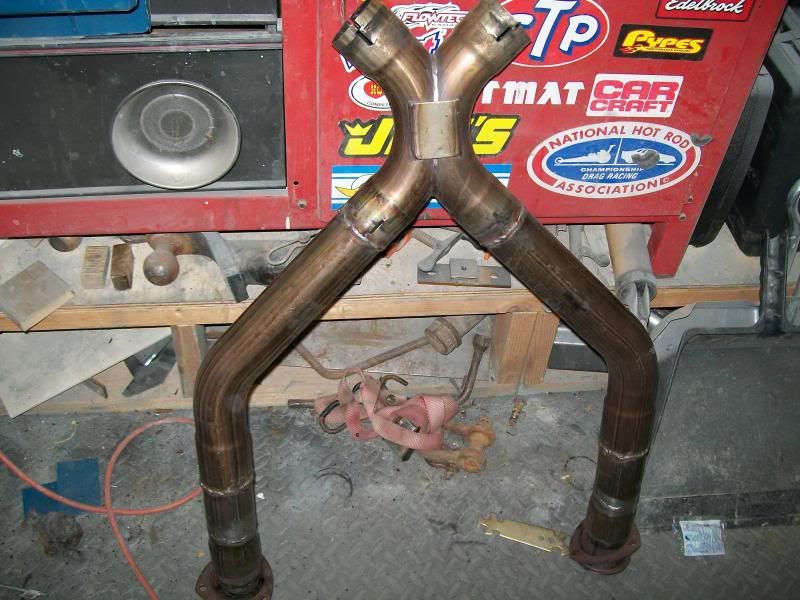 Thats 6 welds already and I have a long ways to go.
__________________
If no one knows what you're doing, they can't tell you you're doing it wrong HG's Dream Car Build - Shelby Cobra Kit Build your own adjustable track bar 71  Long Fleet C/10 Long Fleet C/10 72  Jimmy 4x4 (Junkyard Jimmy) Jimmy 4x4 (Junkyard Jimmy)HG's Plow Truck '78  K35 Dually K35 DuallyBigass Farm Truck HG's thread of miscellaneous stuff |
|
|

|
|
|
#1088 |
|
GEARHEAD
Join Date: Aug 2003
Location: MN
Posts: 6,126
|
Re: Over 25 Years Later, Finally My 71 C-10 Truck Build
Date night fell through, so I went out and made more sparks.
 Here are pics taken from about the same level as the pipes. It's tucked up pretty good. I don't have a low rider, so not really an issue. I have it welded out all the way to the rear cab mounts. 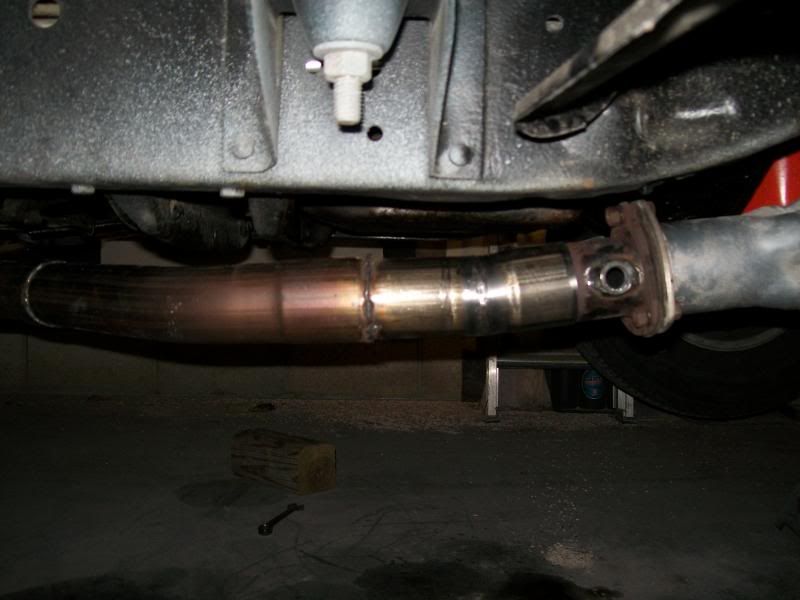 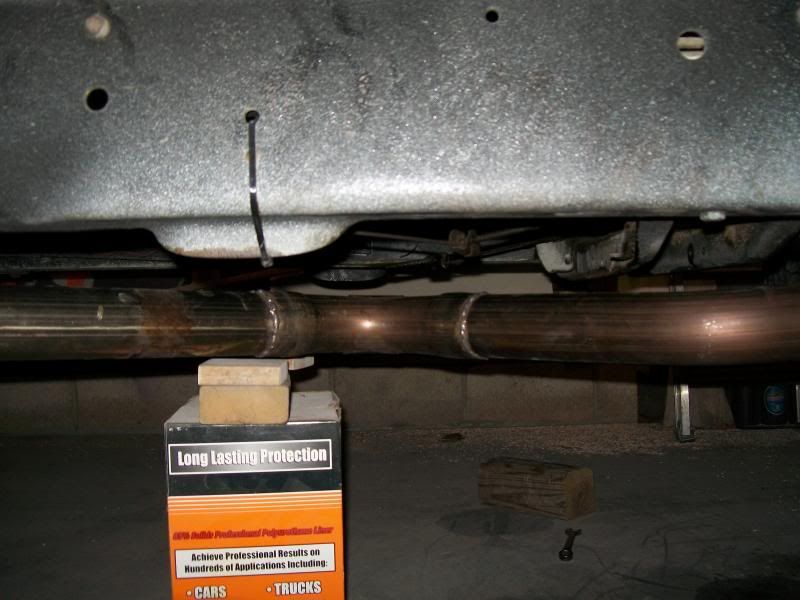 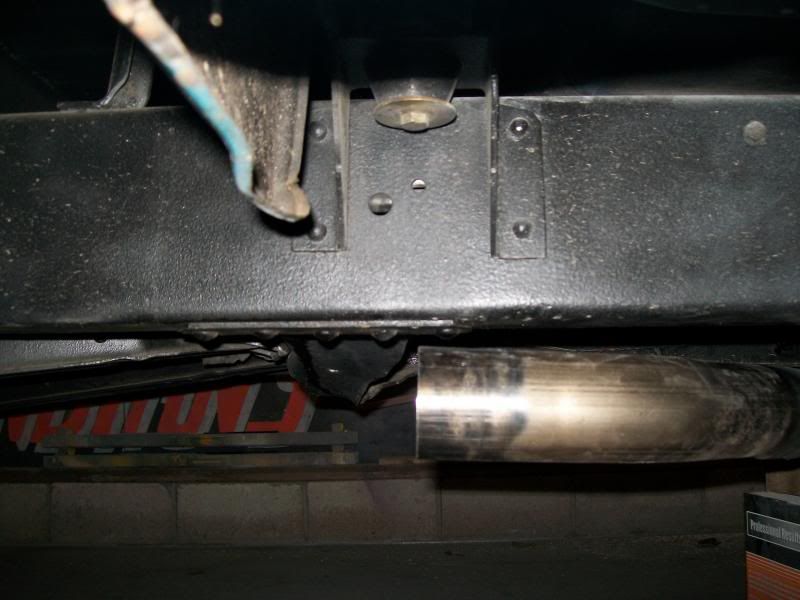 Next step is the little joggle upward and back into the muffler inlets. Hopefully I will get the mufflers in by the end of the weekend. Gotta work tomorrow though. Yippee!
__________________
If no one knows what you're doing, they can't tell you you're doing it wrong HG's Dream Car Build - Shelby Cobra Kit Build your own adjustable track bar 71  Long Fleet C/10 Long Fleet C/10 72  Jimmy 4x4 (Junkyard Jimmy) Jimmy 4x4 (Junkyard Jimmy)HG's Plow Truck '78  K35 Dually K35 DuallyBigass Farm Truck HG's thread of miscellaneous stuff |
|
|

|
|
|
#1089 |
|
Registered User
 Join Date: Apr 2008
Location: San Diego California
Posts: 1,316
|
Re: Over 25 Years Later, Finally My 71 C-10 Truck Build
Looking good, I like the X pipe.
__________________
I'd rather attempt something great and fail.. than try something ordinary and succeed. Norman Vincent Peale Project: Barn Raising http://67-72chevytrucks.com/vboard/s...d.php?t=414961 Project: 30 Be Low https://67-72chevytrucks.com/vboard/...d.php?t=830583 |
|
|

|
|
|
#1090 |
|
GEARHEAD
Join Date: Aug 2003
Location: MN
Posts: 6,126
|
Re: Over 25 Years Later, Finally My 71 C-10 Truck Build
Thanks Mike. I used to have the standard H pipe balance tube. When I added that in to my existing exhaust it made it quieter, not sure why. I had cheap sonic turbos on at the time. I've been running this X-type the past year and with the sort pipes and the flowmaster 40's this thing was LOUD. Made the windows rattle in the truck and the surrounding neighborhood. My neighbor half a block away told me he could hear every time I was going for a drive. My wife could hear me coming a block or 2 away.

__________________
If no one knows what you're doing, they can't tell you you're doing it wrong HG's Dream Car Build - Shelby Cobra Kit Build your own adjustable track bar 71  Long Fleet C/10 Long Fleet C/10 72  Jimmy 4x4 (Junkyard Jimmy) Jimmy 4x4 (Junkyard Jimmy)HG's Plow Truck '78  K35 Dually K35 DuallyBigass Farm Truck HG's thread of miscellaneous stuff |
|
|

|
|
|
#1091 |
|
GEARHEAD
Join Date: Aug 2003
Location: MN
Posts: 6,126
|
Re: Over 25 Years Later, Finally My 71 C-10 Truck Build
Ordered a head unit, JVC KD-X200. One of the new digital media receivers, which basically means it doesn't do CD's or cassettes, which I haven't listened to in a few years anyway. Has a remote control. Sub woofer output, etc.
http://www.crutchfield.com/S-q2RQe2N...l#overview-tab Did some welding on the exhaust this morning. Couple more welds to do for the inlet to the mufflers. Also need to pick up some of these... http://www.summitracing.com/parts/wlk-33240 Going to use them as a break between the front section and the muffler inlets. Once the welding is done it will be a 3 piece exhaust system, front and 2 rear sections which will have the mufflers attached. I will need a few more pipe hangers also. The nozzle connection into the muffler was way bigger than the 2.5" pipe I'm using, which made it tricky to center the tube in it for fit up. I used a few pieces of wire as spacers, then tacked it. Pulled out the wires and welded them up.  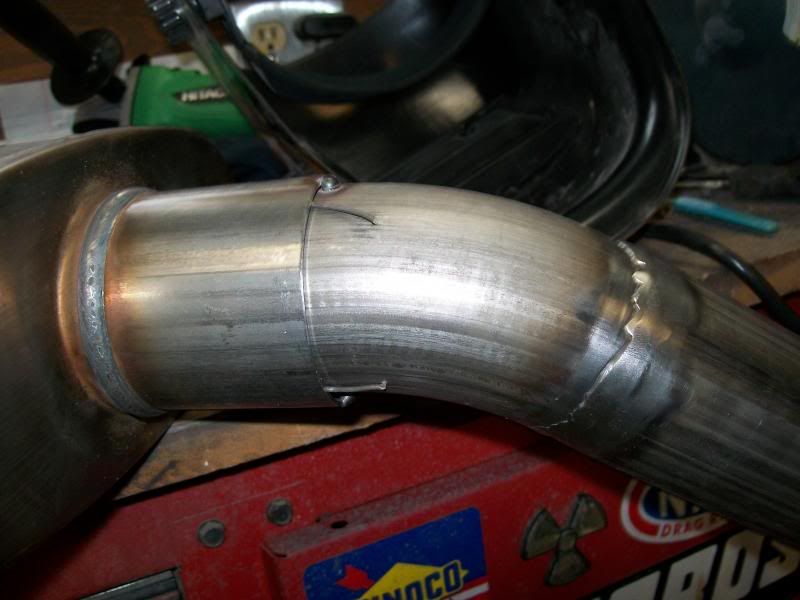 So the inlets are welded to the mufflers. Just have to weld 45's onto the ends of my front section with a stub pipe to butt up to these. Then it's just tail pipes after that. Should have it done by the end of the week if I can get my hands on the clamps and hangers I need. 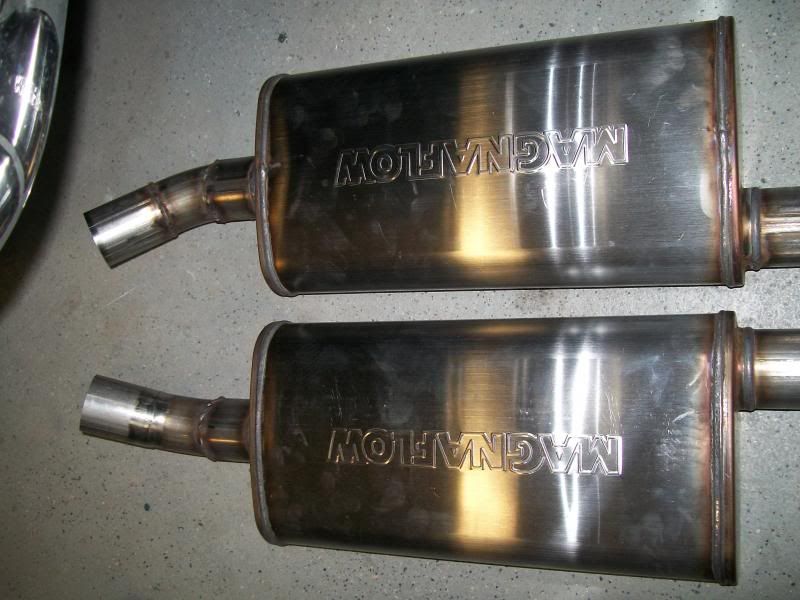 This will be the rear hangers for the front section. All stainless pieces. That body mount bracket was in a good spot for this. 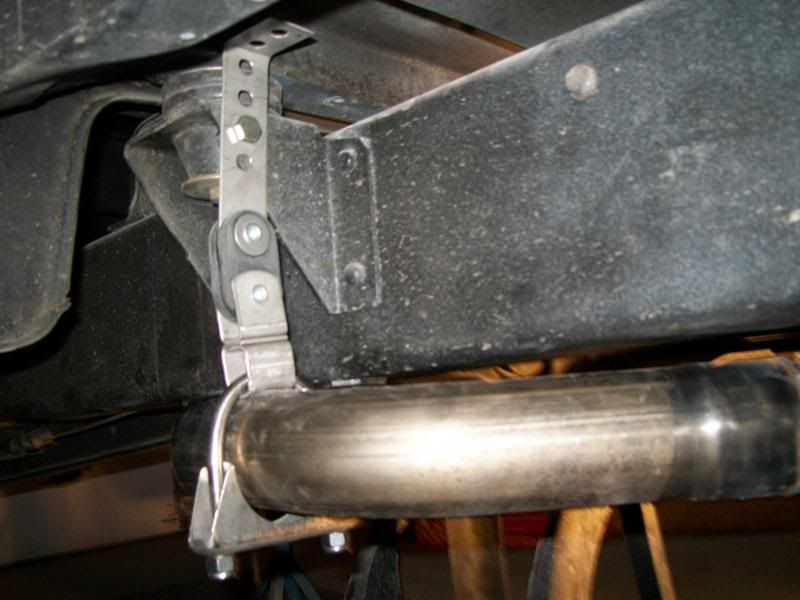
__________________
If no one knows what you're doing, they can't tell you you're doing it wrong HG's Dream Car Build - Shelby Cobra Kit Build your own adjustable track bar 71  Long Fleet C/10 Long Fleet C/10 72  Jimmy 4x4 (Junkyard Jimmy) Jimmy 4x4 (Junkyard Jimmy)HG's Plow Truck '78  K35 Dually K35 DuallyBigass Farm Truck HG's thread of miscellaneous stuff |
|
|

|
|
|
#1092 |
|
GEARHEAD
Join Date: Aug 2003
Location: MN
Posts: 6,126
|
Re: Over 25 Years Later, Finally My 71 C-10 Truck Build
Got a little more of the exhaust done tonight. The front section is all welded out and installed with new collector gaskets. I may pull it apart some other time to clean up the welds and make it look prettier, but for now I just don't have the time to do it.
The clamps and hangers I ordered came in today so I could actually hang the mufflers and hook them up. Will finish the tailpipes some time over the next few days. 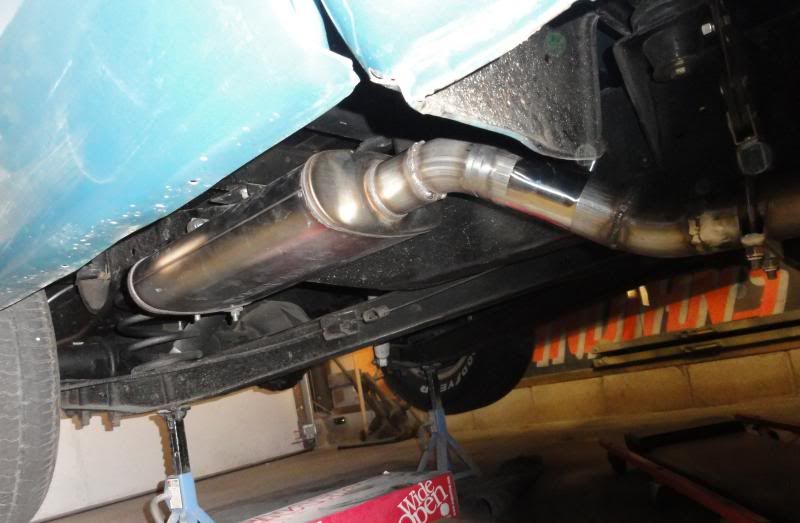 This one kinda shows how the muffler is tucked up in there... 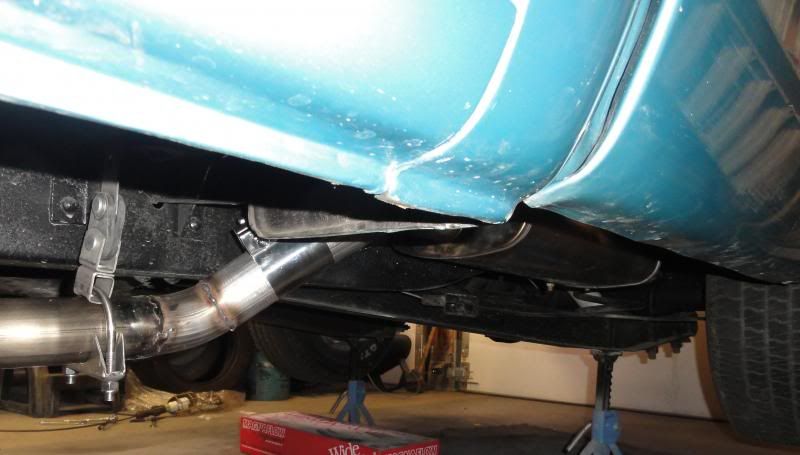 
__________________
If no one knows what you're doing, they can't tell you you're doing it wrong HG's Dream Car Build - Shelby Cobra Kit Build your own adjustable track bar 71  Long Fleet C/10 Long Fleet C/10 72  Jimmy 4x4 (Junkyard Jimmy) Jimmy 4x4 (Junkyard Jimmy)HG's Plow Truck '78  K35 Dually K35 DuallyBigass Farm Truck HG's thread of miscellaneous stuff |
|
|

|
|
|
#1093 |
|
GEARHEAD
Join Date: Aug 2003
Location: MN
Posts: 6,126
|
Re: Over 25 Years Later, Finally My 71 C-10 Truck Build
Straight pipes...
__________________
If no one knows what you're doing, they can't tell you you're doing it wrong HG's Dream Car Build - Shelby Cobra Kit Build your own adjustable track bar 71  Long Fleet C/10 Long Fleet C/10 72  Jimmy 4x4 (Junkyard Jimmy) Jimmy 4x4 (Junkyard Jimmy)HG's Plow Truck '78  K35 Dually K35 DuallyBigass Farm Truck HG's thread of miscellaneous stuff Last edited by hgs_notes; 06-03-2013 at 11:25 AM. |
|
|

|
|
|
#1094 |
|
GEARHEAD
Join Date: Aug 2003
Location: MN
Posts: 6,126
|
Re: Over 25 Years Later, Finally My 71 C-10 Truck Build
With mufflers, no tailpipes...
__________________
If no one knows what you're doing, they can't tell you you're doing it wrong HG's Dream Car Build - Shelby Cobra Kit Build your own adjustable track bar 71  Long Fleet C/10 Long Fleet C/10 72  Jimmy 4x4 (Junkyard Jimmy) Jimmy 4x4 (Junkyard Jimmy)HG's Plow Truck '78  K35 Dually K35 DuallyBigass Farm Truck HG's thread of miscellaneous stuff |
|
|

|
|
|
#1095 |
|
GEARHEAD
Join Date: Aug 2003
Location: MN
Posts: 6,126
|
Re: Over 25 Years Later, Finally My 71 C-10 Truck Build
With the flowmaster 40's...
__________________
If no one knows what you're doing, they can't tell you you're doing it wrong HG's Dream Car Build - Shelby Cobra Kit Build your own adjustable track bar 71  Long Fleet C/10 Long Fleet C/10 72  Jimmy 4x4 (Junkyard Jimmy) Jimmy 4x4 (Junkyard Jimmy)HG's Plow Truck '78  K35 Dually K35 DuallyBigass Farm Truck HG's thread of miscellaneous stuff |
|
|

|
|
|
#1096 |
|
GEARHEAD
Join Date: Aug 2003
Location: MN
Posts: 6,126
|
Re: Over 25 Years Later, Finally My 71 C-10 Truck Build
Got tired of welding pipe and laying under the truck. Decided to work on the seats and speaker brackets instead.
On the speaker bracket I decided to go with riv-nuts to bolt them in. But I don't have riv-nuts or the tool to install them, so I picked that stuff up tonight. Tomorrow I will be able to get them mocked up and maybe even painted up to look OK. The speakers and stereo head unit were delivered today also. The speakers take a real narrow spade terminal end which I don't have and neither do the local stores, so it looks like I will have to go to Mankato to find that. I pulled the seat out of the cab, then set the new one in place. Not thrilled with how far forward the mount brackets are, but I can work with it. One complaint I had with the old seat was that it was too high and I was looking through the tinted part of the windshield all of the time, and having to duck and weave to see around the mirror. The new seat was pretty much at the same level, so I chose to lower it 1". With this style of bracket it's not too difficult. The driver side is welded back up. The passenger side has the front parts cut. Will finish that up tomorrow too I think. Just sitting in place, unbolted.  The bracket mounts...   The bottom will fold forward under the tilt wheel. I don't know if it would without the tilt.  I want to get all this stuff (exhaust, seats, stereo) done by Sunday night. I want a day or 2 of driving again before I take it on the road trip.
__________________
If no one knows what you're doing, they can't tell you you're doing it wrong HG's Dream Car Build - Shelby Cobra Kit Build your own adjustable track bar 71  Long Fleet C/10 Long Fleet C/10 72  Jimmy 4x4 (Junkyard Jimmy) Jimmy 4x4 (Junkyard Jimmy)HG's Plow Truck '78  K35 Dually K35 DuallyBigass Farm Truck HG's thread of miscellaneous stuff |
|
|

|
|
|
#1097 |
|
Registered User
Join Date: Apr 2011
Location: .
Posts: 3,104
|
Re: Over 25 Years Later, Finally My 71 C-10 Truck Build
Liked the videos....especially cherpin' the tires.
Exhaust sounds good 
|
|
|

|
|
|
#1098 | |
|
GEARHEAD
Join Date: Aug 2003
Location: MN
Posts: 6,126
|
Re: Over 25 Years Later, Finally My 71 C-10 Truck Build
Quote:
Today I continued with the seats and radio stuff. I got the speaker brackets installed. I love the riv-nut tool. I used it for the speaker mount screws, and for my radio mount I made. Kinda wishing I had this tool a long time ago. Will be ordering speaker grills later. Anyway, speakers mounted...  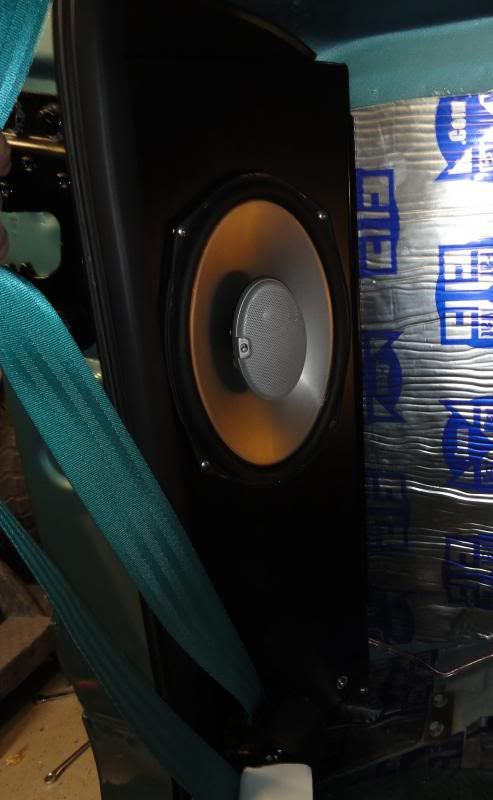 And I built a panel to fit under the front of the seat for the stereo to mount into. I cut out a piece of aluminum from some scrap I had, then bent a 90* angle along the top edge for added stiffness. I don't have a bender, except my hammers and vise and hands, so it took awhile. I notched the corners to fit the seat mounts and drilled some holes for screws to hold it with riv-nuts in the seat mount.  Then I cut a hole for the radio, cleaned it up with a file to get a good fit. I just used a DA sander to clean up the surface and make it look OK. You can see from the pic of the back view how rough that aluminum was. 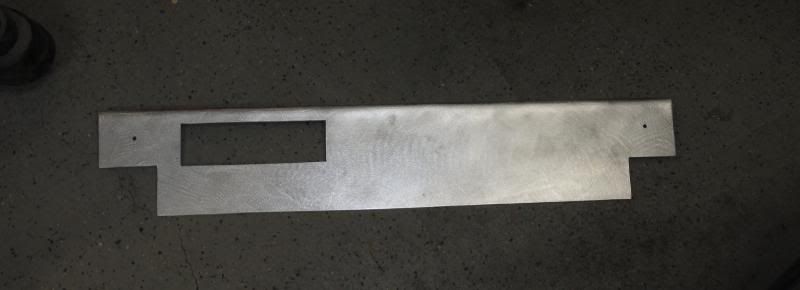 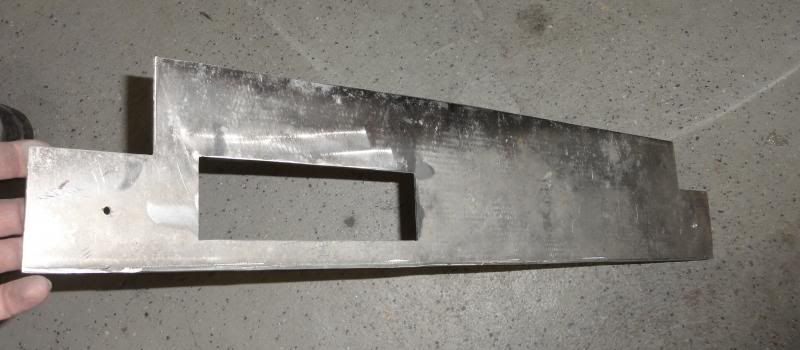 And here it is mounted up. As the seat folds forward it actually lifts a bit so that plate doesn't hit into the carpet. I will do more cleaning up and prettying things after the trip when the interior is getting completely redone. 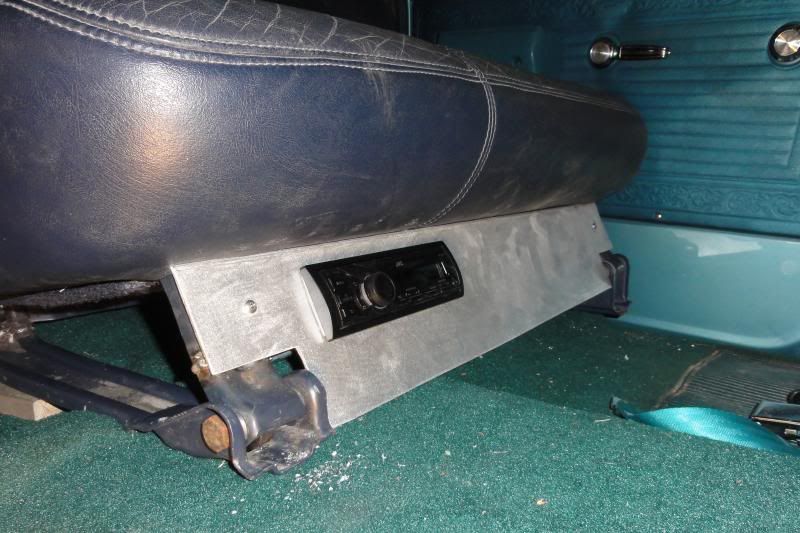 The passenger seat mount is shortened and welded back together. Just need to drill some holes to bolt them in. Then wire the stereo up. Finish the exhaust tailpipes and get it back on the road.
__________________
If no one knows what you're doing, they can't tell you you're doing it wrong HG's Dream Car Build - Shelby Cobra Kit Build your own adjustable track bar 71  Long Fleet C/10 Long Fleet C/10 72  Jimmy 4x4 (Junkyard Jimmy) Jimmy 4x4 (Junkyard Jimmy)HG's Plow Truck '78  K35 Dually K35 DuallyBigass Farm Truck HG's thread of miscellaneous stuff |
|
|
|

|
|
|
#1099 |
|
VA72C10
 Join Date: Mar 2008
Location: Midlothian, VA
Posts: 25,269
|
Re: Over 25 Years Later, Finally My 71 C-10 Truck Build
Looks good! Clean install.
__________________
Looking for a 67-72 swb or blazer project in or around VA. 
|
|
|

|
|
|
#1100 |
|
GEARHEAD
Join Date: Aug 2003
Location: MN
Posts: 6,126
|
Re: Over 25 Years Later, Finally My 71 C-10 Truck Build
Thanks VA. I'm happy with it.
So it's been 2 weeks with my truck up on jack stands. Today I went for a cruise.  The day started out poorly on the personal side, and when I went out to the garage I struggled badly to get going. I pulled off the rear tire to look at how I was going to run my tailpipe and was very discouraged. The pieces I had to work with were not going to cooperate. So I went with plan B. 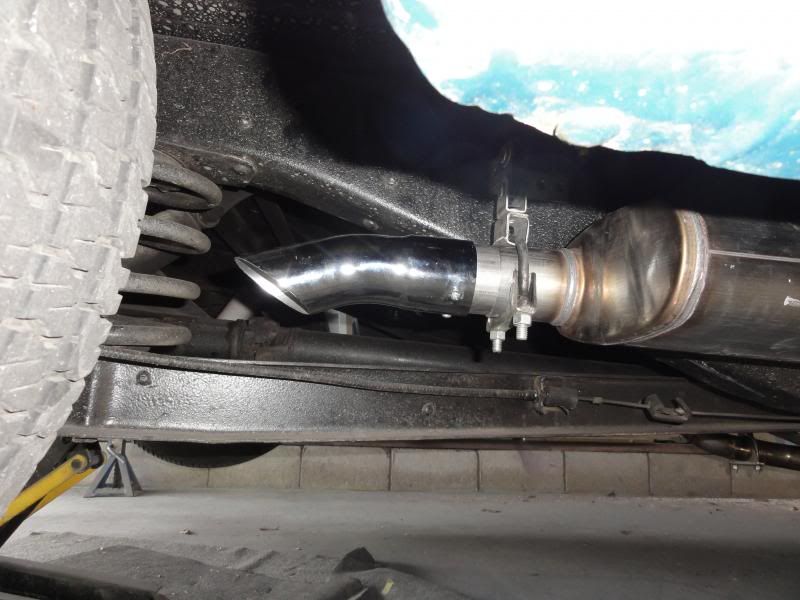 I'm actually really happy with the sound. These downturns cost $10 each at O'Rielys. The first test drive sounded good except that it had a cackling noise on acceleration. Then I remembered the hole for the O2 sensor. So I got that installed and the closed loop is hooked up for the EFI. The next test drive was pure joy. It was running better, smoother, less rich and the sound was just what I was hoping for. No more buzzing from the windows, no more drone. Going down the highway it was just a nice humming. Well worth the effort and cost. The seats are in. It was a bigger chore than I anticipated. 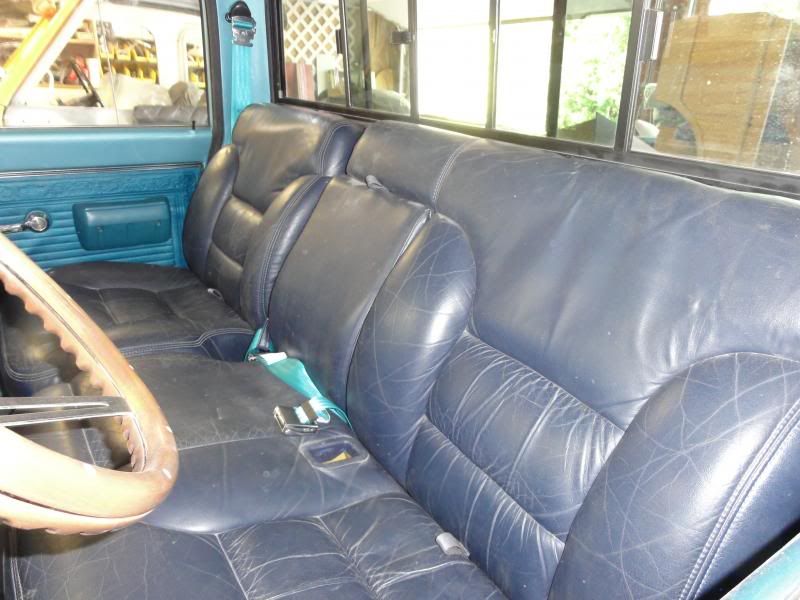 Getting the front bolted down was easy enough. I just drilled holes through the brackets to match up with the existing seat holes. 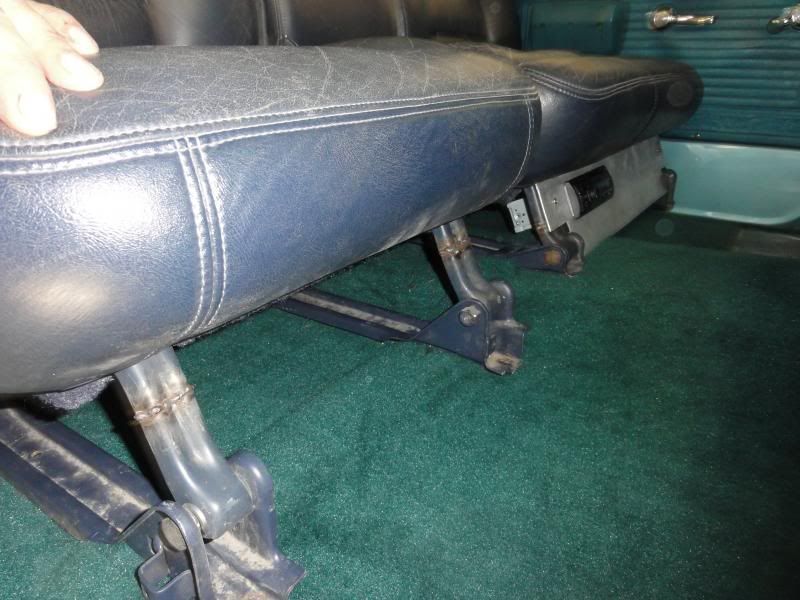 But that weird shape of the back end was baffling me. They were designed to rest on the front edge of the rear bed floor in a tahoe. Well my cab aint got no raised floor to perch on, so I made one from a 2x8. Well 2 actually. One for each seat.  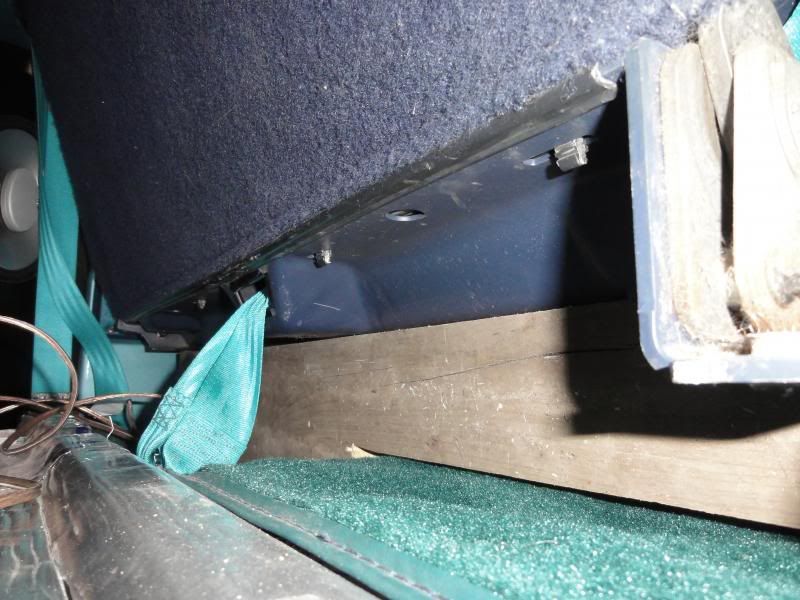 I matched the contours of the back mount, and matched the floor too for the driver side where it goes over the center hump. It works great and I should be able to hide it later when the upholstory gets done. I thought I was done then, but saw the seatbelts I took out to remove the old seat and had to put those in. But I couldn't because there was no hole through the new seat for the belts to go through. So I had to take the damn thing out to cut a hole in it.  I had some left over door edge guard to use on the edges of the new hole so it doesn't saw through my nice new belts. 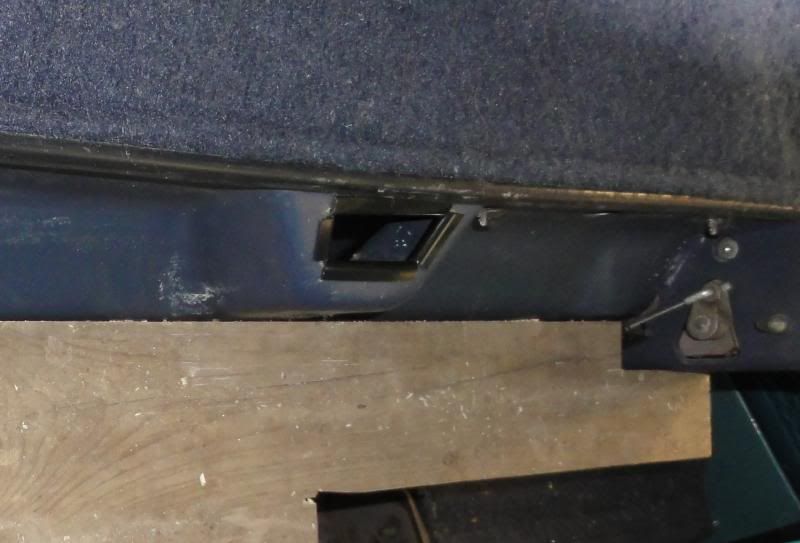 And to finish for the day I put in my cheapo floor mats. The center is supposed to be for a car backseat, but I think it works good on the hump. 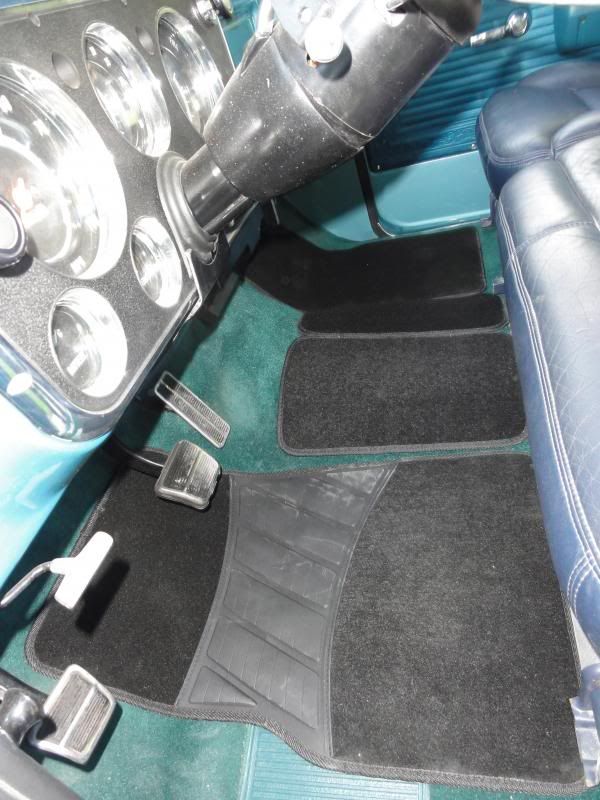 All thats left to prep it for the trip is to wire up the radio, wash it, maybe change the oil, fill up the gas tank and load her up. Time for a road trip and omg do I freaking need the break.
__________________
If no one knows what you're doing, they can't tell you you're doing it wrong HG's Dream Car Build - Shelby Cobra Kit Build your own adjustable track bar 71  Long Fleet C/10 Long Fleet C/10 72  Jimmy 4x4 (Junkyard Jimmy) Jimmy 4x4 (Junkyard Jimmy)HG's Plow Truck '78  K35 Dually K35 DuallyBigass Farm Truck HG's thread of miscellaneous stuff |
|
|

|
 |
| Bookmarks |
|
|