
|
Register or Log In To remove these advertisements. |
|
|
|
|||||||
 |
|
|
Thread Tools | Display Modes |
|
|
 01-18-2022, 10:39 AM
|
#1 |
|
Registered User
Join Date: Dec 2012
Location: Rochester, KENT
Posts: 10,509
|
Re: GRIZZs 79 - 2WD BLAZER Challenge over in London, England. ~Its not a Project
Remember the stables I went to help mate Craig pull down along with Fil from Cambridge.
That came down to allow for redevelopment as a residence. In the mean time groundwork and foundations have been done. Yesterday at 09.00 the new homes stud walls came onto site. Pics from Craig. 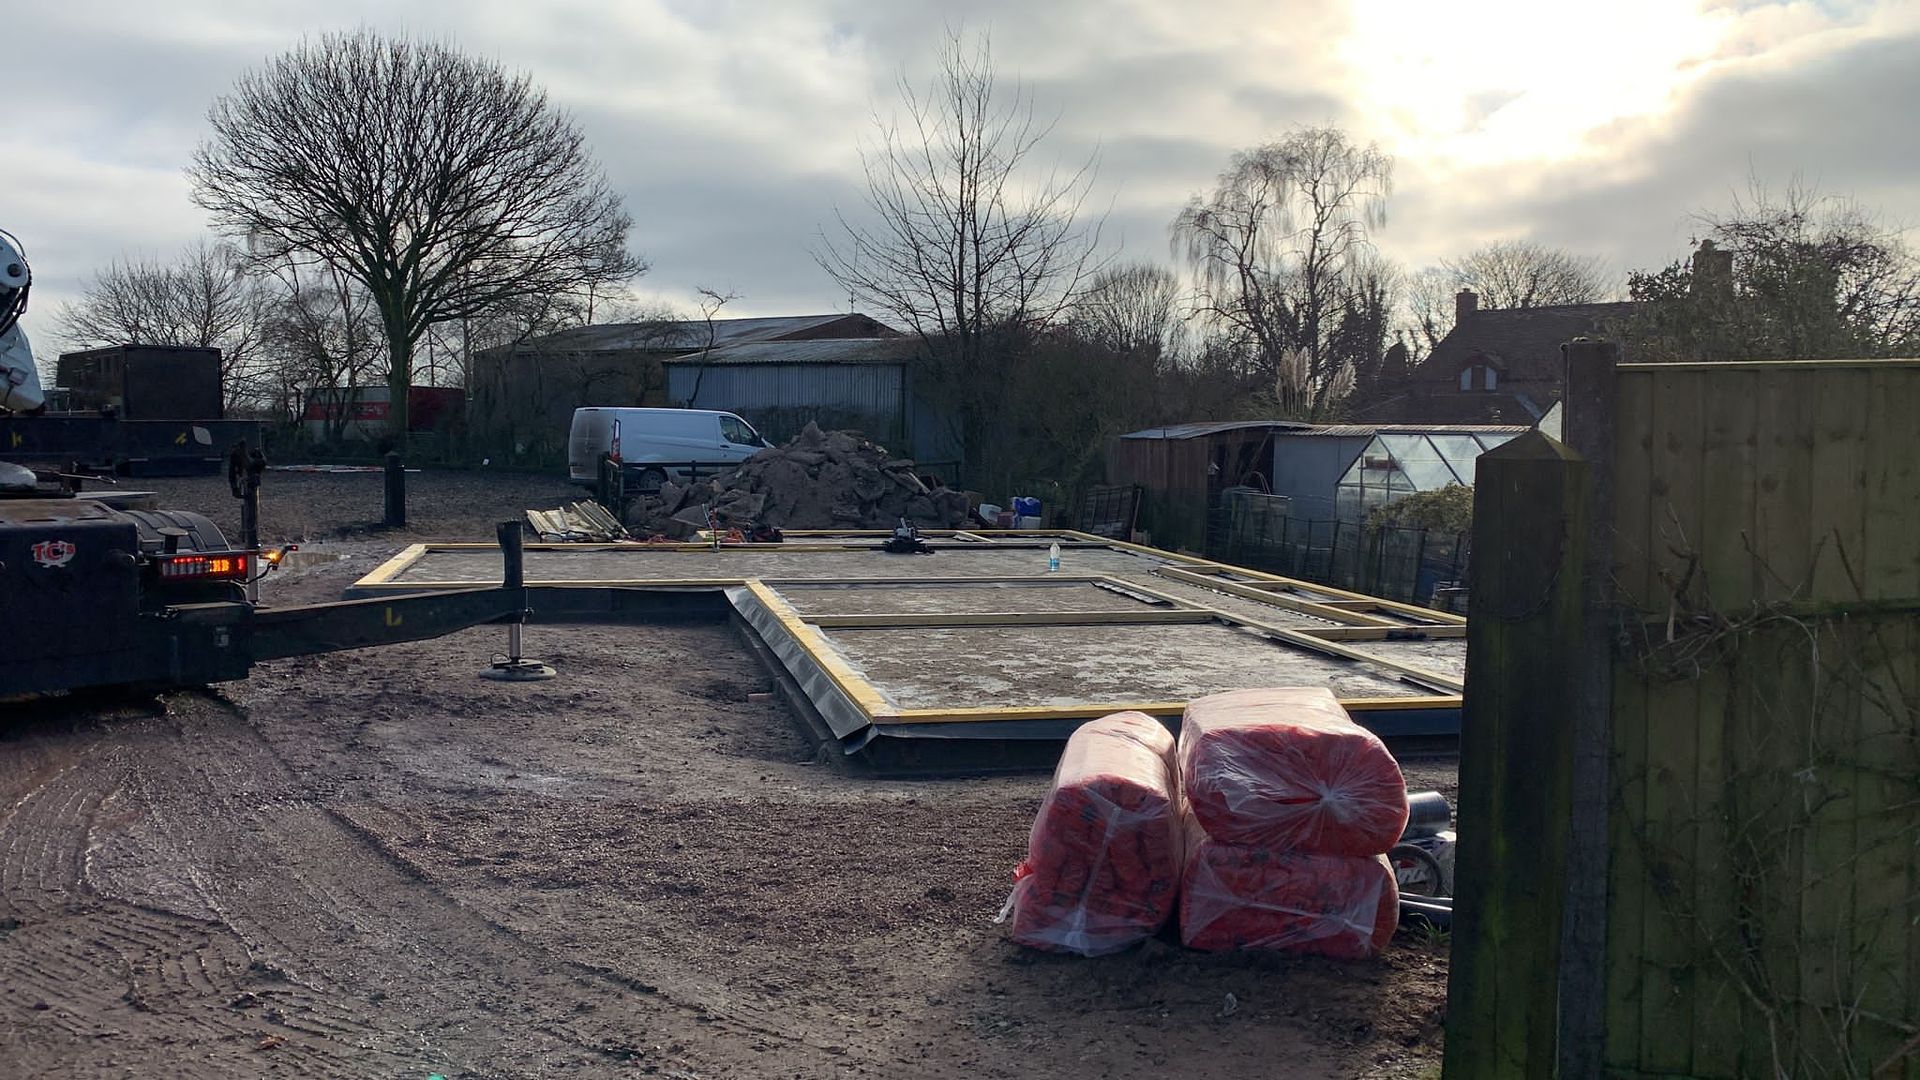 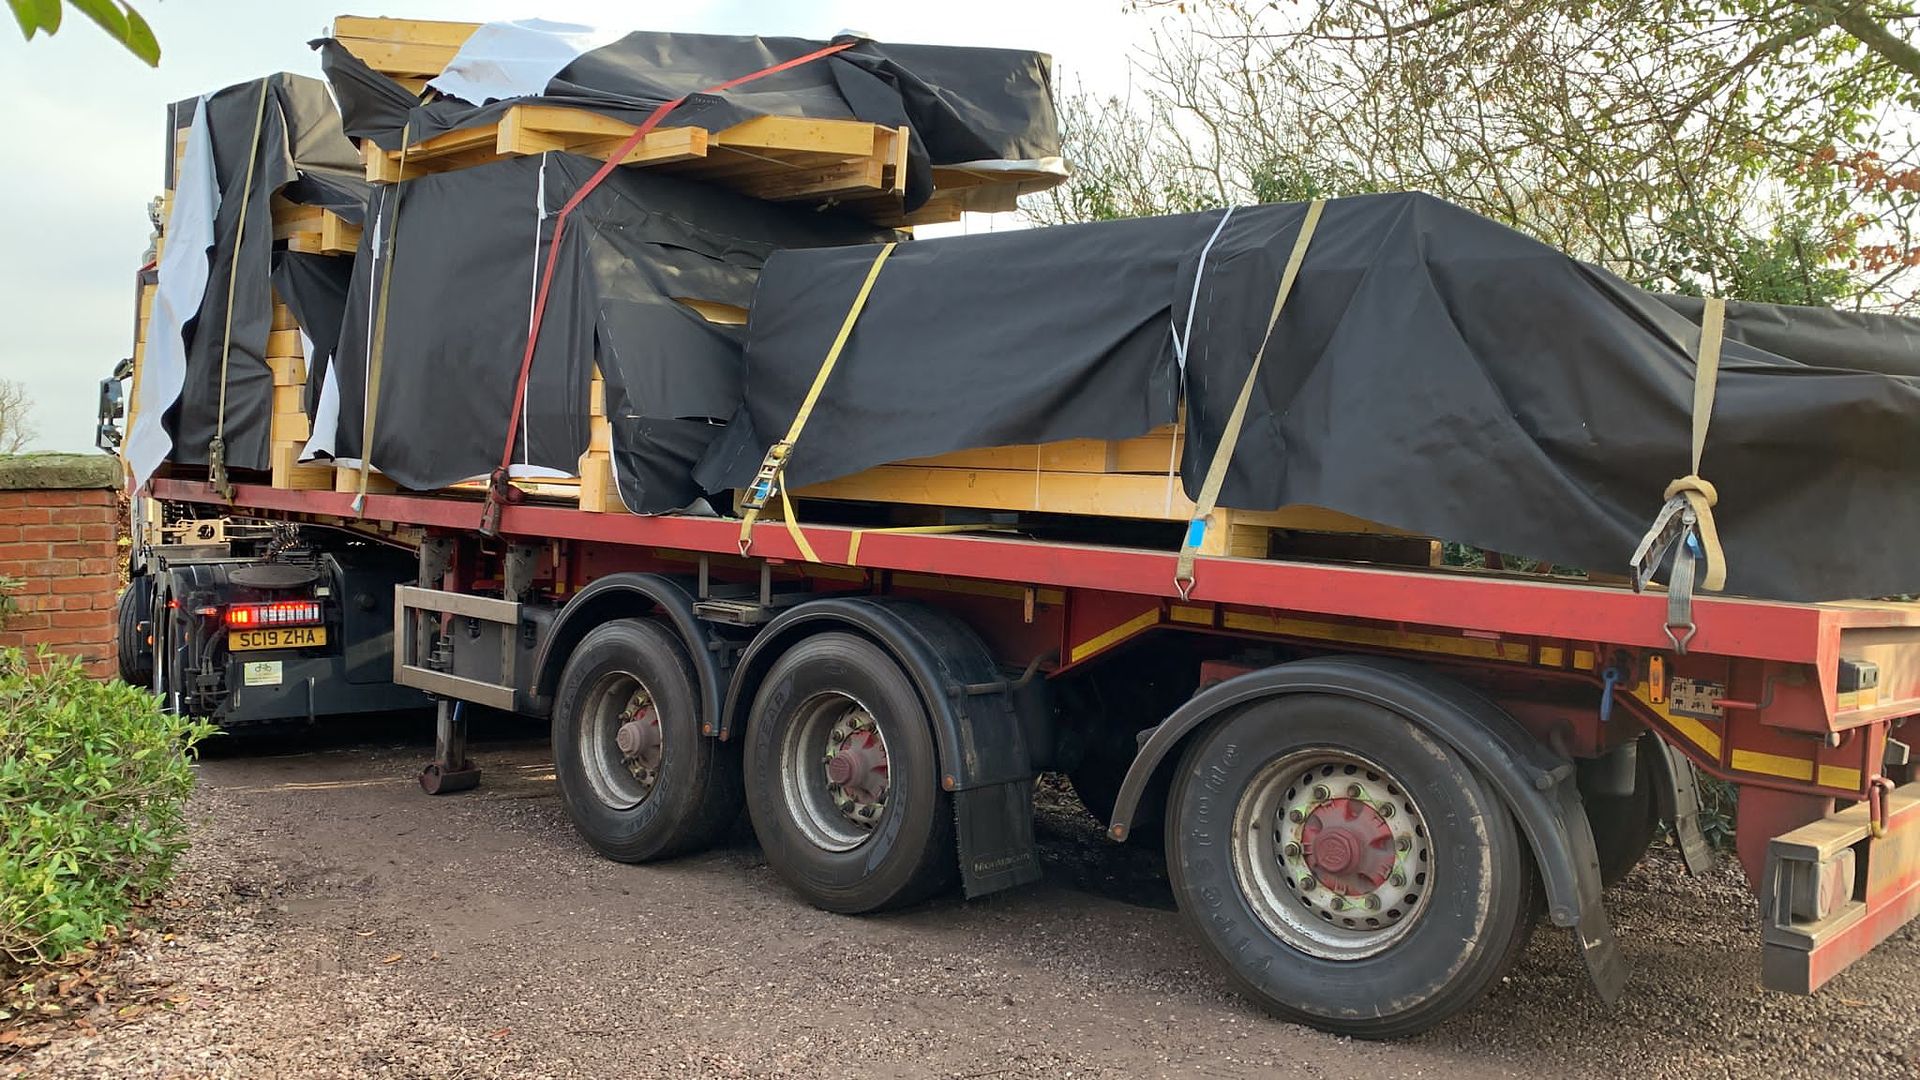 We all need a strong long arm. 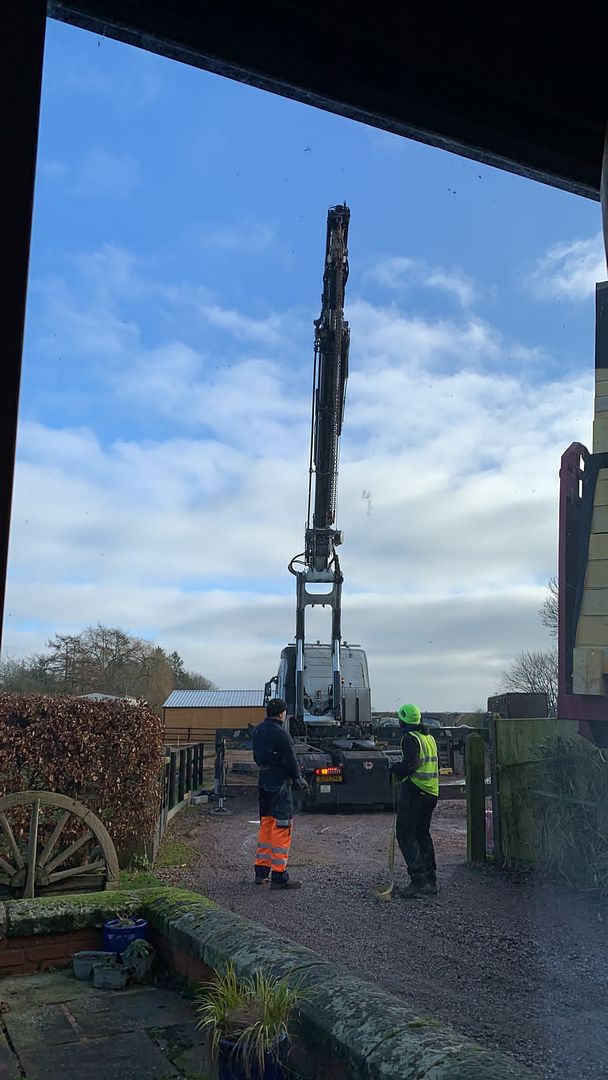  By 3.30 pm this was the status. 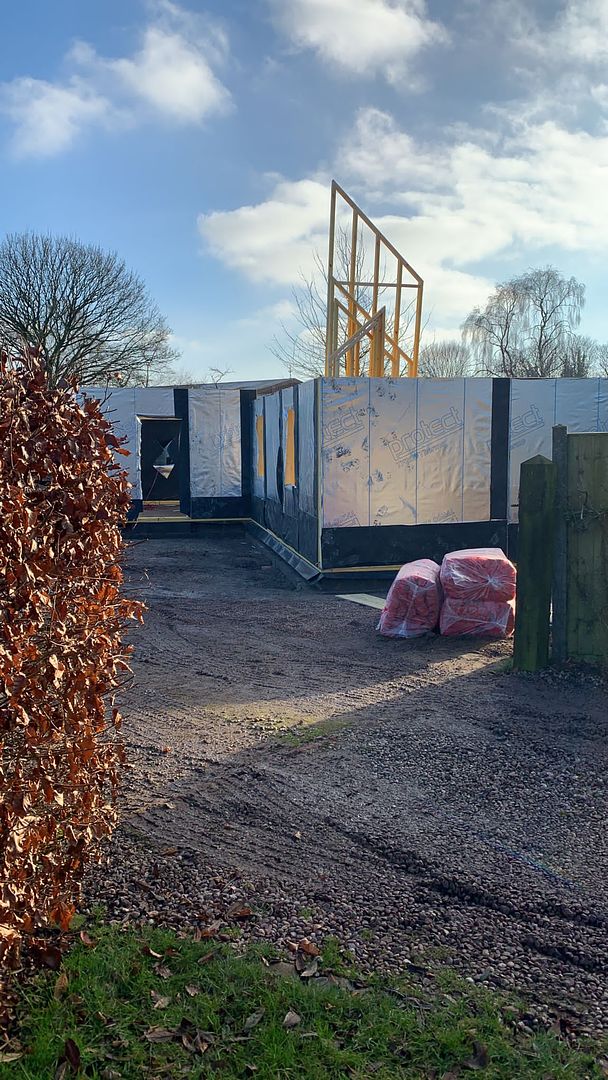 And this morning the chilly sunrise brought this view. 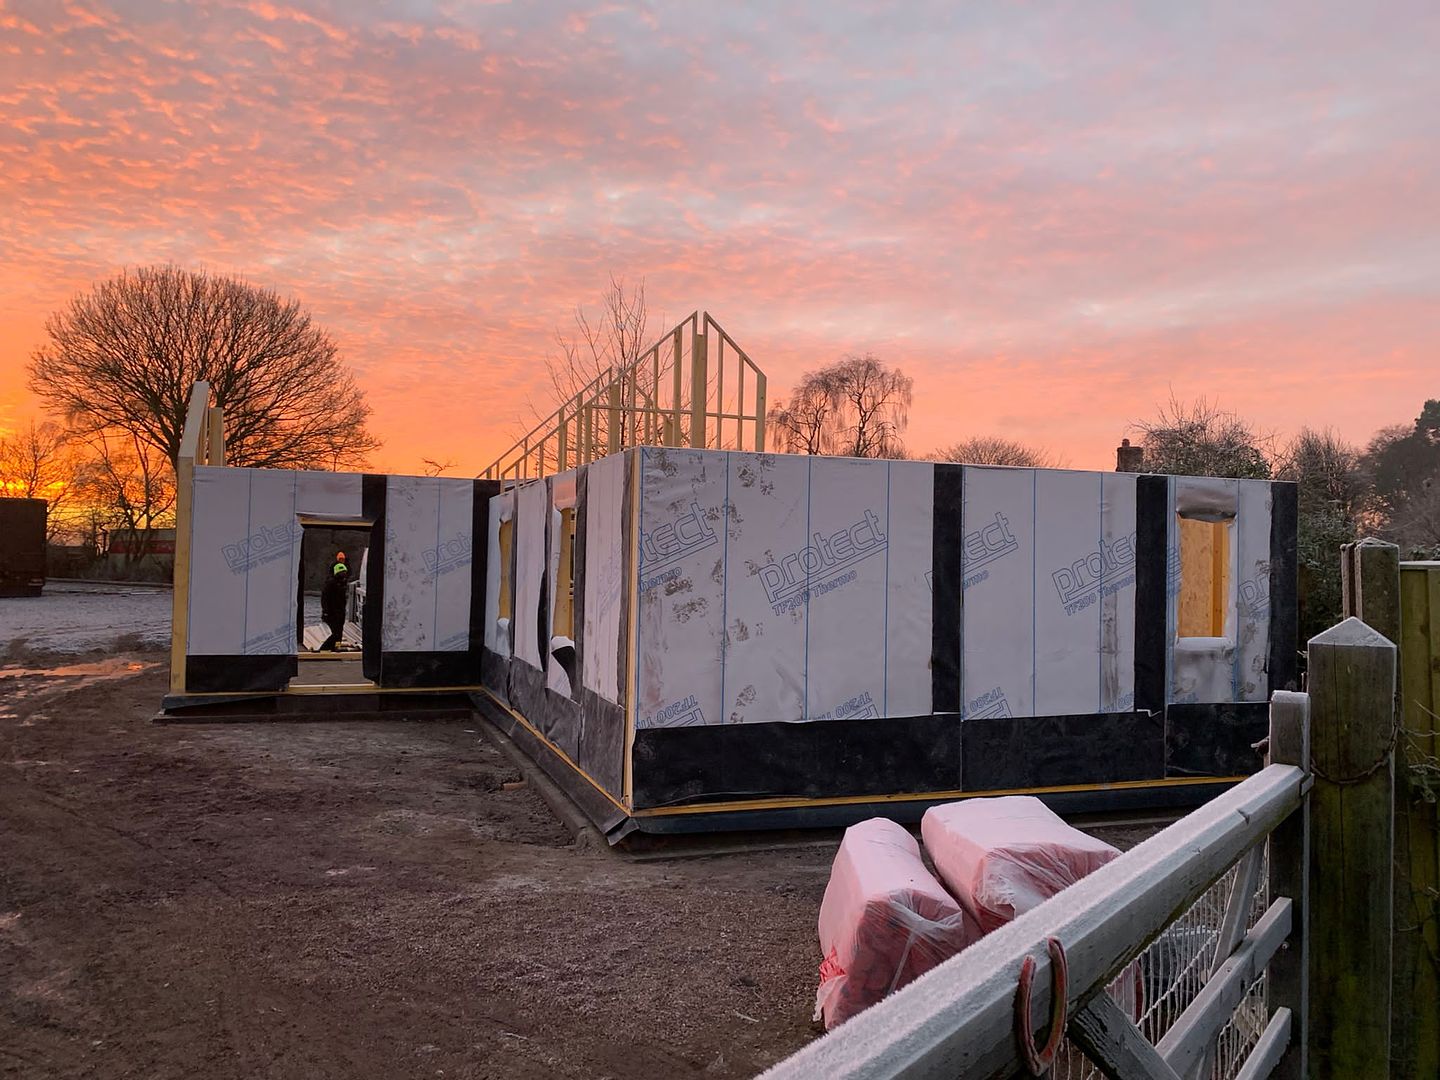 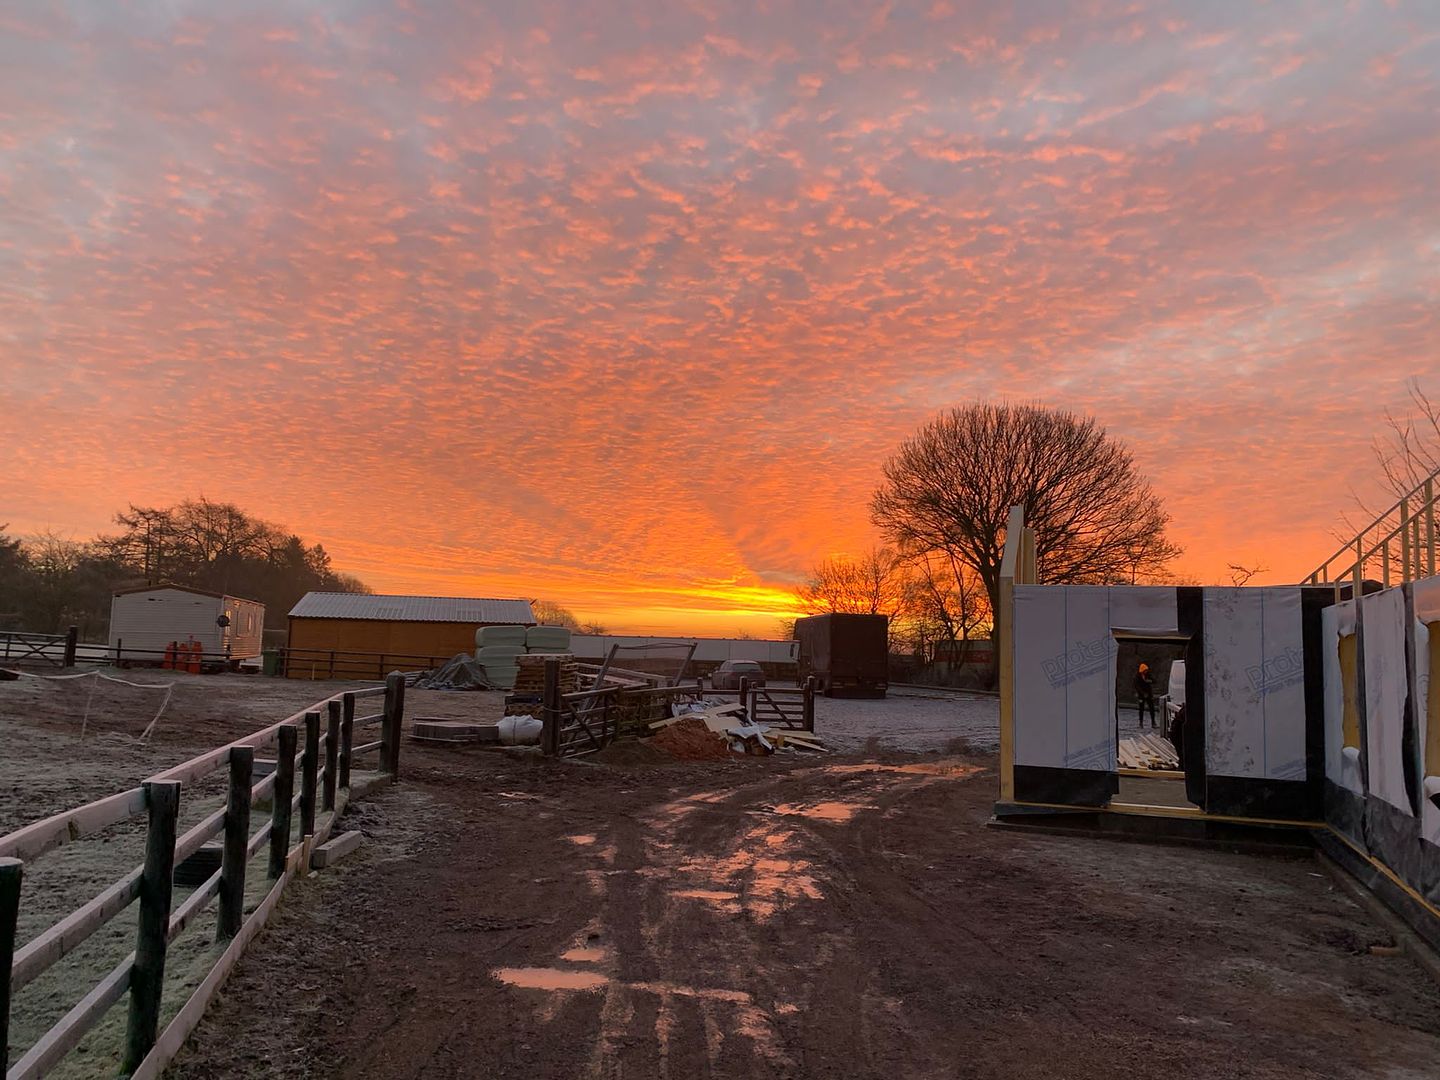 Not sure when exactly I or we will get the call to go help Craig raise the walls on the stables and get the roof on top of them. Hopefully the weather will be kind when the time comes.
__________________
MY BUILD LINK: http://67-72chevytrucks.com/vboard/s...585901]Redneck Express - 1966 C10 Short Fleetside MY USA ROADTRIPS http://forum.retro-rides.org/thread/...2018-humdinger IF YOU CAN'T FIX IT WITH A HAMMER, YOU'VE GOT AN ELECTRICAL PROBLEM MATE. |

|

|
|
01-22-2022, 06:30 AM
|
#2 |
|
Registered User
Join Date: Dec 2012
Location: Rochester, KENT
Posts: 10,509
|
Re: GRIZZs 79 - 2WD BLAZER Challenge over in London, England. ~Its not a Project
This week has been a bit (very) busy with admin stuff, targeting and target lists and general day job stuff.
However, I do want to ask all the IT geniuses out there, why would an XL spreadsheet on Teams only allow one person at a time to edit it. (No need to reply) Spectacular inefficiency again from the bosses, they give you a rally car with one wheel missing and expect you to win the race. Seriously. Anyway. While waiting my turn to go in and edit the list, I was angry enough to pop to the garage and grab the new rear shocks. 15 minutes later I closed the garage. Job done. Old 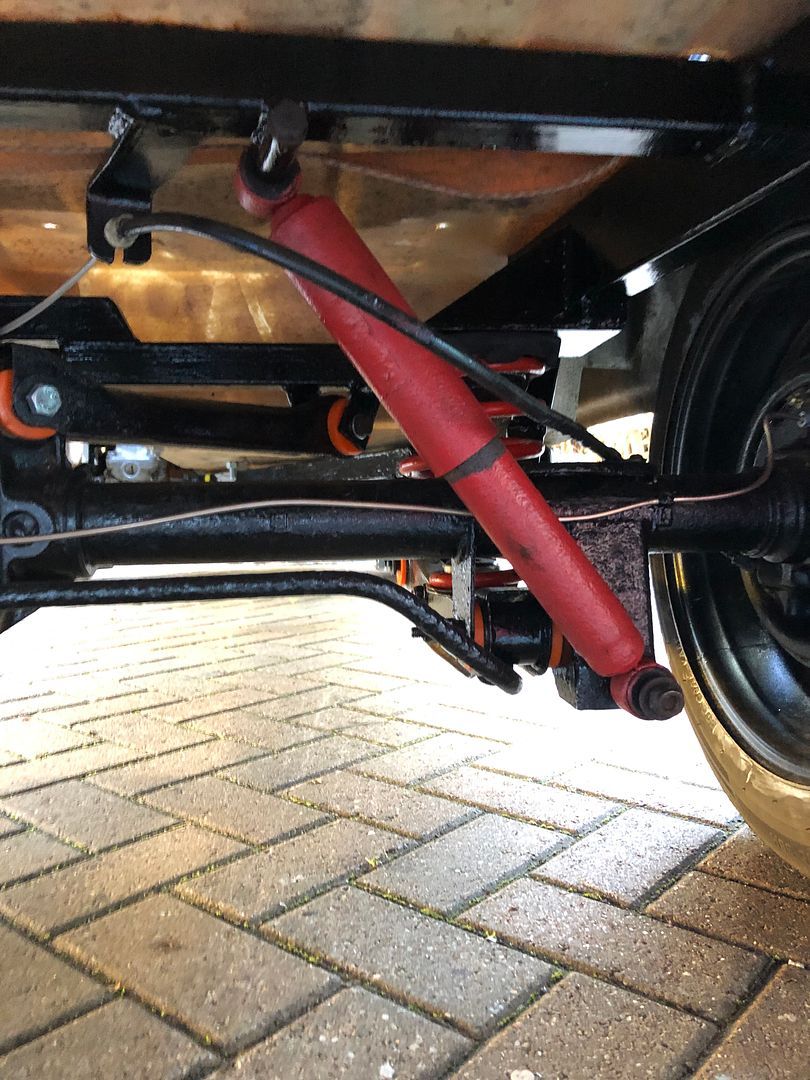 New 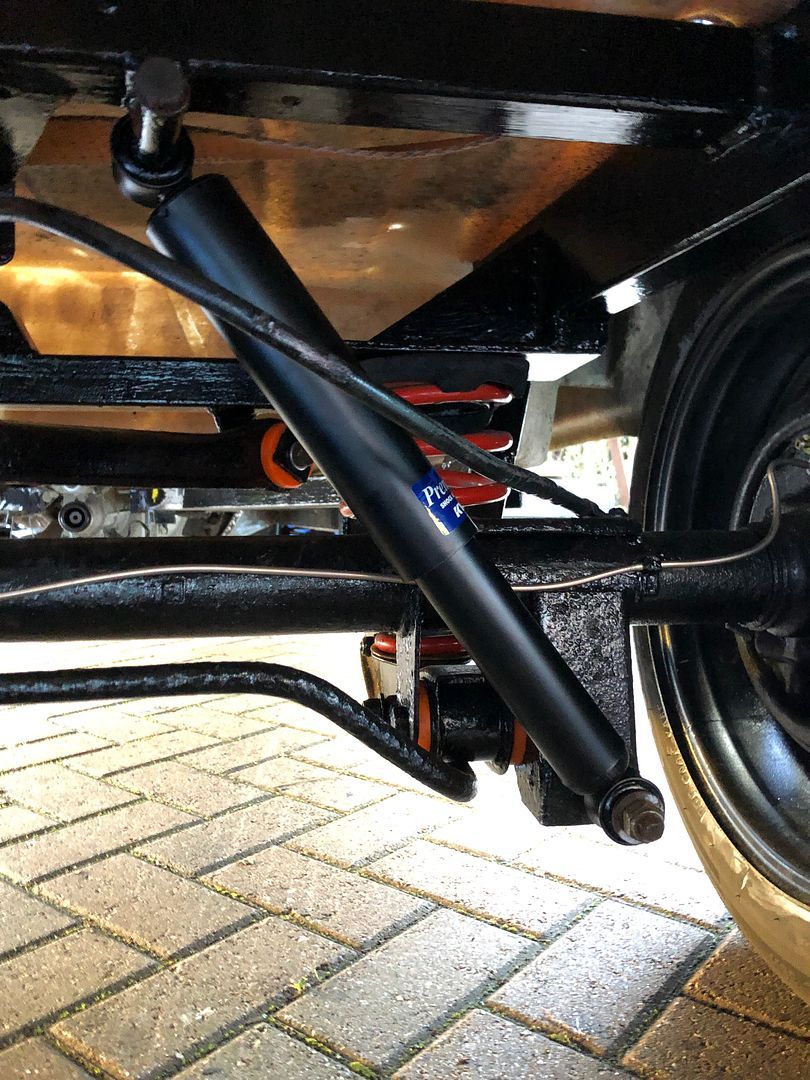 Little wins ehhhh. Today I want to go make up the drilling template for the screen support and scuttle and get the holes drilled in the body and steel that I welded in upside down on Sunday when @nickwheeler came over so we could create the supports and framework from which the steering and dash will be grown. It was a good day for sure. Once the scuttle is drilled, the template needs to be reverse marked onto the underside of the glazed Land Rover screen which then needs 5 holes drilled in order for the threaded bar or cut off bolts to be fitted in there and then Tig welded in place at Nicks place or possibly here as fitting studs for the screen. I also need to start thinking of removing the seats again so the body can be lifted and the underside painted black, either with underseal or some regular black gloss paint to get it looking uniform. Of course I already have a load of regular black paint . Remember this messy underside? 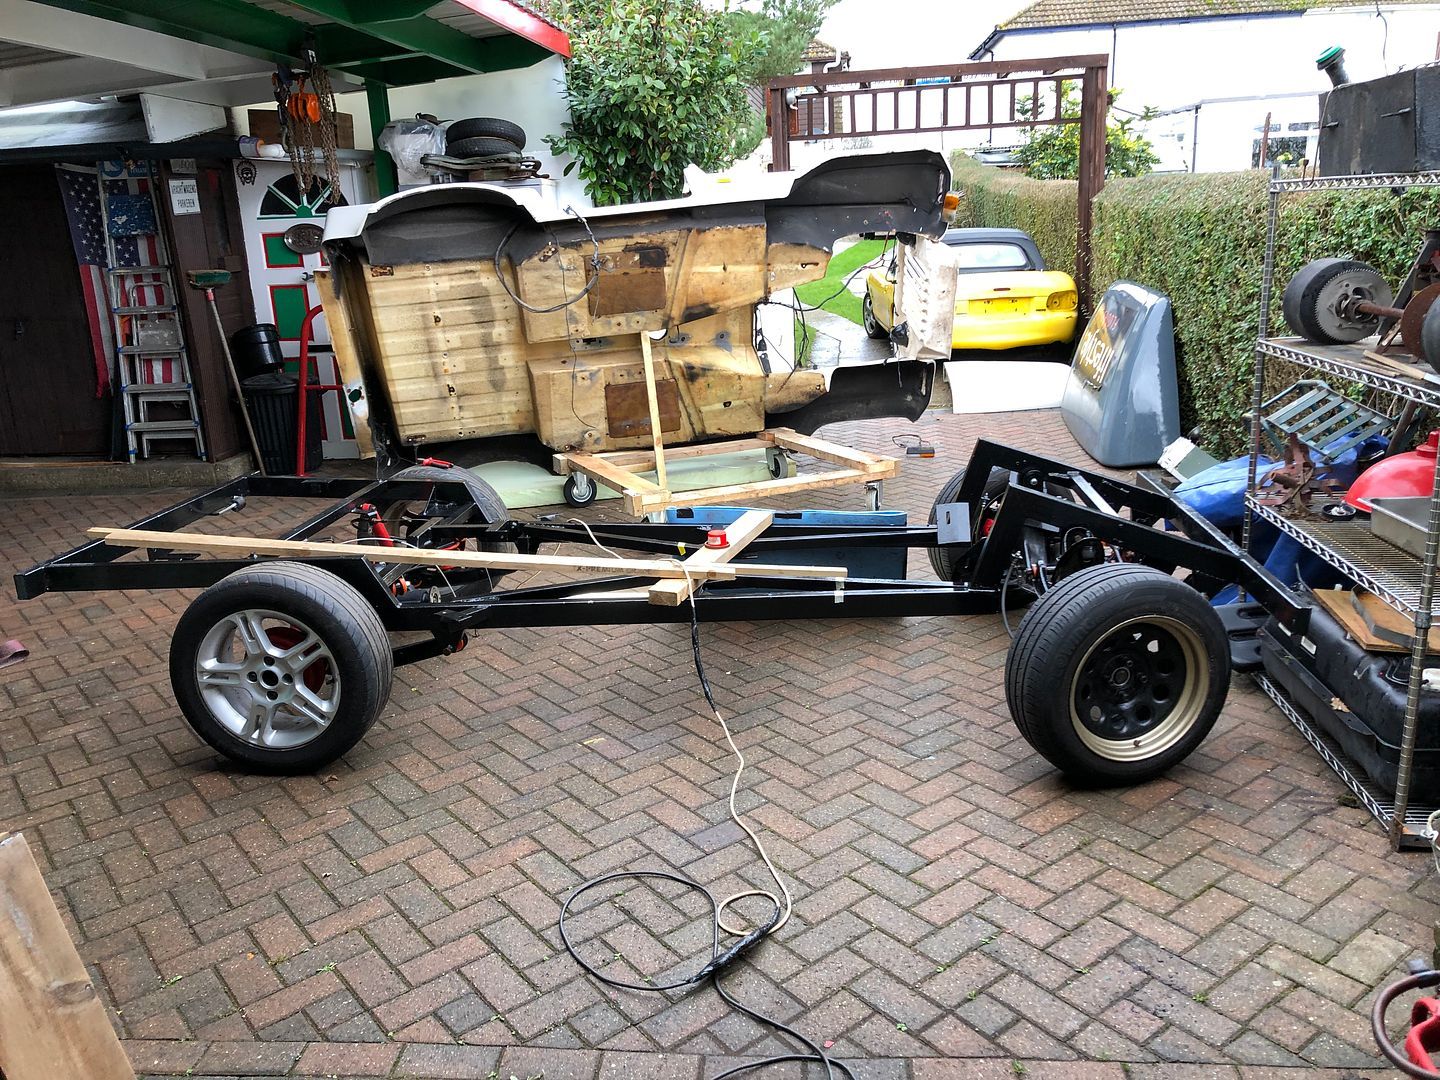 Onwards as @pauly says.
__________________
MY BUILD LINK: http://67-72chevytrucks.com/vboard/s...585901]Redneck Express - 1966 C10 Short Fleetside MY USA ROADTRIPS http://forum.retro-rides.org/thread/...2018-humdinger IF YOU CAN'T FIX IT WITH A HAMMER, YOU'VE GOT AN ELECTRICAL PROBLEM MATE. |
|
|
|
|
01-22-2022, 09:31 AM
|
#3 |
|
Registered User
Join Date: Dec 2012
Location: Rochester, KENT
Posts: 10,509
|
Re: GRIZZs 79 - 2WD BLAZER Challenge over in London, England. ~Its not a Project
RESOUNDING MONUMENTAL FAILURE AT THE GARAGE.
Carefully measured out and drew in screen base size. Measured 5 holes on scuttle top and drilled first pilots with 5mm HSS bit, managed to snap it on hole 5 due to corder hand drill and my cack handed position over it. Replaced the bit from my stash of smaller bits and finished hole no 5 Then up to 8mm as I was headed toward 12mm to allow ease of fitting and some movement space once the studs are welded on. So started hole no 1 again, using some cutting spray from the drill press. And suddenly I was skating on ice. Tried the other holes, changed bits and Fail after Fail. I recall when cleaning and preparing the angle iron for welding the sparks were of the type typical of harder steel. Maybe the angle iron was from some structure that was built to resist corrosion or have a certain strength. In the end I walked away, defeated. I guess next step will be to go find one of those clever coated drill bits in the hope it will penetrate the steel. Frustrated as can be right now . Fun?
__________________
MY BUILD LINK: http://67-72chevytrucks.com/vboard/s...585901]Redneck Express - 1966 C10 Short Fleetside MY USA ROADTRIPS http://forum.retro-rides.org/thread/...2018-humdinger IF YOU CAN'T FIX IT WITH A HAMMER, YOU'VE GOT AN ELECTRICAL PROBLEM MATE. |
|
|
|
|
01-22-2022, 04:05 PM
|
#4 |
|
Registered User
Join Date: Dec 2012
Location: Rochester, KENT
Posts: 10,509
|
Re: GRIZZs 79 - 2WD BLAZER Challenge over in London, England. ~Its not a Project
So my day started, thinking it would be a quick 5 holes measured
.
 Drilled .. 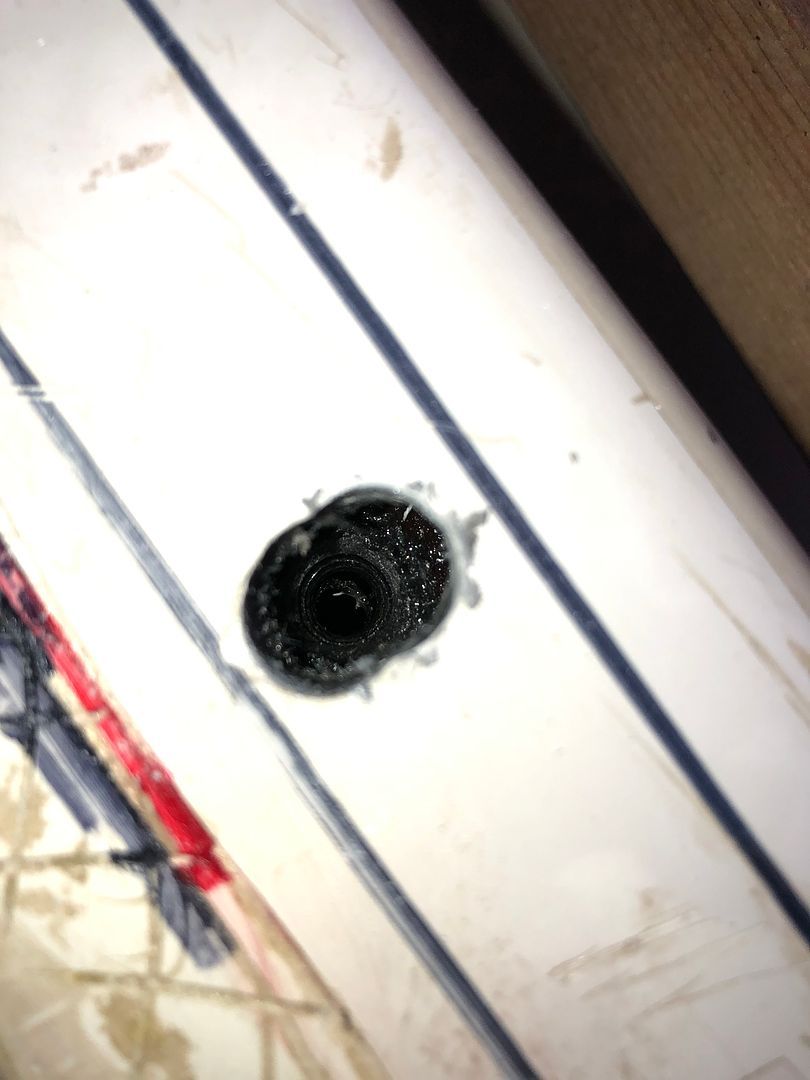 Ooooooppppssss .. Stop right there. Well, the next size drill did, after the 5mm pilot holes were drilled. It was almost like the holes were glazed, despite cutting fluid the 8mm drill bit after the 5mm pilot holes just seemed to spin and create smoke in the holes. I also tried a new 9mm bit and failed. So after trying to drill all 5 mounting holes, I called it a day and went indoors. Sally was busy with her artwork, so I distracted her and offered a quick shopping trip. When she bought the Fiesta it was only supplied with one key, whe. The key was handed over, I objected and Dan the salesman took a moment and then agreed to paying the £75.00 for a spare, immobiliser chipped key for her. So today we went and had one cut and programmed. While out, I also went to B&Q (Big hardware store) and bought a set of various TiN Titanium Nitride drill bits for £22.00 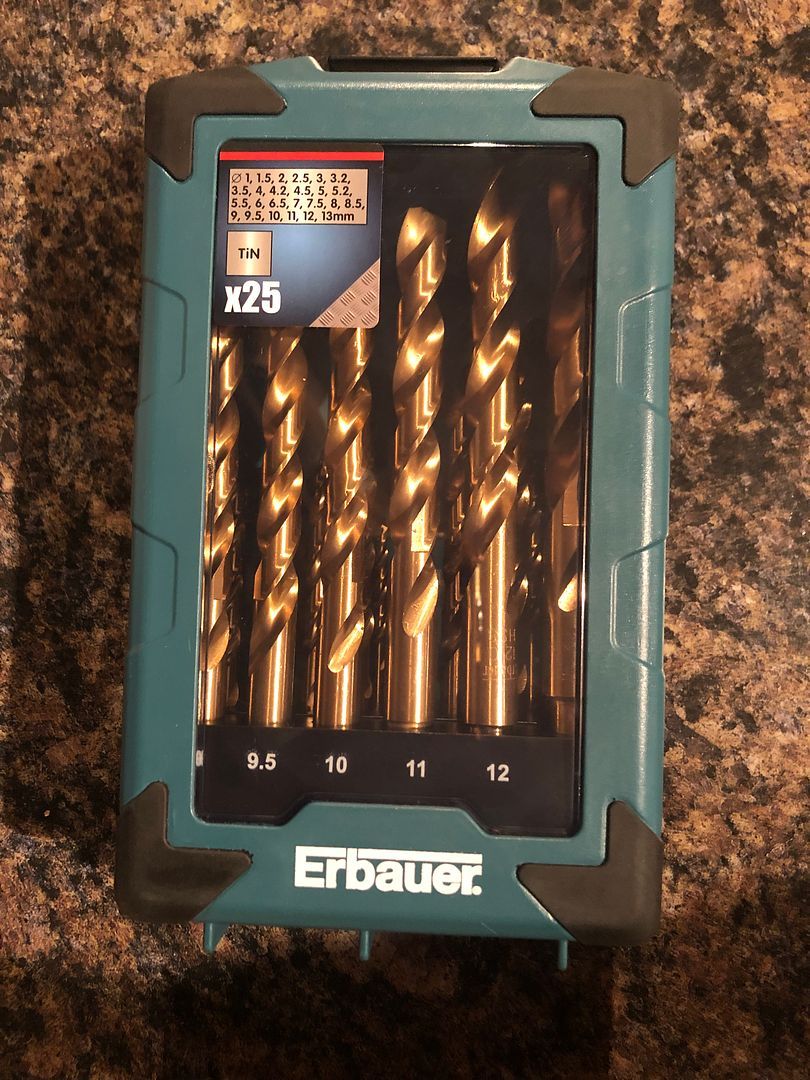 I hope to get back to drilling the holes tomorrow. Of course a hand held, corded drill and no support or stabilisation of the angle iron may make it a touch awkward, but I am hopeful. I really need to get these holes drilled and the screen prepped for Tig welding. Now for some alcohol .
__________________
MY BUILD LINK: http://67-72chevytrucks.com/vboard/s...585901]Redneck Express - 1966 C10 Short Fleetside MY USA ROADTRIPS http://forum.retro-rides.org/thread/...2018-humdinger IF YOU CAN'T FIX IT WITH A HAMMER, YOU'VE GOT AN ELECTRICAL PROBLEM MATE. |
|
|
|
|
01-23-2022, 06:55 PM
|
#5 |
|
Registered User
Join Date: Dec 2012
Location: Rochester, KENT
Posts: 10,509
|
Re: GRIZZs 79 - 2WD BLAZER Challenge over in London, England. ~Its not a Project
Today was a success
. Kind of.
Somewhere between LOL-ing and swearing at myself. It is stiff, sore and not quite right. Off to A&E to see if an X-Ray sheds and light or shadow on it in the morning. 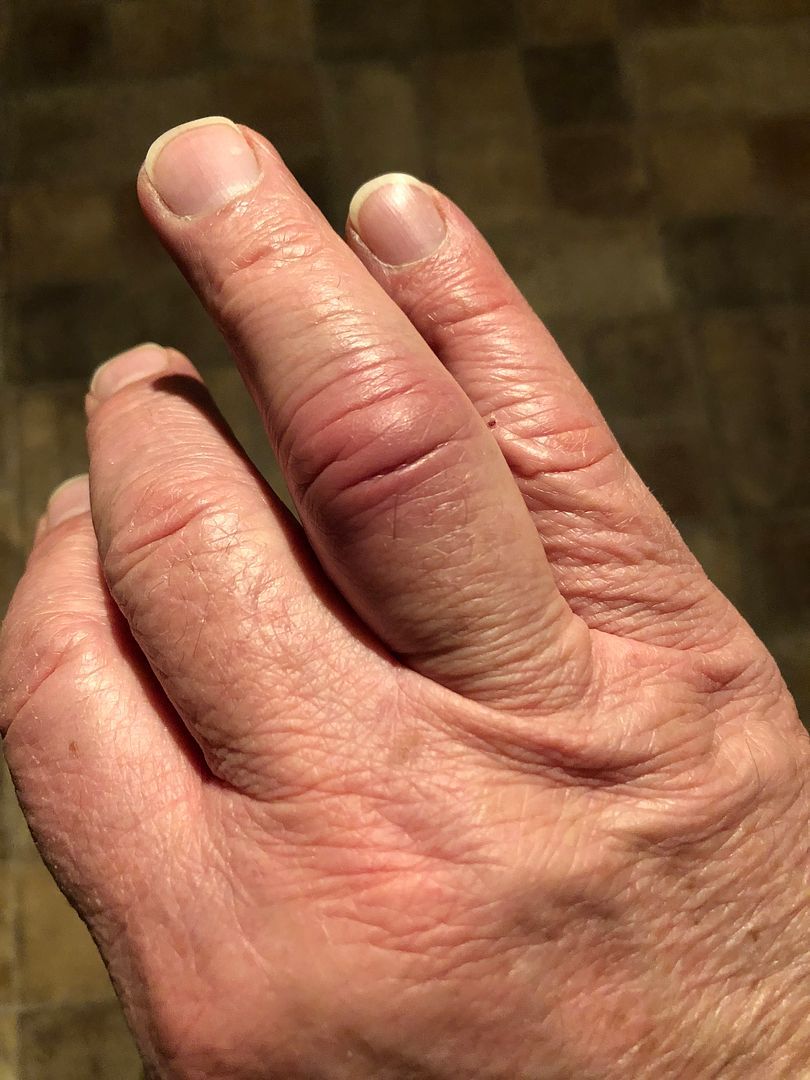
__________________
MY BUILD LINK: http://67-72chevytrucks.com/vboard/s...585901]Redneck Express - 1966 C10 Short Fleetside MY USA ROADTRIPS http://forum.retro-rides.org/thread/...2018-humdinger IF YOU CAN'T FIX IT WITH A HAMMER, YOU'VE GOT AN ELECTRICAL PROBLEM MATE. |
|
|
|
|
01-24-2022, 06:19 AM
|
#6 |
|
Registered User
Join Date: Dec 2012
Location: Rochester, KENT
Posts: 10,509
|
Re: GRIZZs 79 - 2WD BLAZER Challenge over in London, England. ~Its not a Project
One of those random posts today.
As always, thanks for checking in and commenting. I have not done anything like this for some time. Well, since my charity bicycle ride a few years ago that so many people supported. And that went beautifully because people literally donated what they could. From the coins in their cars to some amazingly generous and large donations that had me choking back real tears. Sally is doing this Moon Walk from a point of real conviction and the least I can do for her is to spread the word. If you feel this is not your circus, not your monkeys, it is quite OK. But if you feel inclined to donate any amount to this worthy cause, please follow the link and donate. Sharing the link, if you feel it may help spread the word is good too. I can only thank you deeply on behalf of Sally and those who benefit from Breast Cancer research, male and female. Click the link to see more and decide if this is a worthy cause to contribute to. https://eur03.safelinks.protection.o...amp;reserved=0 Thanks again for any responses.
__________________
MY BUILD LINK: http://67-72chevytrucks.com/vboard/s...585901]Redneck Express - 1966 C10 Short Fleetside MY USA ROADTRIPS http://forum.retro-rides.org/thread/...2018-humdinger IF YOU CAN'T FIX IT WITH A HAMMER, YOU'VE GOT AN ELECTRICAL PROBLEM MATE. |
|
|
|
|
01-24-2022, 09:52 AM
|
#7 |
|
Registered User
Join Date: Dec 2012
Location: Rochester, KENT
Posts: 10,509
|
Re: GRIZZs 79 - 2WD BLAZER Challenge over in London, England. ~Its not a Project
So yesterday was filled with a load of odd jobs, as was Saturday.
But stuff got done and to be honest, I was still pleased with my progress or results. The finger getting hurt did not stop me working, it only really went bad last night and overnight, but I should live 😉 I pulled out my large corded drill and fitted the 12mm TiN coated bit. First hole went through reasonably easy, but it was no 2 that whacked my finger when it caught itself , locking in the steel, spinning the drill and cord around my hand. So a couple of gentle approaches saw hole no 2 go through fine followed by 3, 4, 5 being easy. .jpg) Next job was to remove the trims, glass, and sealant from the full screen that @glenanderson had donated to this build from his stash of spares. Loads of tiny screws kept it all together, and not one broke, but I was careful all the way. 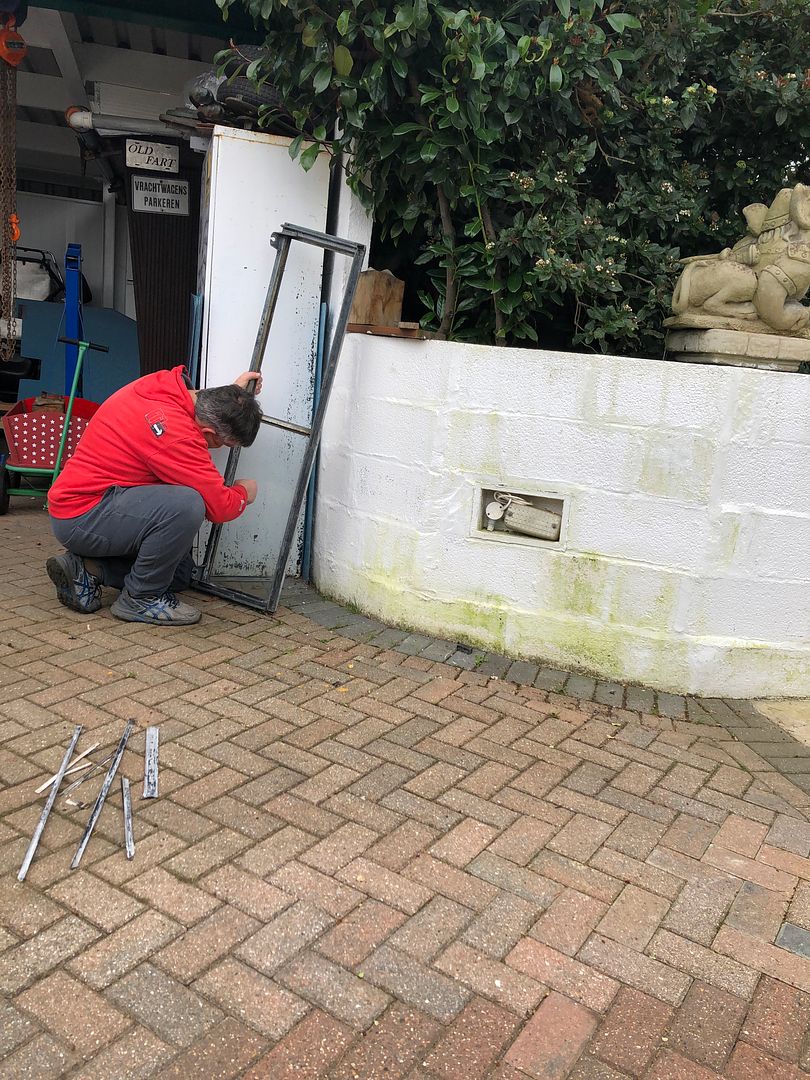 I also drilled out the backs of the rivets that had held the foamy insulation strips to seal the windows on the doors, mounted on some pretty resilient steel strips. Then ground the drilled sides back with a flap wheel followed by my electric keyhole sander. So the rounded rivet heads are still seated on the insides of the frame, looking tidy. 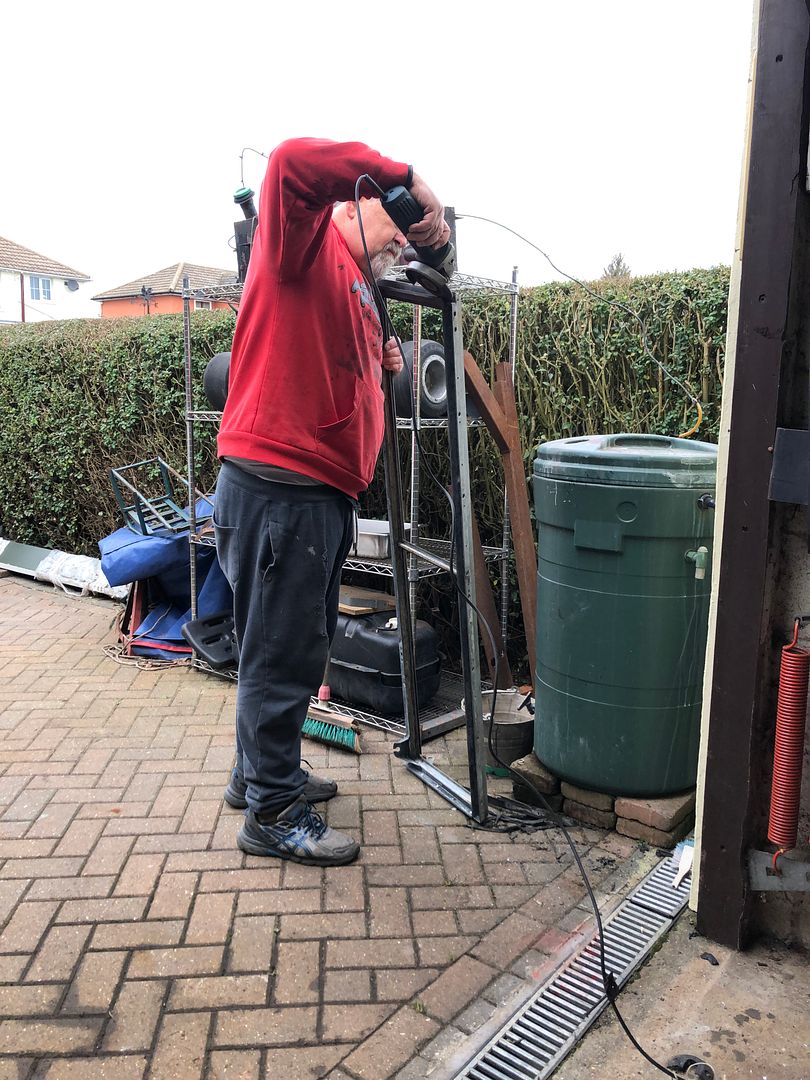 And then measured and marked the holes where the studs will need to go. Drilling and Tig welding will be next, later. 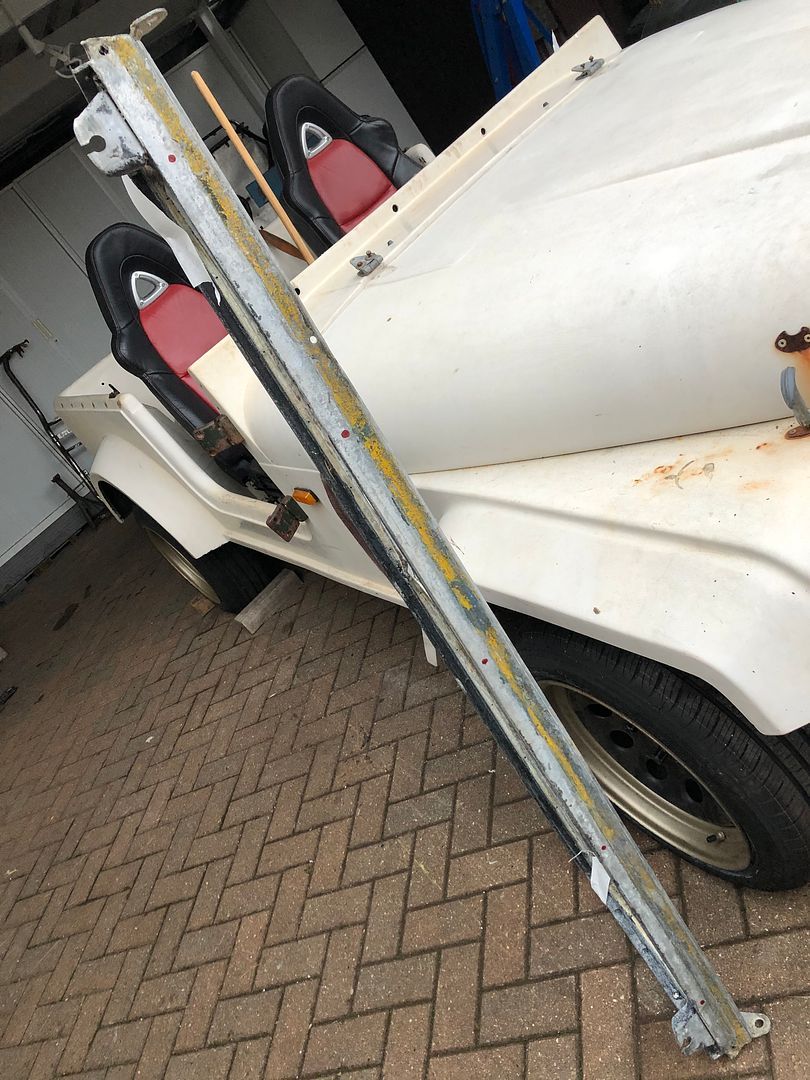 Later I scraped and cleaned the laminated glass screens as well and washed them. QUESTION TIME: How high is the risk of losing one of both screens if I were to firstly find, and then have a glass specialist cut and trim 50mm or 2 off the top of these glasses? I do not really want to destroy them if the risk is too high. But have seen laminated glass cut on some TV car resto programme.  Advice appreciated Thanks. PS: VERDICT ON THE TiN DRILL BITS. ABSOLUTELY WORTH THE £22.00 THE WHOLE SET COST ME. I REALLY COULD FEEL THE DIFFERENCE WHEN WORKING. .
__________________
MY BUILD LINK: http://67-72chevytrucks.com/vboard/s...585901]Redneck Express - 1966 C10 Short Fleetside MY USA ROADTRIPS http://forum.retro-rides.org/thread/...2018-humdinger IF YOU CAN'T FIX IT WITH A HAMMER, YOU'VE GOT AN ELECTRICAL PROBLEM MATE. |
|
|
|
|
01-24-2022, 01:09 PM
|
#8 |
|
Registered User
Join Date: Oct 2015
Location: PNW
Posts: 3,578
|
Re: GRIZZs 79 - 2WD BLAZER Challenge over in London, England. ~Its not a Project
Glad that you found something that worked like you needed it to to get those holes drilled. What a wrestling match. And replacing the shocks, I don't think of that as a small step, often doing four of them is an all day eventand you got halfway there in 15 minutes. Nice to know that the dampening portion of your ride has been addressed. As far as the underside, don't you guys have something over there called stoneguard, something like that? Wouldn't that be most appropriate for the underside of the tub? On my truck, eventually I will be spraying undercoating / bed lining material in the underneath of the fender wells, and also under the cab as a measure of sound reduction. Being open air, maybe that's less critical for you. But it seems like you would want something under there that would not chip readily.
|
|
|
|
|
01-24-2022, 04:24 PM
|
#9 | |
|
Registered User
Join Date: Dec 2012
Location: Rochester, KENT
Posts: 10,509
|
Re: GRIZZs 79 - 2WD BLAZER Challenge over in London, England. ~Its not a Project
Quote:
Yes, progress is a weird thing. And I always enjoy the small wins. We do have stoneguard. Known as Shutz or Schults. Keep in mind it is a fiberglass tub, hence the Rezin Rockit name (Rezin misspelling on purpose, Rockit =Kit car origins) Anyway, the main reason for paintin the underside is to get uniform colour.
__________________
MY BUILD LINK: http://67-72chevytrucks.com/vboard/s...585901]Redneck Express - 1966 C10 Short Fleetside MY USA ROADTRIPS http://forum.retro-rides.org/thread/...2018-humdinger IF YOU CAN'T FIX IT WITH A HAMMER, YOU'VE GOT AN ELECTRICAL PROBLEM MATE. |
|
|
|
|
|
01-24-2022, 01:11 PM
|
#10 |
|
Registered User
Join Date: Oct 2015
Location: PNW
Posts: 3,578
|
Re: GRIZZs 79 - 2WD BLAZER Challenge over in London, England. ~Its not a Project
Oh yeah, and I think that laminated glass can be cut, but not tempered glass. Maybe you can go to a salvage yard and get a windshield to practice on. I really don't know what the method would be, almost like a tile saw maybe? Abrasive blade and water?
|
|
|
|
|
01-24-2022, 04:30 PM
|
#11 | |
|
Registered User
Join Date: Dec 2012
Location: Rochester, KENT
Posts: 10,509
|
Re: GRIZZs 79 - 2WD BLAZER Challenge over in London, England. ~Its not a Project
Quote:
Always a good thing, thanks. I think the idea is to cut one side, then the other, tap it, and slice the lamination with a thin blade. I could be wrong. But the plan is to approach a plant glass company and seeing what they charge. This morning after the hospital and X-rays I popped into my favourite scrap yard/recycling yard.  Needed some pipe to use to extend the MX5 under dash support. Found nothing that I wanted. But got a 2.0 meter length of heavy box section that could do the job too, albeit differently. £10.00 for the steel and this little steel ride on car. I cannot resist them. Needs a steering part to be replaced r repaired. 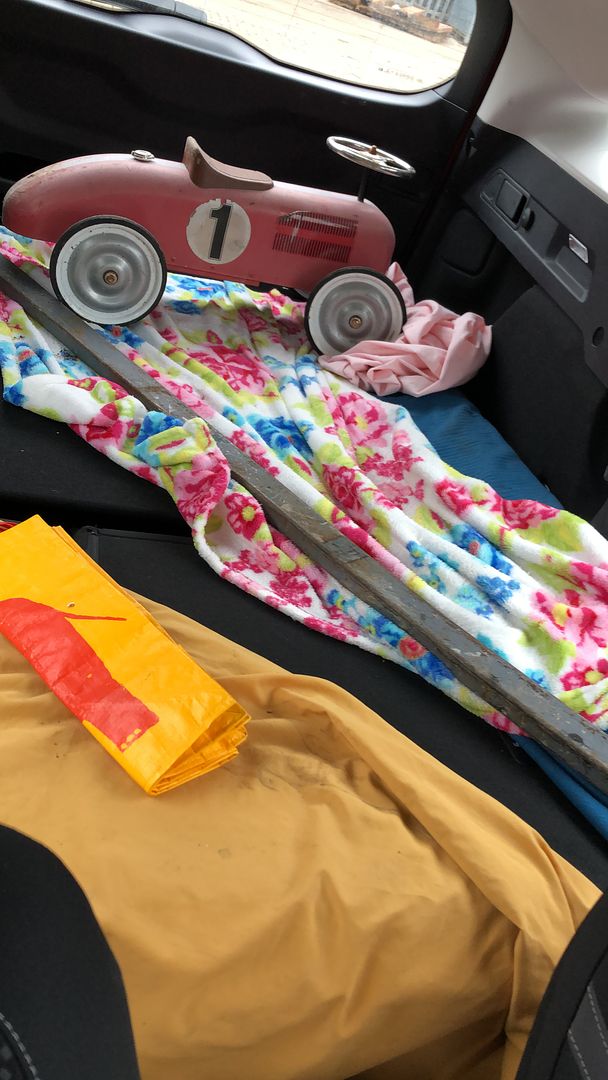 Then straight back home to get some work done. Later the post man delivered the track rod ends I had ordered last week. At lunch time I popped out to go see if they could be fitted in under 30 minutes. Of course they can, just not today. Jacked up front end, minus wheels, undid top nuts, one wallop each side and the tapers popped loose, Undoing the locking nuts, unscrewed and started to fit the new ends once I clened and copper slipped the threads .. then failure to get one side in. Eventually tonight after work, cleaned up threads with Tap and Die and job done.  Old vs New I think the old ones were fully serviceable. 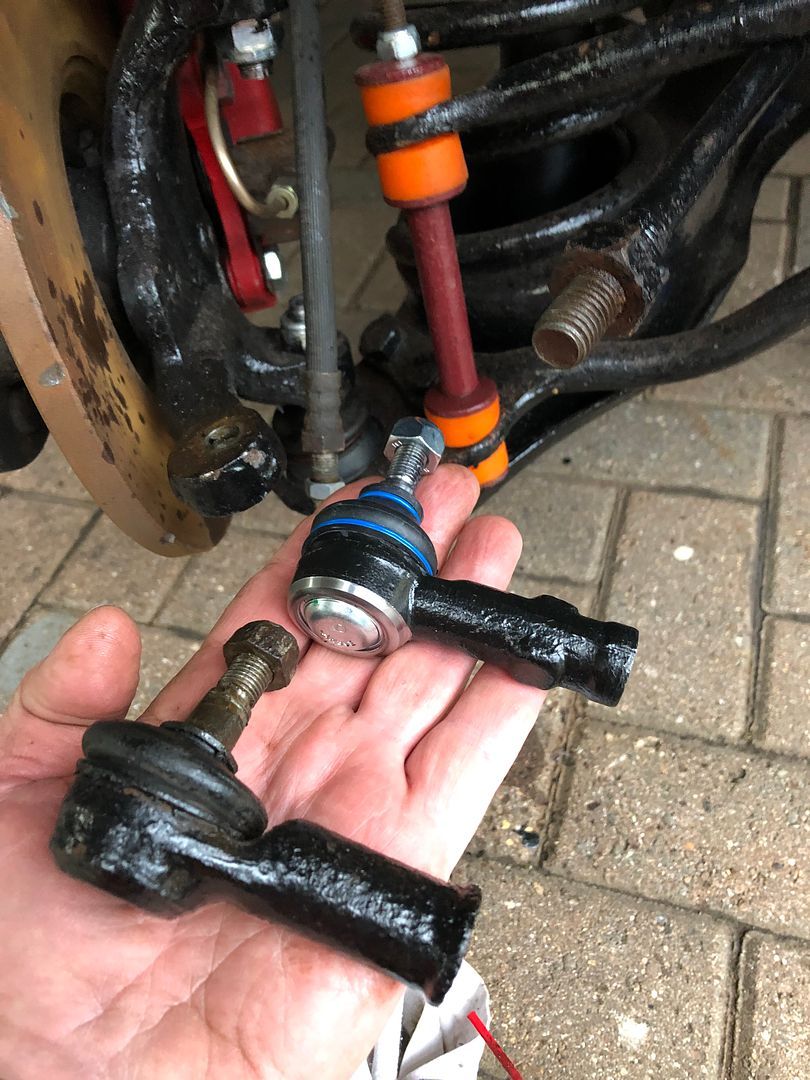 Reassembled. Just needed to be tightened down. 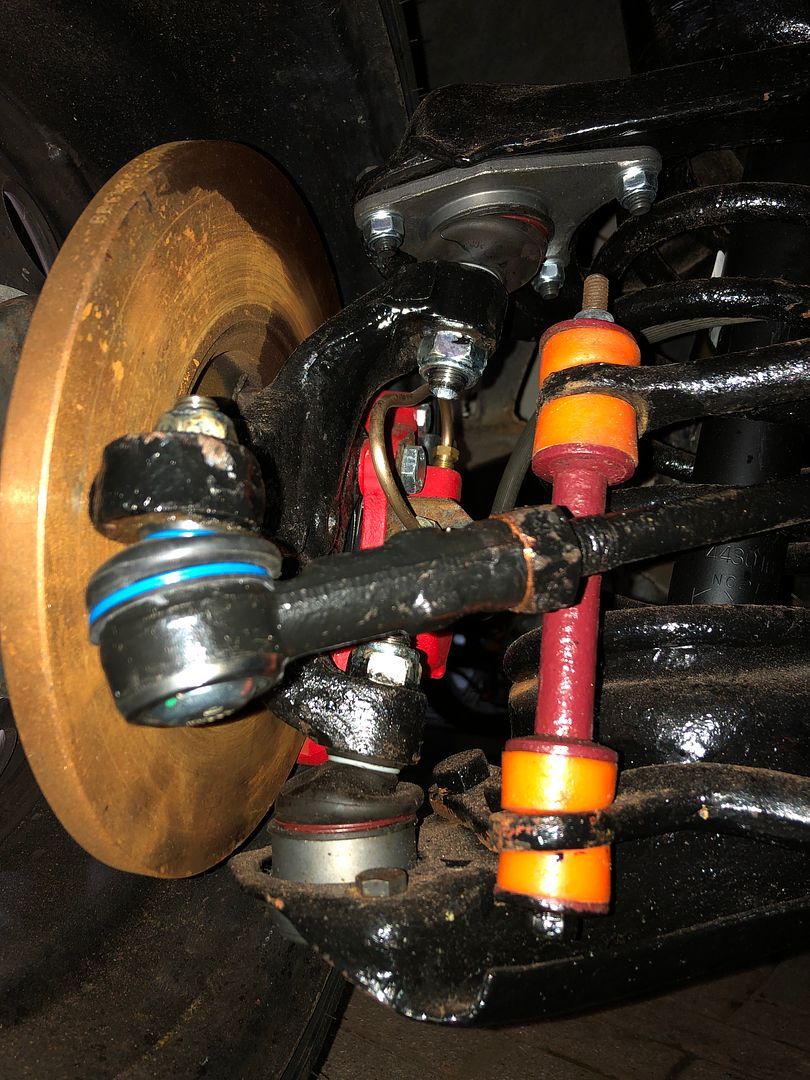 Tracking is wildly put, so I will disassemble and clean up the nut and adjustment thread and then just set it by eye, another job for the professionals once built. Time for some food. .
__________________
MY BUILD LINK: http://67-72chevytrucks.com/vboard/s...585901]Redneck Express - 1966 C10 Short Fleetside MY USA ROADTRIPS http://forum.retro-rides.org/thread/...2018-humdinger IF YOU CAN'T FIX IT WITH A HAMMER, YOU'VE GOT AN ELECTRICAL PROBLEM MATE. |
|
|
|
|
|
01-25-2022, 06:09 AM
|
#12 |
|
Registered User
Join Date: Dec 2012
Location: Rochester, KENT
Posts: 10,509
|
Re: GRIZZs 79 - 2WD BLAZER Challenge over in London, England. ~Its not a Project
RIGHT
TIME FOR A GROUP HUG
OK, just pulling your communal dip sticks. After removing the glass and sealant etc from the Land Rover screen, I decided to measure it for the holes, of course. Stepping away and looking at it the basic look was good. Texting @glenanderson about screen sealant or the original fitting putty for want of a better word, he reminded me that in the dark distant past I had also mentioned chopping the screen down a bit to enhance the whole lowered look. I had forgotten about that mostly as more important things were getting done. But seeing as he has now poked the hornets nest, or is that poking the Grizz? I may as well investigate and look at these options again. I am sure the likes of @rich @admin @westbay @pauly @atomman @grenade @jamesd1972 @peteh1969 @pistonpopper @jimi @v8 @kevins @spacekadett @mr2fc @turbom @quickrack1 and many others will help here with confusing me, but ultimately pointing the way to go. So I placed the screen in the position it should finally be fixed in. This is to ensure maximum contact, stability once bolted down on the scuttle as it should never be accessible once the rest is built into the dash, steering, electrics, clocks etc. Here you go. Stock standard.  Now, for those who read the actual words and text I then took 50mm or 2 wide masking tape and added a new top of the screen below the existing top frame. You need your virtual, or imaginative glasses on now. Imagine the masking tape is the new frame, forget about the existing frame, it will be cut and welded lower, as will the glass, hopefully. Sitting in the driving seat, my vision did not feel encumbered in any way having lost the 50mm of horizon. I did try get the pics from the same position on a timer, mounting the phone in a roll of ductape on a ladder. 50mm or 2 chopped. 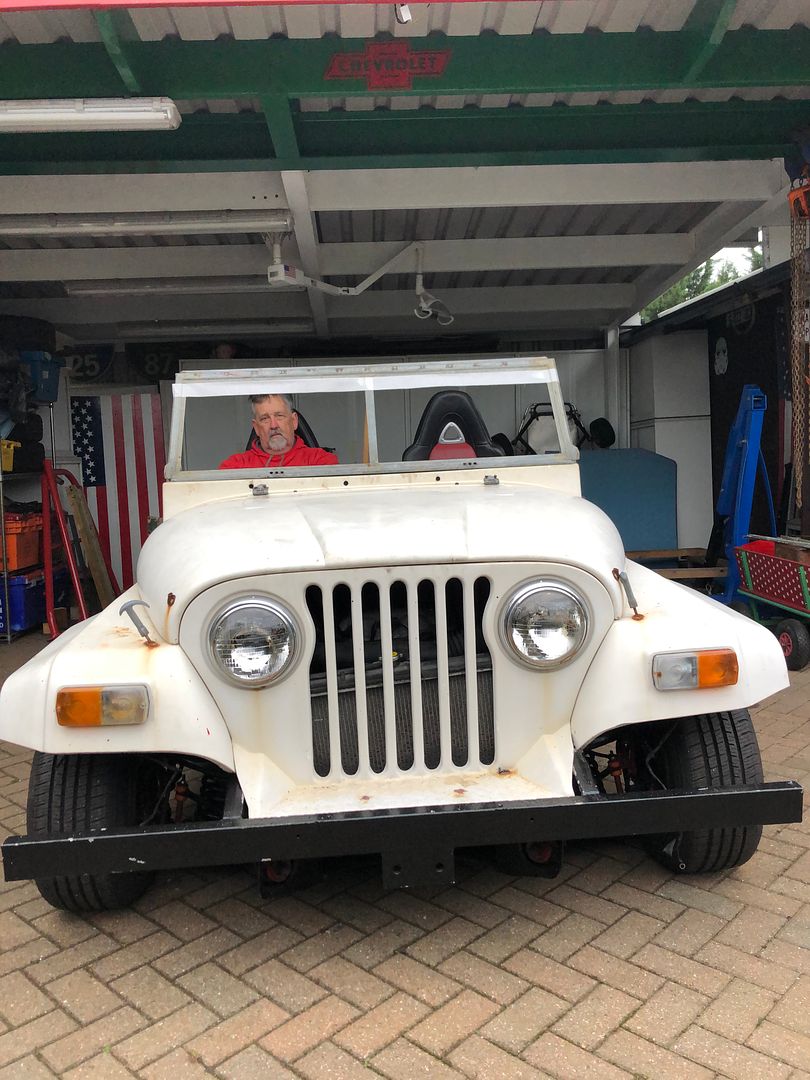 After this I added another 50mm or 2 of tape and got back inside. Remember, when it is cut down, only the bottom line of tape represents the actual frame to be mounted on the car. My horizon was slightly impaired at 4 100mm chop, so not ideal. I did not do a 3 75mm version, but suspect I will be able to live with that if the collective feels the 50mm is not worth the effort. 100mm or 4 chop 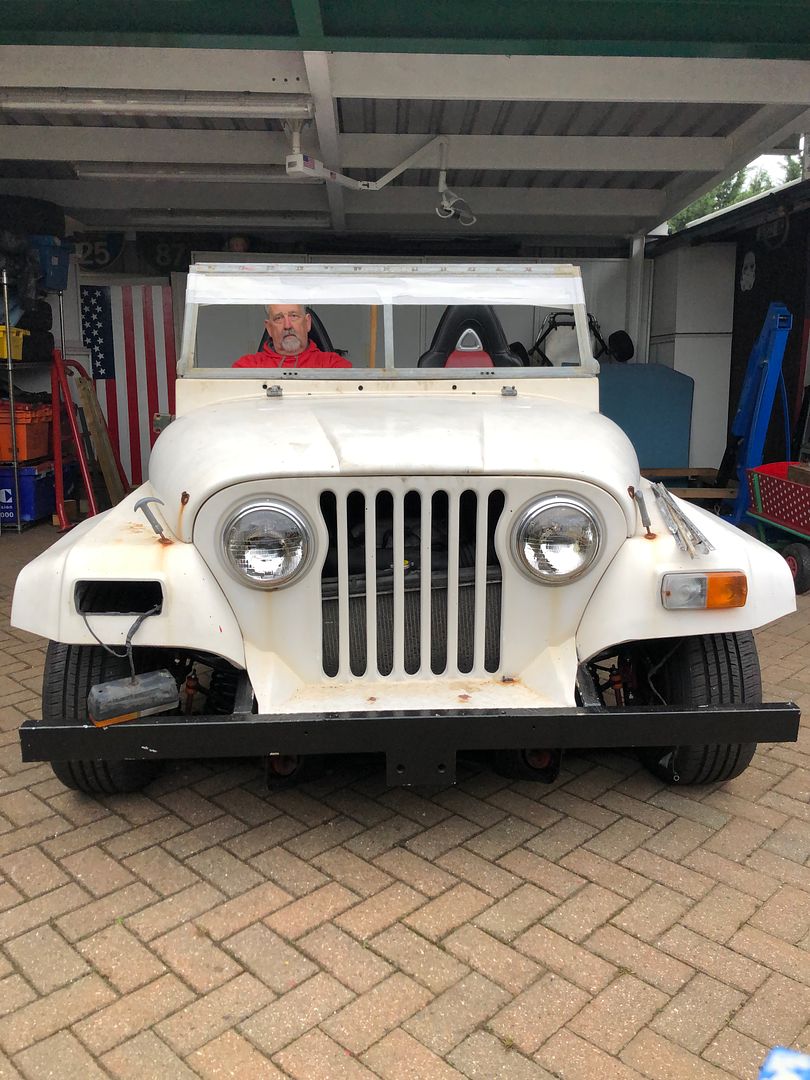 Next, I took two photos of the 50mm chop from 1/4 side front view. You have to visualise what it all will look like chopped, along with the body lowered as it stands. Deducting the existing top of frame and seeing only the masking tape as the new screen top. Can you see it? 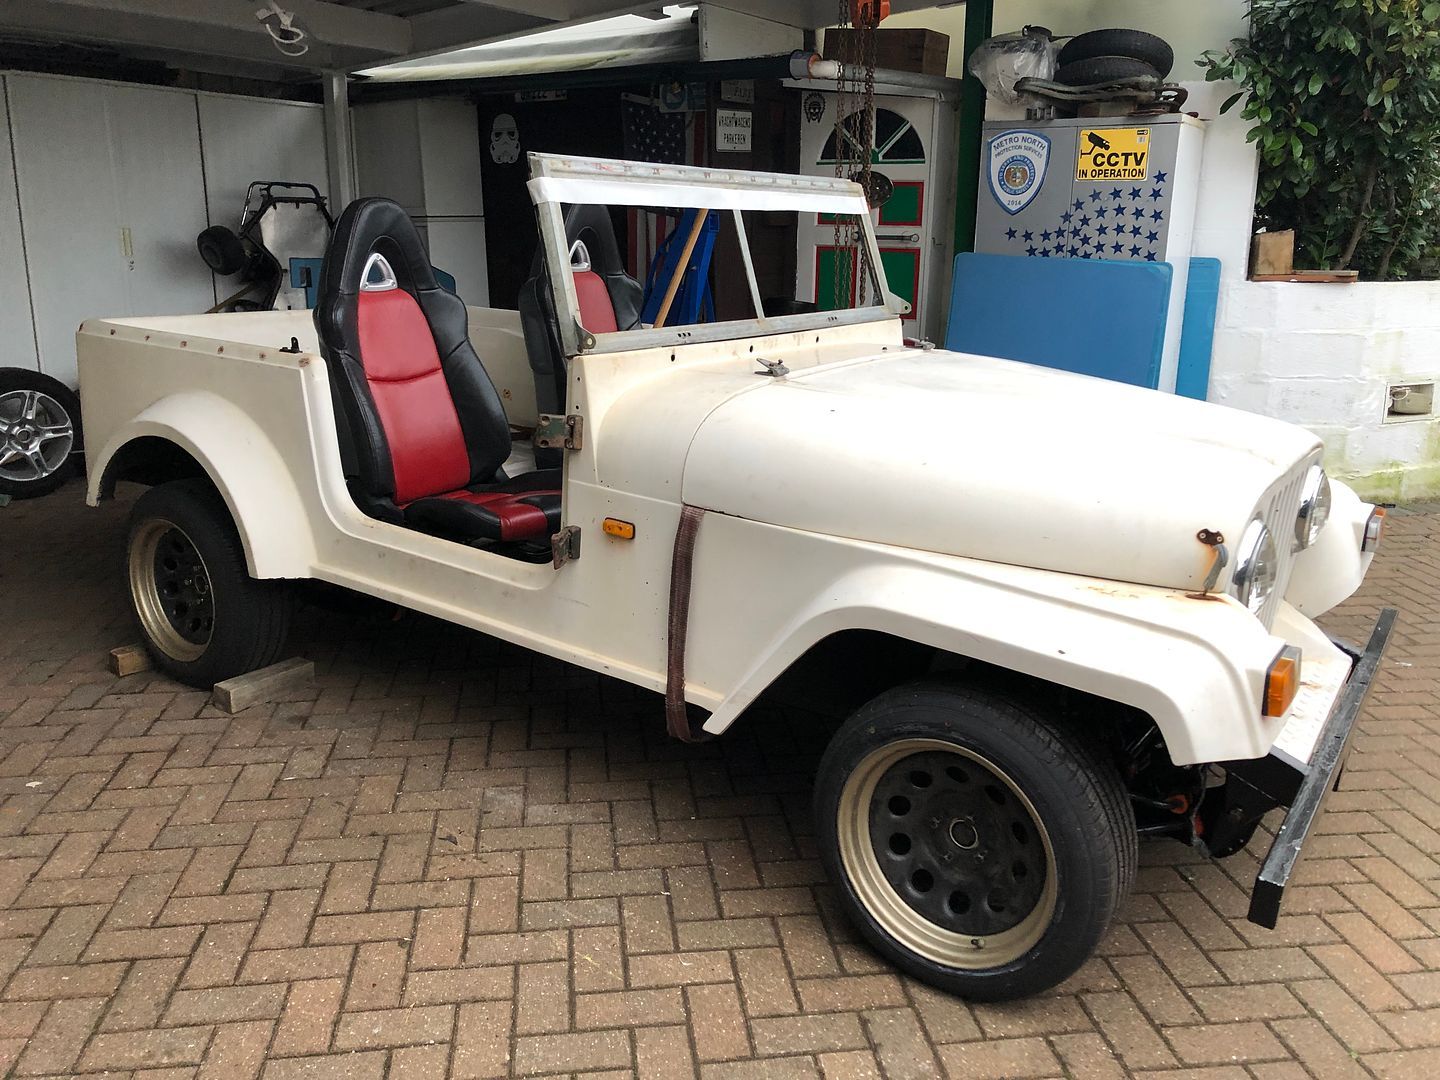 Then, just to really mess with my own, and you guys minds . I put the screen flat in front of where it will be mounted, again, just to create the illusion to help me think, but at this point I was struggling to really see it. At this point you need to actually look at the original top of the screen to see where 50mm would be relative to the body, or is]f you screw your eyes up, maybe the masking tape will show where 100mm would land, though it would suck to drive, like a chopped rat rod may be. 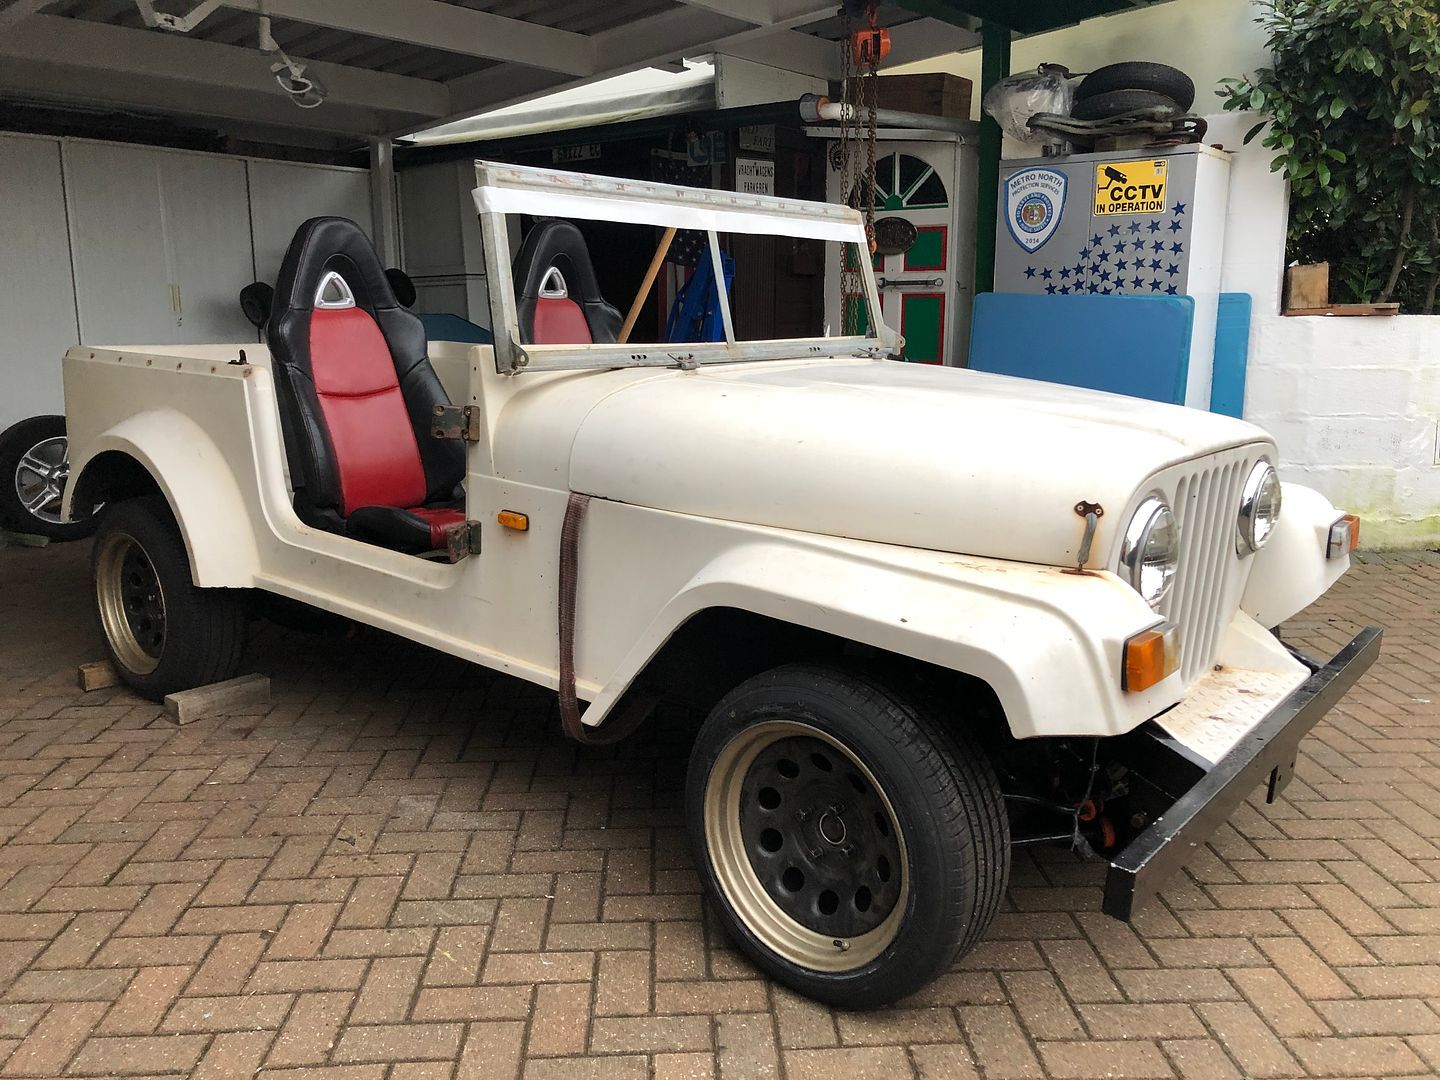 Thank you all for your interest, input and opinions, advice etc. The glass will need to be cut as well, so where to cut and shorten the frame comes into play. I have no idea what sort of money new glass may be. Off we all go .
__________________
MY BUILD LINK: http://67-72chevytrucks.com/vboard/s...585901]Redneck Express - 1966 C10 Short Fleetside MY USA ROADTRIPS http://forum.retro-rides.org/thread/...2018-humdinger IF YOU CAN'T FIX IT WITH A HAMMER, YOU'VE GOT AN ELECTRICAL PROBLEM MATE. |
|
|
|
|
01-25-2022, 12:28 PM
|
#13 |
|
Registered User
Join Date: Dec 2012
Location: Rochester, KENT
Posts: 10,509
|
Re: GRIZZs 79 - 2WD BLAZER Challenge over in London, England. ~Its not a Project
A photoshop of the 50mm
 Worth my time, thinking about it.
__________________
MY BUILD LINK: http://67-72chevytrucks.com/vboard/s...585901]Redneck Express - 1966 C10 Short Fleetside MY USA ROADTRIPS http://forum.retro-rides.org/thread/...2018-humdinger IF YOU CAN'T FIX IT WITH A HAMMER, YOU'VE GOT AN ELECTRICAL PROBLEM MATE. |
|
|
|
|
01-26-2022, 07:18 AM
|
#14 |
|
Registered User
Join Date: Dec 2012
Location: Rochester, KENT
Posts: 10,509
|
Re: GRIZZs 79 - 2WD BLAZER Challenge over in London, England. ~Its not a Project
Saw this on FB
S10 meets Jeep with added Big Block. 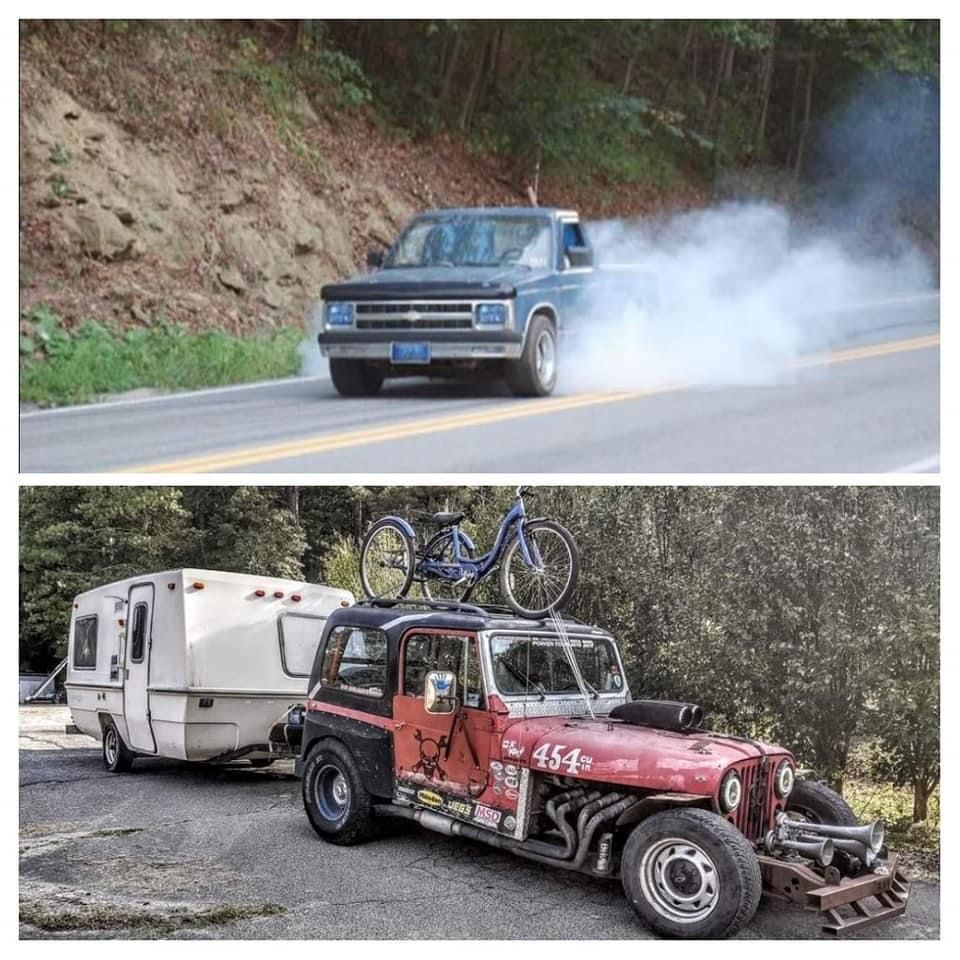   Thought it would have a few of you frothing at the mouth.
__________________
MY BUILD LINK: http://67-72chevytrucks.com/vboard/s...585901]Redneck Express - 1966 C10 Short Fleetside MY USA ROADTRIPS http://forum.retro-rides.org/thread/...2018-humdinger IF YOU CAN'T FIX IT WITH A HAMMER, YOU'VE GOT AN ELECTRICAL PROBLEM MATE. |
|
|
|
|
01-27-2022, 08:43 AM
|
#15 |
|
Registered User
Join Date: Dec 2012
Location: Rochester, KENT
Posts: 10,509
|
Re: GRIZZs 79 - 2WD BLAZER Challenge over in London, England. ~Its not a Project
Well.
Mate Martin who does the disability conversions popped in unexpectedly to sniff around. Thankfully I could take a break from my desk. He was always pro-chopping But sat in the seat with screen up and I could see that maybe if was pushing it with a chop. So I asked him to take a pic for me so I can see the proportions The result it seems would suggest holding back on even the 50mm chop for now. The seat height is fine on the chopped screen. However, mentally adding the roll bar behind and above the seats somewhat seems to be wrong. So for now, I think leaving it alone will be the answer. 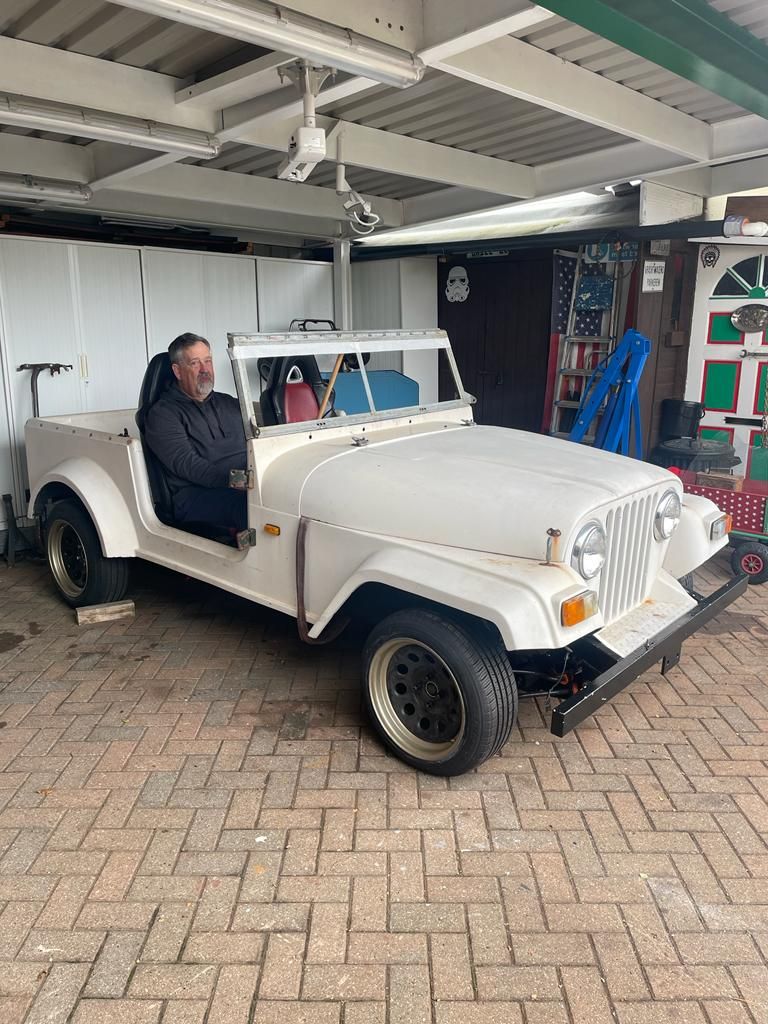 Leaving more time for the important stuff over the weekend. Day job has now fully kicked back into gear.
__________________
MY BUILD LINK: http://67-72chevytrucks.com/vboard/s...585901]Redneck Express - 1966 C10 Short Fleetside MY USA ROADTRIPS http://forum.retro-rides.org/thread/...2018-humdinger IF YOU CAN'T FIX IT WITH A HAMMER, YOU'VE GOT AN ELECTRICAL PROBLEM MATE. |
|
|
|
|
01-27-2022, 01:21 PM
|
#16 |
|
Registered User
Join Date: Oct 2015
Location: PNW
Posts: 3,578
|
Re: GRIZZs 79 - 2WD BLAZER Challenge over in London, England. ~Its not a Project
My two cents is, is that the screen in its current size is more proportional to the rest of the body if you don't cut it down. Also, on cutting the glass slowly with abrasive, I was actually serious. So if you do end up having it cut, I will like to hear how they do it.
|
|
|
|
|
01-27-2022, 05:06 PM
|
#17 | |
|
Registered User
Join Date: Dec 2012
Location: Rochester, KENT
Posts: 10,509
|
Re: GRIZZs 79 - 2WD BLAZER Challenge over in London, England. ~Its not a Project
Quote:
Still not figured out what your user name means. I have decided to keep it as it is for now. There are examples on youtube on cutting laminated glass. You are right, the proportions are good. Quick change of direction. Two day heavy duty business meeting in London this week. 31 years later, I have never forgotten my roots or the privilege of my life, even though I know I have paid my dues. Lunch view on Tuesday. 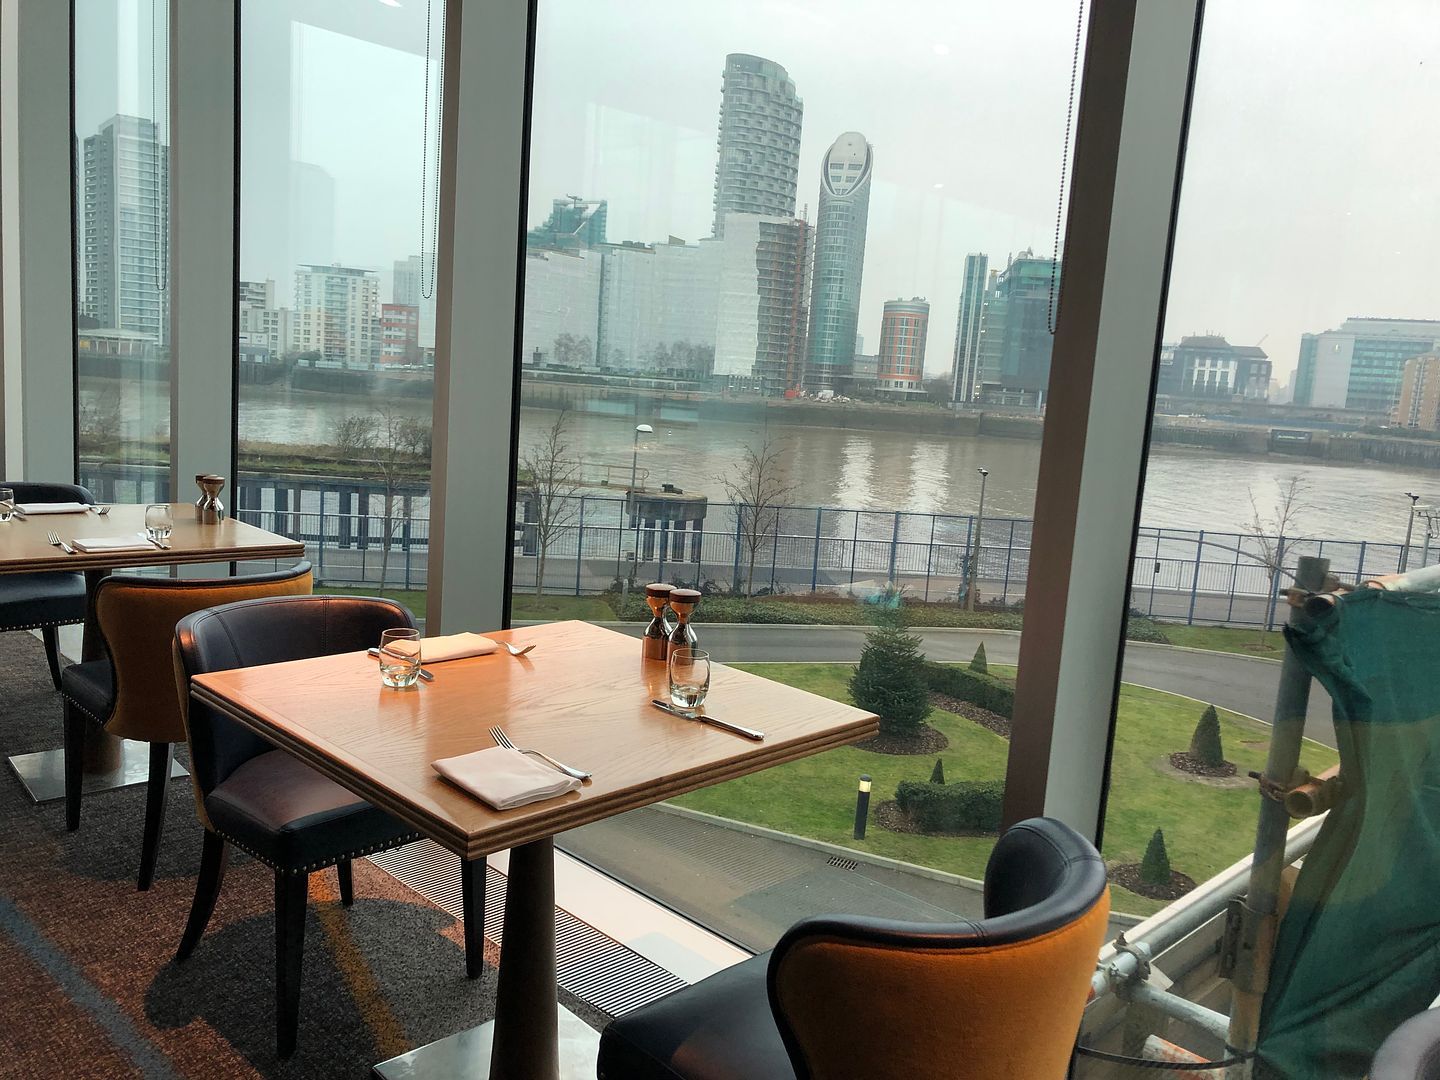 Later . London. 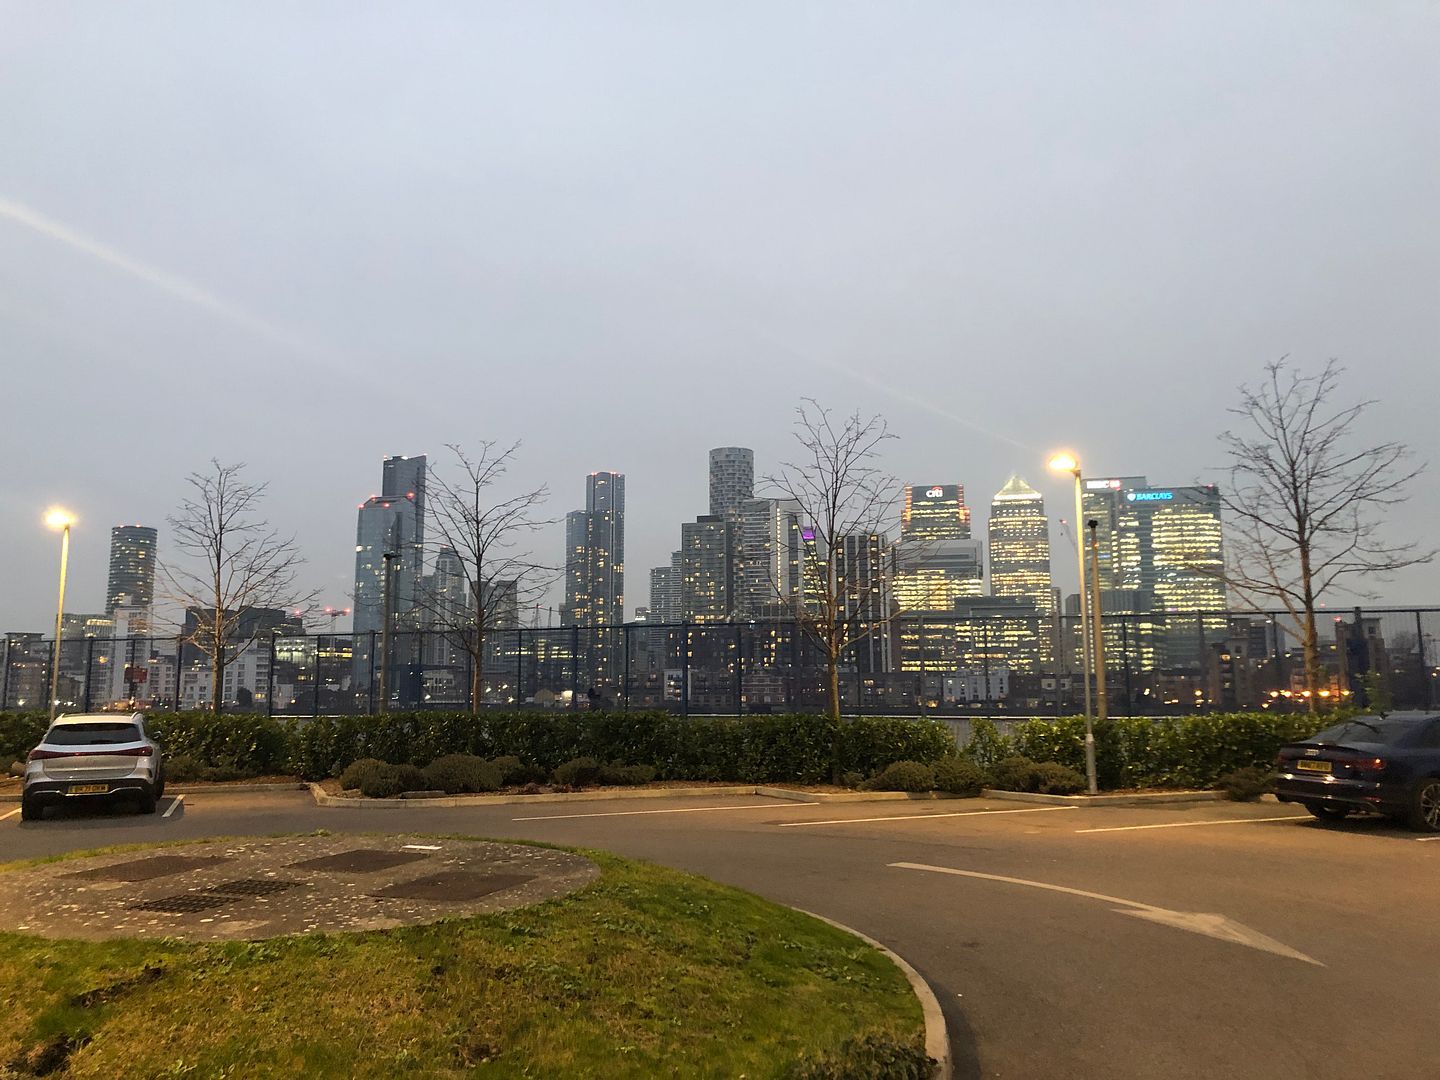 In the evening a walk along the Thames river, a boat cruise and another walk. Eventually leading here Bloody freezing yes. 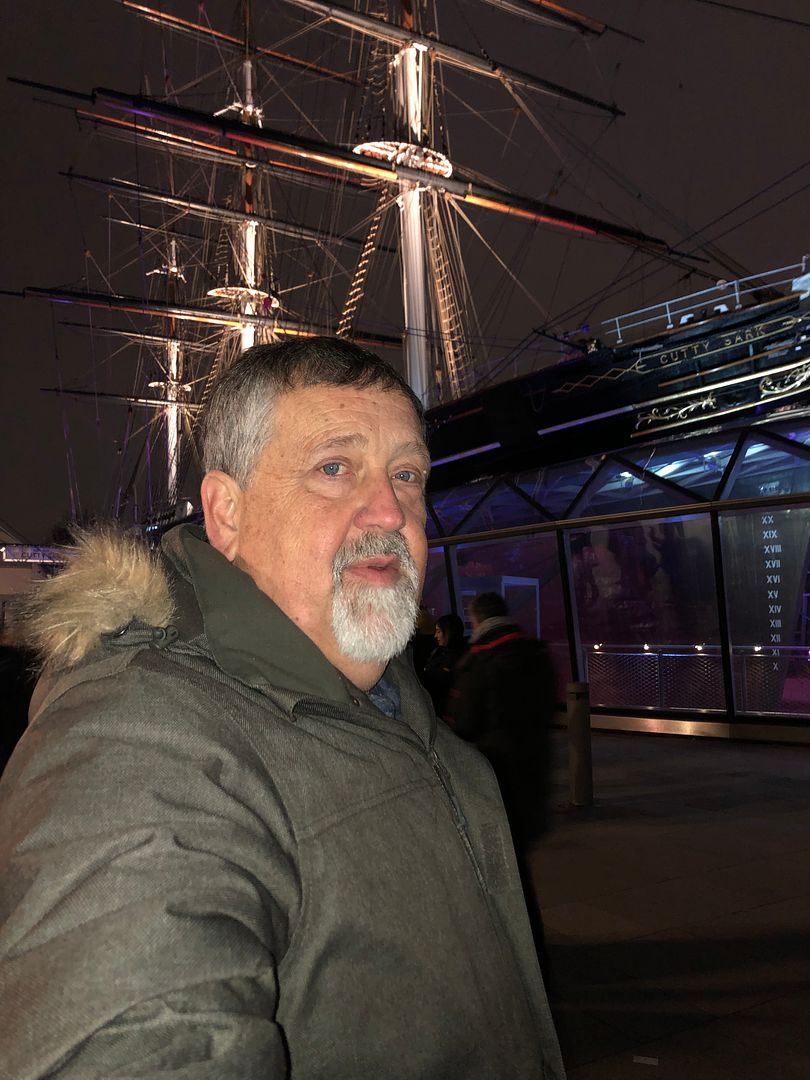  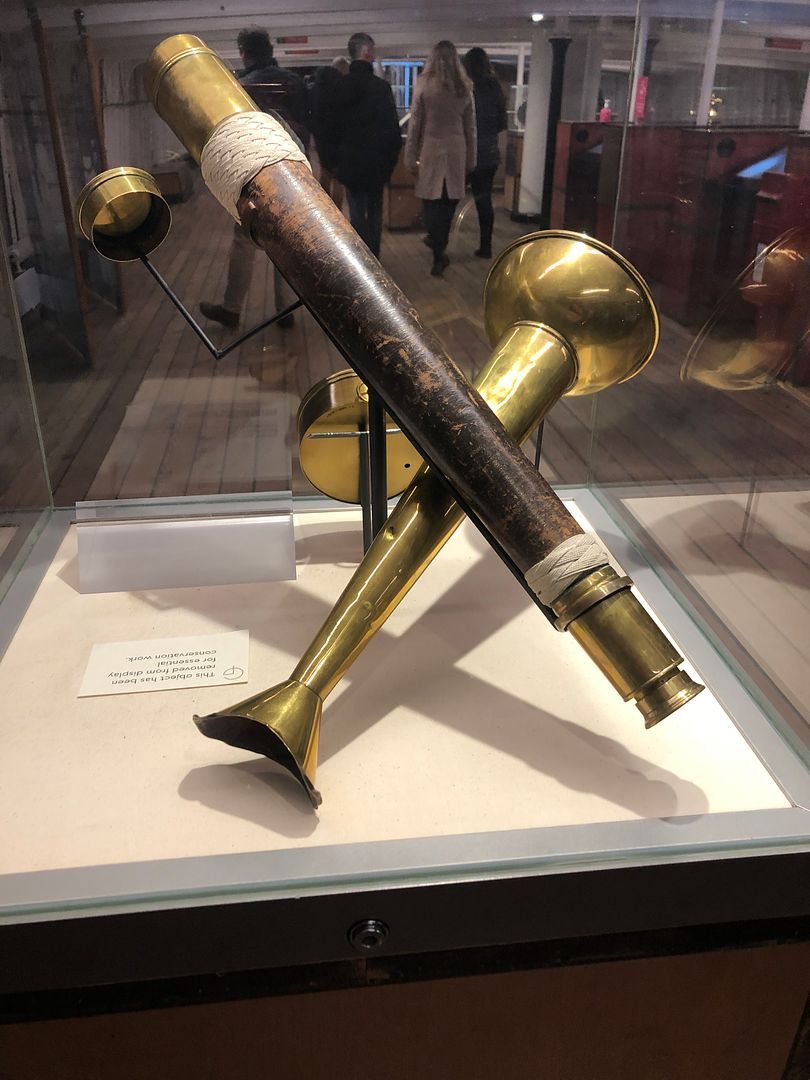 Where are we then? 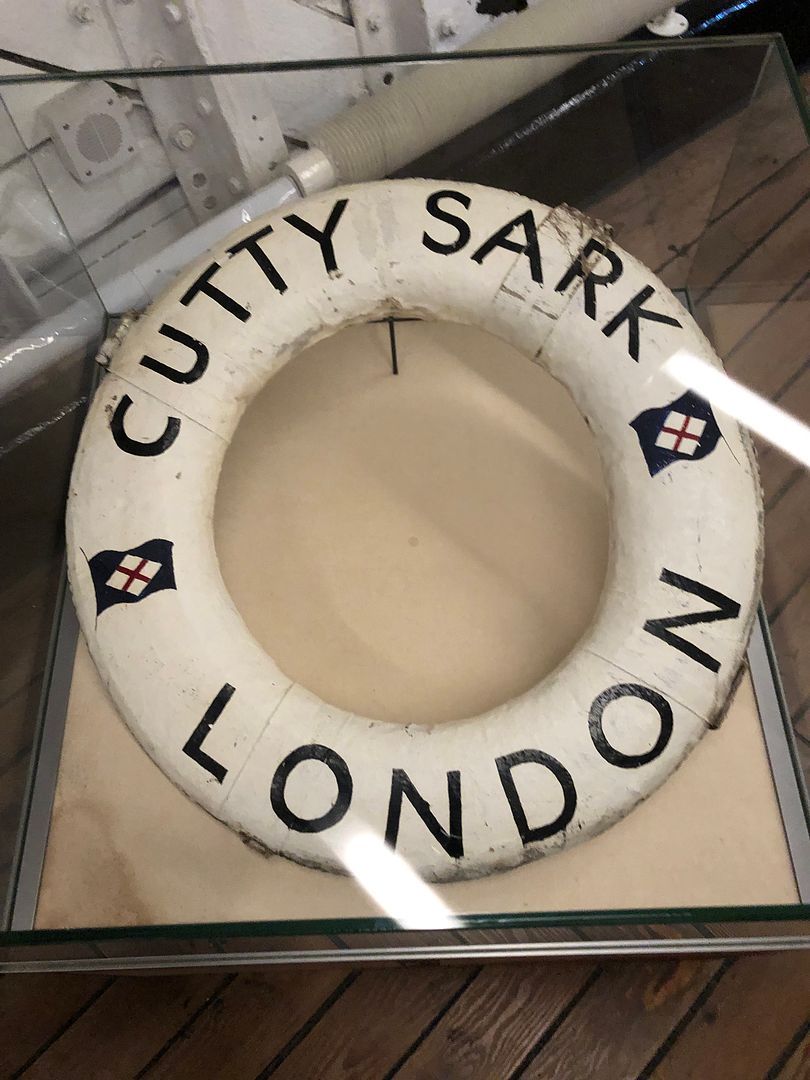 Cutty Sark is a British clipper ship. Built on the River Leven, Dumbarton, Scotland in 1869 for the Jock Willis Shipping Line, she was one of the last tea clippers to be built and one of the fastest, coming at the end of a long period of design development for this type of vessel, which halted as steamships took over their routes. After the big improvement in the fuel efficiency of steamships in 1866, the opening of the Suez Canal in 1869 gave them a shorter route to China, so Cutty Sark spent only a few years on the tea trade before turning to the trade in wool from Australia, where she held the record time to Britain for ten years.[5] Continuing improvements in steam technology meant that gradually steamships also came to dominate the longer sailing route to Australia, and the ship was sold to the Portuguese company Ferreira and Co. in 1895 and renamed Ferreira. She continued as a cargo ship until purchased in 1922 by retired sea captain Wilfred Dowman, who used her as a training ship operating from Falmouth, Cornwall. After his death, Cutty Sark was transferred to the Thames Nautical Training College, Greenhithe in 1938 where she became an auxiliary cadet training ship alongside HMS Worcester. By 1954, she had ceased to be useful as a cadet ship and was transferred to permanent dry dock at Greenwich, London, for public display. Cutty Sark is listed by National Historic Ships as part of the National Historic Fleet (the nautical equivalent of a Grade 1 Listed Building). She is one of only three remaining original composite construction (wooden hull on an iron frame) clipper ships from the nineteenth century in part or whole, the others being the City of Adelaide, which arrived in Port Adelaide, South Australia on 3 February 2014 for preservation, and the beached skeleton of Ambassador of 1869 near Punta Arenas, Chile. The ship has been damaged by fire twice in recent years, first on 21 May 2007 while undergoing conservation. She was restored and was reopened to the public on 25 April 2012.[6] Funders for the Cutty Sark conservation project include: HLF, DCMS, Sammy Ofer Foundation, Greenwich Council, Greater London Authority, The Stavros Niarchos Foundation, Berry Brothers & Rudd, Michael Edwards, Alisher Usmanov.[7] On 19 October 2014 she was damaged in a smaller fire.[8] Cutty Sark whisky derives its name from the ship. An image of the clipper appears on the label, and the maker formerly sponsored the Cutty Sark Tall Ships' Race. The ship also inspired the name of the Saunders Roe Cutty Sark flying boat. Walking down into the dry dock for dinner.  Not so much a request, but an opinion when you are sober and would rather be at home with a mug of tea and a sandwich.  Two days of hard work underscored by a nice reward. Did I mention that Life is Good?
__________________
MY BUILD LINK: http://67-72chevytrucks.com/vboard/s...585901]Redneck Express - 1966 C10 Short Fleetside MY USA ROADTRIPS http://forum.retro-rides.org/thread/...2018-humdinger IF YOU CAN'T FIX IT WITH A HAMMER, YOU'VE GOT AN ELECTRICAL PROBLEM MATE. |
|
|
|
|
|
01-28-2022, 05:42 AM
|
#18 |
|
Registered User
Join Date: Dec 2012
Location: Rochester, KENT
Posts: 10,509
|
Re: GRIZZs 79 - 2WD BLAZER Challenge over in London, England. ~Its not a Project
What a week.
Tomorrow blocked for building this thing. Despite the options did include having a go at this little car. But it wont get the RR on the road. 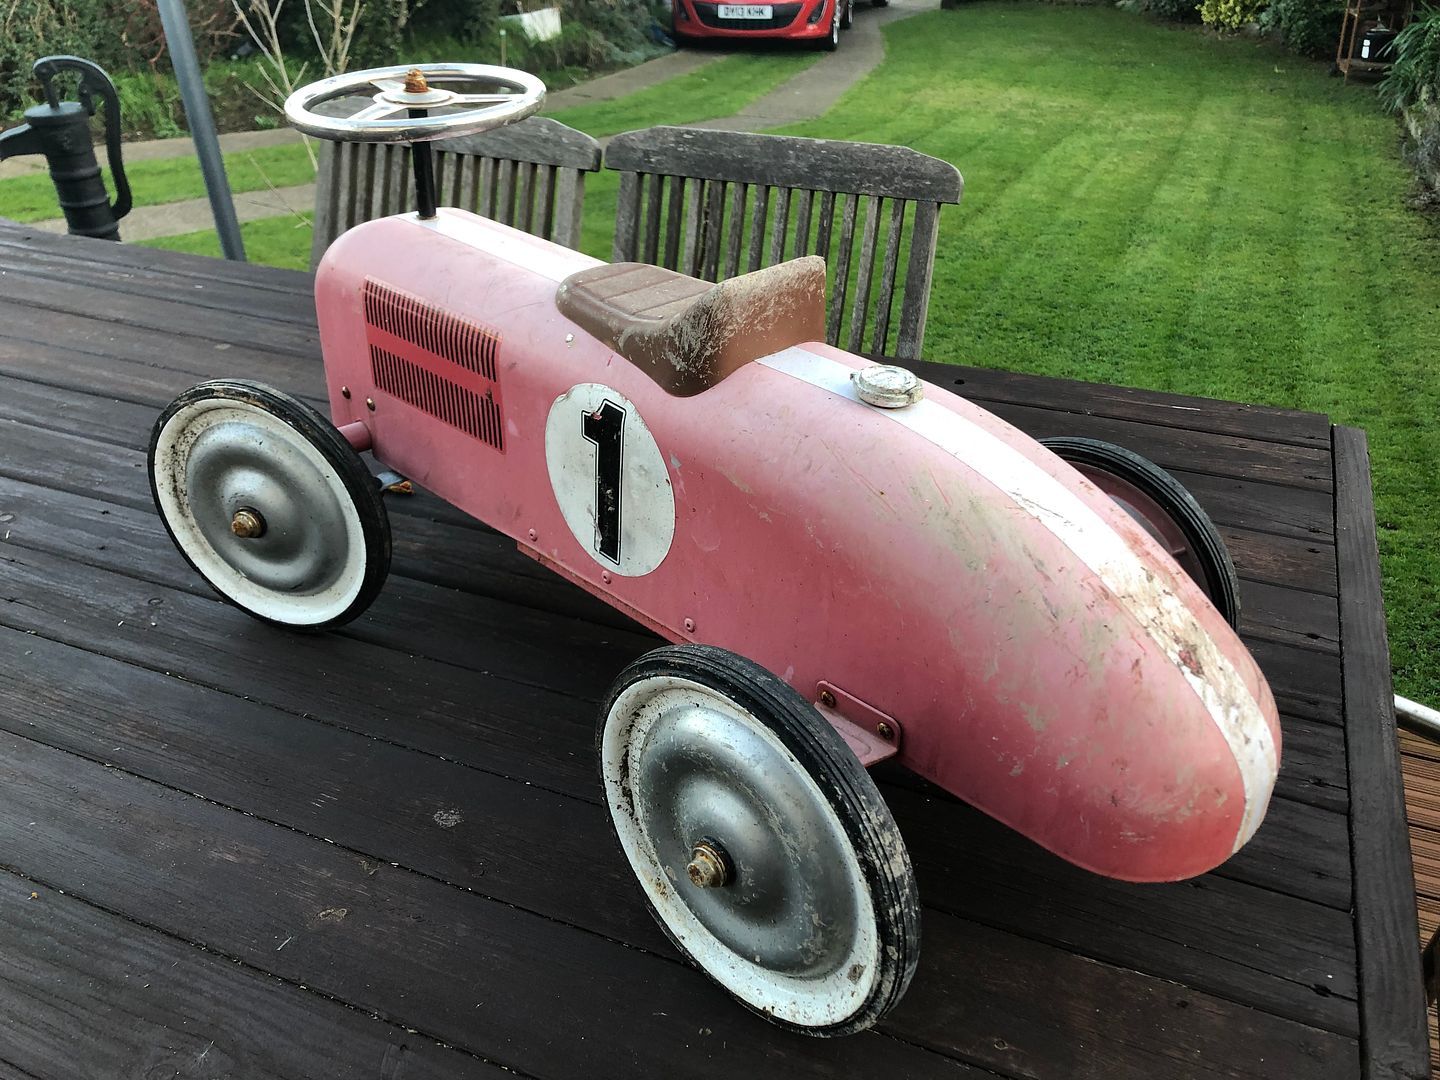 Day job first though. .
__________________
MY BUILD LINK: http://67-72chevytrucks.com/vboard/s...585901]Redneck Express - 1966 C10 Short Fleetside MY USA ROADTRIPS http://forum.retro-rides.org/thread/...2018-humdinger IF YOU CAN'T FIX IT WITH A HAMMER, YOU'VE GOT AN ELECTRICAL PROBLEM MATE. |
|
|
|
|
01-29-2022, 05:49 PM
|
#19 |
|
Registered User
Join Date: Dec 2012
Location: Rochester, KENT
Posts: 10,509
|
Re: GRIZZs 79 - 2WD BLAZER Challenge over in London, England. ~Its not a Project
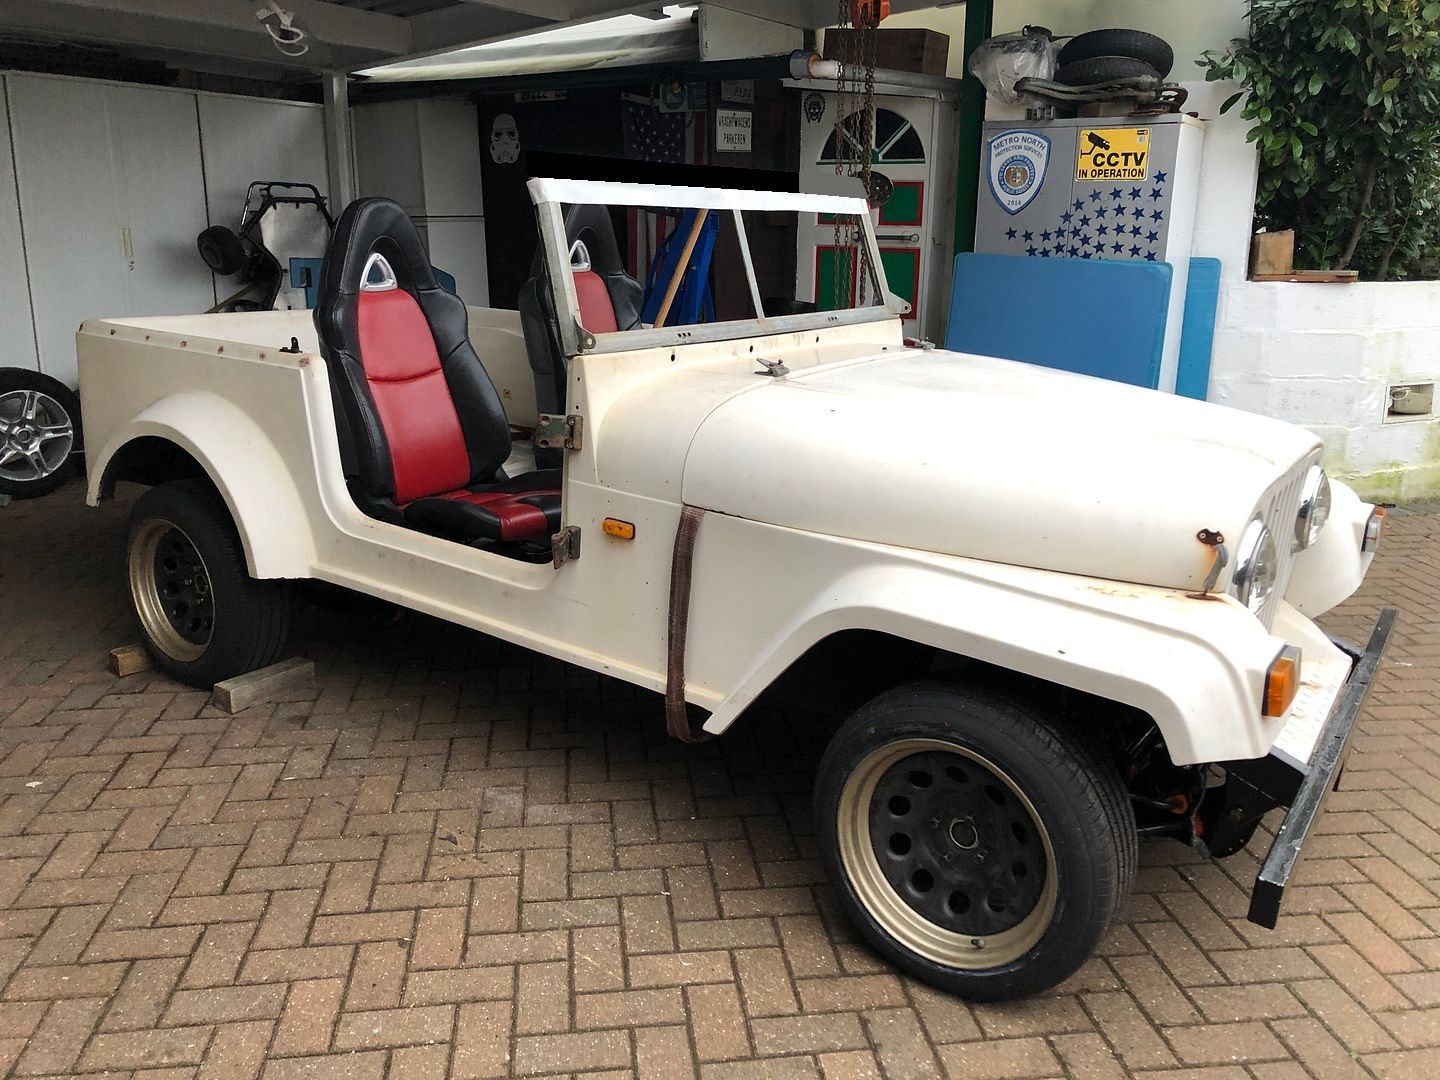
Contact with the new owner today.
So in 2022 this was the look. 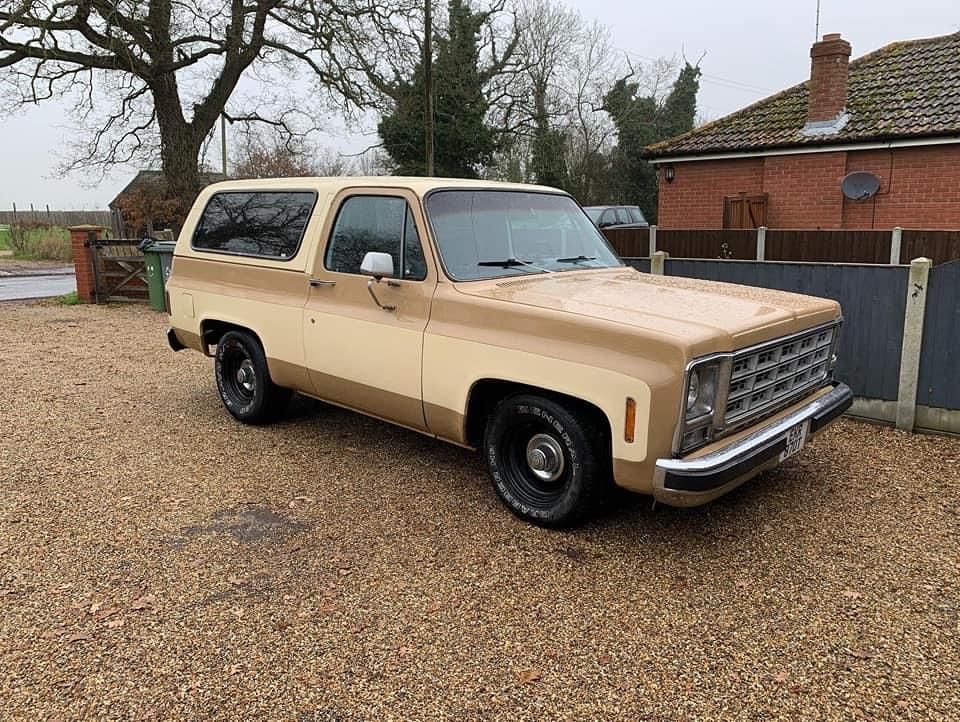 Looking good. New owner loves it too.
__________________
MY BUILD LINK: http://67-72chevytrucks.com/vboard/s...585901]Redneck Express - 1966 C10 Short Fleetside MY USA ROADTRIPS http://forum.retro-rides.org/thread/...2018-humdinger IF YOU CAN'T FIX IT WITH A HAMMER, YOU'VE GOT AN ELECTRICAL PROBLEM MATE. |
|
|
|
|
01-29-2022, 06:36 PM
|
#20 |
|
Registered User
Join Date: Dec 2012
Location: Rochester, KENT
Posts: 10,509
|
Re: GRIZZs 79 - 2WD BLAZER Challenge over in London, England. ~Its not a Project
Another one of those days
..
Started slow, got going in the garage and was looking out front for my neighbour. Saw @nickwheeler was just pulling up and reversed up on my drive. When he got out, he had a mischievous grin on his face .. We walked around to the deck and got a coffee. Then he pulled out this bit of magic .. I had a bit of time and was bored, so I made a Dimple Die I guess once again, we have no excuse not to make a small, tidy visor for the front screen. 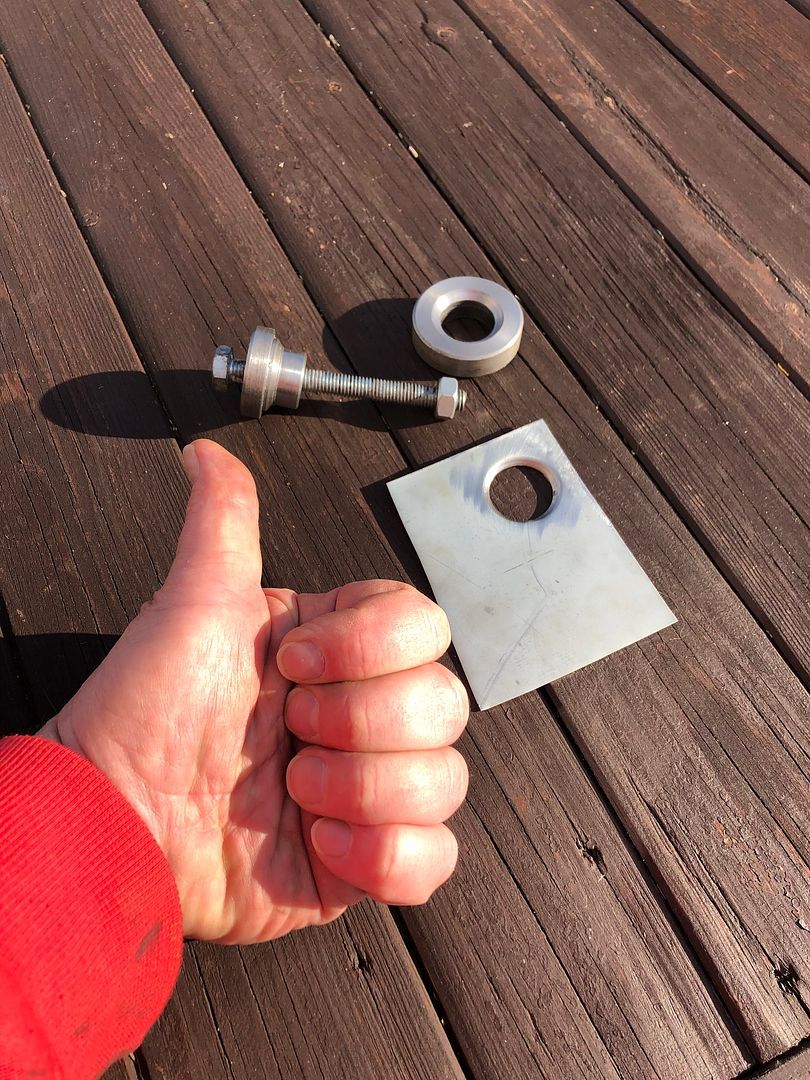 Thanks Nick. That is just awesome. We then spent the rest of the day down at the garage, loads done, little to show. But a nice dinner, chat and an alcohol free beer for Nick. Trust me, the chicken thighs, Cajun rice and a load of vegetables was bloody brilliant. 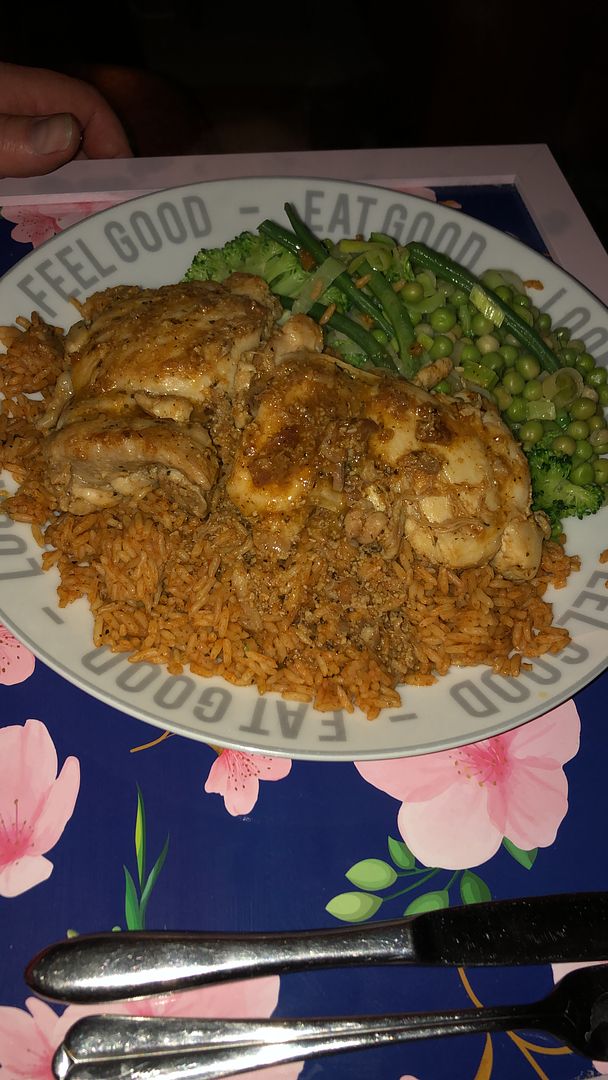 More later.
__________________
MY BUILD LINK: http://67-72chevytrucks.com/vboard/s...585901]Redneck Express - 1966 C10 Short Fleetside MY USA ROADTRIPS http://forum.retro-rides.org/thread/...2018-humdinger IF YOU CAN'T FIX IT WITH A HAMMER, YOU'VE GOT AN ELECTRICAL PROBLEM MATE. |
|
|
|
|
01-30-2022, 04:34 AM
|
#21 |
|
Registered User
Join Date: Dec 2012
Location: Rochester, KENT
Posts: 10,509
|
Re: GRIZZs 79 - 2WD BLAZER Challenge over in London, England. ~Its not a Project
PREPARATION
PREPARATION PREPARATION TIME FLIES FOR SURE. So my first job yesterday morning was to start trimming back the original steel dash support some more so it could be worked in under the dash and support the steering column and other bits. So I ground and cut back the welds at the ends, removing the wings. Better. 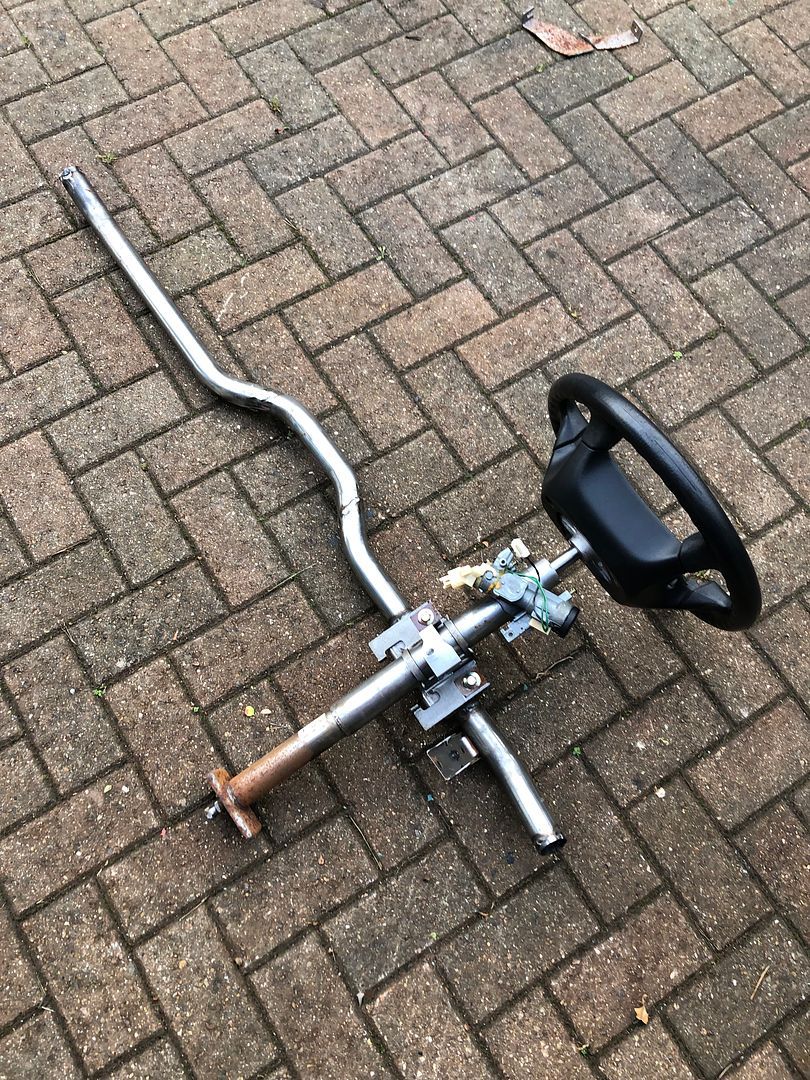 Nick and I were working in parallel most of the day. Next to go, more cautiously was was the steering column end mounts. Followed by careful grinding back, and cooling with a wet cloth to keep the plastic bush safe. 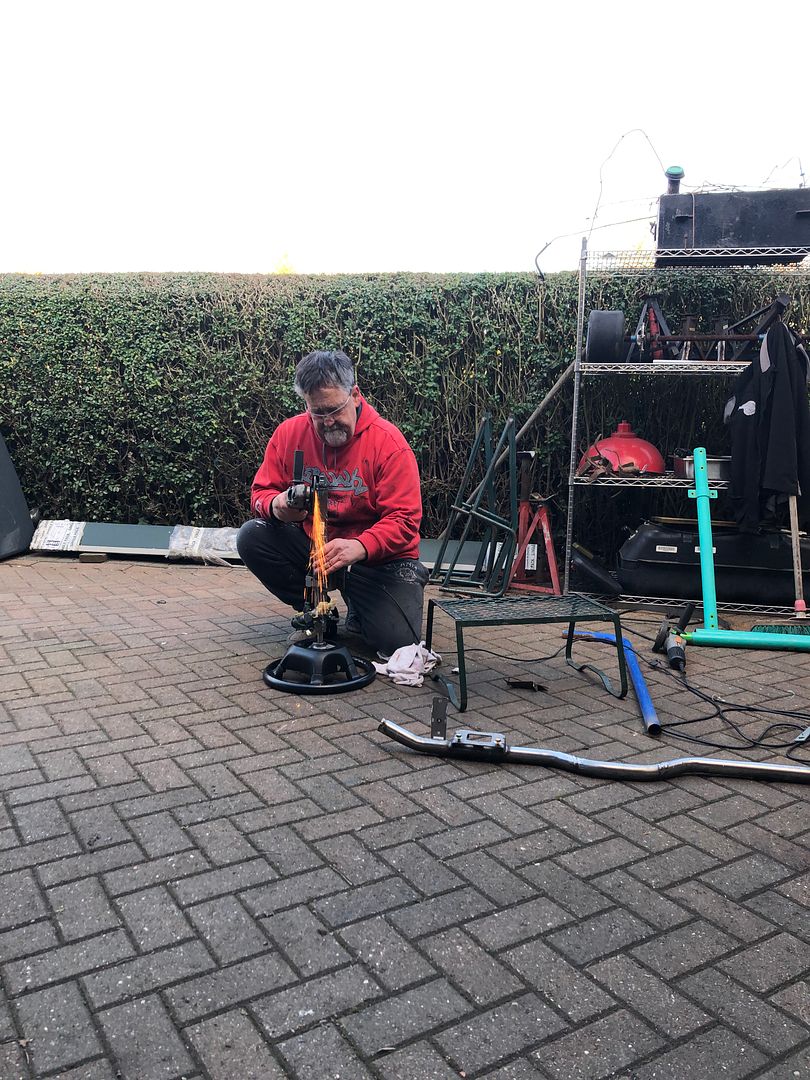 Coffee time at 2.00pm saw the iced Belgian buns coming out. At which time Nick had removed the original brake pipes in the engine bay, and I had managed to remove more of the engine bay decorations that would not work for this build, but will have to be made again to fit and accommodate the Mazda parts. The original Ford steering column bulkhead hole was disassembled and put up a very brave fight . But eventually it was opened and cleared of plates and rusted in allen bolts. Allowing us to start making up the new plates. Which currently will incorporate the Ford brake and clutch assembly, albeit modified. 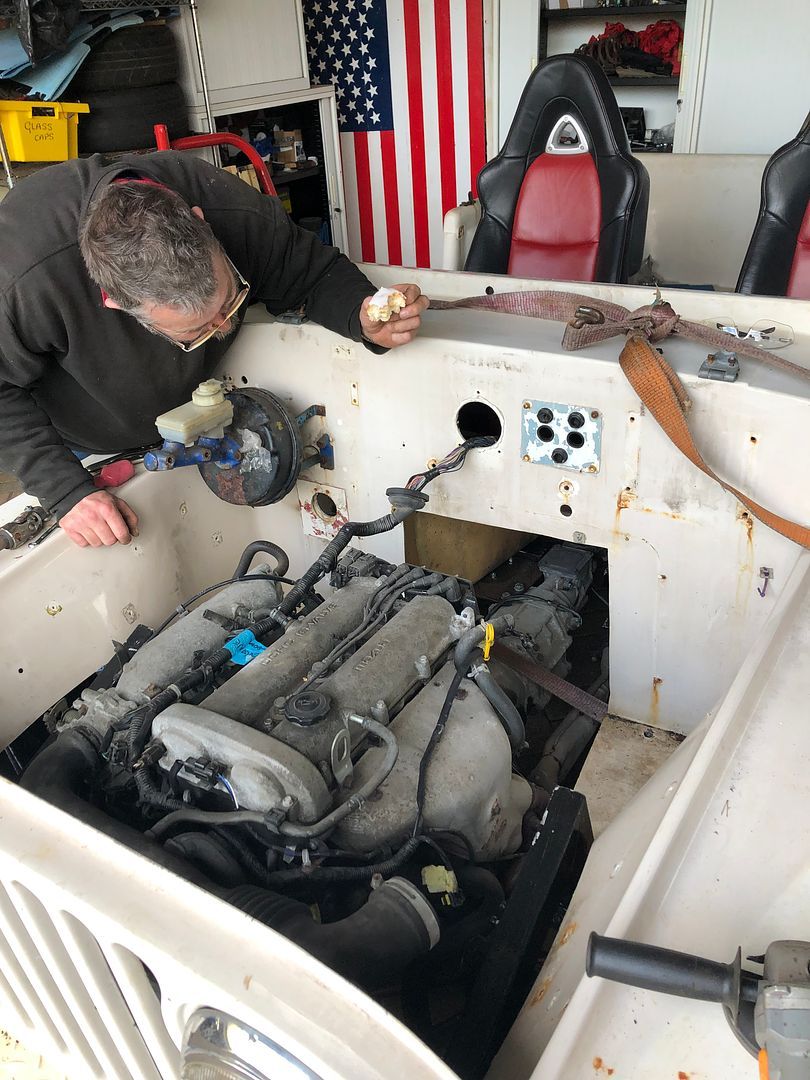 With trial fitting the Mazda steering column it became apparent we needed more space. So @nickwheeler armed with masking tape, marker and ruler, marked the lines of engagement, and I fitted a fine toothed blade to my woodwork jigsaw with vacuum cleaner in tow and opened the dash up. The search will be on for a 450mm wide by 1500mm long length of good marine or phenolic ply to shape the dash from. 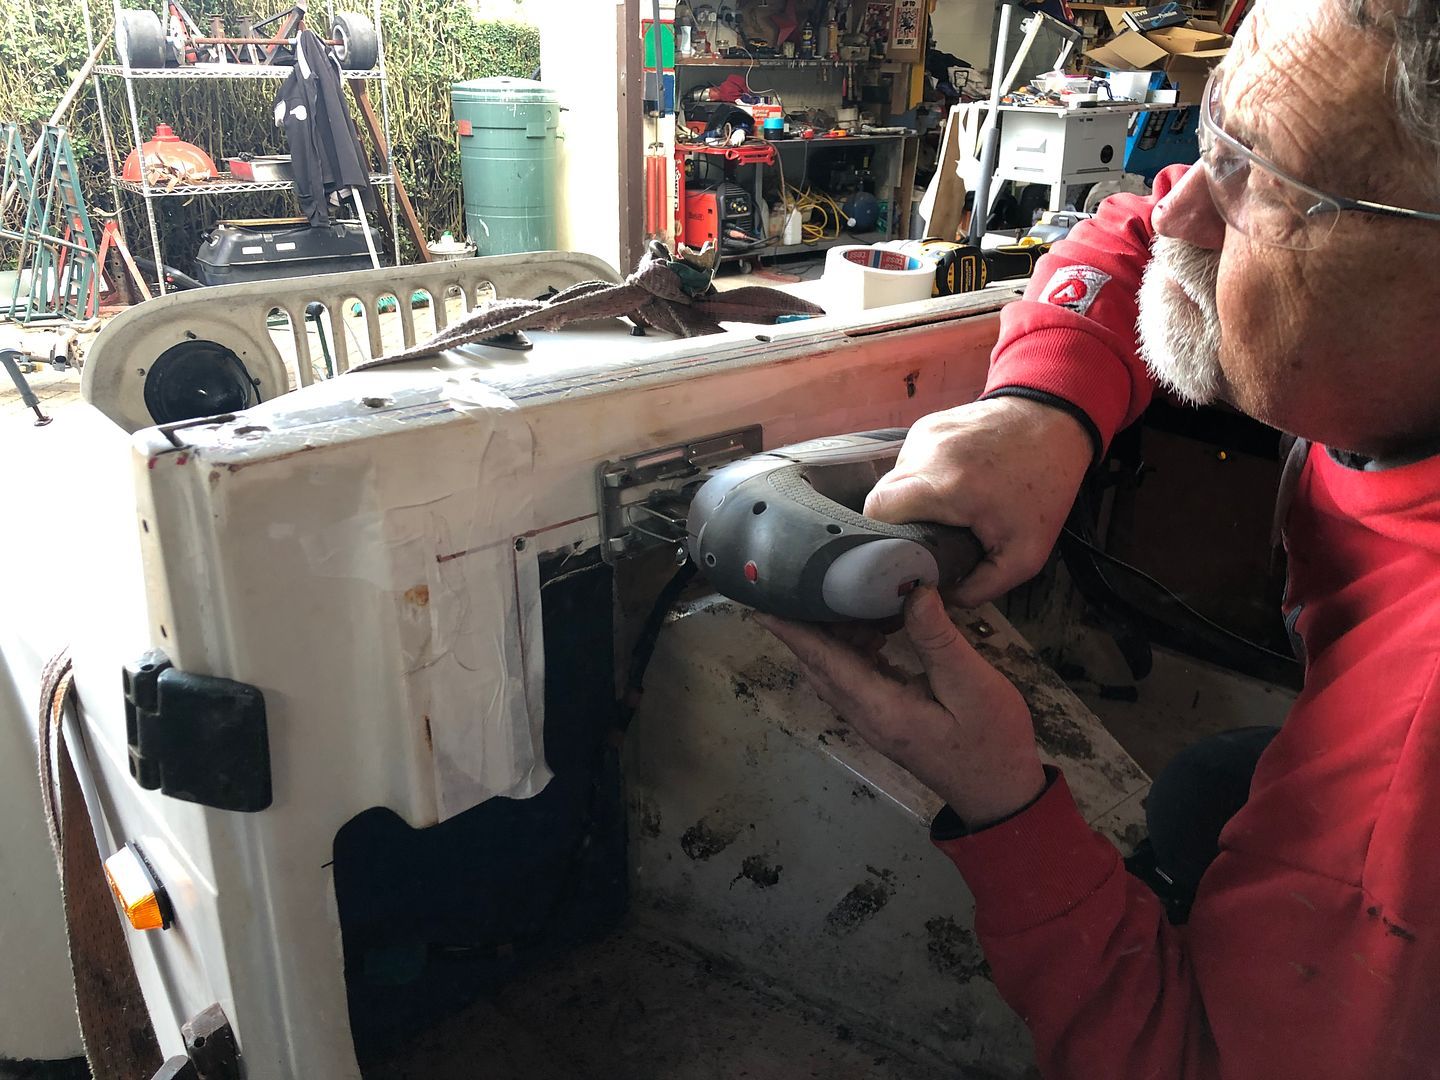 Pretty pleased so far. Followed by filing all the edges down, front and back, plus a strip of masking tape to make it less hazardous. 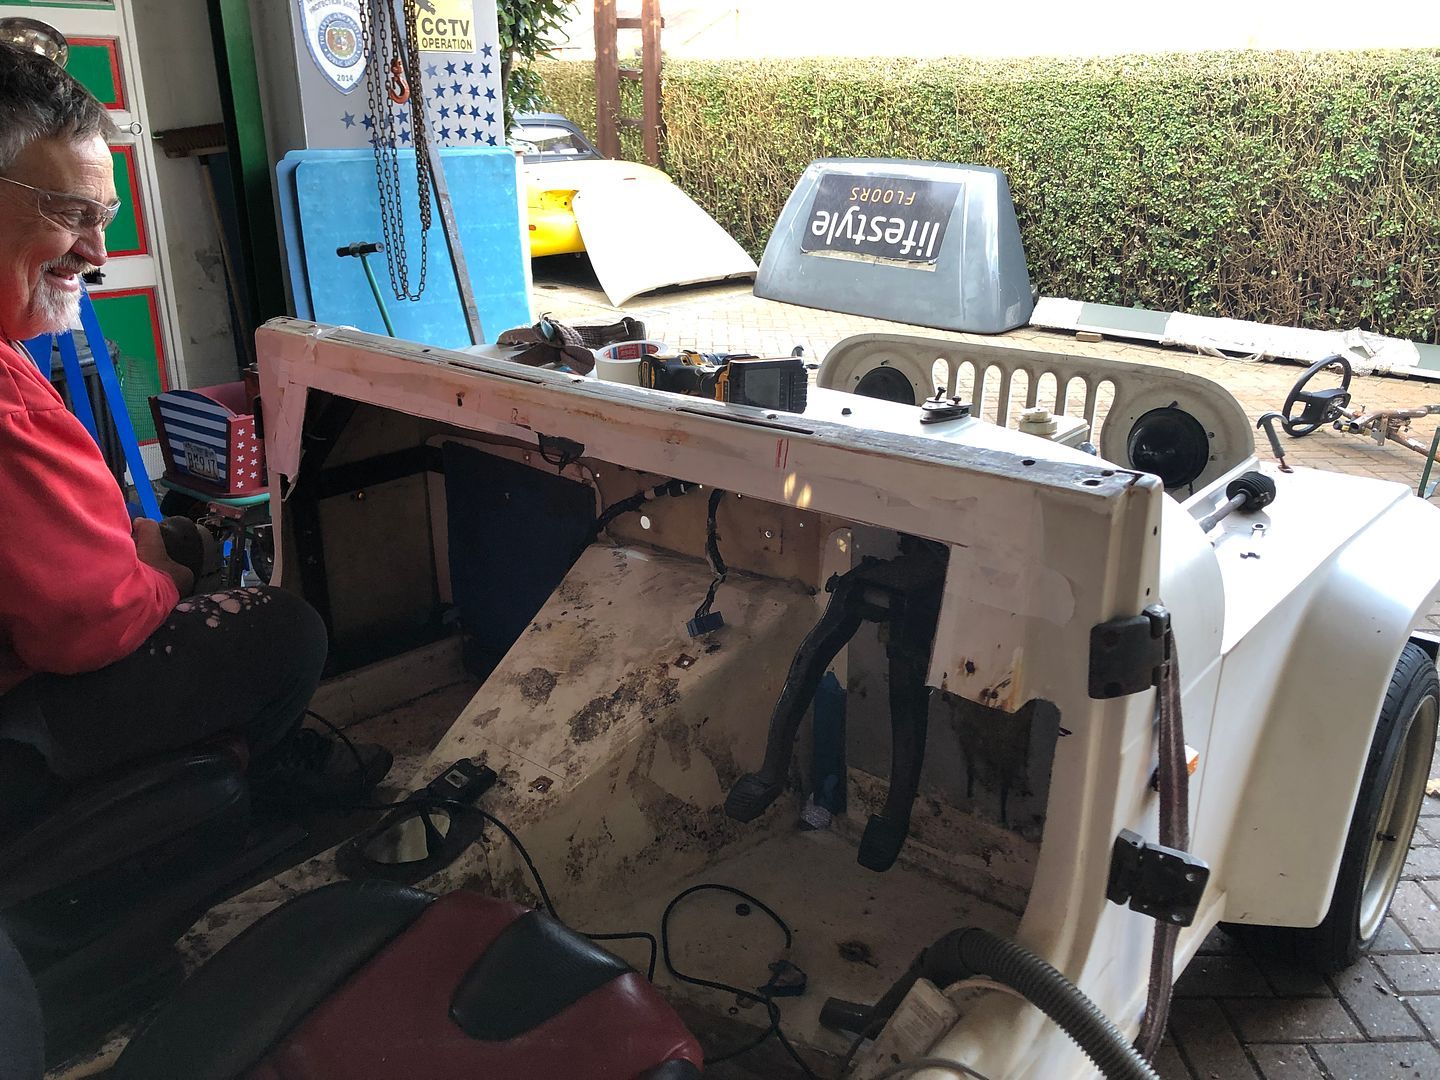 And test fit. Red line for centring.   Time for another coffee. Coffee drives this build.
__________________
MY BUILD LINK: http://67-72chevytrucks.com/vboard/s...585901]Redneck Express - 1966 C10 Short Fleetside MY USA ROADTRIPS http://forum.retro-rides.org/thread/...2018-humdinger IF YOU CAN'T FIX IT WITH A HAMMER, YOU'VE GOT AN ELECTRICAL PROBLEM MATE. |
|
|
|
|
01-30-2022, 06:05 AM
|
#22 |
|
Registered User
Join Date: Dec 2012
Location: Rochester, KENT
Posts: 10,509
|
Re: GRIZZs 79 - 2WD BLAZER Challenge over in London, England. ~Its not a Project
Next job after coffee was to start replicating the firewall plate for the steering column in steel.
Nick,found and shaped some steel plate while I created a template, then copied, punched, drilled the plate while he was removing the last tab off the support, which we could not figure or remember a function or purpose to. Drilled.  Another of my many council tip finds from hears ago. A load of super sized drill bits, adapted to my chuck, going through after them13mm TiN bit did its job. Love it when old found tools are just the right tool for the job.  Test mounted.  Column placed. Loads more to do. 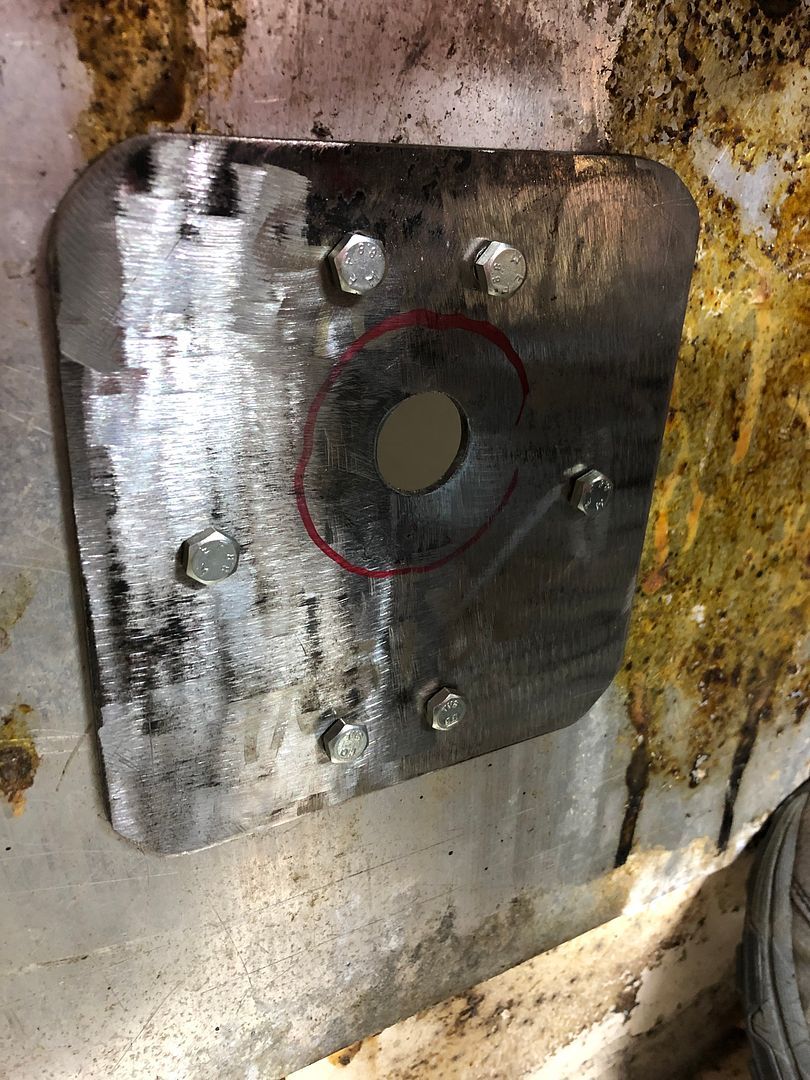 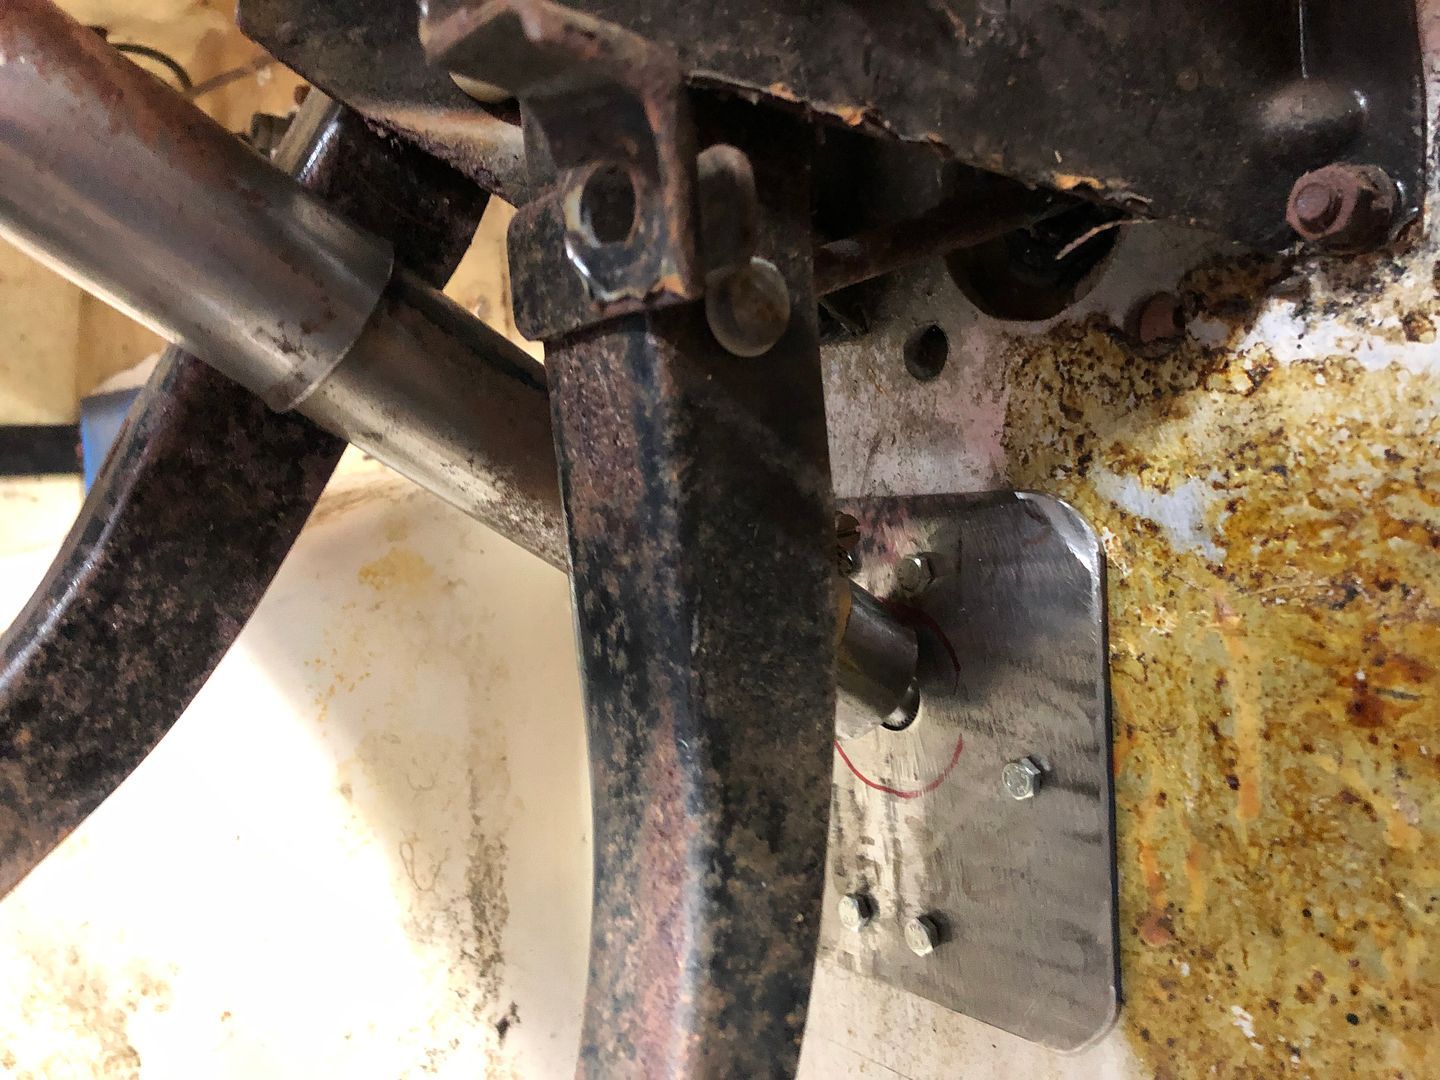 Big chunks of time are spent between Nick and I bouncing and refining ideas. One of them was to sleeve the column where it passes through the firewall plate, weld the sleeve to the plate and then tighten it down with a captive nut and bolt. We could not find any pipe of the right, or even close to right diameter, so I suggested rolling a pipe shaped clamp around a former on the vice. So while making the plate, Nick got on with the shaping of the flat plate into this beautiful piece. Jubilee Clip will clamp it around the shaft sheath. 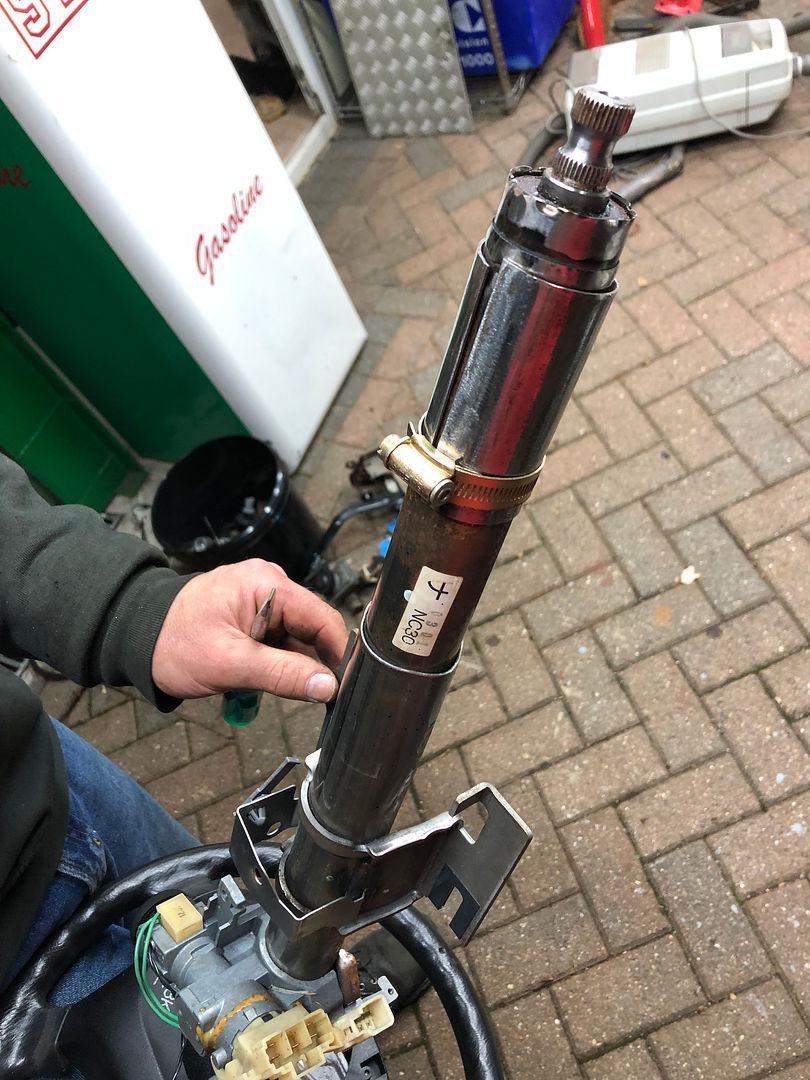 Today my first job will be to get my air die grinder out and to grind back the hole to the inside of the red circle, after which Nick can tack and Mig weld it partially to the plate. Refining of the hole and access will be done once bolted in place, followed by pedals, plates and clutch m/c 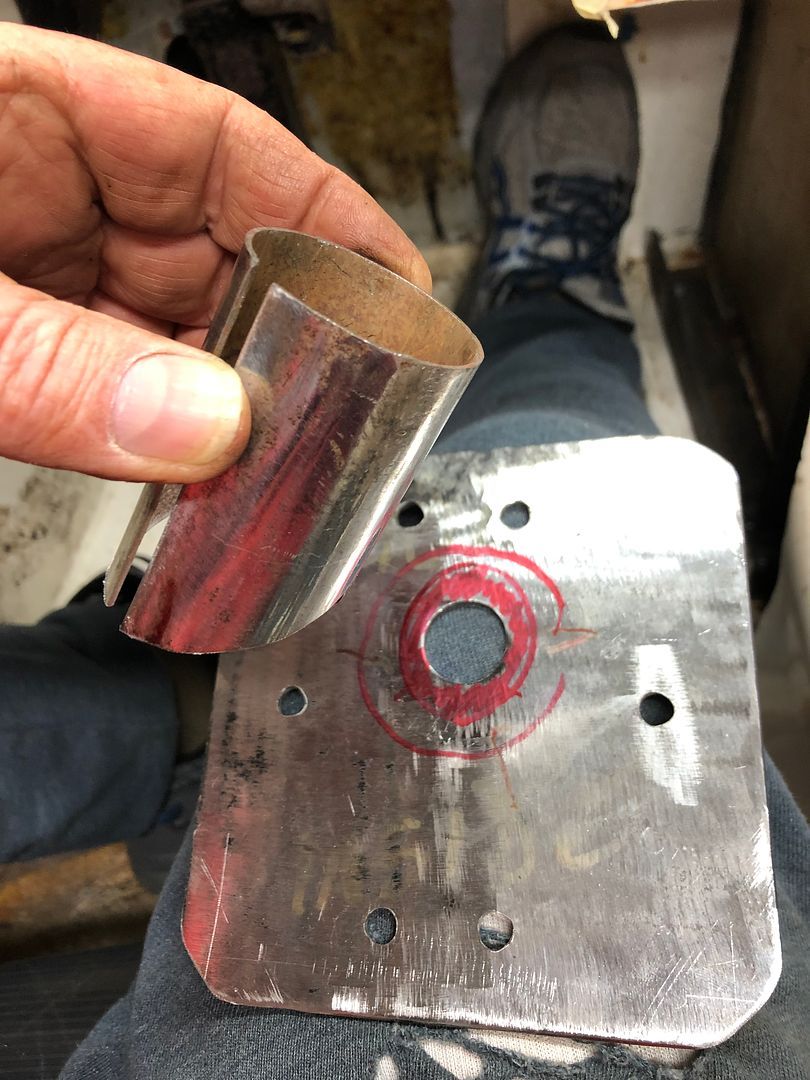 Before shutting down for the evening at 7.00pm Nick pulled this rabbit out his hat . The carports gutting down pipes still have not been fitted, yes I am a touch lazy. But the pipe is an exact fit for the extension needed when the air-box is relocated in the engine bay. I will keep my eyes open for a 600mm offcut of black pipe in a skip the next week or two. 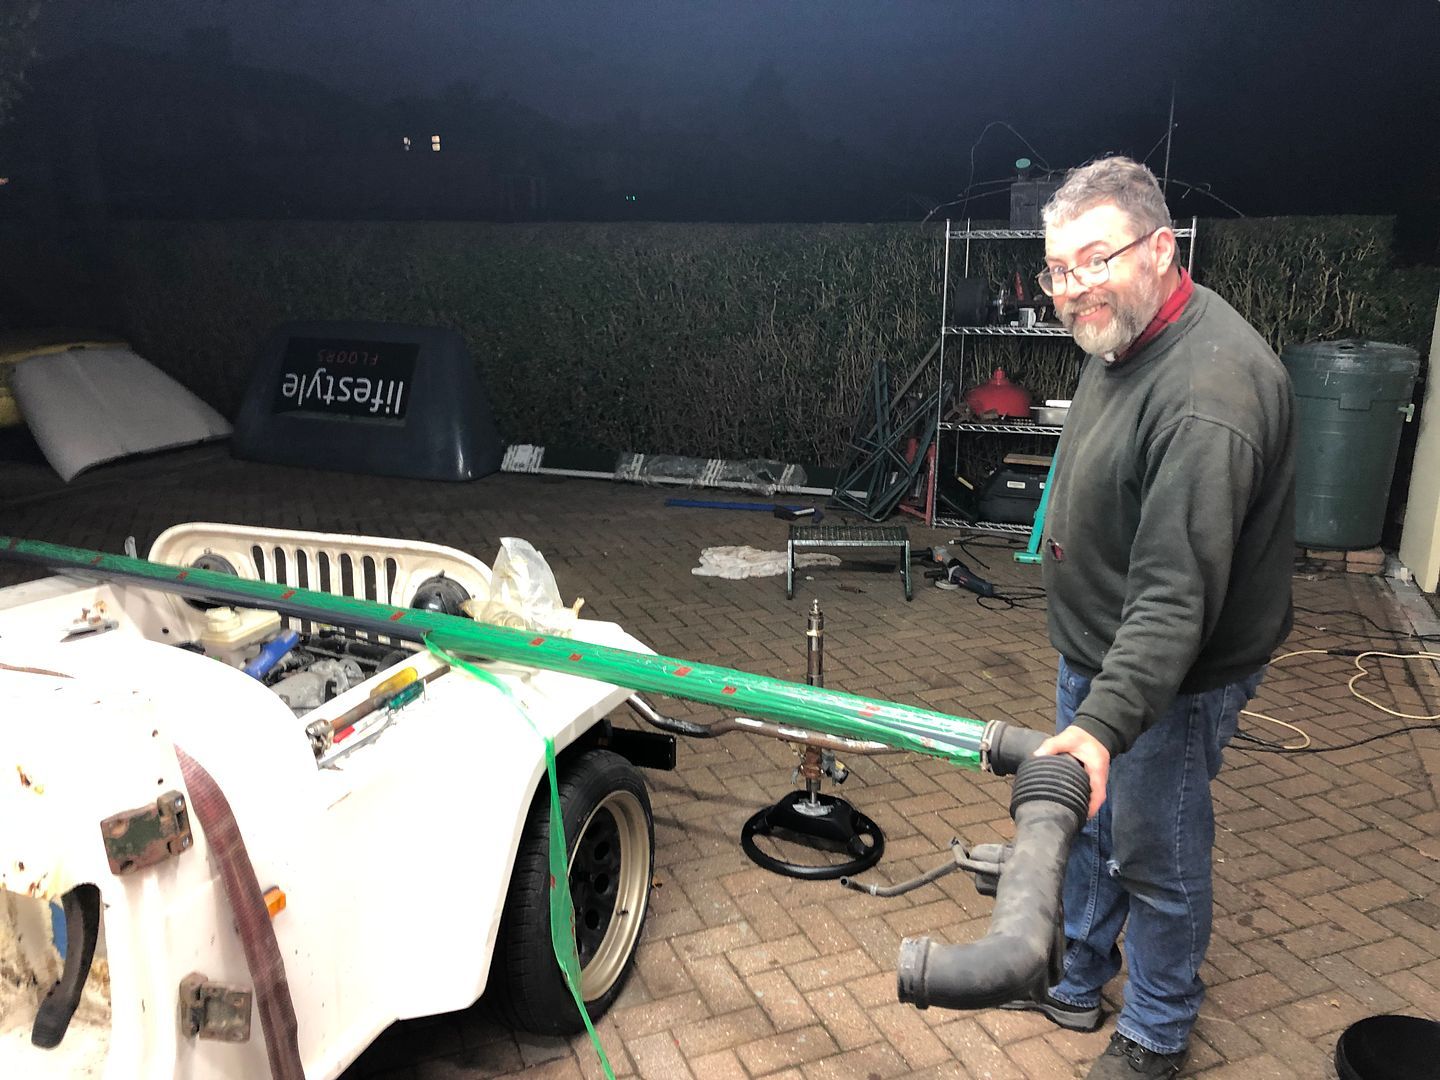 Time to get down to the garage and start again. Seems that time is ticking. Progress though.
__________________
MY BUILD LINK: http://67-72chevytrucks.com/vboard/s...585901]Redneck Express - 1966 C10 Short Fleetside MY USA ROADTRIPS http://forum.retro-rides.org/thread/...2018-humdinger IF YOU CAN'T FIX IT WITH A HAMMER, YOU'VE GOT AN ELECTRICAL PROBLEM MATE. |
|
|
|
|
01-30-2022, 04:54 PM
|
#23 |
|
Registered User
Join Date: Dec 2012
Location: Rochester, KENT
Posts: 10,509
|
Re: GRIZZs 79 - 2WD BLAZER Challenge over in London, England. ~Its not a Project
.
WELL WHAT A DAY ..! ! ! Just got in now. @nickwheeler and I played hard today. Ham, cheese and Chipotle sauce sandwich each at 4.00pm and a gallon of coffee only through the day. We shut shop at 8.00pm And to be honest, Nick and I could have done another hour or more, but we decided to wait till next time. Through the week I will be doing small jobs after work or at lunch time if I get to take a break. Now time to shower and relax a bit. Weekend over again.
__________________
MY BUILD LINK: http://67-72chevytrucks.com/vboard/s...585901]Redneck Express - 1966 C10 Short Fleetside MY USA ROADTRIPS http://forum.retro-rides.org/thread/...2018-humdinger IF YOU CAN'T FIX IT WITH A HAMMER, YOU'VE GOT AN ELECTRICAL PROBLEM MATE. |
|
|
|
|
01-30-2022, 06:38 PM
|
#24 |
|
Registered User
Join Date: Dec 2012
Location: Rochester, KENT
Posts: 10,509
|
Re: GRIZZs 79 - 2WD BLAZER Challenge over in London, England. ~Its not a Project
Today was a great day.
Little to show, loads done and achieved. Fabrication and planning. I got out my pneumatic die grinder and tungsten carbide bits to get the hole roughed out. 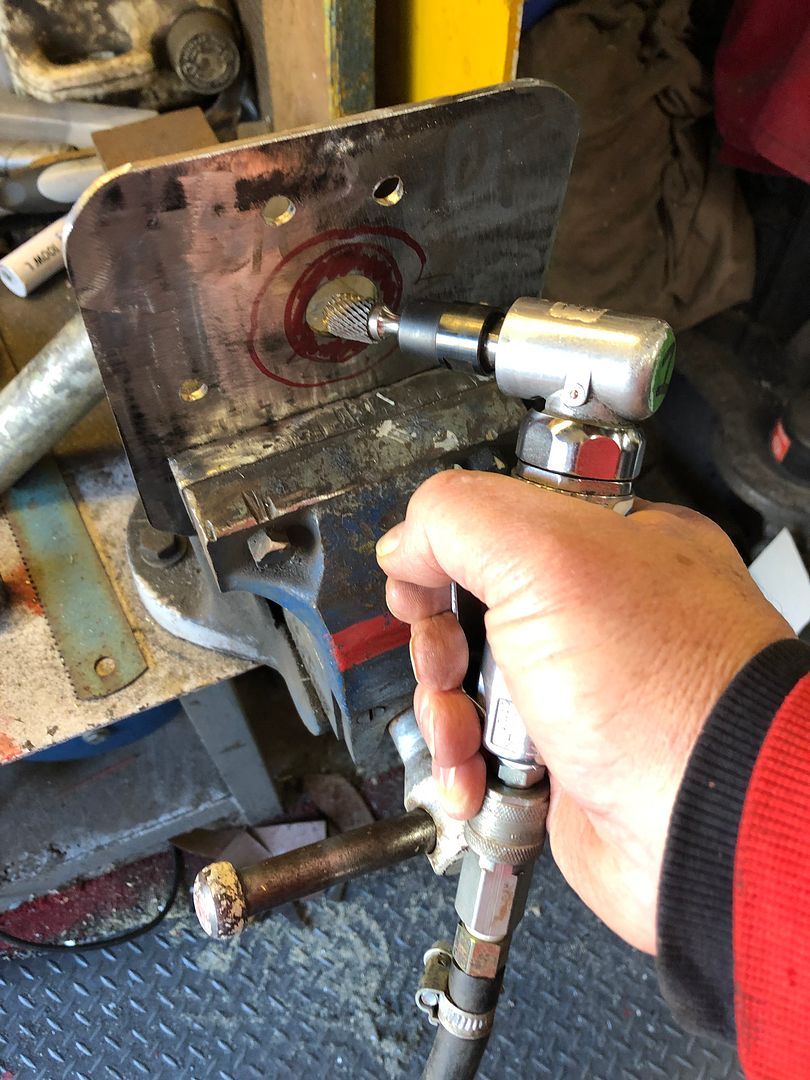 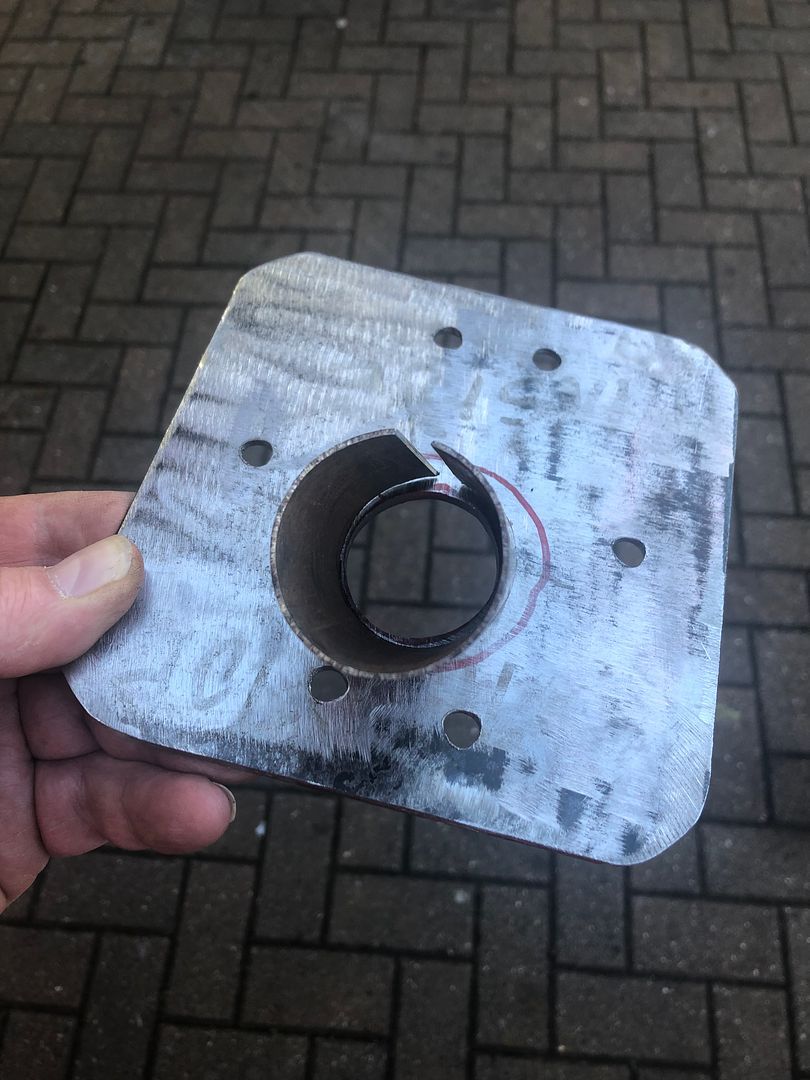 And bolted to the firewall. 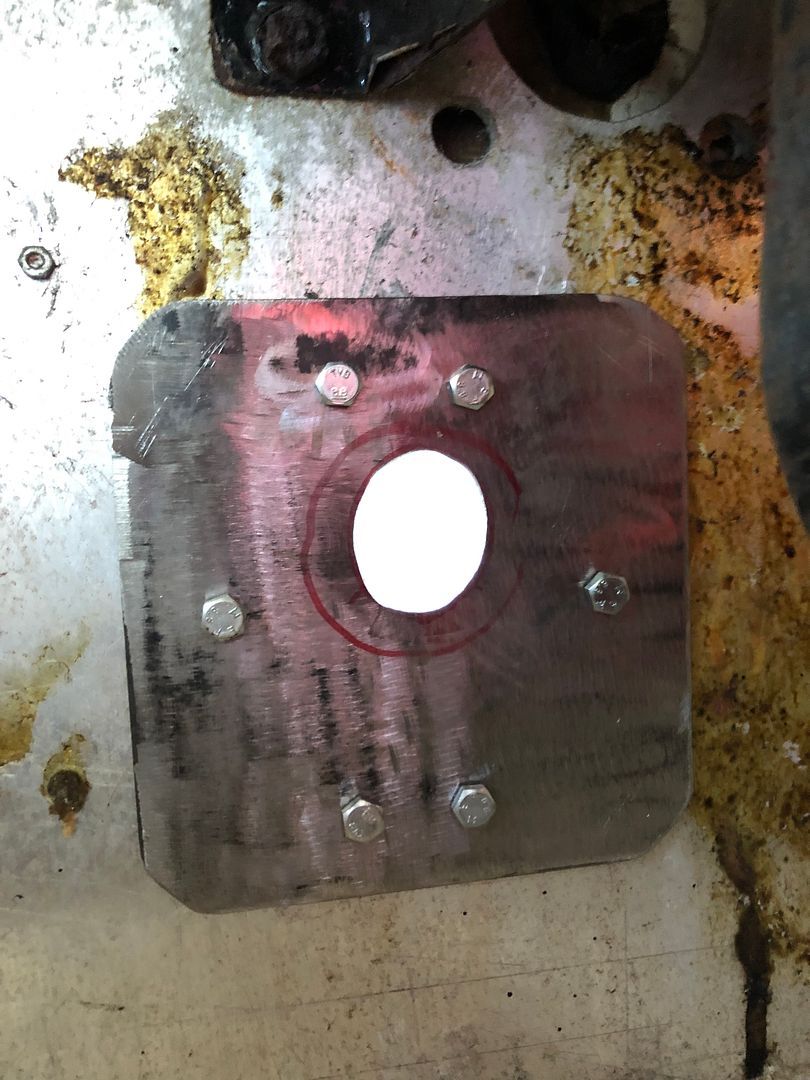 Once in place, I added the steering wheel and shaft. Just to get the position established. Screen cleared. 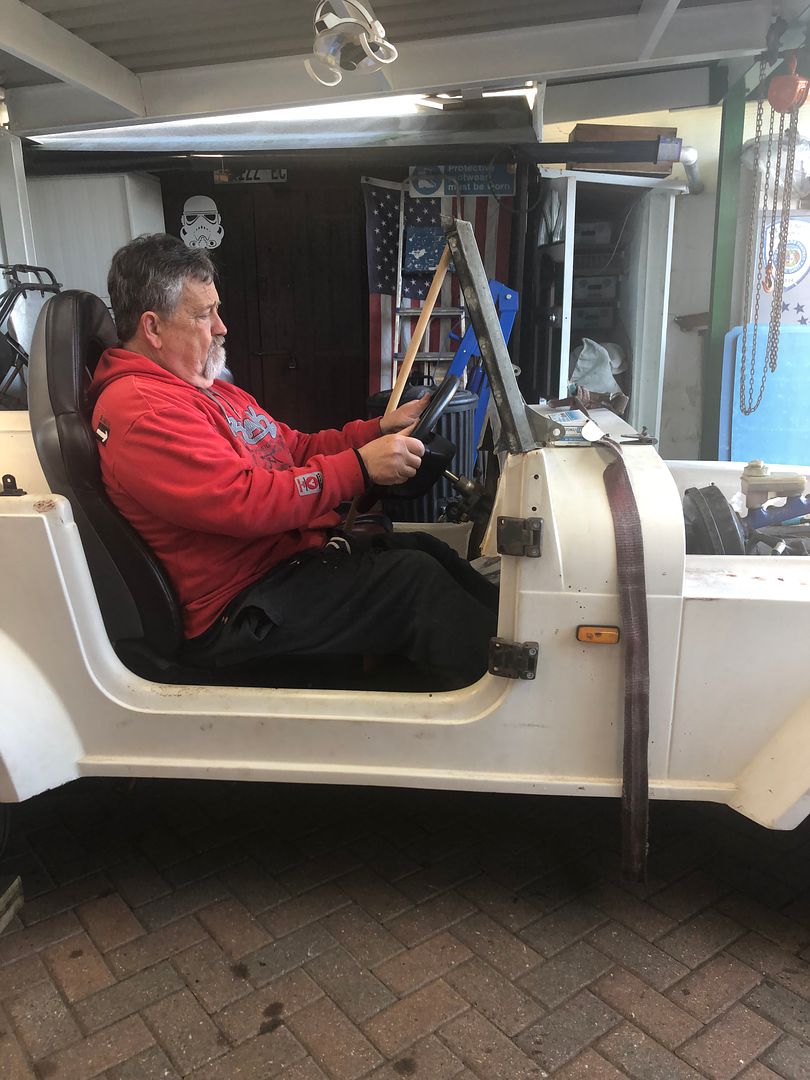 Reasonable position and clearance. .jpg) Steering wheel removed to lessen the load on the firewall channel. 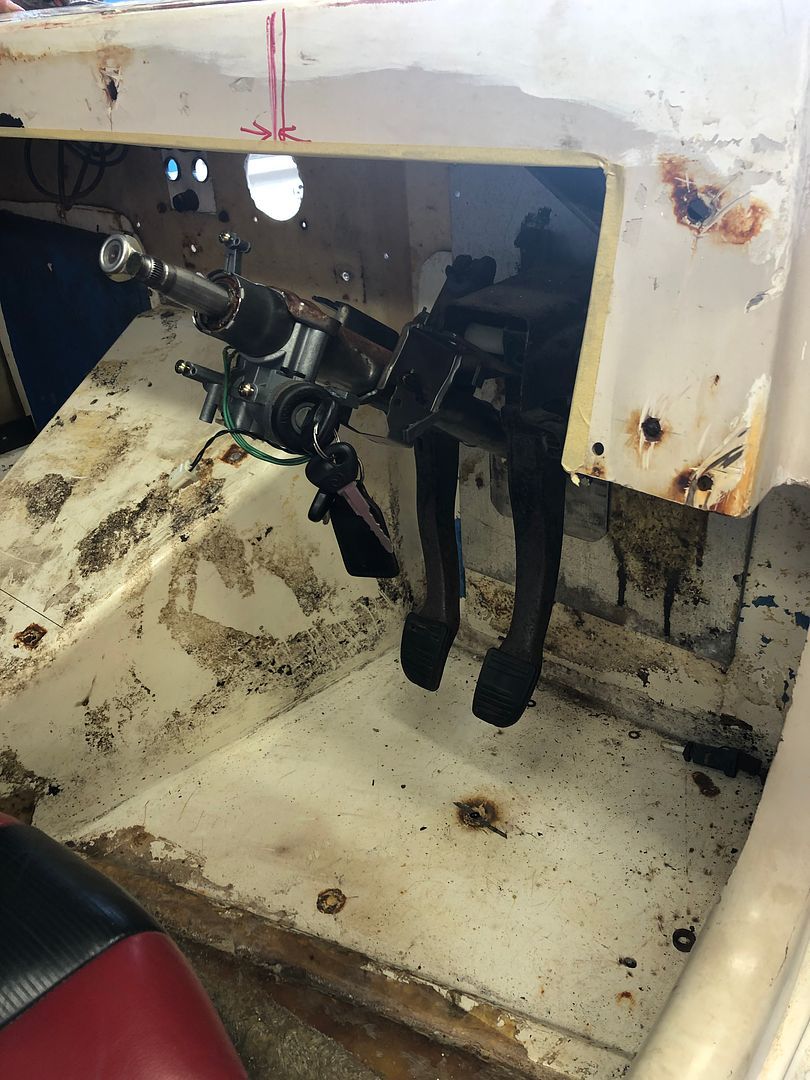 And the engine side. Looking good. 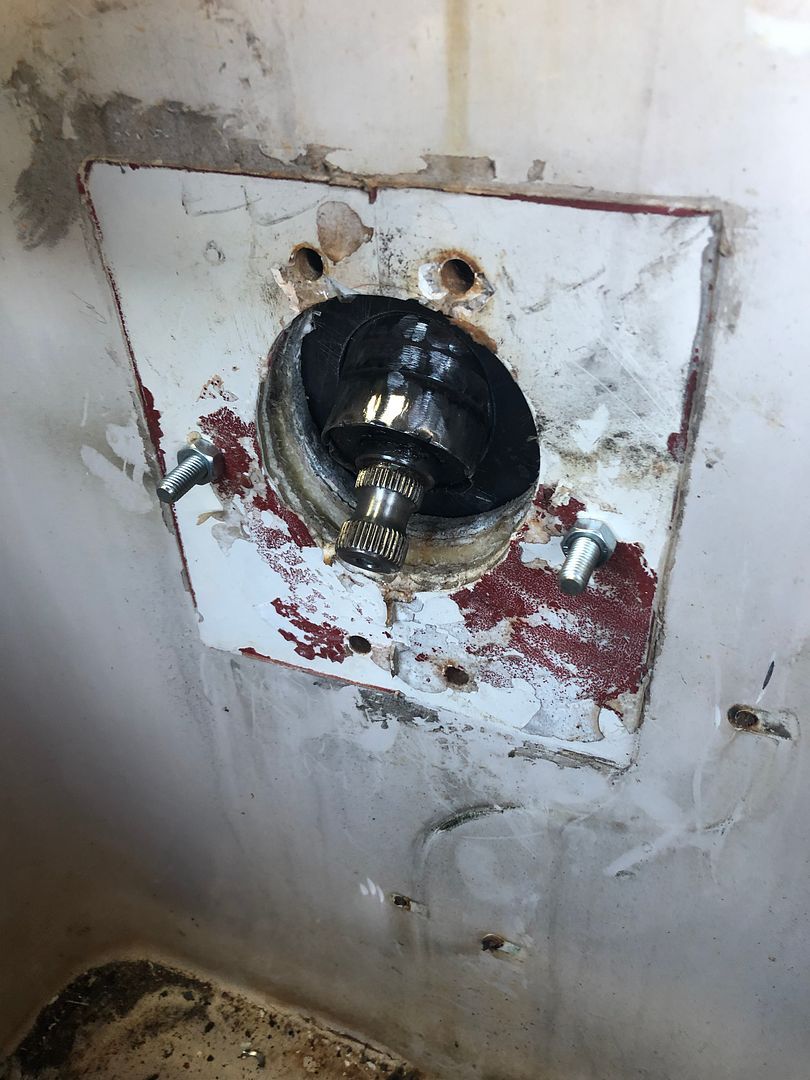 At this point @nickwheeler and I were firing on all cylinders. We seem to be able to just get on with tasks, no boundaries, and total interchangeable rhythm. We had first cut the MX5 dash support shorter and shorter, 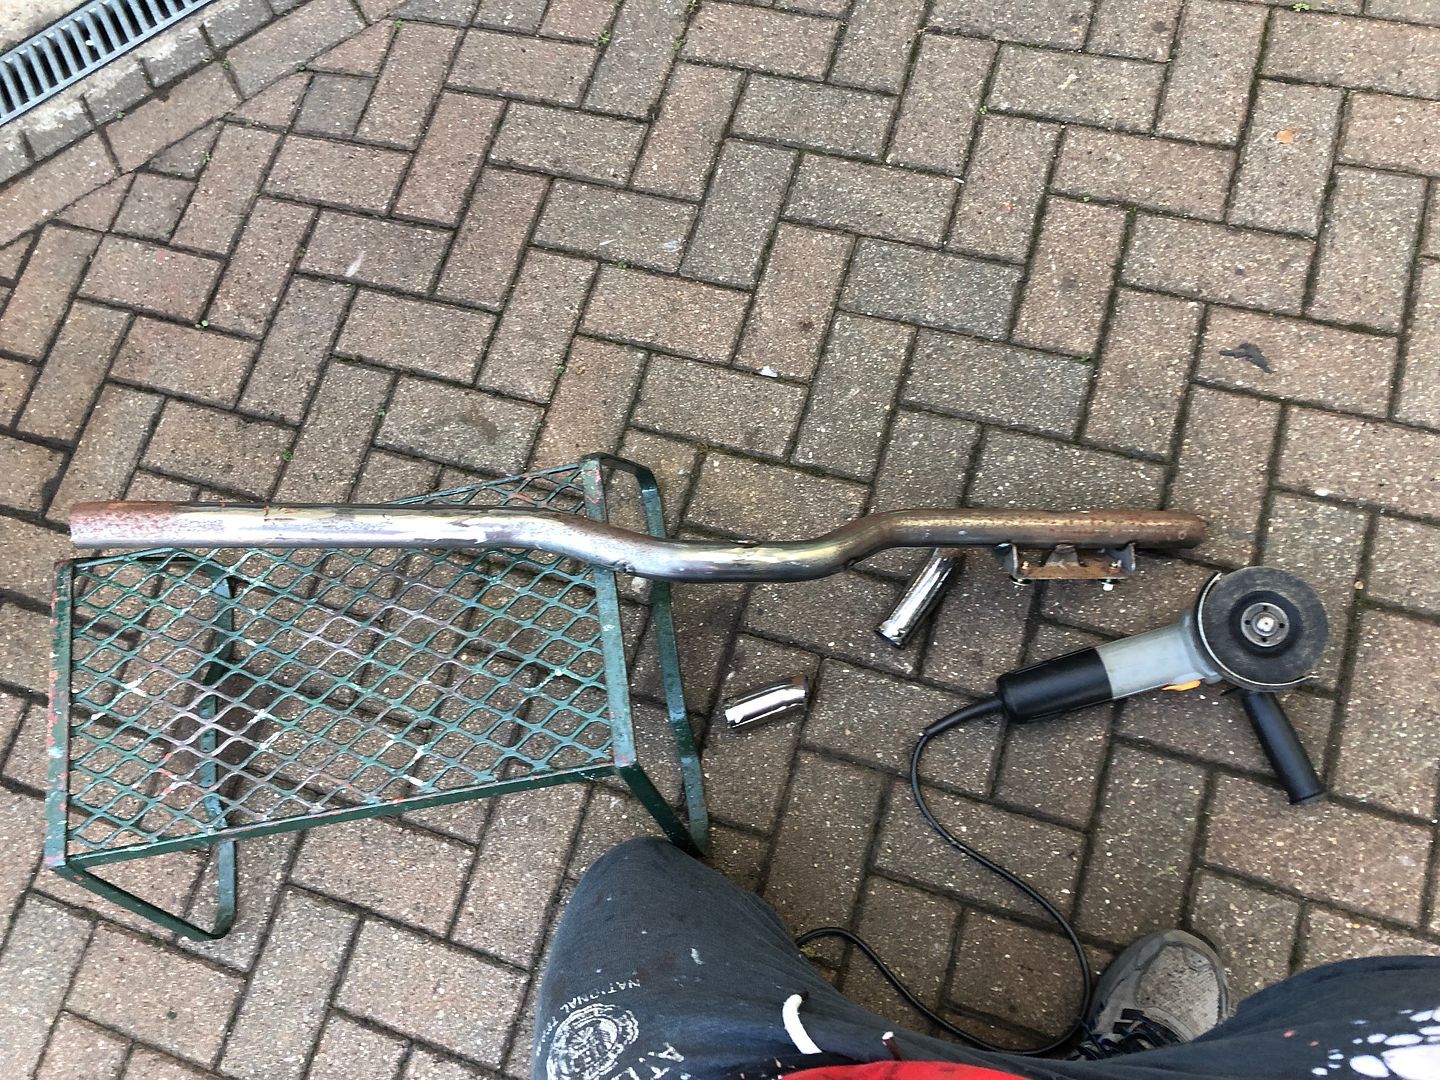 Then added in some steel pipe that curved differently. Nick had brought his Mig welder in the car and we welded a load through the day. At this point, tacking in the extensions that are getting attached to the screen support. 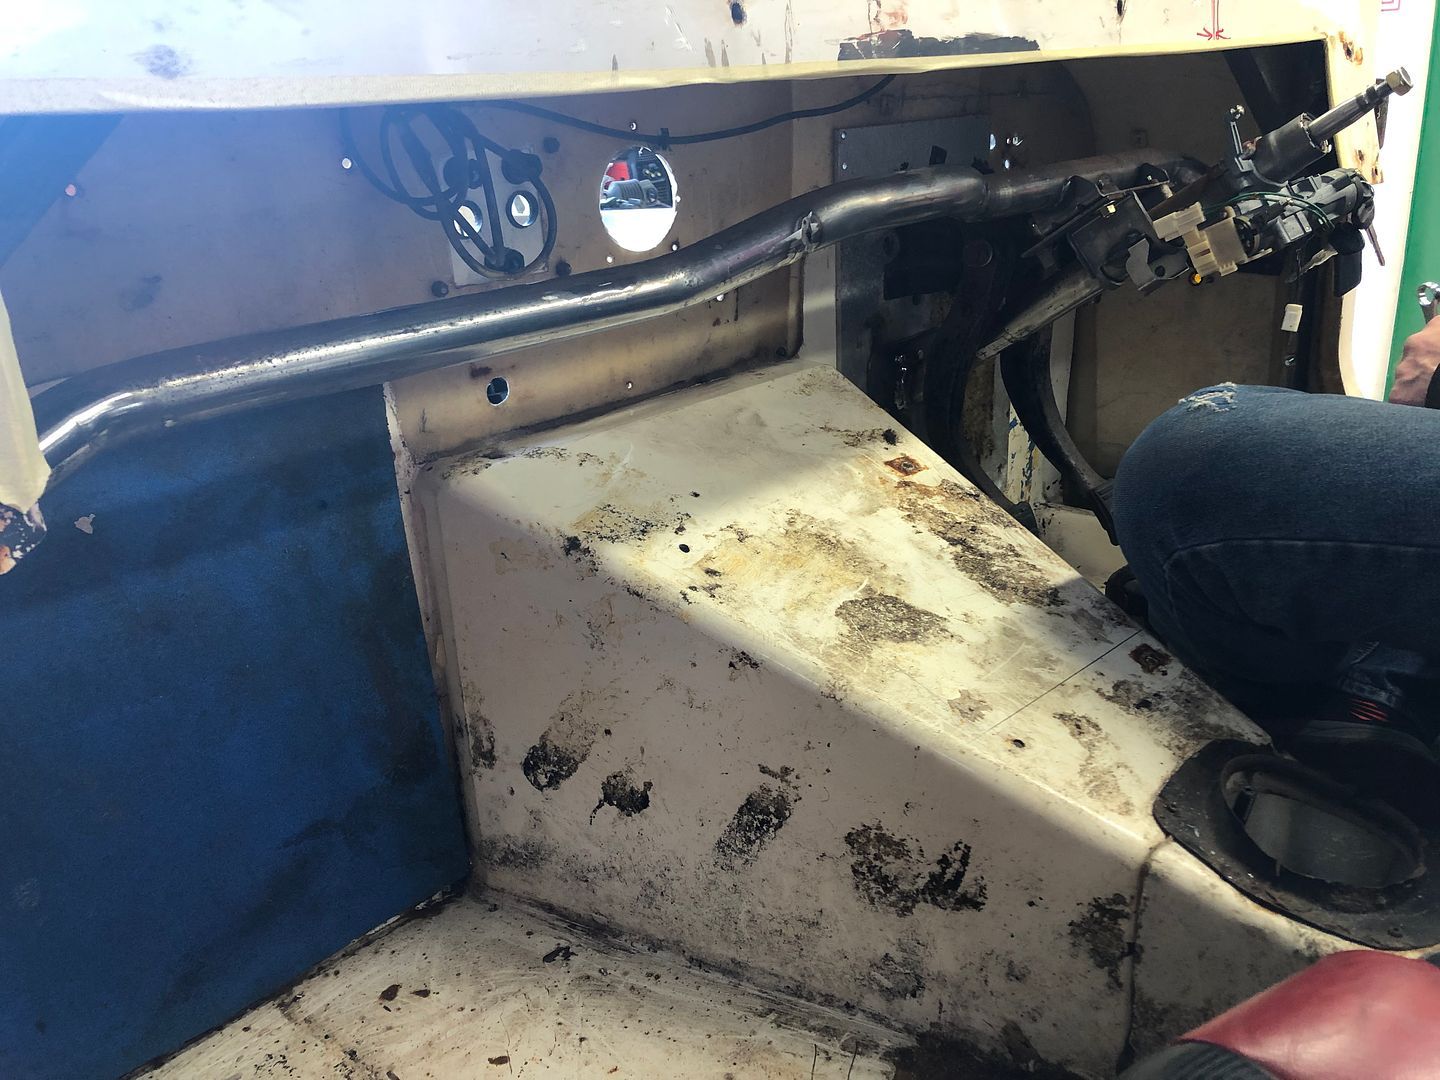 Tacked, next thing proper welds and also a few pie cuts to make it all fit together. 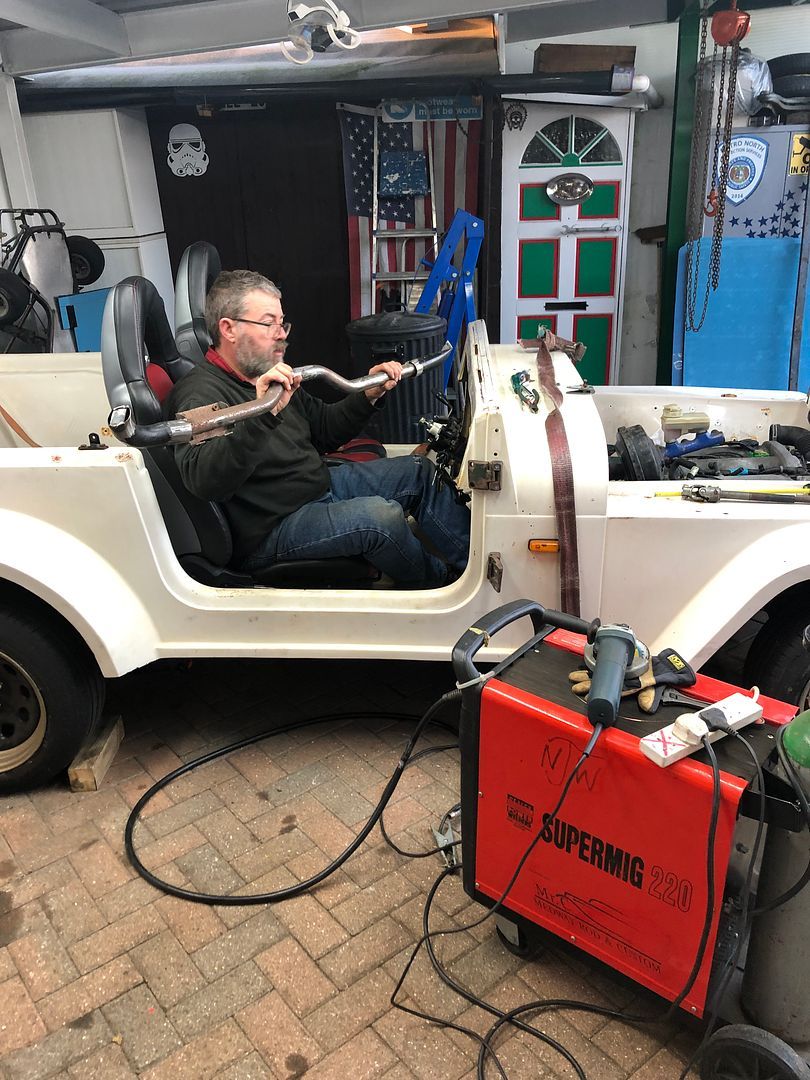 Once back in the car, and in position, a check showed the steering wheel was aligned. Adding the indicator, wiper stalks, airbag and horn push meant one could get a better idea on space utilisation. 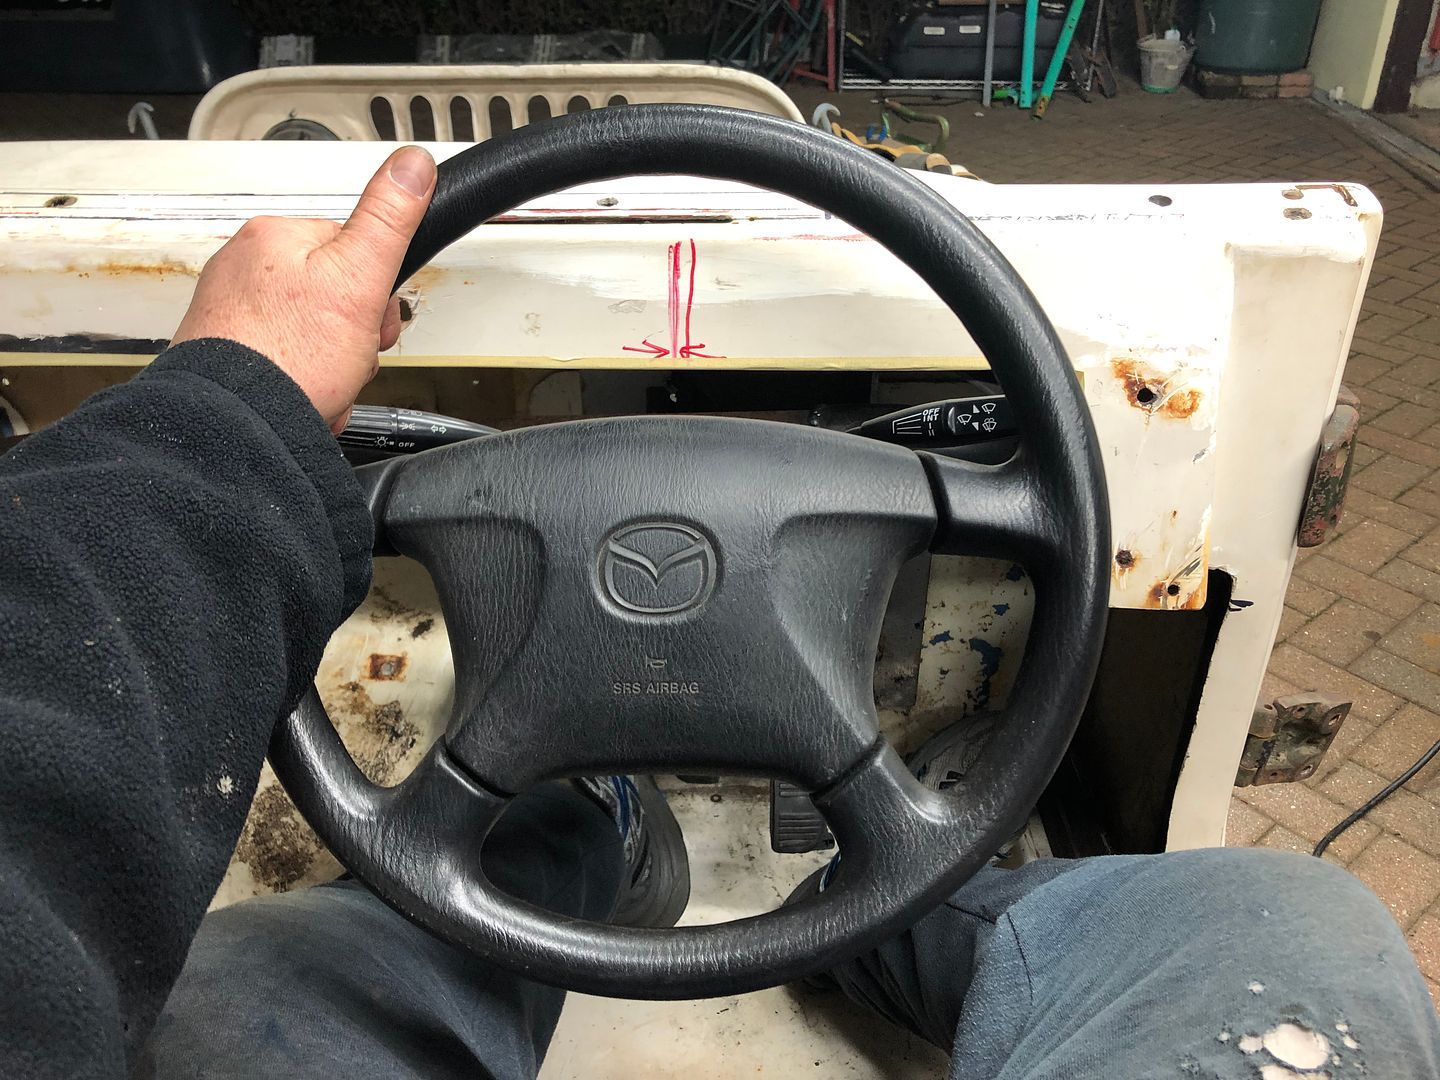 And where the shaft goes through the firewall. 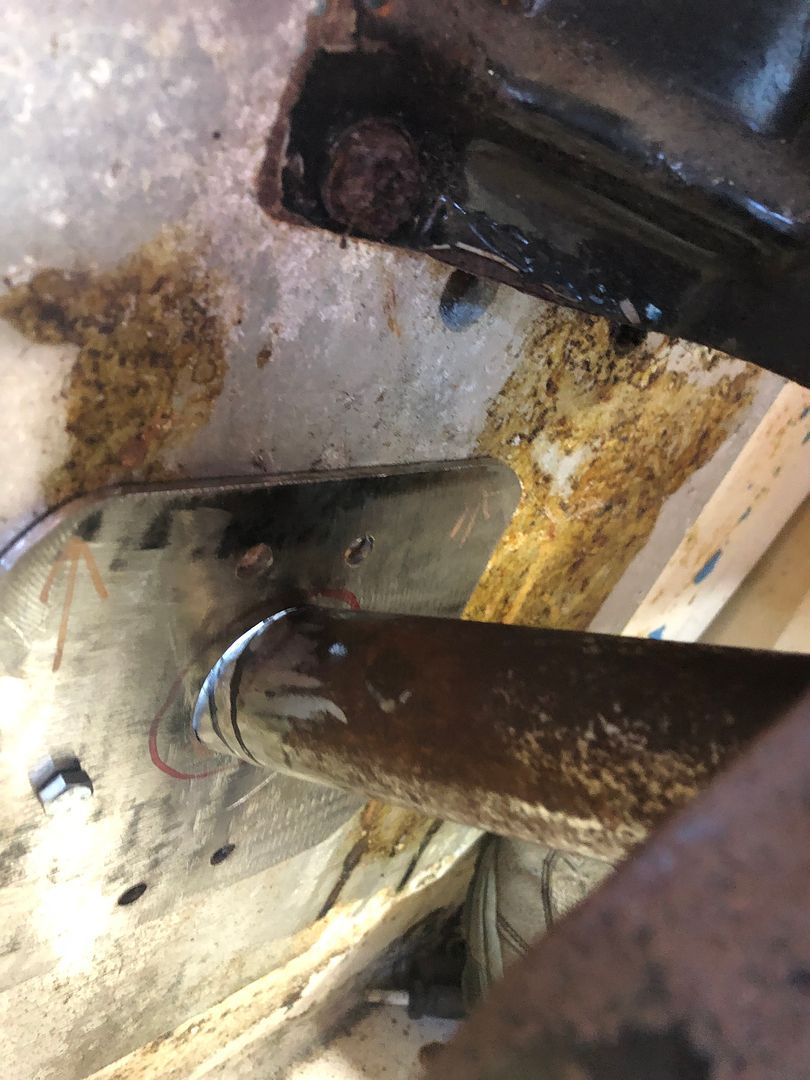 What a nice fit this shaft makes in the plate. More tacking, followed by full depth welding on the bench.  Adding the airbag, indicators and shroud left me with a firewall plate and adjustable clam that Nick had created Looking tidy. 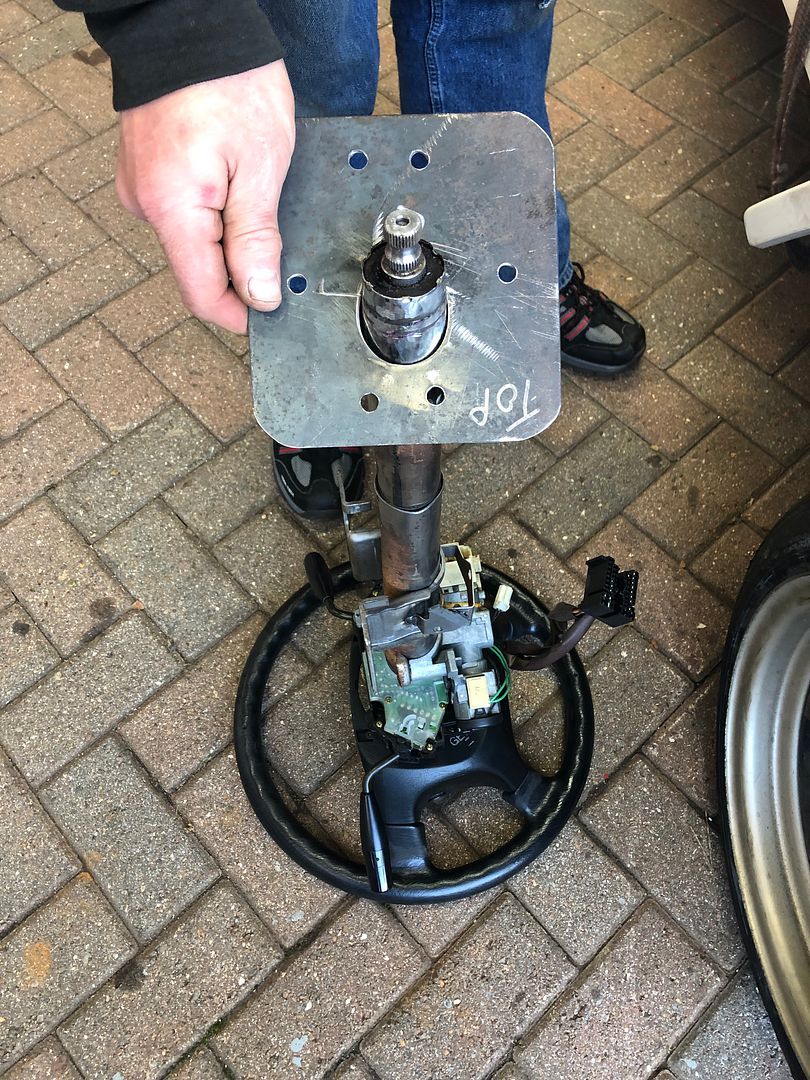 So that, despite not looking like a lot of progress, was a good place to get to .
__________________
MY BUILD LINK: http://67-72chevytrucks.com/vboard/s...585901]Redneck Express - 1966 C10 Short Fleetside MY USA ROADTRIPS http://forum.retro-rides.org/thread/...2018-humdinger IF YOU CAN'T FIX IT WITH A HAMMER, YOU'VE GOT AN ELECTRICAL PROBLEM MATE. |
|
|
|
|
02-01-2022, 04:11 PM
|
#25 |
|
Registered User
Join Date: Dec 2012
Location: Rochester, KENT
Posts: 10,509
|
Re: GRIZZs 79 - 2WD BLAZER Challenge over in London, England. ~Its not a Project
Something completely random, like me.
I have a few weird friends, well, many I guess. some not so weird One in Siberia, and then Vladimir in Russia. It is his birthday today. What I love about them all is this old style mentality of making or fixing stuff. He wanted a tractor, could not afford one, so built one from scrap. This is a short video clip of him and friends, doing what friends do. https://youtu.be/oWWosI0iQ1o I hope you enjoyed that.
__________________
MY BUILD LINK: http://67-72chevytrucks.com/vboard/s...585901]Redneck Express - 1966 C10 Short Fleetside MY USA ROADTRIPS http://forum.retro-rides.org/thread/...2018-humdinger IF YOU CAN'T FIX IT WITH A HAMMER, YOU'VE GOT AN ELECTRICAL PROBLEM MATE. |
|
|
|
|
| Bookmarks |
|
|


 Hybrid Mode
