
|
|
|
 04-03-2008, 02:17 AM
|
#1 |
|
Registered User
Join Date: Oct 2006
Location: fort worth texas
Posts: 395
|
Re: Ackattack's Pro touring restoration thread
where did u get those inner rocker panels
|

|

|
|
04-08-2008, 03:17 AM
|
#2 | |
|
Senior Member
Join Date: Aug 2002
Location: Valley Center KS
Posts: 3,525
|
Re: Ackattack's Pro touring restoration thread
Quote:
|
|
|
|
|
|
04-08-2008, 03:26 AM
|
#3 |
|
Senior Member
Join Date: Aug 2002
Location: Valley Center KS
Posts: 3,525
|
Re: Ackattack's Pro touring restoration thread
I took a break from studying today (the big test is on Friday...then I'm FREE!!!!) I installed the gas tank. I messaged the guy who's link I posted above, but got no reply, so I did this on my own in about 3 hrs or so. I guess I still have a little more things to do, but it's done for now.
I made some mounting straps from 2" wide aluminum I got from HD. 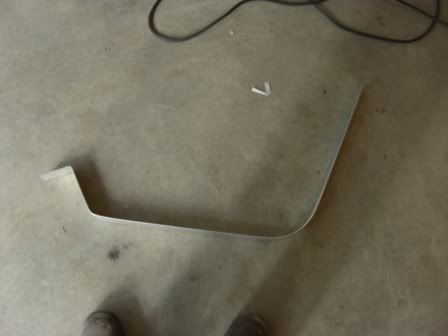 Like I said, I had to cut the bottom of the frame to make it wider for the tank to fit up in there. I also ended up moving the rear most cross member back about 3 inches or so. 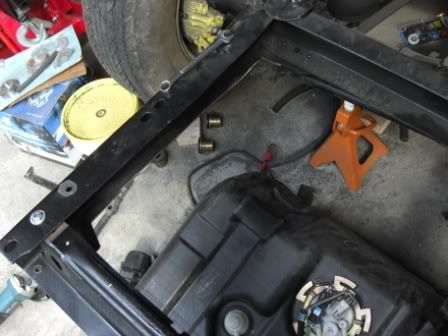 Here it is finished (for now)  The ground clearnance with this tank is pretty good. I believe its a lot better than the blazer tank. Lowered all the way: 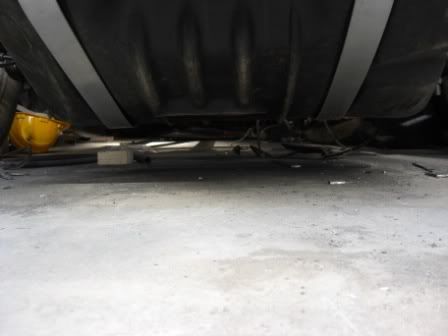 "ride height": 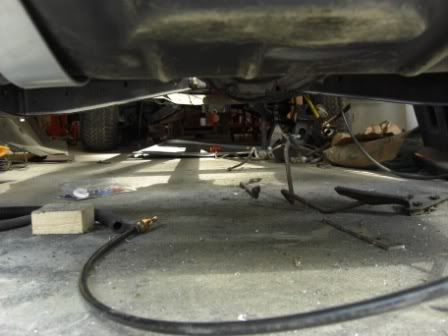 I still have to cut a hold for the filler tube. I'll probably have the filler inside the bed...maybe in the rear stake pocket or behind the wheel well. Oh, it will be on the right side. 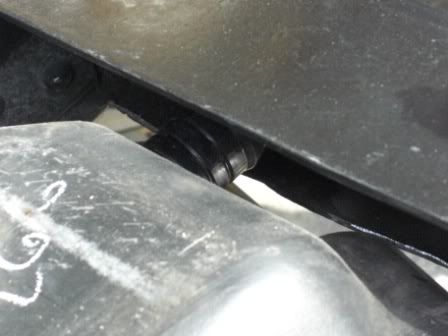 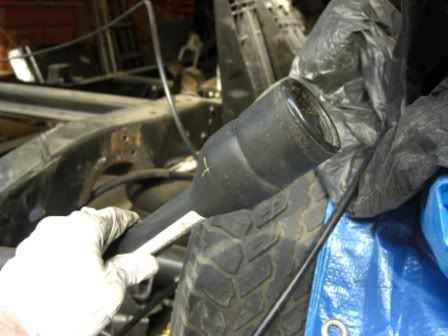 Oh, I also ordered new SS brake lines and all the parts for my fuel lines. So I'll be doing some plumbing next weekend!
__________________
Project Bruiser: 68 Pro-Touring C-10 5.3L / 4L60E Project Ironhide: 97 GMC Crew Cab 4x4 Cummins SOLD: '69 GMC 1/2T SWB TBI'd: Project No Buck Assembly Manual Index Sign up Thread!!! Factory Service Manual Index Last edited by Ackattack; 04-08-2008 at 04:29 AM. |
|
|
|
|
04-15-2008, 08:17 AM
|
#4 |
|
Senior Member
Join Date: Aug 2002
Location: Valley Center KS
Posts: 3,525
|
Re: Ackattack's Pro touring restoration thread
Test is over!!!! So I got some work done today. I partially installed the fuel line. I'm running 3/8" SS fuel line up to the engine. I convert to a -6 braided stainless steel line running from the frame up to the fuel rail. I also made a braided return line from the filter/regulator. I haven't gotten the 3/8" quick connects to make the rest of the fittings.
I also played around with some of the wiring. I removed one of the rear O2 sensors, and then layed the harness onto the engine and made most of the connections. I 'm going to have to tear it all apart to make it fit the way I want and be somewhat hidden. |
|
|
|
|
04-15-2008, 04:45 PM
|
#5 |
|
Hittin E-Z Street on Mud Tires
 Join Date: Nov 2004
Location: Greenville, SC
Posts: 23,090
|
Re: Ackattack's Pro touring restoration thread
What kind of engineer are you? I'm a Civil. I'm eligible to take it in September, but I think I'll wait for next April's test. How bad was it?
__________________
Jesse James 1967 C10 SWB Stepside: 350/700R4/3.73 1965 Ford Mustang: 289/T5-5spd/3.25 Trac-Loc 1968 Pontiac Firebird: Project Fire Chicken! 2015 Silverado Double Cab 5.3L Z71 2001 Jeep Wrangler Sport 4.0L 5spd 2020 Chevrolet Equinox Premium 2.0L Turbo 2011 Mustang V6 ~ Wife's ride  American Born, Country by the Grace of God  1967 CST Shop Truck Rebuild! My 1967 C-10 Build Thread My Vintage Air A/C Install Project "On a Dime" Trying my hand at Home Renovation! 1965 Mustang Modifications! |
|
|
|
|
04-15-2008, 06:18 PM
|
#6 | |
|
Senior Member
Join Date: Aug 2002
Location: Valley Center KS
Posts: 3,525
|
Re: Ackattack's Pro touring restoration thread
Quote:
|
|
|
|
|
|
04-15-2008, 06:20 PM
|
#7 | |
|
Hittin E-Z Street on Mud Tires
Join Date: Nov 2004
Location: Greenville, SC
Posts: 23,090
|
Re: Ackattack's Pro touring restoration thread
Quote:
 Best of luck on the results, now get this truck done 
__________________
Jesse James 1967 C10 SWB Stepside: 350/700R4/3.73 1965 Ford Mustang: 289/T5-5spd/3.25 Trac-Loc 1968 Pontiac Firebird: Project Fire Chicken! 2015 Silverado Double Cab 5.3L Z71 2001 Jeep Wrangler Sport 4.0L 5spd 2020 Chevrolet Equinox Premium 2.0L Turbo 2011 Mustang V6 ~ Wife's ride American Born, Country by the Grace of God 1967 CST Shop Truck Rebuild! My 1967 C-10 Build Thread My Vintage Air A/C Install Project "On a Dime" Trying my hand at Home Renovation! 1965 Mustang Modifications! Last edited by 67ChevyRedneck; 04-15-2008 at 06:21 PM. |
|
|
|
|
|
04-16-2008, 03:33 PM
|
#8 |
|
Back in the sticks
Join Date: Jan 2001
Location: Fordland, MO
Posts: 3,188
|
Re: Ackattack's Pro touring restoration thread
Wow, this is a cool project Ack. Like to see it in person sometime. Maybe if you have some time in May, I'll be home on leave for the daughter's wedding. Should see you at Monroe as well. Keep the pics coming!
__________________
1971 Cheyenne C-10 w/700R4 and Tuned Port Injection 1969 K5 Blazer w/Tuned Port 2010 2SS/RS Flaming Orange Camaro 2011 K1500 Suburban 2014 K1500 Pickup 2008 Nissan Altima? The wifes' hoopty |
|
|
|
|
06-02-2008, 12:22 PM
|
#9 |
|
Senior Member
Join Date: Aug 2002
Location: Valley Center KS
Posts: 3,525
|
Re: Ackattack's Pro touring restoration thread
I finally got back to doing a little work this weekend.
I finished up the fuel lines after some parts being back ordered. I also got the tranny and torque converter bolted in after having the wrong length of bolts and breaking one off because of the wrong torque specs. I set my new driver's seat in place ('99-07 silverado) to see what it's going to take to get it in. And then I started working on mounting up the DBW gas pedal. I ended up making a little sheet metal piece that the pedal assy can bolt to. I put it at an angle to avoid having the gas pedal too close to the brake, so that in an emergency, you don't slam on the brake and hit the gas at the same time. I think it will work good though. I'll get some pictures later. I'm still waiting on brake lines. I think it's been 6 weeks since I ordered them! |
|
|
|
|
06-03-2008, 11:23 AM
|
#10 |
|
Senior Member
Join Date: Aug 2002
Location: Valley Center KS
Posts: 3,525
|
Re: Ackattack's Pro touring restoration thread
I finally got my brake lines. They didn't come with the unions, so I'll have to go pick some of those up. I'll also probably go ahead and pull the engine to run the lines across the back of the cross member too.
|
|
|
|
|
06-05-2008, 12:43 AM
|
#11 |
|
Senior Member
Join Date: Aug 2002
Location: Valley Center KS
Posts: 3,525
|
Re: Ackattack's Pro touring restoration thread
well funding has been approved through the house approapreation committee (my wife) so hopefully the truck will start to take shape a little quicker.
Basically since we're planning on having a baby sometime soon, and the fact that I hope Hot Rod Power Tour will come towards Seattle next year, my goal is to get it on the road by this time next year. In order for that to happen I've had to temorarily scale back some of the plans for now. It looks like I'll be running the 5.3L for awhile along with the stock 4L60E and torque converter. I also won't be getting the drag wheel/tires or big brakes right away (I'll still get the 20s though ) Oh, I also won't get the in car computer/navigation sound system I was planning on getting. (Although the other day I saw a stereo that will fit in the stock dash that has only a radio, and then a cord to control ipods, so that should work well in the mean time)So now I'm gonna be busting butt to get the rust repair done and get this bad boy to the paint shop. Obviously have some other things to get done before then too, but the rust repair is definatly the long leg. I got a little bit of the work done tonight. I got the rear cab corner support cut down to size, fit up, and welded in along the floor and inner rocker. Still gotta weld it to the existing support though. Not too bad for a few hours though. Oh yeah, I also scored a center console/seat on ebay tonight too. |
|
|
|
|
06-05-2008, 12:02 PM
|
#12 |
|
PITbut
Join Date: Sep 2007
Location: monroe washington
Posts: 3,042
|
Re: Ackattack's Pro touring restoration thread
"""will fit in the stock dash that has only a radio, and then a cord to control ipods, so that should work well in the mean time"""
WHERE!!!!!.. I was thinking of getting one of those last night.... Let me know please. Does it have the ability to hook rcas to the radio so you can intall amps and what not? |
|
|
|
|
06-05-2008, 05:30 PM
|
#13 | |
|
Senior Member
Join Date: Aug 2002
Location: Valley Center KS
Posts: 3,525
|
Re: Ackattack's Pro touring restoration thread
Quote:
|
|
|
|
|
|
07-11-2008, 02:27 PM
|
#14 |
|
Senior Member
Join Date: Aug 2002
Location: Valley Center KS
Posts: 3,525
|
Re: Ackattack's Pro touring restoration thread
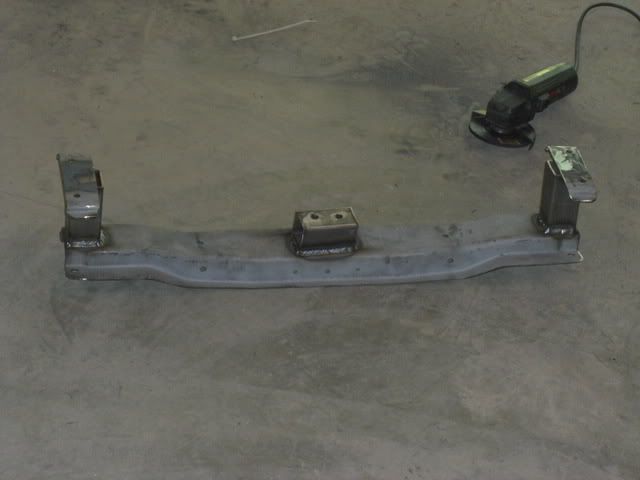
So here is a picture of the modified tranny crossmember:
 A couple of the drivers side of the cab: 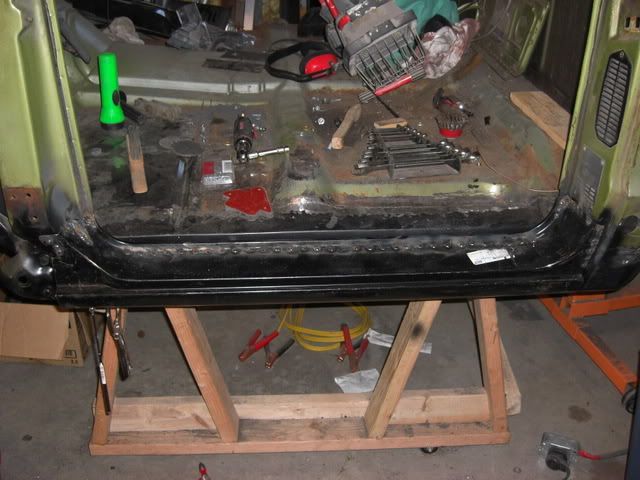  Here's what I'm starting with on the passenger side: 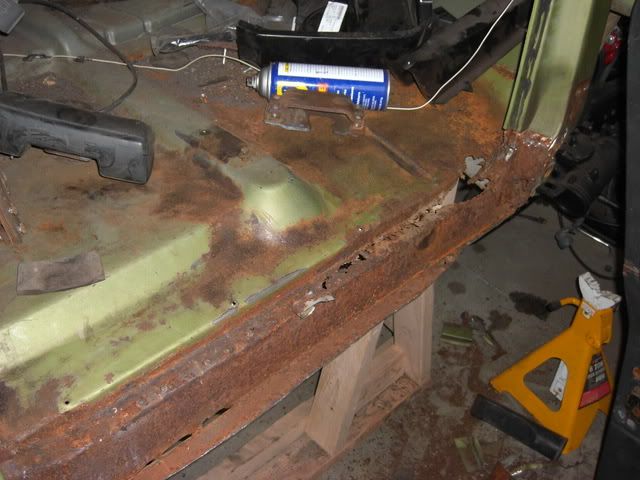 And here is the fuel lines at the tank: 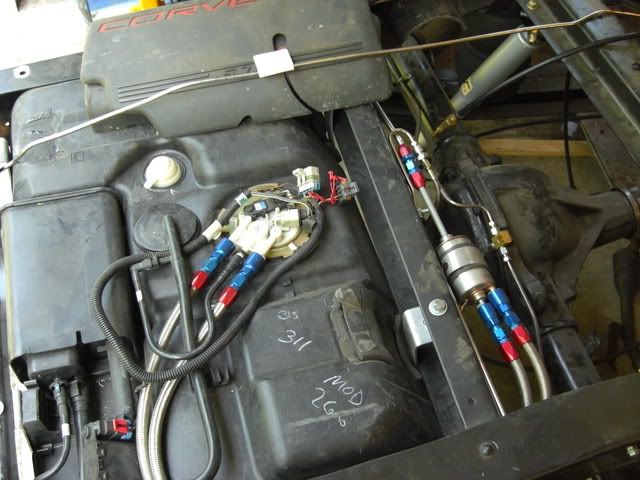
|
|
|
|
|
07-13-2008, 11:57 PM
|
#15 |
|
Senior Member
Join Date: Aug 2002
Location: Valley Center KS
Posts: 3,525
|
Re: Ackattack's Pro touring restoration thread
I set the bed on the frame today!
Here are some pictures: Airbags full: 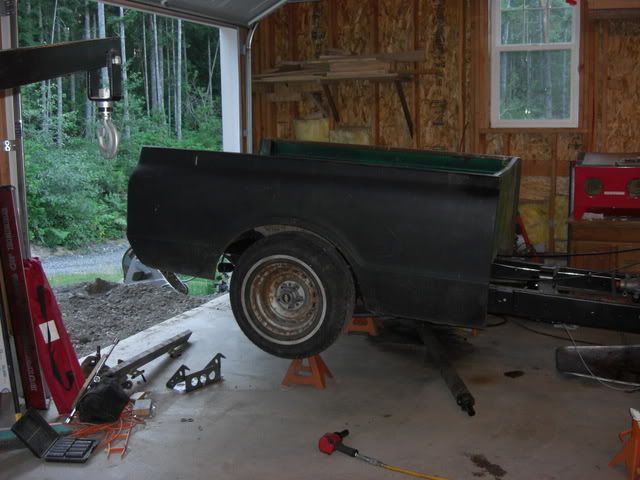 Airbags empty: 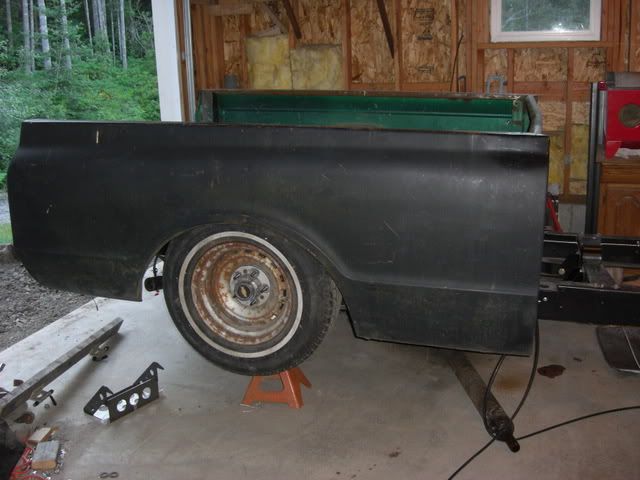
|
|
|
|
|
07-10-2008, 10:14 PM
|
#16 |
|
Senior Member
Join Date: Aug 2002
Location: Valley Center KS
Posts: 3,525
|
Re: Ackattack's Pro touring restoration thread
Time for another update I guess: I'll get pictures up when I get to my computer that has them on it.
I got the driver's side sheet metal all welded on. I'm in search of a different driver's side door. The one I have isn't in as good of shape as I thought it was. On the passenger side I got the outer rocker panel removed. The pass. side door is in good shape, so I'll be able to use it. I modified the tranny crossmember to raise the transmission up. Originally I was planning on completely making a new one, but then I decided I could modify the stock one. So I removed the rivets that hold on the upper pieces, cut the upper pieces down so that the only part that is left of them is the part that sets inside the frame rail. Then I used a piece of square tubing and welded the two together. I also used another piece of tubing to raise the tranny hieght. This should give me room to run the exhaust up above the crossmember. I also pulled out the engine to swap over to the F-body oil pan. It gives a lot better ground clearance. I also enlarged the holes on the headers so they will bolt up. Some of the holes were not spaced quite exactly right, and I couldn't get all of the bolts in. Should be fixed now. I also got the brake lines ran across the front crossmember (couldn't really get them in there with the engine in the way). Torqued all of the front suspension / steering pieces. Need to grease them and I should be good to go on the front. Oh, I got the hole drilled in the frame for the gas filler tube to pass through. So now I believe I'm ready to put the bed on temporarily. Hopefully that will happen this weekend. Then I can start on the tubbing process and get the wheels ordered. I'll also fabricate the gas filler setup. The bed will have to come back off so I can do a few touch ups to the paint on the frame. So if you look back, I started on the tear down just over a year ago. I don't really feel like I've gotten very far in a whole year. I'm hoping its just things aren't quite put back together, and I have actually made a lot of progress. I guess we'll see though. Now that the frame / suspension / drivetrain is basically done, hopefully I can bust out the rest of the rust repair and body work and get it off to get some of the other things taken care of (state inspection for the different VINs on the cab/frame, exhaust installed, alignment, and paint) |
|
|
|
|
07-14-2008, 08:06 AM
|
#17 |
|
State of Confusion!
 Join Date: Jul 2002
Location: Gulfport, MS USA
Posts: 46,755
|
Re: Ackattack's Pro touring restoration thread
Making good progress!
__________________
Bill 1970 Chevy Custom/10 LWB Fleetside 2010 Toyota Tacoma PreRunner SR5 Double Cab - DD Member of Louisiana Classic Truck Club (LCTC) Bill's Gallery Life isn't tied with a bow, but it's still a gift. Live simply. Love generously. Care deeply. Speak kindly. Leave the rest to God! |
|
|
|
|
07-18-2008, 05:08 PM
|
#18 |
|
Registered User
Join Date: Jan 2008
Location: Lacombe, Alberta
Posts: 353
|
Re: Ackattack's Pro touring restoration thread
Can you post more pics of the fuel tank setup and filler. I like what you did and don't like how low the blazer tank sits.. If you can post all angles, or email then to me.
Thanx. Trevor tk-mpl@shaw.ca |
|
|
|
|
07-18-2008, 06:35 PM
|
#19 |
|
Account Suspended
Join Date: Nov 2007
Location: San Diego ca
Posts: 717
|
Re: Ackattack's Pro touring restoration thread
who makes those wheels?
|
|
|
|
|
07-18-2008, 07:43 PM
|
#20 | |
|
*************
Join Date: Apr 2005
Location: Pensacola, FL
Posts: 17,837
|
Re: Ackattack's Pro touring restoration thread
Quote:
 . .
__________________
Rob - https://www.instagram.com/hart_rod_c10 As Iron Sharpens Iron, So One Man Sharpens Another. Proverbs 27:17 FOR SALE: DBW pedal bracket - http://67-72chevytrucks.com/vboard/s...d.php?t=651123 FOR SALE: Hood Brackets http://67-72chevytrucks.com/vboard/s...d.php?t=679945 1987 Silverado SWB - 34.5K original miles http://67-72chevytrucks.com/vboard/s...d.php?t=801834 1969 SuperBurb - http://67-72chevytrucks.com/vboard/s...d.php?t=200387 1968 Farm truck - http://67-72chevytrucks.com/vboard/s...d.php?t=358692 1968 SWB - http://67-72chevytrucks.com/vboard/s...d.php?t=551258 1948 Chevy - http://67-72chevytrucks.com/vboard/s...=122164&page=3 |
|
|
|
|
|
07-19-2008, 10:35 PM
|
#21 | |
|
Account Suspended
Join Date: Nov 2007
Location: San Diego ca
Posts: 717
|
Re: Ackattack's Pro touring restoration thread
Quote:
|
|
|
|
|
|
07-18-2008, 09:02 PM
|
#22 | |
|
Senior Member
Join Date: Aug 2002
Location: Valley Center KS
Posts: 3,525
|
Re: Ackattack's Pro touring restoration thread
Quote:
I'll go ahead and post some more pictures of the tank on here, so everyone can see if they're interested |
|
|
|
|
|
07-19-2008, 01:44 AM
|
#23 |
|
Senior Member
Join Date: Aug 2002
Location: Valley Center KS
Posts: 3,525
|
Re: Ackattack's Pro touring restoration thread
So here is probabably the best shot I have of the gas tank:
 What I did was first move the rear most cross member back about an inch, then cut/grinded on the frame to clear the tank. Then I took some 2" wide aluminum strips and bent them to the contour of the tank. I bolted the one end to the rear cross member, then used long bolts on the next crossmember to draw the tank up and tight against the frame. I kept some of the foam padding that was originally on the take as cushioning too. The filler neck sits right in the frame rail, so I use a hole saw (2" I believe) and cut a hole for the rubber filler tube to pass through. I'll have to get a picture of this. Since I just got the bed on, I haven't finished where installing the filler tube. I'm actually not 100% sure where it's going to go. It really wasn't too hard to install the tank, once I had the tank in hand. Good luck. Oh, I got a little bit of work done yesterday. I began modifying my 70 GMC core support to be like the 68 chevy core support. I made a little pattern with some paper and pencil (rubbing) then drilled holes where the headlight adjusters pass though. Then I started cutting the corners of the holes to make them square with my dremel, but the battery died, so I'm not finished. I'll have to get pictures when I finish. |
|
|
|
|
07-20-2008, 09:27 PM
|
#24 |
|
Senior Member
Join Date: Aug 2002
Location: Valley Center KS
Posts: 3,525
|
Re: Ackattack's Pro touring restoration thread
So I got some work done on the core support again. I finished up the square holes for the adjuster screws, and then welded in the holes where the GMC headlight buckets were spot welded to it. So now i have some clean up grinding to do, and sandblast, and then paint and it will be done.
Then I moved on to the wheel wells. I figured more people may be interested in this, so I posted it on the main page here: http://67-72chevytrucks.com/vboard/s...d.php?t=300122 |
|
|
|
|
07-20-2008, 09:30 PM
|
#25 |
|
Registered User
Join Date: Apr 2001
Location: DALLAS,TX
Posts: 21,935
|
Re: Ackattack's Pro touring restoration thread
Nice work.....
__________________
67SWB-B.B.RetroRod 64SWB-Recycle 89CCDually-Driver/Tow Truck 99CCSWB Driver All Fleetsides @rattlecankustoms in IG Building a small, high rpm engine with the perfect bore, stroke and rod ratio is very impressive. It's like a highly skilled Morrocan sword fighter with a Damascus Steel Scimitar..... Cubic inches is like Indiana Jones with a cheap pistol. |
|
|
|
 |
| Bookmarks |
|
|


 Hybrid Mode
