
 |
|
|
#101 |
|
Registered User
Join Date: Apr 2007
Location: antreville, south carolina
Posts: 873
|
Re: Over 25 Years Later, Finally My 71 C-10 Truck Build
I totally understand about what you mean when the truck has a no soul after a point when it comes to switching cabs...that actually why I decided to rebuild my rusty original..roof rot and all>I wanted it to still be my truck..not a franken truck
__________________
"Dixie Destroyer" 71 C10 LWB Fleet Future Blown Prostreet Monster |
|
|

|
|
|
#102 |
|
GEARHEAD
Join Date: Aug 2003
Location: MN
Posts: 6,126
|
Re: Over 25 Years Later, Finally My 71 C-10 Truck Build
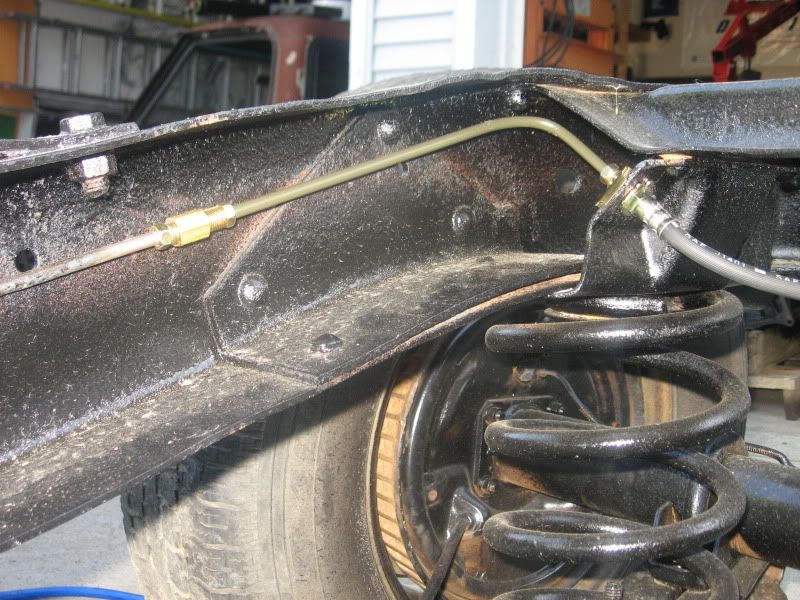
It's not much, but it is one more thing off the to do list. Replaced the rear brake hose and repaired my cut rear brake line. I also got the ebrake cable re-connected. Next job on the chassis is the track bar and gas tank.
 This is my fuel regulator and pressure guage. I also got the flywheel dust cover cleaned up and painted and put back on, no pic of that though. I'm going back out to do some more detail work on the engine. 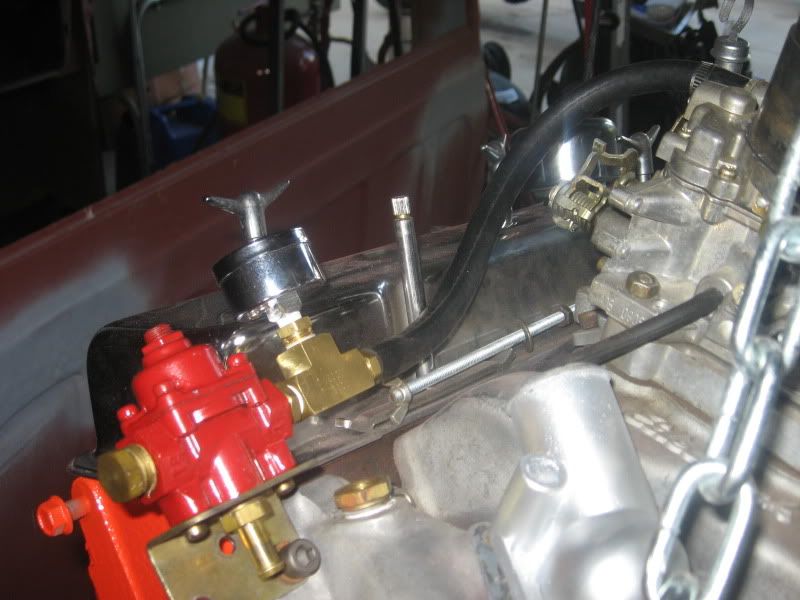
__________________
If no one knows what you're doing, they can't tell you you're doing it wrong HG's Dream Car Build - Shelby Cobra Kit Build your own adjustable track bar 71  Long Fleet C/10 Long Fleet C/10 72  Jimmy 4x4 (Junkyard Jimmy) Jimmy 4x4 (Junkyard Jimmy)HG's Plow Truck '78  K35 Dually K35 DuallyBigass Farm Truck HG's thread of miscellaneous stuff Last edited by hgs_notes; 06-04-2009 at 09:12 PM. |
|
|

|
|
|
#103 | |
|
spirit rider66
 Join Date: Oct 2008
Location: pahrump, nevada, in the bowels of the Mojave desert
Posts: 291
|
Re: Over 25 Years Later, Finally My 71 C-10 Truck Build
Quote:
 and the adventure begins, little parts ordered here and there, then you fall head over heels for the work you've started and can't quit. welcome to the board, congrats on your work, looks like a labor of love. good luck hgs and the adventure begins, little parts ordered here and there, then you fall head over heels for the work you've started and can't quit. welcome to the board, congrats on your work, looks like a labor of love. good luck hgs
__________________
:Chevy: If you don't run your own life,, some one else will.  to our vets,, welcome home,, and thank you for your service.:Chevy: to our vets,, welcome home,, and thank you for your service.:Chevy: 
|
|
|
|

|
|
|
#104 | |
|
spirit rider66
 Join Date: Oct 2008
Location: pahrump, nevada, in the bowels of the Mojave desert
Posts: 291
|
Re: Over 25 Years Later, Finally My 71 C-10 Truck Build
Quote:

__________________
:Chevy: If you don't run your own life,, some one else will.  to our vets,, welcome home,, and thank you for your service.:Chevy: to our vets,, welcome home,, and thank you for your service.:Chevy: 
|
|
|
|

|
|
|
#105 |
|
GEARHEAD
Join Date: Aug 2003
Location: MN
Posts: 6,126
|
Re: Over 25 Years Later, Finally My 71 C-10 Truck Build
I figured out how I'm going to put in a gas filler. I got one from a parts blazer I just got last weekend. Instead of going through the bedside, I'm going to cut it and reverse the direction 180* so the fill opening is in the rear corner of the bed. It'll be out of the way and easy enough to make a sheetmetal cover to go over the hoses and make it look like it was made that way.
I got the new motor and tranny mounts on. The power steering pump brackets have drying paint, so I'll finish that tomorrow. About all that's left for the engine is finding the correct starter bolts, painting the pulleys and getting some better alternator brackets, all of which can be done easily with the engine in the frame.
__________________
If no one knows what you're doing, they can't tell you you're doing it wrong HG's Dream Car Build - Shelby Cobra Kit Build your own adjustable track bar 71  Long Fleet C/10 Long Fleet C/10 72  Jimmy 4x4 (Junkyard Jimmy) Jimmy 4x4 (Junkyard Jimmy)HG's Plow Truck '78  K35 Dually K35 DuallyBigass Farm Truck HG's thread of miscellaneous stuff |
|
|

|
|
|
#106 |
|
PITbut
Join Date: Sep 2007
Location: monroe washington
Posts: 3,052
|
Re: Over 25 Years Later, Finally My 71 C-10 Truck Build
 I had to replace that exact line the exact same way few weekends ago.. Mine had rusted through. ahaha. My little kid used it as a step stool so he could climb on the tire and it popped.
__________________
New project. 1971 Twin Turbo blazer http://67-72chevytrucks.com/vboard/s...d.php?t=676047 My new YOUTUBE channel.. Videos of my truck and a current walk around. Lyrikz74 Youtube channel DONE! SOLD!  My 1971 stepside build thread My Build Thread UPDATED 6/11. DONE and sold. |
|
|

|
|
|
#107 |
|
GEARHEAD
Join Date: Aug 2003
Location: MN
Posts: 6,126
|
Re: Over 25 Years Later, Finally My 71 C-10 Truck Build
When I was removing the rear axle I needed to disconnect the line. The hard line twisted with the nut, so I had to cut it and replace.
This morning I made up some aluminum fuel lines from the pump to the regulator and carb. My first attempt at making hard lines for this, so hopefully it doesn't leak. I used brass compression fittings for a couple joints, flared the one end for the fuel pump, and will need to use a small piece of rubber tube connecting to the carb, at least for now. Pic later. I got the mounts on and power steering pump on. I'm going to wait to install the engine until I get back from Mexico (work trip) next weekend.
__________________
If no one knows what you're doing, they can't tell you you're doing it wrong HG's Dream Car Build - Shelby Cobra Kit Build your own adjustable track bar 71  Long Fleet C/10 Long Fleet C/10 72  Jimmy 4x4 (Junkyard Jimmy) Jimmy 4x4 (Junkyard Jimmy)HG's Plow Truck '78  K35 Dually K35 DuallyBigass Farm Truck HG's thread of miscellaneous stuff |
|
|

|
|
|
#108 |
|
GEARHEAD
Join Date: Aug 2003
Location: MN
Posts: 6,126
|
Re: Over 25 Years Later, Finally My 71 C-10 Truck Build
First is a couple pics of my fuel lines. I just need to put a couple clamps on and it is all set.
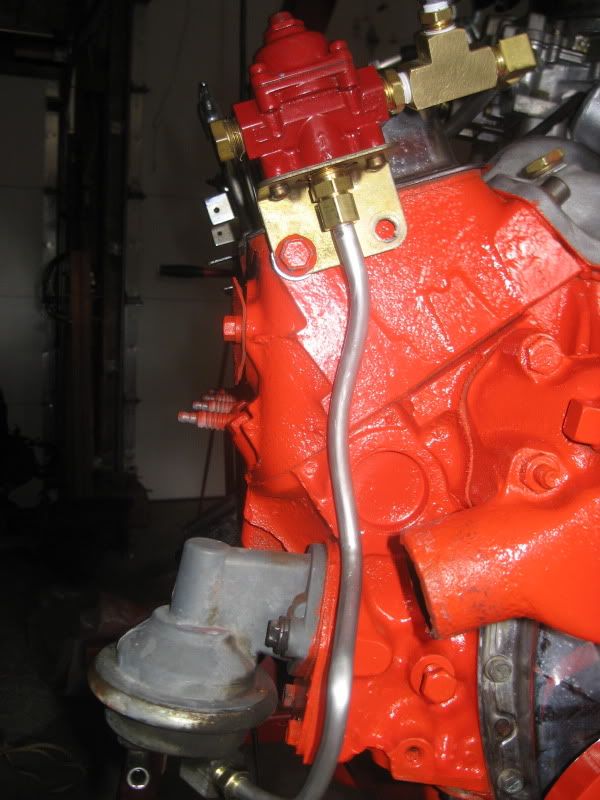  Now my own invention or twist for an adjustable track bar. I finally got it all together. I'm going to post directions on the main board I think. I'm kinda proud of it. 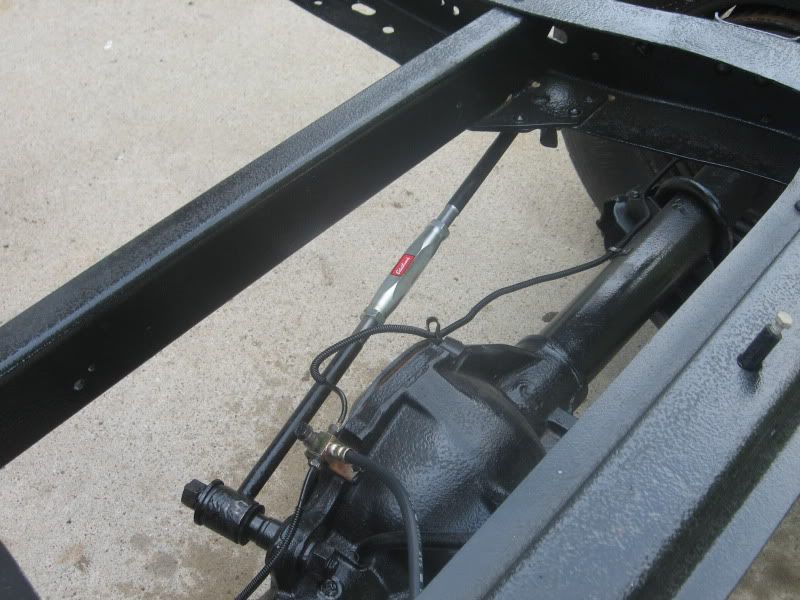 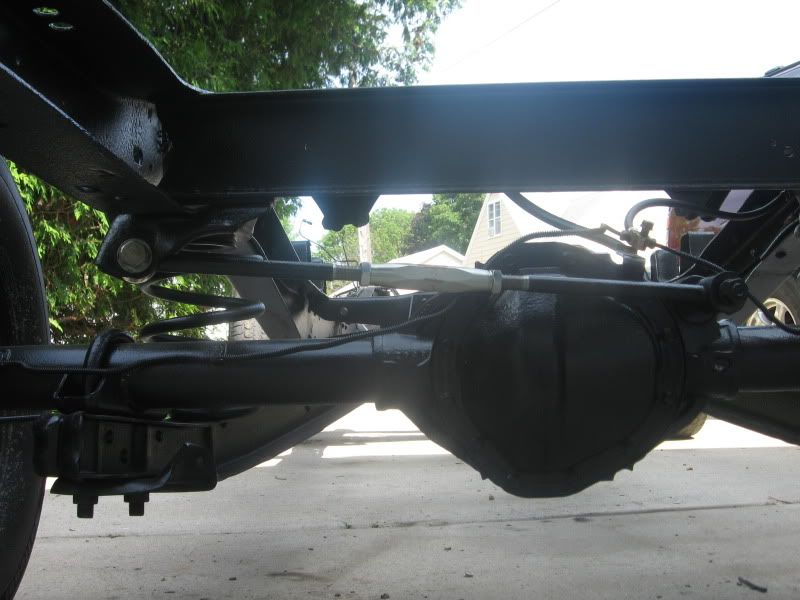 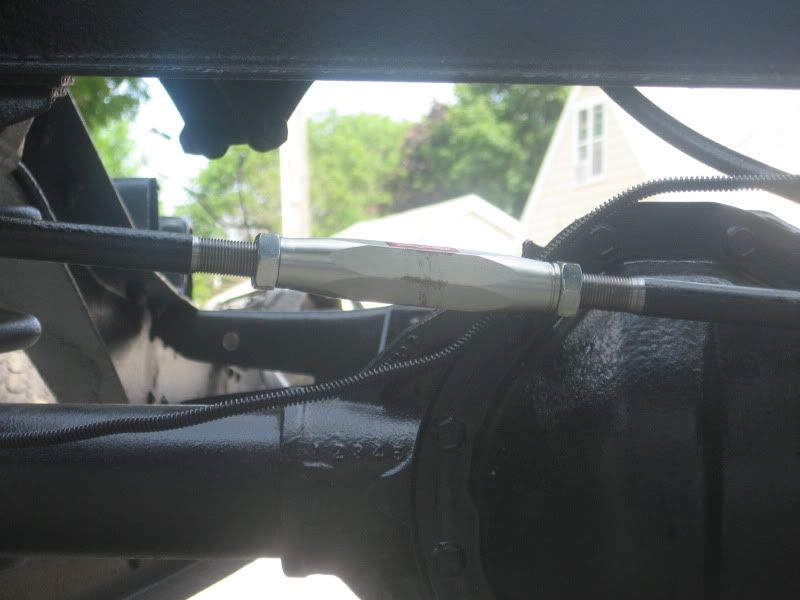
__________________
If no one knows what you're doing, they can't tell you you're doing it wrong HG's Dream Car Build - Shelby Cobra Kit Build your own adjustable track bar 71  Long Fleet C/10 Long Fleet C/10 72  Jimmy 4x4 (Junkyard Jimmy) Jimmy 4x4 (Junkyard Jimmy)HG's Plow Truck '78  K35 Dually K35 DuallyBigass Farm Truck HG's thread of miscellaneous stuff |
|
|

|
|
|
#109 |
|
Registered User
Join Date: Jul 2006
Location: Central PA
Posts: 12,201
|
Re: Over 25 Years Later, Finally My 71 C-10 Truck Build
does it have to have the fuel regulator?
__________________
The Garage: 1968 K-10 SWB - "Project Money Pit" 1996 Z-71 - "huntin rig" 1969 C-10 LWB (SOLD) "Project flip that truck or else" 1993 Passport, F@rd 1-ton (SOLD)"Project Cousin Eddie" My Garage Build "The 1,000 footer" |
|
|

|
|
|
#110 |
|
GEARHEAD
Join Date: Aug 2003
Location: MN
Posts: 6,126
|
Re: Over 25 Years Later, Finally My 71 C-10 Truck Build
On this engine, with this fuel pump, yes. I used it for years because the fuel pressure from the pump was pushing fuel past the needle and seat in the float bowl and flooding the engine. The carb was rebuilt and the problem persisted. I did some checking and the carb manufacturers have a range recommended for the pressure in their carbs, usually maxed out at about 5.5 psi for a street engine. Out of curiousity I put a gauge on it and was getting over 7 psi from my stock pump. I put the regulator on, set it at 5 psi and never again had problems. I didn't make any other changes. I tried going without the regulator again since last summer and was having issues. Not flooding, but unpredictable idle, and the engine would starve for fuel at times, then recover. So I put a test gage back on and watched it. The pressure was fluctuating up and down and the engine idle followed with it. I didn't think it would matter, because the fuel should be fed from the float bowl at atmospheric pressure, but it did change how it ran.
If my stock fuel pump put out the standard 4-5 psi, I wouldn't need it, as most cars don't. But the regulator solved a problem and it looks kinda cool. I'm sure you know fuel injected cars have pressure regulators. You have to have a minimum pressure for the injectors to work correctly for atomizing the fuel and maintaining a specific calibration or flow rate. There are more sensors and computer controls that calibrate the air/fuel mix on the newer cars, but consistant pressure is important.
__________________
If no one knows what you're doing, they can't tell you you're doing it wrong HG's Dream Car Build - Shelby Cobra Kit Build your own adjustable track bar 71  Long Fleet C/10 Long Fleet C/10 72  Jimmy 4x4 (Junkyard Jimmy) Jimmy 4x4 (Junkyard Jimmy)HG's Plow Truck '78  K35 Dually K35 DuallyBigass Farm Truck HG's thread of miscellaneous stuff |
|
|

|
|
|
#111 |
|
Registered User
Join Date: Jul 2006
Location: Central PA
Posts: 12,201
|
Re: Over 25 Years Later, Finally My 71 C-10 Truck Build
good info... that's what I was wondering since I noticed you had a carb and not FI...
__________________
The Garage: 1968 K-10 SWB - "Project Money Pit" 1996 Z-71 - "huntin rig" 1969 C-10 LWB (SOLD) "Project flip that truck or else" 1993 Passport, F@rd 1-ton (SOLD)"Project Cousin Eddie" My Garage Build "The 1,000 footer" |
|
|

|
|
|
#112 |
|
GEARHEAD
Join Date: Aug 2003
Location: MN
Posts: 6,126
|
Re: Over 25 Years Later, Finally My 71 C-10 Truck Build
I'm back from my work trip to Mexico. It went well, but I'm glad to be home again. Reviewing 4 major plants in 5 days ain't easy, and now it's time for the report writing.
Anyway, I got some time sunday for playing and I set the engine back in place.  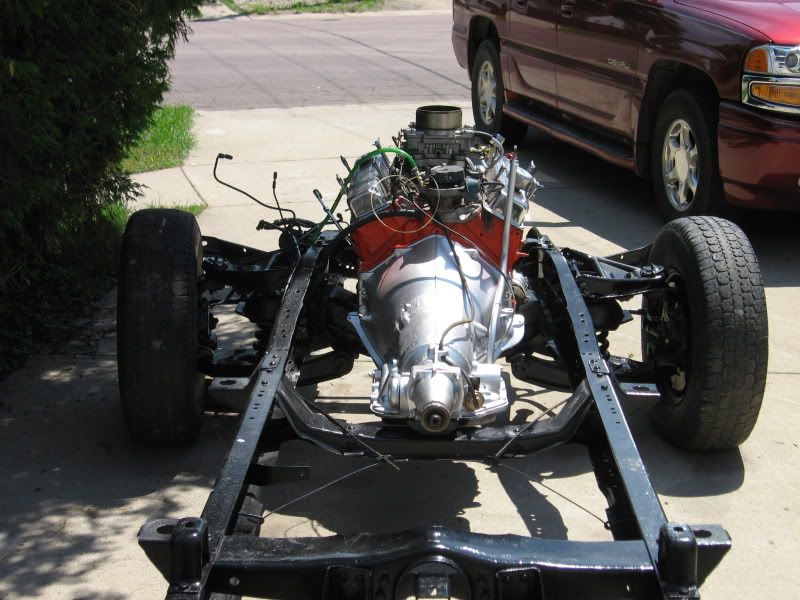 I also set the radiator support back in, but need to replace the bolts before I tighten it down. So I will be spending some time this week just reconnecting some lines, painting some pullies, replacing hoses, etc. and also plan on putting the gas tank in and routing the new line for that. I'd like to be able to focus on this project only this week, but I have to finish stripping parts from my 2wd parts blazer this week so the remainder can be scrapped. The city is complaining about where it's sitting (not my property) and the owner of the property needs me to finish it this week. Not much left there to do, no problem.
__________________
If no one knows what you're doing, they can't tell you you're doing it wrong HG's Dream Car Build - Shelby Cobra Kit Build your own adjustable track bar 71  Long Fleet C/10 Long Fleet C/10 72  Jimmy 4x4 (Junkyard Jimmy) Jimmy 4x4 (Junkyard Jimmy)HG's Plow Truck '78  K35 Dually K35 DuallyBigass Farm Truck HG's thread of miscellaneous stuff |
|
|

|
|
|
#113 |
|
GEARHEAD
Join Date: Aug 2003
Location: MN
Posts: 6,126
|
Re: Over 25 Years Later, Finally My 71 C-10 Truck Build
I wish I could say I got more done, but all I did was bolt the radiator support down and replaced the battery tray. I'm going to route the new gas line in the morning I think. I won't have much time tuesday, work all day and then my youngest girls softball games all evening.
Here's what I was working on this evening, I need to finish stripping it of usable parts this week so the rest can be scrapped.  
__________________
If no one knows what you're doing, they can't tell you you're doing it wrong HG's Dream Car Build - Shelby Cobra Kit Build your own adjustable track bar 71  Long Fleet C/10 Long Fleet C/10 72  Jimmy 4x4 (Junkyard Jimmy) Jimmy 4x4 (Junkyard Jimmy)HG's Plow Truck '78  K35 Dually K35 DuallyBigass Farm Truck HG's thread of miscellaneous stuff |
|
|

|
|
|
#114 |
|
GEARHEAD
Join Date: Aug 2003
Location: MN
Posts: 6,126
|
Re: Over 25 Years Later, Finally My 71 C-10 Truck Build
Work has been a killer the past couple weeks, but I got out tonight for a while and got the gas tank mounted and most of the fuel line clamped down. As a reminder, this is a tank from a 75 blazer. I used a couple strips of galvanized sheetmetal for the straps. I folded over each end for added strength.
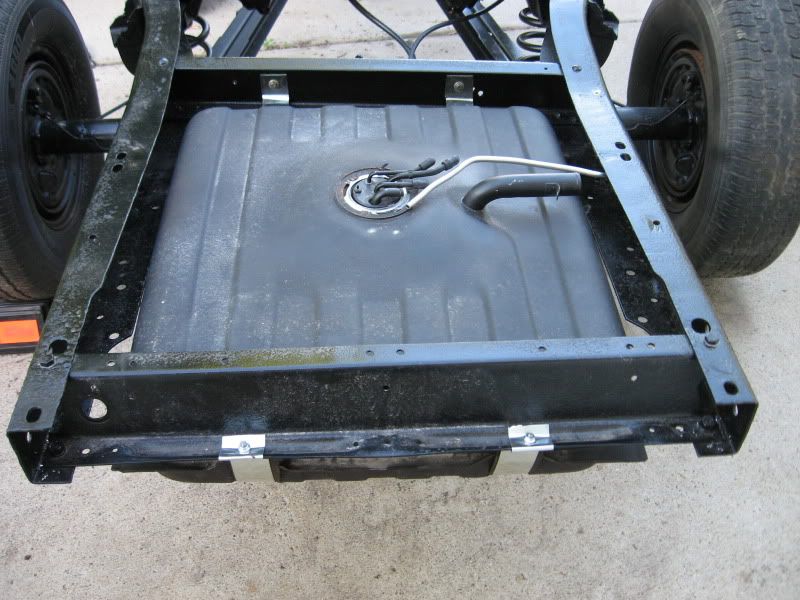 The fuel line is 3/8" aluminum tubing from Summit. It's cheap and real easy to work with. Corrosion shouldn't be an issue. I still need about 3 or 4 tubing clamps and then it's just hooking it up with a couple pieces of rubber hose. 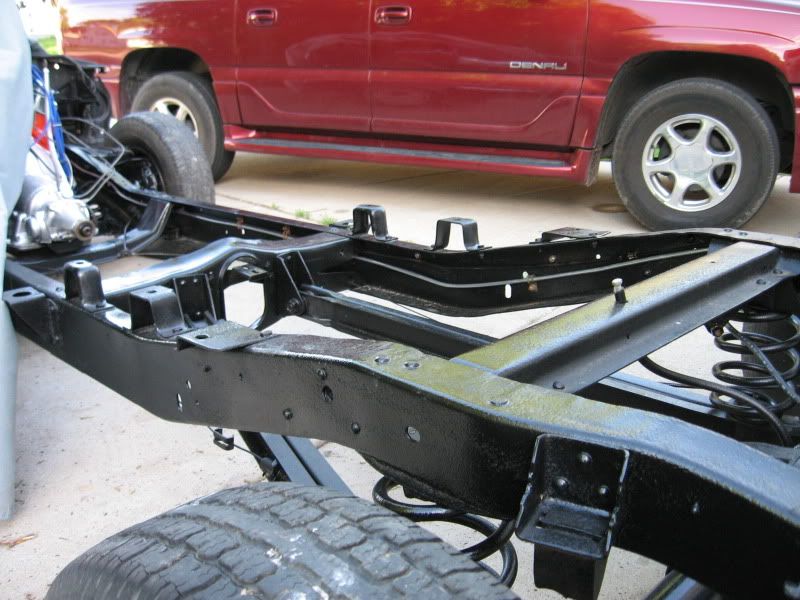
__________________
If no one knows what you're doing, they can't tell you you're doing it wrong HG's Dream Car Build - Shelby Cobra Kit Build your own adjustable track bar 71  Long Fleet C/10 Long Fleet C/10 72  Jimmy 4x4 (Junkyard Jimmy) Jimmy 4x4 (Junkyard Jimmy)HG's Plow Truck '78  K35 Dually K35 DuallyBigass Farm Truck HG's thread of miscellaneous stuff |
|
|

|
|
|
#115 |
|
GEARHEAD
Join Date: Aug 2003
Location: MN
Posts: 6,126
|
Re: Over 25 Years Later, Finally My 71 C-10 Truck Build
No pictures today, but hardly needed. I finished the fuel line connections and clamps to the frame. I finished stabilizing the rear brake line, it was loose where the flexible hose bolts down to the axle. I replaced the lower radiator hose. I replaced the rear seal on the end of the transmission and installed the driveshaft.
The only work left on the back half is the shocks and I'm thinking of putting something on the rear differential vent hose to keep crap out. If anyone has an idea for that, please let me know. I was thinking about a small filter or something, maybe an offroader would have an idea. I have a bucket of parts to drop off at the sandblaster, pulleys and brackets, etc. for the motor. I think I might have to buy some large washers for the cab mounts, mine were in bad shape. I already bought bolts, and the rubber mounts, but not the washers. I'm going to be gone half the week again, but plan on taking vacation and a 4 day weekend this next week. I am planning on setting the new cab on the frame, finishing the motor accessories, maybe a fresh coat of rustoleum black on the radiator support. I don't want to think past that stage. That's when I'll be getting into an area that's unfamiliar to me...body work.
__________________
If no one knows what you're doing, they can't tell you you're doing it wrong HG's Dream Car Build - Shelby Cobra Kit Build your own adjustable track bar 71  Long Fleet C/10 Long Fleet C/10 72  Jimmy 4x4 (Junkyard Jimmy) Jimmy 4x4 (Junkyard Jimmy)HG's Plow Truck '78  K35 Dually K35 DuallyBigass Farm Truck HG's thread of miscellaneous stuff |
|
|

|
|
|
#116 |
|
GEARHEAD
Join Date: Aug 2003
Location: MN
Posts: 6,126
|
Re: Over 25 Years Later, Finally My 71 C-10 Truck Build
I've been gone this week again, but still had a small but important thing happen. I got a killer deal on some headers. I got these: http://www.summitracing.com/parts/HO...n/?prefilter=1
from a seller on ebay for $125 shipped. I'm real excited to see them. Hopefully they are as described. The seller has good feedback on these and other name brand items.
__________________
If no one knows what you're doing, they can't tell you you're doing it wrong HG's Dream Car Build - Shelby Cobra Kit Build your own adjustable track bar 71  Long Fleet C/10 Long Fleet C/10 72  Jimmy 4x4 (Junkyard Jimmy) Jimmy 4x4 (Junkyard Jimmy)HG's Plow Truck '78  K35 Dually K35 DuallyBigass Farm Truck HG's thread of miscellaneous stuff |
|
|

|
|
|
#117 |
|
Registered User
 Join Date: Mar 2008
Location: San Marcos, CA
Posts: 578
|
Re: Over 25 Years Later, Finally My 71 C-10 Truck Build
Great build so far! Keep up the good work! On your Blazer tank do the cross sill need to be cut the way you have it setup? I checked the sizes on that tank and the website lists it at 10 3/4" tall with the bottom half 3 1/2" tall this would leave 7 1/4" going up from the bottom of the frame rails where the rails are 4" tall. Long story short I calculate that you need some sort of drop? Thanks for any info!
__________________
1964 Fleetside LWB 1995 Yellow Mustang convertible 1996 Camaro Z28 My build thread Looking for help on completing the Disc Brake Upgrade Reference Thread If you didn't build it, you don't really own it |
|
|

|
|
|
#118 | |
|
Registered User
Join Date: Jul 2006
Location: Central PA
Posts: 12,201
|
Re: Over 25 Years Later, Finally My 71 C-10 Truck Build
Quote:
Check out tri-pro automotive's build "Project GPW", he used a little filter on the differential vent hose.
__________________
The Garage: 1968 K-10 SWB - "Project Money Pit" 1996 Z-71 - "huntin rig" 1969 C-10 LWB (SOLD) "Project flip that truck or else" 1993 Passport, F@rd 1-ton (SOLD)"Project Cousin Eddie" My Garage Build "The 1,000 footer" |
|
|
|

|
|
|
#119 |
|
Registered User
 Join Date: Mar 2008
Location: San Marcos, CA
Posts: 578
|
Re: Over 25 Years Later, Finally My 71 C-10 Truck Build
Thanks Mike, I missed his build for some reason!
__________________
1964 Fleetside LWB 1995 Yellow Mustang convertible 1996 Camaro Z28 My build thread Looking for help on completing the Disc Brake Upgrade Reference Thread If you didn't build it, you don't really own it |
|
|

|
|
|
#120 |
|
GEARHEAD
Join Date: Aug 2003
Location: MN
Posts: 6,126
|
Re: Over 25 Years Later, Finally My 71 C-10 Truck Build
What I did on my tank install was set a couple levels across the frame rails right where the bed cross sills would set. The top of the blazer tank has a bulge in it that sets up a bit. The filler and vent lines are right between the sills and the filler will go just above the frame rail. If I were to notch the bed cross sills, I could pull the tank up another 3/4" maybe so the tank itself would rest against the cross sills. I still might do this. I don't really like how the tank moves right now and my straps are not adjustable.
I will probably order new straps (they are about $30), notch the sills, and then pull the tank up tight to the bed sills. It won't look hardly any different than it is now, but should be more stable. Not much progress to report today. I got the engine pulleys sand blasted and repainted. I got my cab mount bushings almost ready to install (I'm missing a couple nuts and washers) and might get the cab on today or monday (taking a vacation day). My headers should arrive tuesday.
__________________
If no one knows what you're doing, they can't tell you you're doing it wrong HG's Dream Car Build - Shelby Cobra Kit Build your own adjustable track bar 71  Long Fleet C/10 Long Fleet C/10 72  Jimmy 4x4 (Junkyard Jimmy) Jimmy 4x4 (Junkyard Jimmy)HG's Plow Truck '78  K35 Dually K35 DuallyBigass Farm Truck HG's thread of miscellaneous stuff |
|
|

|
|
|
#121 | |
|
GEARHEAD
Join Date: Aug 2003
Location: MN
Posts: 6,126
|
Re: Over 25 Years Later, Finally My 71 C-10 Truck Build
Quote:
The other day I was driving home from Il through WI, there is a national guard base there. Anyway, I see a formation of 10 army copters flying over and I think of you. I don't know you outside the board here, but the little bits we see here can sometimes stick in the brain anyway. "Fly Army!"
__________________
If no one knows what you're doing, they can't tell you you're doing it wrong HG's Dream Car Build - Shelby Cobra Kit Build your own adjustable track bar 71  Long Fleet C/10 Long Fleet C/10 72  Jimmy 4x4 (Junkyard Jimmy) Jimmy 4x4 (Junkyard Jimmy)HG's Plow Truck '78  K35 Dually K35 DuallyBigass Farm Truck HG's thread of miscellaneous stuff Last edited by hgs_notes; 06-28-2009 at 09:31 AM. |
|
|
|

|
|
|
#122 |
|
GEARHEAD
Join Date: Aug 2003
Location: MN
Posts: 6,126
|
Re: Over 25 Years Later, Finally My 71 C-10 Truck Build
It's starting to look like a truck again. The cab is on with all new mounts.
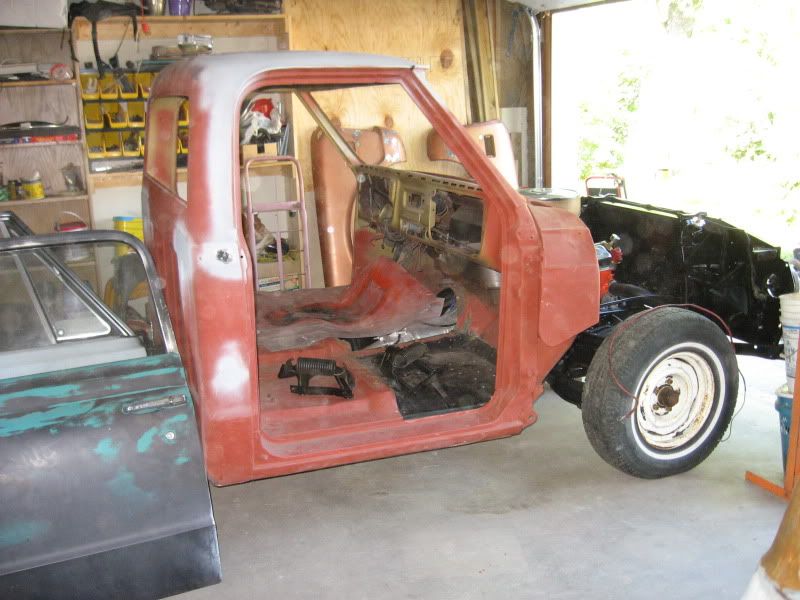 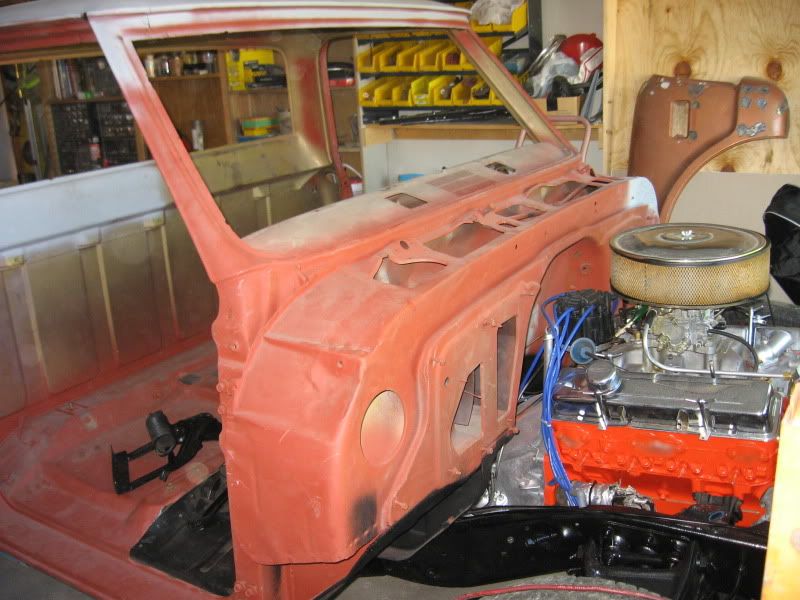 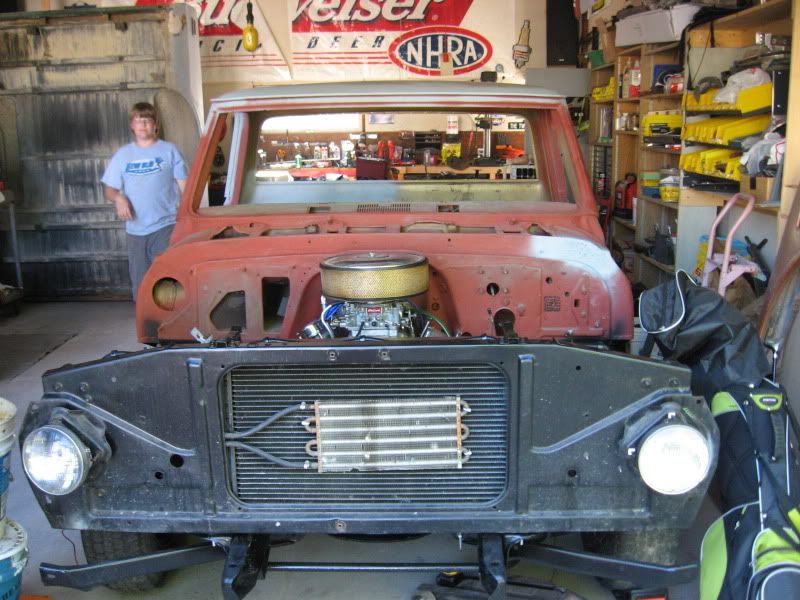 That job took less than an hour. I worked all day moving things around the garage so I could roll it back inside and off the driveway. I don't have complaining neighbors or anything, but there are kids around that like to mess with stuff. No problems so far, but I'm glad it's inside now. The garage is still packed full. I got the family out there to help me tip the bed up. It takes less space and it's easier to work on the bottom side like this. No real rust surprises anyway. Looks pretty good. 
__________________
If no one knows what you're doing, they can't tell you you're doing it wrong HG's Dream Car Build - Shelby Cobra Kit Build your own adjustable track bar 71  Long Fleet C/10 Long Fleet C/10 72  Jimmy 4x4 (Junkyard Jimmy) Jimmy 4x4 (Junkyard Jimmy)HG's Plow Truck '78  K35 Dually K35 DuallyBigass Farm Truck HG's thread of miscellaneous stuff |
|
|

|
|
|
#123 |
|
GEARHEAD
Join Date: Aug 2003
Location: MN
Posts: 6,126
|
Re: Over 25 Years Later, Finally My 71 C-10 Truck Build
I posted a thread on the main board yesterday with my concerns about this project stagnating. I have concerns that I'm getting to a point where I will stop and fret over what to do next. I really want to keep the momentum going, but can't really afford to have all the bodywork completed and the whole thing painted right now. I would like to get the inside of the cab, the door jambs, the window openings and firewall painted, but even that may be out of my price range now because I'm not real confident on doing the prep work myself. I have a cheap spray gun that may be ok for primer. My garage could work to spray in if I hauled out most of the parts so I had more room to move around. I never did plan on painting it myself, but would like to do as much prep as I can. Partly because of personal pride in the work, partly for cost savings.
This is new territory for me. I've never had a car repainted before, let alone a complete color change inside and out. I look at it now, knowing I need to start doing some sanding and filling, and I just don't know where to start. Any input would be appreciated. As far as progress goes, I got my headers yesterday. I bought them direct from Holley Performance though their ebay store. There was no picture on the listing. I got them for a great price and don't have any regrets, YET. The finish was ceramic coated, but there is something on it that looks kinda like overspray, but may be dried up polishing compound from when they were built. Turns out they were on the shelf at Holley for the past 9 years. They are new, but not recently new. Anyway, it took me about an hour to clean up one of them, and I still have to do more on it. I finally figured out what will work, a green scrub pad and mothers mag polish, though another polish would probably work too. What didn't work, turtle wax wheel cleaner, simple green, brake cleaner, spray carb cleaner, etc. I tried in out of sight areas. The green pad cuts the stuff off and it cleans up ok, it's just elbow grease. 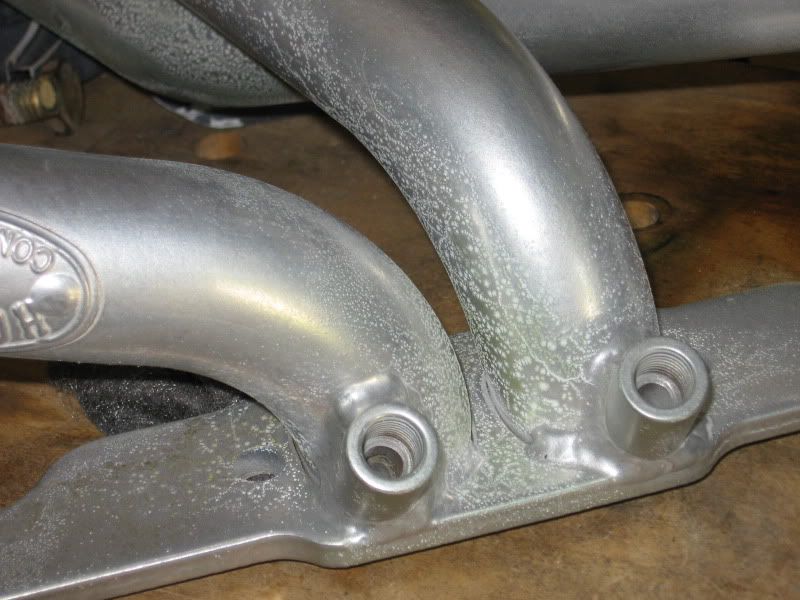 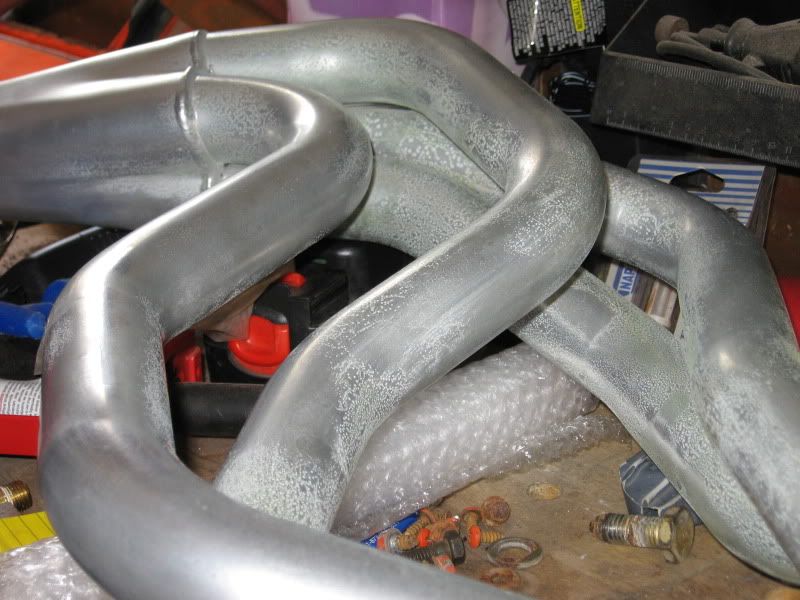 The cleaned up one is one the right, not sure if you can see it in the pic or not. 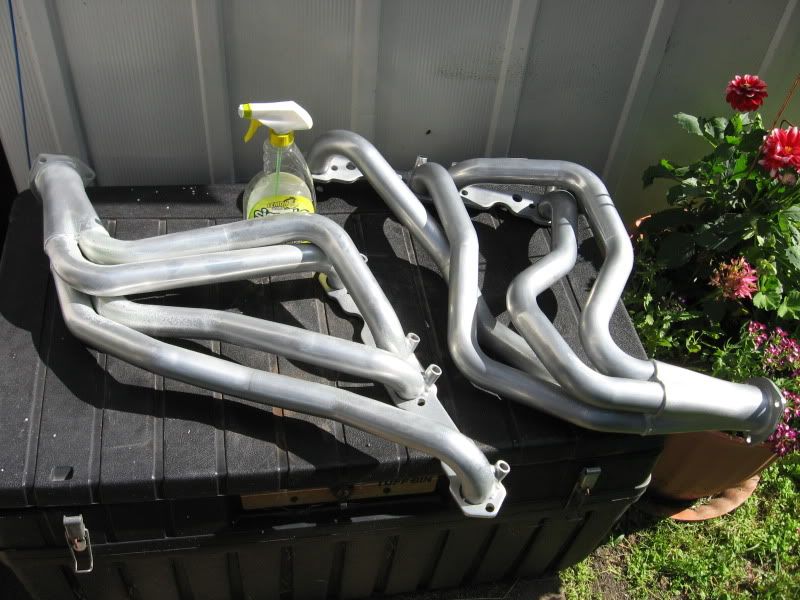
__________________
If no one knows what you're doing, they can't tell you you're doing it wrong HG's Dream Car Build - Shelby Cobra Kit Build your own adjustable track bar 71  Long Fleet C/10 Long Fleet C/10 72  Jimmy 4x4 (Junkyard Jimmy) Jimmy 4x4 (Junkyard Jimmy)HG's Plow Truck '78  K35 Dually K35 DuallyBigass Farm Truck HG's thread of miscellaneous stuff Last edited by hgs_notes; 07-01-2009 at 06:50 PM. |
|
|

|
|
|
#124 |
|
GEARHEAD
Join Date: Aug 2003
Location: MN
Posts: 6,126
|
Re: Over 25 Years Later, Finally My 71 C-10 Truck Build
Nobody has an opinion on body work direction, or nobody is reading, oh well, back to the grind.
Another of those days where you seem to be working but not much is getting done. I wanted to get the steering column in today. I rebuilt a van tilt column a while back, but it still was not quite ready. It looked great, but I still had to move the neutral safety switch. I was going to try it without moving it, but it's just up too high on the column and interferes with the brake rod/pedal and keeps the column to far into the dash. So I did complete moving the switch. The next obstacle was those rubber parts or grommets on the column. Here's a tip for anyone working on a new replacement column, you need to put those rubber grommet things on before the main shaft with shifter lever poking out the side. That way you won't have to cut them to install later. The cuts should not be visible or a problem once installed. The last issue (I think), is the wiring. My connector was cut off, the wire colors are not all a direct match. So I need to do a little research and splice in the wiring connector. I should be able to get the column in then and working. I cleaned and painted the steering shaft between the column and rag joint, so that's ready to go. I installed the upper radiator hose. I also worked on some parts that are for sale. So even though I didn't complete the job I wanted to do, I still made progress. And for those of you thinking about seeing that new Johnny Depp movie about Dilinger, it's OK, but would I pay $50 plus for admission and popcorn to see it again, NO.
__________________
If no one knows what you're doing, they can't tell you you're doing it wrong HG's Dream Car Build - Shelby Cobra Kit Build your own adjustable track bar 71  Long Fleet C/10 Long Fleet C/10 72  Jimmy 4x4 (Junkyard Jimmy) Jimmy 4x4 (Junkyard Jimmy)HG's Plow Truck '78  K35 Dually K35 DuallyBigass Farm Truck HG's thread of miscellaneous stuff |
|
|

|
|
|
#125 |
|
State of Confusion!
  Join Date: Jul 2002
Location: Gulfport, MS USA
Posts: 47,090
|
Re: Over 25 Years Later, Finally My 71 C-10 Truck Build
I sorta am at the same point. I want to fire my engine soooo bad, but no wiring.
So my plan (waiting on weather and some money) is to paint the inside of the cab, door jams, windshield, the outside of the cab between the cab and bed. The assemble everything, do the new wiring, assemble the interior, fire the engine, the eventually paint the entire outside. I felt this way it would get a bunch of stuff off the floor and prevent me from having to disassemble a bunch of stuff for later stuff. It really can be a pain and yeah I am like you I worry that sometimes I am in a slump and losing interest. Especially with me right now as it seems all I am doing is sanding/blocking and I see no difference in what the truck looks like. Keep hitting it. I am enjoying reading, although I don't get to sit down every day like I use to to really read board posts. This thing called work seems to interfere.  
__________________
Bill 1970 Chevy Custom/10 LWB Fleetside 2010 Toyota Tacoma PreRunner SR5 Double Cab - DD Member of Louisiana Classic Truck Club (LCTC) Bill's Gallery Life isn't tied with a bow, but it's still a gift. Live simply. Love generously. Care deeply. Speak kindly. Leave the rest to God! |
|
|

|
 |
| Bookmarks |
|
|