
|
|
|
 01-25-2016, 03:44 PM
|
#1 |
|
Registered User
Join Date: Feb 2010
Location: Central, IL
Posts: 599
|
Re: Sarge's rattle-can rebuild
Nice work!
Amazing what a little scuff pad can do! You can never have enough Ammo Cans: 
__________________
03 Suburban Z71 Z71 98 GMC Yukon SLT 4x4 Yukon 86 M1009 CUCV Project Milverado 48 Willys CJ2A 48CJ2A |

|

|
|
01-25-2016, 04:00 PM
|
#2 | |
|
I know the pieces fit
Join Date: Nov 2007
Location: MONTGOMERY, AL
Posts: 5,523
|
Re: Sarge's rattle-can rebuild
Quote:
|
|
|
|
|
|
01-25-2016, 05:28 PM
|
#3 |
|
I know the pieces fit
Join Date: Nov 2007
Location: MONTGOMERY, AL
Posts: 5,523
|
Re: Sarge's rattle-can rebuild
Next four pics - In the first pic you can see the console sitting where it needs to go, base attached. It looks tall, but the base height and padded armrest height were taken in consideration to get the thing up to my elbow to make it a comfortable place to rest your arm. Second pic - remember I said these things were spec'd cheap? Uncle Sam said if you smoke, bring your own d@mn lighter. I quit smoking a couple of years back, but... Where to charge our screens? We're lost without our screens! Pic three you can see where this is going and pic four how I chose to solve it. I'm mounting one on the front and one on the back, so even if the whole family is in the car they can keep their screens charged.
Question: I want to use two 12v distribution boxes of the enclosed variety, one hot and one ground, so I don't have to go redneck and make six wires teed off the main hot and main ground. Well, five, but you get the idea. One thing the console has is more depth than necessary, so I'm going to make a short four-legged "table" for the inside that will be the new bottom of the console, maybe three fingers tall? Just high enough so the wires to the chargers and distribution blocks have room, kinda like the raised floor in a computer room. It'll be flush to all the sides so nothing can get past it but liquid, but I would like the wiring underneath to be neat and safe. Ideas? |
|
|
|
|
01-25-2016, 05:47 PM
|
#4 |
|
Registered User
Join Date: Feb 2010
Location: Central, IL
Posts: 599
|
Re: Sarge's rattle-can rebuild
Go to your favorite box store (Menards, Lowes, Home Depot) and buy a Carlon Plastic 2-Gang weather proof box and lid.
 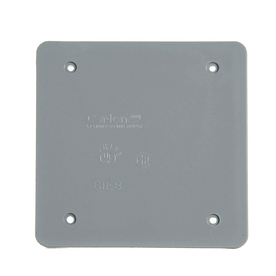 You can then easily mount it to the bottom. Mount these inside (one for + and one for -) 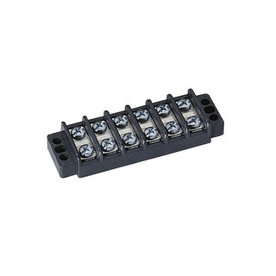 Use these for entry into the ammo can and the electrical box for weather seal and restraint with a piece of heavy drop cord 16 gauge minimum 
__________________
03 Suburban Z71 Z71 98 GMC Yukon SLT 4x4 Yukon 86 M1009 CUCV Project Milverado 48 Willys CJ2A 48CJ2A |
|
|
|
|
01-25-2016, 06:03 PM
|
#5 |
|
Senior Member
 Join Date: Mar 2013
Location: Ann Arbor, MI
Posts: 1,028
|
Re: Sarge's rattle-can rebuild
Nice work on the console. I've always just stuck civvy consoles in my M1009's and while they work, I like keeping the military look like you have so I may try this on my next one. A couple questions:
What is the ammo can designation? I like the size you chose. Do you have it centered between the seats or offset to the driver? |
|
|
|
|
01-25-2016, 06:49 PM
|
#6 | |
|
I know the pieces fit
Join Date: Nov 2007
Location: MONTGOMERY, AL
Posts: 5,523
|
Re: Sarge's rattle-can rebuild
Quote:
|
|
|
|
|
|
02-20-2016, 03:41 PM
|
#7 |
|
I know the pieces fit
Join Date: Nov 2007
Location: MONTGOMERY, AL
Posts: 5,523
|
Re: Sarge's rattle-can rebuild
I finally finished this console and got it in the truck. When I left off I'd made the mounting brackets but I ended up having to fit them to the floor. The front legs had to be curved to fit the tranny hump, the rear legs got a relief cut so the mounting tabs could be rotated back to fit the floor flat. Then the reliefs needed filler pieces welded in. Then I got it where I wanted it in the truck and drilled the floor. At that point I could paint it and put it all together.
|
|
|
|
|
02-20-2016, 03:49 PM
|
#8 |
|
I know the pieces fit
Join Date: Nov 2007
Location: MONTGOMERY, AL
Posts: 5,523
|
Re: Sarge's rattle-can rebuild
I'm sure this is all overkill but I didn't like the idea of a 14 gauge wire run from under the hood into a metal can, even though it'll be fused. So I cut a wood "floor" for the bottom of the console then put the junction box in like 48cj2a suggested. The box is pictured open but it does have the lid on it now and then the shelf added above it that is now the bottom of the usable storage space. The ammo can is 14" deep, I put 3" legs on the shelf to cut the functional space down to a more reasonable 11".
|
|
|
|
|
01-25-2016, 06:26 PM
|
#9 | |
|
I know the pieces fit
Join Date: Nov 2007
Location: MONTGOMERY, AL
Posts: 5,523
|
Re: Sarge's rattle-can rebuild
Quote:
|
|
|
|
|
|
02-24-2016, 04:08 PM
|
#10 |
|
Registered User
Join Date: Feb 2010
Location: Central, IL
Posts: 599
|
Re: Sarge's rattle-can rebuild
That sucks, but parts should not be hard to find!
GM Weatherstrip # is 471009 Perfect time to get a windshield with an antenna for a stereo too if you don't already have one. As for the paint hit it good with a pressure washer to knock off the nasty stuff build up from the elements, then use a scrub brush and some CLR before you clear it. It will look like new! by the way - Nice work on the Console Wiring!
__________________
03 Suburban Z71 Z71 98 GMC Yukon SLT 4x4 Yukon 86 M1009 CUCV Project Milverado 48 Willys CJ2A 48CJ2A |
|
|
|
|
02-24-2016, 05:08 PM
|
#11 |
|
I know the pieces fit
Join Date: Nov 2007
Location: MONTGOMERY, AL
Posts: 5,523
|
Re: Sarge's rattle-can rebuild
Thanks for the part number, I didn't think they'd still have those available. It won't be hard to work on with the windshield out. The dash pad is still out, so whoever does the work can sit on the metal dash to work the metal back. The windshield was already cracked and I need one with the antenna anyway, so this isn't as big a deal as it would be on a different truck. But it's still going to be time and money. The Eastwood stud kit is $270. I can't discount his expertise, but if I do it myself I'll still have the tools. We'll see what he says and go from there.
|
|
|
|
|
02-24-2016, 06:17 PM
|
#12 |
|
Registered User
Join Date: Dec 2010
Location: murray ky
Posts: 351
|
Re: Sarge's rattle-can rebuild
Man that does stink but it looks like you're trying to make lemonade so good luck with it.
|
|
|
|
|
02-24-2016, 10:21 PM
|
#13 |
|
I know the pieces fit
Join Date: Nov 2007
Location: MONTGOMERY, AL
Posts: 5,523
|
Re: Sarge's rattle-can rebuild
Thanks. It sucks, but it does give me an excuse to buy a stud welder kit. I kinda want to try to fix it myself but we'll see.
|
|
|
|
|
02-24-2016, 11:13 PM
|
#14 |
|
laying low
Join Date: Mar 2001
Location: Searcy, Ark. USA
Posts: 13,394
|
Re: Sarge's rattle-can rebuild
I hate that it happened but it's an excuse to pickup another power tool. It ain't all bad.

__________________
Boog 69 Chevy stepside, 358/T350, 4.11 posi, 4.5/4 drop, rallys, poboy driver primer is finer 91 Chevy sportside, Tahoe, Yukon & GMC Crewcab All GM..'nuff said. I stand for the flag and kneel at the cross |
|
|
|
|
02-24-2016, 11:26 PM
|
#15 |
|
I know the pieces fit
Join Date: Nov 2007
Location: MONTGOMERY, AL
Posts: 5,523
|
Re: Sarge's rattle-can rebuild
Funny thing is, on Trucks! TV last Sunday, one of the new guys was showing the basics of pulling dents with studs and a slide hammer and I was watching and thinking how much I'd like to own one and try that.
I guess that's the route I'm going. I'm not budgeted for this but maybe I can make it work. I'm dang sure not going to make an insurance claim. Alright then. Let's give it a whirl. |
|
|
|
|
03-06-2016, 09:01 PM
|
#16 |
|
I know the pieces fit
Join Date: Nov 2007
Location: MONTGOMERY, AL
Posts: 5,523
|
Re: Sarge's rattle-can rebuild
Anyone else perpetually riding the Time & Money Pendulum? This was one of those weekends where I had plenty of one and none of the other, you can probably guess which. That's OK, there's always something to catch up on. I'd shelved a few projects while it was so dang cold, one of them was my drivers side window regulator. When I did all the work to the vent windows and doors, the drivers side door window had a tight spot in it when you rolled it up, but only with the door panel on. Weird, right? I ended up bending the new regulator before I figured it out. Well, Boog figured it for me, he suggested I check the inner door shell. It was bowed in a bare smidge, but it was enough to bind up with all new seals on everything, including the door panels. I'd rolled the window up and left it there for the winter. I was able to bend the inner shell back with my hands, it wasn't easy but it didn't have to move much. I'd already ordered a new regulator, so I got that installed. I didn't take a picture of this earlier, but I'd bought a roll of plastic sheeting at Home Depot and used it to line inside the doors. And I didn't take a picture, but I also replaced the foam strip at the lower inside of the door panel. Drivers side works well now.
|
|
|
|
|
04-13-2016, 06:46 AM
|
#17 |
|
Registered User
Join Date: Feb 2010
Location: Central, IL
Posts: 599
|
Re: Sarge's rattle-can rebuild
Pictures don't do it justice but nice work and you got to dabble in something new too!
__________________
03 Suburban Z71 Z71 98 GMC Yukon SLT 4x4 Yukon 86 M1009 CUCV Project Milverado 48 Willys CJ2A 48CJ2A |
|
|
|
|
04-13-2016, 11:04 AM
|
#18 |
|
I know the pieces fit
Join Date: Nov 2007
Location: MONTGOMERY, AL
Posts: 5,523
|
Re: Sarge's rattle-can rebuild
Thanks man. It's just a good truck to learn on, that's really the bottom line.
|
|
|
|
|
04-13-2016, 11:07 AM
|
#19 |
|
Registered User
Join Date: Dec 2009
Location: Fairbanks, AK
Posts: 1,830
|
Re: Sarge's rattle-can rebuild
Ouch! Good work on the repair.
__________________
-Marcus 1991 V3500 L29 454 4L80E NP205 D60/14 Bolt 4.56's 1984 K30 292 TH400 NP205 D60/14 Bolt 4.56's flat bed 7'6" Meyer Plow 2022 Silverado 3500 L8T Project Daily Driver Project Heavy Hauler Project Plow Truck |
|
|
|
|
04-13-2016, 11:13 AM
|
#20 |
|
I know the pieces fit
Join Date: Nov 2007
Location: MONTGOMERY, AL
Posts: 5,523
|
Re: Sarge's rattle-can rebuild
Thanks Marcus. Yeah that one hurt like hell, made me get down out of the truck for a few minutes for sure.
|
|
|
|
|
04-13-2016, 11:47 AM
|
#21 |
|
Registered User
Join Date: Jun 2014
Location: Longmont, Colorado
Posts: 252
|
Re: Sarge's rattle-can rebuild
Nice work attempting something you've never done. You have to feel good about that.
__________________
Folks that throw dirt on you aren't always trying to hurt you, and folks that pull you out of a jam aren't always trying to help you. |
|
|
|
|
04-13-2016, 06:34 PM
|
#22 |
|
State of Confusion!
 Join Date: Jul 2002
Location: Gulfport, MS USA
Posts: 46,997
|
Re: Sarge's rattle-can rebuild

__________________
Bill 1970 Chevy Custom/10 LWB Fleetside 2010 Toyota Tacoma PreRunner SR5 Double Cab - DD Member of Louisiana Classic Truck Club (LCTC) Bill's Gallery Life isn't tied with a bow, but it's still a gift. Live simply. Love generously. Care deeply. Speak kindly. Leave the rest to God! |
|
|
|
|
04-13-2016, 07:18 PM
|
#23 | ||
|
I know the pieces fit
Join Date: Nov 2007
Location: MONTGOMERY, AL
Posts: 5,523
|
Re: Sarge's rattle-can rebuild
Quote:
Quote:
|
||
|
|
|
|
04-14-2016, 03:14 PM
|
#24 |
|
Registered User
Join Date: Jul 2007
Location: Lufkin Texas
Posts: 213
|
Re: Sarge's rattle-can rebuild
looking good I want to find some of the military bumpers for my Jimmy and gun racks
__________________
http://67-72chevytrucks.com/vboard/s...d.php?t=616455My 55 first series build |
|
|
|
|
04-17-2016, 08:18 PM
|
#25 |
|
I know the pieces fit
Join Date: Nov 2007
Location: MONTGOMERY, AL
Posts: 5,523
|
Re: Sarge's rattle-can rebuild
Bodywork is tedious! I've used most all of the 1 lb can of Bondo I bought but very little of it is on the truck - trowel it on, sand it off. Find the new low spot and repeat. I've got a DA but I couldn't use much, most of it was blocking with 100-grit on a sanding block, going this way \ all the way across then coming back like this /. Over and over. This repair is on a difficult area for the inexperienced, it being across the crown of the cab where it curves down to the windshield. It's not that a first timer can't do it, it's that a first timer isn't going to get it on the first, second, third, or even fourth coat of mud. After seven or eight coats I've got it close. In the first pic you can see a lot of lighter spots in the filler, the last two rounds I used a little less hardener so I could take my time and spot fill several spots before it got too thick to work with. Next pic it's covered with sealer primer then a few coats of filler primer. I'm done with filler, I'll keep blocking this a few more rounds then paint it.
I didn't make a picture, but I put an 80-grit disc on the DA and took it down to metal in the repair area before I started with filler. |
|
|
|
 |
| Bookmarks |
|
|


 Hybrid Mode
