
|
 07-15-2010, 12:31 AM
|
#101 |
|
Registered User
Join Date: Mar 2008
Location: Monroe, WA
Posts: 181
|
Re: My project 55 begins
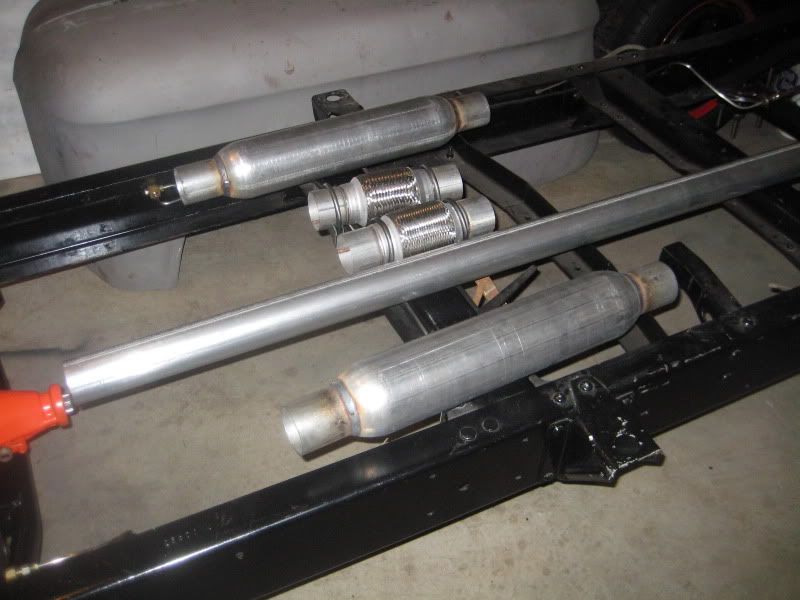
Well I learned my lesson after buying a pre-fabbed brake line kit that I ended up having to modify and add to. I could have saved myself a ton of money buying bulk line and bending it up myself. It was time to start thinking about the exhaust so instead of looking for a kit I looked for the bulk pipe at the local parts store. One 7 foot pipe, two flex joints, some generic hangers, and a pair of glass pack mufflers in 2.5" diameter should get me started. I still have not decided if it would look better to have some oval tips exit below the steps on each side, take it all the way back to terminate below the bumper, or just run it back to the rear end and have some turndowns and make a "hidden" exhaust.
 -Joel |

|

|
|
07-15-2010, 10:22 AM
|
#102 | |
|
PITbut
Join Date: Sep 2007
Location: monroe washington
Posts: 3,052
|
Re: My project 55 begins
Quote:
__________________
New project. 1971 Twin Turbo blazer http://67-72chevytrucks.com/vboard/s...d.php?t=676047 My new YOUTUBE channel.. Videos of my truck and a current walk around. Lyrikz74 Youtube channel DONE! SOLD!  My 1971 stepside build thread My Build Thread UPDATED 6/11. DONE and sold. |
|
|
|
|
|
07-24-2010, 08:27 PM
|
#103 |
|
Registered User
Join Date: Mar 2008
Location: Monroe, WA
Posts: 181
|
Re: My project 55 begins
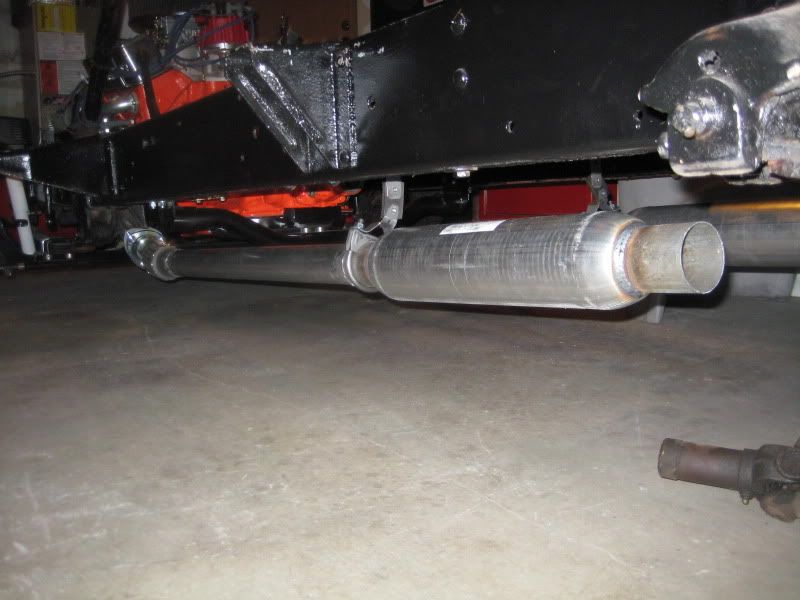
Exhaust is done for now, after I have the bed ready to put back on the frame I will finish the rest. I still cannot decide but I am leaning towards tips exiting below the step on each side.
  I can't wait to fire this up and hear it. -Joel |
|
|
|
|
07-24-2010, 10:00 PM
|
#104 | |
|
PITbut
Join Date: Sep 2007
Location: monroe washington
Posts: 3,052
|
Re: My project 55 begins
Quote:
__________________
New project. 1971 Twin Turbo blazer http://67-72chevytrucks.com/vboard/s...d.php?t=676047 My new YOUTUBE channel.. Videos of my truck and a current walk around. Lyrikz74 Youtube channel DONE! SOLD! My 1971 stepside build thread My Build Thread UPDATED 6/11. DONE and sold. |
|
|
|
|
|
07-25-2010, 09:08 PM
|
#105 |
|
Registered User
Join Date: Mar 2008
Location: Monroe, WA
Posts: 181
|
Re: My project 55 begins
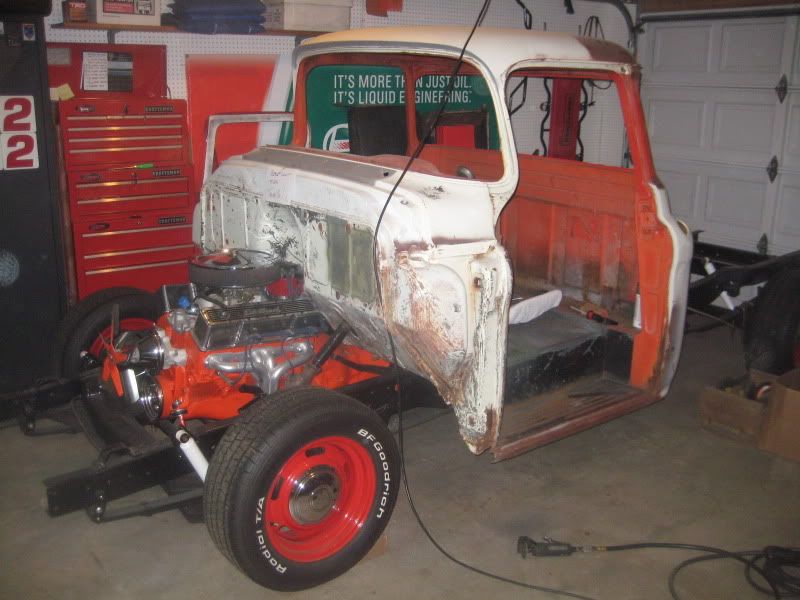
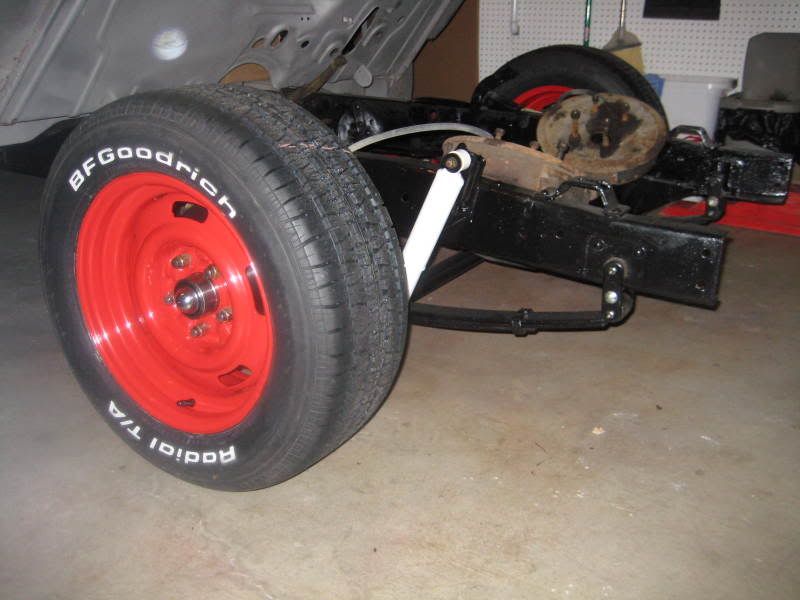
Thats low for a static drop. Can you bring it up closer to the frame or is that just the angle of the picture.?? Looks really good.
__________________ Del, Its not as low as it looks in the picture it should be fine. -Joel |
|
|
|
|
07-26-2010, 12:27 AM
|
#106 |
|
Registered Chevy Owner
Join Date: Aug 2008
Location: Snohomish, wa
Posts: 1,557
|
Re: My project 55 begins
I didn't see if you said, but how much was your exhaust?
__________________
Love is fleeting, but Chevy trucks are forever!!!!  1970 Chevy CST C10 long box 350/400  2008 Chevy Silverado short box 4x4 Had; 1951 Chevy short box 307/T5 1988 Chevy shot box 4x4 350/350 1971 Chevy C10 long box 4x4 350/350 1971 Chevy C20 long box 350/350 1971 Chevy C10 long box 350/350 |
|
|
|
|
07-26-2010, 10:02 AM
|
#107 | |
|
PITbut
Join Date: Sep 2007
Location: monroe washington
Posts: 3,052
|
Re: My project 55 begins
Quote:
__________________
New project. 1971 Twin Turbo blazer http://67-72chevytrucks.com/vboard/s...d.php?t=676047 My new YOUTUBE channel.. Videos of my truck and a current walk around. Lyrikz74 Youtube channel DONE! SOLD! My 1971 stepside build thread My Build Thread UPDATED 6/11. DONE and sold. |
|
|
|
|
|
07-26-2010, 10:54 PM
|
#108 | |
|
Registered User
Join Date: Mar 2008
Location: Monroe, WA
Posts: 181
|
Re: My project 55 begins
Quote:
-Joel |
|
|
|
|
|
07-26-2010, 11:08 PM
|
#109 |
|
Registered Chevy Owner
Join Date: Aug 2008
Location: Snohomish, wa
Posts: 1,557
|
Re: My project 55 begins
cool thanks Joel!
__________________
Love is fleeting, but Chevy trucks are forever!!!! 1970 Chevy CST C10 long box 350/400 2008 Chevy Silverado short box 4x4 Had; 1951 Chevy short box 307/T5 1988 Chevy shot box 4x4 350/350 1971 Chevy C10 long box 4x4 350/350 1971 Chevy C20 long box 350/350 1971 Chevy C10 long box 350/350 |
|
|
|
|
08-04-2010, 12:16 AM
|
#110 |
|
Registered User
Join Date: Mar 2008
Location: Monroe, WA
Posts: 181
|
Re: My project 55 begins
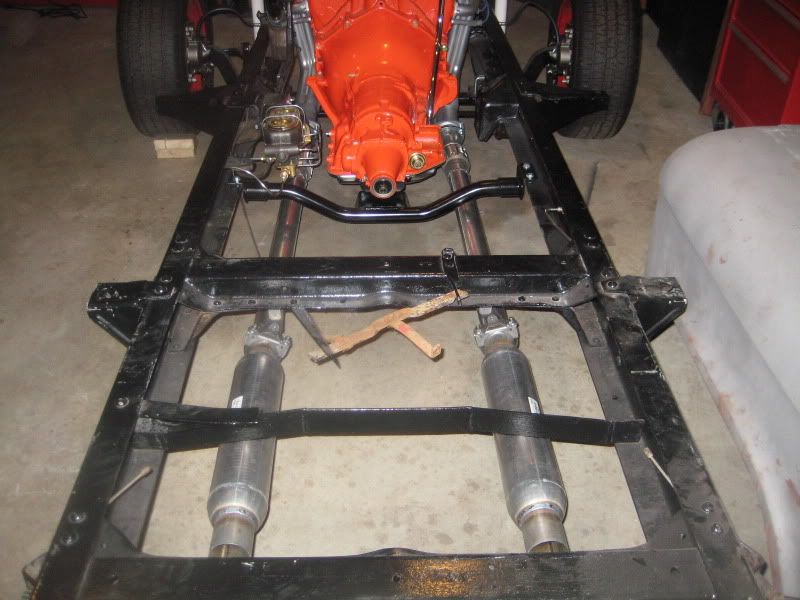
Dropped off my driveline! Shop is putting in the new center support bearing, shortening the front shaft, replacing the u-joints, putting on the slip yoke for the TH350 and balancing the whole thing. My chassis is about to be considered DONE!! Soon I will be able to work on the body work and paint prep. I wish I was made out of money this would go so much faster.
-Joel |
|
|
|
|
08-18-2010, 09:16 AM
|
#111 |
|
Registered User
Join Date: Mar 2008
Location: Monroe, WA
Posts: 181
|
Re: My project 55 begins
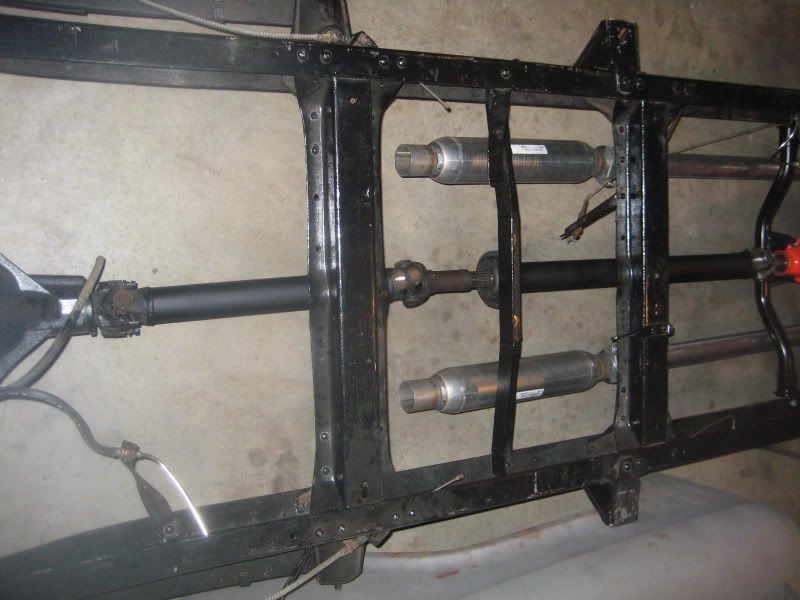
Well my driveline is back and in the truck! Now I am kinda excited because soon this is going to start looking like a truck again instead of a pile of parts. I took some time last weekend and started cutting some chunks out of my old cab to fill the new cab and I am taking an inventory of what I am going to have to buy as far as patch panels. so far its not looking too bad.
 -Joel |
|
|
|
|
04-03-2011, 07:31 PM
|
#112 |
|
Registered User
Join Date: Mar 2008
Location: Monroe, WA
Posts: 181
|
Re: My project 55 begins
Finally some sort of progress! We have been in the middle of trying to sell our house so everything has been focused on that (which sucks, I am exhausted with trying to keep the home spotless with two kids under 5!) So today I decided I am just going to put in some patch panels in. The truck isn't gonna build itself after all!
 First patch was on the floor drivers side right where the heel hits when you are driving. Lucky for me the original cab which looked like swiss cheese after the sand blasting still had really solid floors. Me and my pal "sawzall" relieved the old cab of its good sheet metal. Saved me some money and its nice to fix my new cab with some original steel. 1st patch went in fairly nicely and I learned quickly about the correct settings for my welder. Funny thing is my buddy said you can train a monkey to mig weld, just grab some scrap and play around with it until you feel comfortable enough to attack the cab. I'm not going to lie I burned through a couple spots but after settling in on a good setting I was making good welds and the patch was in. Grabbed the grinder and everything is looking sweet (quite proud of myself at this point) then ooops little too aggressive and I ground through a ridge. (much cussing ensued.) I cant weld it because its right on an edge and too thin anyway. Time for lunch before I act dumb. Back from lunch and my mind is clear, cut out the thin spot and cut another chunk out of the old floor panel. It went in pretty quick and turned out just fine. At least now I have that much more experience! Now my drivers side step has a couple holes in it but is otherwise solid, I just couldn't see replacing the whole step so I salvaged a chunk out of the old cab and decided to try and repair the original step worse case I replace the whole step if I screw it up. 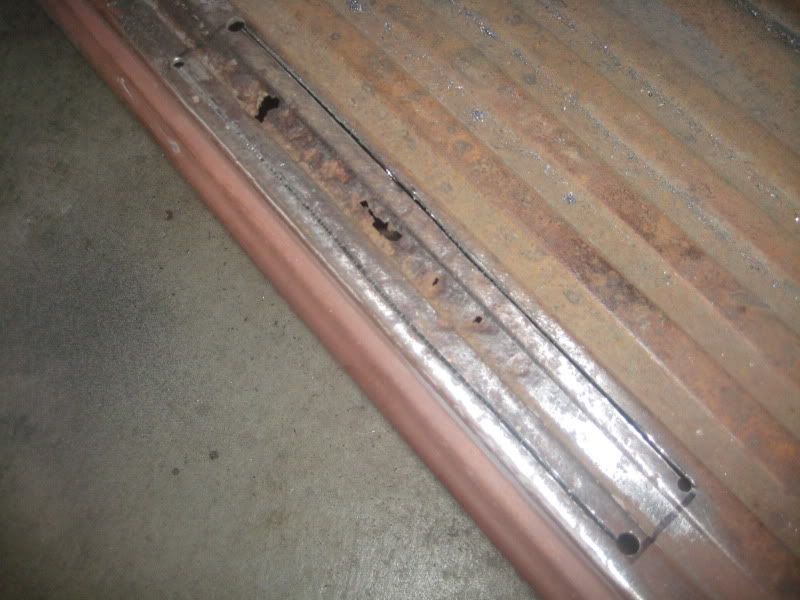 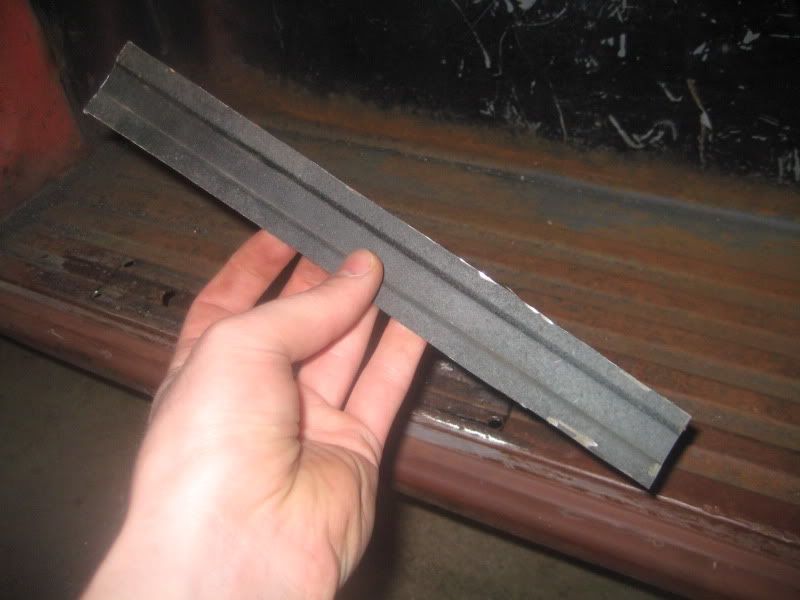 Now this turned out not half bad! I just shot it with some primer since its just going to the sand blasters after all the patches are in anyway. 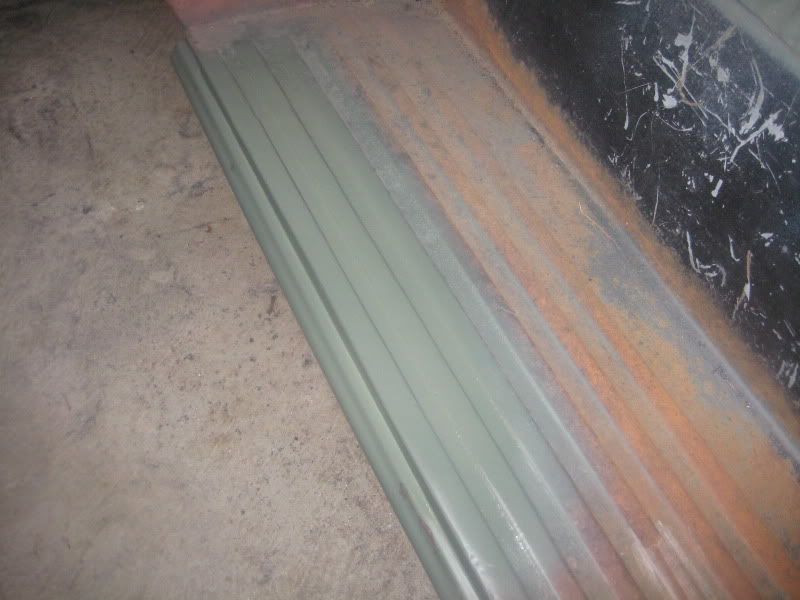 Now that the ball is rolling I am going to try and keep fixing a little bit every weekend. -Joel |
|
|
|
|
04-03-2011, 09:09 PM
|
#113 |
|
A320 Pilot/USAF Retired
Join Date: Mar 2009
Location: Charleston, SC
Posts: 2,629
|
Re: My project 55 begins
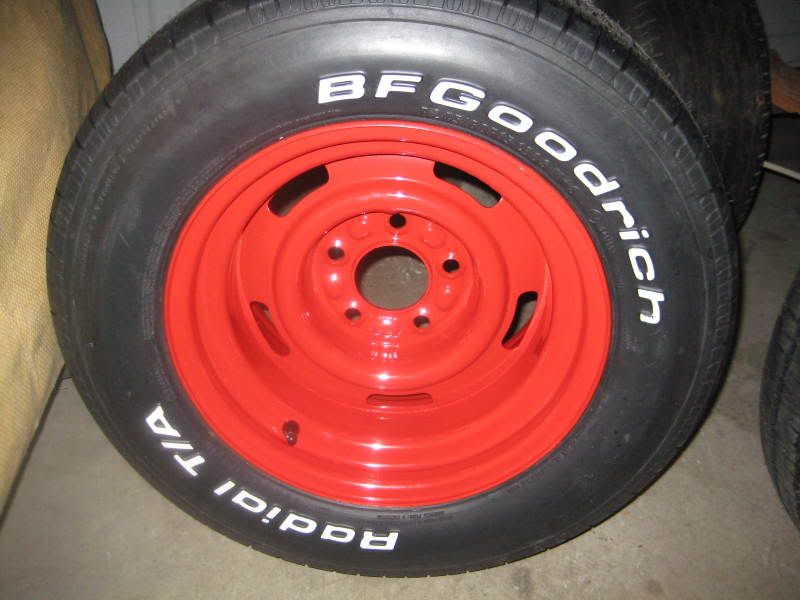
Welcome back and nice work! I really like your rim choice!!
__________________
JJ My 1957 build: http://67-72chevytrucks.com/vboard/s...d.php?t=334552 http://www.trifive.com/forums/showthread.php?t=22037 Instagram - Chuckdriver57 |
|
|
|
|
04-04-2011, 12:47 AM
|
#114 |
|
Registered User
Join Date: Aug 2007
Location: Corona, California
Posts: 7,998
|
Re: My project 55 begins
Looking good. That's the nice thing about steel, if you screw it up you can just cut it out and start over.
Kim |
|
|
|
|
04-04-2011, 02:47 AM
|
#115 | |
|
Registered User
Join Date: Mar 2008
Location: Monroe, WA
Posts: 181
|
Re: My project 55 begins
Quote:
 ! !-Joel |
|
|
|
|
|
04-30-2011, 02:41 PM
|
#116 |
|
Registered User
Join Date: Mar 2008
Location: Monroe, WA
Posts: 181
|
Re: My project 55 begins
Floor repair...
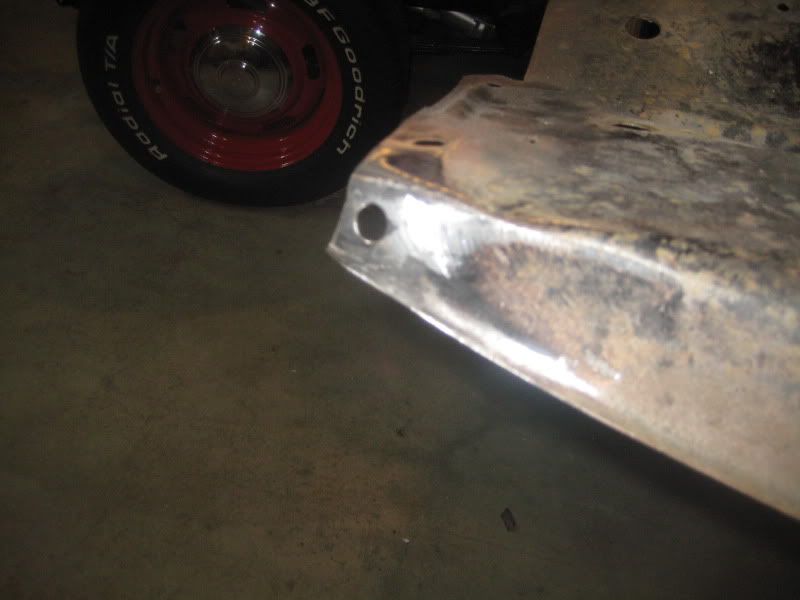
 the front fenders ended up being pretty bad, lucky for me the inner fenders are solid. the left one had a small crack at the front top mounting hole. I figured I'd at least give it a shot to weld the crack. Tooooo thin hit it with the mig and *poof* gone! lol Oh well so I bent up some scrap and re-made the end of the panel. A little grinding and you can't even tell. I ordered up some new stock height valve covers so next week I can replace the tall covers and pull the spacers out of the front cab mounts and finish mocking up the front end. -Joel |
|
|
|
|
05-02-2011, 11:05 PM
|
#117 |
|
Registered User
Join Date: Mar 2008
Location: Monroe, WA
Posts: 181
|
Re: My project 55 begins
Just a pic of the inner fender repair...
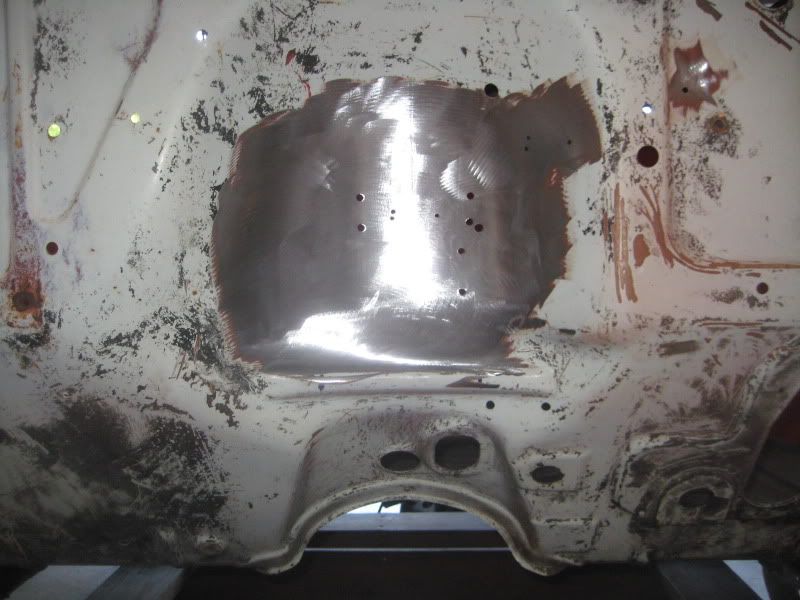
 Cut the end off replaced and re-drilled the hole. -Joel Last edited by B17CRX; 05-02-2011 at 11:06 PM. |
|
|
|
|
09-05-2011, 11:20 AM
|
#118 |
|
Registered User
Join Date: Mar 2008
Location: Monroe, WA
Posts: 181
|
Re: My project 55 begins
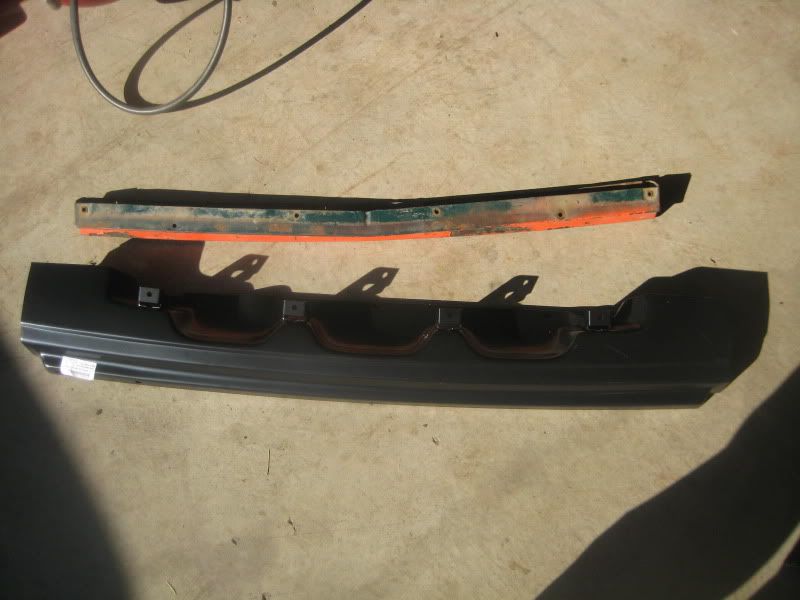
We have a classic car and truck swap meet twice a year and I always go and look through the goodies. This year I was able to find a very clean upper grill filler panel for 10 bucks! Pictured next to the new lower filler from LMC.
|
|
|
|
|
09-05-2011, 11:49 AM
|
#119 |
|
Registered User
Join Date: Mar 2008
Location: Monroe, WA
Posts: 181
|
Re: My project 55 begins
Just like everyone else here my firewall has had "one or two" extra holes drilled in it over the years. For whatever reason the previous owners of my cab had made swiss cheese out of the distributor relief area.
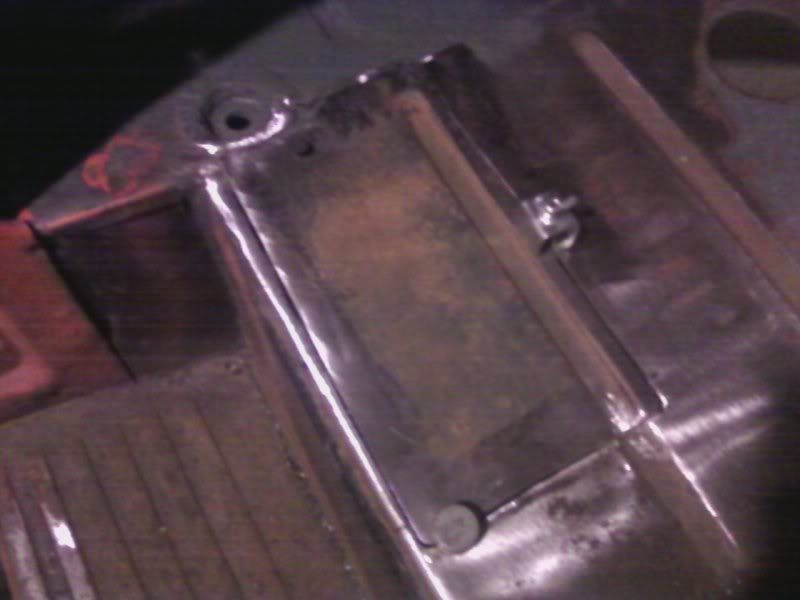
 This turned out to be one of those times when I can kill two birds with one stone because when I test fit the cab with the new engine/trans settup installed in the frame I found that the HEI distributor nearly touches the firewall. While it has about 1/8" of actual room between the cap and the firewall there isn't enough room to install the back plugwires. Of course I could cut out the whole thing and buy a new resessed firewall kit, but I thought it would look cool to just have an extra relief around the HEI and keep the original look to the firewall. 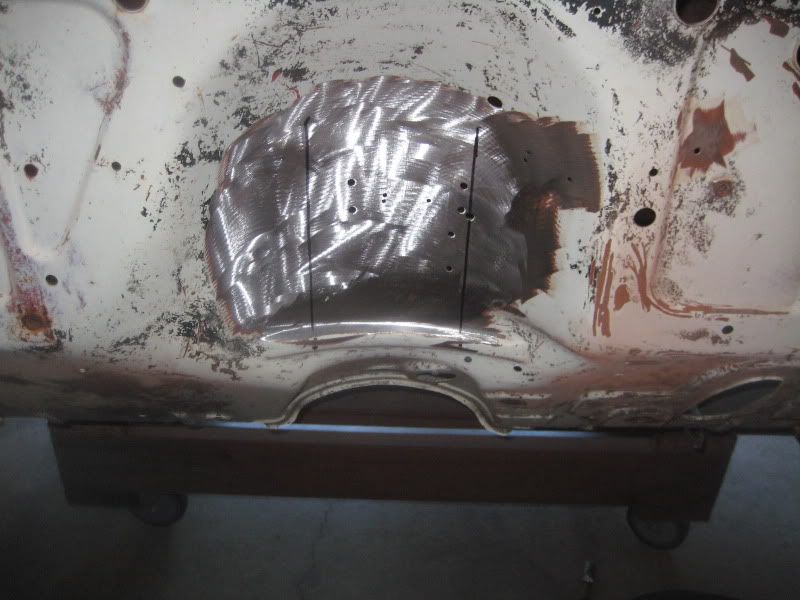 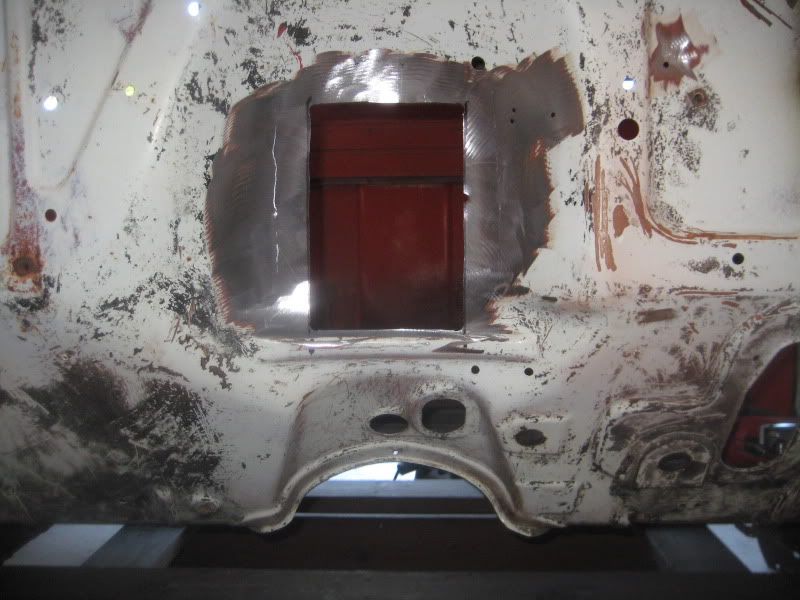 I took some 16 gauge sheet steel and measured the diameter of the distributor and added a bit for knuckle clearance. It turned out the the motor on my bench grinder had just the right size so I bent the sheet around the motor and made the patch panel. 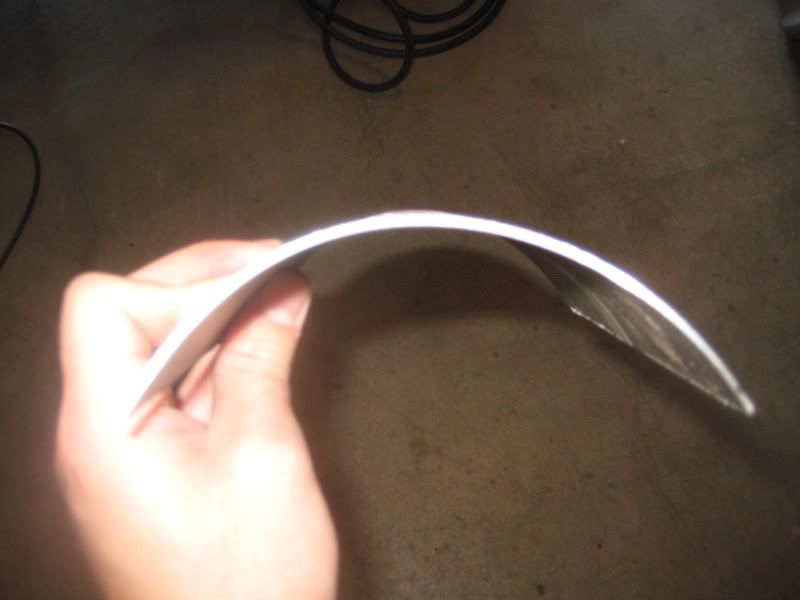 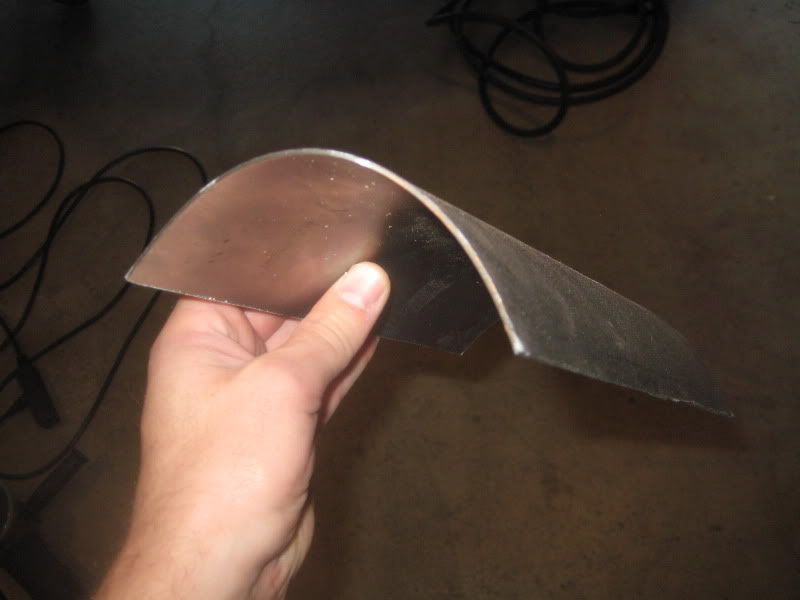 My measurements were good and the panel fit right into place. 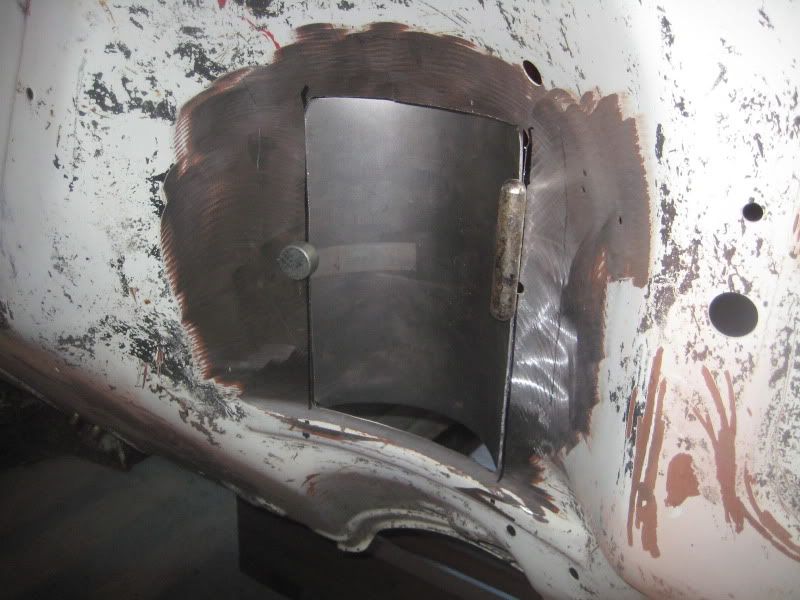 This is the third panel I have installed in the cab and the welds are getting better and better. After some grinder work and some primer it looks pretty good. 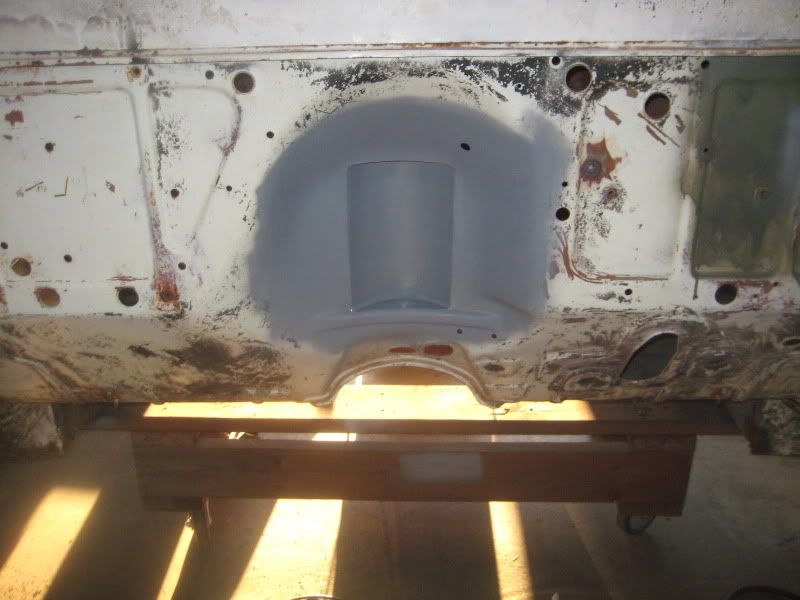 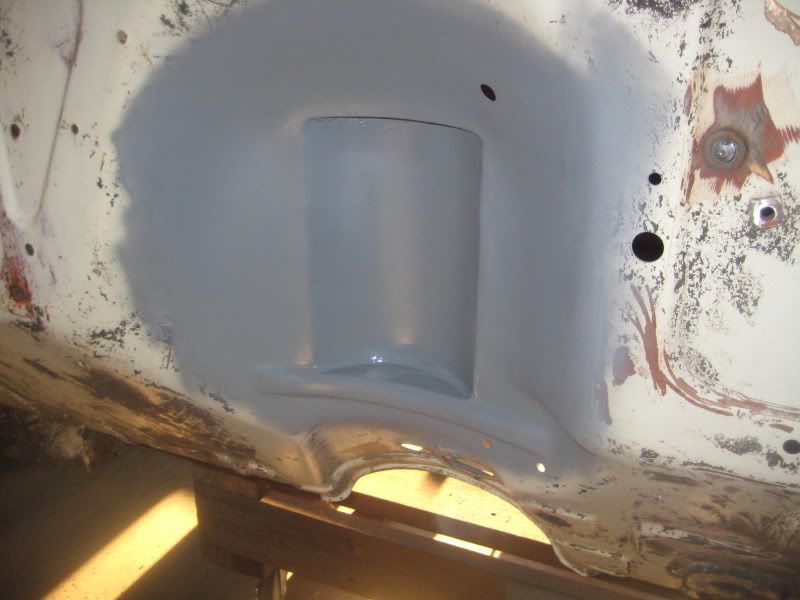 -Joel |
|
|
|
|
09-05-2011, 11:59 AM
|
#120 |
|
Registered User
Join Date: Mar 2008
Location: Monroe, WA
Posts: 181
|
Re: My project 55 begins
If I could do this over I would have welded in the half moons that make up the top and bottom of the relief BEFORE welding it into the firewall. I had to get creative with my line of sight and contort my body to get everything fully welded on the top and bottom from the backside under the dash. Overall I am happy with the end result. Time to move on to the front cab corners.
-Joel |
|
|
|
|
09-05-2011, 02:24 PM
|
#121 |
|
Registered User
Join Date: Aug 2007
Location: Corona, California
Posts: 7,998
|
Re: My project 55 begins
Looks good Joel.
Kim |
|
|
|
|
09-05-2011, 09:07 PM
|
#122 | |
|
Registered User
Join Date: May 2010
Location: Lawrenceville, Ga
Posts: 2,648
|
Re: My project 55 begins
Quote:
You are doing some nice work on the truck, it's looking good. |
|
|
|
|
|
09-05-2011, 09:12 PM
|
#123 |
|
A320 Pilot/USAF Retired
Join Date: Mar 2009
Location: Charleston, SC
Posts: 2,629
|
Re: My project 55 begins
Wow! My upper grill bar looked exactly the same as that one too!
__________________
JJ My 1957 build: http://67-72chevytrucks.com/vboard/s...d.php?t=334552 http://www.trifive.com/forums/showthread.php?t=22037 Instagram - Chuckdriver57 |
|
|
|
|
09-05-2011, 11:41 PM
|
#124 |
|
Registered User
Join Date: Mar 2008
Location: Monroe, WA
Posts: 181
|
Re: My project 55 begins
haha maybe there is a guy running around the country selling orange and green filler panels.
|
|
|
|
|
09-06-2011, 01:39 AM
|
#125 | |
|
Registered User
Join Date: Jan 2009
Location: Santa Clara, CA
Posts: 69
|
Re: My project 55 begins
you didn't have any problems with the wheel rubbing on caliper?
Quote:
|
|
|
|
|
 |
| Bookmarks |
|
|


 Linear Mode

