
|
Register or Log In To remove these advertisements. |
|
|
|
|||||||
 |
|
|
Thread Tools | Display Modes |
|
|
 04-14-2022, 05:56 AM
|
#1 |
|
Registered User
Join Date: Dec 2012
Location: Rochester, KENT
Posts: 10,514
|
Re: GRIZZs 79 - 2WD BLAZER Challenge over in London, England. ~Its not a Project
Using my special, banned tool, I got the second nut undone.
The threads are good, and new gasket was ordered, will get some new nuts. Job done. 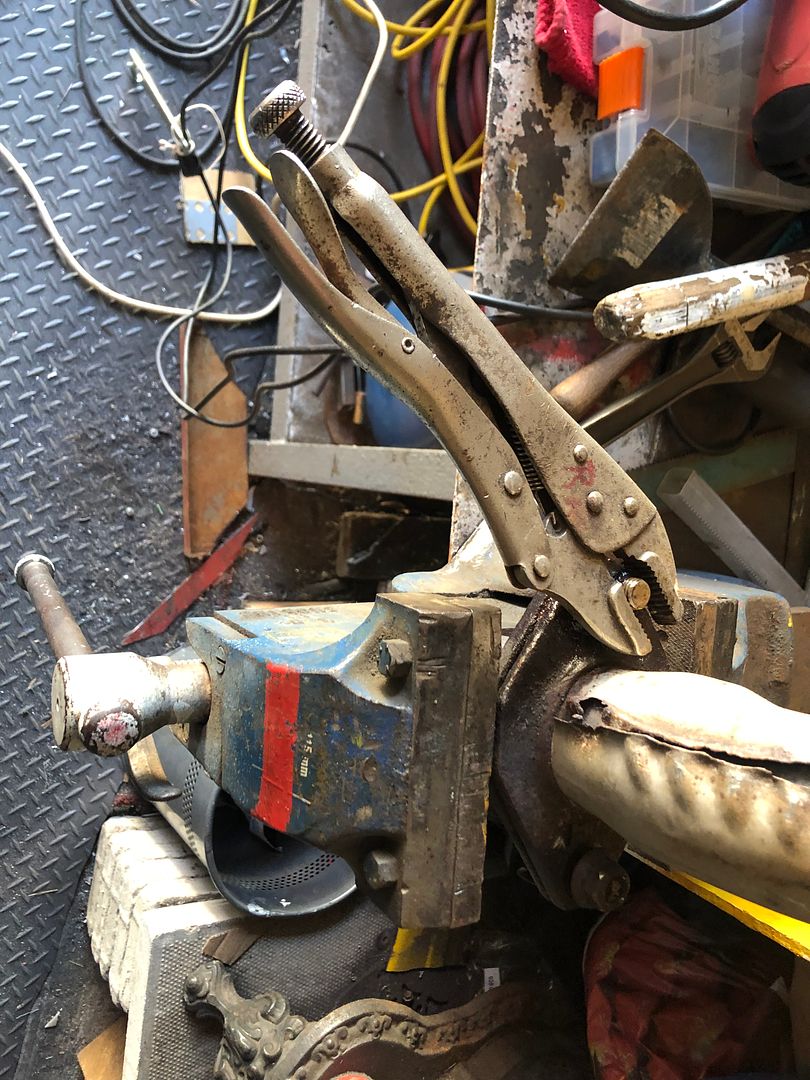
__________________
MY BUILD LINK: http://67-72chevytrucks.com/vboard/s...585901]Redneck Express - 1966 C10 Short Fleetside MY USA ROADTRIPS http://forum.retro-rides.org/thread/...2018-humdinger IF YOU CAN'T FIX IT WITH A HAMMER, YOU'VE GOT AN ELECTRICAL PROBLEM MATE. |

|

|
|
04-15-2022, 03:59 AM
|
#2 |
|
Registered User
Join Date: Dec 2012
Location: Rochester, KENT
Posts: 10,514
|
Re: GRIZZs 79 - 2WD BLAZER Challenge over in London, England. ~Its not a Project
Went to Euro Car Parts yesterday to collect a Nissan Micra high pressure fuel filter @pauly made some suggestions for me to consider that includes a return valve that may be needed in the system.
Hopefully @nickwheeler can decipher Pauls advice. 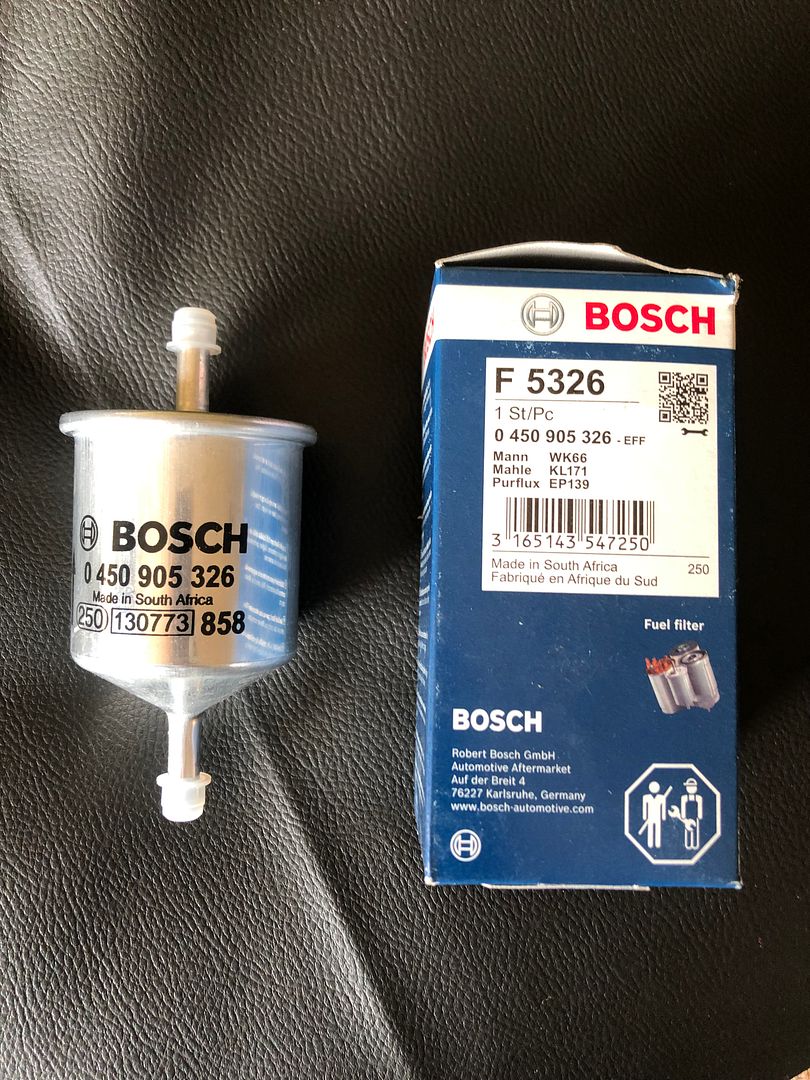 While out, I saw a nice example of some French engineering that with small, subtle tweaks, drew my eye. 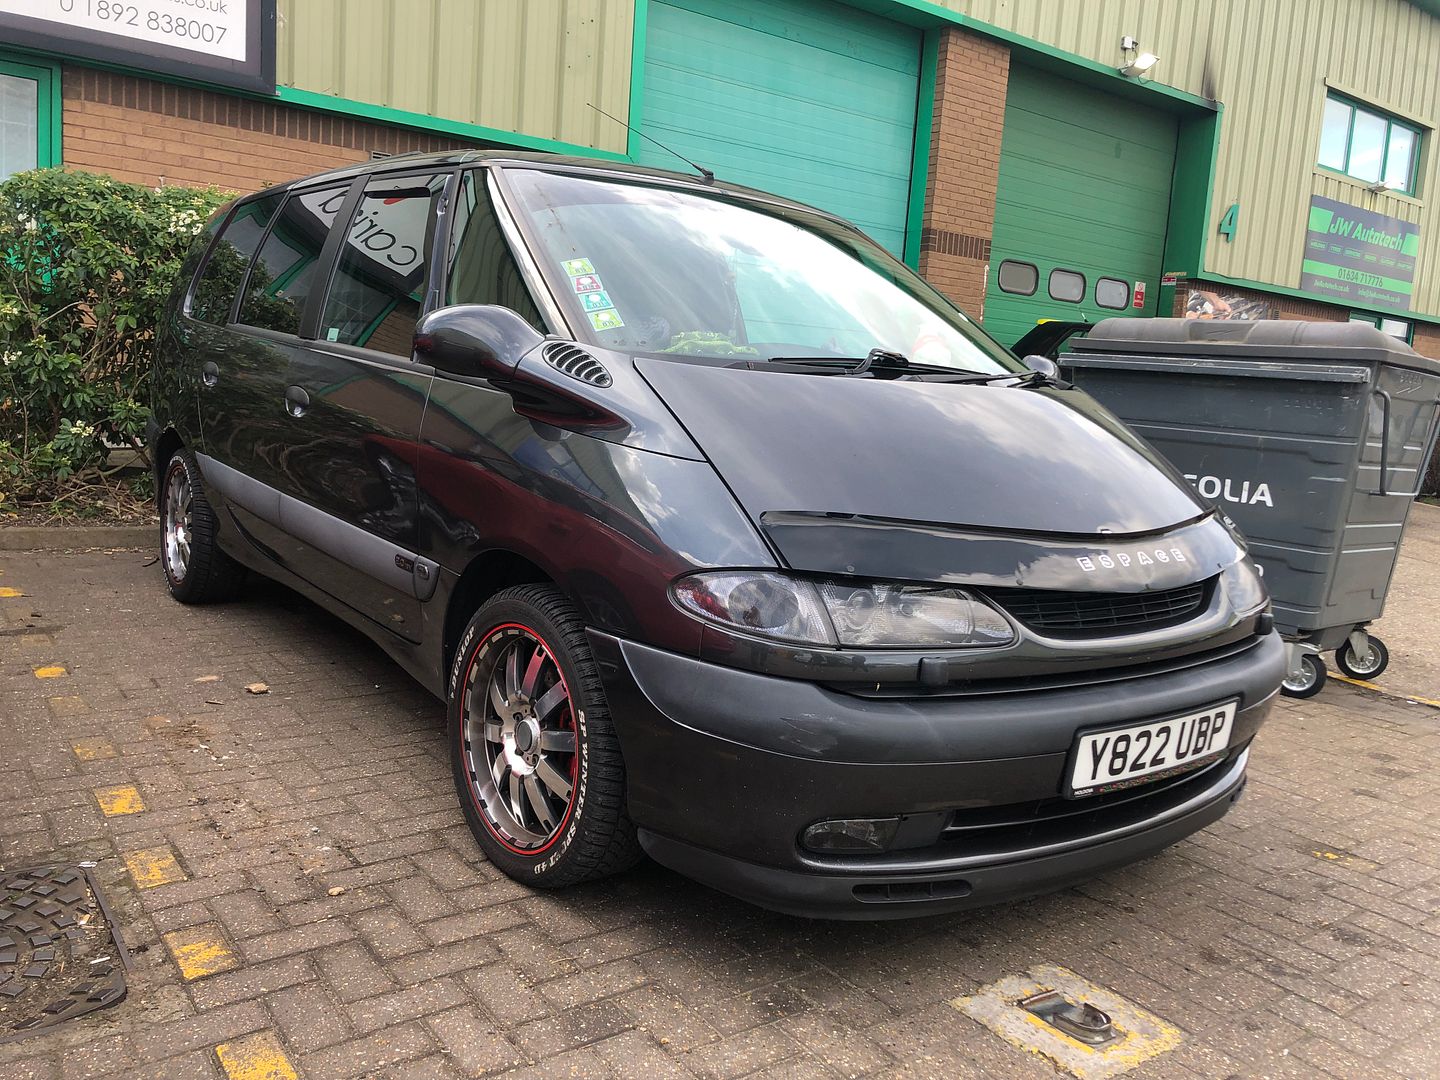 I had ordered two 57mm exhaust clamps and a gasket, along with the fuel filter. Looking at the list pricing, I wonder how these prices differ so wildly. 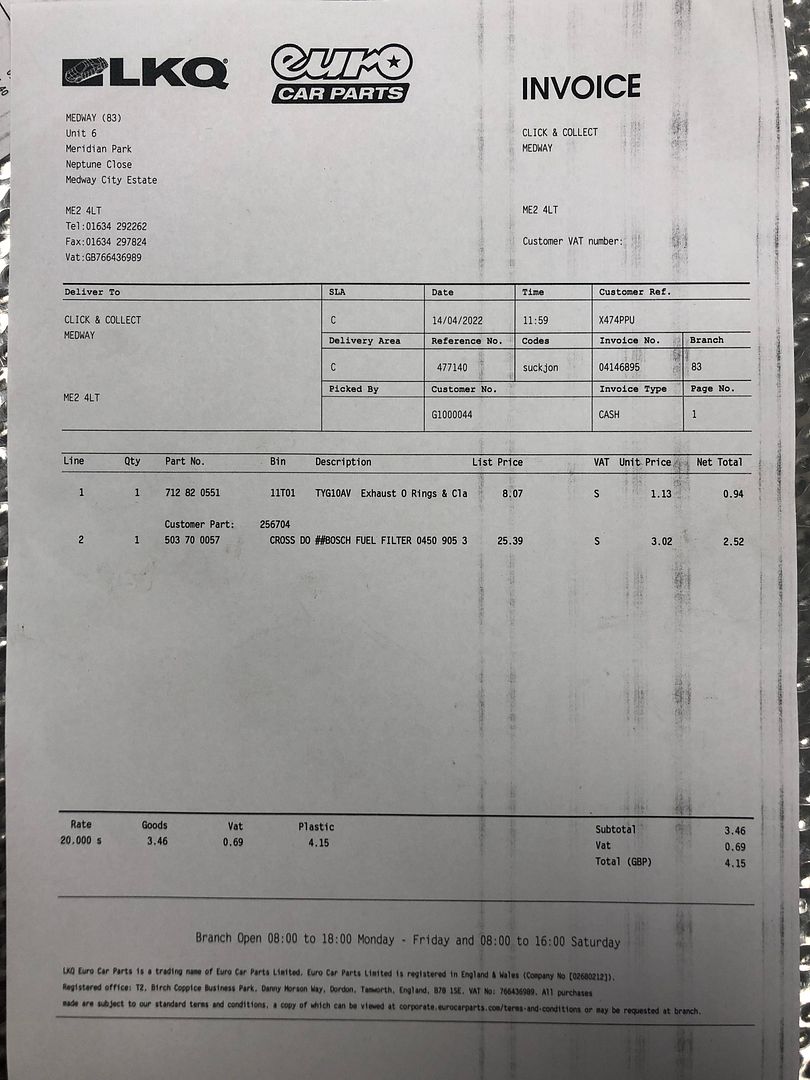 When I collected, they only had one clamp. Slightly miffed, I was sure there would be another at home, but it is a risk to hope you have a random one floating about. Serendipity. Got home and the straight pipe I had ordered was delivered on time, by DHL. Guess what ..? An exhaust clamp included in the price, I had not realised. John my one lodger was home early, and took a pic when I laid them out. 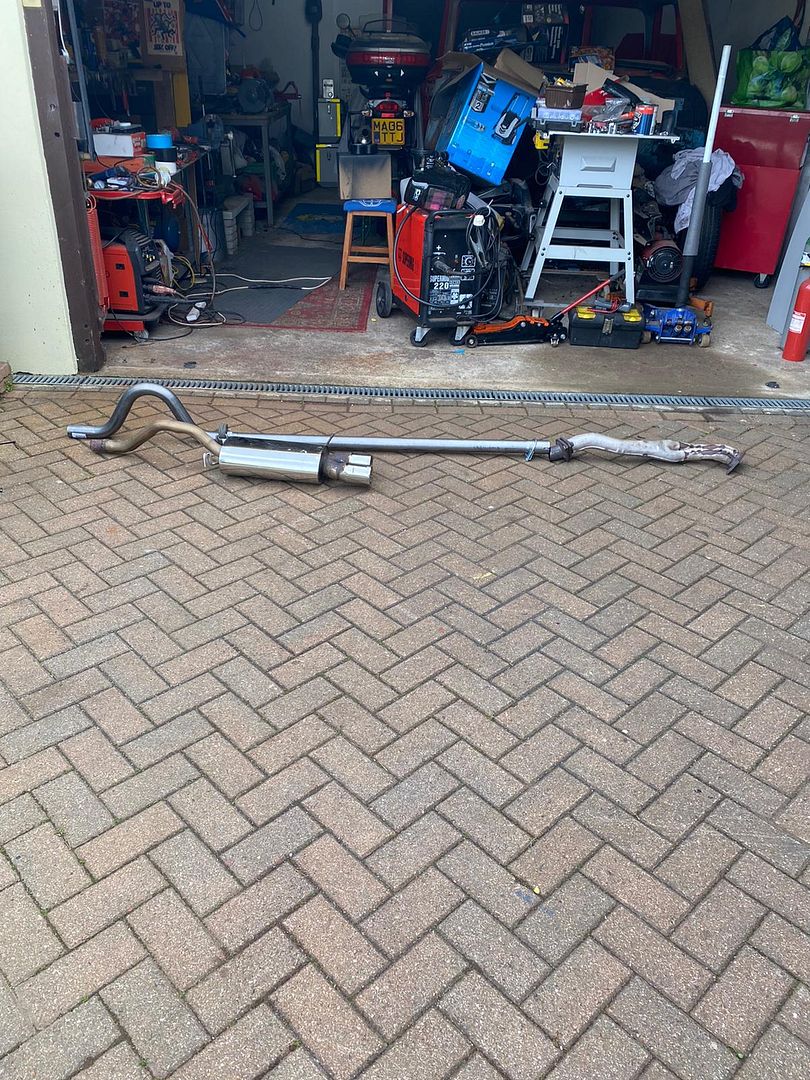 Job for the weekend. Next job was to quickly assemble the tank inners. Pump, return etc. Got the original screws and realised that the build was done using M5 nuts rather than the M3 that was standard on the MX5 tank. Thankfully I have a tub of nuts, bolts etc in all sorts of sizes that always gives and gives. Got 12 bolts and tried them, 5 of the nuts would not thread in, so out came the small Tap and Die set and a quick run through saw me fighting the next fight, threading them all and keeping the rubber gasket in position. 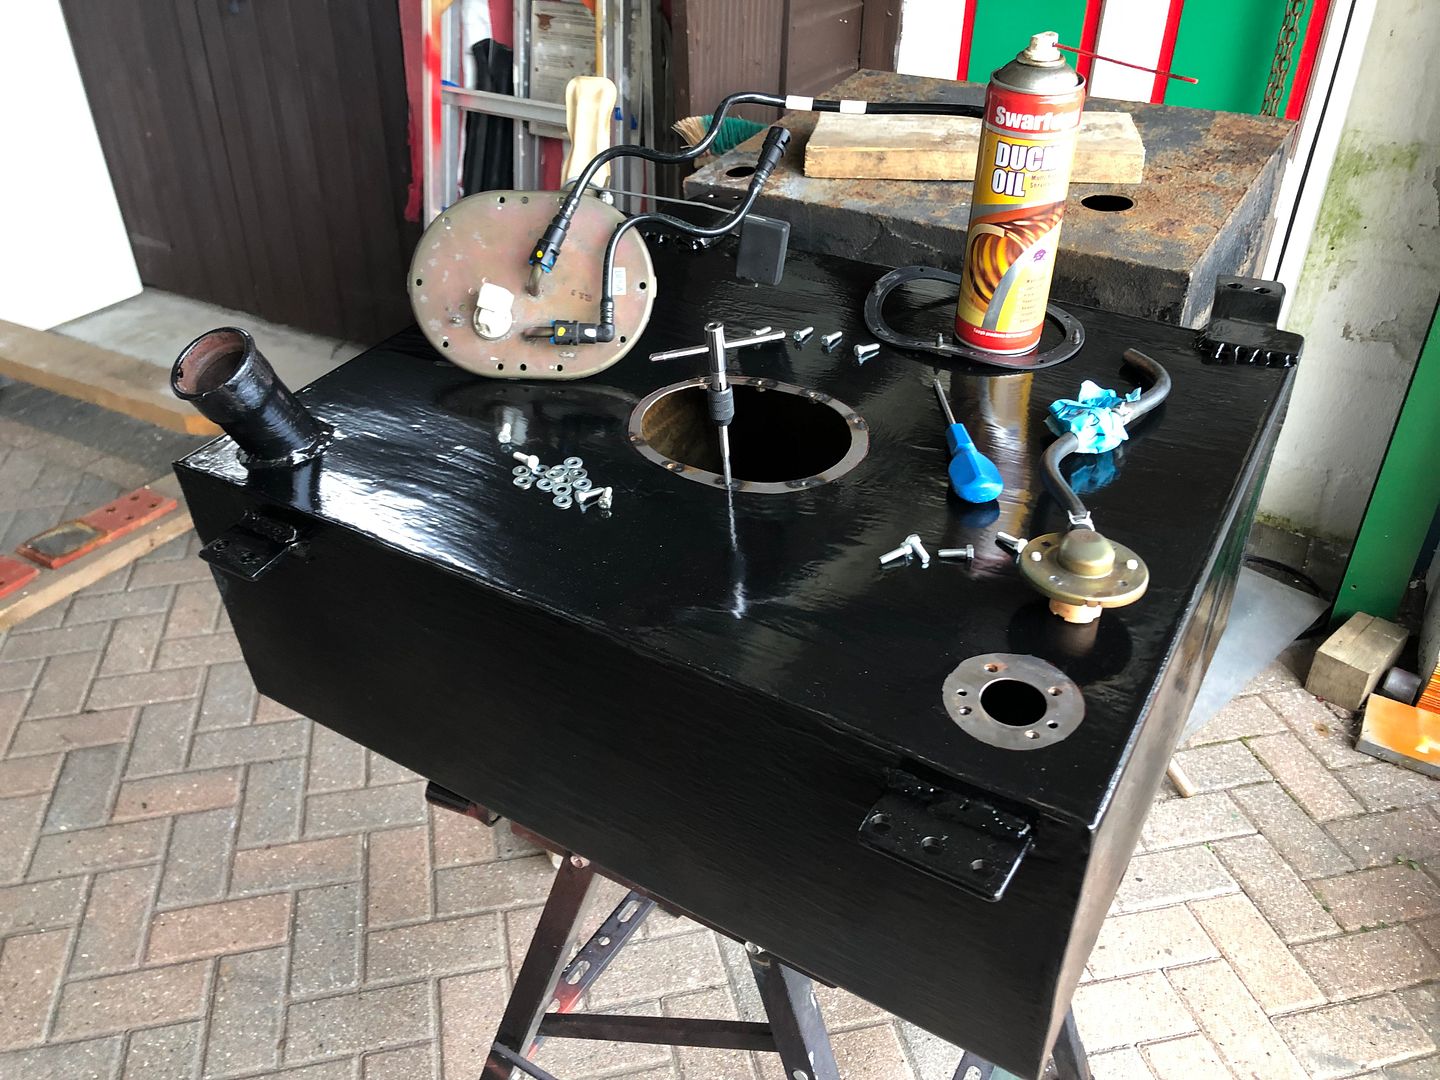 Fuel pump arm shortened by 60mm to fit in the new custom tank. 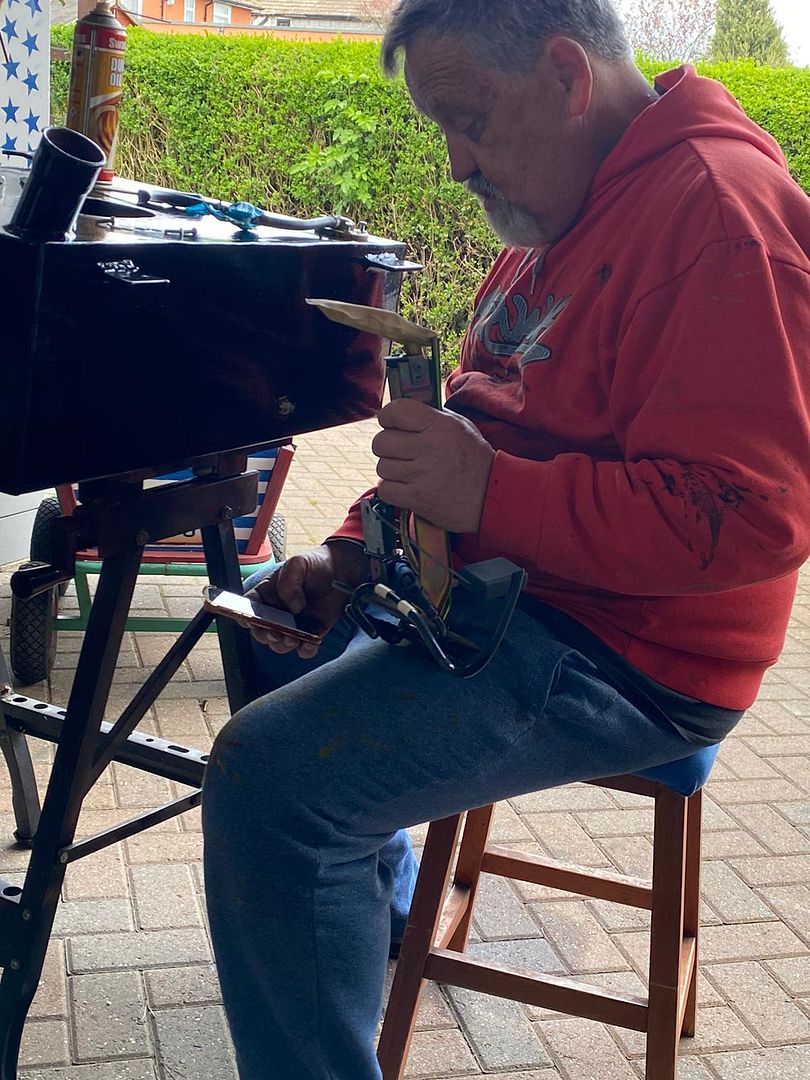 Pray this lot does not need to be taken apart again. 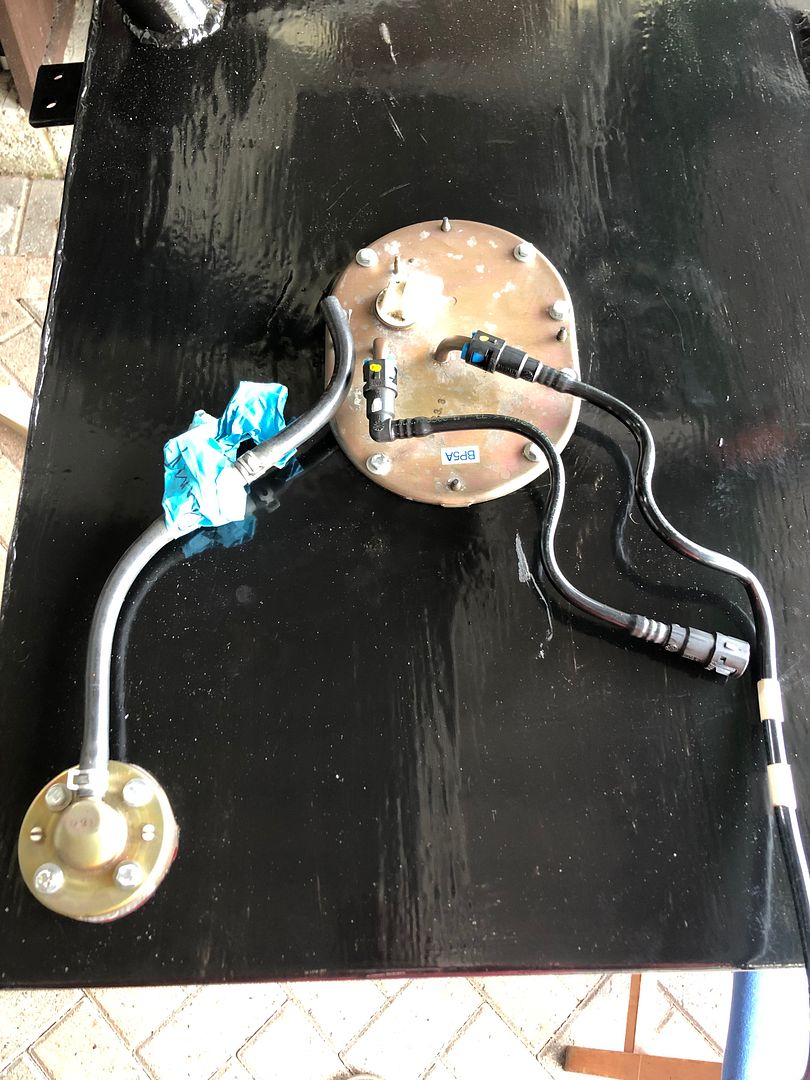 Also looked in my collection of three filler caps to see if one fitted .. Nope. So need to go out and find one I suspect that this is a former Ford filler neck.  Hopefully not too hard to find one.
__________________
MY BUILD LINK: http://67-72chevytrucks.com/vboard/s...585901]Redneck Express - 1966 C10 Short Fleetside MY USA ROADTRIPS http://forum.retro-rides.org/thread/...2018-humdinger IF YOU CAN'T FIX IT WITH A HAMMER, YOU'VE GOT AN ELECTRICAL PROBLEM MATE. |
|
|
|
|
04-16-2022, 03:51 AM
|
#3 |
|
Registered User
Join Date: Dec 2012
Location: Rochester, KENT
Posts: 10,514
|
Re: GRIZZs 79 - 2WD BLAZER Challenge over in London, England. ~Its not a Project
Well, Wheels Day came and went.
I chose not to go for various reasons, none very valid in retrospect. I hope it was a good day for those who went and that someone takes the time to create thread for us all. At home I saw this walking to the garage with uncle Bob who came to see what filler cap my gas tank needs.  He does not have one that fits in his stash either. Parts store it is then. Fingers crossed. Or else it may end up being a simple plastic bung type in the end, protected by the locking toolbox, balanced on the rear bumper. While I was at that job, I pulled out the towball and plate that came from somewhere. I want to be able to tow with this car, my small garden trailer etc. So along with the toolbox bolted on, I am going to weld this guy onto the top bolt and fasten it with the nut from behind. Tow ball goes one step lower. I can imagine people shouting and gesticulating on the motorway that I have forgotten my toolbox and wrench on the back.  Cleaned and painted. Needs fitting and wiring into loom.  Weirdly, I did not get started till after 1.00pm with helping Mickey next door, and Uncle Bob spending more than two hours here. So I drilled the holes for the plates to hold the new dash, using existing holes. 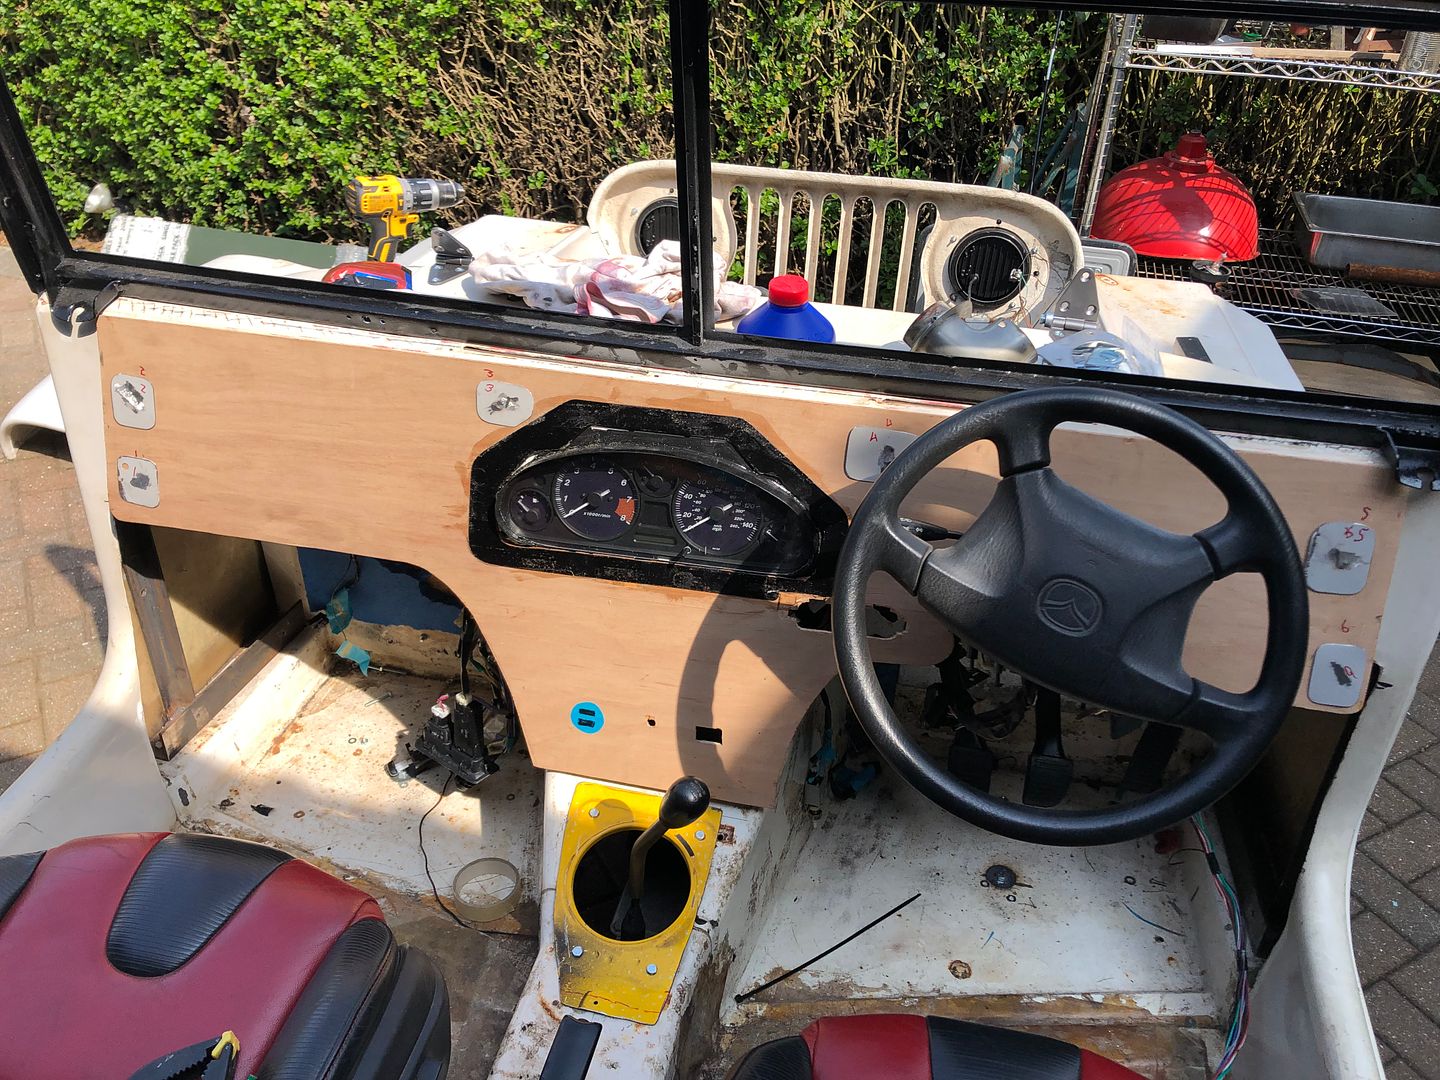 Then added more holes through both wood and fiberglass. Should hold it in place. 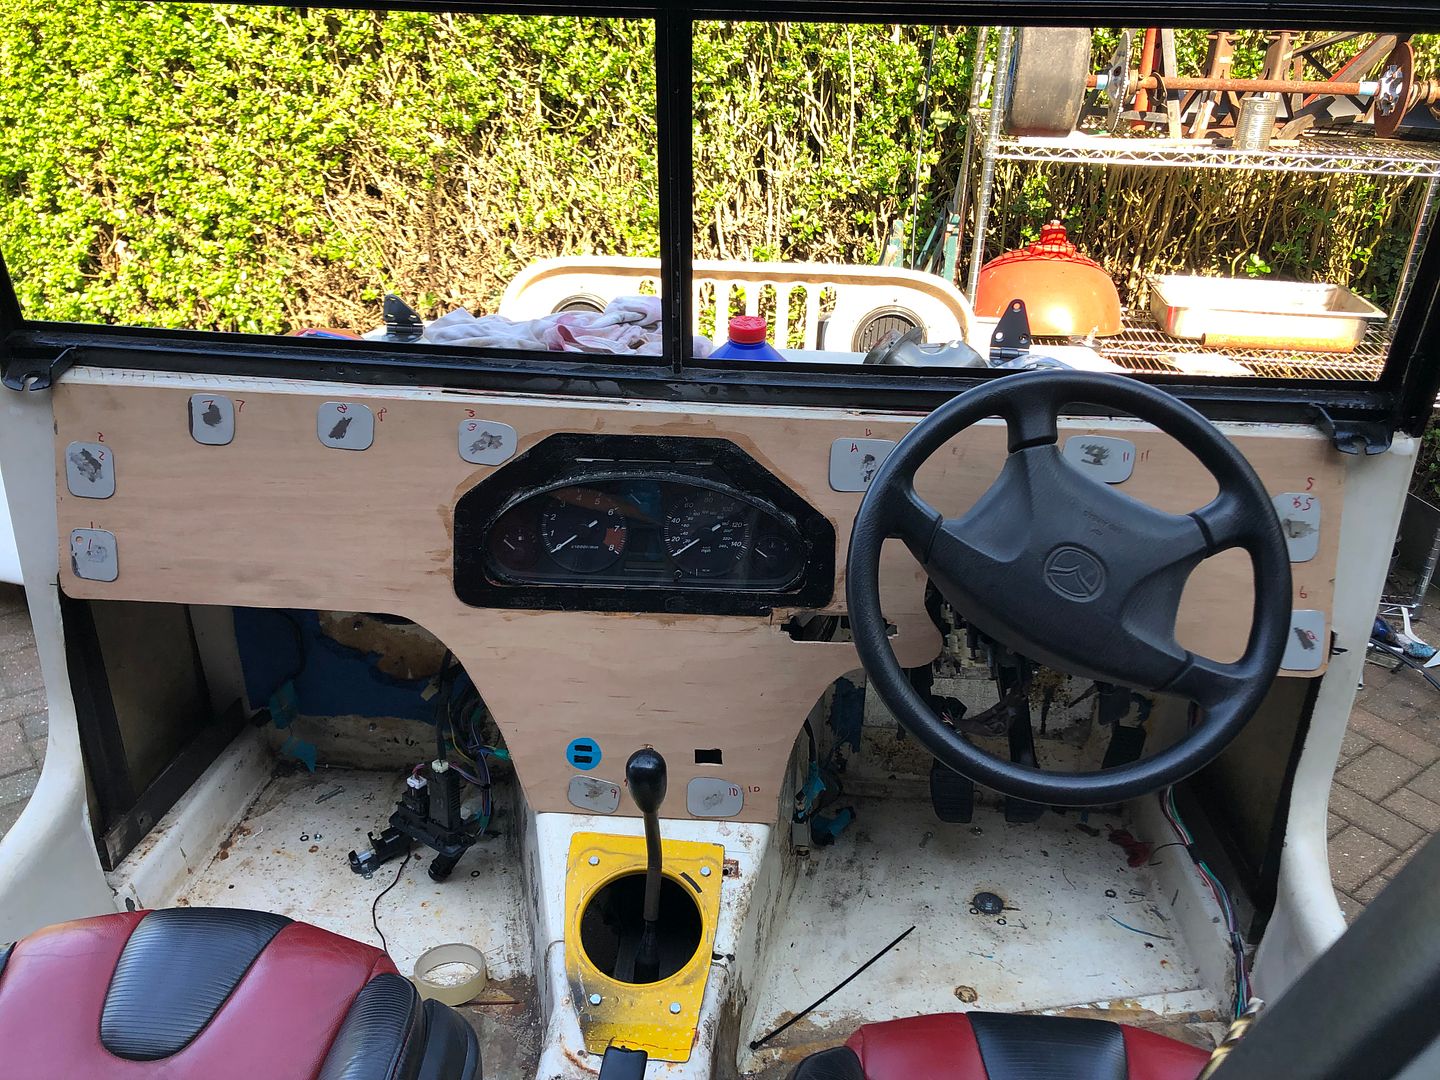 Once all were straightened and made to fit exactly as expected, I added the glue to seal them in place. 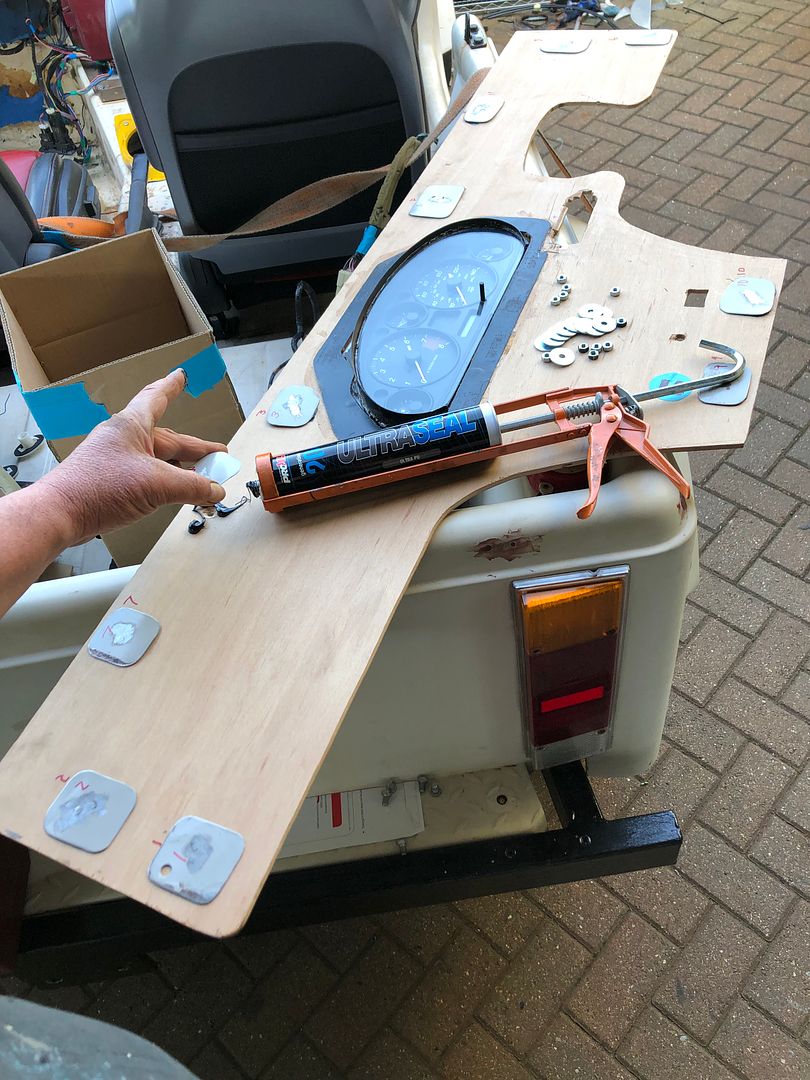 And the rear looks tidy. 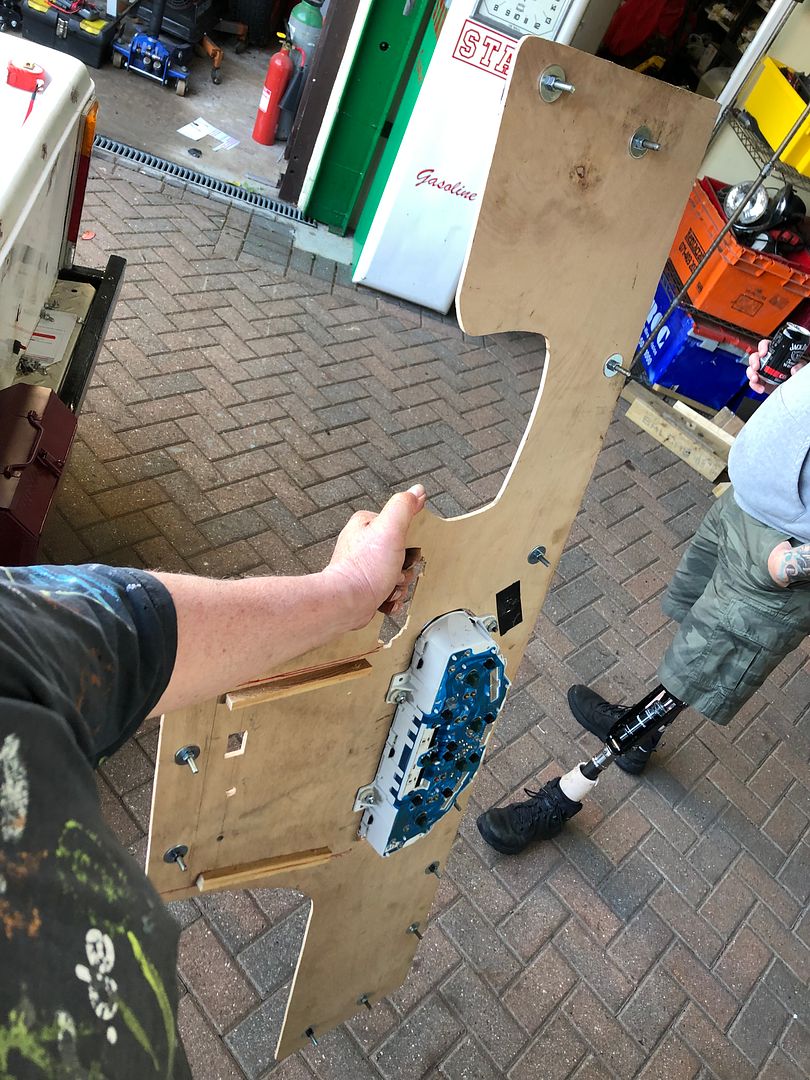 I will trial fit it later today, in the hope all 11 studs thread through the holes and that it fits around the steering wheel and under the window frame. Sun is out
__________________
MY BUILD LINK: http://67-72chevytrucks.com/vboard/s...585901]Redneck Express - 1966 C10 Short Fleetside MY USA ROADTRIPS http://forum.retro-rides.org/thread/...2018-humdinger IF YOU CAN'T FIX IT WITH A HAMMER, YOU'VE GOT AN ELECTRICAL PROBLEM MATE. |
|
|
|
|
04-17-2022, 05:59 AM
|
#4 |
|
Registered User
Join Date: Dec 2012
Location: Rochester, KENT
Posts: 10,514
|
Re: GRIZZs 79 - 2WD BLAZER Challenge over in London, England. ~Its not a Project
Almost 10.30 on Easter Sunday, and I am not expecting to be in the garage before 11.00
Slow start, Bunny shaped crumpets and coffee, and Sally just left to go work in her garden, cook Uncle Bobs dinners for the next three days. So I will do a quick write up of yesterdays work with @nickwheeler. I went shopping early on to see if I could find a fuel filler cap, or radiator cap to fit the neck of the fuel tank. No luck. BUT .. petrolcaps.co.uk is the address Nick had supplied, and is a bona fide supplier of you will never guess . Yup, petrol cpas. @mercdan68malready dropped off a filler cap earlier this morning that is not a fit, but a good place to start making a new neck for, before wafting off in his W202 Mercedes Benz, sunroof and windows open, Meatloafs Bat Outta Hell drifting down the road. What a way to use a real 20-something year old car. Back to yesterday. Nick proceeded to plan where to attach the high pressure fuel filter, changing his mind three times. The tank was also fitted and removed three times, including removing the fuel pump unit to establish the feed and return, as I could not remember which way they went. Making a clamshell bracket took longer than a few minutes, as did attaching it, and some other brackets for the various fuel lines and pipes. 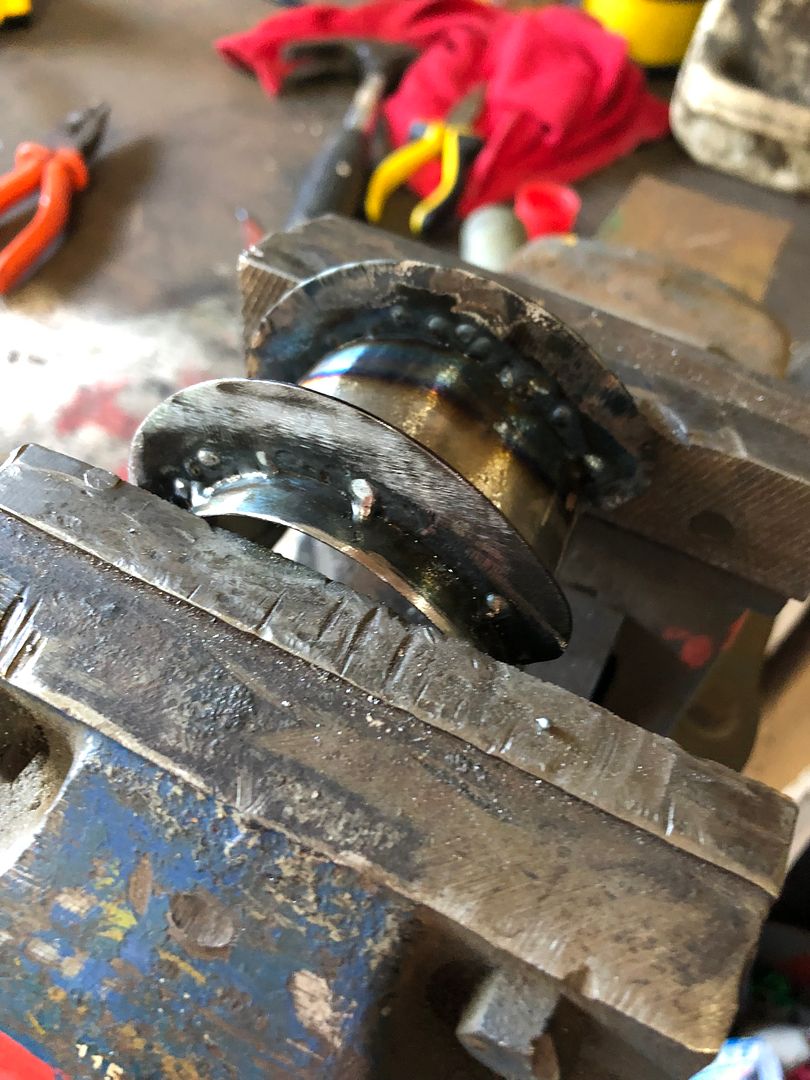 There you see well over 10 minutes of work. 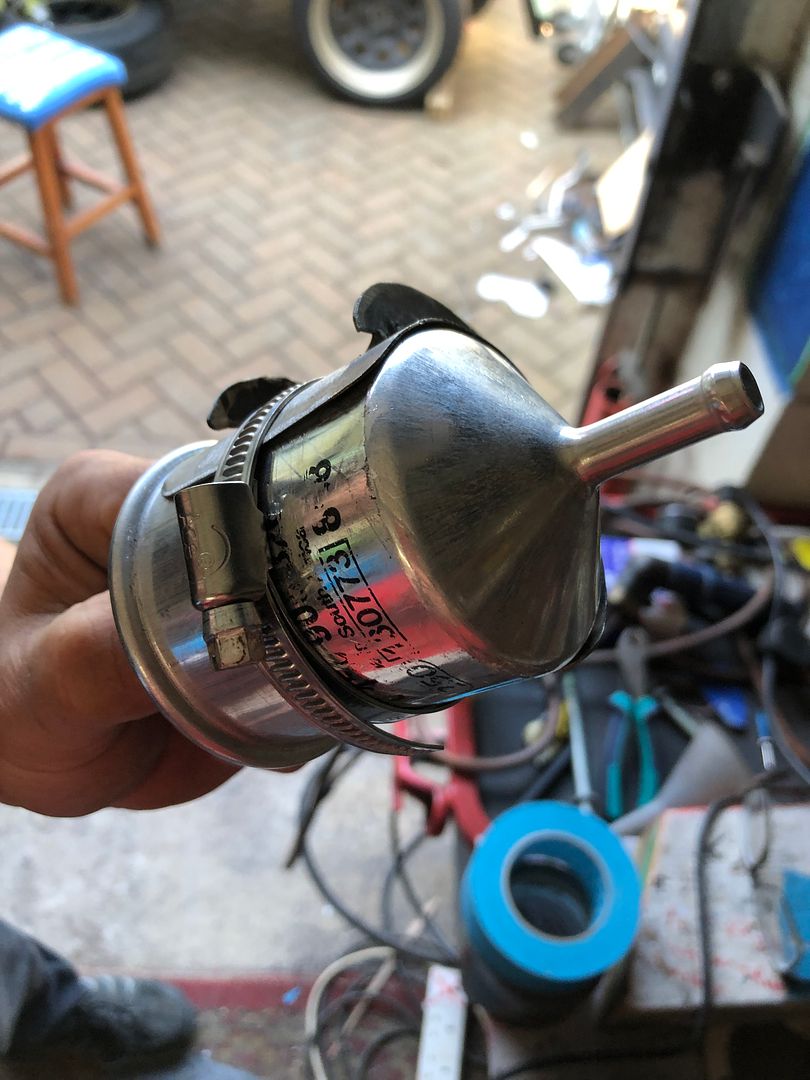 Result 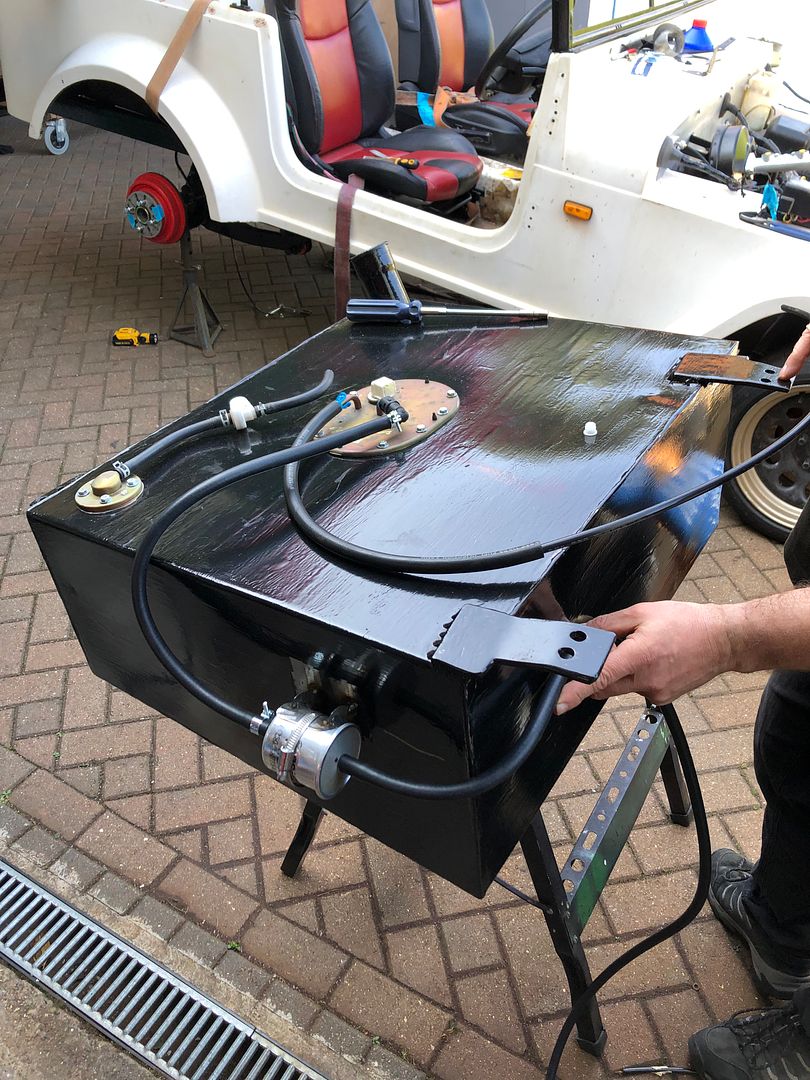 And second fitment of three. Yes, of course I helped. (Someone had to jack it up, fit axle stands and make coffee) 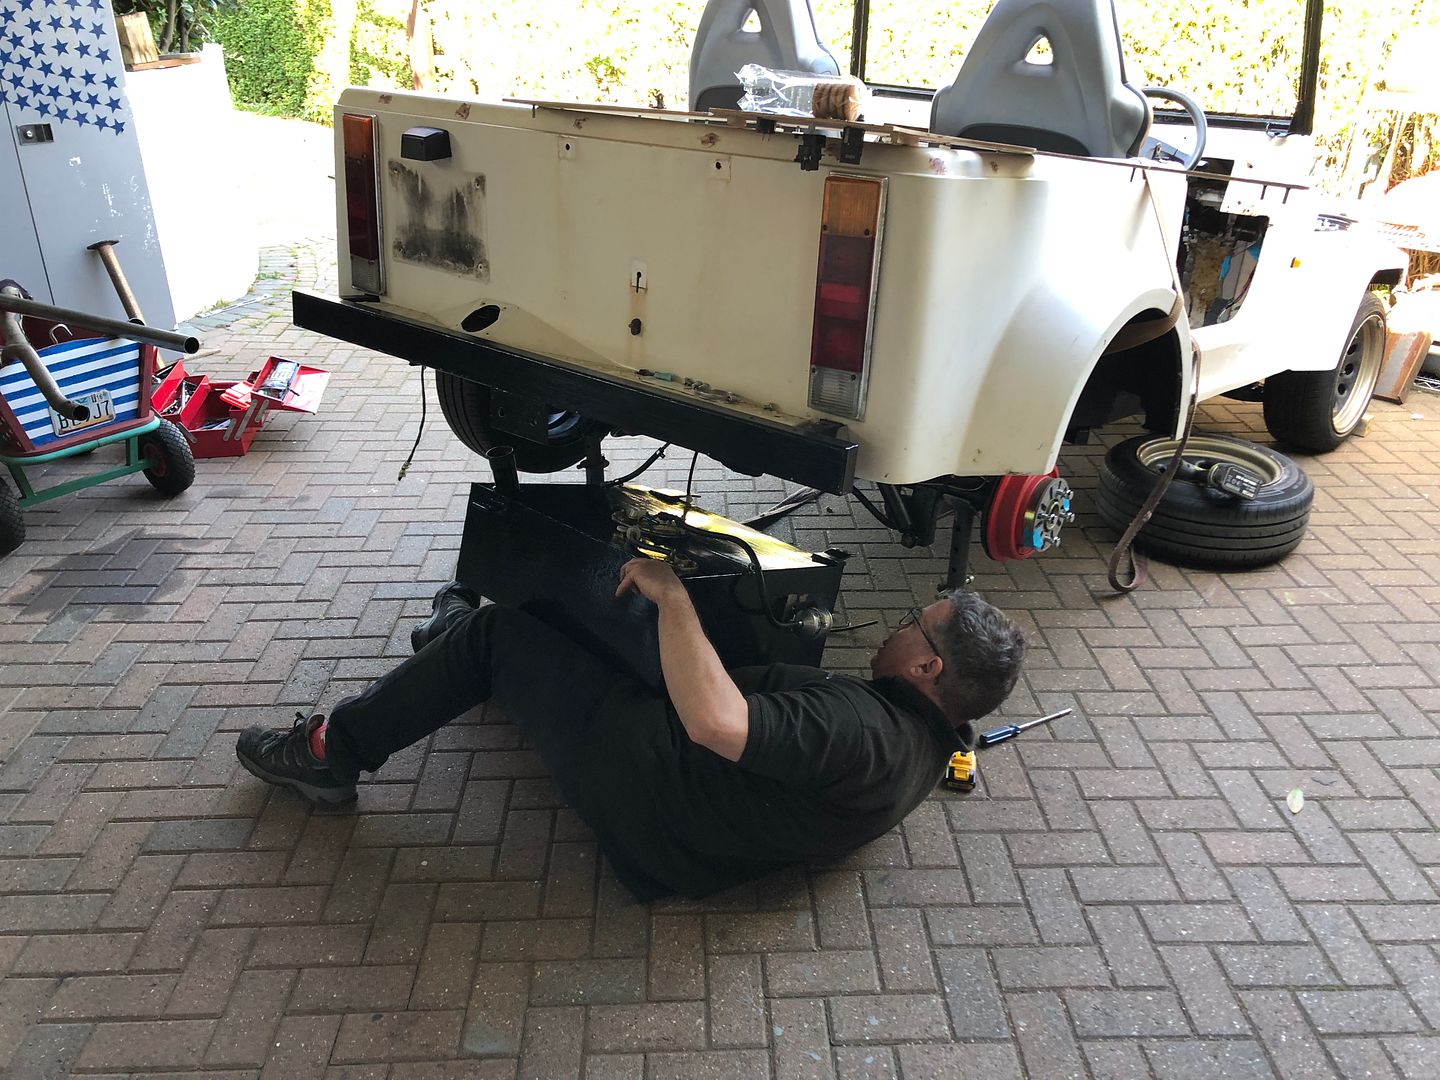 In the mean time, I carried on with other jobs, including the dash testing, some more dash reshaping in order to fit the steering column shroud once covered in vinyl. In and out about 6 times for fine tuning. Also now fits with all the studs glued in place and holes drilled.  Another job that took an easy hour was again, fitting and fine tuning the switches that have been retained or added from the MX5 donor. Fog lights, cluster lighting, hazard light switch, heater/blower switch and of course the twin USB charger points. This little cover for the Hazard switch took forever to work till it was round enough, with flattened fixing tabs at the back, made from one bit of flat Dexian shelving. 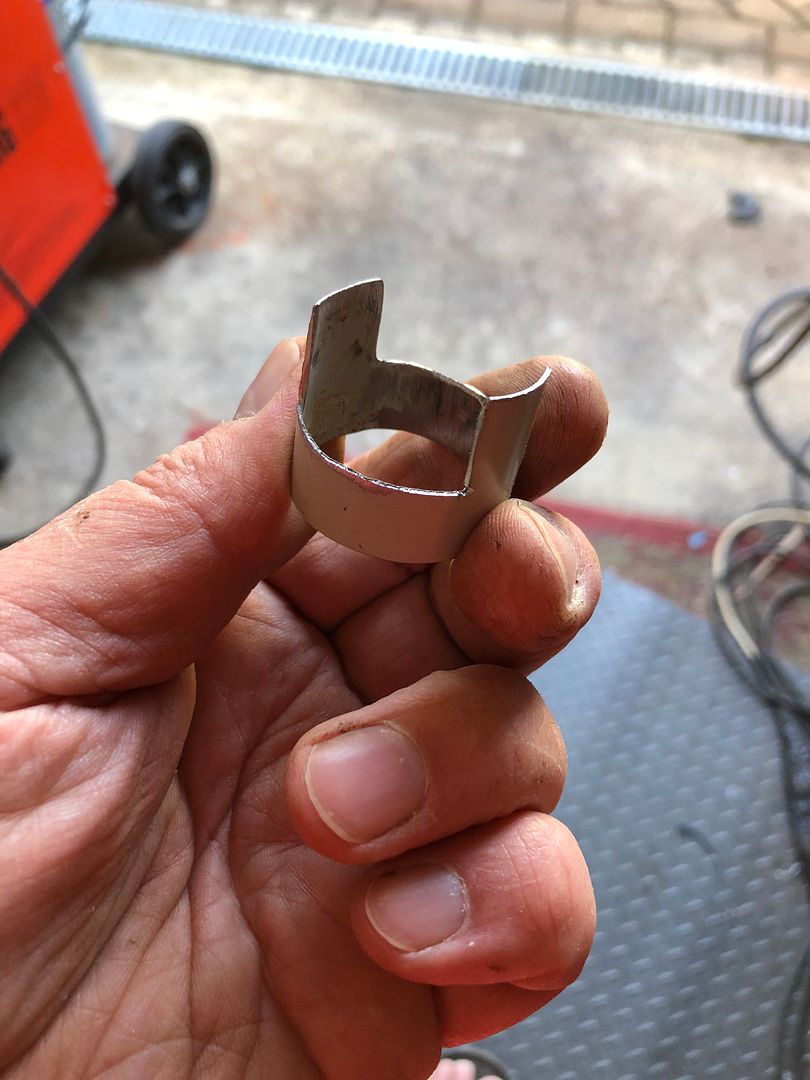 Trust me, once covered in scrim foam and vinyl it should look a bit better. 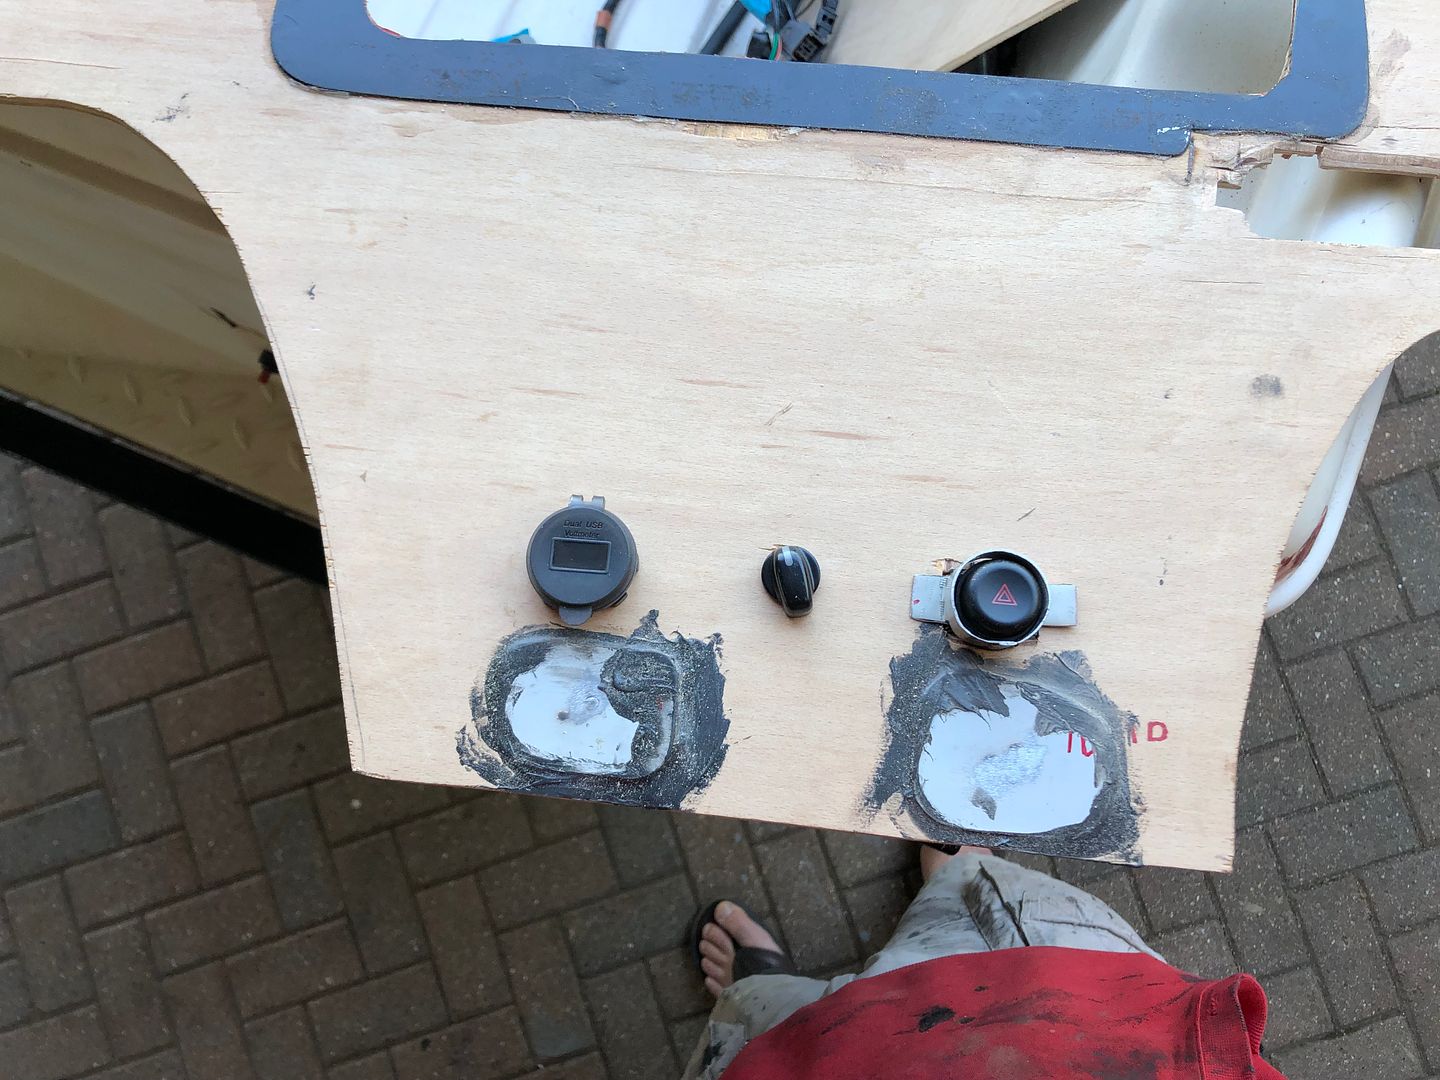 While the body was up in the air, we also started to cut and trim the rear box @kevins donated, and the straight length ordered this week. I had to be shut and showering by 6.00pm for a chest CT scan hospital appointment at 7.30 Yes, they work on a weekend too. Amazing team I was dealt by. A bit of fiddling, a bit of luck should see the pipe miss all the obstructions, both fixed and moving. 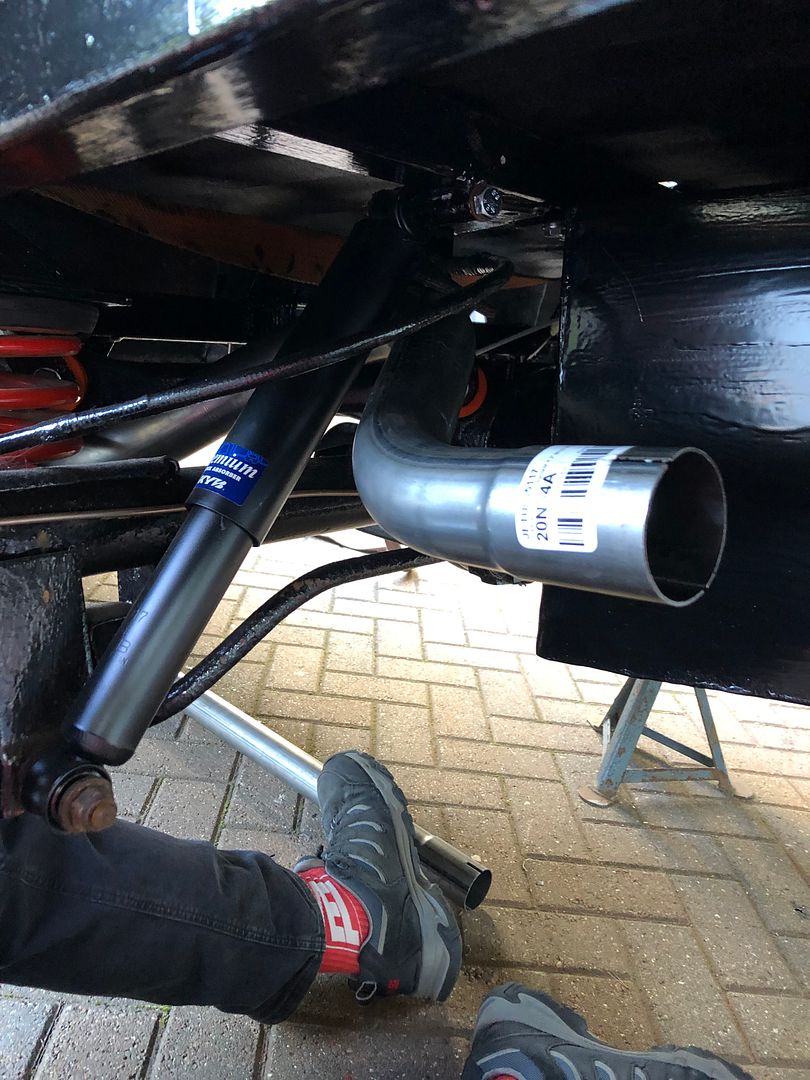 I tried one more little job just as we closed shop. I hope @nickwheeler has stopped laughing, because he was still laughing when he drove off toward the sunset and home. Suffice it to say, one of my plans had completely backfired, and the joy he got from it was amazing. I am sure he will be along to,explain . 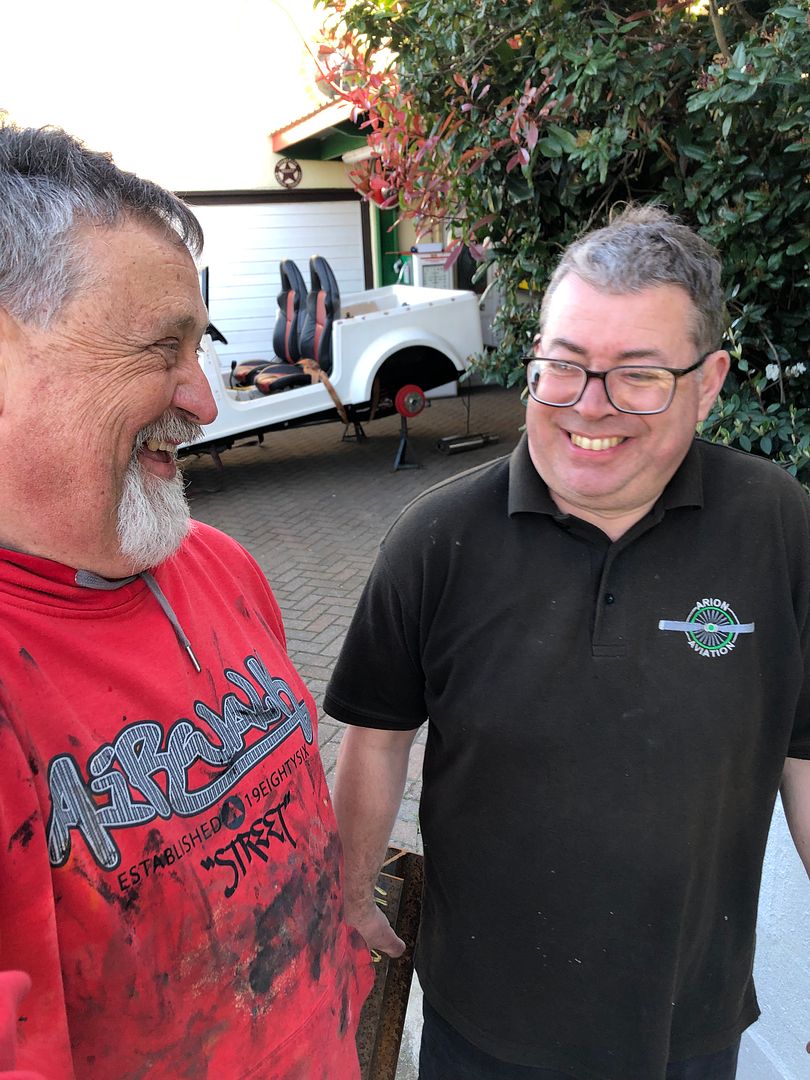 Mate Fil did a quick Photoshop of a pic I had sent him when we were chatting about how far we had made it. 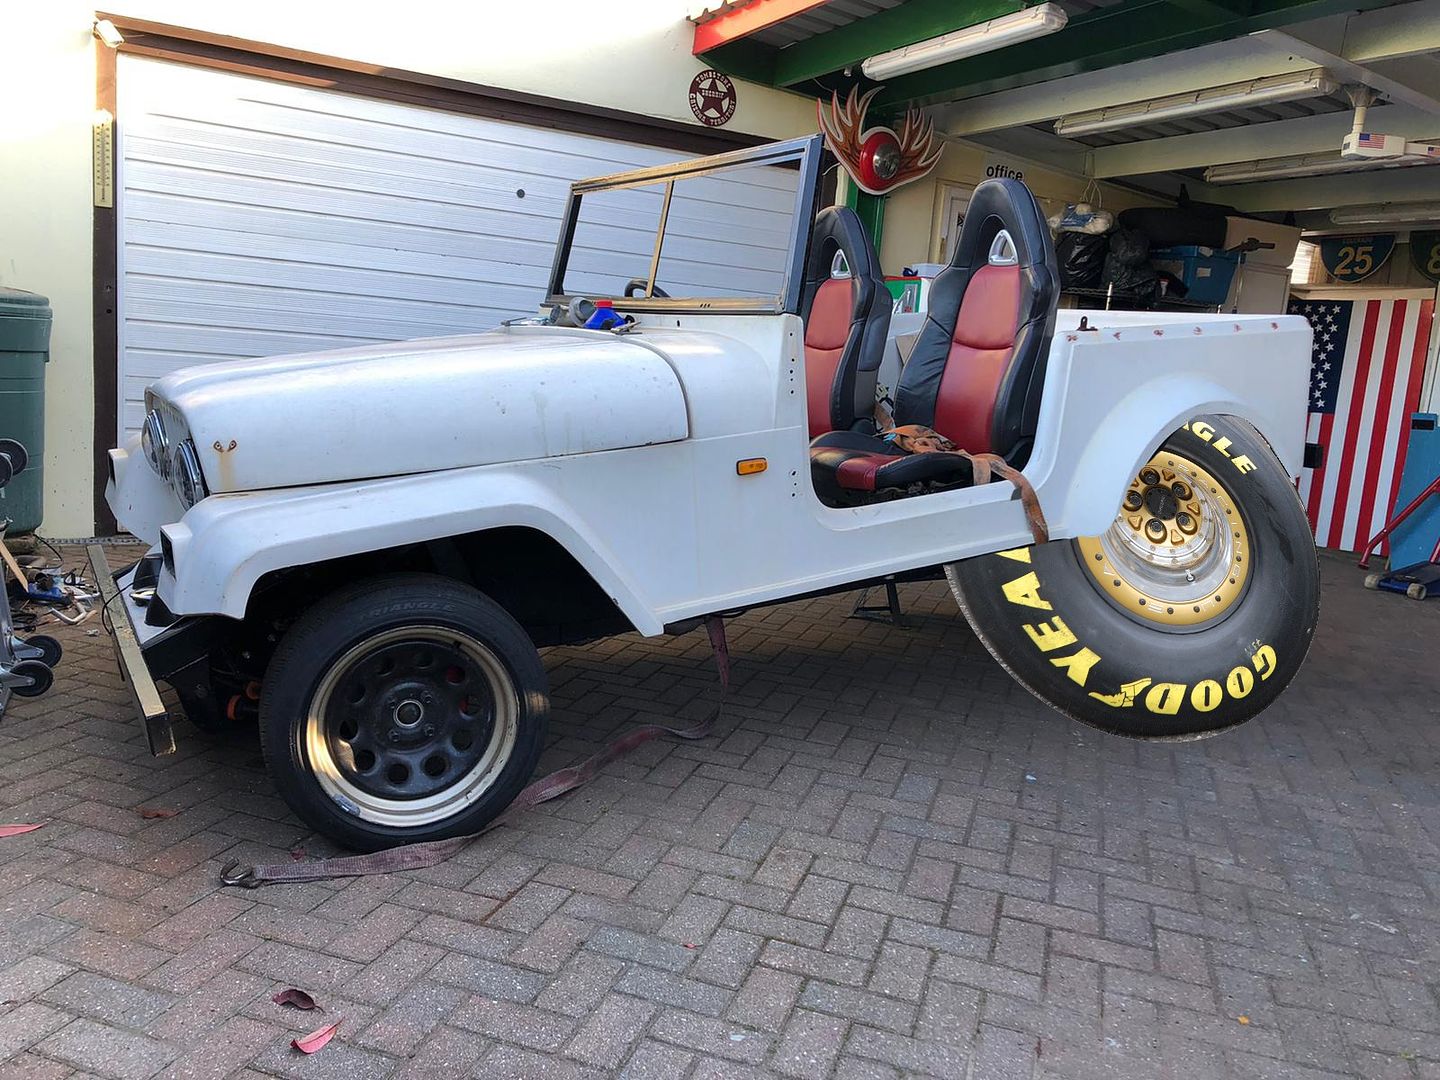 Well, it is 10.51 now, 30 minutes later. Need to get out and spend some time moving more small jobs along. Later gang.
__________________
MY BUILD LINK: http://67-72chevytrucks.com/vboard/s...585901]Redneck Express - 1966 C10 Short Fleetside MY USA ROADTRIPS http://forum.retro-rides.org/thread/...2018-humdinger IF YOU CAN'T FIX IT WITH A HAMMER, YOU'VE GOT AN ELECTRICAL PROBLEM MATE. |
|
|
|
|
04-17-2022, 04:19 PM
|
#5 |
|
Registered User
Join Date: Dec 2012
Location: Rochester, KENT
Posts: 10,514
|
Re: GRIZZs 79 - 2WD BLAZER Challenge over in London, England. ~Its not a Project
So in between domestic duties, and a variety of things, I also spent so e time down at the garage.
Not a lot of time, but still a little bit of progress. @Mercdan68 dropped off a fuel filler cap with a key. Thos was not a fit, but got me thinking. So I went back to my pile of 3 vintage fuel caps, all with at least one key. Found one I liked, that has two keys. And started with a bit of offcut 2 mild steel exhaust pipe. Cut and shaped to counter the weird angle of the tank filler exit. Followed by some measuring and then using my large step drill, and a half-round file. 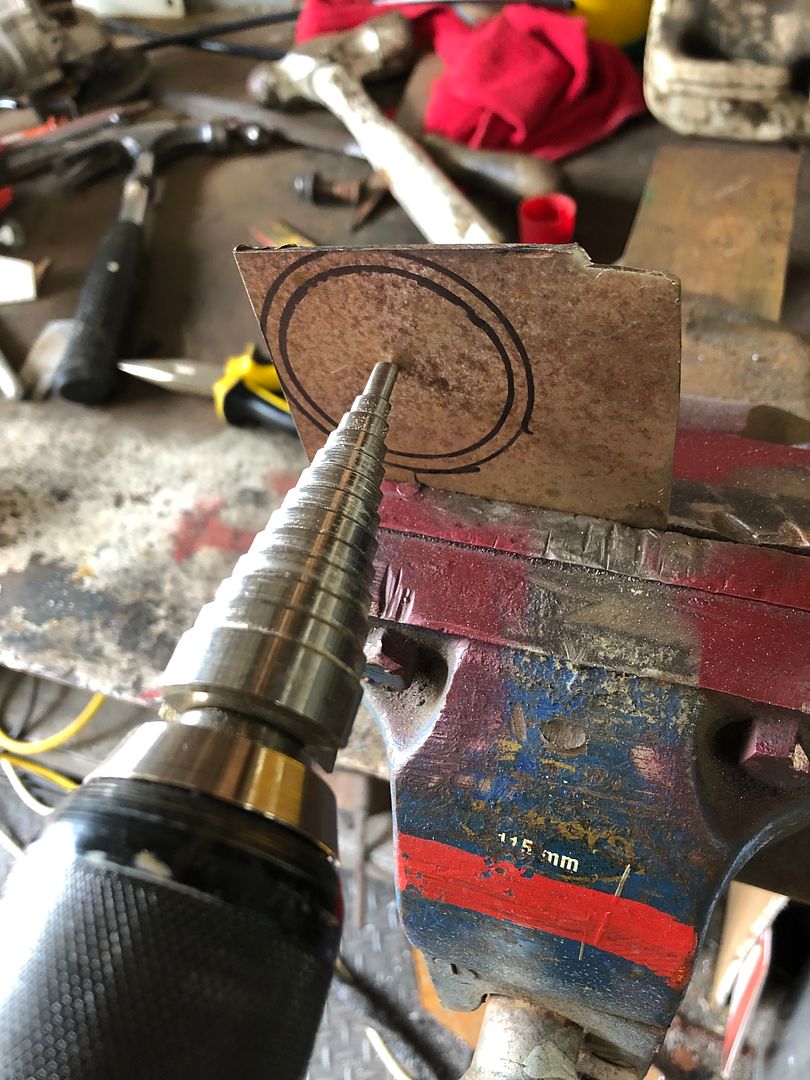 Filed till the hole was the right size, measured, marked and filed to allow the tabs entry.  Test fitted. Liking that. 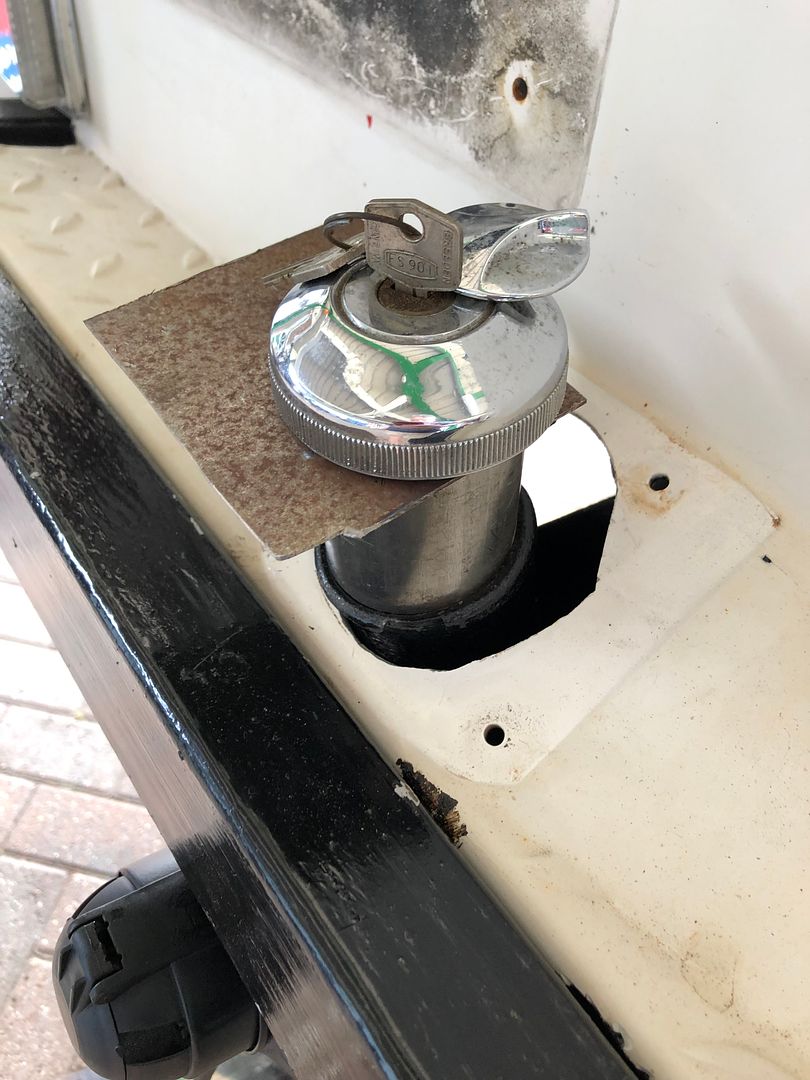 Glued it together. 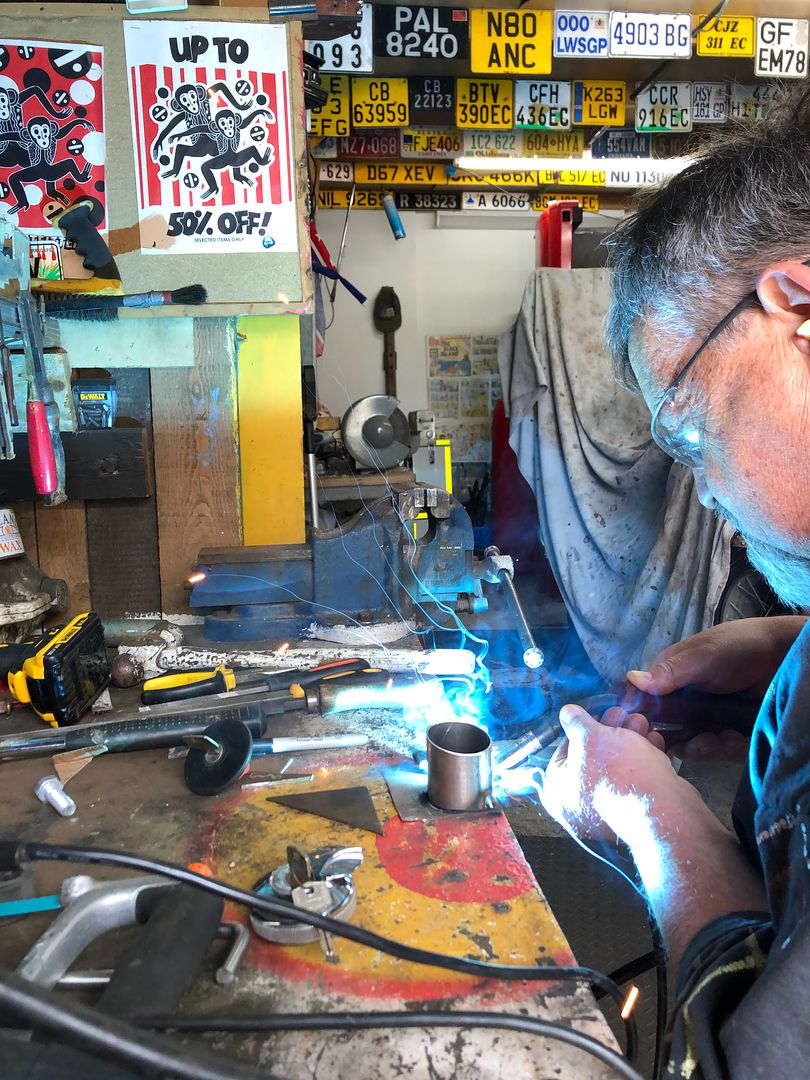 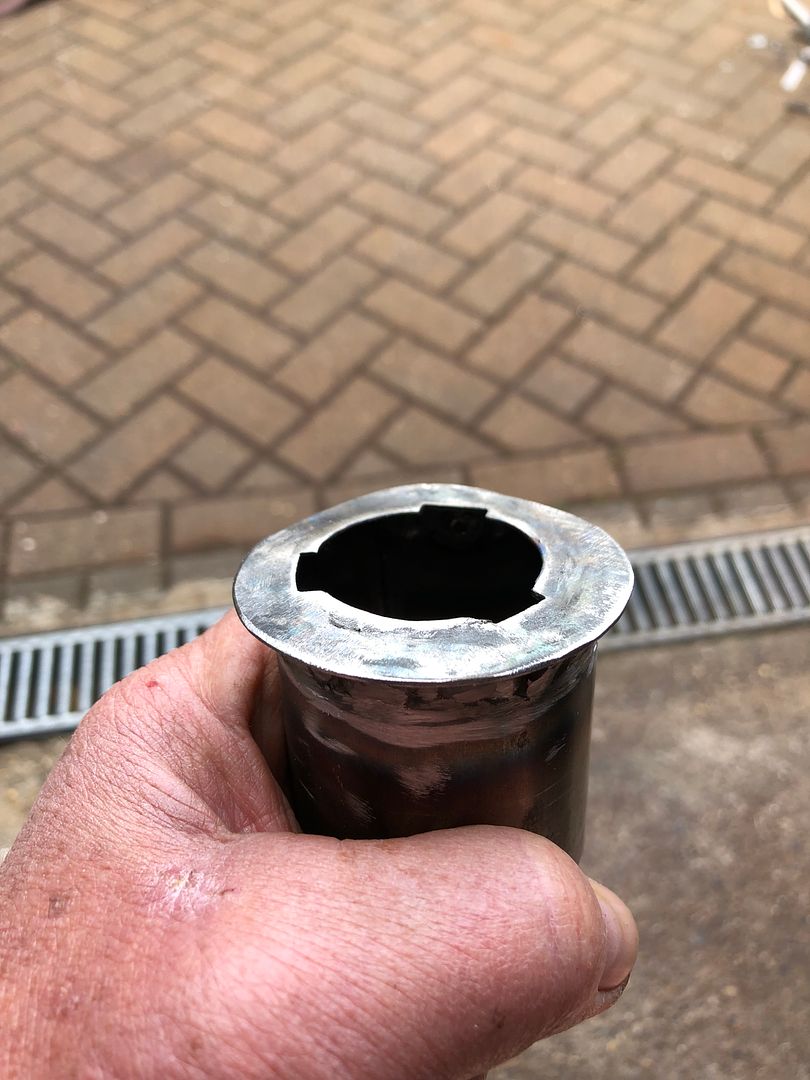 Hammerite tomorrow. 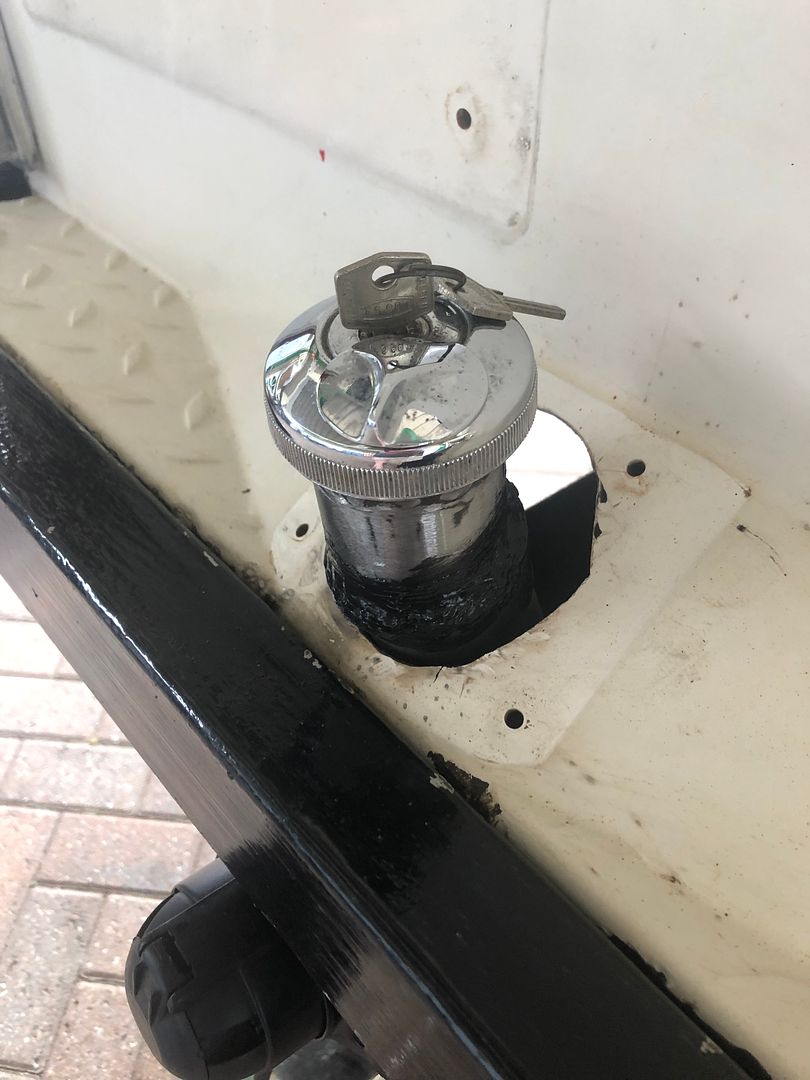 Following this, I made a major cock up. I used a flap disc to smooth down the mounting plates, then a bit of satin black to seal the open steel. So the next job was cutting the scrim foam to size, spraying the contact adhesive on both surfaces and joining them. Major mistake Once on top of each other, I walked over the back of the dash panel to ensure maximum adhesion. Mistake, mistake, mistake, and Nick will give me a bollocking, maybe. Amazingly, the pattern of the brick paving has gone through and is visible on the scrim foam. Tomorrow morning I will cut the excess off with a scalpel blade. Then apply a second coat to absorb the irregularities. 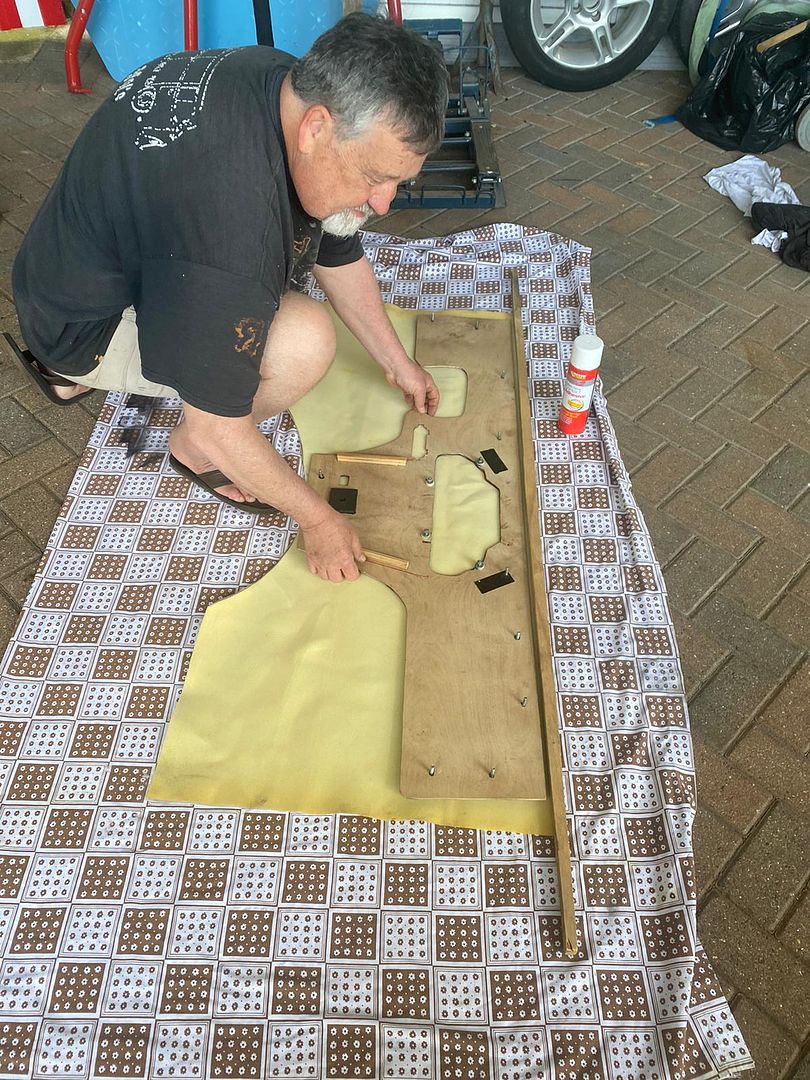 I also closed shop early and spent some time with Sally, she continues to put up with me playing in the garahe. So we went for a 3 mile walk over the marshes and took Bonnie along, she loves these walks. So many smells and things to see. Different from her previous life, caged up 24/7 in a block of apartments.  I keep repeating this, but it is true. Little jobs that keep stealing,time. But life is good.
__________________
MY BUILD LINK: http://67-72chevytrucks.com/vboard/s...585901]Redneck Express - 1966 C10 Short Fleetside MY USA ROADTRIPS http://forum.retro-rides.org/thread/...2018-humdinger IF YOU CAN'T FIX IT WITH A HAMMER, YOU'VE GOT AN ELECTRICAL PROBLEM MATE. |
|
|
|
|
04-18-2022, 01:50 AM
|
#6 |
|
Registered User
Join Date: Dec 2012
Location: Rochester, KENT
Posts: 10,514
|
Re: GRIZZs 79 - 2WD BLAZER Challenge over in London, England. ~Its not a Project
And this was how I solved this one for myself.
Could have made it at an angle, had it at an angle, but then minimal OCD kicked in and fitted it straight. Also tempted to change the colour to blue to make it contrast and look like a Record brand tool, which it is. The toolbox of course stays as part of the illusion. 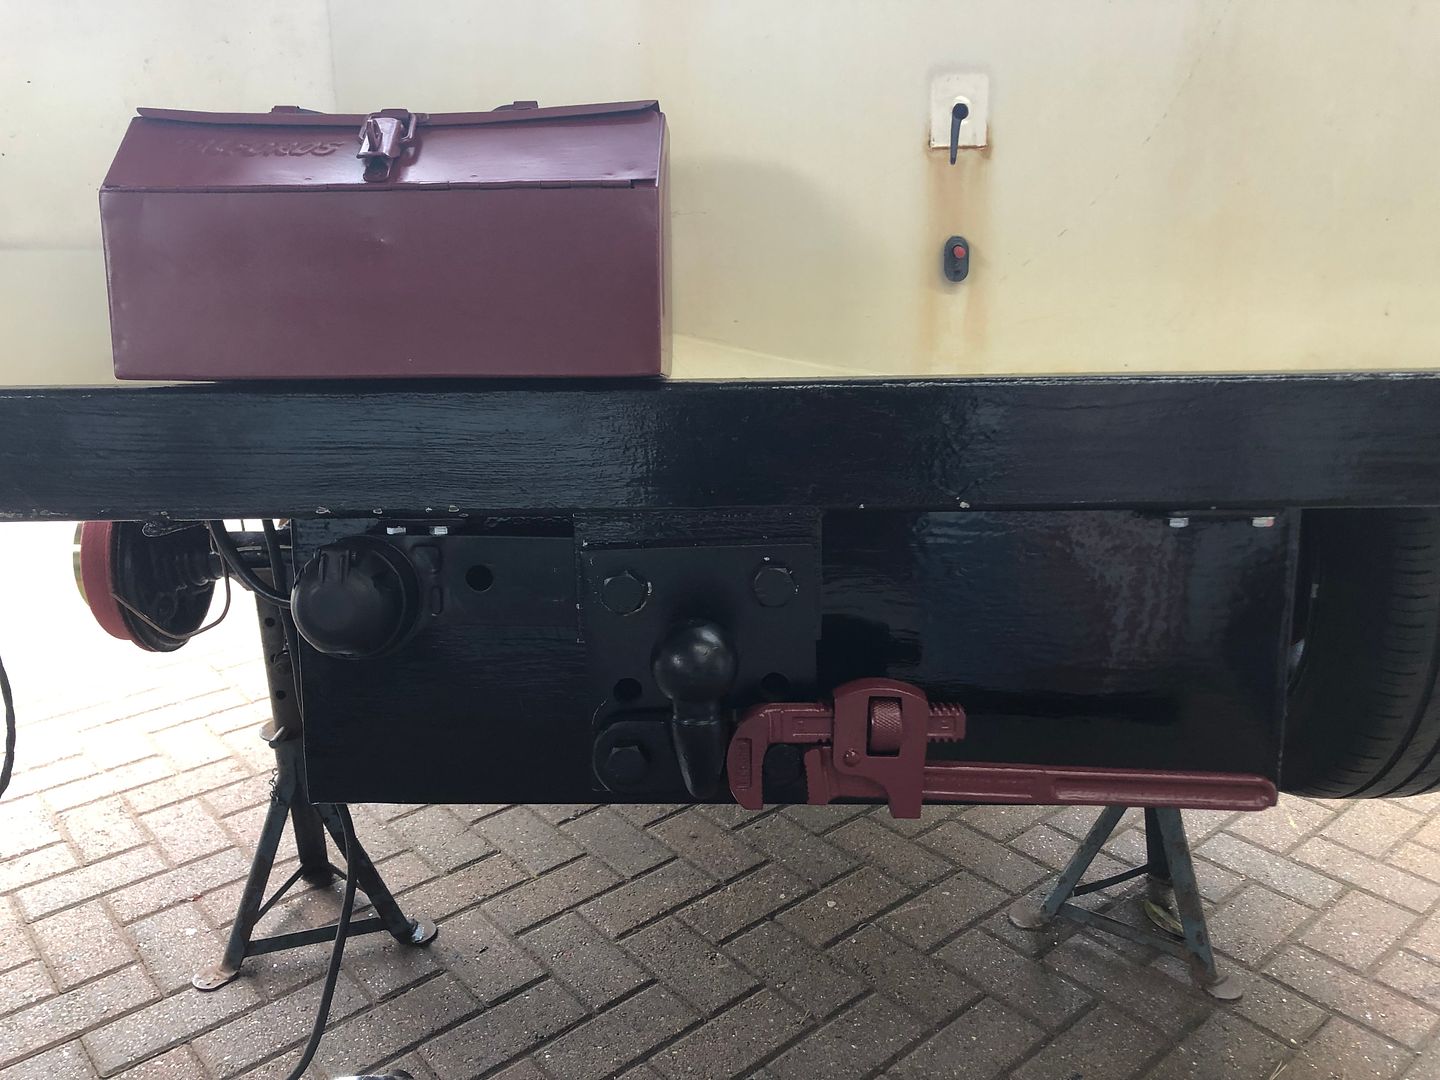 Waiting for the first horn beep and wild gesticulating.
__________________
MY BUILD LINK: http://67-72chevytrucks.com/vboard/s...585901]Redneck Express - 1966 C10 Short Fleetside MY USA ROADTRIPS http://forum.retro-rides.org/thread/...2018-humdinger IF YOU CAN'T FIX IT WITH A HAMMER, YOU'VE GOT AN ELECTRICAL PROBLEM MATE. |
|
|
|
|
04-21-2022, 03:36 AM
|
#7 |
|
Registered User
Join Date: Dec 2012
Location: Rochester, KENT
Posts: 10,514
|
Re: GRIZZs 79 - 2WD BLAZER Challenge over in London, England. ~Its not a Project
I realised that on RetroRides the post count was going silly.
And looked at it over 24 hours. NUTS. 24 HOURS Who is looking in on this thread? Almost 1400 views in 24 hours. Well, 1385 in the last 24 hrs. 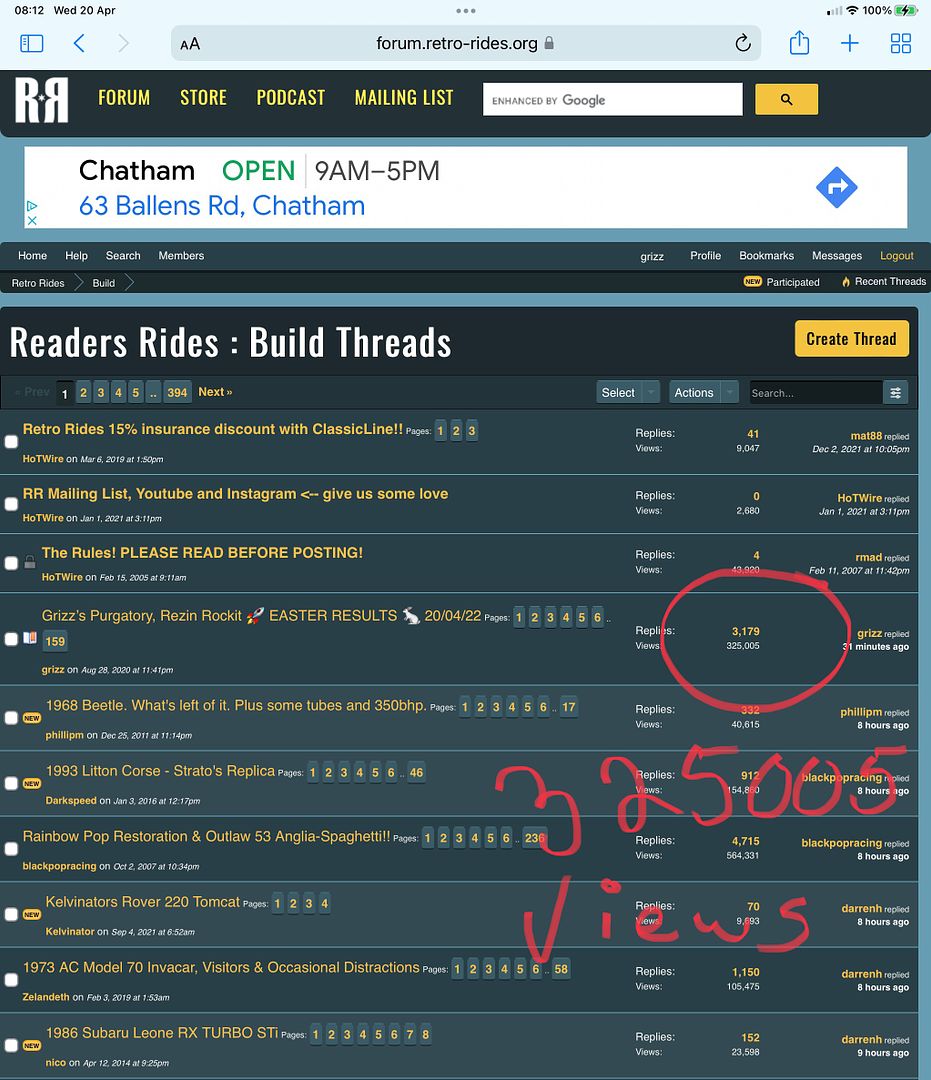 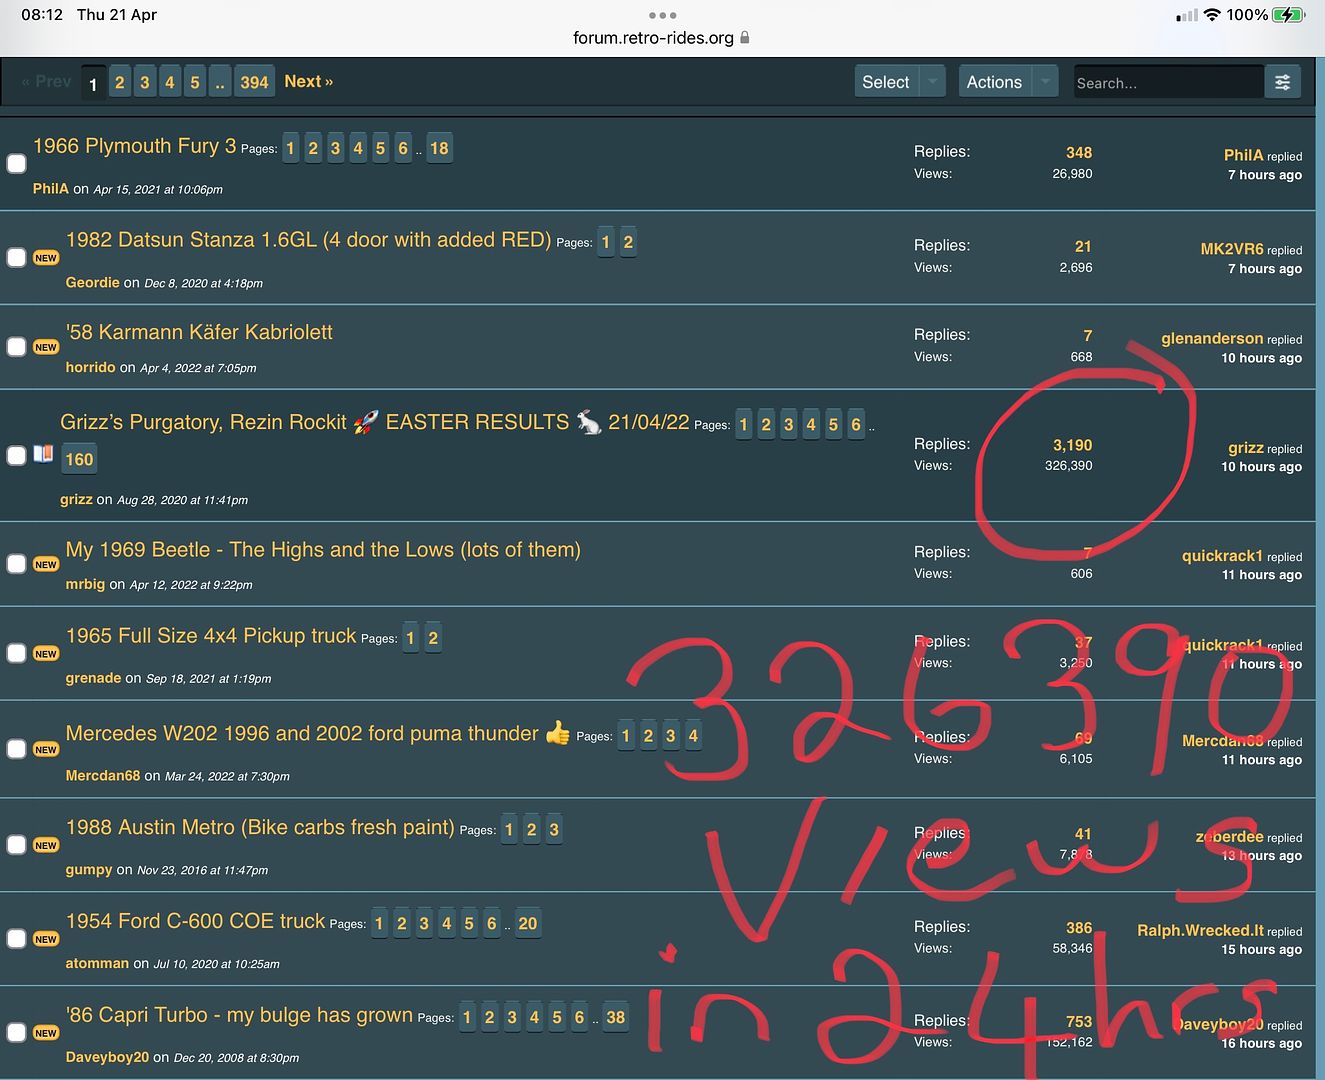 I am amazed and guess there are a certain amount of lurkers out there clicking in and out and never commenting. Thank you all who take the time to post comments and advice. Plus pop in for a cuppa and cookies.
__________________
MY BUILD LINK: http://67-72chevytrucks.com/vboard/s...585901]Redneck Express - 1966 C10 Short Fleetside MY USA ROADTRIPS http://forum.retro-rides.org/thread/...2018-humdinger IF YOU CAN'T FIX IT WITH A HAMMER, YOU'VE GOT AN ELECTRICAL PROBLEM MATE. |
|
|
|
|
04-23-2022, 04:23 PM
|
#8 |
|
Registered User
Join Date: Dec 2012
Location: Rochester, KENT
Posts: 10,514
|
Re: GRIZZs 79 - 2WD BLAZER Challenge over in London, England. ~Its not a Project
Small jobs.
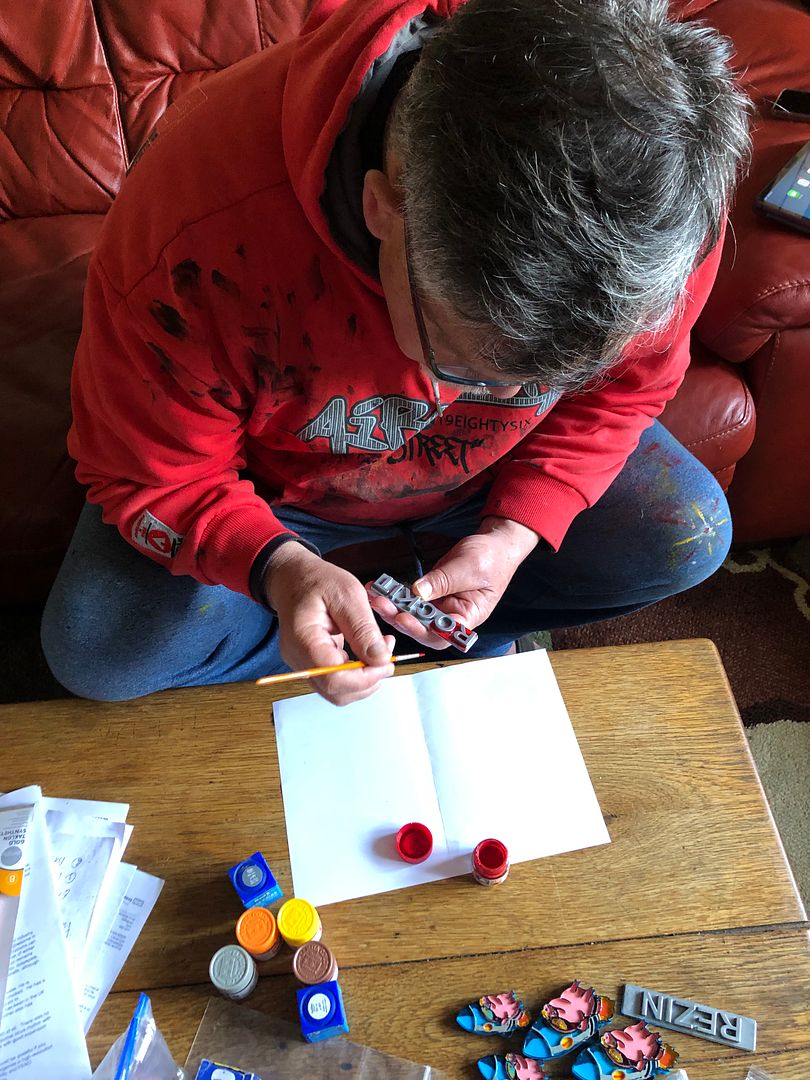    And then also painted the three new pigs. 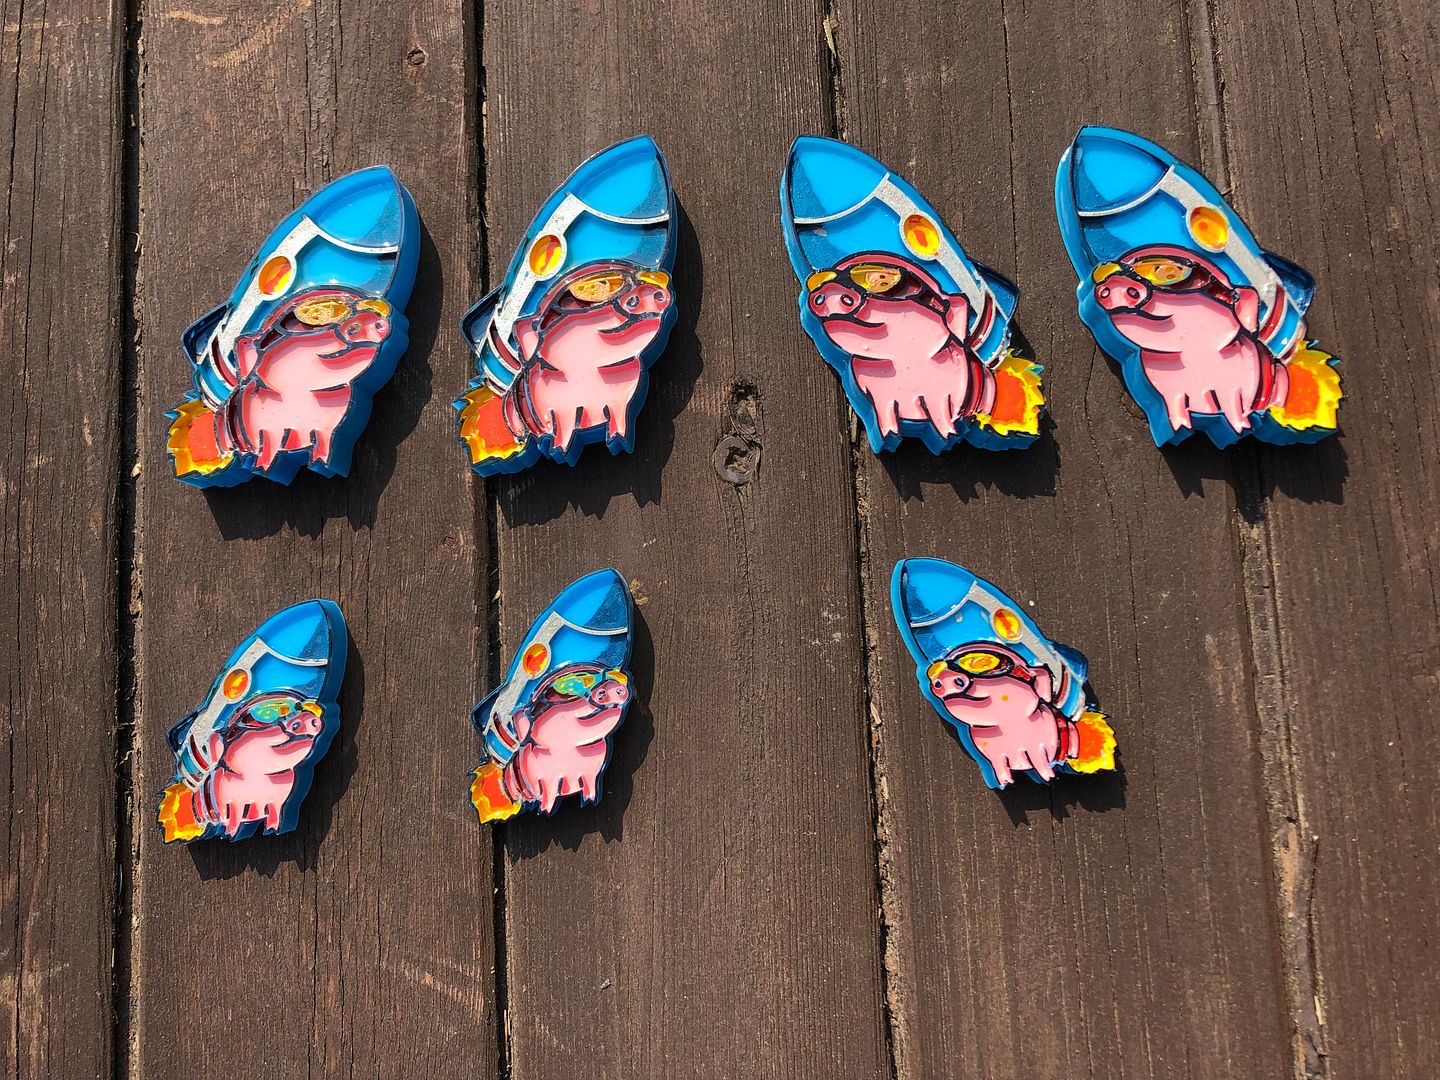 While @nickwheeler crawled around, I made a splash apron for the filler neck. 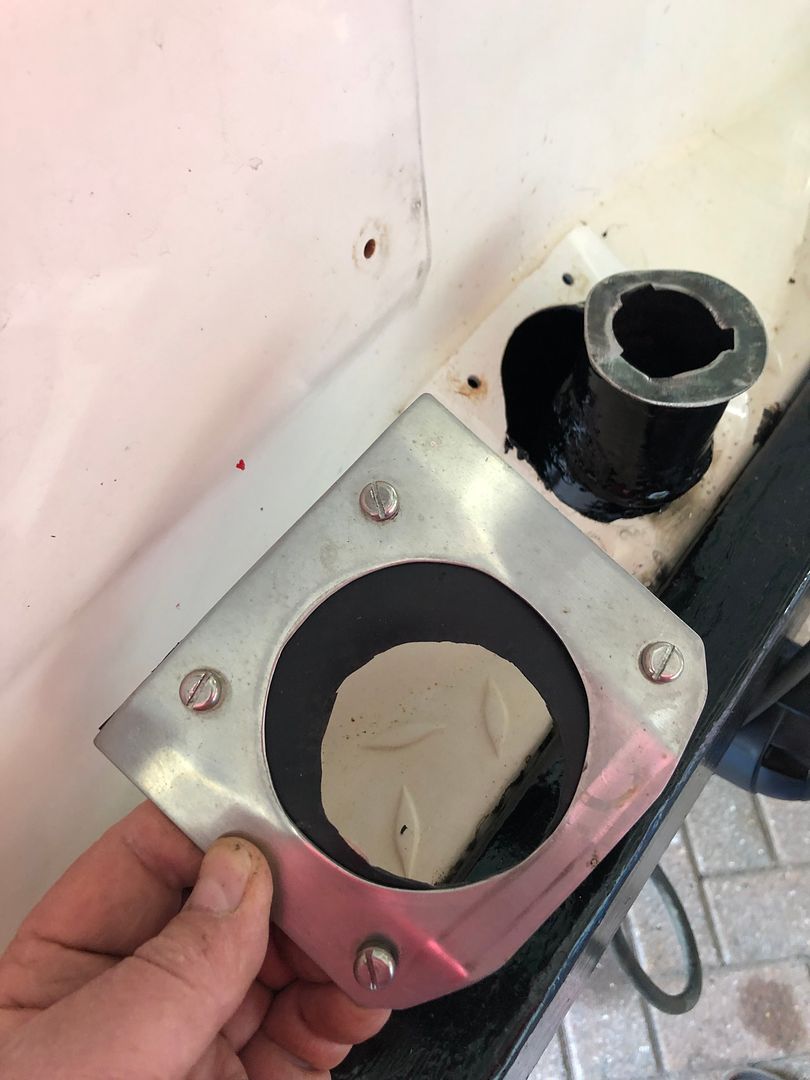 Followed by a tacked in brace to keep the toolbox in place. 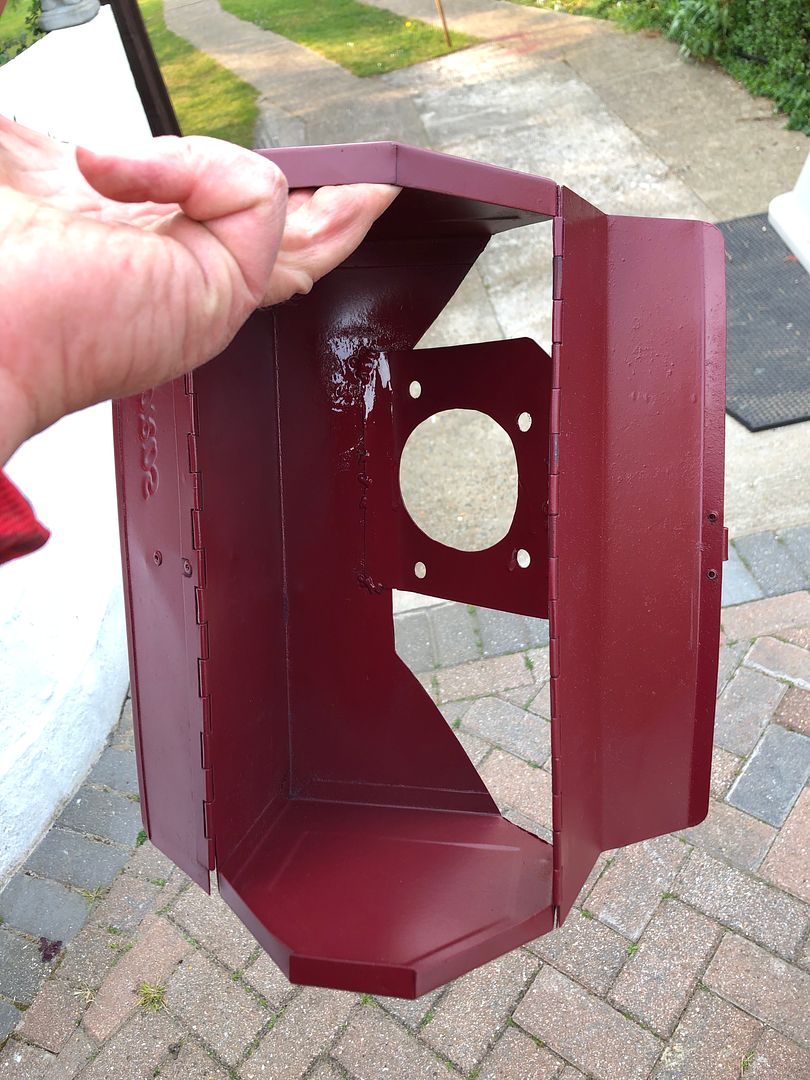 What it will look like. Later. 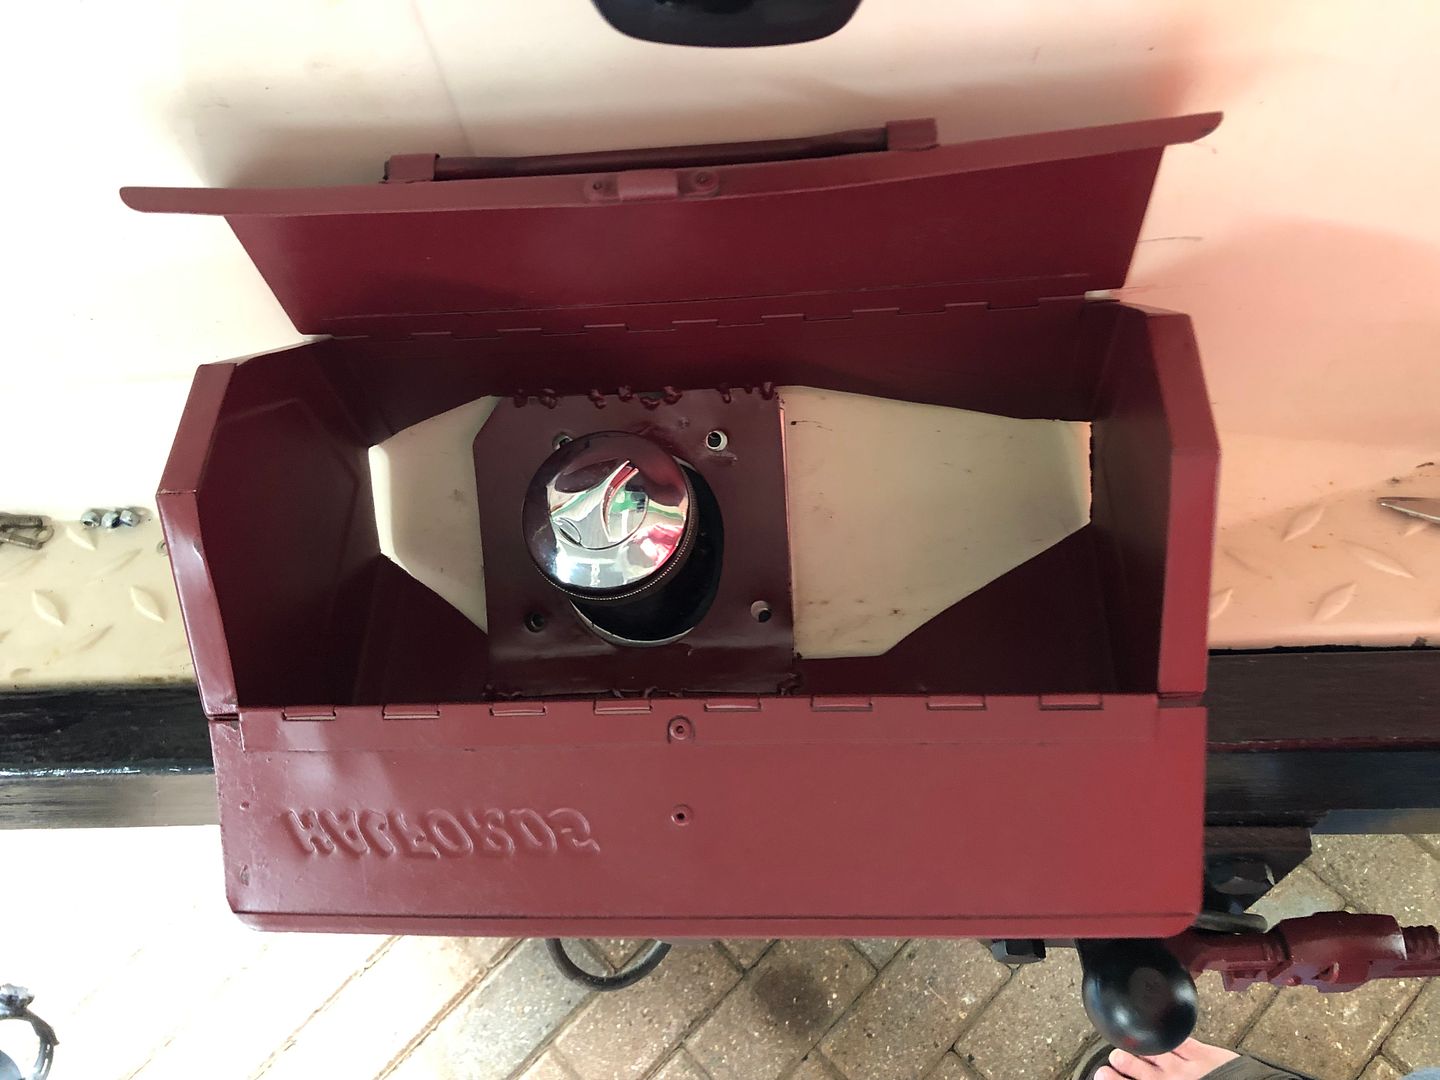 And the highlight of my day. No words needed. 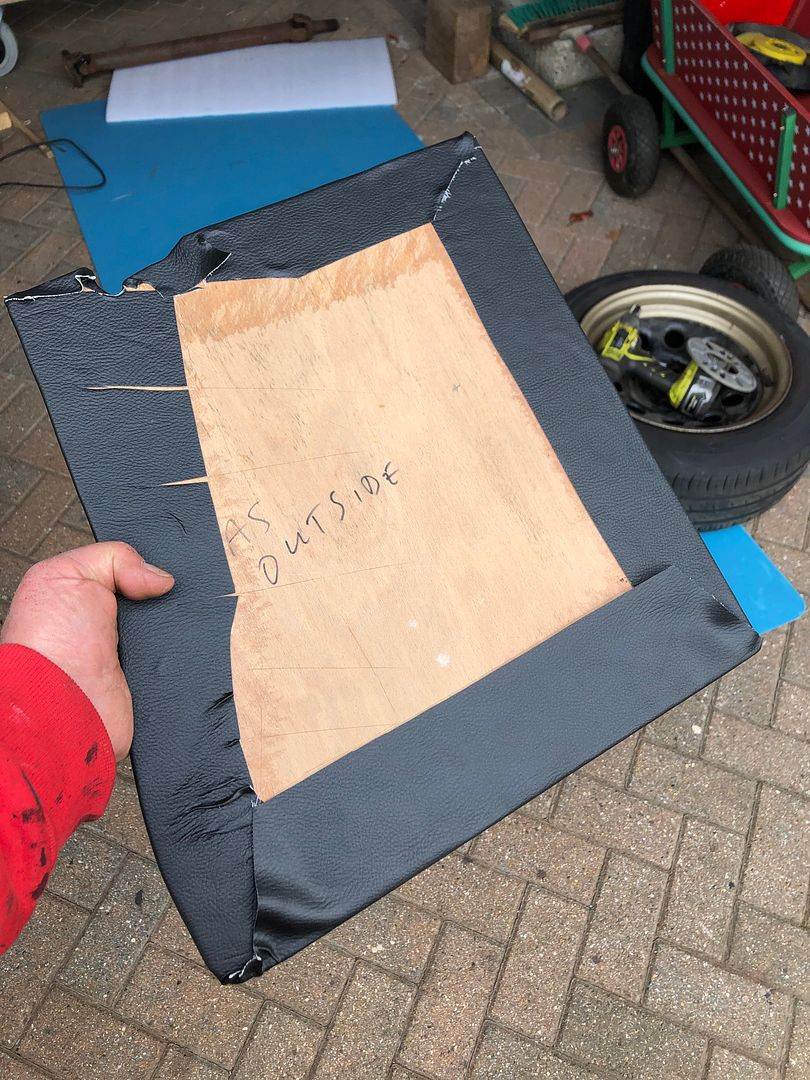 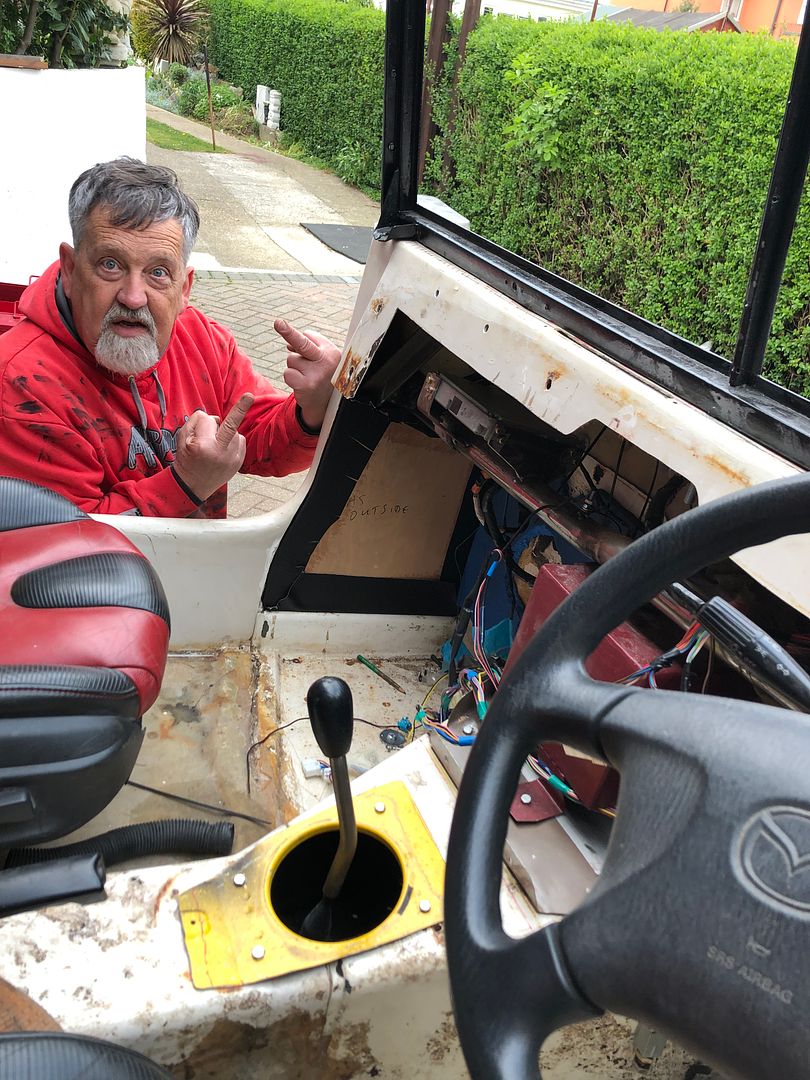 Gutted and super angry with allowing myself to get distracted like this. The instructions were so clearly written on both sides. I guess happens to some of us. I did laugh and laugh. Tired tonight.
__________________
MY BUILD LINK: http://67-72chevytrucks.com/vboard/s...585901]Redneck Express - 1966 C10 Short Fleetside MY USA ROADTRIPS http://forum.retro-rides.org/thread/...2018-humdinger IF YOU CAN'T FIX IT WITH A HAMMER, YOU'VE GOT AN ELECTRICAL PROBLEM MATE. |
|
|
|
|
04-24-2022, 04:23 AM
|
#9 |
|
Registered User
Join Date: Dec 2012
Location: Rochester, KENT
Posts: 10,514
|
Re: GRIZZs 79 - 2WD BLAZER Challenge over in London, England. ~Its not a Project
So yesterday the other TWO BIG BOXES TICKED.
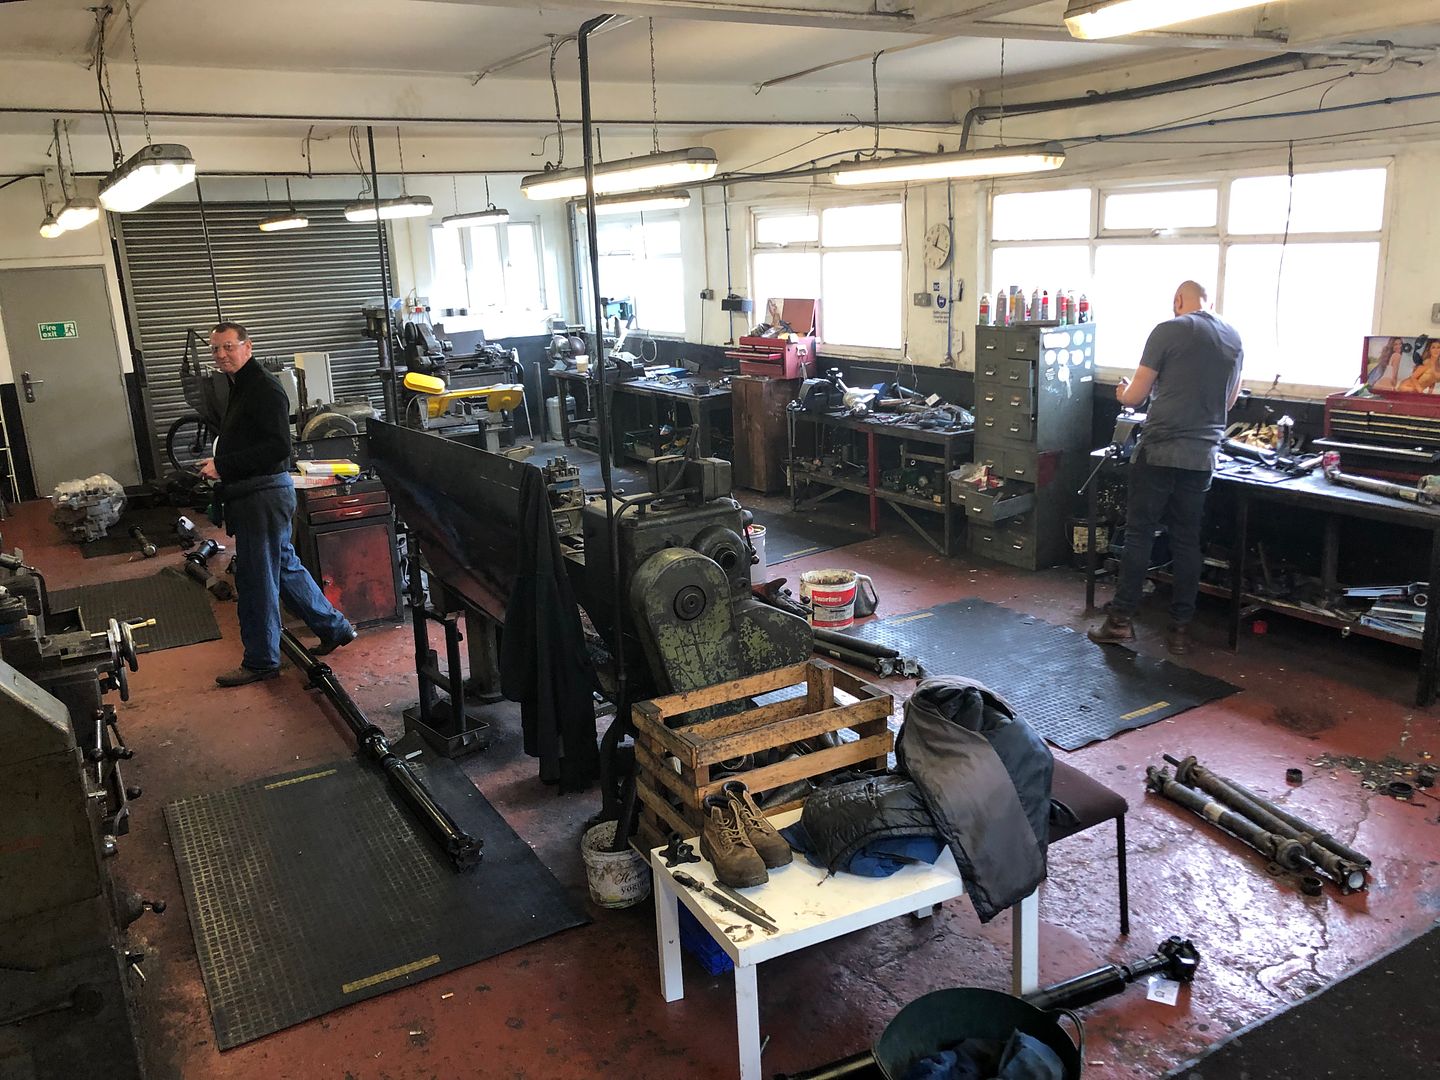
One was the new custom built Propshaft, bolted in after I cleaned the threads on the diff flange. Simple cheque book job, but pivotal. Really does make it look more complete under there. 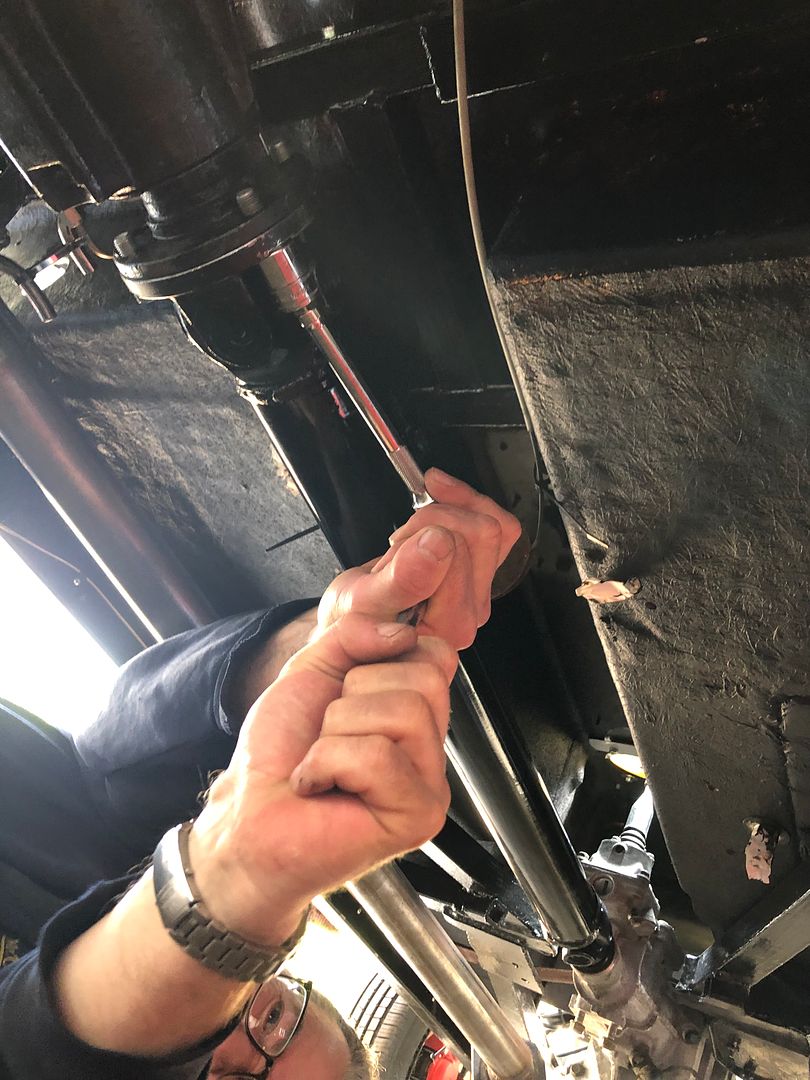 Second job was to complete (bar two small chassis hanger bracket welds I have to go do in a bit) the exhaust build, using the shorter new silencer I bought last week. @nickwheeler and I have had very few differences of opinion on this build, which is probably why we are both still enjoying it, and each others company HOWEVER Nick is a more oldskool rodder at heart, and prefers things simple, monochrome, hidden and functional. Me on the other hand . Saddle up that unicorn 🦄 So I like a chrome tipped exhaust system, slightly noisy, and things like the toolbox filler and a spanner hanging from the towball. Get the picture? So this is Nicks Nirvana and my chalk on a blackboard look. 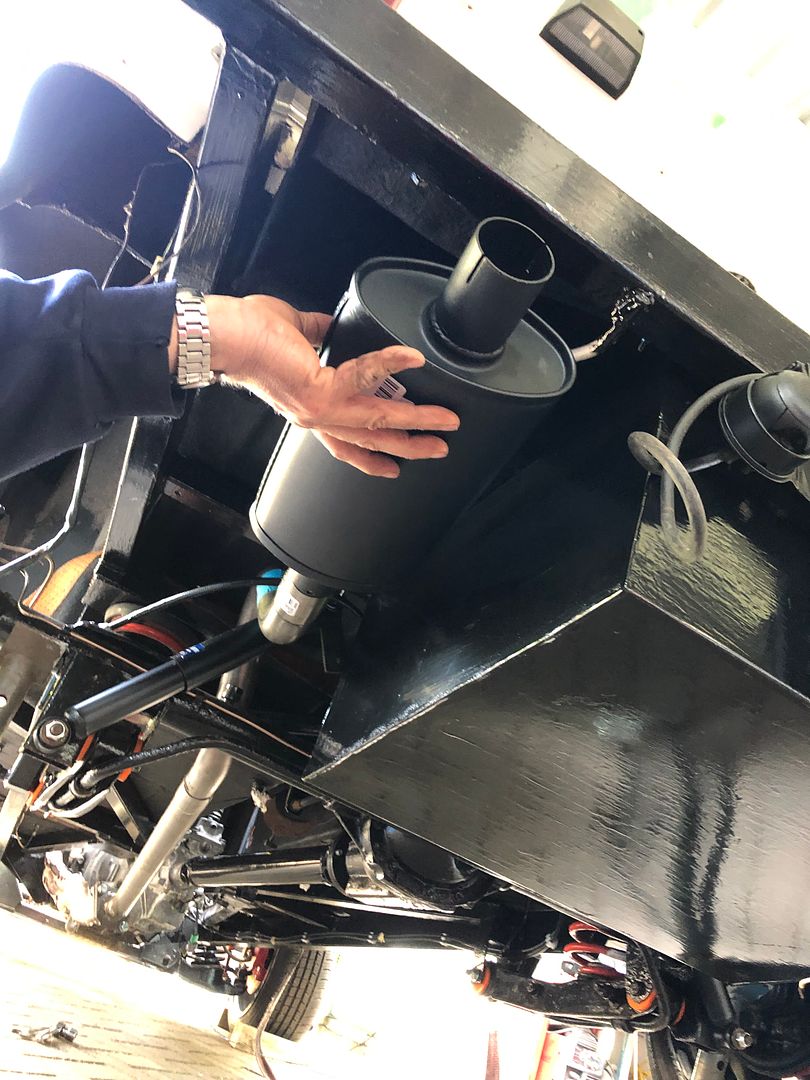 Tucked away, out of sight and only a curved downpipe would suit Nick. I wanted a chrome tailpiece to end right in line with the rear bumper. So in order to achieve both our goals you see, compromise. The over axle/shock pipe needed to be raised by 70mm and tucked back toward the axle by 100mm to get the tip in under the bumper. So measuring, cutting, and welding the exit at a different height and plane needed to be done. And if you recall my screw up with the kick panel vinyl yesterday, Nick managed to do it as well .. 25mm on the wrong side, only thing is, his mistake was on the safe side, so he could cut another 25mm off to get it to the right point for welding up. And he got it spot on, after the powerfile was employed, you can hardly see it under there unless it was pointed out. Bloody brilliant. 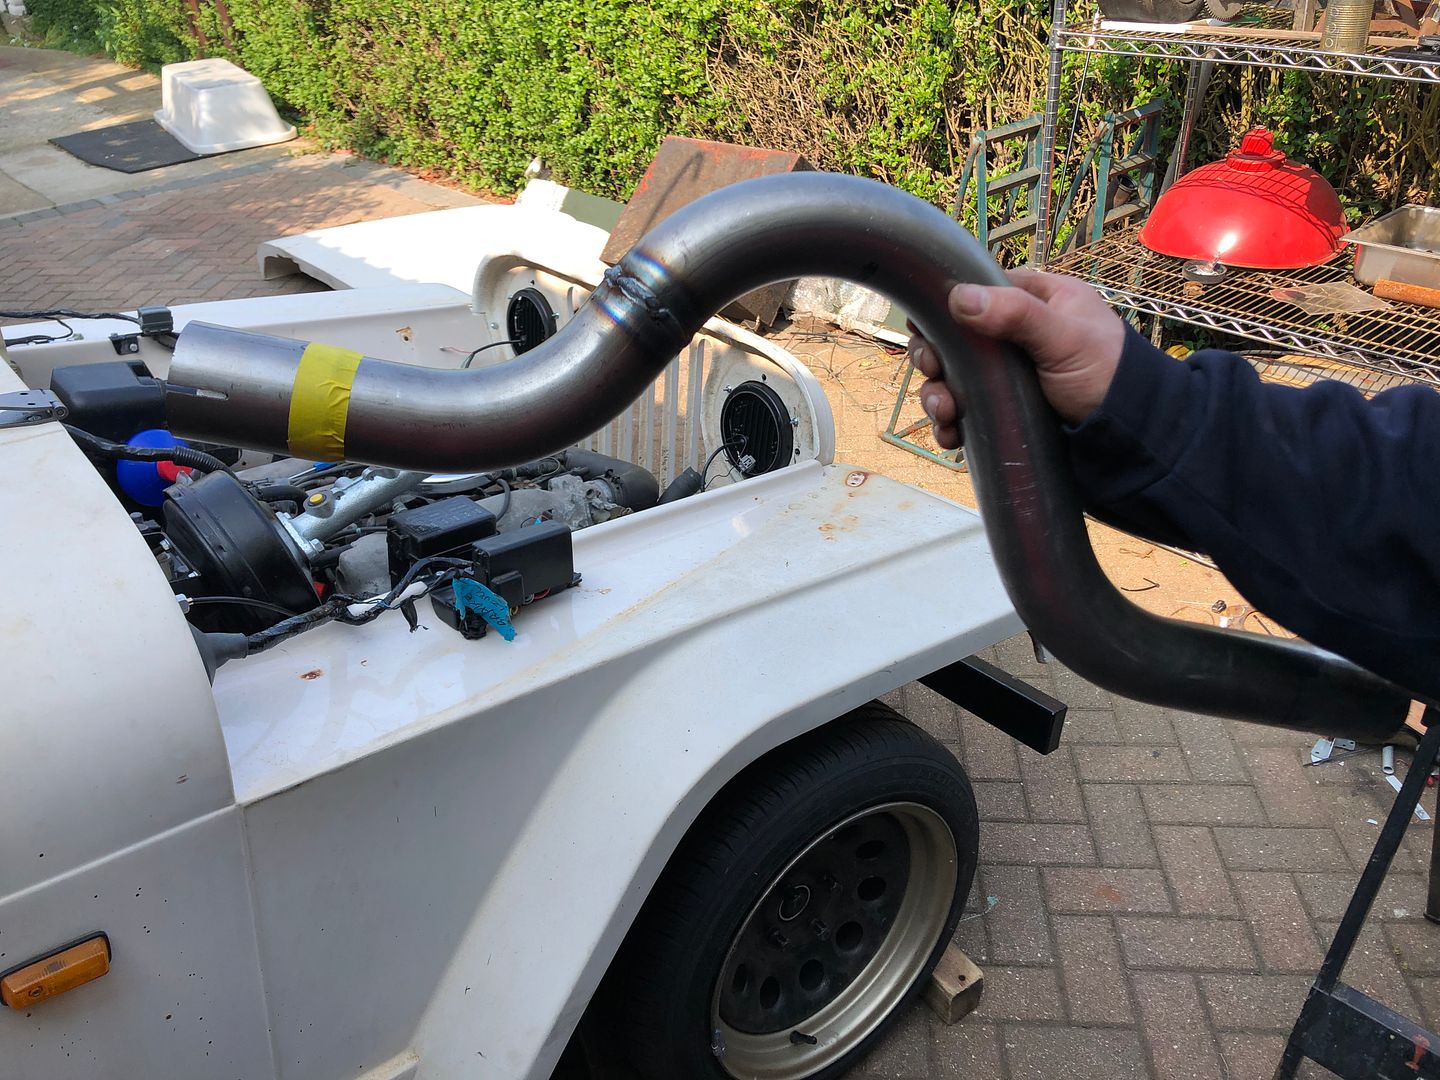 Next job was to create a a double ended hanger bracket to secure the silencer to the chassis/rear bumper. Some 12mm rod, BFH, a pole and the grinder with some welds later  Tacked in place because the welder started to play up, not giving decent penetration. I will weld it in as soon as I have done this write up, everything takes time. Also in the shortening and raising was actually cutting off 60mm of the bent pipe, where it is flared, then welding a slip in section from a Metro Cat-back pipe that then sleeved into the silencer. A big win for fitting and reducing overall length.  Hangers test fitted.  And the side view with the rear wheel removed shows how well this all came out. Once on the ground with the wheel fitted it was even more stealthy and tidy.  After refitting the wheel, getting it off the axle stands and rolling it out, Nick was very pleased with the stealth look. I was looking for a chrome 2 tip to add to the rear you know, a bit of contrast 😉 It may just have to stay like this, however, a BLACK rolled tip would be on my shopping list next to tidy the rear tip slightly. Nick won this one. Chuffed to bits. 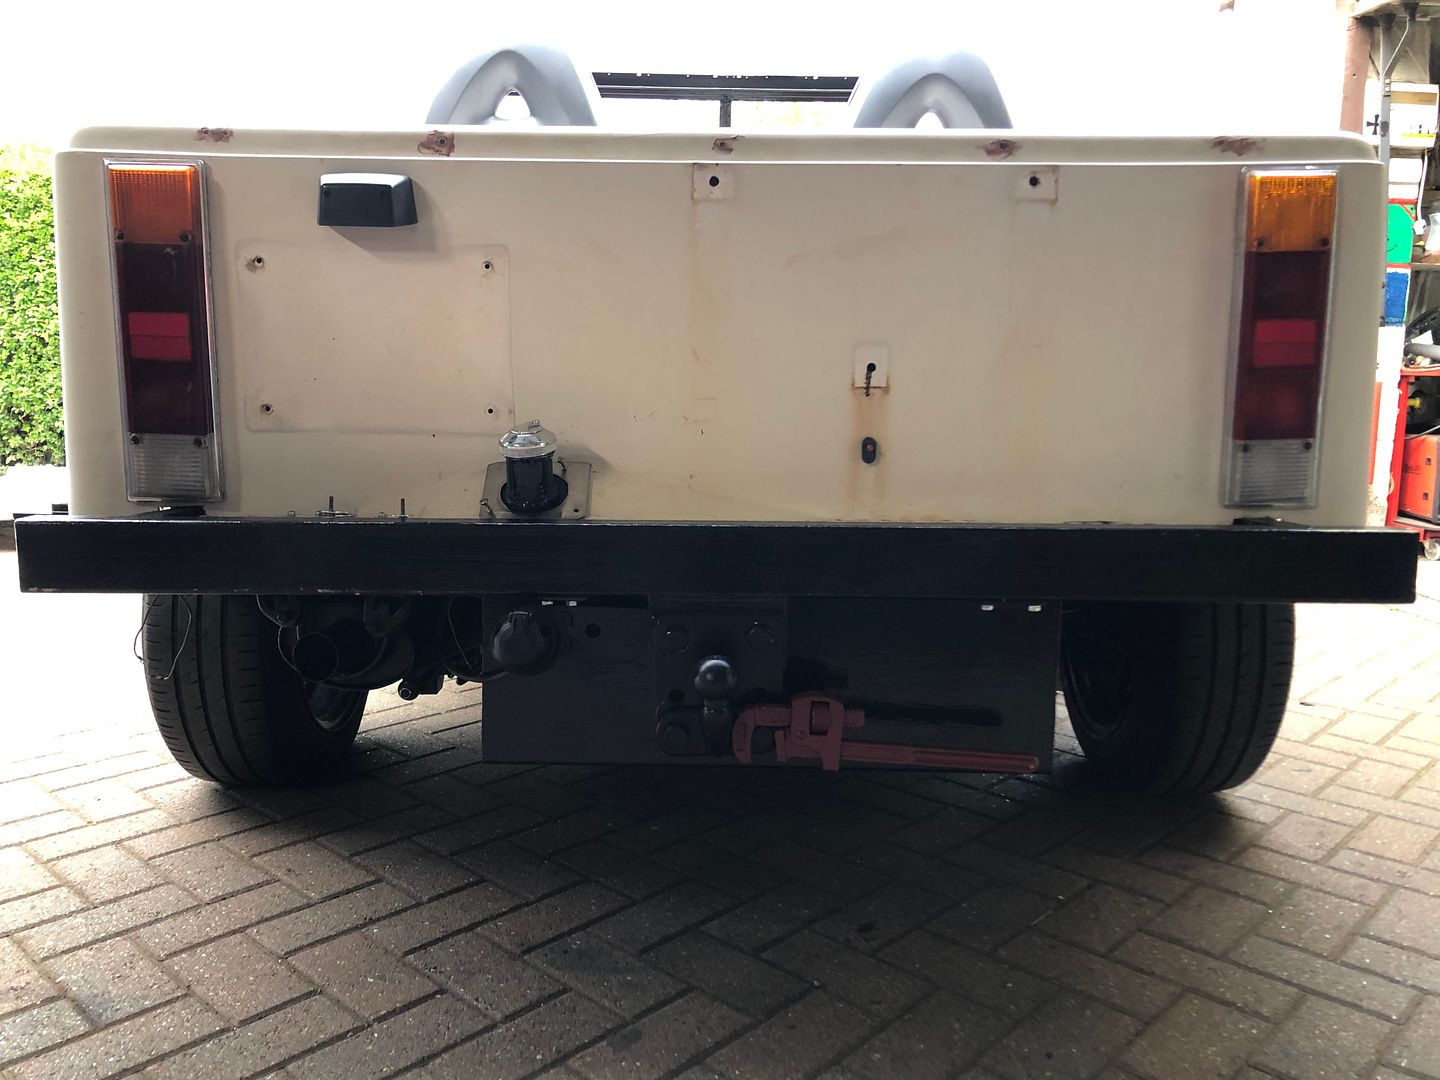 So tools packed away by 7.00pm and pulled the car back under cover, using the gearbox to stop it. For the first time since this build started it was not held in place by a block of wood. John the lodger did the honours. 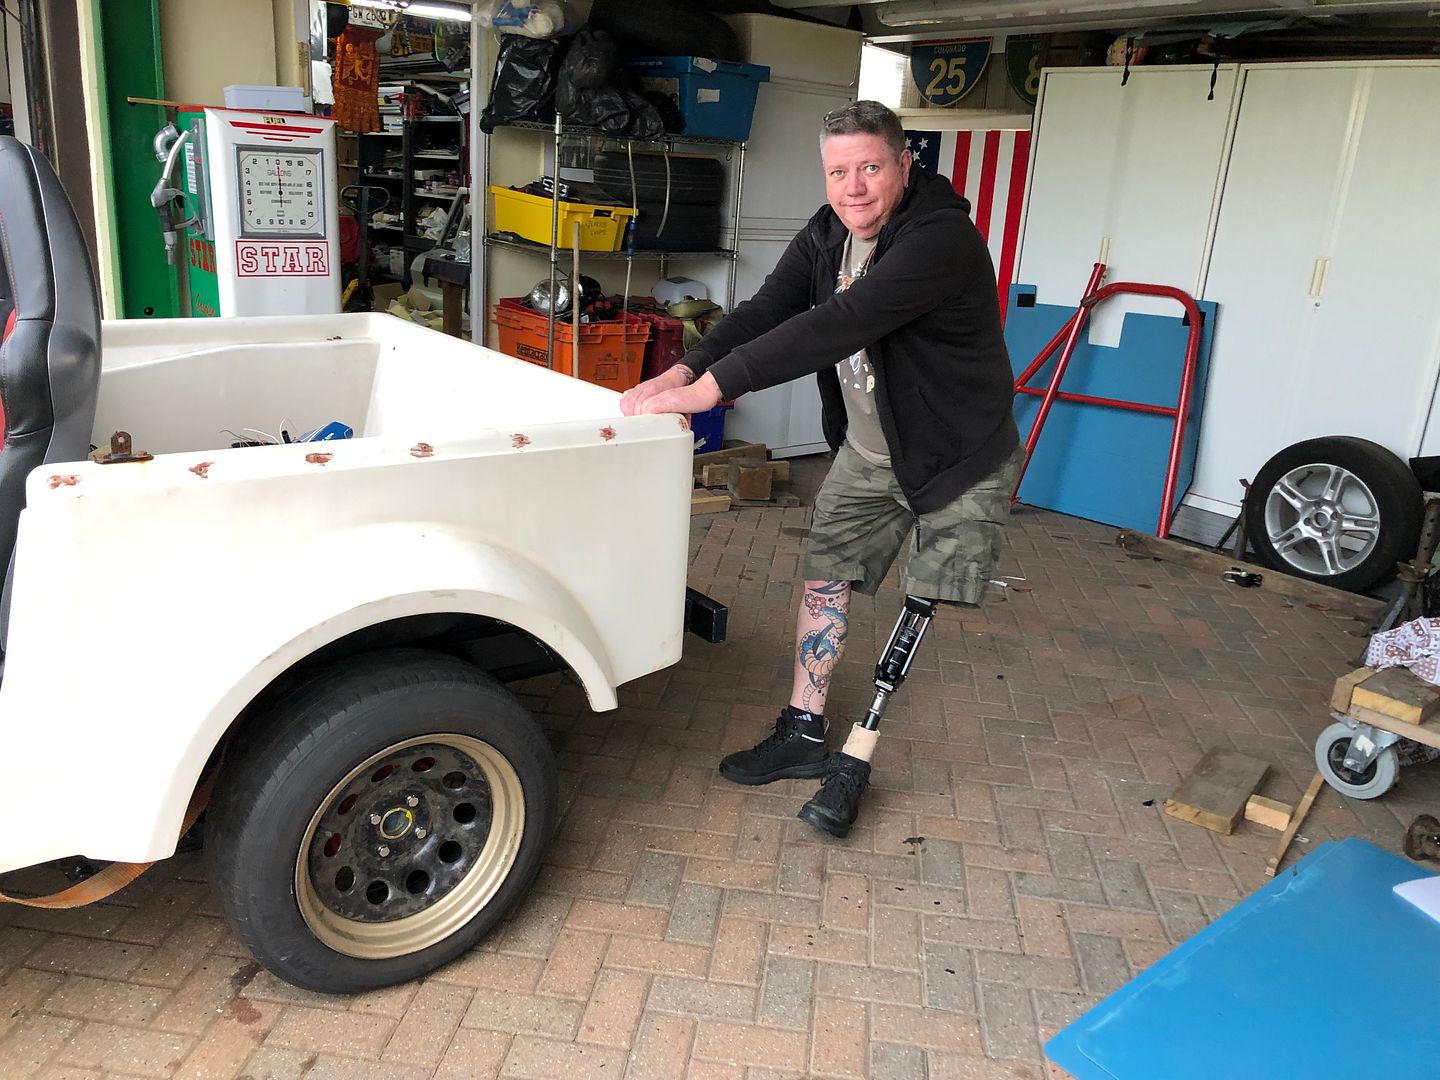 Right, time to get started out there. Handbrake, Electrics, tow hitch wiring on the menu today. Not quite ready to start up. Oh, and clutch and brakes need more work.
__________________
MY BUILD LINK: http://67-72chevytrucks.com/vboard/s...585901]Redneck Express - 1966 C10 Short Fleetside MY USA ROADTRIPS http://forum.retro-rides.org/thread/...2018-humdinger IF YOU CAN'T FIX IT WITH A HAMMER, YOU'VE GOT AN ELECTRICAL PROBLEM MATE. |
|
|
|
|
04-27-2022, 03:57 AM
|
#10 |
|
Registered User
Join Date: Dec 2012
Location: Rochester, KENT
Posts: 10,514
|
Re: GRIZZs 79 - 2WD BLAZER Challenge over in London, England. ~Its not a Project
Yesterday evening, Mickey came knocking.
He had a parcel, and a silly grin. The man is nosey. Once I got the parcel, I started to chuckle and laugh. I had a few people spring to mind who could have sent it, appropriately decorated with an apology. @pedalcarjoe @sparkplug Fil who fetched the car @peteh1969 and even @mercdan68 who drives past my home every day, but may have sent a parcel. The guy I did not at all have spring to mind first was @glenanderson 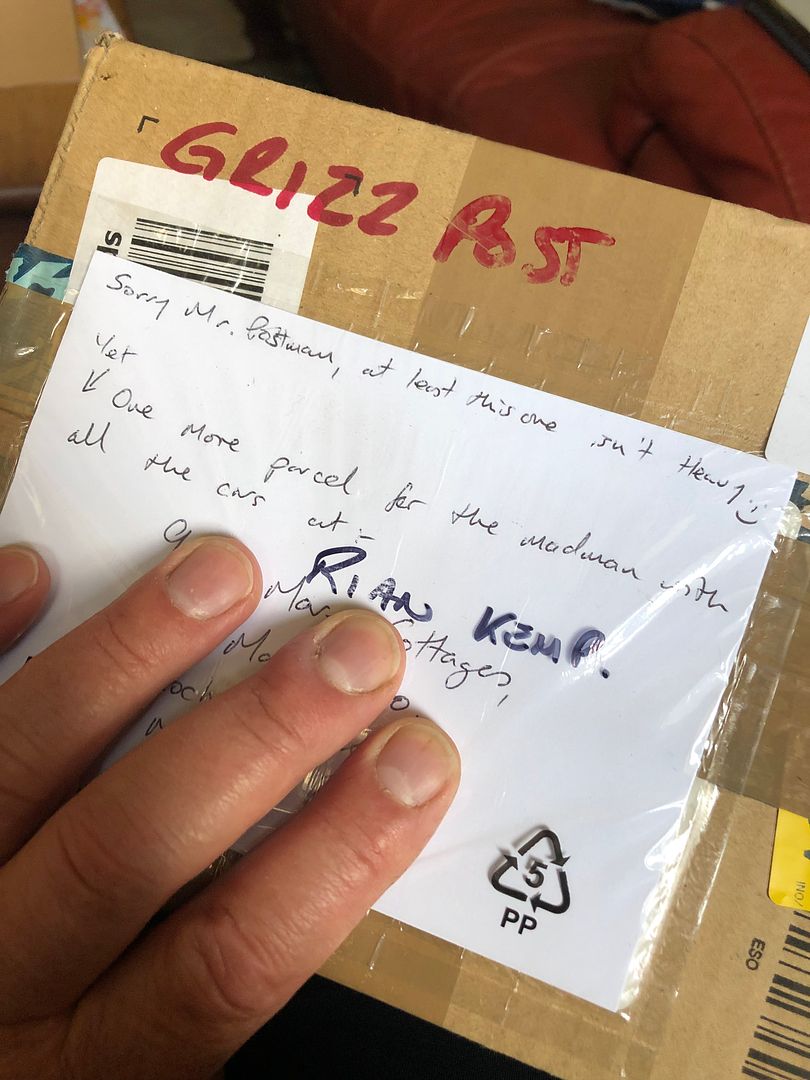 So when I opened the box, out popped an unobtainable brake reservoir for the master cylinder previously fitted. Thanks Glen ! Massive help this is, again because I could not order one anywhere. 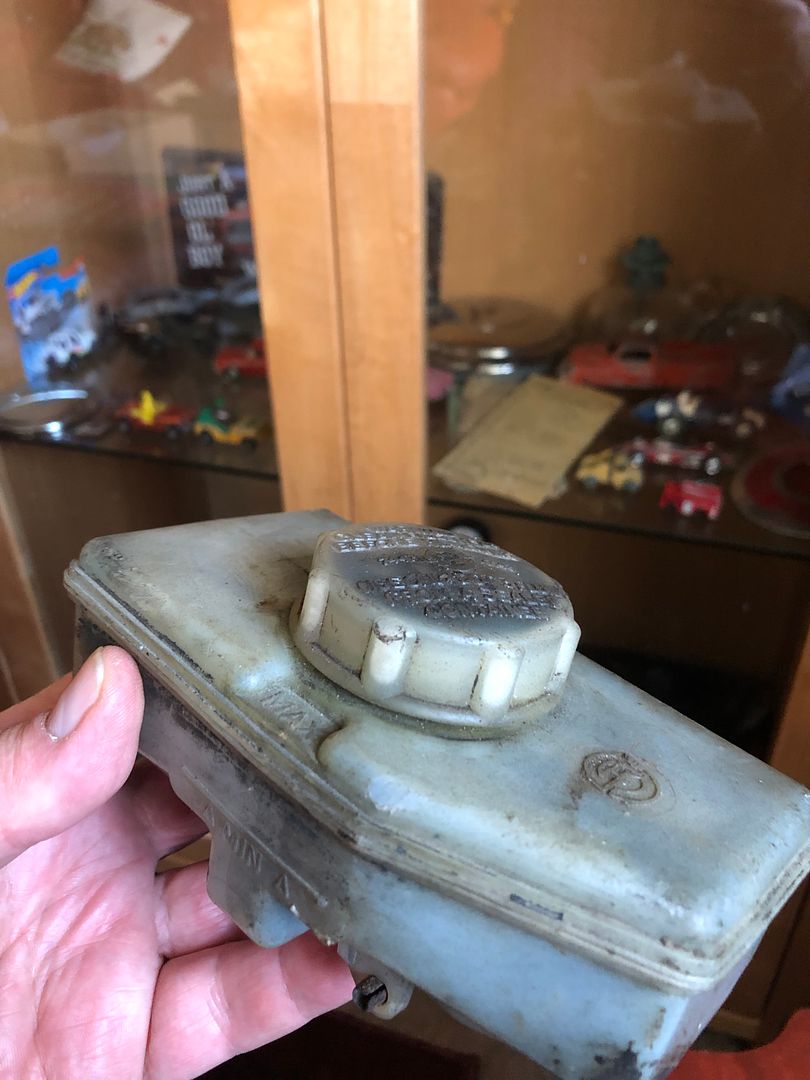 I will clean it up some time after work and have it ready to install by the weekend along with the brake pipes for the front end. Progress is progress, however little it is.
__________________
MY BUILD LINK: http://67-72chevytrucks.com/vboard/s...585901]Redneck Express - 1966 C10 Short Fleetside MY USA ROADTRIPS http://forum.retro-rides.org/thread/...2018-humdinger IF YOU CAN'T FIX IT WITH A HAMMER, YOU'VE GOT AN ELECTRICAL PROBLEM MATE. |
|
|
|
|
04-27-2022, 03:28 PM
|
#11 |
|
Registered User
Join Date: Dec 2012
Location: Rochester, KENT
Posts: 10,514
|
Re: GRIZZs 79 - 2WD BLAZER Challenge over in London, England. ~Its not a Project
This week I capitulated and bought George some dry food.
He usually gets ham or chicken when he visits in the morning, and Dreamies when he demands it. There is water in the water feature and the bird bath has fresh water regularly, and he drinks from there. So today was a work from home day, and he got a handful of the dry food early. Later I saw him from my office, drinking from the lodgers bathroom toilet. Guess it passed his muster. 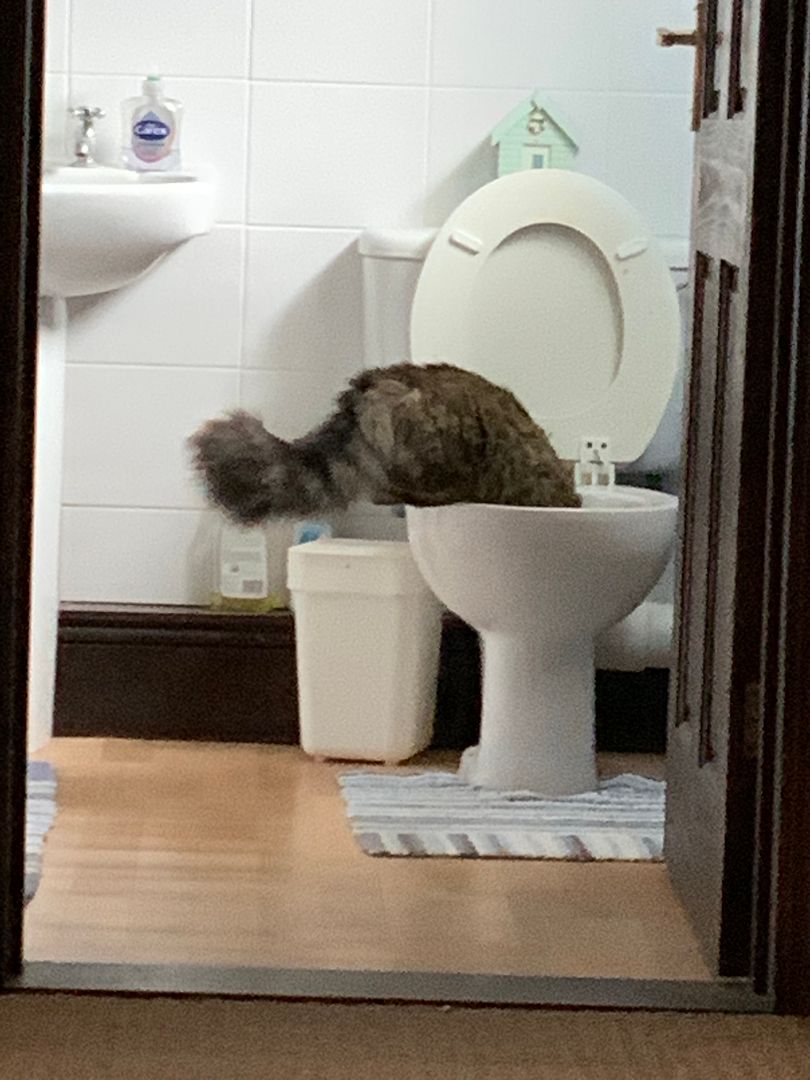 I certainly would not. More randomness, this time the scrapyard had these broken toys (perfect garage ornaments) for £5.00 each. I have not bought them.  Sally and I go walk Bonnie the dog randomly on the farm through fields etc. I was previously asked about where I live, Between the Thames and Medway rivers and English Channel. 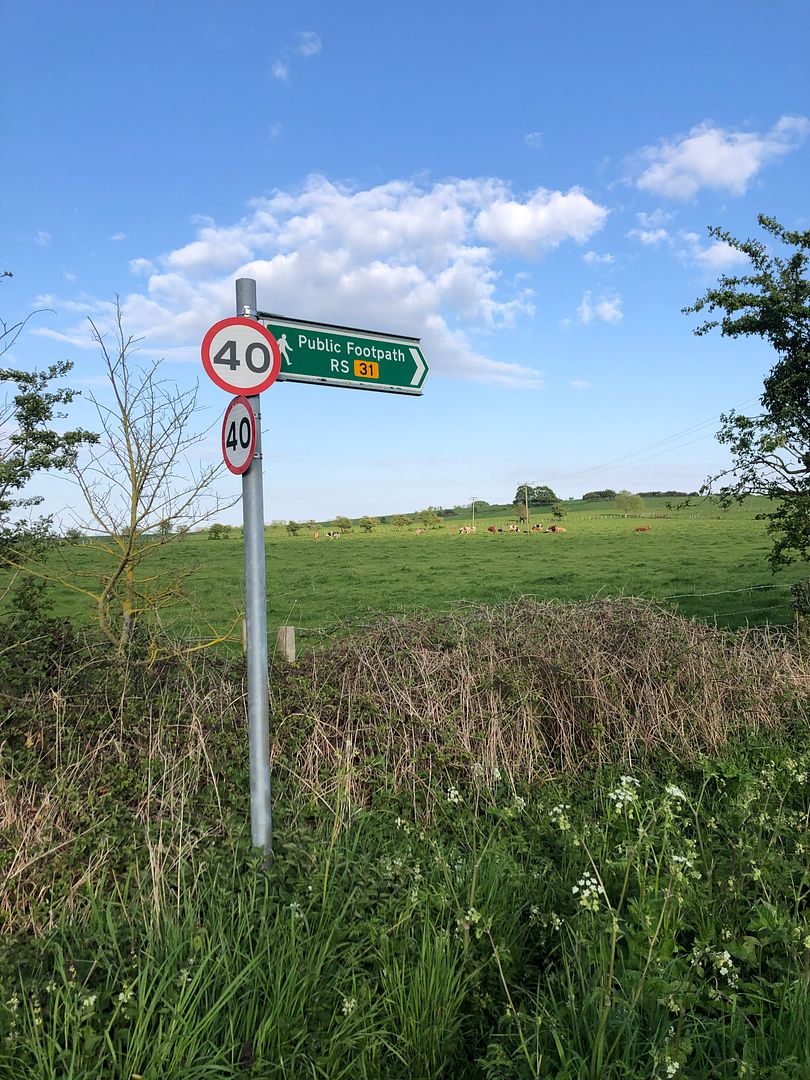   
__________________
MY BUILD LINK: http://67-72chevytrucks.com/vboard/s...585901]Redneck Express - 1966 C10 Short Fleetside MY USA ROADTRIPS http://forum.retro-rides.org/thread/...2018-humdinger IF YOU CAN'T FIX IT WITH A HAMMER, YOU'VE GOT AN ELECTRICAL PROBLEM MATE. Last edited by Grizz1963; 04-27-2022 at 03:51 PM. |
|
|
|
|
04-28-2022, 03:53 AM
|
#12 |
|
Registered User
Join Date: Dec 2012
Location: Rochester, KENT
Posts: 10,514
|
Re: GRIZZs 79 - 2WD BLAZER Challenge over in London, England. ~Its not a Project
So the next little win was cleaning up the brake reservoir.
Anyone look inside one before? It is a serious labyrinth of inaccessible walls. So I thought I would try various different things to clean it the best I can. Petrol and brush, wash and rinse failed. Jif/Handy Andy/amonia based kitchen cleaner failed. Bleach failed. Hot water and bleach failed. Then popped to Mickey next door and grabbed some sharp sand (Google it) and added it, along with Fairy Liquid dish washing liquid and some water to create a thick gloopy paste and shook it around for a bit. After this a thourough multiple rinse gave me the result I had hoped for. Almost looks like new.  Should blend in nicely with the rest of the clean and new parts. .
__________________
MY BUILD LINK: http://67-72chevytrucks.com/vboard/s...585901]Redneck Express - 1966 C10 Short Fleetside MY USA ROADTRIPS http://forum.retro-rides.org/thread/...2018-humdinger IF YOU CAN'T FIX IT WITH A HAMMER, YOU'VE GOT AN ELECTRICAL PROBLEM MATE. |
|
|
|
|
04-29-2022, 05:11 PM
|
#13 |
|
Registered User
Join Date: Dec 2012
Location: Rochester, KENT
Posts: 10,514
|
Re: GRIZZs 79 - 2WD BLAZER Challenge over in London, England. ~Its not a Project
Handbrake seized up.
Take 2 Using vice grips on top, undo mounting bolts, clevis etc. Remove. 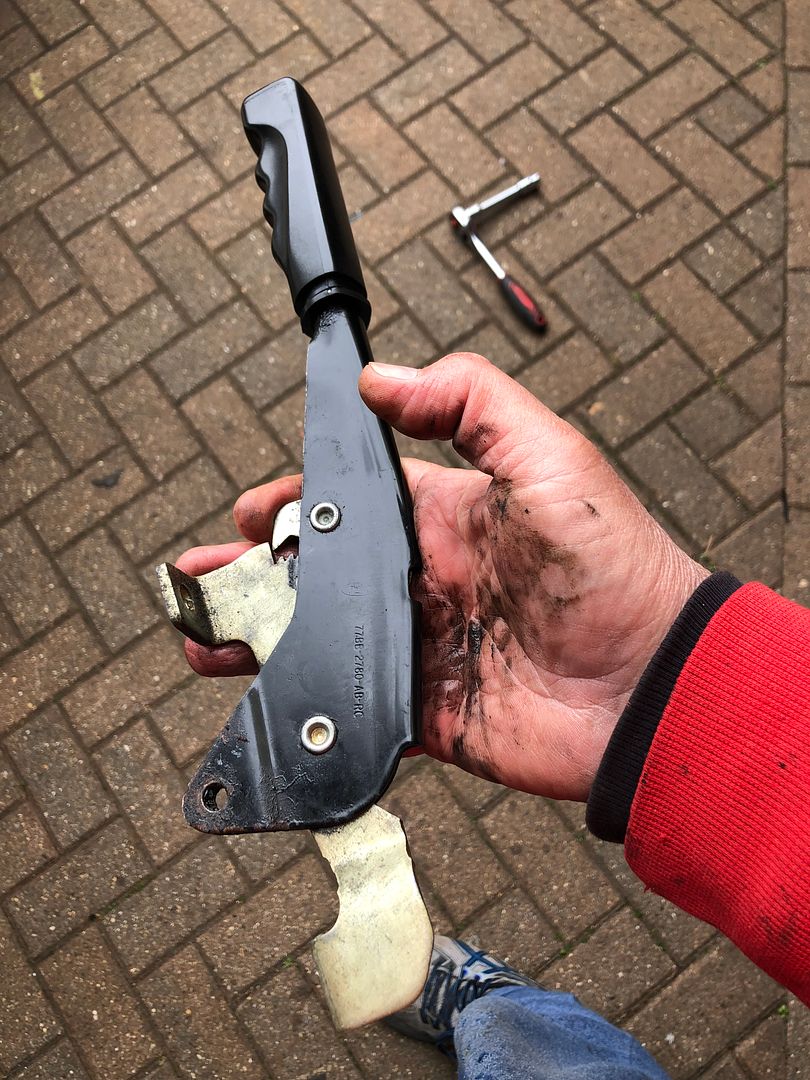 Then using the bench vice to support the handle, and a ball pein hammer on the ratchet catch, I managed to slip the handle off the lever. 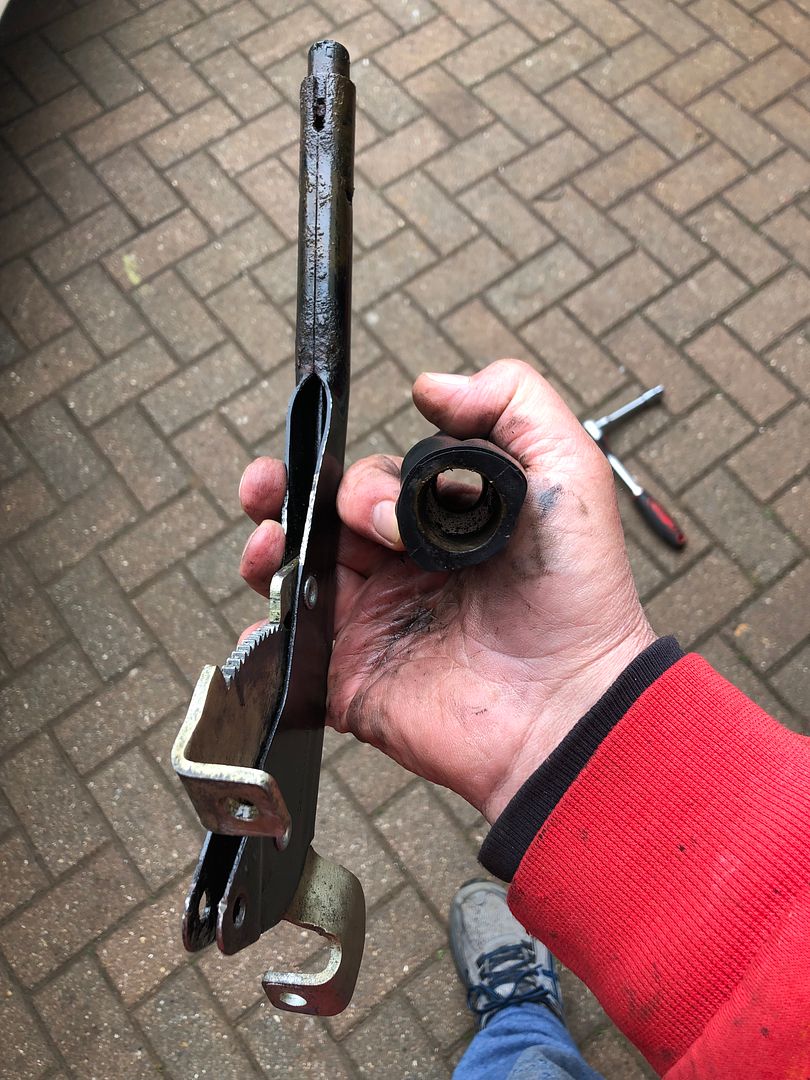 And eventually Culprit. 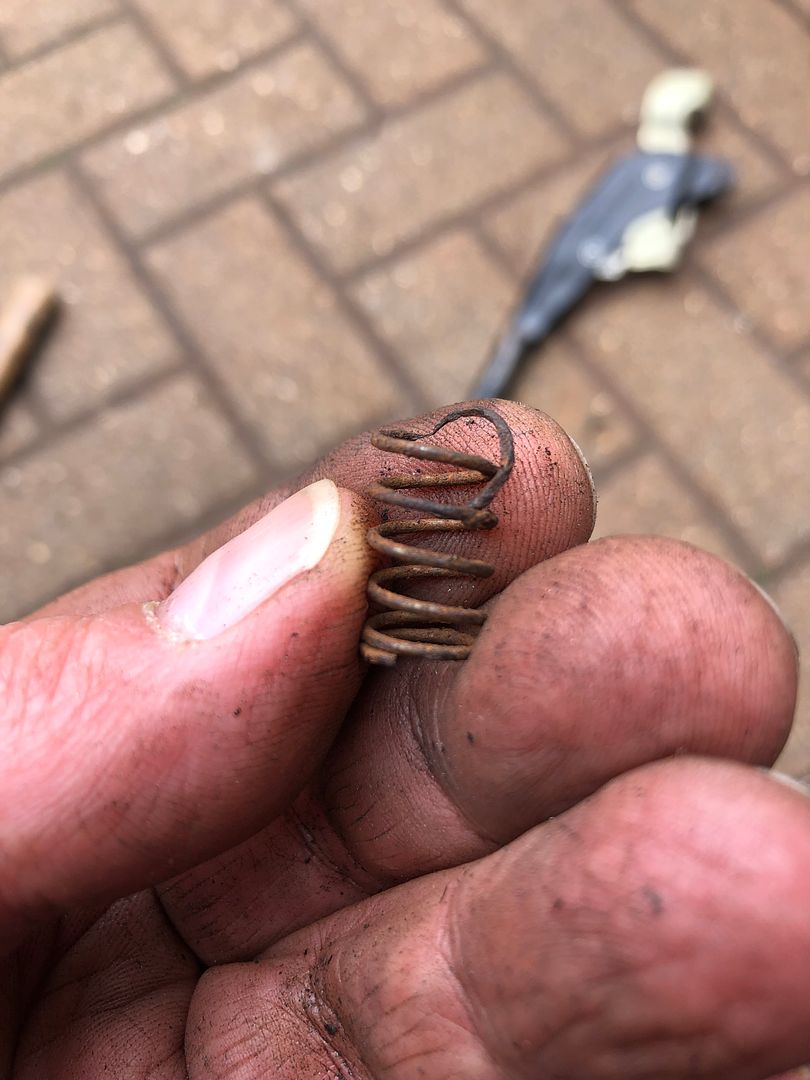 Button, felt washer, spring and a support washer. 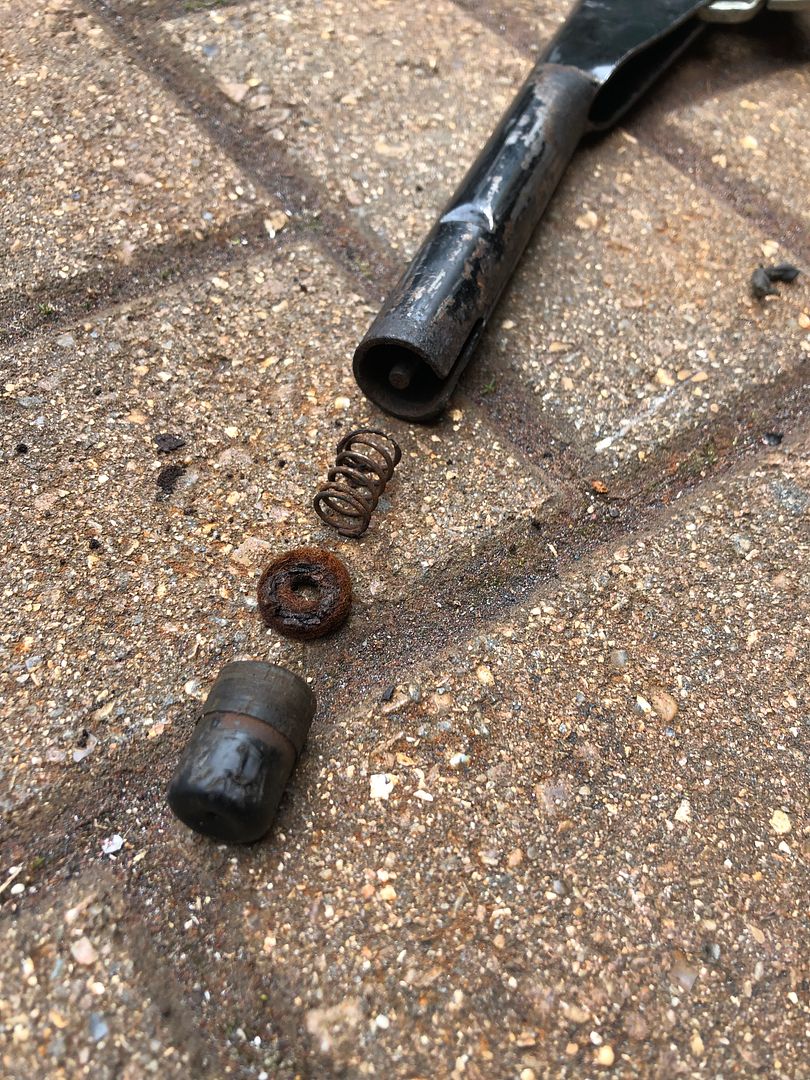 And the inside more rust. 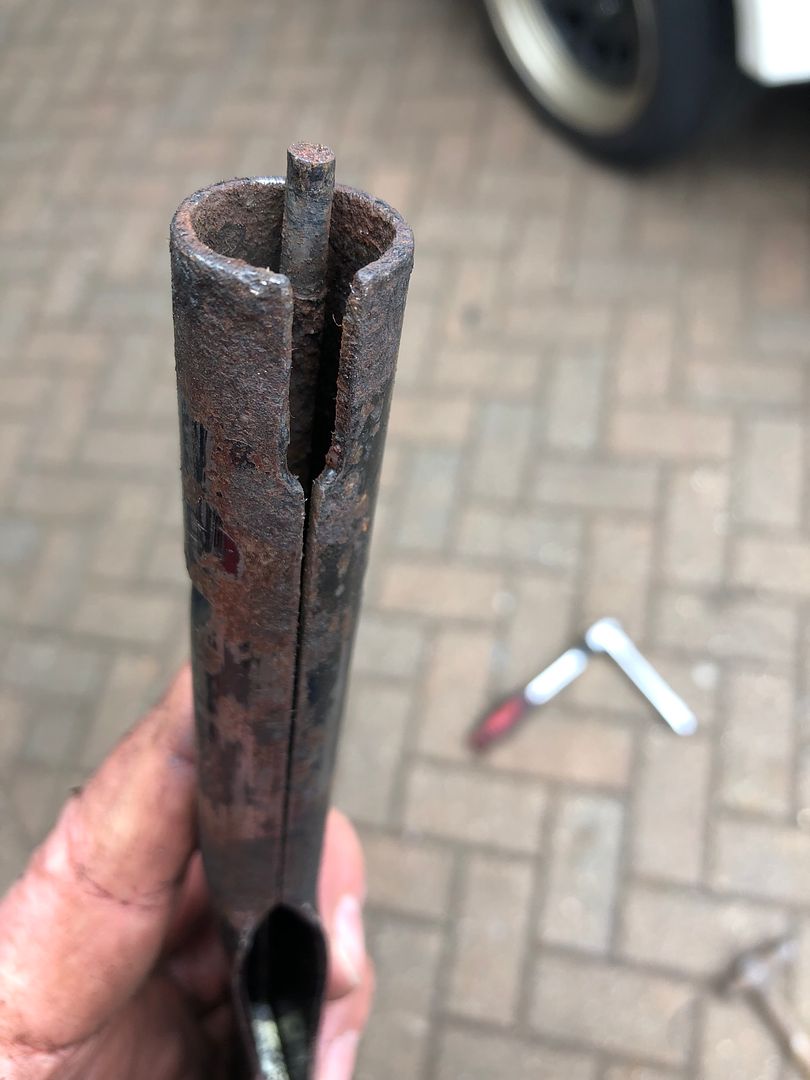 Solution Some coarse sand paper on a shaft, slipped over the release rod and a load of rotation and in and out movement. 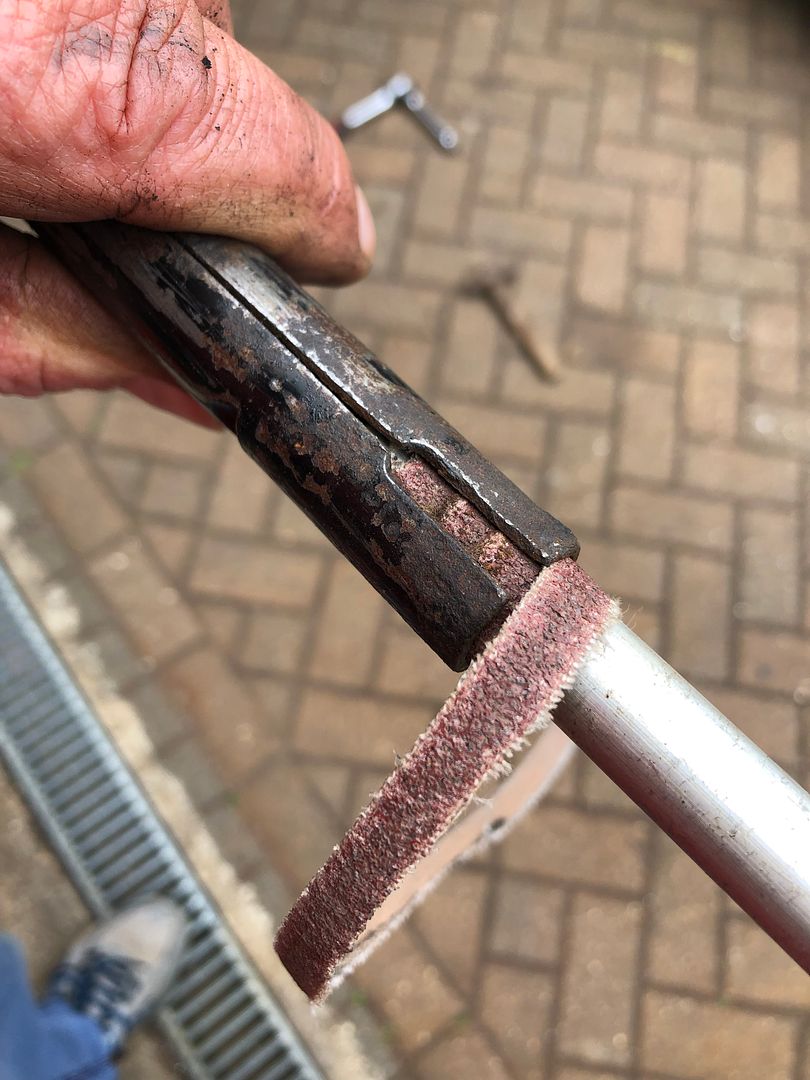 Also the felt washer clearly needed to be replaced. Where to buy these little parts from though. Bugggerrr. 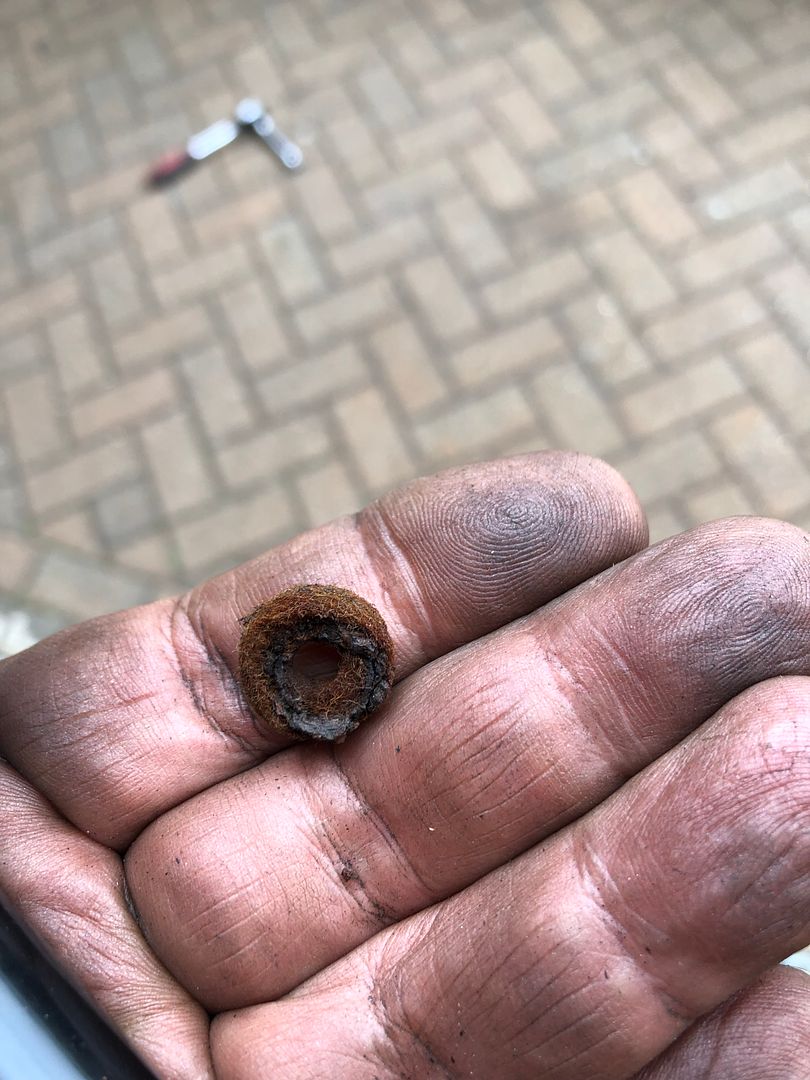 Around 12.30 Nick came sauntering down the garden path. Coffee time.
__________________
MY BUILD LINK: http://67-72chevytrucks.com/vboard/s...585901]Redneck Express - 1966 C10 Short Fleetside MY USA ROADTRIPS http://forum.retro-rides.org/thread/...2018-humdinger IF YOU CAN'T FIX IT WITH A HAMMER, YOU'VE GOT AN ELECTRICAL PROBLEM MATE. |
|
|
|
|
04-29-2022, 05:52 PM
|
#14 |
|
Registered User
Join Date: Dec 2012
Location: Rochester, KENT
Posts: 10,514
|
Re: GRIZZs 79 - 2WD BLAZER Challenge over in London, England. ~Its not a Project
You know those tubs or tins of absolutely useless nuts, bolts, screws, fasteners, springs etc?
After coffee, I headed into the back corner of the garage and started to rummage through my useless tubs and tins . Much to @nickwheeler s amusement, he even recorded the madness. 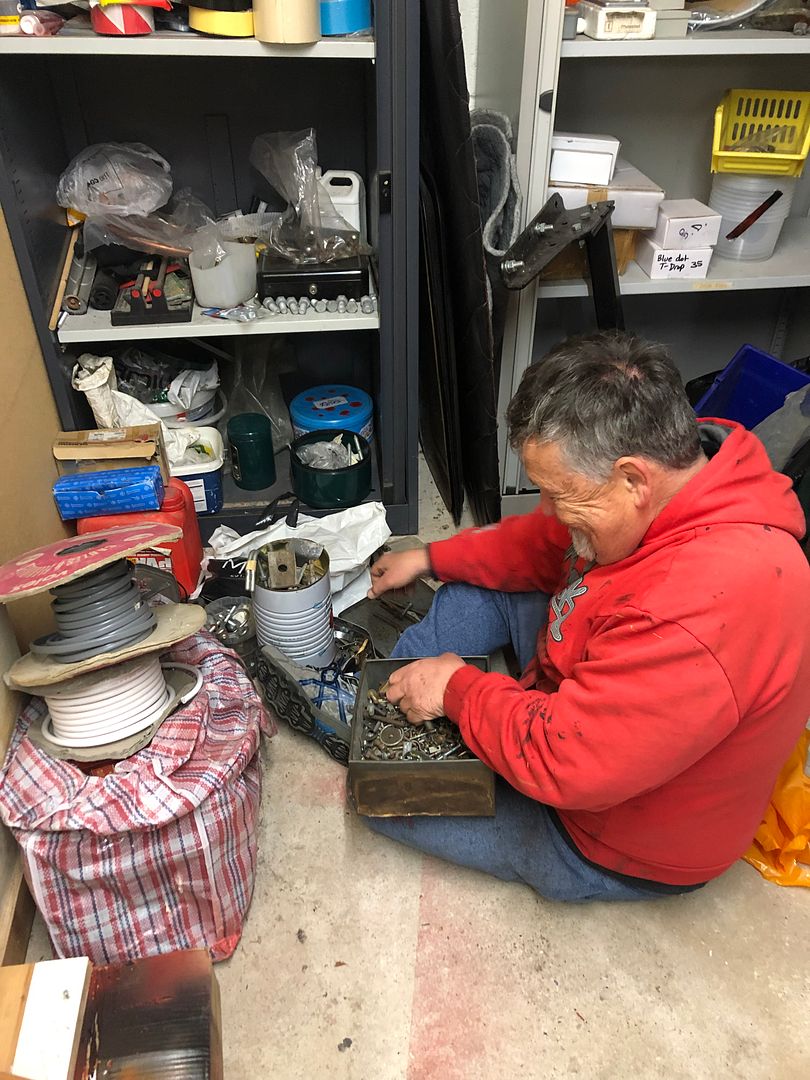 So I found a spring. And some felt that I used to use on my woodwork to cover ornament bases. 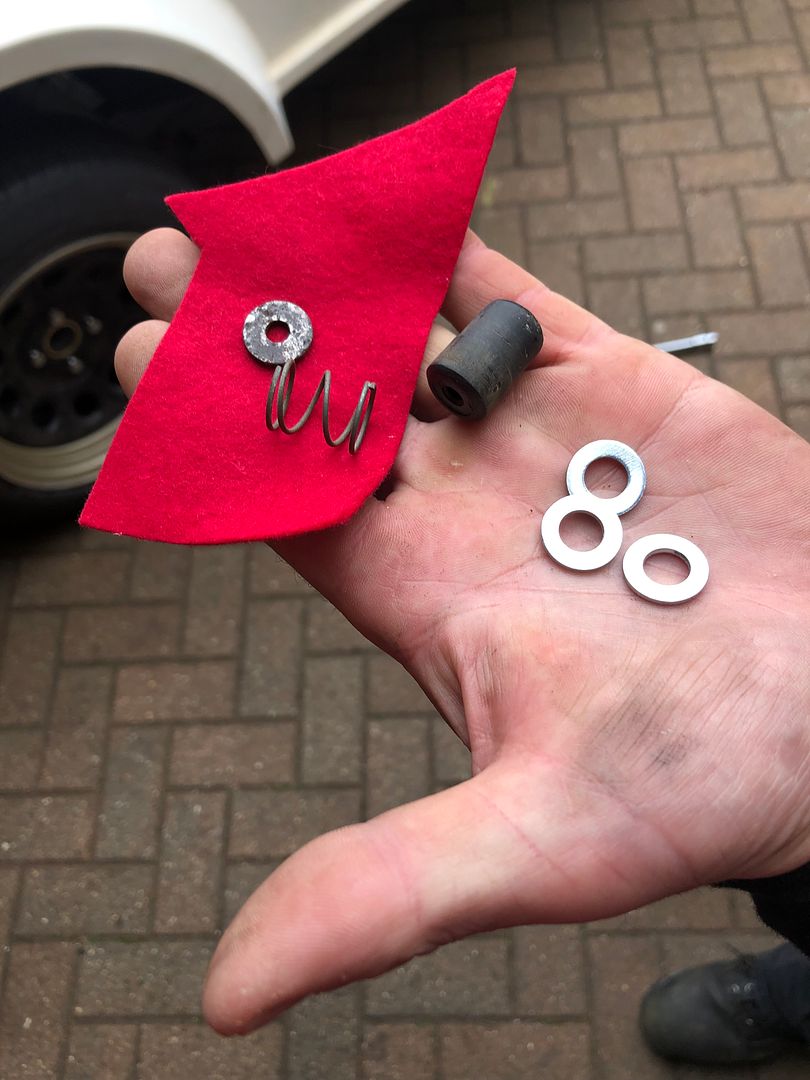 So I made a four layer washer while Nick made the spring fit, we needed 4 washers to take up the space as the spring was shorter than the original. Assembled, and filled with white grease to prevent some future corrosion 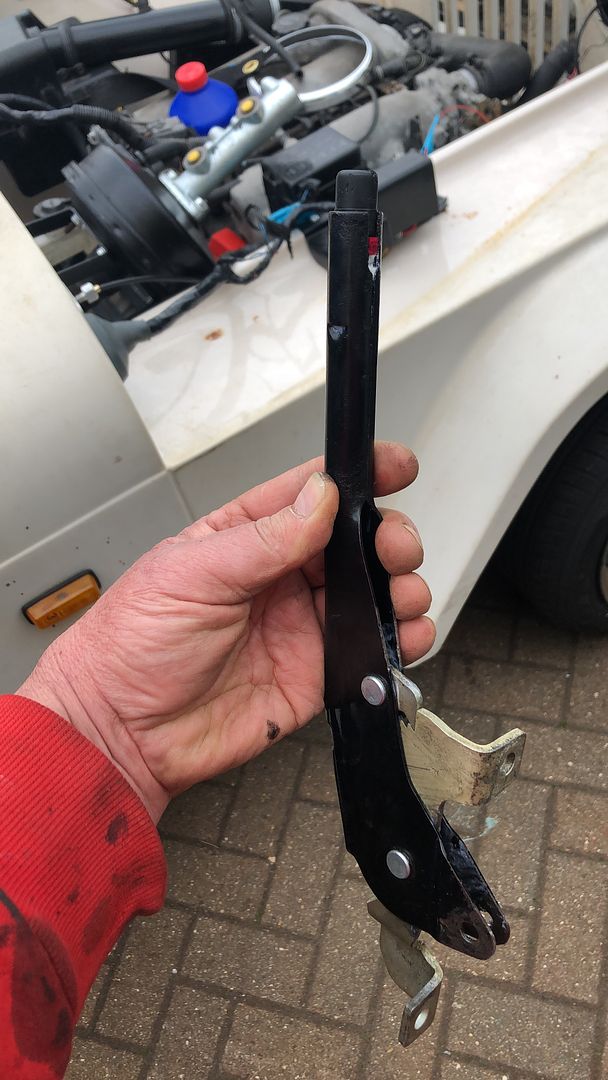 Next up, I made a failed collar to hold the rubber collar, washer and tunnel together . So Nick started another, using thicker aluminium and better planning, while I got distracted by another job. Much better. Note the directions, clearly written on the one side. 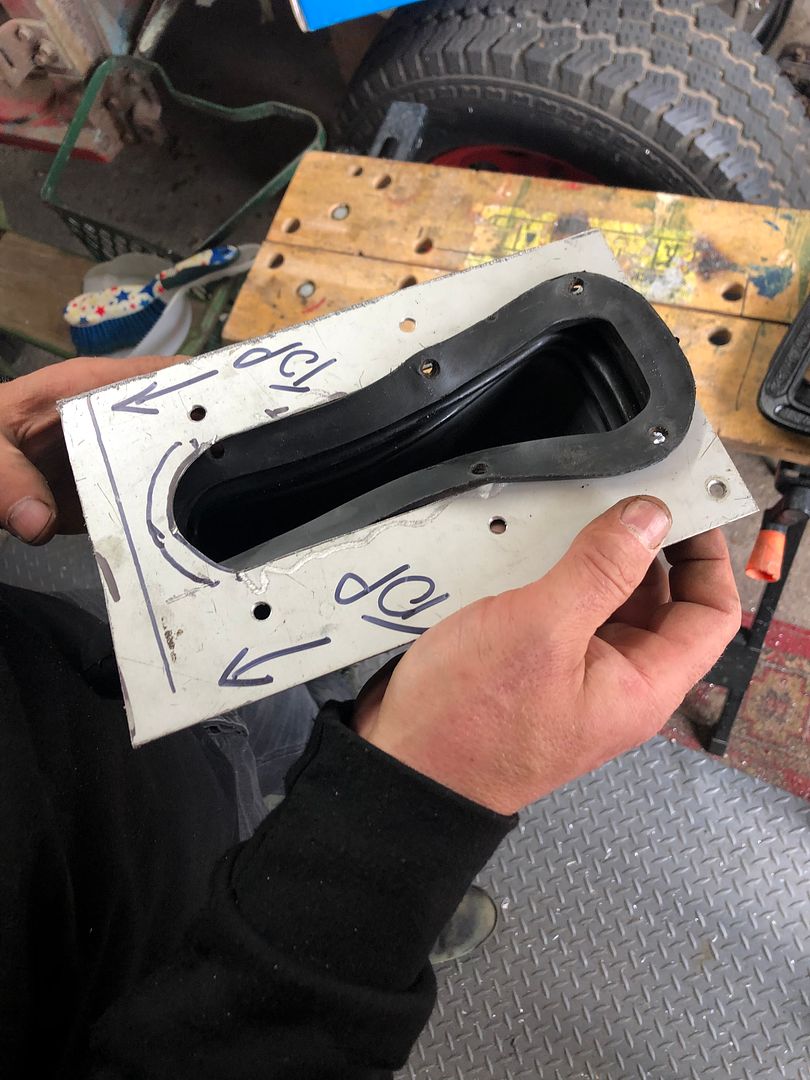 Blowing up? Nick underneath, getting it down. 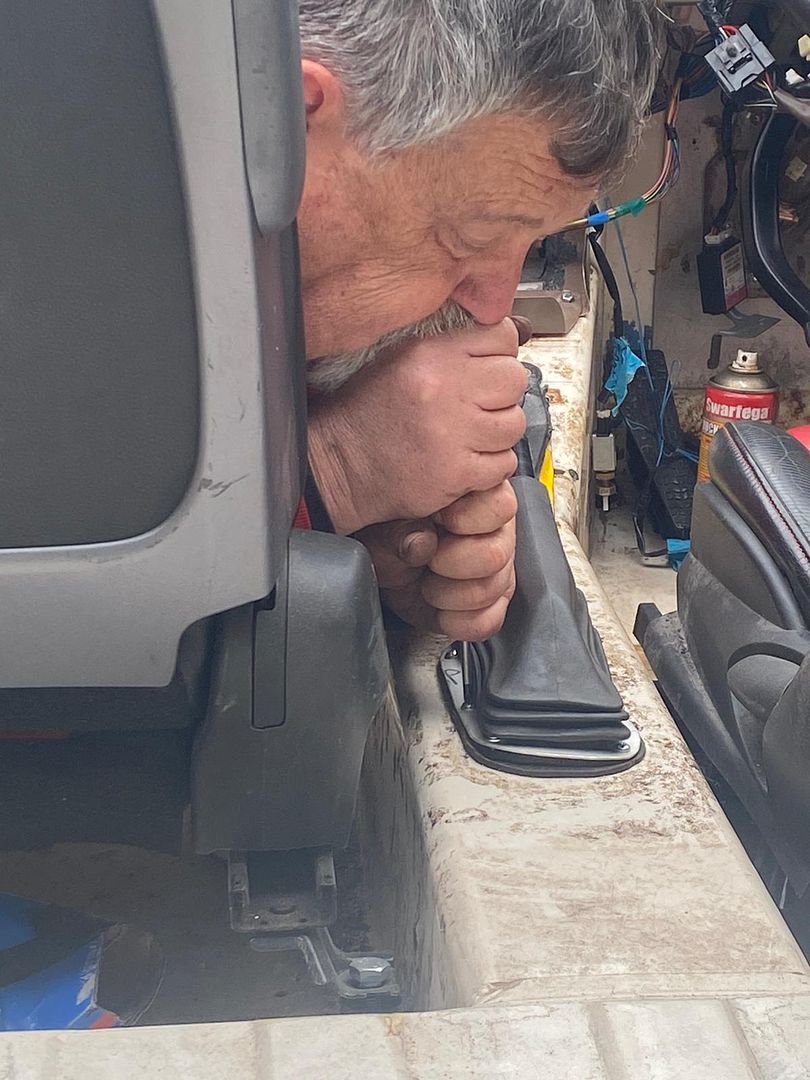 It will get unscrewed one more time at least .. When I get to carpeting the floor as well. 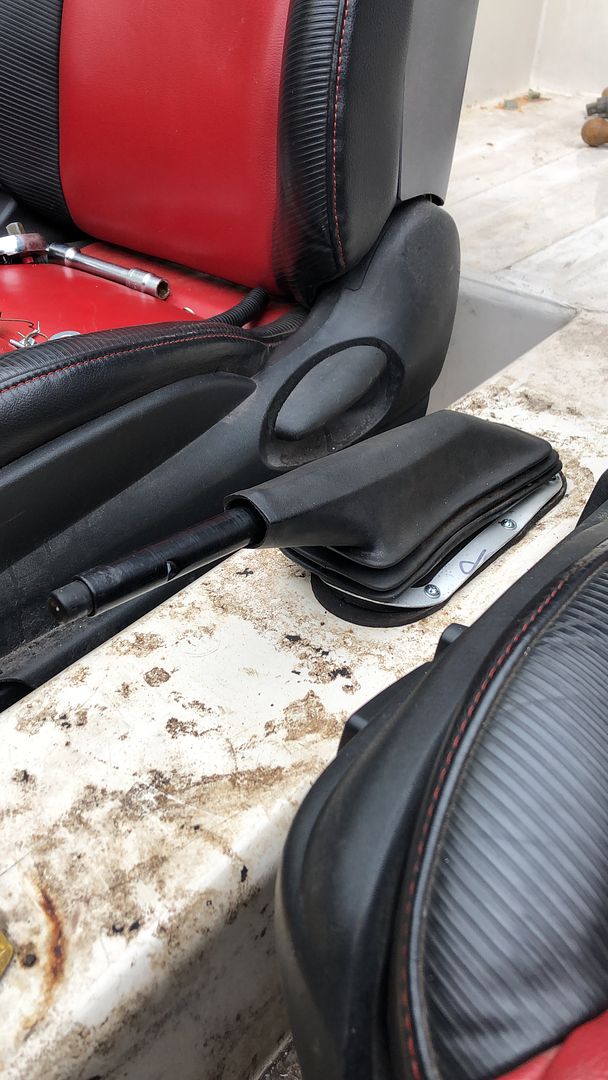 Nick Reassembled the handbrake cables and was happy to pronounce a functioning handbrake. It needs adjustment, but hey It is fixed. .
__________________
MY BUILD LINK: http://67-72chevytrucks.com/vboard/s...585901]Redneck Express - 1966 C10 Short Fleetside MY USA ROADTRIPS http://forum.retro-rides.org/thread/...2018-humdinger IF YOU CAN'T FIX IT WITH A HAMMER, YOU'VE GOT AN ELECTRICAL PROBLEM MATE. |
|
|
|
|
04-18-2022, 04:20 PM
|
#15 |
|
Registered User
Join Date: Dec 2012
Location: Rochester, KENT
Posts: 10,514
|
Re: GRIZZs 79 - 2WD BLAZER Challenge over in London, England. ~Its not a Project
Went to fill my car today and saw this van.
You certainly cannot ignore it. As an ex serviceman myself, and possibly being true to my own beliefs, this really does appeal. 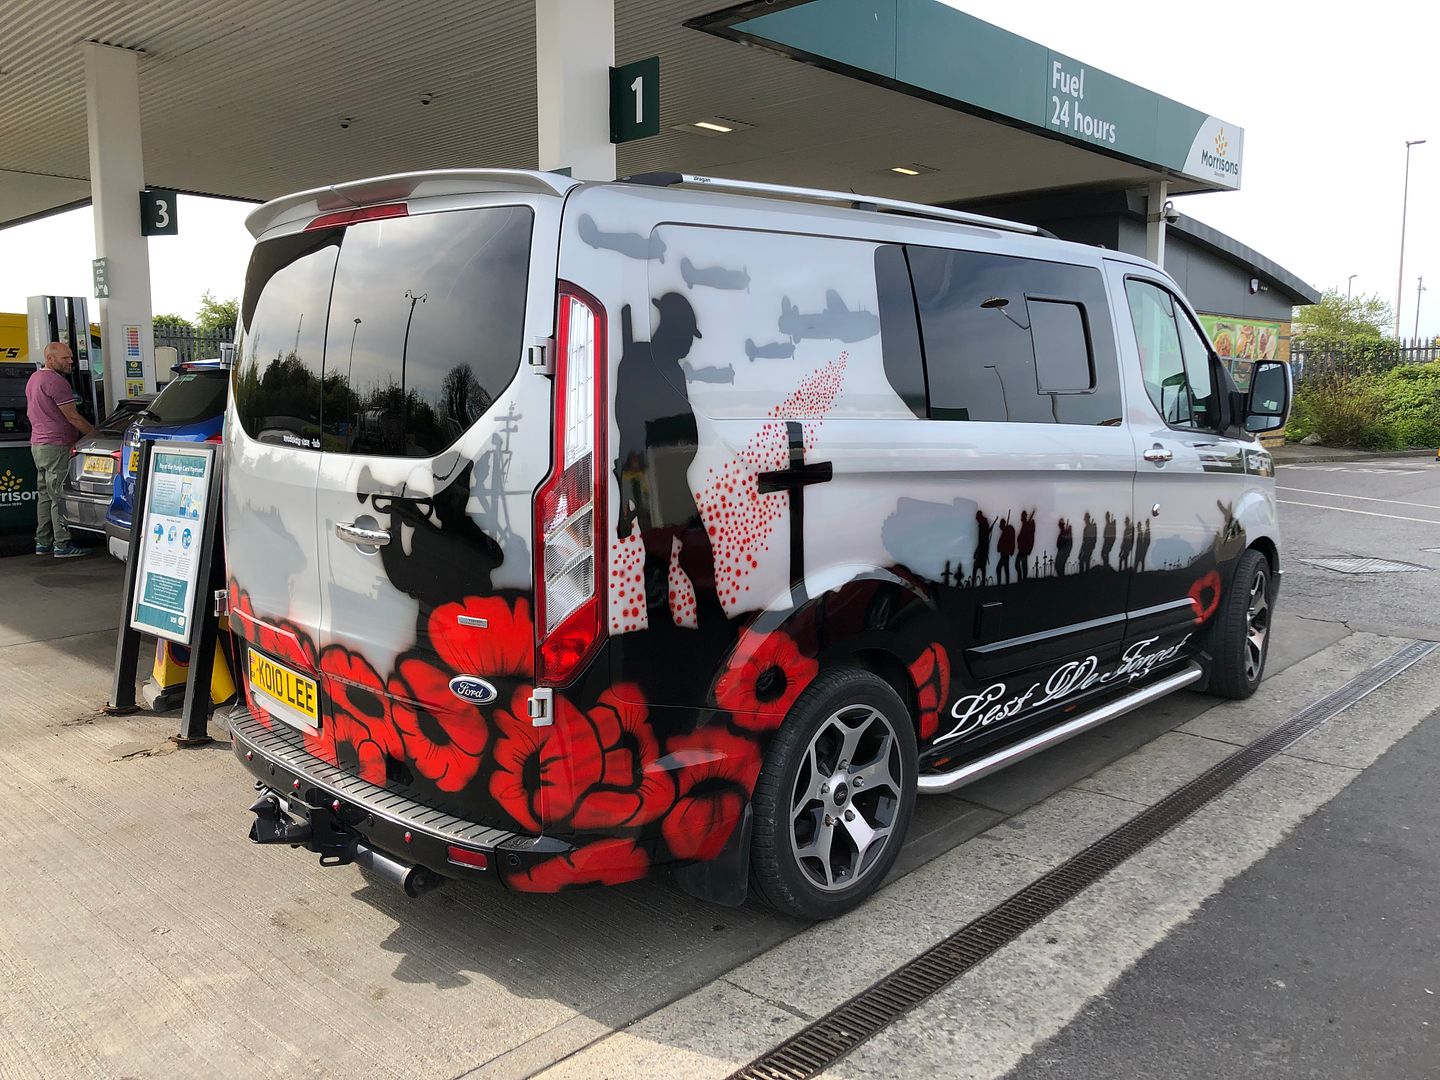 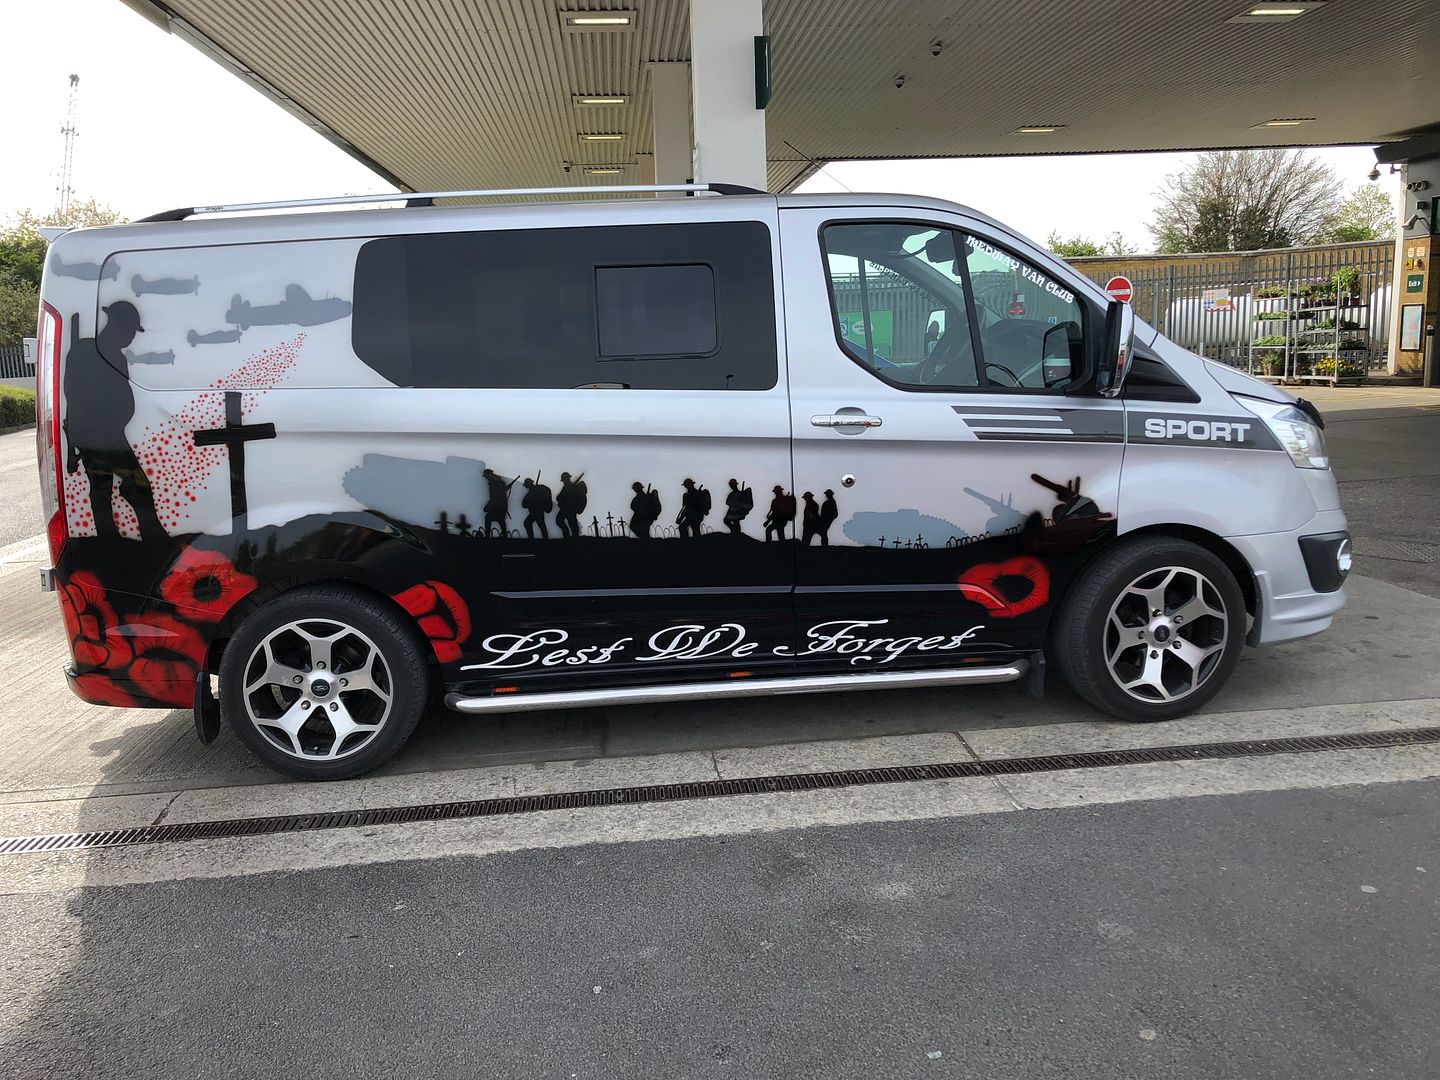 Owner was proud of his immaculate car.
__________________
MY BUILD LINK: http://67-72chevytrucks.com/vboard/s...585901]Redneck Express - 1966 C10 Short Fleetside MY USA ROADTRIPS http://forum.retro-rides.org/thread/...2018-humdinger IF YOU CAN'T FIX IT WITH A HAMMER, YOU'VE GOT AN ELECTRICAL PROBLEM MATE. |
|
|
|
|
04-19-2022, 03:30 AM
|
#16 |
|
Registered User
Join Date: Dec 2012
Location: Rochester, KENT
Posts: 10,514
|
Re: GRIZZs 79 - 2WD BLAZER Challenge over in London, England. ~Its not a Project
Easter Monday.
Some parts of the world has had a 4 day weekend, and thus a short 4 day week ahead. Various tasks, including food shopping, also wanted to get a digital photo done for a new passport application. But photo shop was shut for the long weekend. Job for another day then. Got back by 11.00 and in the garage by 11.15, coffees in hand as Nick had already started and opened the shop. Time consumers continue to consume more time than anticipated. So I carried on tidying phase one of the upholstery Clearing holes, padding the kick panels and inner side panels with the ever patient Nick guiding and explaining the finer intricacies of scrim foam, which it turns out, is super sensitive to pressure, irregularity and even the contact adhesive before it fully dries. 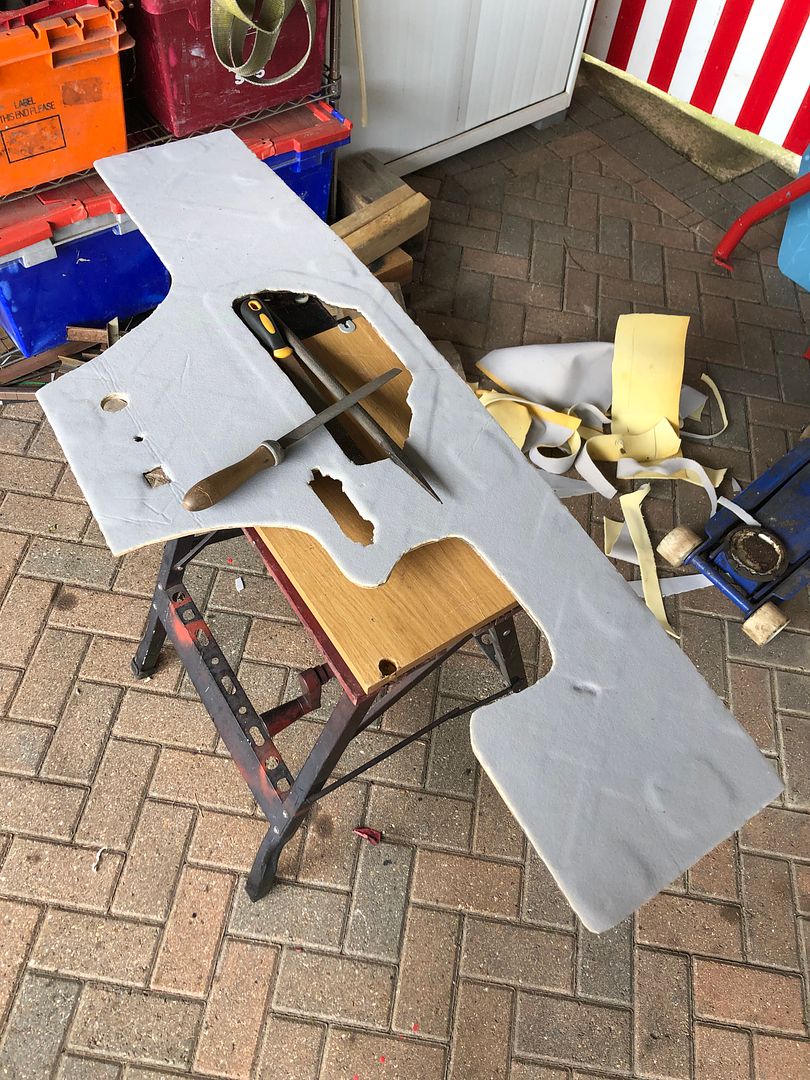 Using a strip of the vinyl I used to to create the right tolerances for switchgear and panel fit. Thanks Nick for the warning and advice on that, disaster avoided, again. 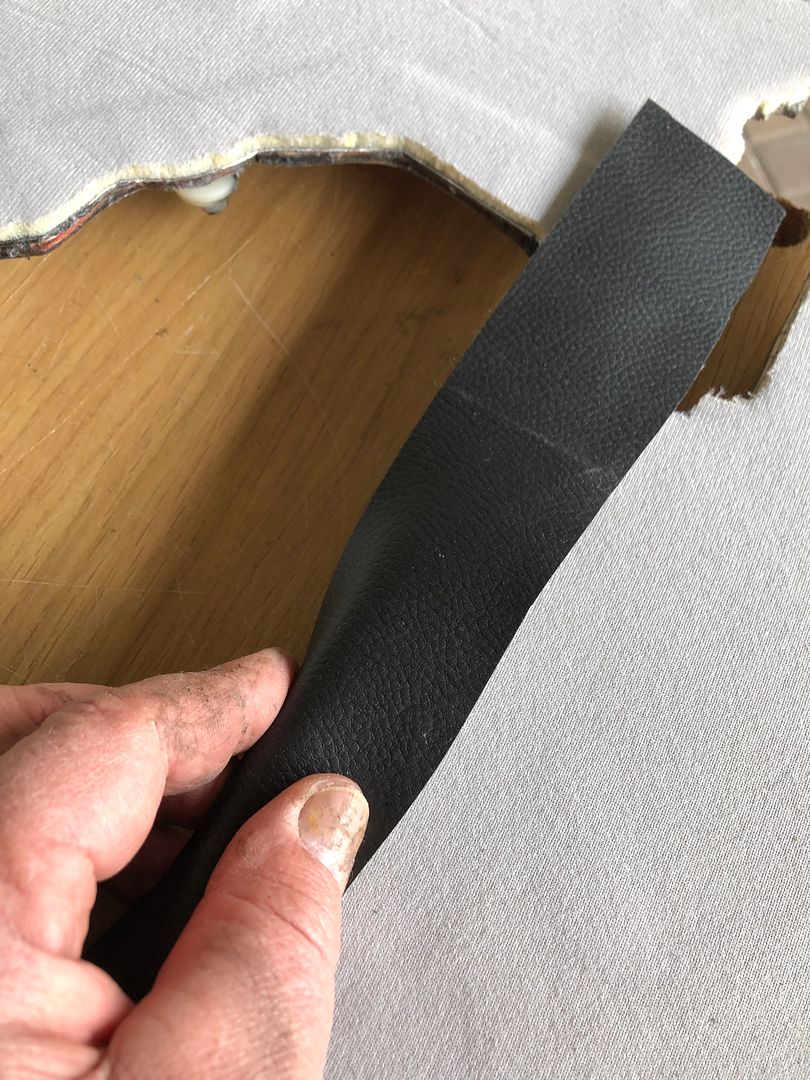 The dash will get a second coat of scrim foam this week, in order to make it plush once covered. Interestingly, the seller is out of stock of black vinyl. When I tried to buy another meter of black it showed no stock. Grrrrrrr.
__________________
MY BUILD LINK: http://67-72chevytrucks.com/vboard/s...585901]Redneck Express - 1966 C10 Short Fleetside MY USA ROADTRIPS http://forum.retro-rides.org/thread/...2018-humdinger IF YOU CAN'T FIX IT WITH A HAMMER, YOU'VE GOT AN ELECTRICAL PROBLEM MATE. |
|
|
|
|
04-20-2022, 03:01 AM
|
#17 |
|
Registered User
Join Date: Dec 2012
Location: Rochester, KENT
Posts: 10,514
|
Re: GRIZZs 79 - 2WD BLAZER Challenge over in London, England. ~Its not a Project
Monday @nickwheeler came around and we carried on with the exhaust pipe
Starting at the down pipe flange, measuring, cutting and welding the straight pipe together. Short video clip. CLICK LINK. https://youtu.be/P17LbbgotUs Resulting in this. 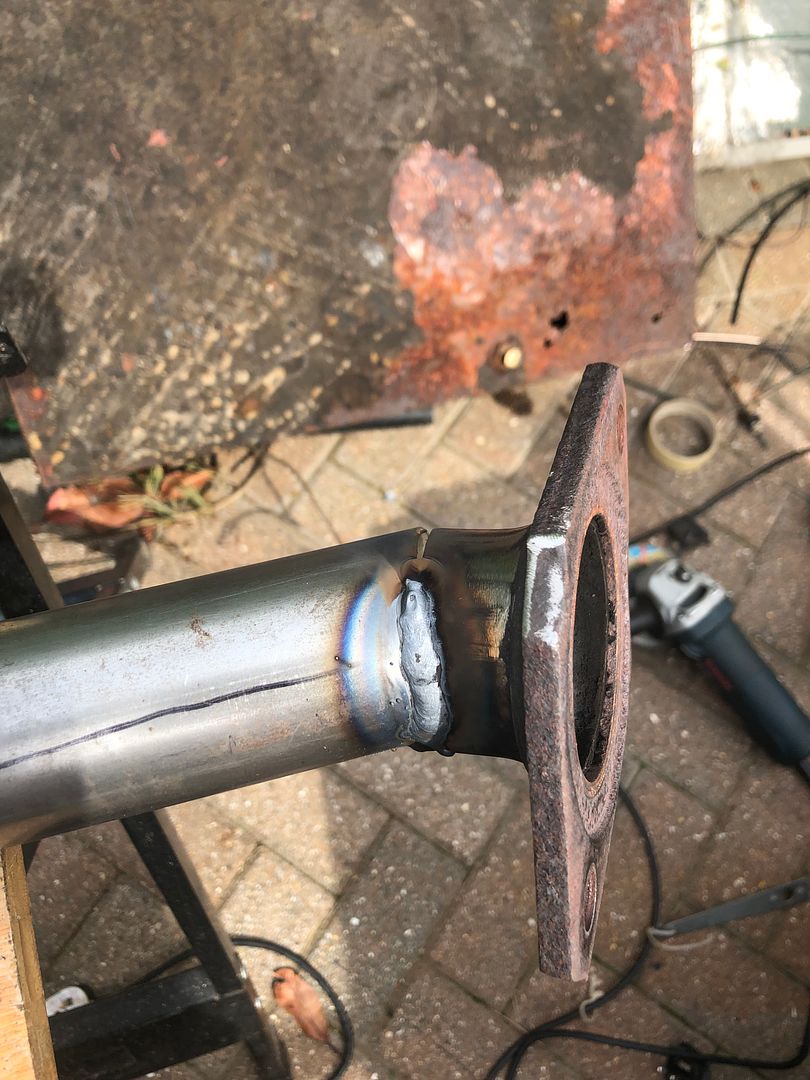 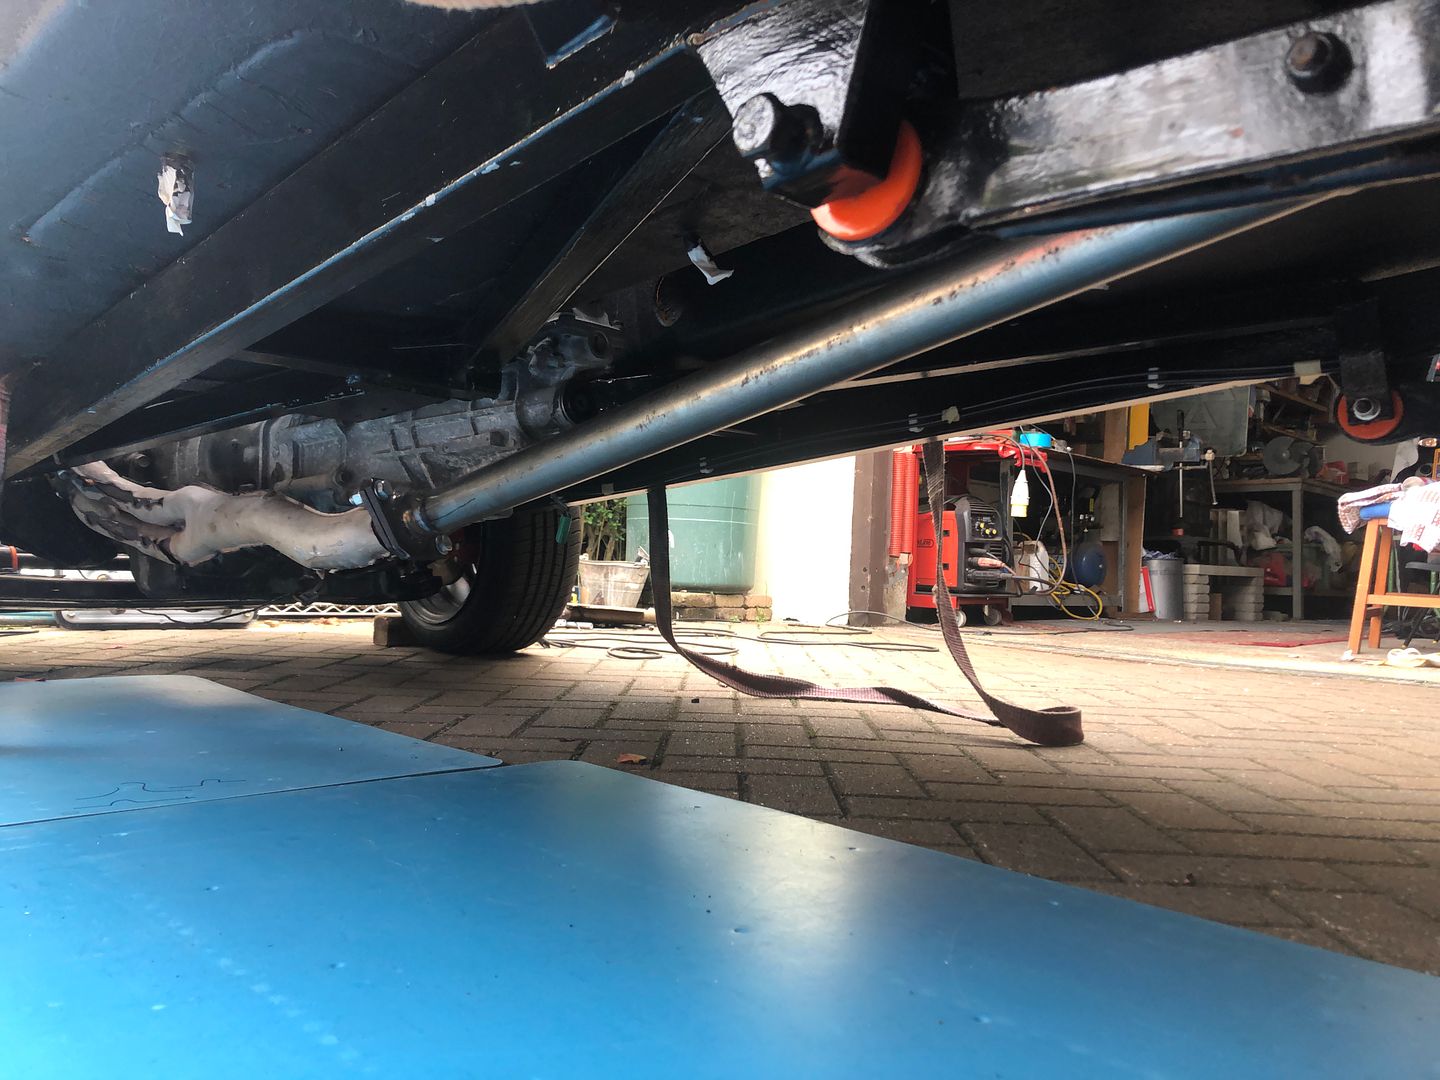 A load of jiggery pokerey and push and pulling later, Nick extended the over axle exhaust section as it became apparent that the anticipated route of the pipe was not ideal when I realised it could go over the rear shock and axle, not between them. Having cut the straight pipe to accommodate the bend in the initial position it now needed about 50mm added onto it to reach the straight sleeve.  In the mean time I found some 12mm rod to add to the chassis and exhaust to fit the rubber hangers to. Some serious bending and banging later these went on.  Both done, a few more to make up. Time thieves, but they all need making up.  Some tight spot grinding, and welding. All good fun ehhh?   Getting us to this point.  Now the next hour or so was spent along with other bits of time, trying to make the rear box @kevins had donated, fit in the space available as a side exit was also out the question. In the end I decided to order a shorter, 315mm long, 2 inch exit/entry rear box from Jetex on Ebay, in black so it blends. Another £50.00 scattered to the hobby gods. Delivery expected Thursday. Hopefully cutting and shaping the over axle pipe to get it shorter and mounted higher wont take half a day, and then the box and a tip attached to the rear as well as the hanging brackets that need to be individually made and shaped before welding them on. Once we had the car off the axle stands where it had lived the last week, I measured the lowest point on the exhaust with two passengers loaded and like the front crossmember it came to 90mm or 3 inches. 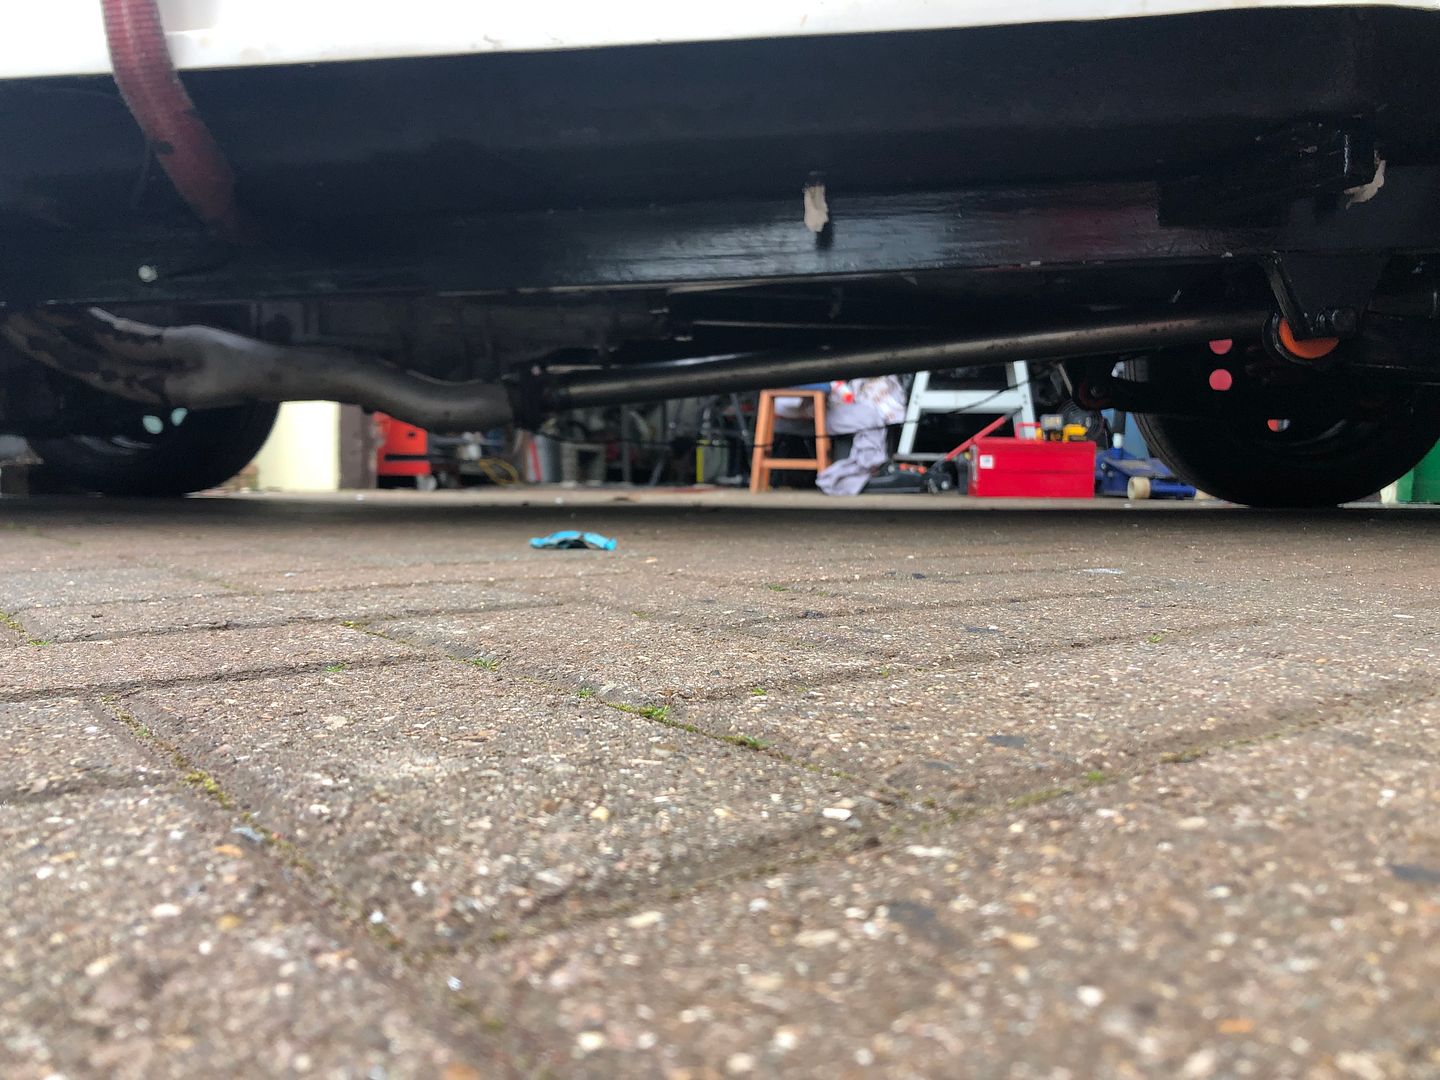 Seemed pretty low . BUT Looking at the year 2000 Mazda MX5 dimensions it seems it was a low car to start with. 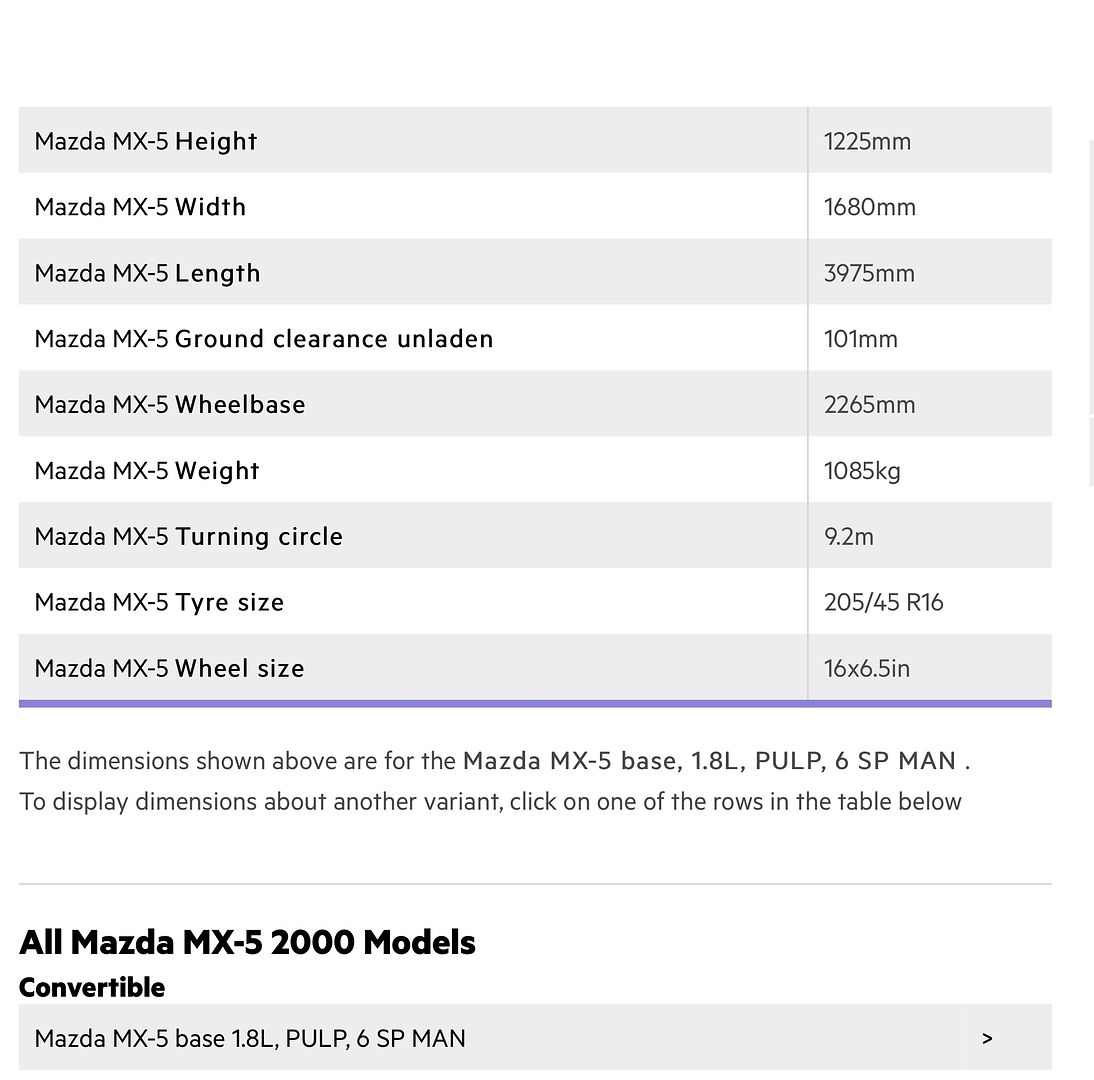 4 day week this week. Day job squarely in the way of fun, but have bought 4 more exhaust hanger rubbers and a couple of other small jobs to fit in after hours. More about them later. Thanks for checking in and posting your replies, opinions, and advice. Much appreciated.
__________________
MY BUILD LINK: http://67-72chevytrucks.com/vboard/s...585901]Redneck Express - 1966 C10 Short Fleetside MY USA ROADTRIPS http://forum.retro-rides.org/thread/...2018-humdinger IF YOU CAN'T FIX IT WITH A HAMMER, YOU'VE GOT AN ELECTRICAL PROBLEM MATE. |
|
|
|
|
04-20-2022, 04:36 PM
|
#18 |
|
Registered User
Join Date: Dec 2012
Location: Rochester, KENT
Posts: 10,514
|
Re: GRIZZs 79 - 2WD BLAZER Challenge over in London, England. ~Its not a Project
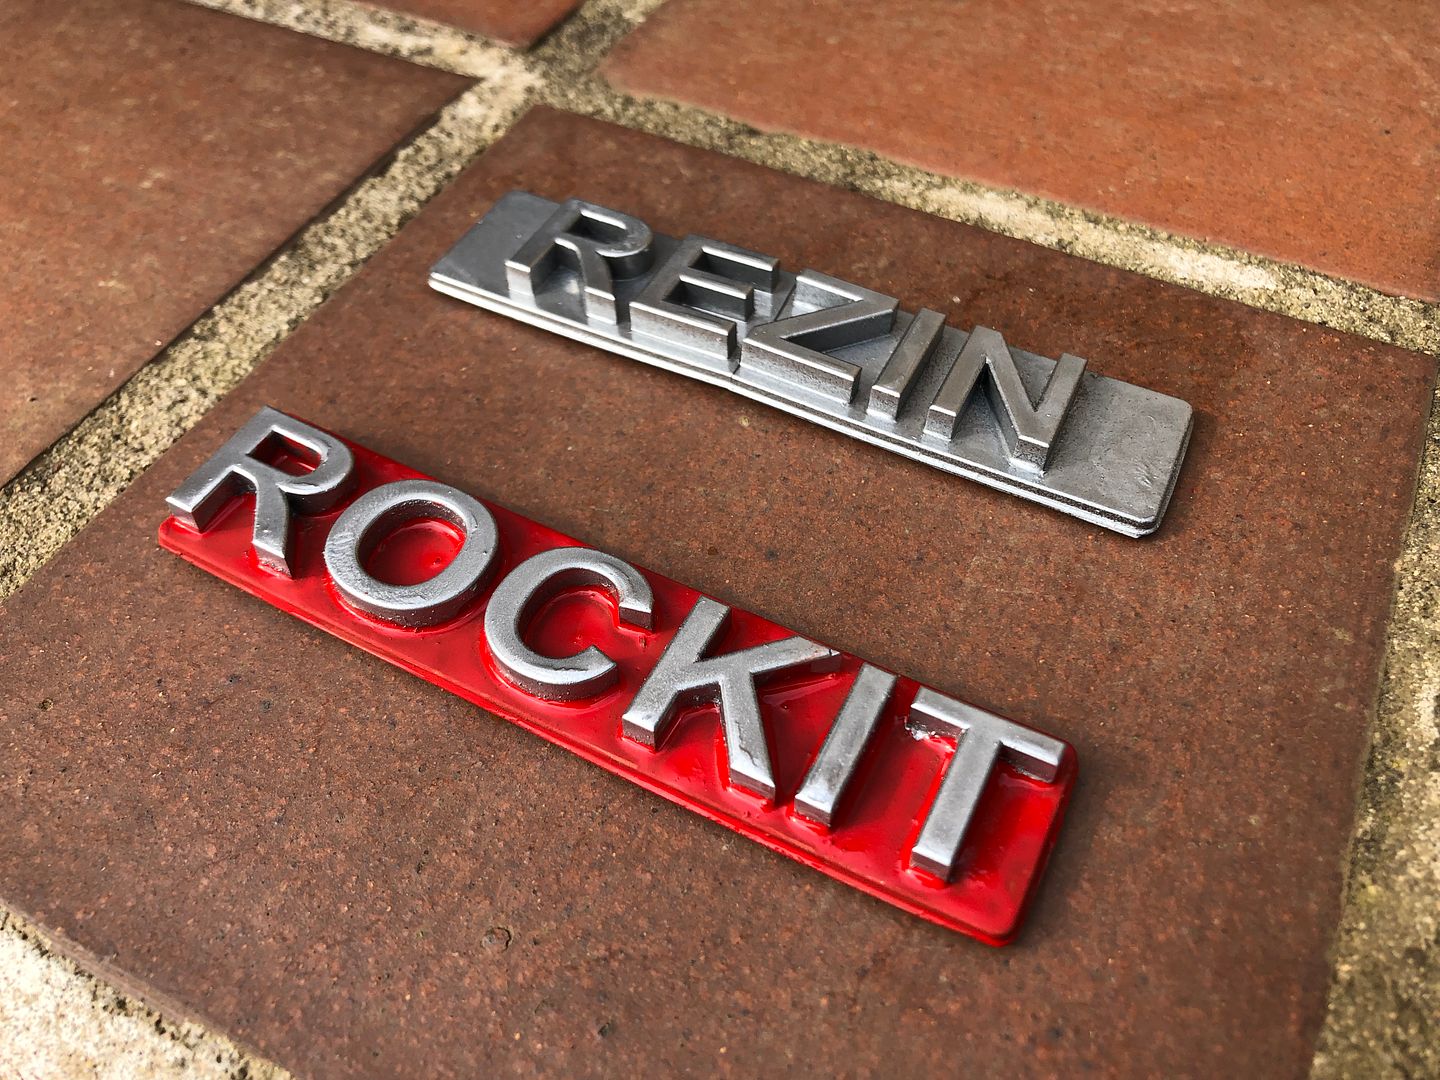
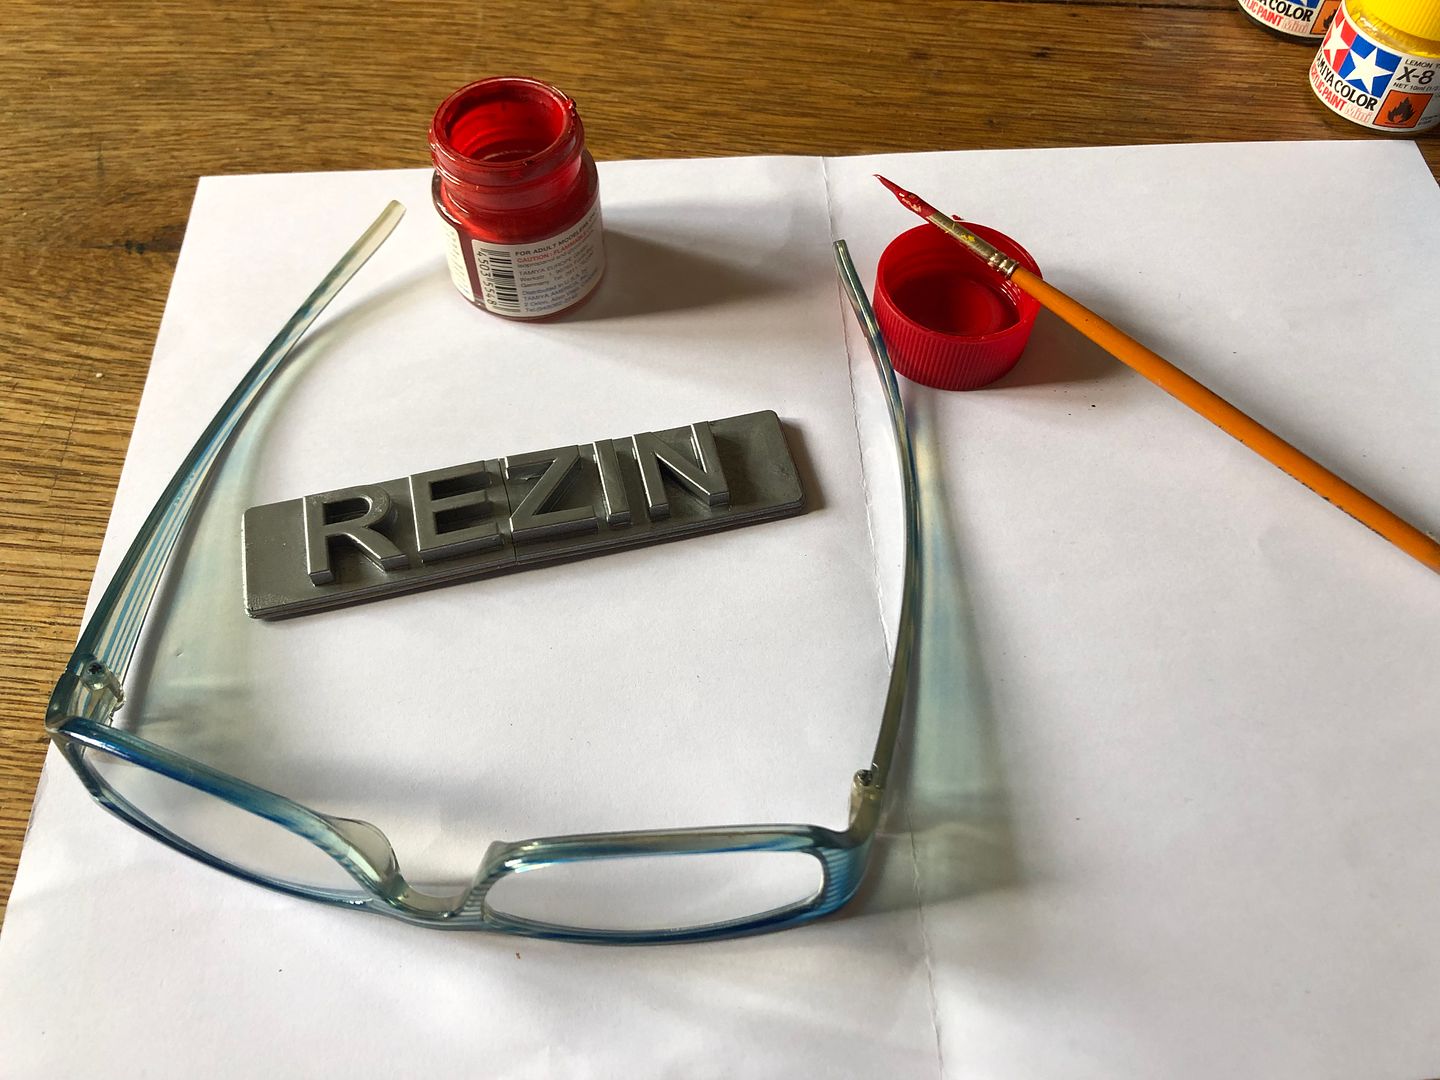
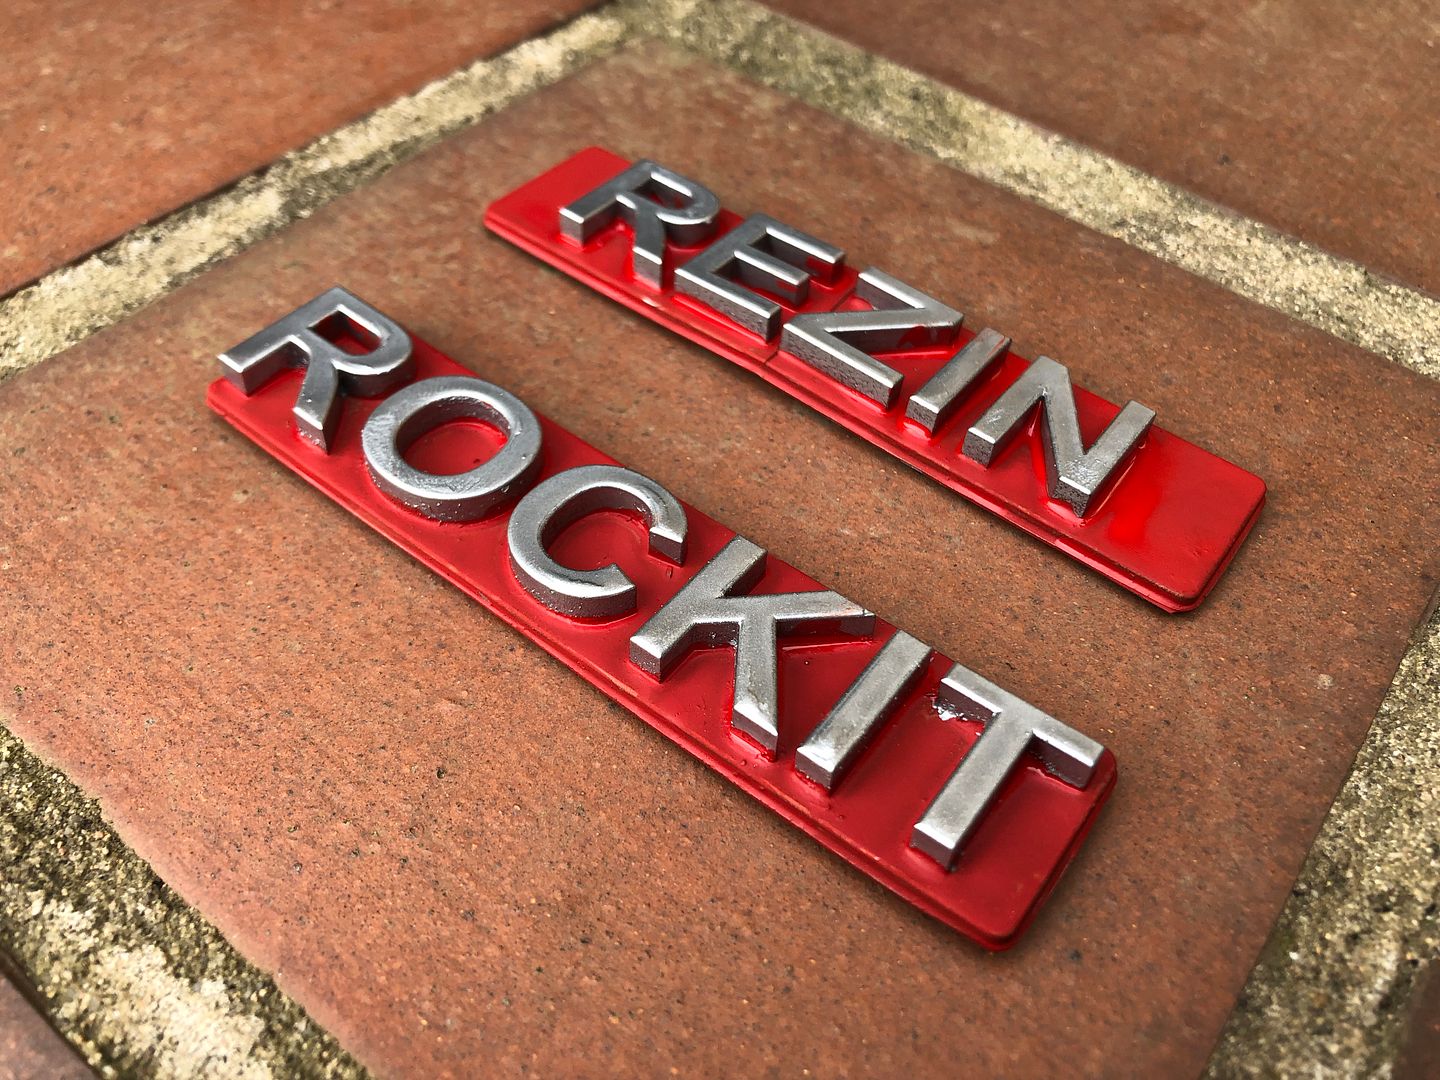
Badges.
Remember them. Covered in floor polish, crazy? Seems not. 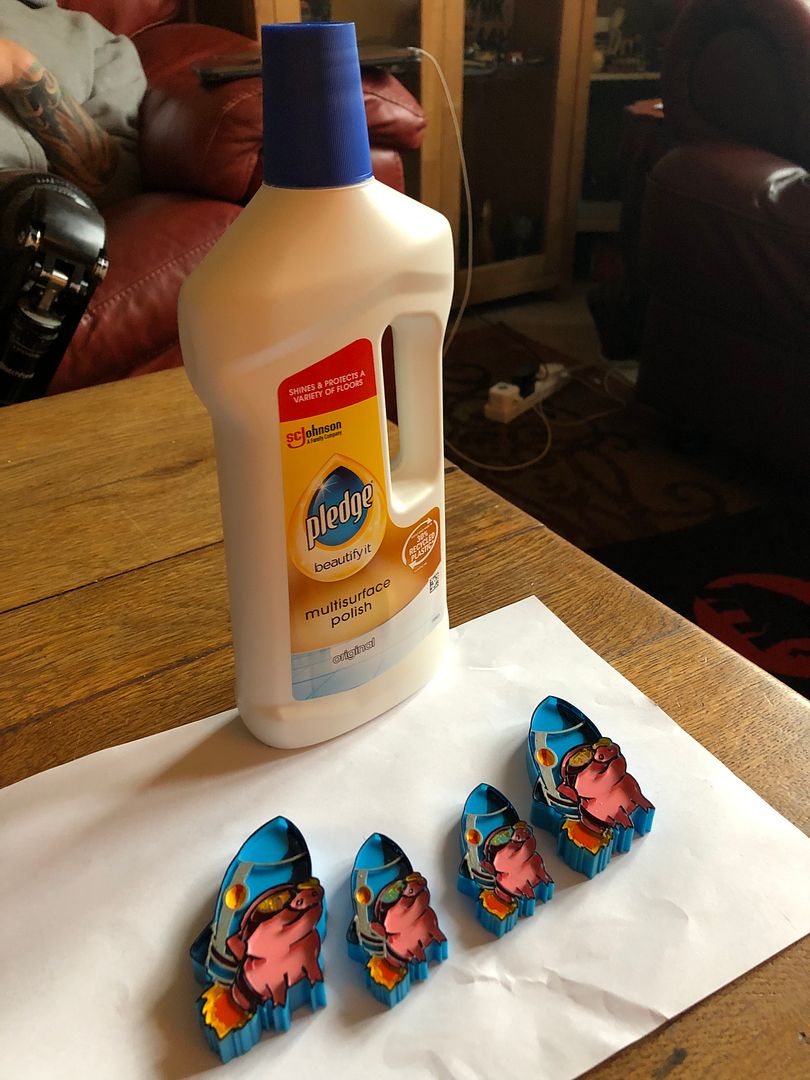 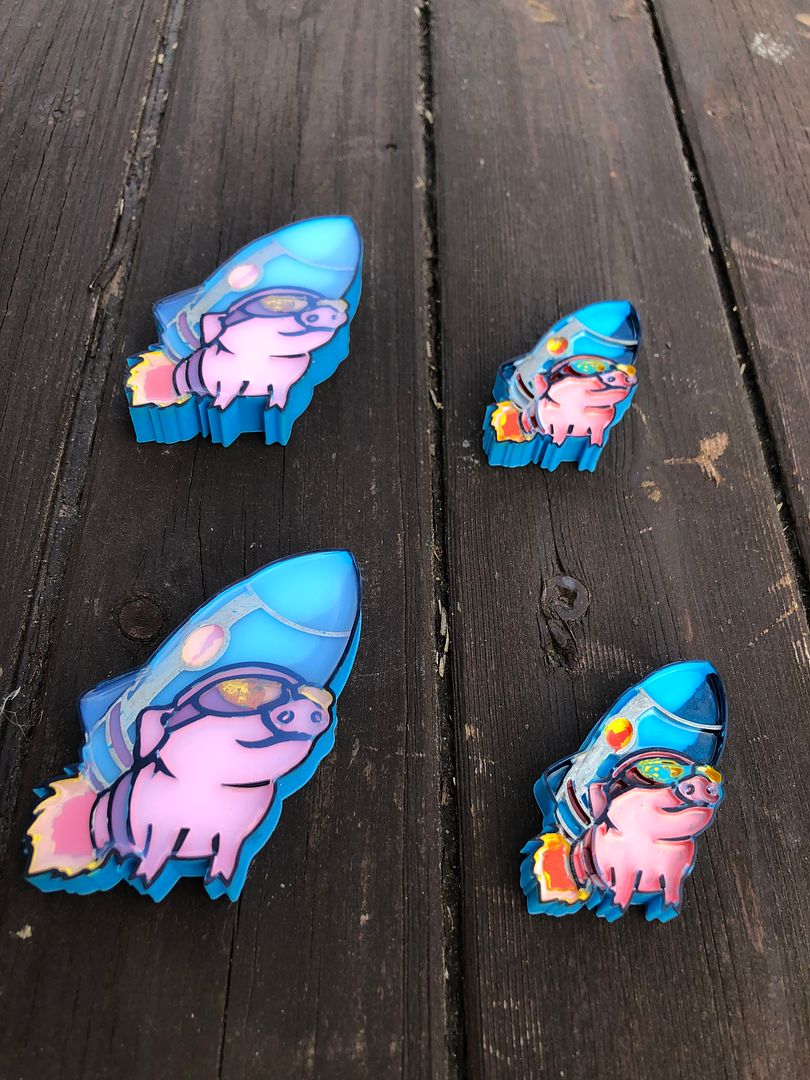 Last night I also added the second layer of scrim foam. 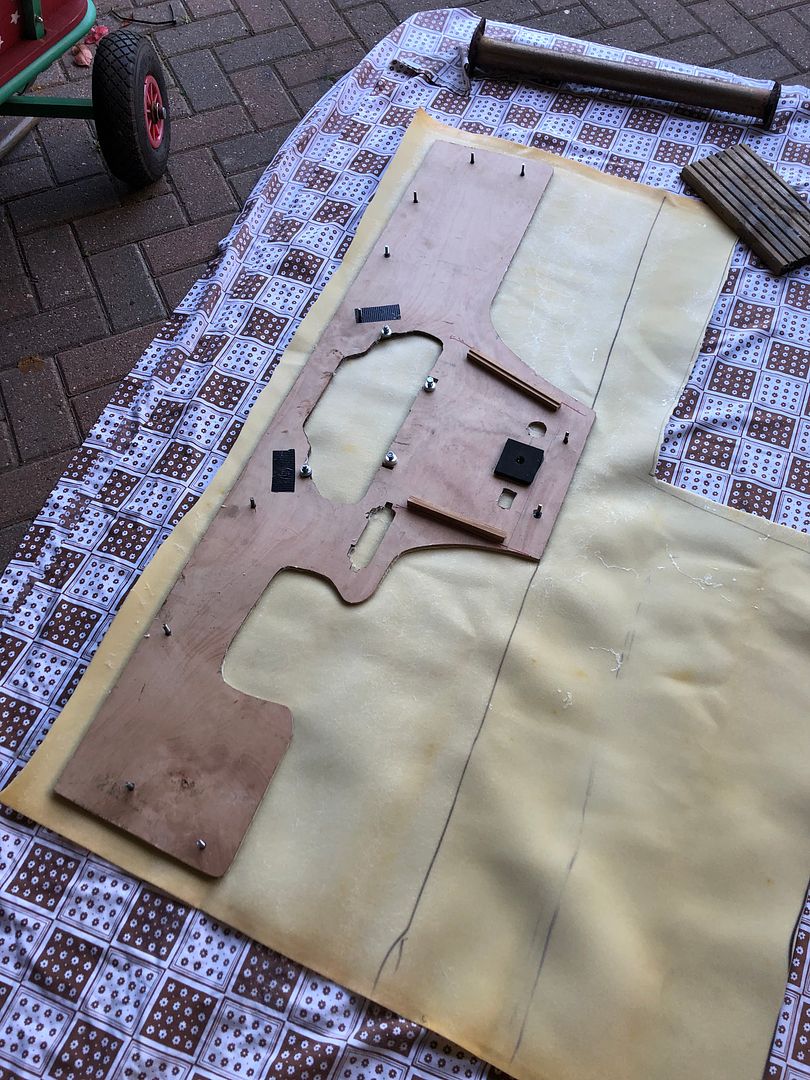 Tonight I cut it back and then trimmed the edges. Next stop will be the black vinyl. Fingers crossed. 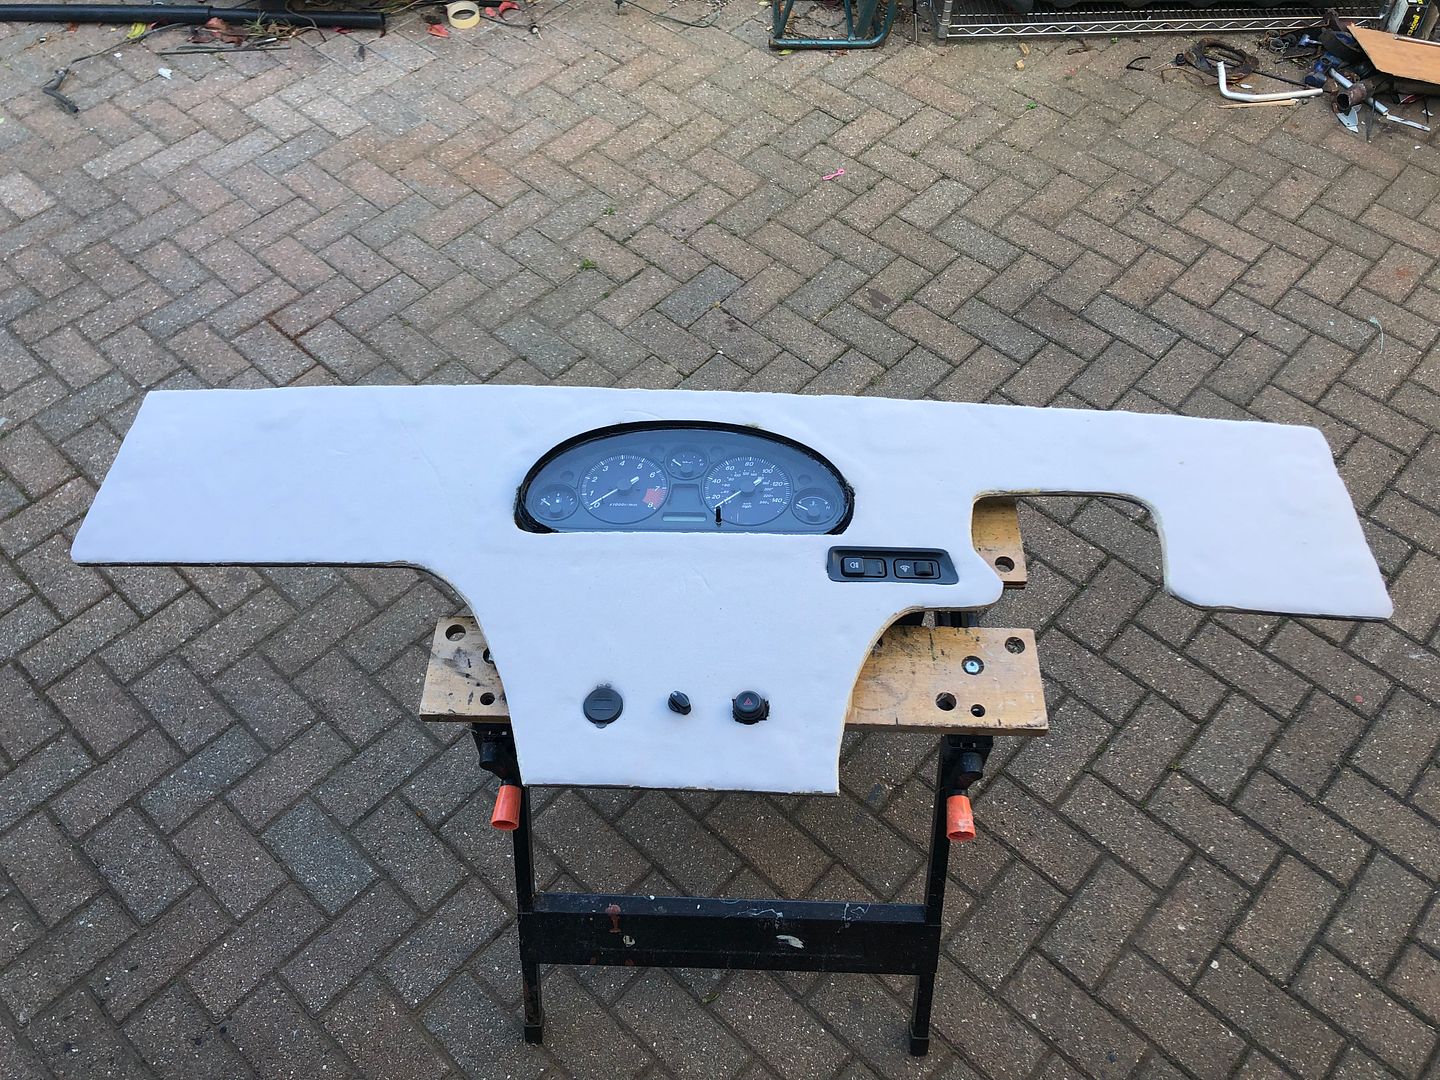 Also yesterday, I went to JWE engineering to see about having a Custom propshaft made up. Mazda one side, Ford on the other. Around £200.00 and I supply the MX5 propshaft to have a Ford back end added on. 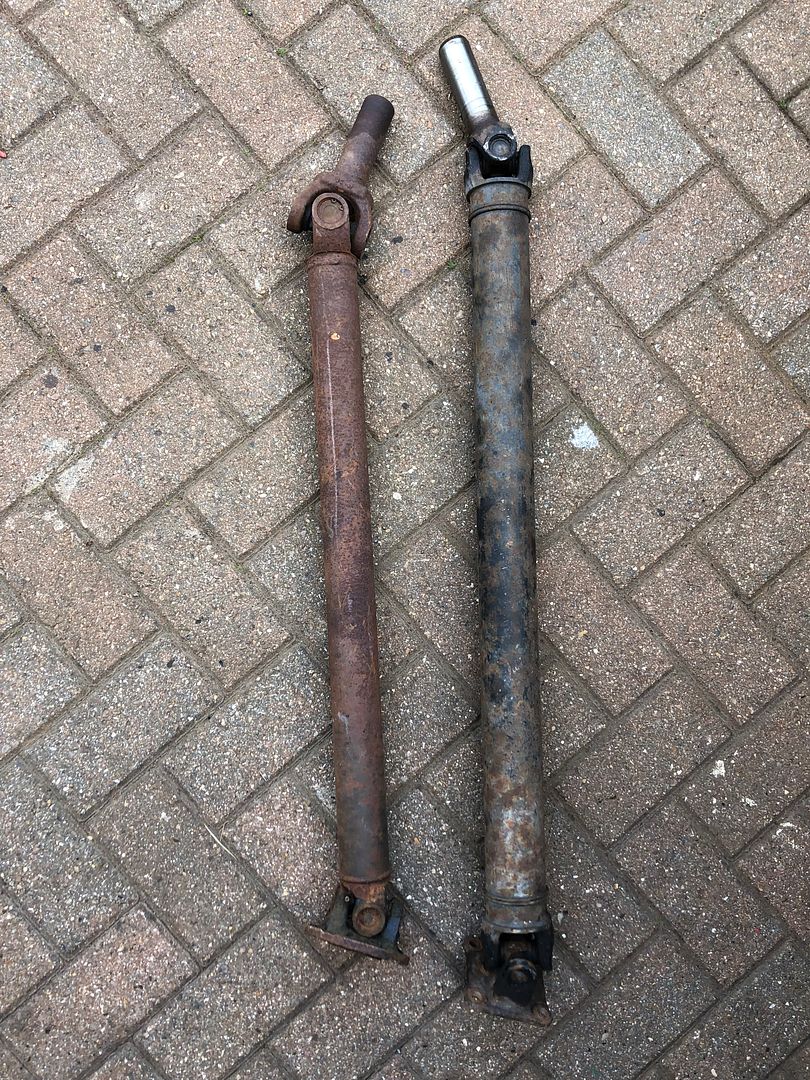 So I measured it and delivered them today. 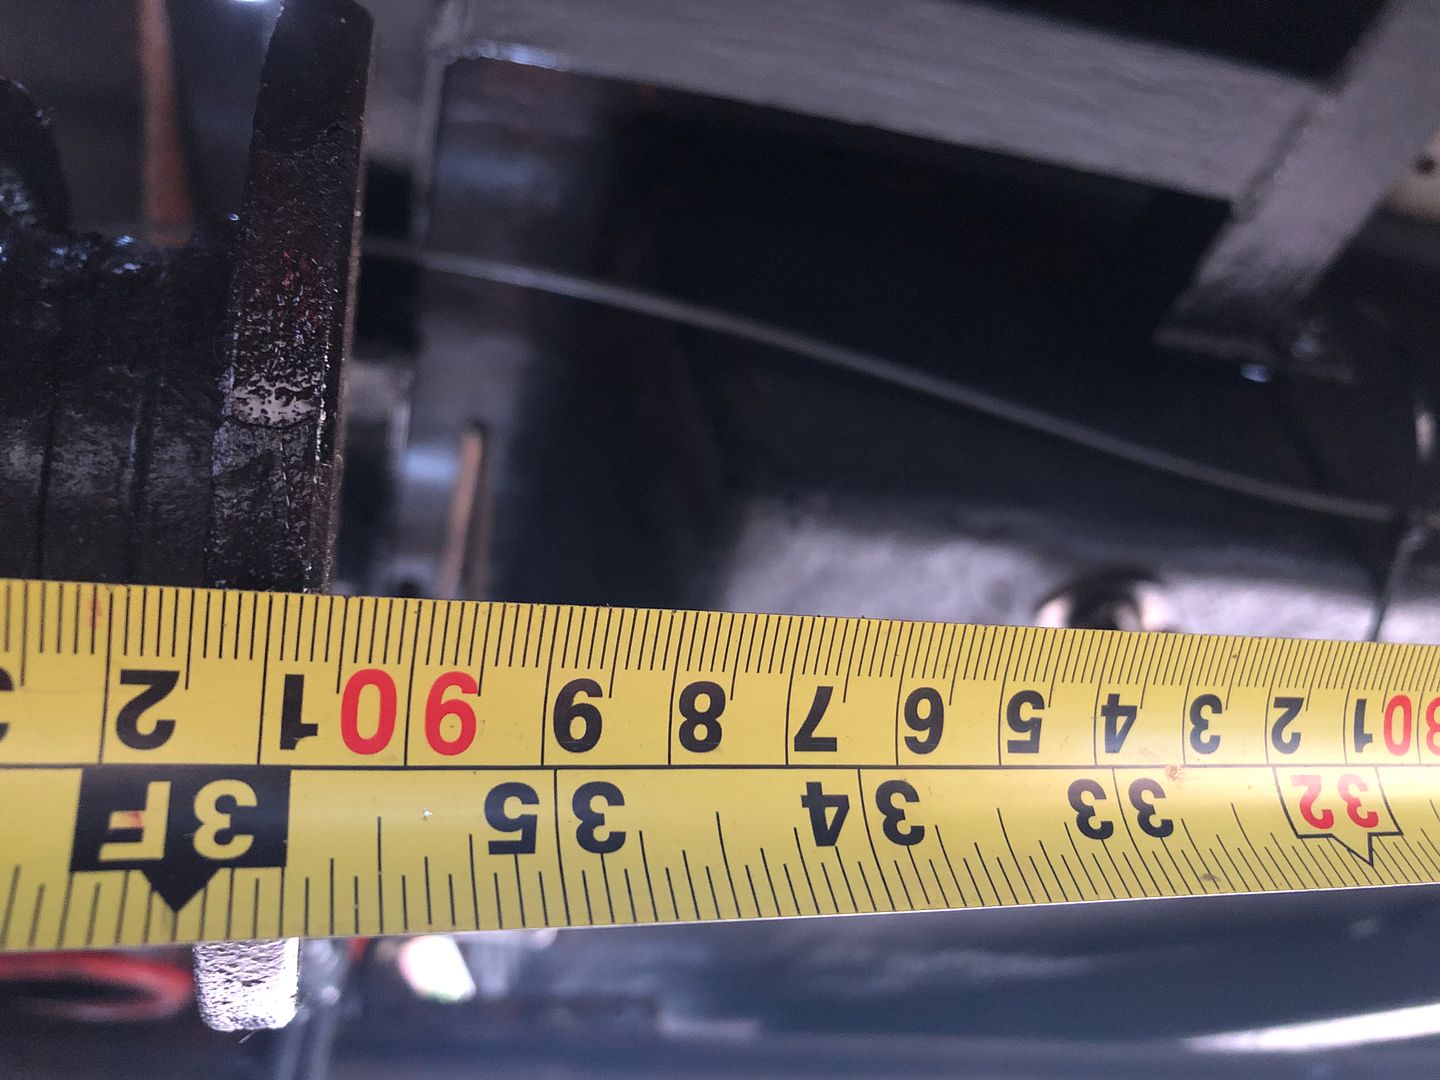 Turn around time could be 2-3 days .the differential flange uses bolts, screwed into it. Weird size that I cannot readily buy off the shelf is a collared, M10 x 1 and 18mm long bolt. So need to get four of these high tensile bolts. 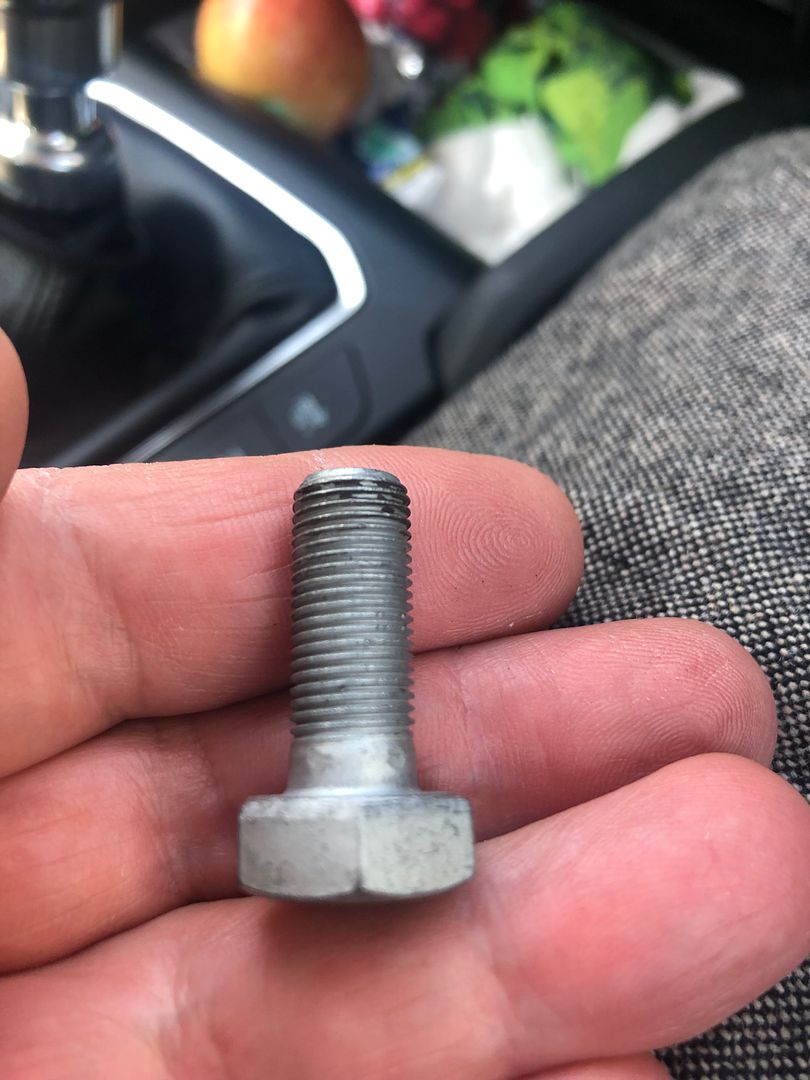 I continue to be amazed by some vendors on Ebay. On Monday evening I ordered this silencer. Delivered before midday today. Service. Compared to the unit @kevins gave me, this is a bit shorter and smaller. Just hope it all fits neatly. 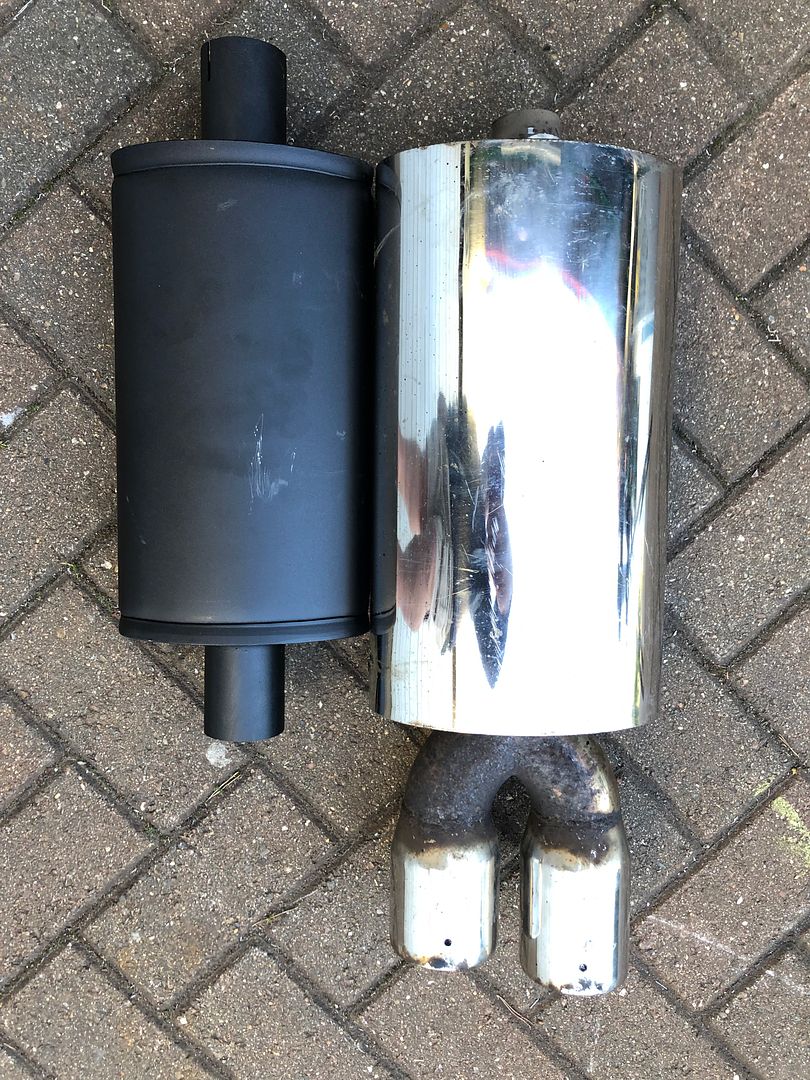 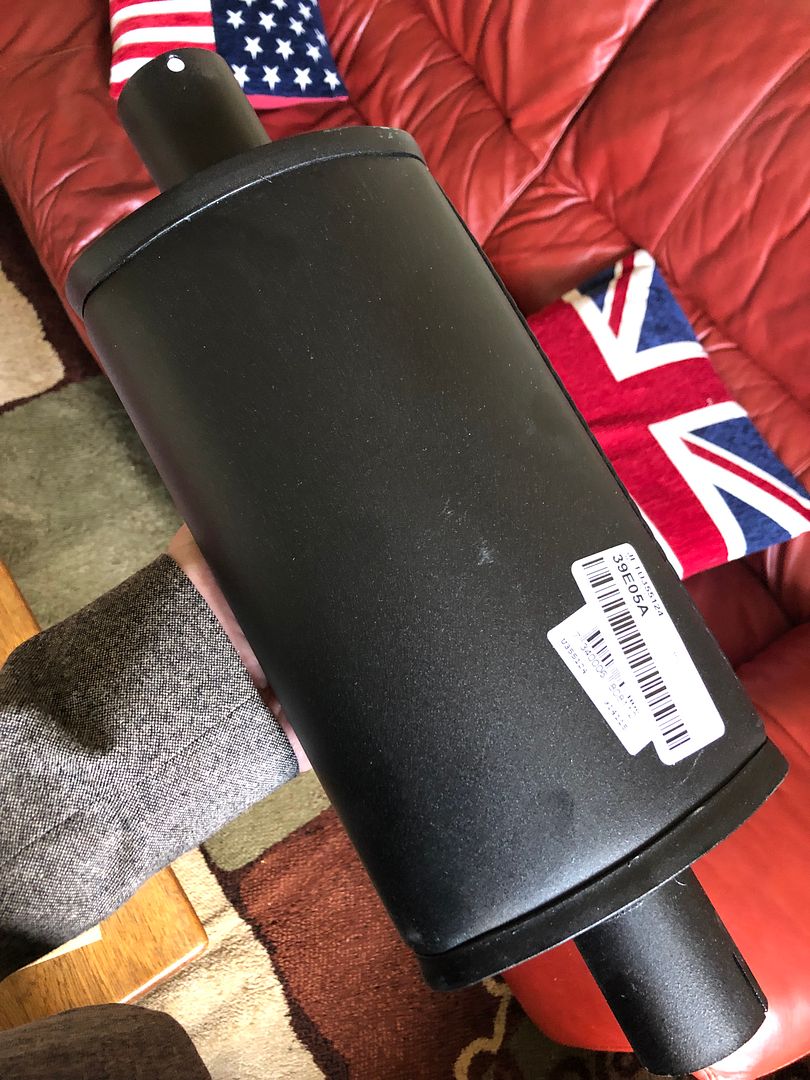 Last bit of delivery pleasure today was the stick on number plate to go on the rear. 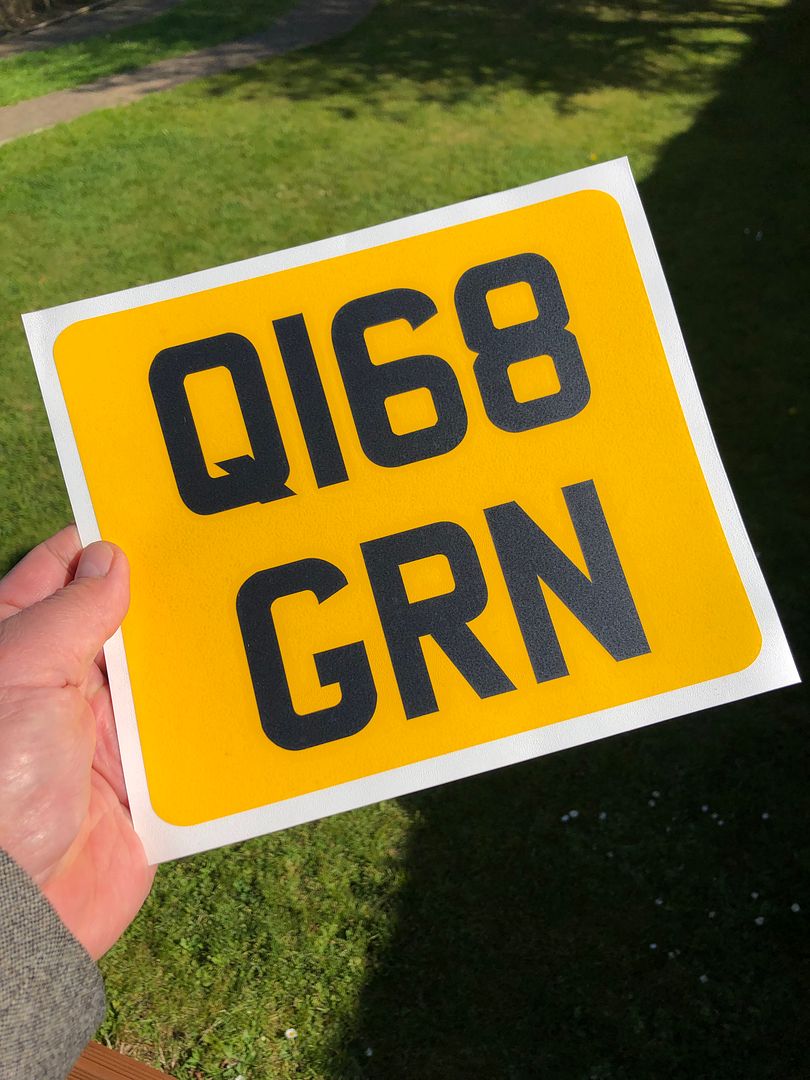 This will fit in above the fuel filler toolbox and next to the rear lights. .
__________________
MY BUILD LINK: http://67-72chevytrucks.com/vboard/s...585901]Redneck Express - 1966 C10 Short Fleetside MY USA ROADTRIPS http://forum.retro-rides.org/thread/...2018-humdinger IF YOU CAN'T FIX IT WITH A HAMMER, YOU'VE GOT AN ELECTRICAL PROBLEM MATE. |
|
|
|
|
04-22-2022, 02:12 PM
|
#19 |
|
Registered User
Join Date: Dec 2012
Location: Rochester, KENT
Posts: 10,514
|
Re: GRIZZs 79 - 2WD BLAZER Challenge over in London, England. ~Its not a Project
Small parcel in the mail yesterday.
Thanks again @peteh1969 for making the effort for a total stranger. I suspect many of you can guess where the name badge is headed. The RocketPigs are actually left handers, or mirror images of the ones I painted before. My mild OCD asked for them to all be pointing forward and Pete was kind enough to print off a new set. Also included was the cars name. 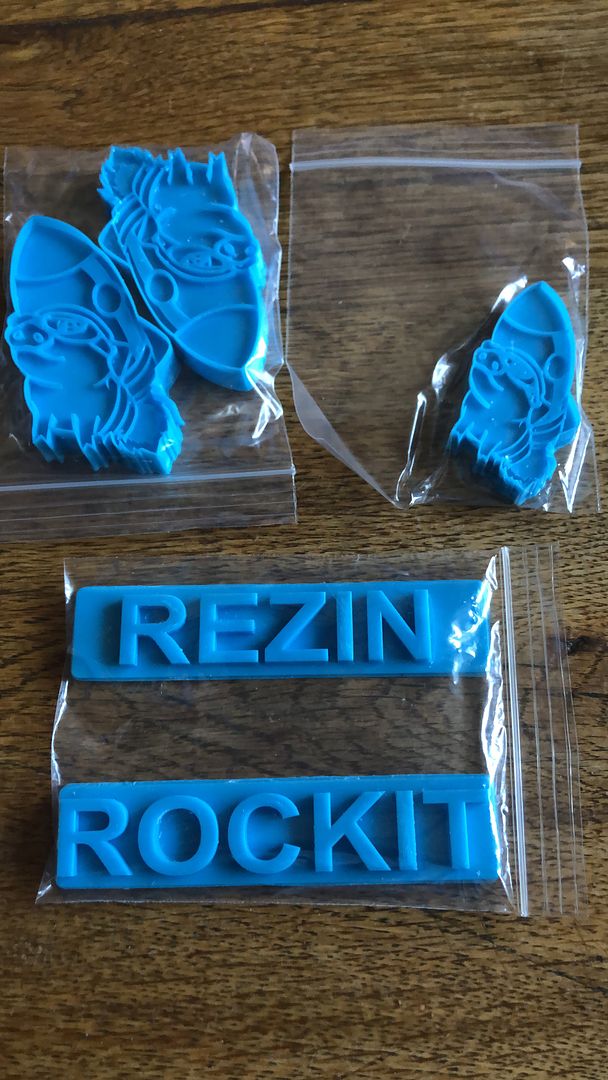 I managed to snap one on trying to straighten it out gently, so added automotive double sided tape to fix it to the toolbox on tje rear. Than followed up with black paint all over. 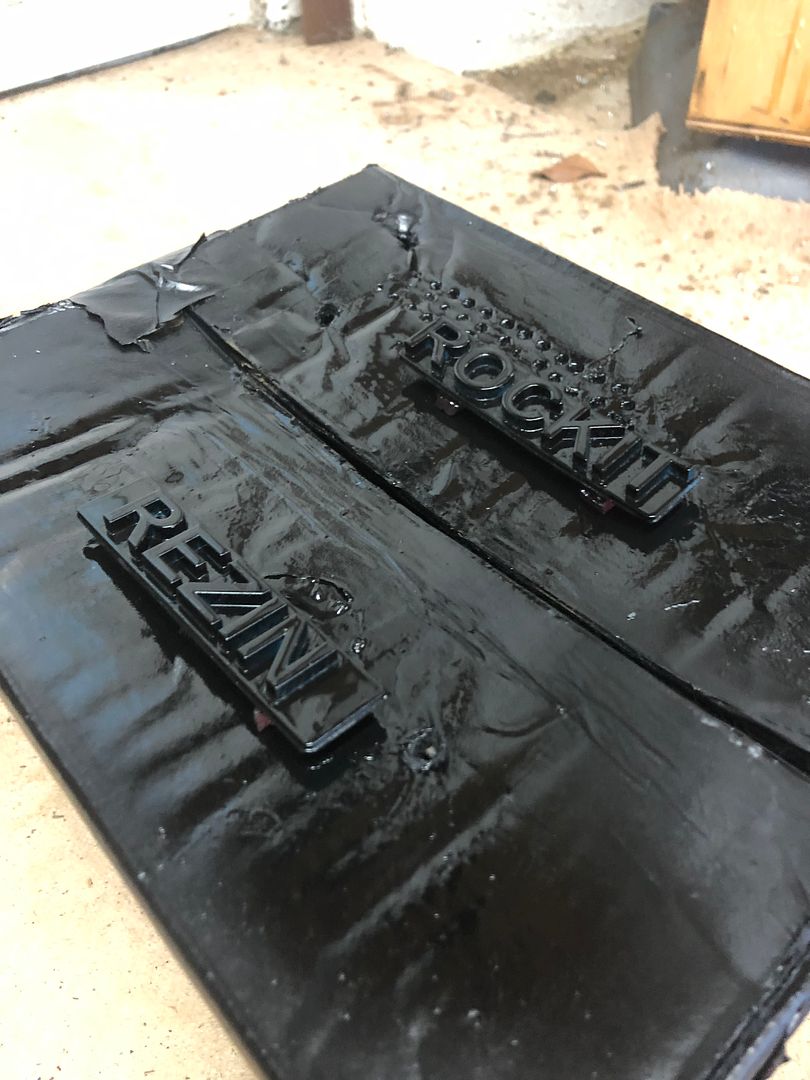 Then 4 very light coatings of silver chrome paint. 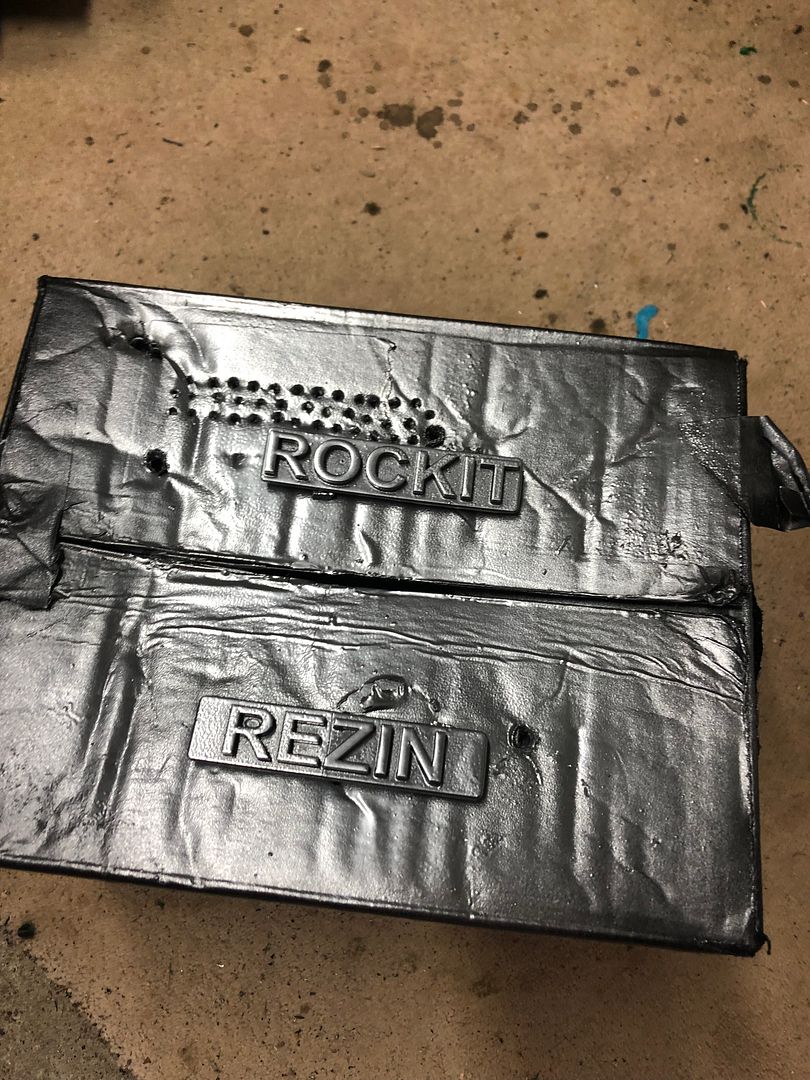 Once fitted to the rear of the Rezin Rockit they will be fixed to it. But before that I need to paint the background out in black to allow the letters to pop 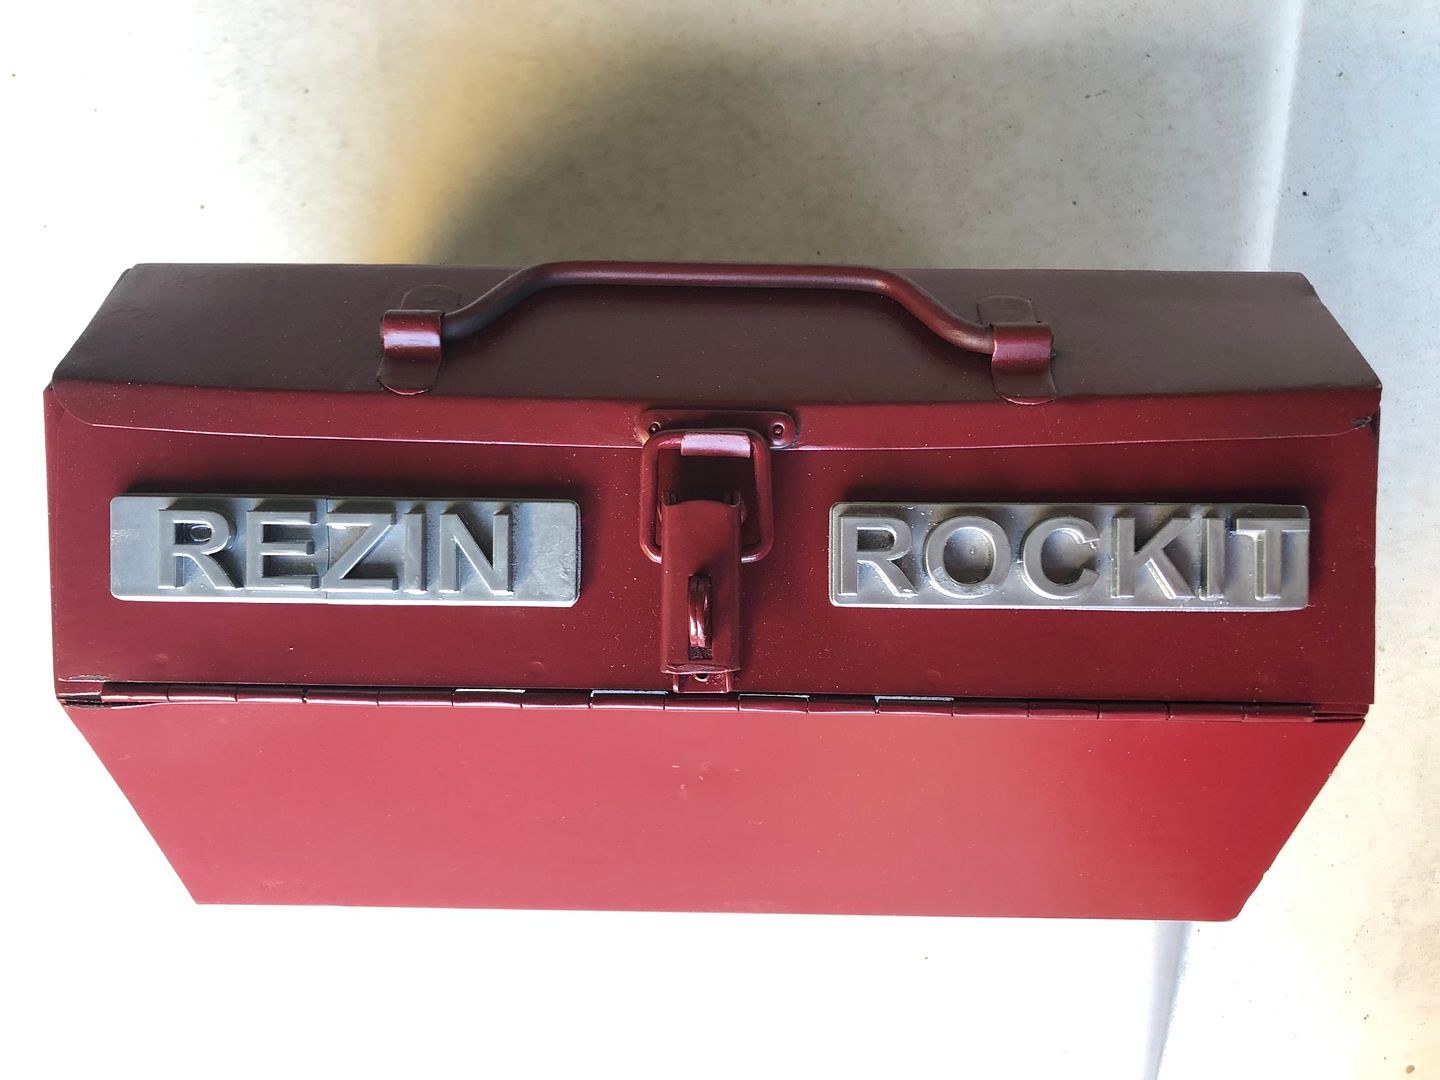 While I was down there, I decided to give vinyl covering the first kick panel a go. Contact adhesive, light pressure, new Stanley knife blade and away we go. Curve done first, many cuts to allow the best stretching and shaping on the curve. 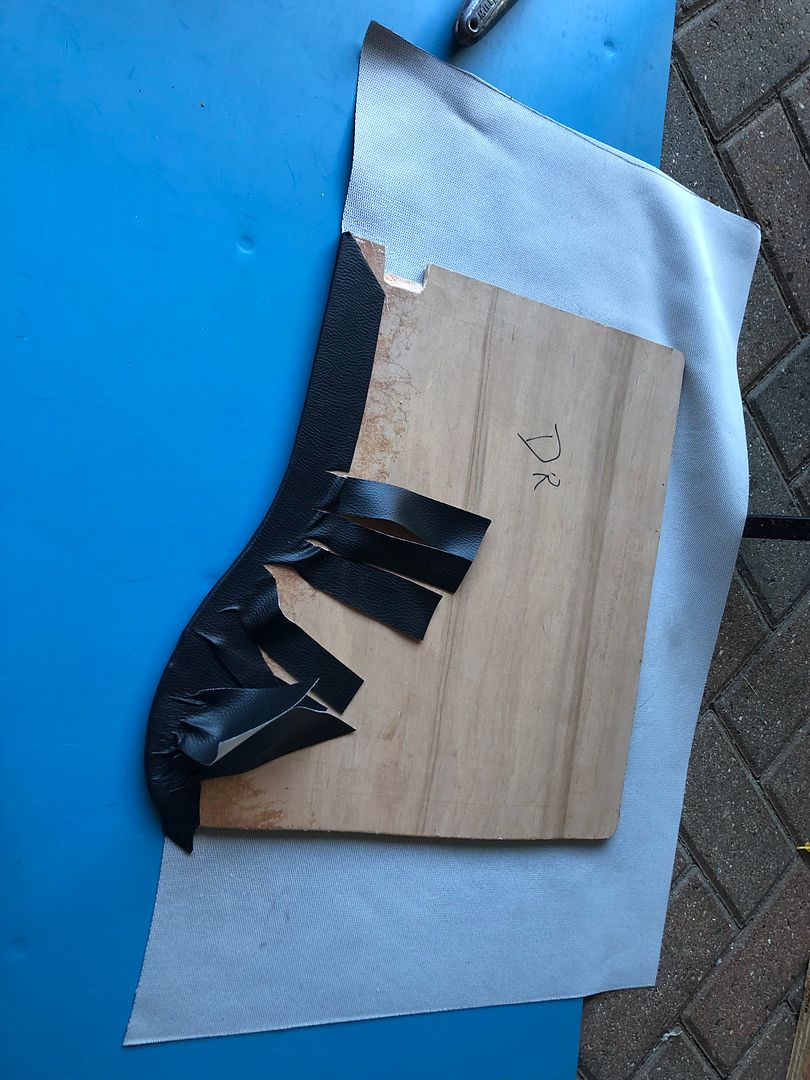 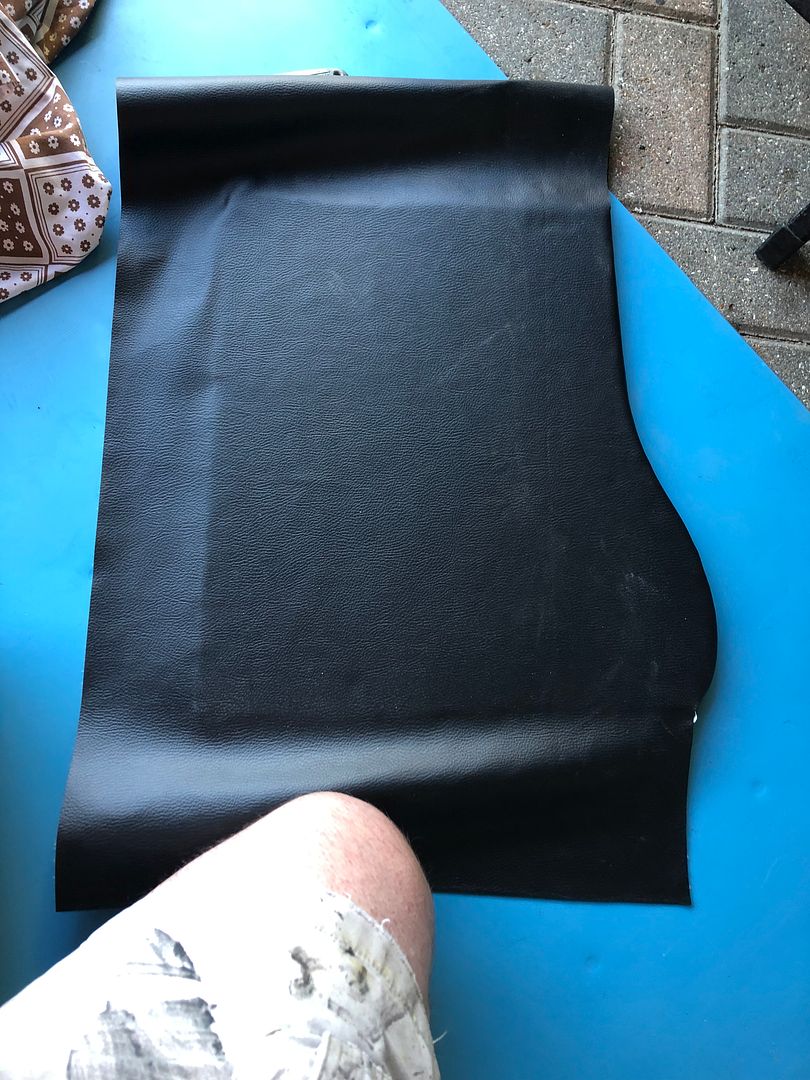 Job completed, well, first panel done. 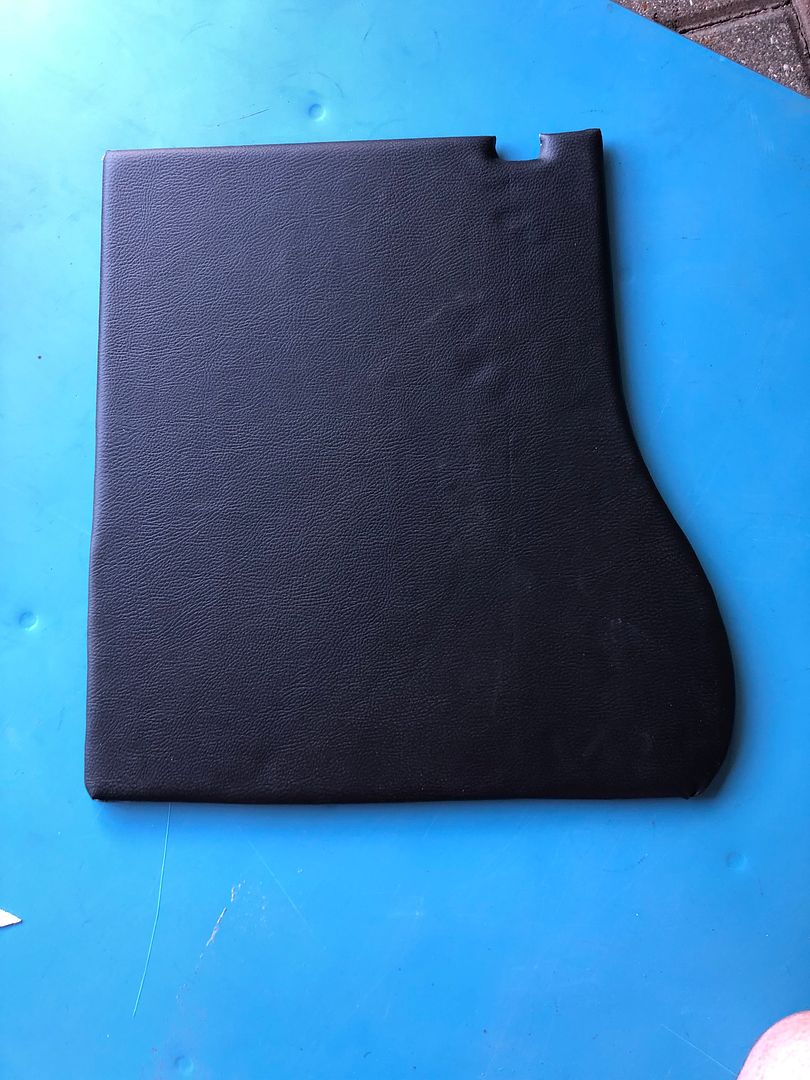 And fitted. Yes, I know ... Loads more to get done. 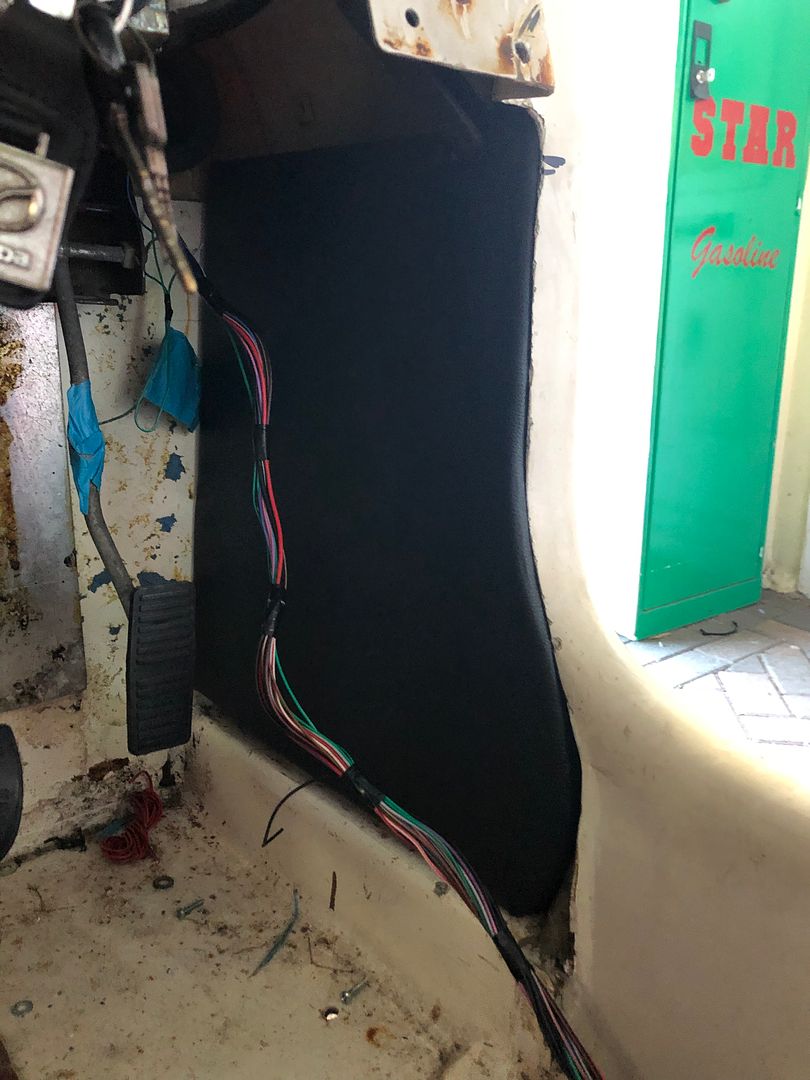 If the rest of the vinyl comes out this well, I will be very pleased. Weekend tomorrow. Lots to do.
__________________
MY BUILD LINK: http://67-72chevytrucks.com/vboard/s...585901]Redneck Express - 1966 C10 Short Fleetside MY USA ROADTRIPS http://forum.retro-rides.org/thread/...2018-humdinger IF YOU CAN'T FIX IT WITH A HAMMER, YOU'VE GOT AN ELECTRICAL PROBLEM MATE. |
|
|
|
|
04-22-2022, 02:54 PM
|
#20 |
|
Registered User
Join Date: Dec 2012
Location: Rochester, KENT
Posts: 10,514
|
Re: GRIZZs 79 - 2WD BLAZER Challenge over in London, England. ~Its not a Project
And then mate Fil, Sparkplug goes and does a quick photoshop.
 Getting to look even better.
__________________
MY BUILD LINK: http://67-72chevytrucks.com/vboard/s...585901]Redneck Express - 1966 C10 Short Fleetside MY USA ROADTRIPS http://forum.retro-rides.org/thread/...2018-humdinger IF YOU CAN'T FIX IT WITH A HAMMER, YOU'VE GOT AN ELECTRICAL PROBLEM MATE. |
|
|
|
|
04-23-2022, 02:37 AM
|
#21 |
|
Registered User
Join Date: Dec 2012
Location: Rochester, KENT
Posts: 10,514
|
Re: GRIZZs 79 - 2WD BLAZER Challenge over in London, England. ~Its not a Project
WHEN YOU CAN SMELL A PICTURE.
 Dont you just love a 48 hour turnaround. Called in at JWE Engineering [a hrefhttps://www.google.co.uk/url?sa=t&rc...7fD0BeoUt8]JWE Engineering[/a] Dropped off my two prop-shafts and measurements and less than 48 hrs later they called me back to say I can come collect. £200.00 including the four special M10x1 18mm shouldered bolts later and I was on my way to a work meeting. Great to get it on a Friday so @nickwheeler and I can have a test fit later today. 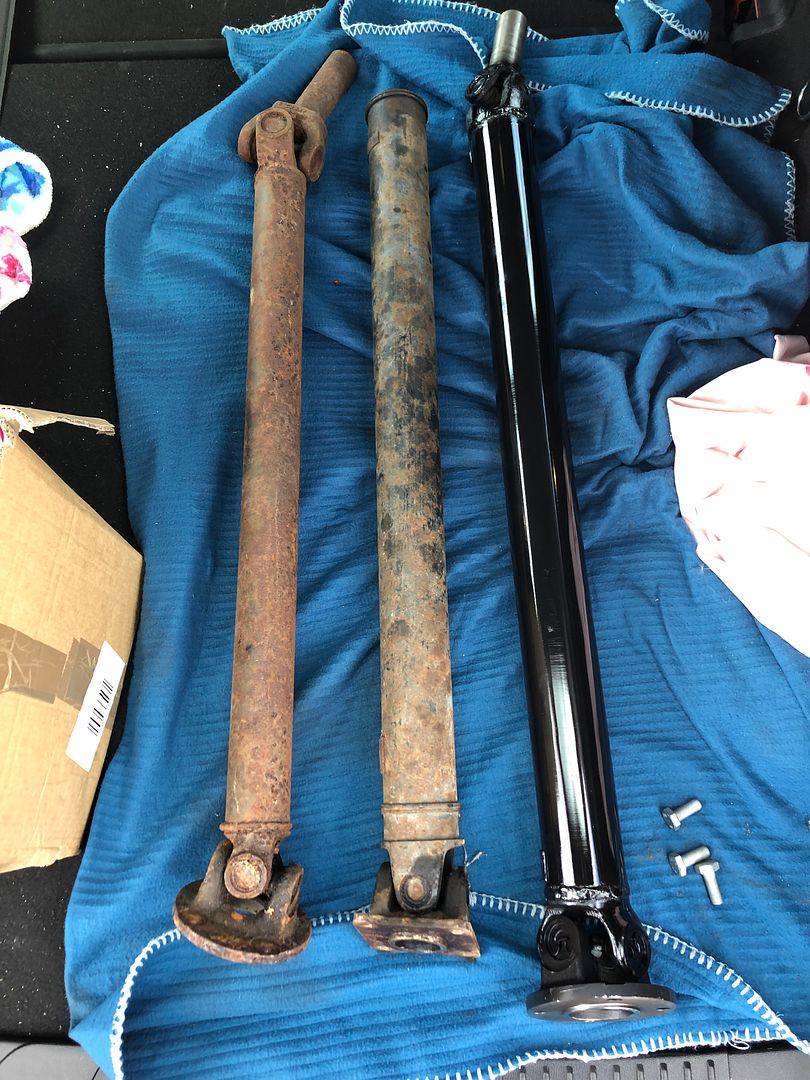 Back home I had a chance to take a look. 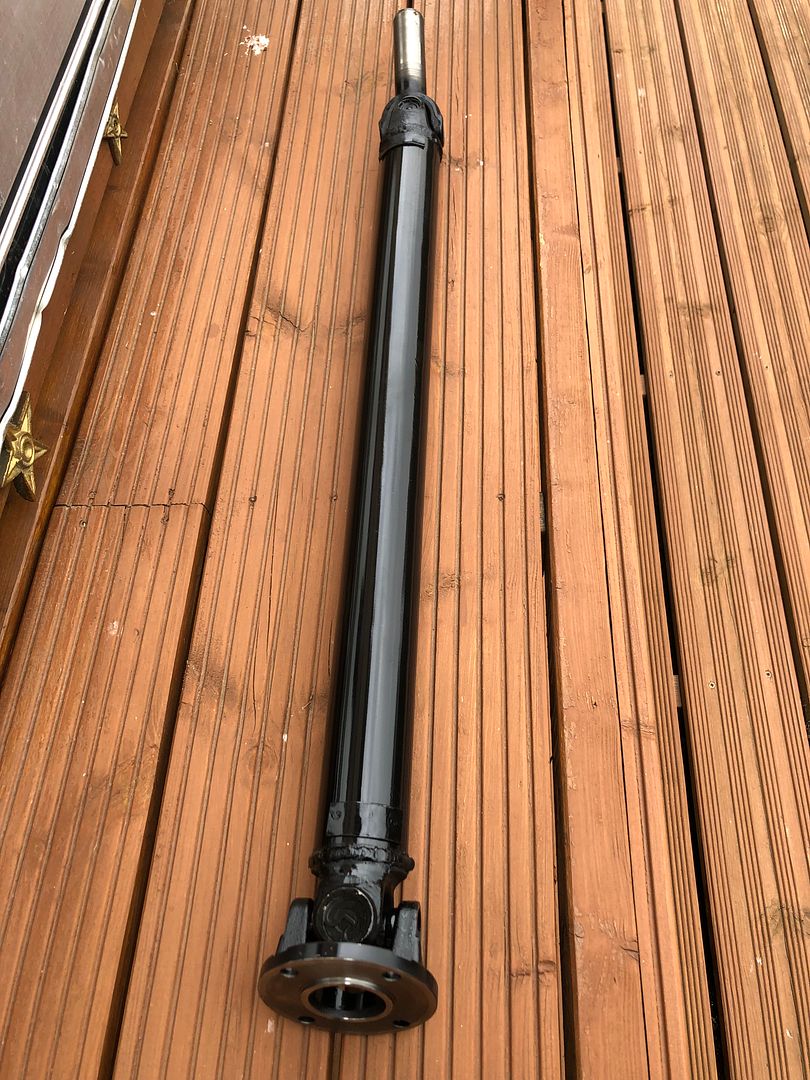 Happy with that. Black, new parts. Shiny.
__________________
MY BUILD LINK: http://67-72chevytrucks.com/vboard/s...585901]Redneck Express - 1966 C10 Short Fleetside MY USA ROADTRIPS http://forum.retro-rides.org/thread/...2018-humdinger IF YOU CAN'T FIX IT WITH A HAMMER, YOU'VE GOT AN ELECTRICAL PROBLEM MATE. |
|
|
|
|
04-25-2022, 01:50 PM
|
#22 |
|
Registered User
Join Date: Oct 2015
Location: PNW
Posts: 3,580
|
Re: GRIZZs 79 - 2WD BLAZER Challenge over in London, England. ~Its not a Project
Good progress. I hope you guys get your week off to a good start.
|
|
|
|
|
04-25-2022, 04:41 PM
|
#23 | |
|
Registered User
Join Date: Dec 2012
Location: Rochester, KENT
Posts: 10,514
|
Re: GRIZZs 79 - 2WD BLAZER Challenge over in London, England. ~Its not a Project
Quote:
One of Sundays jobs was reconnecting the hndbrake. And yes, it works, engages rear wheel drums, but the handbrake will not engage a ratchet. The handle lifts, the button is locked in place. Any ideas? 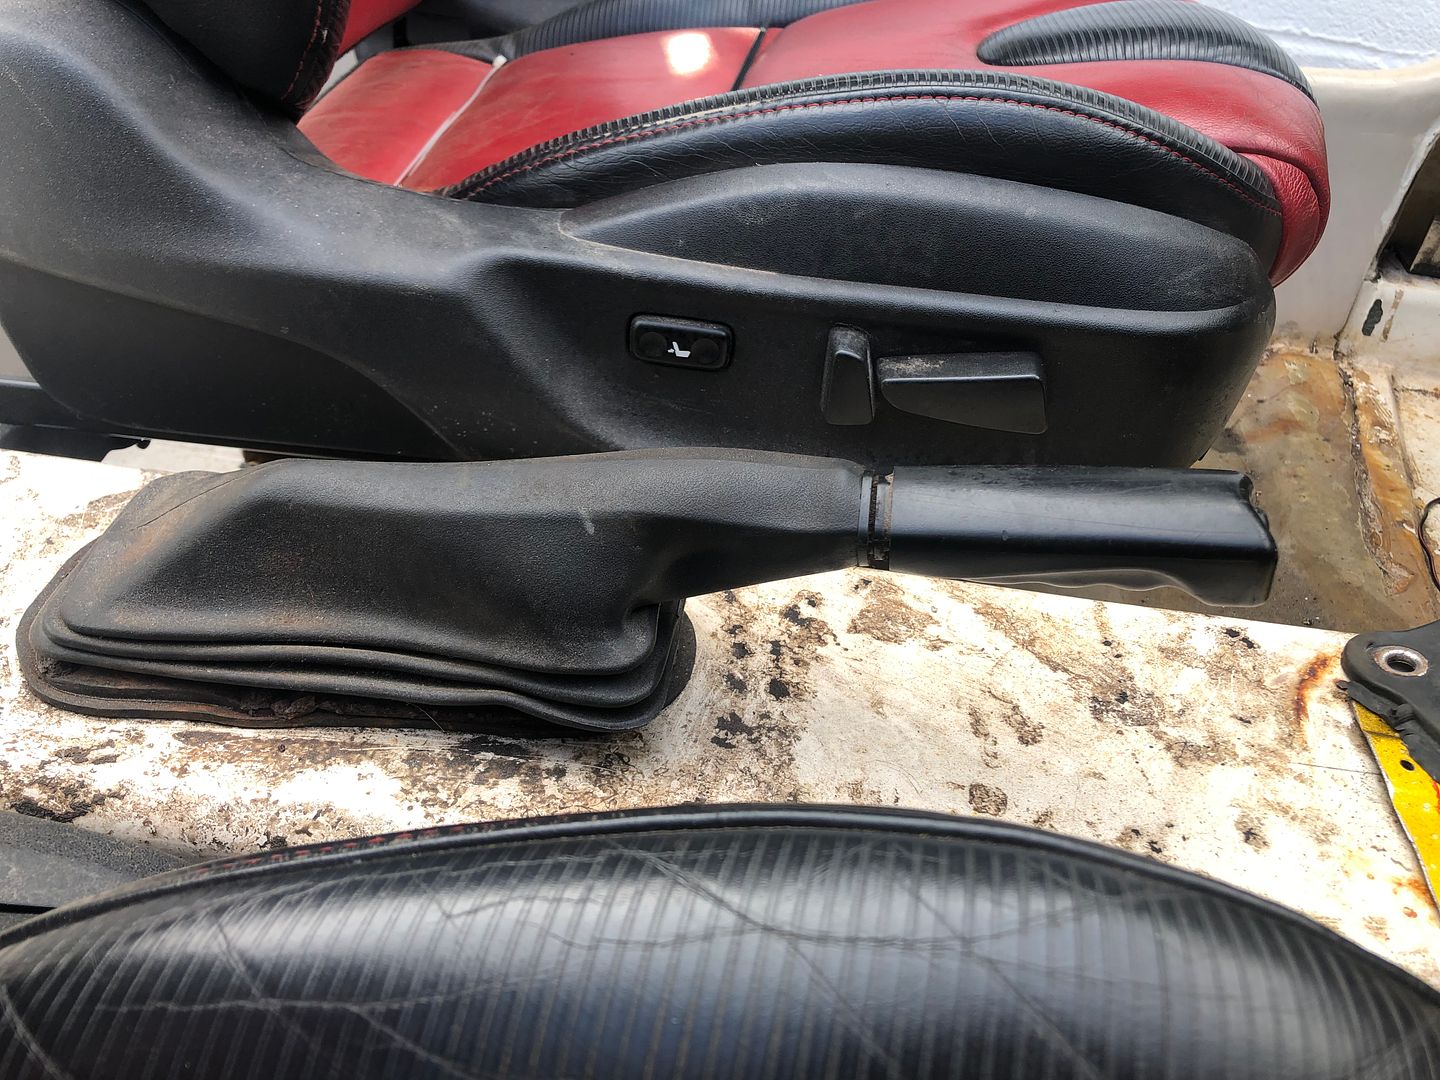 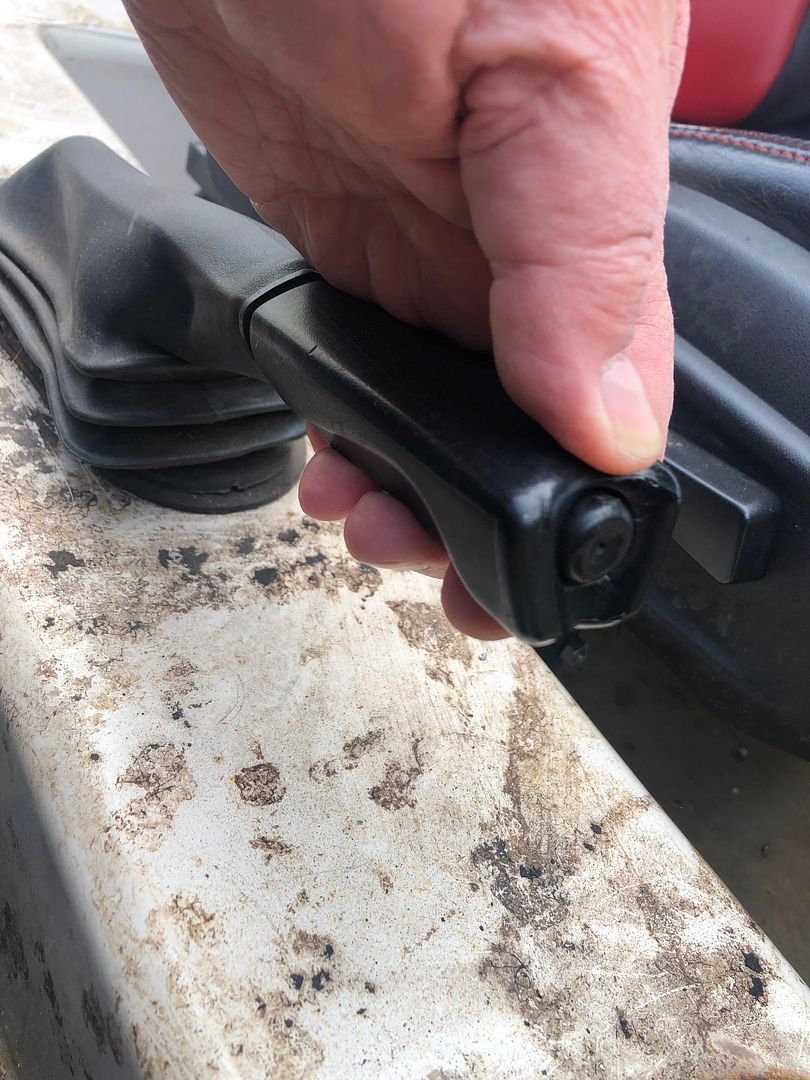 So that did not work too well. Advice? Anyone for a handbrake lever stashed somewhere? Thanks.
__________________
MY BUILD LINK: http://67-72chevytrucks.com/vboard/s...585901]Redneck Express - 1966 C10 Short Fleetside MY USA ROADTRIPS http://forum.retro-rides.org/thread/...2018-humdinger IF YOU CAN'T FIX IT WITH A HAMMER, YOU'VE GOT AN ELECTRICAL PROBLEM MATE. |
|
|
|
|
|
04-26-2022, 04:15 PM
|
#24 |
|
Registered User
Join Date: Dec 2012
Location: Rochester, KENT
Posts: 10,514
|
Re: GRIZZs 79 - 2WD BLAZER Challenge over in London, England. ~Its not a Project
Remember the blower/heater unit built and fitted a while ago?
I need to finalise and button that up. Went to the scrapyard yesterday and did not find the ideal donor, but a corrugated vacuum cleaner pipe could just work. Also found these two damaged, but neat toys (ornaments) for sale at £5.00 each. And when I got home I pushed the car out into the sunlight for a better pic of the rear end. Not perfect, but better. 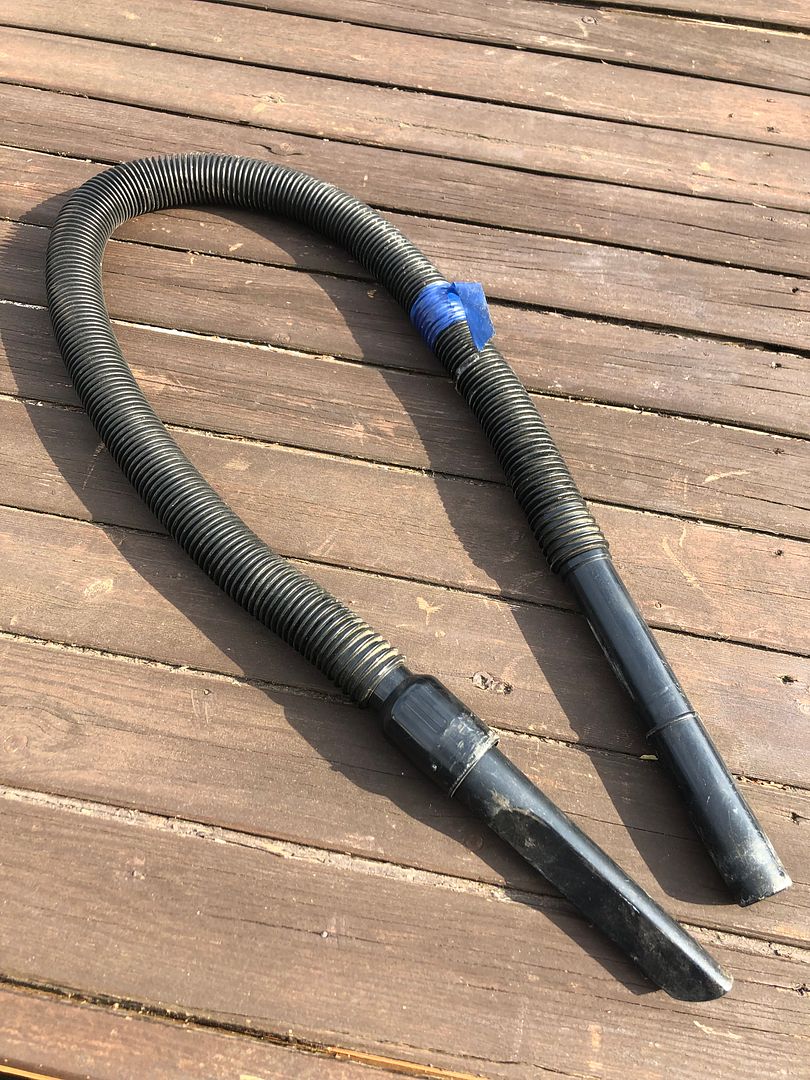 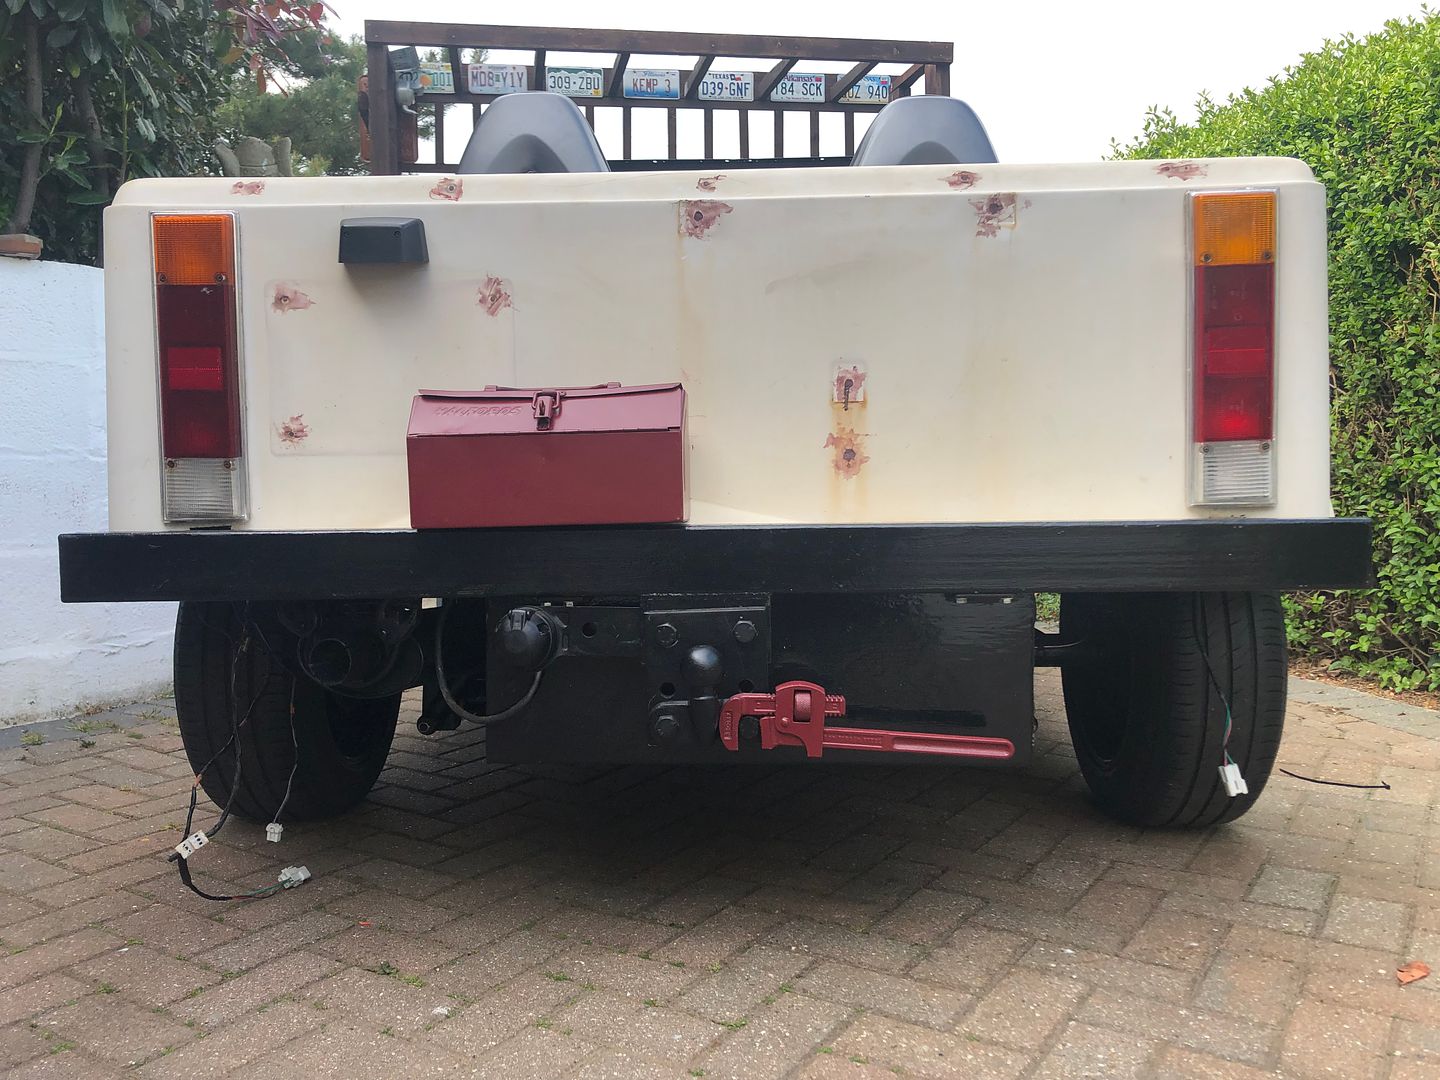 .
__________________
MY BUILD LINK: http://67-72chevytrucks.com/vboard/s...585901]Redneck Express - 1966 C10 Short Fleetside MY USA ROADTRIPS http://forum.retro-rides.org/thread/...2018-humdinger IF YOU CAN'T FIX IT WITH A HAMMER, YOU'VE GOT AN ELECTRICAL PROBLEM MATE. |
|
|
|
|
04-29-2022, 04:25 AM
|
#25 |
|
Registered User
Join Date: Dec 2012
Location: Rochester, KENT
Posts: 10,514
|
Re: GRIZZs 79 - 2WD BLAZER Challenge over in London, England. ~Its not a Project
Remember the movie JAWS?
Every time you think it is safe Felt like that last night. I constantly hope to be finished with the grinder on this built, and then it has to come out again. Last night, after removing the side handle (I hacked a finger tip doing this 30 years ago) I slipped it from the diff, up the transmission tunnel to get to the 6 rusted in bolts and cut them back in order to remove the rubber boot on the handbrake lever.  Then, taking the best part of an hour (yes, I am extremely patient) a load of Duck oil and a screwdriver, small ball pein hammer and a ton of up and down, in and outing, I tried to get the button to release so that I could hand operate it. FAILED TOTALLY. It moves in and out, but only with serious persuasion. 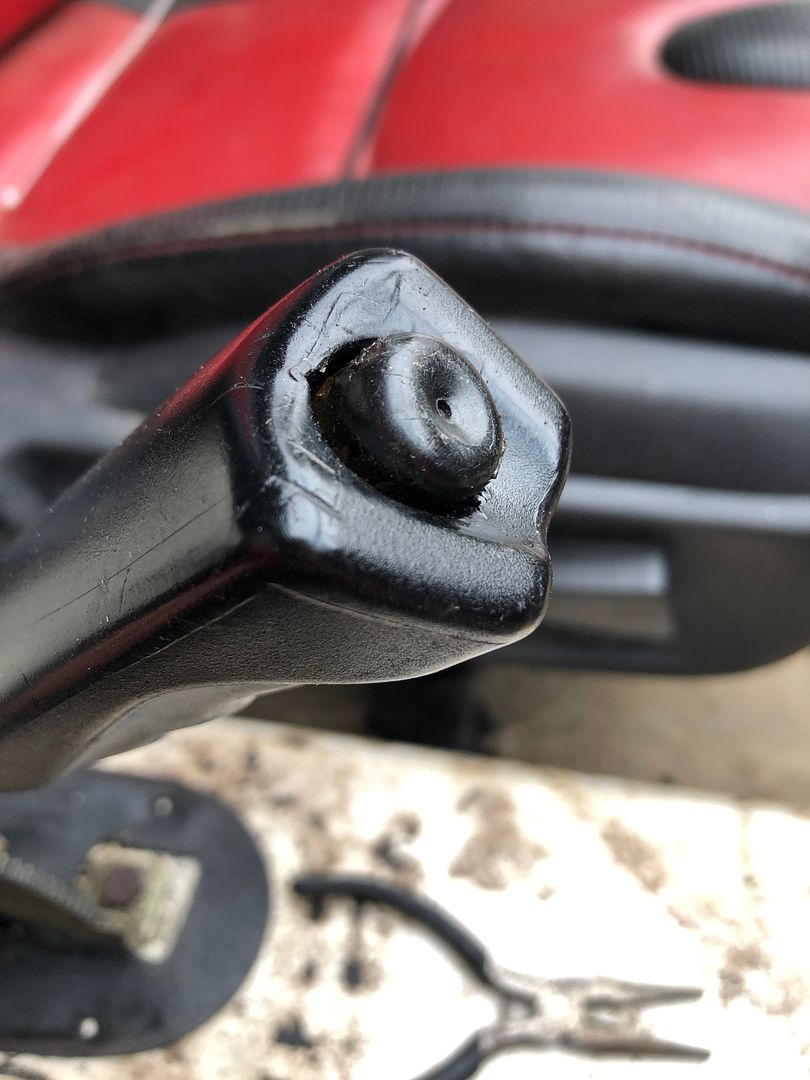 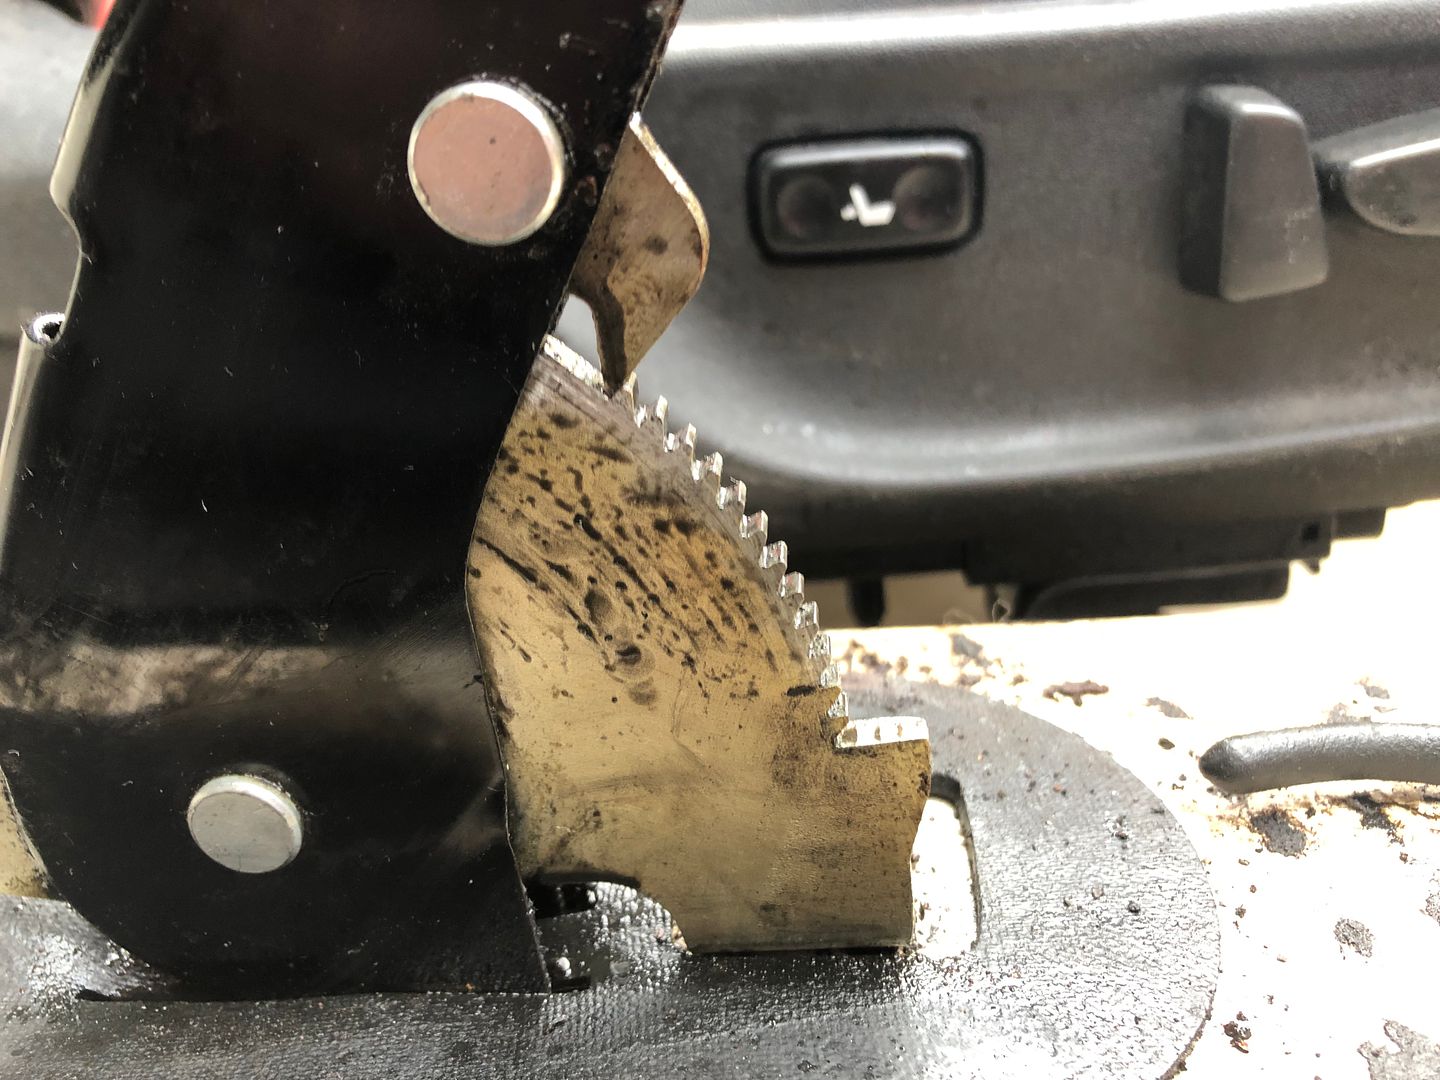 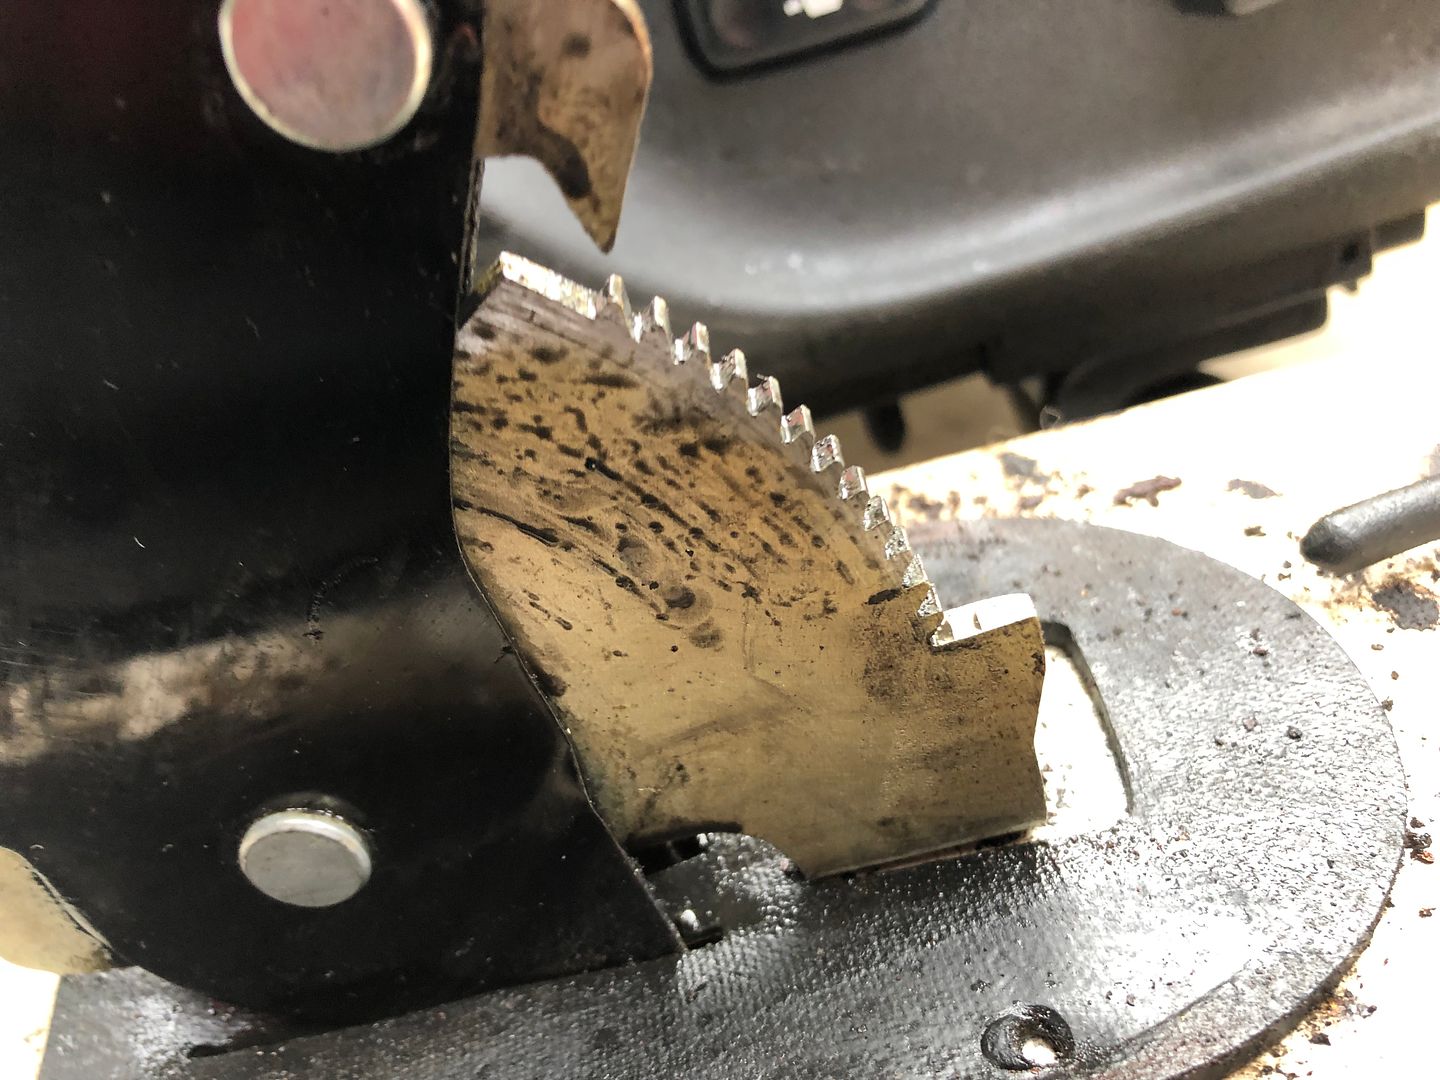 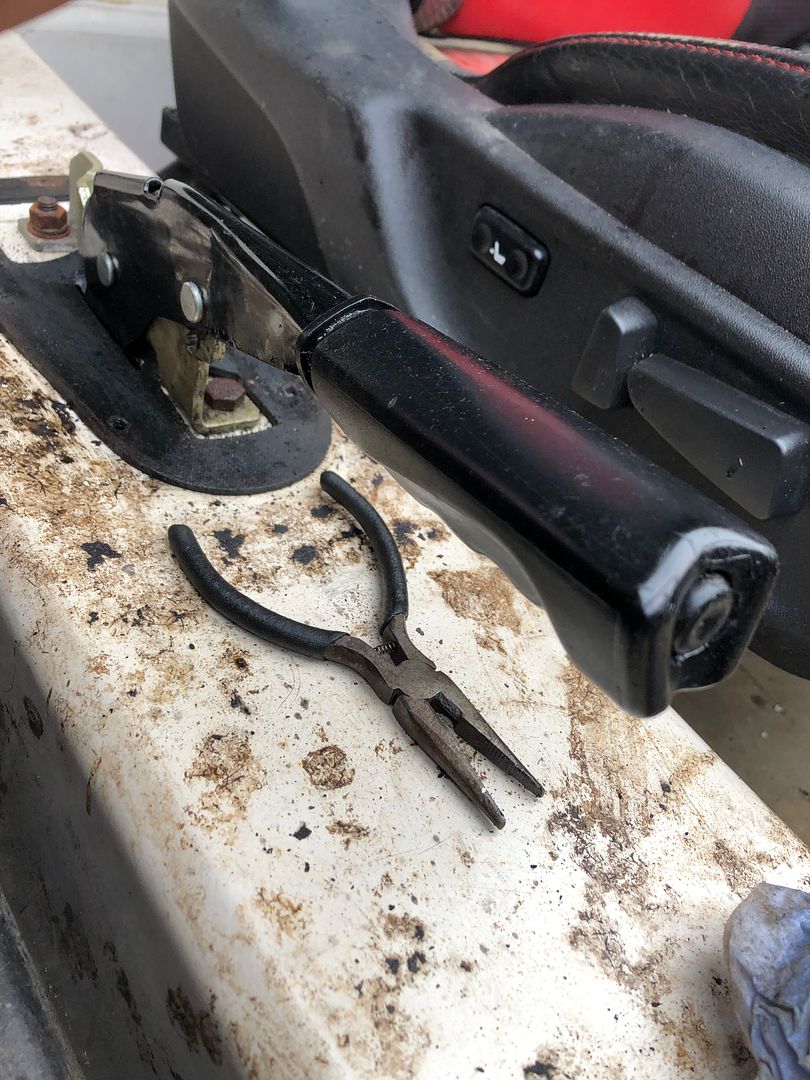 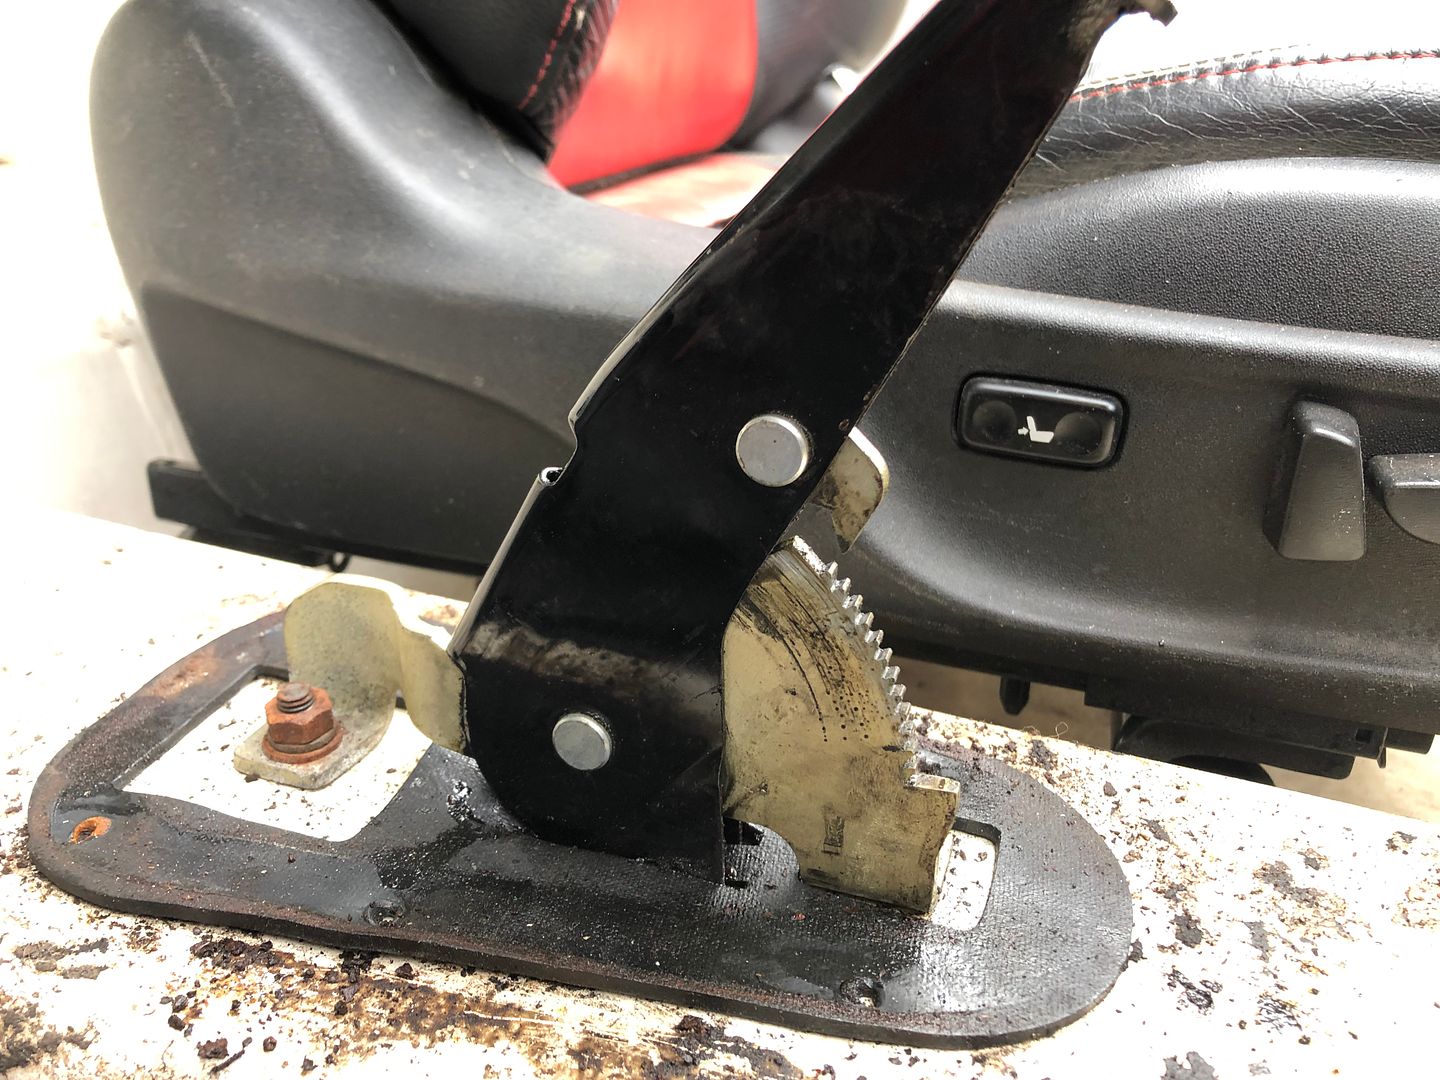 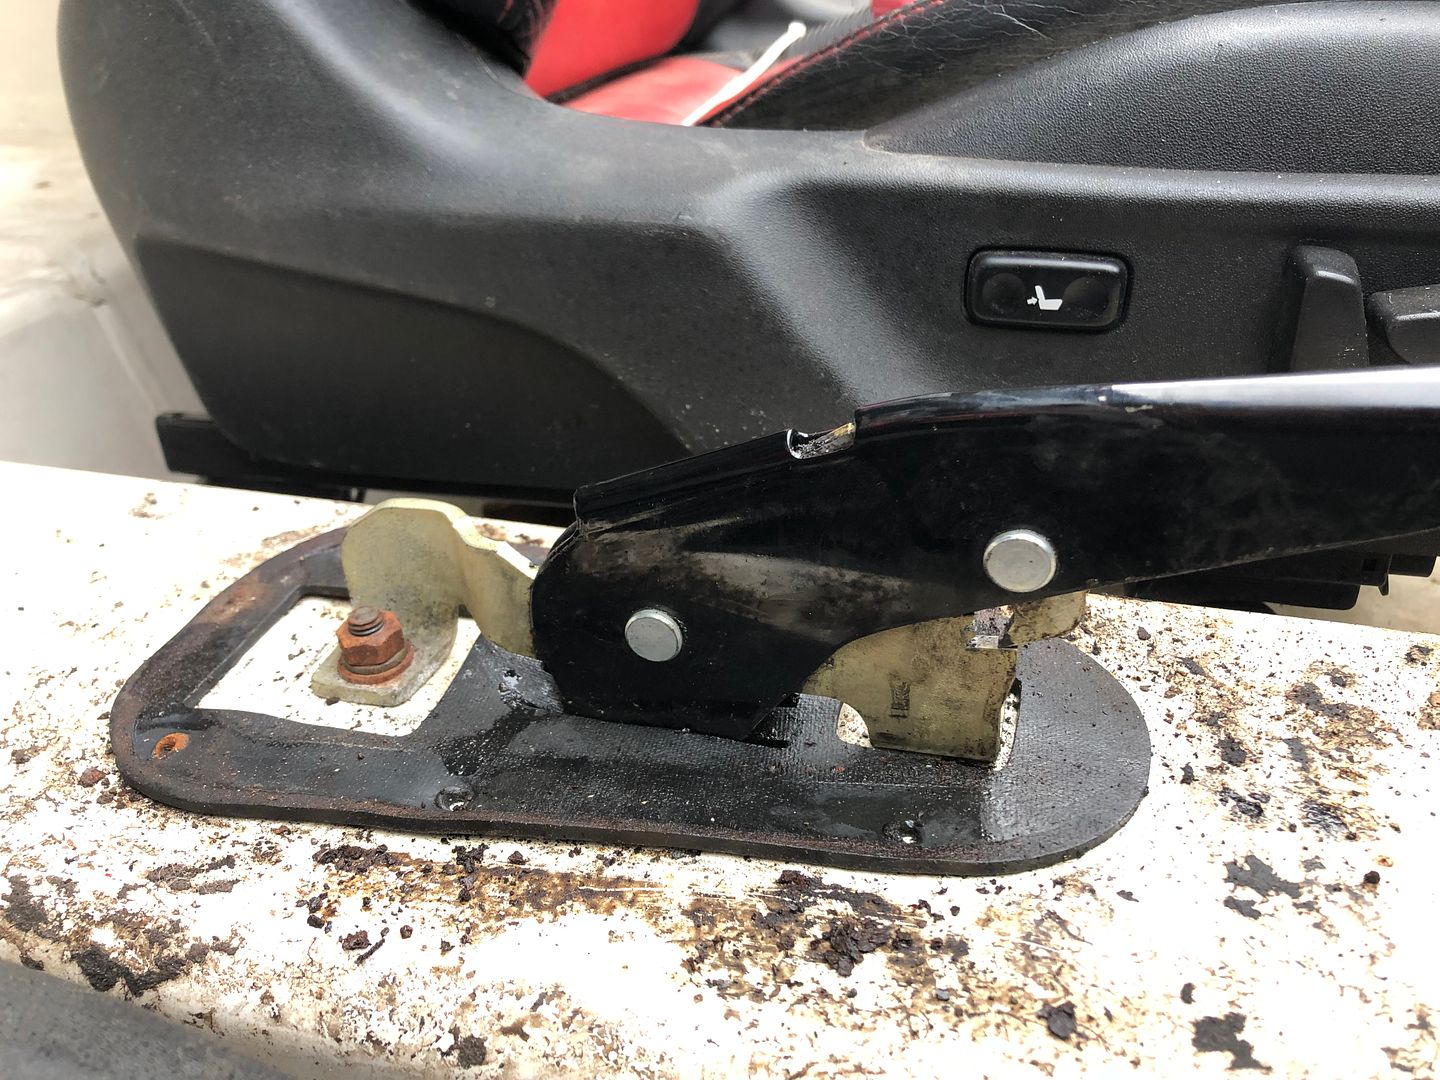 In the end I walked away as I could not figure how to get the rubber handle off, without damaging it. I sprayed more Duck oil in from both ends, using the extension to get in from the bottom. Seems this has truly succumbed to 15 plus years out in a field in Scotland.
__________________
MY BUILD LINK: http://67-72chevytrucks.com/vboard/s...585901]Redneck Express - 1966 C10 Short Fleetside MY USA ROADTRIPS http://forum.retro-rides.org/thread/...2018-humdinger IF YOU CAN'T FIX IT WITH A HAMMER, YOU'VE GOT AN ELECTRICAL PROBLEM MATE. |
|
|
|
|
| Bookmarks |
|
|


 Hybrid Mode
