
|
|
|
 02-23-2012, 02:44 AM
|
#1 |
|
Registered User
Join Date: Jul 2011
Location: Des Moines, Iowa
Posts: 3,016
|
Re: Project "My Happy Mess"
Previous owner from 1991 mentioned this full width floor mat when I spoke to him the one time. That makes this [real] rubber floor mat 21yrs old! There's no shoe wear!
  
__________________
project: "my happy mess" |

|

|
|
02-24-2012, 04:52 AM
|
#2 |
|
Registered User
Join Date: Jul 2011
Location: Des Moines, Iowa
Posts: 3,016
|
Re: Project "My Happy Mess"

Last edited by litew8; 02-24-2012 at 05:01 AM. |
|
|
|
|
02-24-2012, 04:53 AM
|
#3 |
|
Registered User
Join Date: Jul 2011
Location: Des Moines, Iowa
Posts: 3,016
|
Re: Project "My Happy Mess"
A ps rendition of what it should look like -
 Pics below, my original mat was kept even though torn up. De-greased and matched a piece against the dash and steering column. The only known [by me] imagery of an authentic OEM [elusive] Sandalwood Rubber Floor Cover/Mat    Colors made up at the auto store. The red outlines are failed attempts. Green is what I settled for (may want a hint darker). Everything else is true Sandalwood vinyl paint from the factory.   Unmasked the OEM vent windows and wiped clean The chrome is nearly perfect still, 41 year old QUALITY The rubber is still dark black and pliable! wow  
__________________
project: "my happy mess" Last edited by litew8; 02-24-2012 at 05:15 AM. |
|
|
|
|
02-24-2012, 06:47 AM
|
#4 |
|
Registered User
Join Date: Mar 2010
Location: Forest Hill, MD
Posts: 171
|
Re: Project "My Happy Mess"
Very very nice job litew8!! Can tell this one will be awesome.
__________________
72Kay20 Bel Air, MD 1972 Hugger Orange K20 LWB 350, 4wd, 4spd Sm465, Dana 44, HO52 Other Toys 69 Cortez Silver Z28 86 White Buick T Type |
|
|
|
|
02-24-2012, 04:37 PM
|
#5 |
|
Registered User
Join Date: Jul 2011
Location: Des Moines, Iowa
Posts: 3,016
|
Re: Project "My Happy Mess"
Thanks man! A couple hours a day, things are looking better.
Funny how you don't realize something is nice, until you sandblast, paint and clean it. Proud of my 41 year old chrome vent windows  Here's what today brought -   This is the "Ivory" paint sample (right side) for door panels, etc... A dash of White (to brighten it up) was added -  And a couple more shots of my vent windows, sorry - I'm impressed too   
__________________
project: "my happy mess" |
|
|
|
|
03-02-2012, 04:08 AM
|
#6 |
|
Registered User
Join Date: Jul 2011
Location: Des Moines, Iowa
Posts: 3,016
|
Re: Project "My Happy Mess"
Not much of an update other than we're starting to work on the cab.
We're not going to bring the whole thing down to bare metal, but maybe some. Here's a pic of the entire floor covered with Hushmat, and today did some wire wheeling to remove the old weatherstrip adhesive. Looks good underneath!     Should be able to get a lot more done this weekend.
__________________
project: "my happy mess" |
|
|
|
|
03-03-2012, 03:25 AM
|
#7 |
|
Registered User
Join Date: Jul 2011
Location: Des Moines, Iowa
Posts: 3,016
|
Re: Project "My Happy Mess"
Thanks hg
Nice fab work on your latest repair!-- Here are some pics of the window channel. Not very exciting, just showing what I'm working with and how much rust is present. It could be worse We think our window guy, a friend of The Fixer's, will be able to work with it OK.Worst parts are the top corners. In between, along the top/bottom, are very clean! Drip rails are very clean also. Before shots - 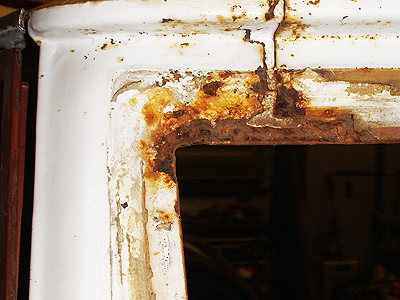  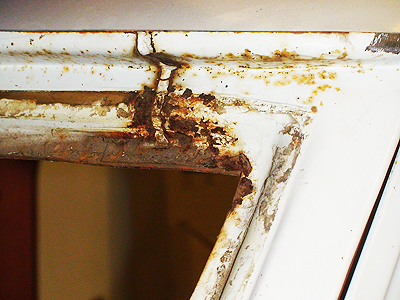     My ghetto masking job - And after wire wheeling - 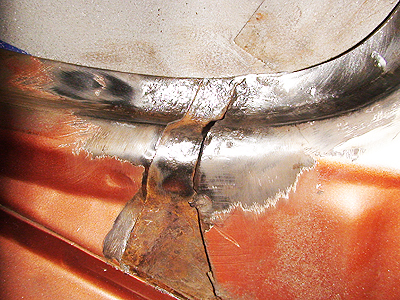   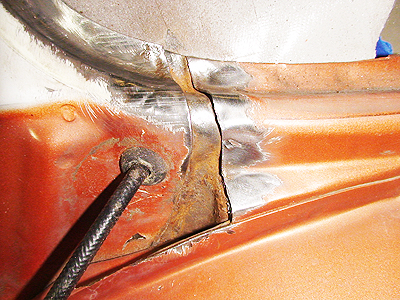   Planning on working a lot more this weekend. Thanks for looking!
__________________
project: "my happy mess" Last edited by litew8; 03-03-2012 at 03:54 AM. |
|
|
|
|
03-05-2012, 04:10 PM
|
#8 |
|
Registered User
Join Date: Jul 2011
Location: Des Moines, Iowa
Posts: 3,016
|
Removing old paint
Got a lot of paint removed over the weekend. The goal is to remove the paint
in corners so the rest can be hit with the DA later. We'll remove the remaining paint and sand out scratches left by the wire wheel, all in one pass. I've done more (today) since these shots were taken.           Who knows what this is?  Tools used (also a 4" wire wheel) -     
__________________
project: "my happy mess" |
|
|
|
|
03-06-2012, 05:55 AM
|
#9 | |
|
Registered User
Join Date: Dec 2011
Location: Germanton, NC
Posts: 61
|
Re: Removing old paint
Quote:
http://www.mytractorforum.com/showthread.php?t=145850
__________________
Link to my 69 Camaro 6.0/T56 swap: http://ls1tech.com/forums/conversion...69-camaro.html |
|
|
|
|
|
03-06-2012, 10:31 AM
|
#10 | |
|
Registered User
Join Date: Jul 2011
Location: Des Moines, Iowa
Posts: 3,016
|
Re: Removing old paint
Quote:
Not so mini Though none (pgs 2 & 3) in that link are as complete. It's The Fixer's. It will be getting cleaned up too. Maybe throw it in the back of my 71'. 
__________________
project: "my happy mess" |
|
|
|
|
|
03-06-2012, 04:22 PM
|
#11 |
|
Registered User
Join Date: Jul 2011
Location: Des Moines, Iowa
Posts: 3,016
|
Door work
Well, it's nearly 70 degrees here today!
I keep on changing the schedule.Thought we'd hit the kick panels and door jams first, but the way things have been going, I think we'll just wait and hit it all at once instead. The weather looks to be getting better and better each week. Today, spent a few hoursworking on the driver's door. Again, just cleaning up the corners, curves and groves, later we'll hit the flat areas with the DA. I can almost smell the paint! or is that the dust from grinding Not bad, none of the rust has busted through entirely and should clean up nice. The Fixer said we'll hit the rusty areas with a spot blaster later. Before -       After -  
__________________
project: "my happy mess" |
|
|
|
|
03-11-2012, 02:00 PM
|
#12 |
|
Registered User
Join Date: Jul 2011
Location: Des Moines, Iowa
Posts: 3,016
|
Re: Project "My Happy Mess"
Got the other bulb put into the blast cabinet.
Here's a shot of it and product placement.  400w equivalent (both) using only 84w!  Who can guess what this is? 
__________________
project: "my happy mess" Last edited by litew8; 03-11-2012 at 02:07 PM. |
|
|
|
|
03-13-2012, 02:13 AM
|
#13 |
|
Registered User
Join Date: Jul 2011
Location: Des Moines, Iowa
Posts: 3,016
|
Re: Project "My Happy Mess"
edit: Go back and read what I wrote, calmly and slowly.
------------------------------------------------------------- Now that the  nay-say rambling is over (hopefully nay-say rambling is over (hopefully  ), we'll continue on! ), we'll continue on! Reconditioned my fresh air vents today. Drilled out the old rivets and replaced w/new, similar rivets.  After, I used the drill bit to make holes in the new insert for the new rivets.    The tool used to smack the rivets down into place. Didn't get a picture of them finished, going to touch up with ZR first.  Product placement.   This explains it. This explains it.
__________________
project: "my happy mess" |
|
|
|
|
03-13-2012, 03:56 PM
|
#14 |
|
Registered User
Join Date: Jul 2011
Location: Des Moines, Iowa
Posts: 3,016
|
Re: Project "My Happy Mess"
Finished up the fresh air vents with quick shots of ZR.
 Pic of the doors, a little more done. Haven't had time (or space) to finish.  Misc.  Another hint:  Saving the best for last, I thought I'd let you all get to know my crew better. Here are pics of The Fixer and the Pit Boss The Fixer  The Pit Boss 
__________________
project: "my happy mess" |
|
|
|
|
03-14-2012, 03:52 PM
|
#15 |
|
Registered User
Join Date: Jul 2011
Location: Des Moines, Iowa
Posts: 3,016
|
Passenger's fender
Decided to pull the OEM replacement fender out.
Wanted to see what what underneath the paint. Had a little surprise, but not too bad Here's what I had to start with:   Then I stuck gold! not really, it's bondo  Looks like there was a dent that was hammered out -  And then on the other side, a little more. This looks like holes for lower trim. The fender must have either been a donor before, or whoever owned it got rid of the lower trim and welded up the holes.   Finished off for the day. Not bad for a couple hours worth of work      
__________________
project: "my happy mess" |
|
|
|
|
03-16-2012, 02:37 AM
|
#16 |
|
Registered User
Join Date: Jul 2011
Location: Des Moines, Iowa
Posts: 3,016
|
Re: Project "My Happy Mess"
 My typing is getting a little sloppy (above post). My typing is getting a little sloppy (above post). That's what happens when I'm tired and in a rush. Oh well. "Wanted to see what was" "Then I struck gold!" --------- Took the driver's side fender out today and cleaned it up. Found a couple more little surprises, easy fixes.  Before I started, The Fixer and I finished converting the shop's lighting. Same bulbs used as in the blast cabinet. We estimate he'll be using one 1/2 less power now and has a brighter coverage than before. We're not "going green" because we think that's for sissies 2,400w [equivalent] candle power (cp)! He had 12 4' florescent light fixtures, dual bulbs. The Fixer finishing up -   Driver's fender in 80 degree weather! booyah!       Here are the areas that will need some attention later on. Expect a little tutorial on how to use/apply bondo.  
__________________
project: "my happy mess" Last edited by litew8; 03-16-2012 at 02:49 AM. |
|
|
|
|
03-17-2012, 02:11 AM
|
#17 |
|
Registered User
Join Date: Jul 2011
Location: Des Moines, Iowa
Posts: 3,016
|
Re: Project "My Happy Mess"
Got the driver's door cleaned up some more. Tip: How to get sunburned in March,
grind a 71' Chevy pickup door down to metal, at noon, under the sun. Couple pics of the driver's door - Since this door was previously stripped (uneven paint) and there was small, noticeable signs of surface rust around the center, I took the paint off completely to verify it's condition. Not bad, very small areas of surface rust... will clean up easily.   Misc. My sister's (Patty from the Bronx) car floor mat  Who knows what this is? Hint, K&N isn't related.   
__________________
project: "my happy mess" Last edited by litew8; 03-17-2012 at 02:28 AM. |
|
|
|
|
03-17-2012, 09:56 PM
|
#18 |
|
Registered User
Join Date: Aug 2008
Location: North GA
Posts: 400
|
Re: Project "My Happy Mess"
Its an electric driven pump to supply clean air to respirators, made by Bullard...
__________________
"Some of my finest hours have been spent on my back veranda, smoking hemp and observing as far as my eye can see." - Thomas Jefferson 72 C10 SWB "Work in Progress" |
|
|
|
|
03-17-2012, 10:56 PM
|
#19 |
|
Registered User
Join Date: Jul 2011
Location: Des Moines, Iowa
Posts: 3,016
|
Re: Project "My Happy Mess"
Correct! A Bullard Free-Air electric pump to be exact. Oil-less so they do not produce carbon monoxide, oil vapor or oil mist. Doesn't need CO monitors, temperature alarms, airline filters, or complicated calibration equipment. AIR FLOW: 10 cfm at 5 psig. Supplies air to one, or two workers wearing continuous-flow, supplied-air half or full face mask respirators, or one worker wearing a continuous-flow, supplied-air hood or helmet style respirator. Open drip-proof motor drive, for use in clean, dry areas. Inlet Filter: Medium efficiency, keeps particles larger than 25 microns out of the air supply. Inlet filter can be extended up to 300 feet from the pump Outlet Filter: Carbofine with activated carbon Weight: 49 lbs. Dimensions: 8” wide x 16.3” long x 13.5” high. Was a demo unit, got at 1/2 price. I believe it to be industrial grade. Do you know anything about these bcutt?
__________________
project: "my happy mess" |
|
|
|
|
03-17-2012, 10:57 PM
|
#20 |
|
Registered User
Join Date: Feb 2011
Location: Crowley TX
Posts: 979
|
Re: Project "My Happy Mess"
hey litew8 , looking good .
|
|
|
|
|
03-18-2012, 12:12 AM
|
#21 |
|
Registered User
Join Date: Jul 2011
Location: Des Moines, Iowa
Posts: 3,016
|
Re: Project "My Happy Mess"
Since the majority of work is done to the doors and fenders, I decided to spend
some time tackling the front end panel. Besides the tailgate, it's the last large panel to clean up. God help us all, I'm glad I don't have to do all this to the bedsides. Here's what we have to start with. Outlined are the two worst areas needing attention. They're dents. At one time early on, I thought about leaving them for character - but we'll clean them up instead. The factory grease pen markings. Sad to see them go They were never seen anyway since they face the back of the cab, and at least I've got pictures to archive the find.   OK, back to work -    Uncovered a little something special. If you ever want to know if your front end panel is OE, look for this stamping on both ends of the panel. I can't make out what it is, if it's symbol or two numbers. They're the same on either end. If I remember right, my doors have this too. I think I took pics, I'll have to look later.  Finishing up for the day, got all I need done, done.      
__________________
project: "my happy mess" Last edited by litew8; 03-18-2012 at 12:19 AM. |
|
|
|
|
03-18-2012, 12:50 AM
|
#22 |
|
Registered User
Join Date: Jul 2011
Location: Des Moines, Iowa
Posts: 3,016
|
Re: Project "My Happy Mess"
Correction: I misspoke about the lighting earlier.
"2,400w [equivalent] candle power (cp)! He had 12 4' florescent light fixtures, dual bulbs." Actually, he had 15 4' florescent light fixtures, dual bulbs (30 total), and was replaced with 15 DayLight florescents. They produce a very Nice, natural light. 3,000w [equivalent] candle power! He says at night, the garage "glows" like National Lampoons Christmas Vacation house.  
__________________
project: "my happy mess" Last edited by litew8; 03-18-2012 at 12:57 AM. |
|
|
|
|
03-18-2012, 12:25 PM
|
#23 |
|
Registered User
Join Date: Jul 2011
Location: Des Moines, Iowa
Posts: 3,016
|
Re: Project "My Happy Mess"
A little more info on the pump. Being a demo unit, The Fixer says it
would have been used during sales presentations, etc... Not a unit that sat on the shelf. They'd most likely demonstrate it's low maintenance and show how to disassemble to replace the carbon vanes after they've worn. In the picture below, you can see the 4 carbon vanes. Looking to the ones directly to the left and top, you can see how they don't sit flush with the drum, indicating very little wear. I'd imagine they'd wear completely down to near nothing if allowed. A rep. for the company, when asked, said she had, recently, a customer needing repair after 15 years of use! Since it isn't going to be used constantly, we should be good for a LONG while 4 carbon vanes shown. Centrifugal force pushes them to the outer wall, which I think then pushes air out through to the low pressure air line, out the mask. I also got GREAT deals on masks. May post them later.  Needs a little cleaning   Misc. hint #3 
__________________
project: "my happy mess" |
|
|
|
|
03-20-2012, 03:42 PM
|
#24 |
|
Registered User
Join Date: Jul 2011
Location: Des Moines, Iowa
Posts: 3,016
|
Re: Project "My Happy Mess"
Brand New $400 Professional Full-Face Airline Respirator Masks. I scored for $50/$100! One to be used as a backup.You cannot find this one anymore! From 1995, brand new, never used Got it from an aviation outfit. Brand new, never used. This one retails for $3/400! Got for $50 bucks!  They connect to this 1/2, low pressure hose that connects to the Bullard Free-Air pump -  Did a little more cleaning on the driver's door today. Not a lot, just cleaning up the little I missed the other day. Tomorrow, maybe hit the pass. door a little more. We're not in any rush, so it's easy going. Besides, I'm the only one doing the grunt work so far    Okay, no more hints. Here's the 1965 Harley-Davidson M50 Scooter! Made in Italy, which I think the plant is still in use today.   Here's what it should look like restored: 50cc 2-Stroke by Aermacchi  ----- I know none of the sanding/grinding pics are exciting and everyone wants to see PAINT! We're getting there
__________________
project: "my happy mess" Last edited by litew8; 03-20-2012 at 03:49 PM. |
|
|
|
|
03-21-2012, 01:12 AM
|
#25 |
|
Registered User
Join Date: Jul 2011
Location: Des Moines, Iowa
Posts: 3,016
|
Re: Project "My Happy Mess"
__________________
project: "my happy mess" |
|
|
|
 |
| Bookmarks |
|
|


 Hybrid Mode
