
|
|
|
 12-08-2012, 12:44 AM
|
#1 | |
|
Registered User
Join Date: Aug 2012
Location: Salem Mo
Posts: 652
|
Re: 1957 Chevy truck re-rebuild
Quote:
With the Shark idea, I'm not so much trying to build a Shark image into the front so mach as I am trying to merely enhance the lines that are already there in hopes to bring out more of a Shark image that is already there. We've all heard the phrase "beauty is in the eyes of the beholder", much of my build is just me expanding my horizon when it comes to building. Much of my build thread is based on how I expanded my horizon, this is why I post not only the finished result but how I got the result. I've mentioned the welding of the gills, I've decided my best bet is to weld them from the backside, this way I can limit the amount of weld build that I will have to clean up later. My first step was to fit the gills then tack weld them into place. Once tack welded I was able to grind away most of the excess gill material, basically have a flush surface from the gill edge to the fender material. 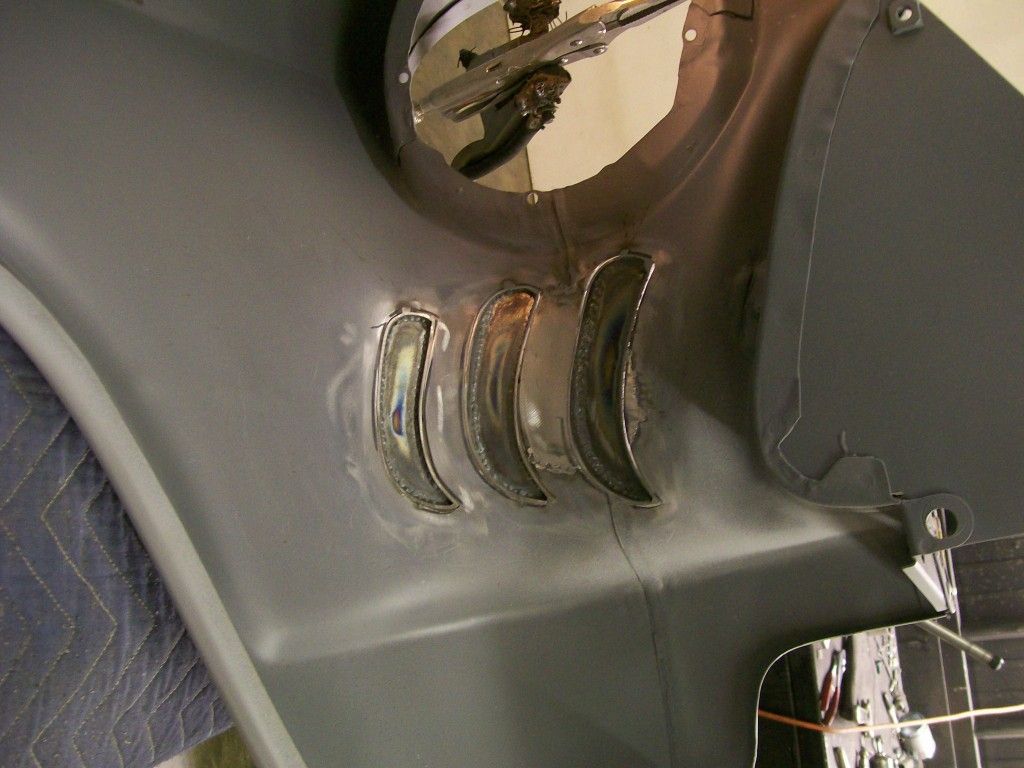 Here my biggest concern was to keep from burning through and adding to the amount of fine grinding I will do later. One stitch weld at a time and moving from gill to gill helped keep the heat from getting out of hand. 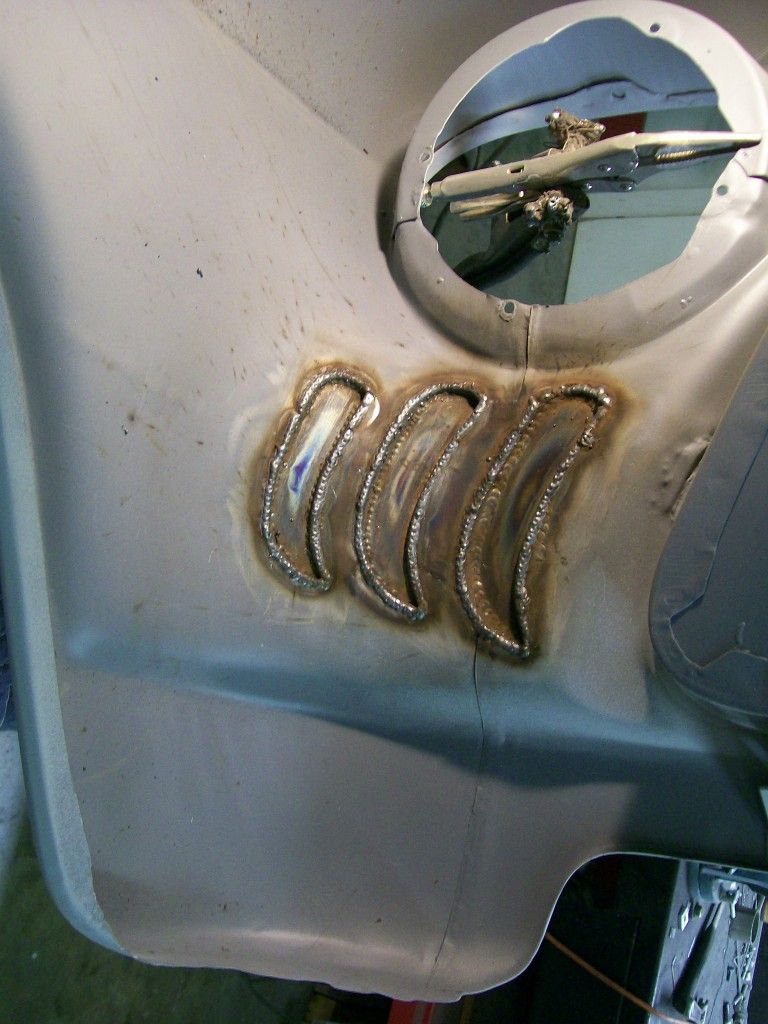 Here was the goal. By welding from the back side I was able to use the 4 1/2" grinder and do a clean up grinding. The weld beads that are noticable are the ones made when I made the gills. Since this part of the front fenders can be seen in the front wheel well when the truck is done, I will smooth these welds also. This way, when done, these should look nearly factory when finished. 
|
|

|

|
|
12-08-2012, 01:00 AM
|
#2 |
|
Registered User
Join Date: Aug 2007
Location: Corona, California
Posts: 7,998
|
Re: 1957 Chevy truck re-rebuild
The inside looks good.
Now lets see the outside. Kim |
|
|
|
|
12-08-2012, 01:12 AM
|
#3 | |
|
Registered User
Join Date: Aug 2012
Location: Salem Mo
Posts: 652
|
Re: 1957 Chevy truck re-rebuild
Quote:
I'm starting to get some options for internet service, soon I will have high speed. Do you still have that house for sale down the street, that might be a quicker way for me to get high speed. 
|
|
|
|
|
|
12-08-2012, 01:16 PM
|
#4 | |
|
Registered User
Join Date: Aug 2007
Location: Corona, California
Posts: 7,998
|
Re: 1957 Chevy truck re-rebuild
Quote:
Looking forward to seeing how they turned out. Kim |
|
|
|
|
|
12-08-2012, 08:27 PM
|
#5 | |
|
Registered User
Join Date: Aug 2012
Location: Salem Mo
Posts: 652
|
Re: 1957 Chevy truck re-rebuild
Quote:
Ok Kim, I got off work today and began the up-loading process. Lets see, I hit enter, then fed the dogs and started a load of laundry. Once that pic was done I hit enter on another pic, about that time the Fed Ex truck showed up with the headlights we were talking about. I'm very happy with the look of the headlights. They are a halogen bulb and they have a small amber light for the turn signals. What I really like is they are called a 3 bar design. The three bars come to the center and form what I will call a pupil. I chose the black pupil design to give the look of an actual eyeball. I'll have pictures later. After about an hour I have pictures. The final result of the gills is basically the same as when I had them taped in place, I'm just glad that the welding didn't make a mess. I will show the process regardless...... After the stitch welding done on the backside the penetration still came through to the front side. Although I have grinding clean up to do, it's far less than if I welded on the front side. 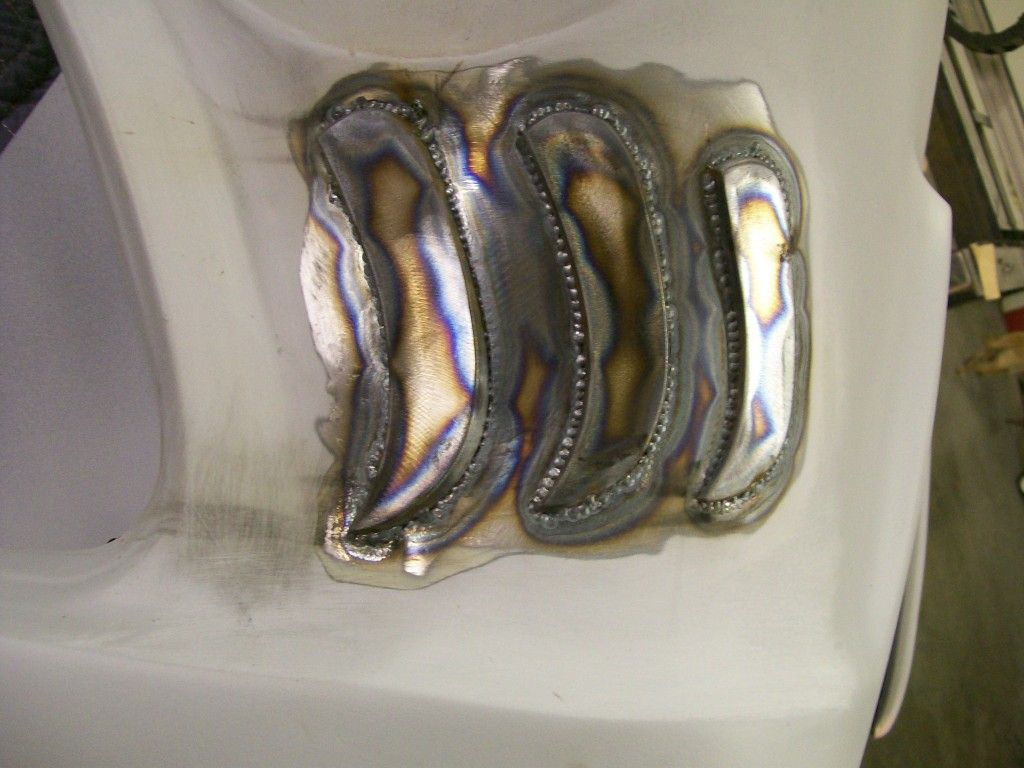 For some reason I didn't get a good picture of the gills during the weld clean up grinding. I used a 3" cut off wheel. I was able to get close to the gills without cutting into them. A pic of the process... 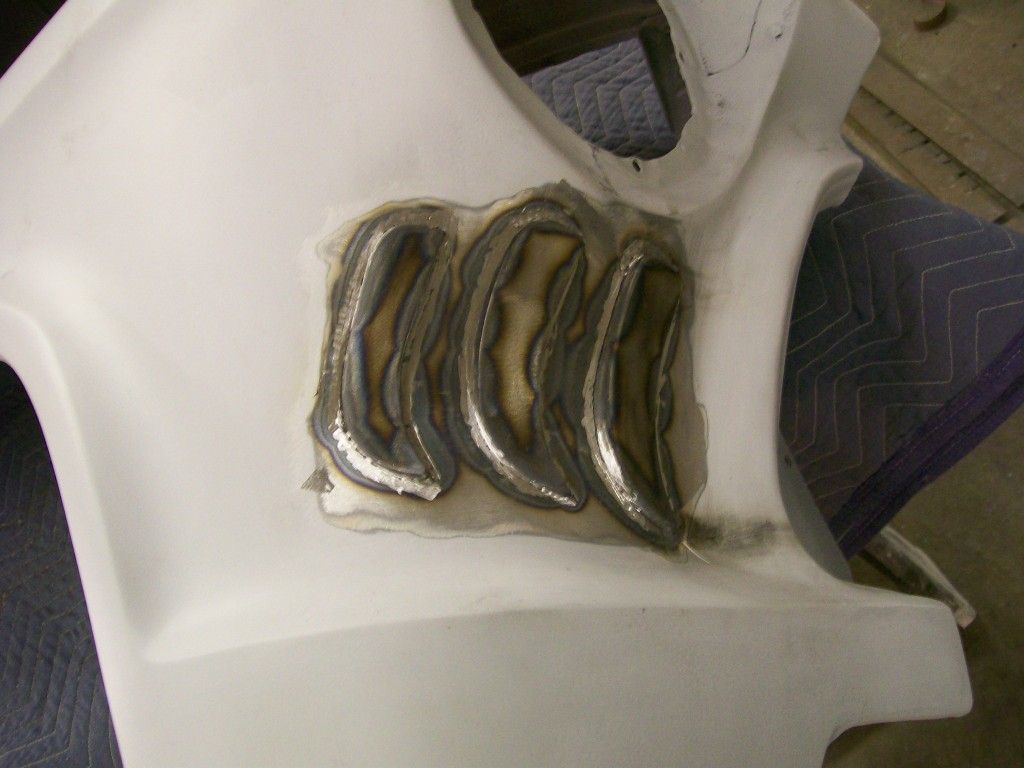 Finished... From this point I could either very lightly apply some body filler to smooth the edges or, apply a couple coats of epoxy primer, apply a thin layer of spot putty then finish with a primer like feather fill. I'll probably go with the second choice. I've mentioned this before, I am old school that I like the sand blaster. Not only does it clean the area, it also removes most of the grinding marks. 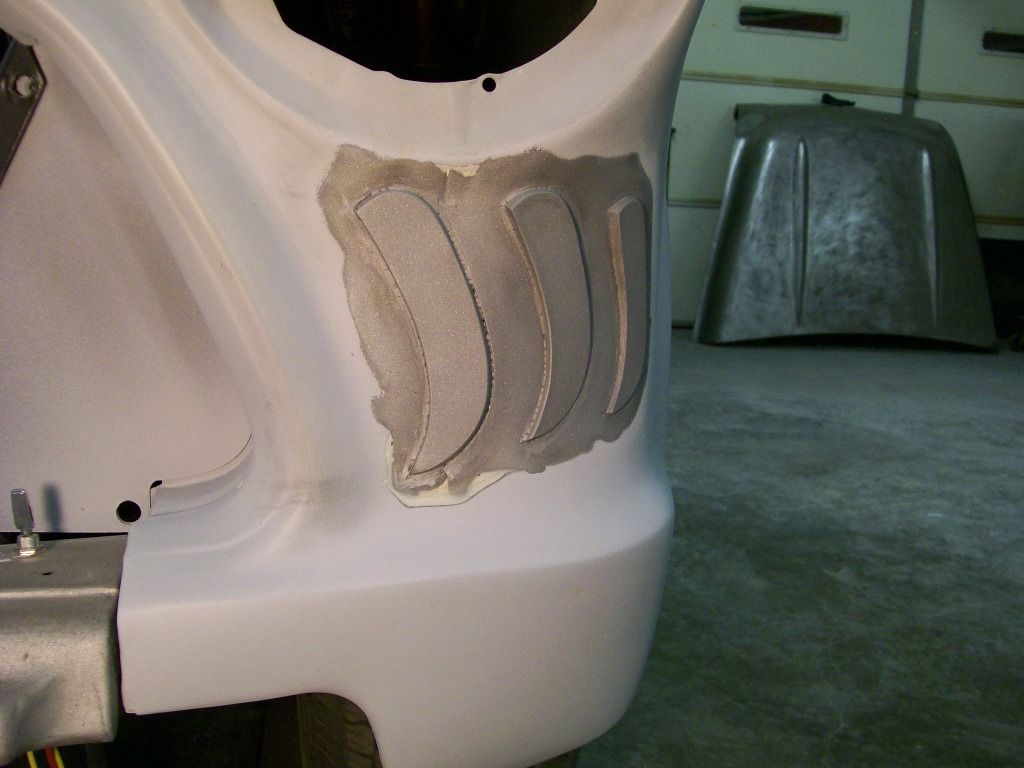 One more of the front. Now I wish I had the new headlights installed for this picture. 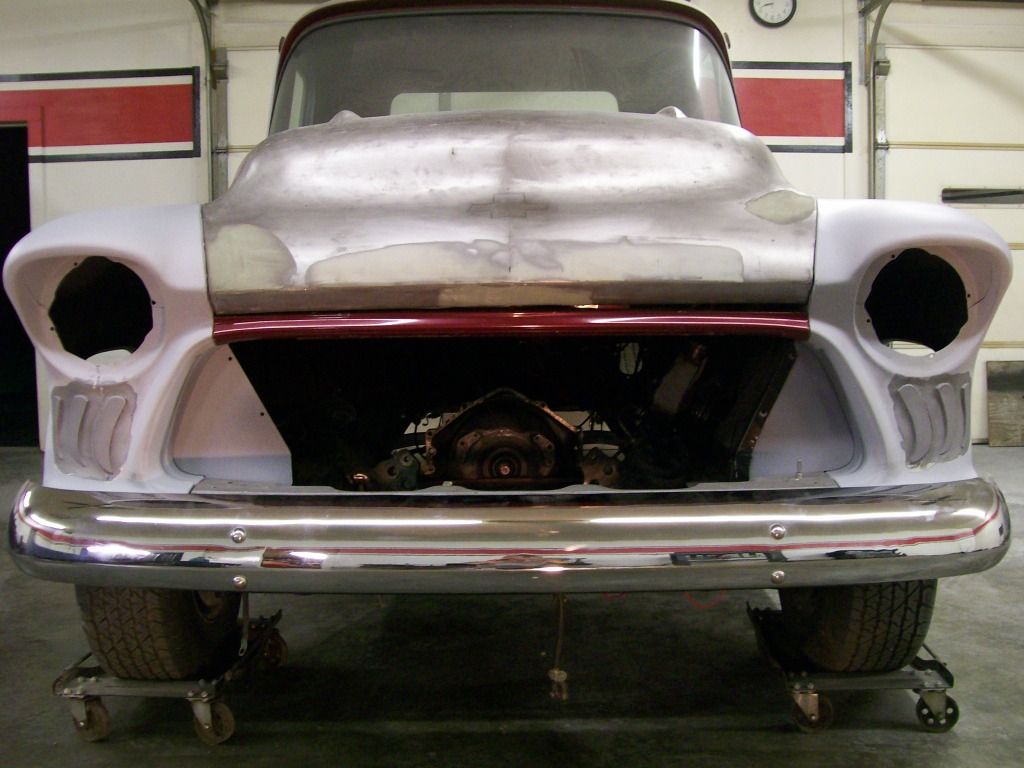
Last edited by Stepside Jim; 12-08-2012 at 08:32 PM. |
|
|
|
|
|
12-08-2012, 08:37 PM
|
#6 |
|
Registered User
 Join Date: May 2012
Location: Finley, TN.
Posts: 198
|
Re: 1957 Chevy truck re-rebuild
How much for the siv tail light frame items?
|
|
|
|
|
12-08-2012, 01:57 PM
|
#7 |
|
Registered User
Join Date: Jan 2012
Location: Motown
Posts: 7,680
|
Re: 1957 Chevy truck re-rebuild
dial up??? i didn't know they still offered that
 though i'm sure it's not available in the boonies either when i lived in southern minnesota we had an 8 party line, ufda
__________________
cool, an ogre smiley Ogre's 58 Truk buildhow to put your truck year and build thread into your signature shop air compressor timer |
|
|
|
|
12-08-2012, 09:26 PM
|
#8 |
|
Registered User
Join Date: Aug 2007
Location: Corona, California
Posts: 7,998
|
Re: 1957 Chevy truck re-rebuild
They came out nice.
Adds a different and unique visual look to your truck. Kim |
|
|
|
|
01-09-2013, 10:26 AM
|
#9 |
|
Registered User
Join Date: Aug 2007
Location: Corona, California
Posts: 7,998
|
Re: 1957 Chevy truck re-rebuild
Looking good.
The front fenders came out nice. Kim |
|
|
|
|
01-09-2013, 11:55 PM
|
#10 | |
|
Registered User
Join Date: Aug 2012
Location: Salem Mo
Posts: 652
|
Re: 1957 Chevy truck re-rebuild
Quote:
 Focusing on the radio patch panel...... I'm going back to a song from the 70's. " No one knows what goes on behind old paint" Yeah, I changed the words a bit. I've looked at the dash for a couple years now, over time I realized someone altered the dash for a different radio. It looked ok with the paint covering what was lurking underneath. Looking from the backside I could see a plate tack welded to the dash. I figured the plate was just a reinforcement. Ha, they cut open the dash, then welded a plate on the backside. Then used body filler to fill the gap. 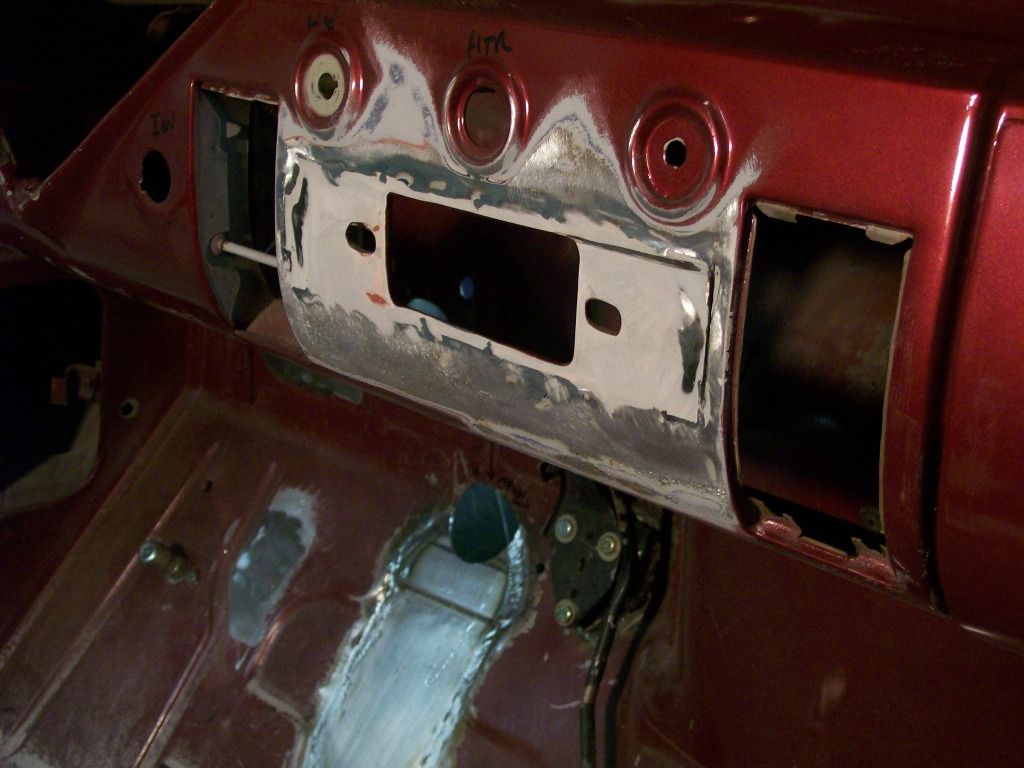 Here's the new plate, I'm so glad to find this available. 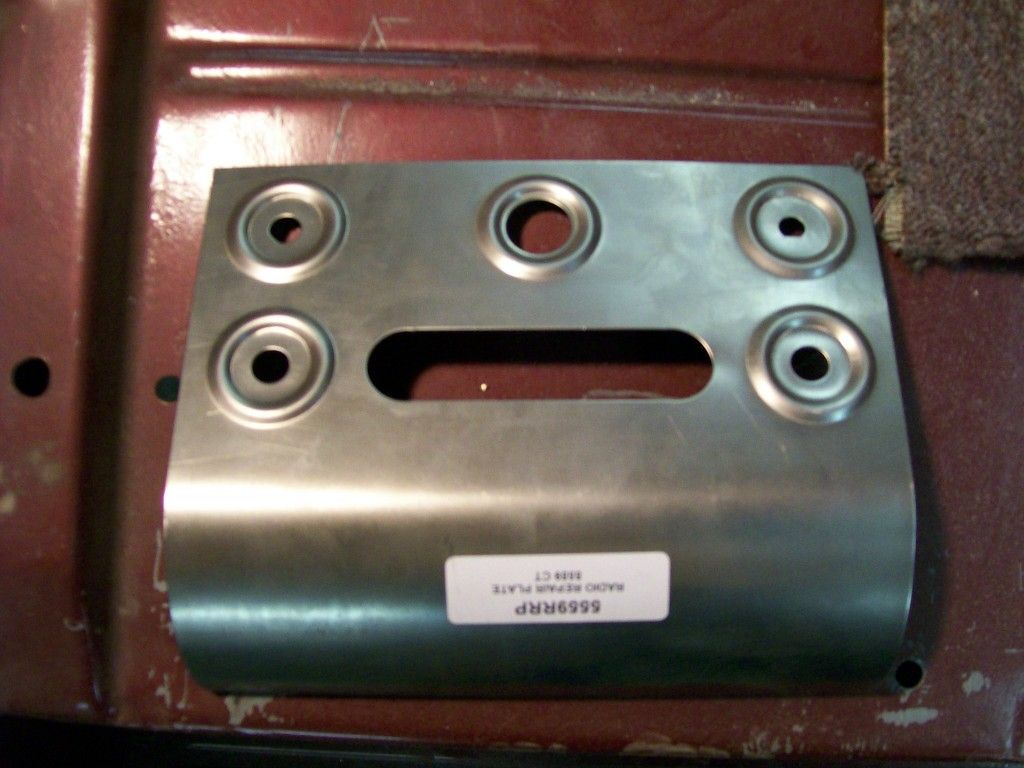 Fitted and welded. 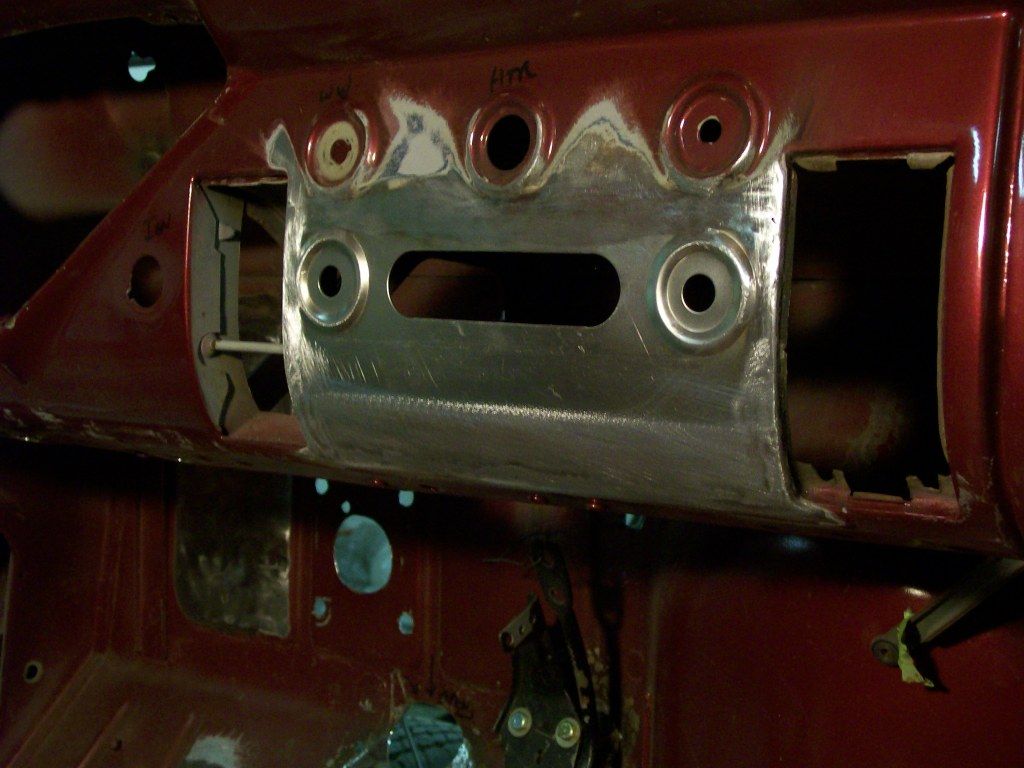 I just got the new radio today and went right to the shop to check the fit. There isn't much room for the radio to fit and I was concerned I'd have to alter the new panel holes to fit the new radio. I'm happy to say, it all fit perfect. Check one more item of the "to do" list. 
|
|
|
|
|
|
01-10-2013, 02:06 PM
|
#11 |
|
Registered User
Join Date: May 2012
Location: Finley, TN.
Posts: 198
|
Re: 1957 Chevy truck re-rebuild
[QUOTE=Stepside Jim;5807711]Thanks Kim, any more it's not easy finding a new twist, I hope it looks good when painted and done.
Focusing on the radio patch panel...... I'm going back to a song from the 70's. " No one knows what goes on behind old paint" Yeah, I changed the words a bit. I've looked at the dash for a couple years now, over time I realized someone altered the dash for a different radio. It looked ok with the paint covering what was lurking underneath. Looking from the backside I could see a plate tack welded to the dash. I figured the plate was just a reinforcement. Ha, they cut open the dash, then welded a plate on the backside. Then used body filler to fill the gap. Here's the new plate, I'm so glad to find this available. Fitted and welded. I just got the new radio today and went right to the shop to check the fit. There isn't much room for the radio to fit and I was concerned I'd have to alter the new panel holes to fit the new radio. I'm happy to say, it all fit perfect. Check one more item of the "to do" list. [/QUOI noticed you used a marker to label the holes, unless you go to bare metal the marker can come thru the new paint. It may take a while but it will. |
|
|
|
|
01-12-2013, 10:21 PM
|
#12 | |
|
Registered User
Join Date: Aug 2012
Location: Salem Mo
Posts: 652
|
Re: 1957 Chevy truck re-rebuild
Quote:
Moving onto the next dash modification. I wanted one more switch outlet so I figured the space between the headlight switch and the choke cable would be a good place. I had an extra switch hump left over from the radio patch panel, so I figured I would use it here. 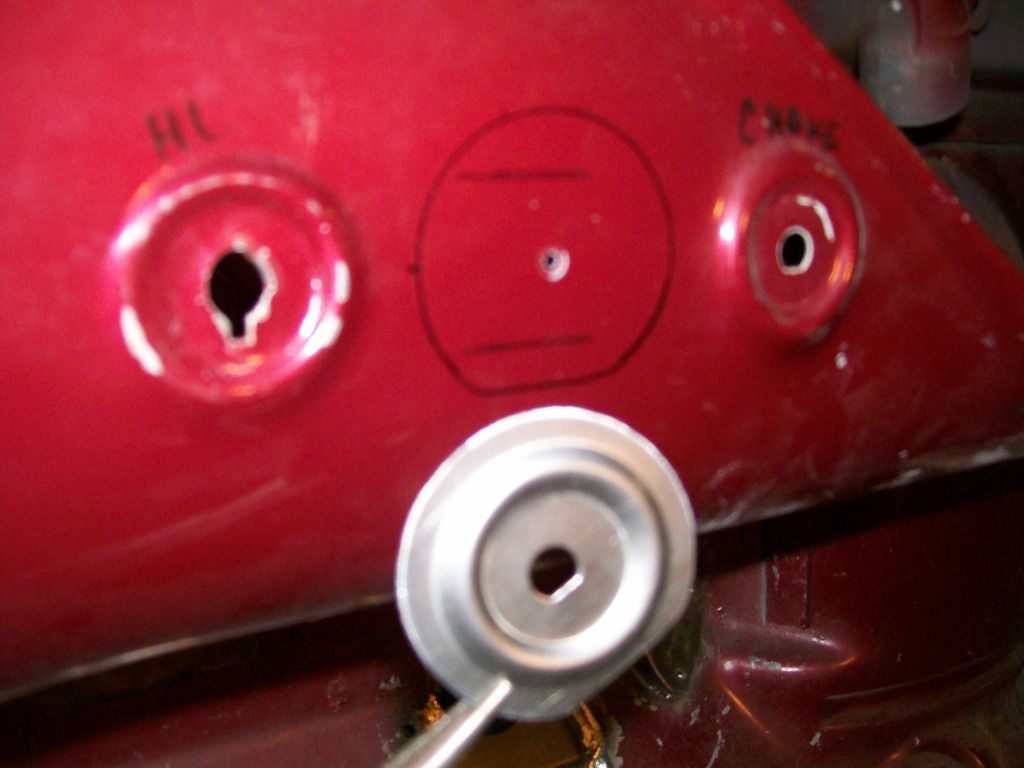 Once again put the 1/8" drill bit to use. 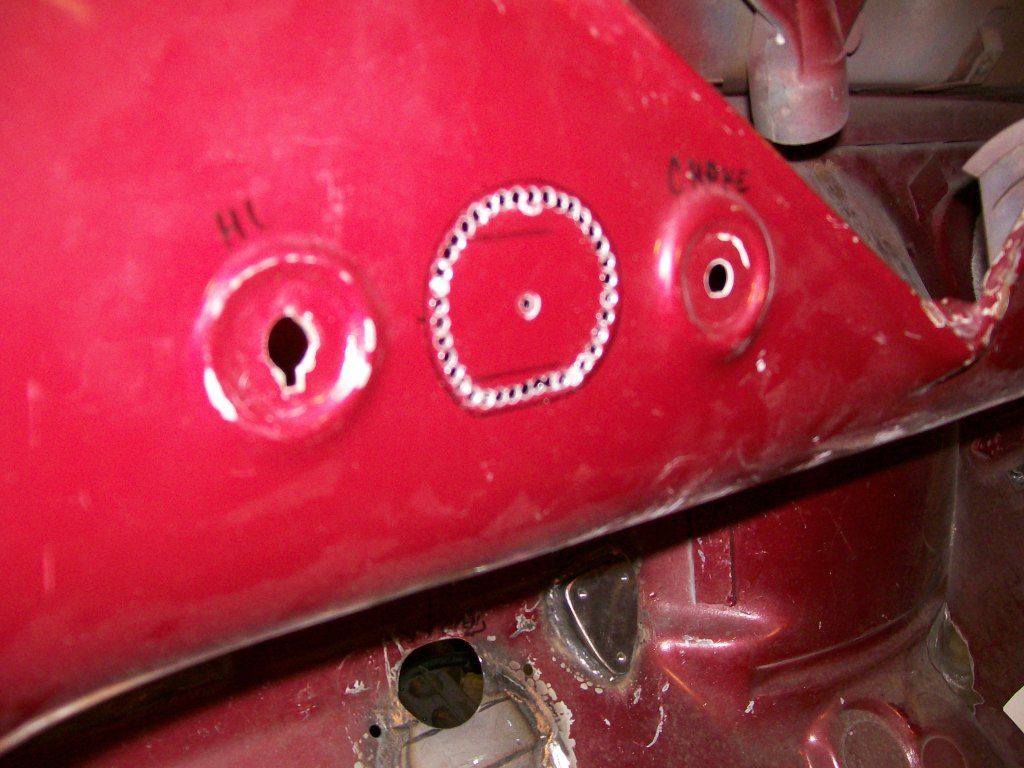 After the drilling, I used the larger rotary brr to clean the edges and fit the hole to the switch mount. 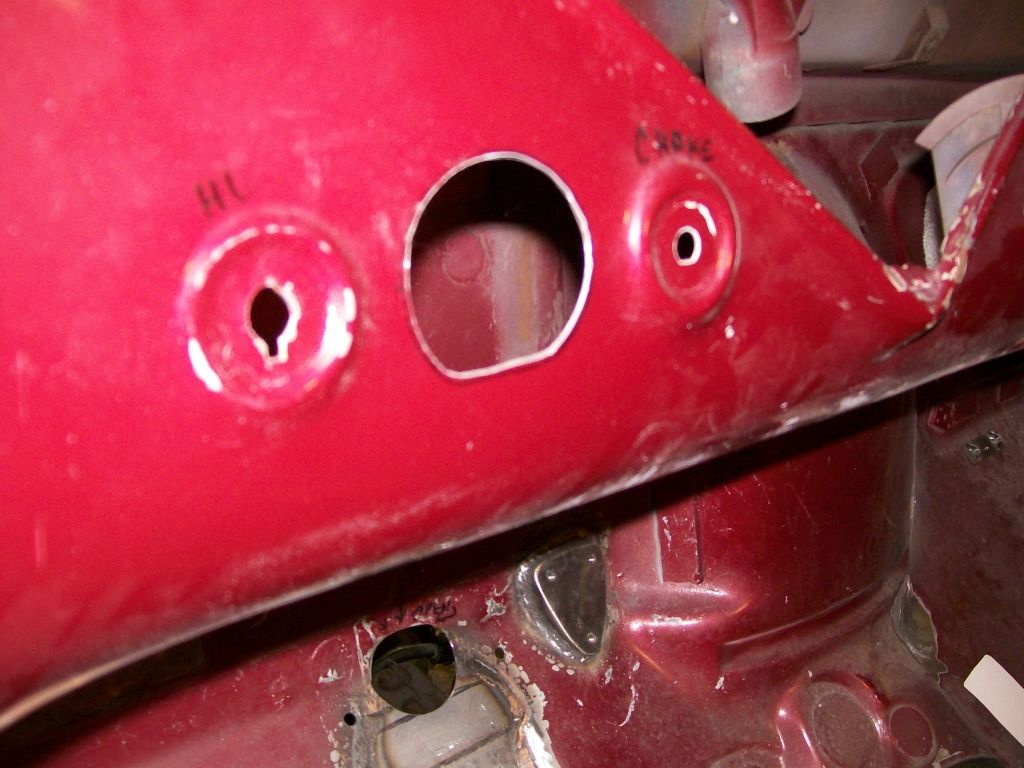 Done with the welding. Still a little clean up to do, but this gets me where I need to be til I'm ready to do the finish work on the rest of the dash. 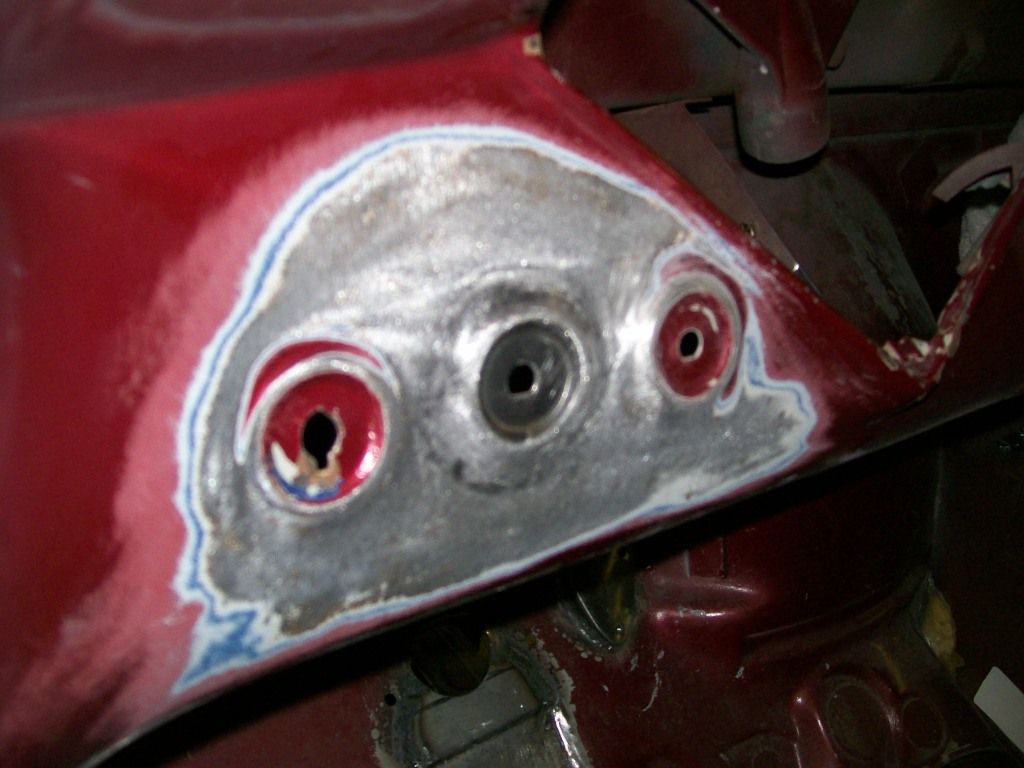
|
|
|
|
|
|
01-13-2013, 01:19 AM
|
#13 |
|
Registered User
Join Date: Aug 2007
Location: Corona, California
Posts: 7,998
|
Re: 1957 Chevy truck re-rebuild
Nice work.
Kim |
|
|
|
|
01-13-2013, 01:12 PM
|
#14 |
|
Registered User
Join Date: Jan 2012
Location: Motown
Posts: 7,680
|
Re: 1957 Chevy truck re-rebuild
looking good stepside jim
__________________
cool, an ogre smiley Ogre's 58 Truk buildhow to put your truck year and build thread into your signature shop air compressor timer |
|
|
|
|
01-29-2013, 12:12 AM
|
#15 |
|
Registered User
Join Date: Aug 2012
Location: Salem Mo
Posts: 652
|
Re: 1957 Chevy truck re-rebuild
I've pretty well worked myself into a corner, meaning this cab has to come off the frame.
Although the floor is in pretty good shape, I still want to sandblast the top and the bottom. I have a few small patches to put in and I want clean metal. I work alone, and although I have people stop by, I don't want to wait for a time when someone is here to help lift the cab. I look forward to the sandblasting also. I just get tired of using sandpaper around all the edges. Sandblasting just gets it done in no time, and super clean. The best lifting item I have is the cherry picker. I made a bracket, got some wood, did some cutting and fitting, and now removing the cab is a breeze. 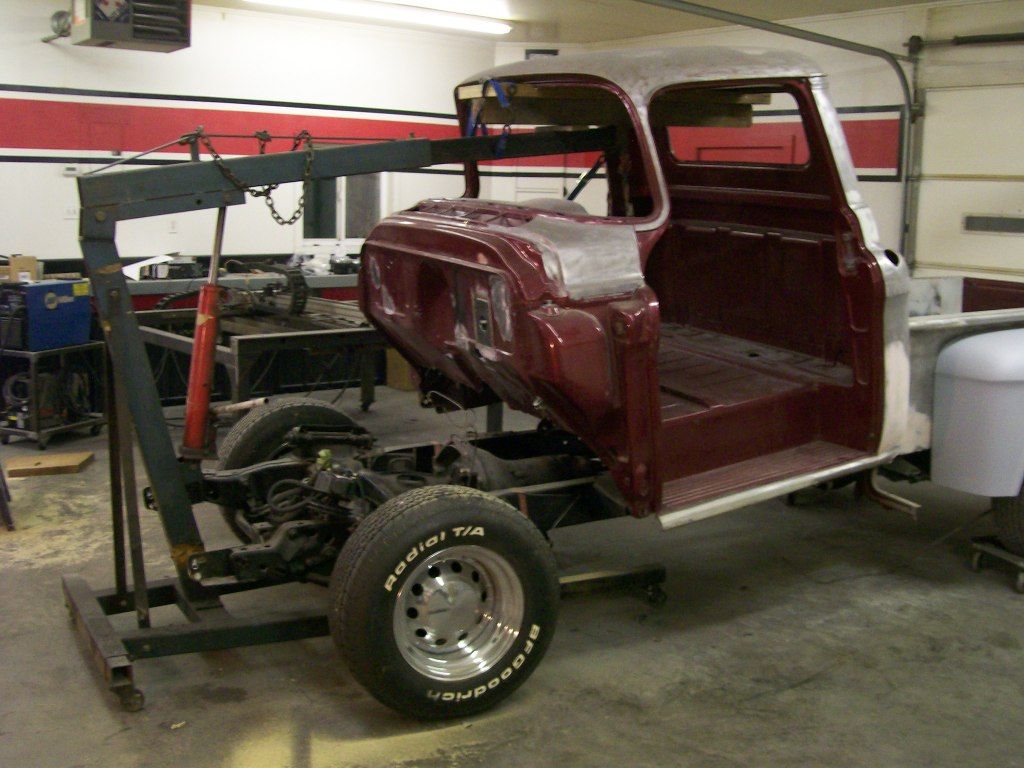 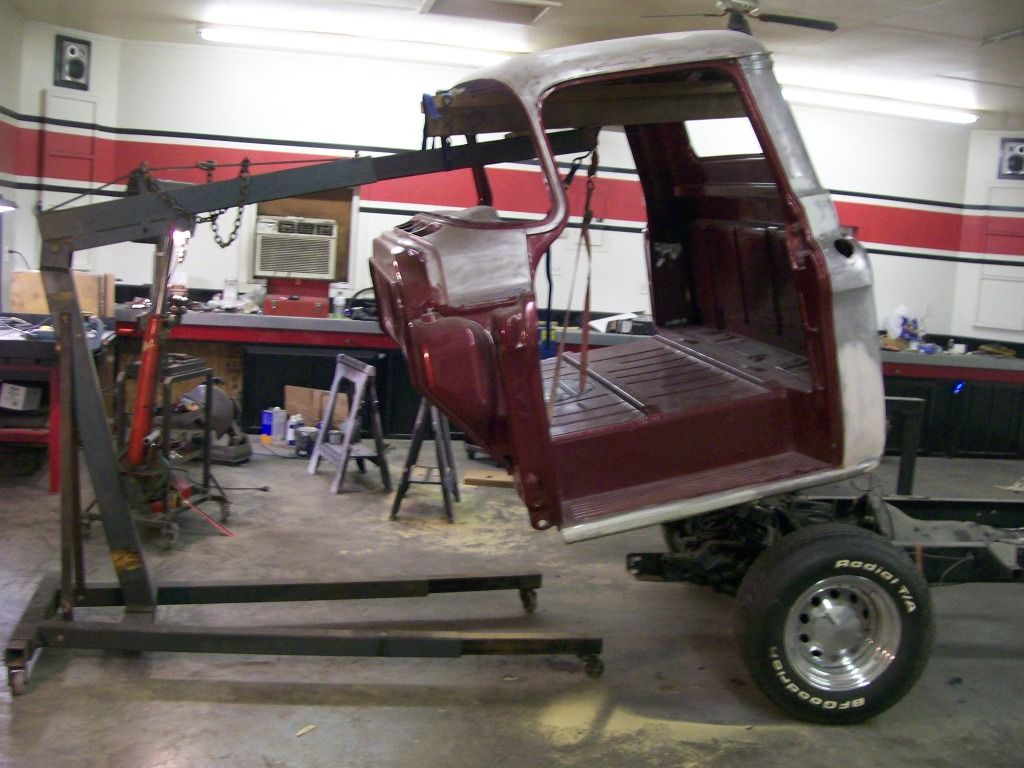 Next I have to get it outside, that'll be next.
|
|
|
|
|
01-29-2013, 01:15 AM
|
#16 |
|
Registered User
Join Date: Aug 2007
Location: Corona, California
Posts: 7,998
|
Re: 1957 Chevy truck re-rebuild
I use my engine hoist to lift mine also. I go in through one of the doors though.
Kim |
|
|
|
|
01-29-2013, 08:24 AM
|
#17 |
|
Registered User
Join Date: May 2000
Location: Flin Flon, Manitoba, Canada
Posts: 8,855
|
Re: 1957 Chevy truck re-rebuild
great idea for those of us that work alone the majority of the time. Now if only it would lift or tilt enough to slide the cab over the stock steering column.
__________________
My name's Tim and I'm a truckaholic My 56 Chevy shop truck build http://67-72chevytrucks.com/vboard/s...d.php?t=562795 |
|
|
|
|
02-05-2013, 10:07 PM
|
#18 |
|
Registered User
Join Date: Apr 2011
Location: .
Posts: 3,104
|
Re: 1957 Chevy truck re-rebuild
got my attention.
subscribed. |
|
|
|
|
02-05-2013, 11:42 PM
|
#19 |
|
Registered User
Join Date: Aug 2012
Location: Salem Mo
Posts: 652
|
Re: 1957 Chevy truck re-rebuild
Hi Kim, I started going through the door, then I decided to go through the front. Either way, it worked very smooth.
dubie, hmmm, I never got the original steering column, I'm not sure how it would work. On the other hand, it is the "mother of all invention". I mean, it's amazing what we'll come up with to keep moving forward when we don't want to rely on help from others. I just got an offer from a guy who wants to be there on paint day, ha, that's a day I really perfer to be alone. Especially on a two tone finish, I need total concentration. Hi Bomp, I have to get more pics uploaded. I'm helping some others rebuild an engine and a transmission, and now I've come down with a terrible cold. I hate this down time, grrrrr. |
|
|
|
|
02-06-2013, 03:52 PM
|
#20 | |
|
Registered User
Join Date: May 2000
Location: Flin Flon, Manitoba, Canada
Posts: 8,855
|
Re: 1957 Chevy truck re-rebuild
Quote:
__________________
My name's Tim and I'm a truckaholic My 56 Chevy shop truck build http://67-72chevytrucks.com/vboard/s...d.php?t=562795 |
|
|
|
|
|
02-16-2013, 10:28 PM
|
#21 |
|
Registered User
Join Date: Aug 2012
Location: Salem Mo
Posts: 652
|
Re: 1957 Chevy truck re-rebuild
_Ogre, sorry so long for a reply. With all the blasting media out there, I've only got availability to sand right now. I've been using it for over 30 years now so I'm familiar with the characteristics of using sand.
dubie, sounds like you and I have the same "gotta do what I gotta do" attitude. I can't count the times I get myself into a teetering situation trying to balance something with my heart pounding. Shoooey, rubbing the sweat of my forehead, that was close. Here's my situation.... This is my first picture without using Photobucket. They changed the site and I can't get to the upload to work. Hoefully this will work, if it does, I can get back to posting again. |
|
|
|
|
02-06-2013, 03:00 PM
|
#22 |
|
Registered User
Join Date: Jan 2012
Location: Motown
Posts: 7,680
|
Re: 1957 Chevy truck re-rebuild
nice work on getting the cab off, as my signature says:
if necessity is the mother of invention, poverty is the mother of necessity - plato nice shop too. a lot more than a basic 2 car garage. what are using for sand blasting?
__________________
cool, an ogre smiley Ogre's 58 Truk buildhow to put your truck year and build thread into your signature shop air compressor timer |
|
|
|
|
02-18-2013, 04:11 PM
|
#23 |
|
Registered User
Join Date: May 2000
Location: Flin Flon, Manitoba, Canada
Posts: 8,855
|
Re: 1957 Chevy truck re-rebuild
thanks for the tip on using the engine crane to lift the cab Jim. My wife and I put a 2x10 through the cab and balanced the crane arm in the middle. Getting the cab to balance on jack stands so we could get the legs of the crane under it proved to more challenging than lifting the cab itself. We recruited a little more muscle to get the cab over the steering column, but it's on the truck now
__________________
My name's Tim and I'm a truckaholic My 56 Chevy shop truck build http://67-72chevytrucks.com/vboard/s...d.php?t=562795 |
|
|
|
|
02-20-2013, 12:17 AM
|
#24 | |
|
Registered User
Join Date: Aug 2012
Location: Salem Mo
Posts: 652
|
Re: 1957 Chevy truck re-rebuild
Quote:
Since I'm back to posting pics, let's see how to get the yard cart under the truck with out using the lift. It seems these inexpensive carts/wagons are everywhere so I hope this idea helps someone put one to use. Once the cab is rolled forward on the firewall there is a cab reinforcement that goes from both front cab mounting bolt holes to the opening of the transmission tunnel opening, this is what the cart/wagon will hook to. On the cart/wagon there is a bolt on each side by the drop gate. I removed the original bolts and installed longer bolts so the threads are facing up. These longer bolts are going to hook to the cab reinforcements that I mentioned. Hopefully the pics will help explain. The end result, I can pick up the cab and move it around by using the cart/wagon as a dolly. |
|
|
|
|
|
02-18-2013, 08:42 PM
|
#25 |
|
Registered User
Join Date: Sep 2009
Location: Monroe,Iowa
Posts: 4,370
|
Re: 1957 Chevy truck re-rebuild
I think floor patchs would be easier for me this way.
|
|
|
|
 |
| Bookmarks |
|
|


 Hybrid Mode
