
|
|
|
 02-14-2019, 09:54 AM
|
#1 |
|
Senior Member
 Join Date: Sep 2017
Location: Bryan, Texas
Posts: 2,296
|
Re: Wife's 48
Thanks Joe. I was told by Martinsr and others to walk away and let it cool. Lucky the whoop de whoop will be covered by the bed. Doesn't make me happy, but covers up my mistake.
I was looking at the inside of the cab where I have been welding. I was also grinding that area. I guess I should just let that area be covered up by the interior instead of grinding it smooth. Oh well, we live and learn, and I know I'm really learning on these trucks!
__________________
8man-aka Robert 1948 on a S10 Frame, small block with a carb 1954 Cab, 53 Front and Bed, 50 Doors, S10 Frame, Power TBD Build thread: "]http://67-72chevytrucks.com/vboard/showthread.php?t=746899&highlight=wife%27s+48[/URL] [/URL]http://67-72chevytrucks.com/vboard/showthread.php?t=840204 |

|

|
|
02-14-2019, 12:48 PM
|
#2 |
|
Registered User
Join Date: Jul 2017
Location: Joshua, Texas.
Posts: 1,303
|
Re: Wife's 48
Looks good. Took me a year working on mine before I had the courage just to do my cab corners, not sure I'd do as big a repair as you yet. I cant get to back side real well with a grinder to clean up in there either but like you, its covered up and its way better than what we started with.
__________________
1950 Build |
|
|
|
|
02-15-2019, 10:46 AM
|
#3 |
|
Registered User
Join Date: Nov 2010
Location: calgary alberta
Posts: 7,941
|
Re: Wife's 48
how about on the whoop de whoop if you gat a hammer and dolly and hammer on dolly the weld area so it expands and takes the warp out. the warp is usually from too much heat in a concentrated area and then it cools down and shrinks that spot. if you can expand it back, by hammer on dolly, then it will be closer. when you weld also hammer on dolly when it is still red to expand the metal some so it cools and shrinks closer to what you want.
|
|
|
|
|
02-15-2019, 10:54 AM
|
#4 |
|
Registered User
Join Date: Nov 2010
Location: calgary alberta
Posts: 7,941
|
Re: Wife's 48
also spot tack the panel all the way around before starting to weld,then just weld a short bead and walk away. when the welded area is the same temp as the surrounding metal do another stitch somehwere else, then walk away. its good to have another project on the go so you can get sidetracked and not get antsy about getting the welding done. if you get a seam that has too much gap you can use a copper or brass piece behind as a backer, the weld puddle won't fall through so easily. I have used a flattened piece of copper pipe in the past.
|
|
|
|
|
02-15-2019, 10:58 AM
|
#5 |
|
Senior Member
Join Date: Sep 2017
Location: Bryan, Texas
Posts: 2,296
|
Re: Wife's 48
I was using a piece of flattened copper pipe with a wooden handle as a backer for that reason. I'm just not good at it yet.
I got the panel tacked in and it was fitting great. I did as you thought and got going on some areas what with filling in the crack and that's what did it. They say we learn from our mistakes. I learned. I will not make that mistake again. As Martinsr said, if I can't put my tongue on it, I'll go do something else until I can. I don't want this problem again! Thanks for the help.
__________________
8man-aka Robert 1948 on a S10 Frame, small block with a carb 1954 Cab, 53 Front and Bed, 50 Doors, S10 Frame, Power TBD Build thread: "]http://67-72chevytrucks.com/vboard/showthread.php?t=746899&highlight=wife%27s+48[/URL] [/URL]http://67-72chevytrucks.com/vboard/showthread.php?t=840204 |
|
|
|
|
02-15-2019, 12:03 PM
|
#6 |
|
Registered User
Join Date: Nov 2010
Location: calgary alberta
Posts: 7,941
|
Re: Wife's 48
check out a google on shrinking discs, it will help you understand the theories behind shrinking a high spot.basically a shrinking disc is a flat surface that is spun on an angle grinder against the surface, it only hits the high spots and they get hot, then a wet rag is used to cool down that hot spot so it shrinks. some use an iron from the laundry room even.it only has to get hot enough to make some steam so you could try it if you can snag an iron without the boss seeing. then hammer the low spots out to be high spots and continue till you get it flat. hammer on dolly will expand, hammer off dolly will shrink. google a few methods or just try a few methods for some techniques.
|
|
|
|
|
02-15-2019, 10:53 AM
|
#7 |
|
Senior Member
Join Date: Sep 2017
Location: Bryan, Texas
Posts: 2,296
|
Re: Wife's 48
Dsraven, The high is at the corner of the patch. Then as I go down the weld it goes low and high and low again. So the first question is hammer on dolly at the corner where it is high? Won't that stretch an area that is already high?
Again, I AM LEARNING, and I'm trying hard, but I thought hammer off dolly at that "high" corner and then see if I can get some more out. Is this correct? On the hammer on dolly when hot, I have been told that with MIG because of the way the weld sticks out that is not useful. Again, is this correct? Thanks for the help. I do want to get better at this before I ruin my truck.
__________________
8man-aka Robert 1948 on a S10 Frame, small block with a carb 1954 Cab, 53 Front and Bed, 50 Doors, S10 Frame, Power TBD Build thread: "]http://67-72chevytrucks.com/vboard/showthread.php?t=746899&highlight=wife%27s+48[/URL] [/URL]http://67-72chevytrucks.com/vboard/showthread.php?t=840204 |
|
|
|
|
02-26-2019, 09:40 PM
|
#8 |
|
Registered User
Join Date: Jul 2017
Location: Joshua, Texas.
Posts: 1,303
|
Re: Wife's 48
Took me forever to do my cab corners and my weld line is a little sunken too.
__________________
1950 Build |
|
|
|
|
02-26-2019, 11:53 PM
|
#9 |
|
Registered User
Join Date: Nov 2010
Location: calgary alberta
Posts: 7,941
|
Re: Wife's 48
it sinks because it shrinks and distorts while still hot from weld,use hammer on dolly and see if that helps. it expands the metal so when it shrinks from cooling it isn't as sunken in.
|
|
|
|
|
02-27-2019, 09:56 AM
|
#10 |
|
Senior Member
Join Date: Sep 2017
Location: Bryan, Texas
Posts: 2,296
|
Re: Wife's 48
Thank you. I'll try that first.
__________________
8man-aka Robert 1948 on a S10 Frame, small block with a carb 1954 Cab, 53 Front and Bed, 50 Doors, S10 Frame, Power TBD Build thread: "]http://67-72chevytrucks.com/vboard/showthread.php?t=746899&highlight=wife%27s+48[/URL] [/URL]http://67-72chevytrucks.com/vboard/showthread.php?t=840204 |
|
|
|
|
03-14-2019, 09:00 AM
|
#11 |
|
Senior Member
Join Date: Sep 2017
Location: Bryan, Texas
Posts: 2,296
|
Re: Wife's 48
No progress to report, and there won't be any for another 5-7 weeks. Had surgery a week ago yesterday and can't put any weight on my foot until sometime in May.
So the rest of you need to get stuff done, post pictures, etc. because I'm going stir crazy already!!!
__________________
8man-aka Robert 1948 on a S10 Frame, small block with a carb 1954 Cab, 53 Front and Bed, 50 Doors, S10 Frame, Power TBD Build thread: "]http://67-72chevytrucks.com/vboard/showthread.php?t=746899&highlight=wife%27s+48[/URL] [/URL]http://67-72chevytrucks.com/vboard/showthread.php?t=840204 |
|
|
|
|
03-14-2019, 10:04 AM
|
#12 |
|
Registered User
Join Date: Jul 2017
Location: Joshua, Texas.
Posts: 1,303
|
Re: Wife's 48
Don't worry! Joedoh has a new build you can follow. Lol sorry to hear about your surgery, hope everything heals up good.
__________________
1950 Build |
|
|
|
|
03-14-2019, 08:49 PM
|
#13 |
|
Senior Member
 Join Date: May 2007
Location: Doodah Kansas
Posts: 7,762
|
Re: Wife's 48
man sorry to hear that! feel better soon!
__________________
the mass of men live lives of quiet desperation if there is a problem, I can have it. new project WAYNE http://67-72chevytrucks.com/vboard/s...d.php?t=844393 |
|
|
|
|
04-01-2019, 04:38 PM
|
#14 |
|
Senior Member
Join Date: Sep 2017
Location: Bryan, Texas
Posts: 2,296
|
Re: Wife's 48
Surgery went well, but the 6-8 weeks of NO WEIGHT on the foot is getting OLD!
I go out to the shop and touch stuff, but I can't work on anything yet. So nothing to report on "progress" on the truck. However, I do have news to report. My buddy decided he could not swing the 48, so once again I have 2 trucks to build. I don't have room to work on both, so I think that since the 48 cab is sitting on the frame, I'll set the 54 aside and work on the 48 again. When I can go back to work that is.
__________________
8man-aka Robert 1948 on a S10 Frame, small block with a carb 1954 Cab, 53 Front and Bed, 50 Doors, S10 Frame, Power TBD Build thread: "]http://67-72chevytrucks.com/vboard/showthread.php?t=746899&highlight=wife%27s+48[/URL] [/URL]http://67-72chevytrucks.com/vboard/showthread.php?t=840204 |
|
|
|
|
04-01-2019, 07:10 PM
|
#15 |
|
Senior Member
Join Date: Mar 2011
Location: West Plains, Missouri
Posts: 7,555
|
Re: Wife's 48
Take care, and get better soon...Jim
__________________
my build thread: http://67-72chevytrucks.com/vboard/s...d.php?t=459839 Jimbo's long bed step build:http://67-72chevytrucks.com/vboard/s...t=464626<br /> |
|
|
|
|
04-23-2019, 04:37 PM
|
#16 |
|
Senior Member
Join Date: Sep 2017
Location: Bryan, Texas
Posts: 2,296
|
Re: Wife's 48
Not much to report, other than a severe case of cabin fever!
I've been studying all the things I need to do on the 48, as I want to get it done first as it is further along. The 54 has taken a back burner in my planning. I was looking at parts and pieces today and I found a piece of the cab windlace channel I had cut off the bad cab. I saw a tool on here that someone made to repair the channel to make it easier to get the rubber in when ready. Since I have a tall stool at the work bench, a vice, a hacksaw and a file handy I thought it would be a good time to build that tool. I found a piece of flat bar off of something under the workbench just staring at me. 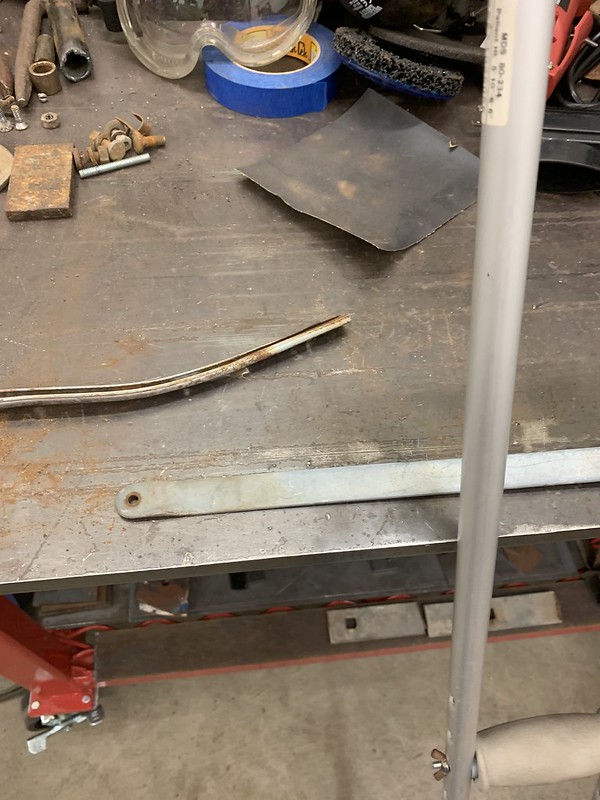 IMG_0023 by Robert Moorman, on Flickr IMG_0023 by Robert Moorman, on FlickrThe piece of the channel I had cut from the bad cab is behind it. So with my trusty hacksaw and file I cut some grooves in a short piece of the flat bar. I drilled the hole a little larger, and found a bolt to use as a handle.  IMG_0024 by Robert Moorman, on Flickr IMG_0024 by Robert Moorman, on FlickrThen I took my piece of channel and my new tool and it works.  IMG_0025 by Robert Moorman, on Flickr IMG_0025 by Robert Moorman, on FlickrI think I can do the drivers side as it is all still welded in place, but I'll have to cut a piece out of the rider's side to do the kick panel replacement, and I don't know if I can save it, but with the tool, I'm hopeful. Then I was caught in the shop and told to come inside. 1 1/2 more weeks on the crutches with no more than 35 lbs on the foot. Then I'll still have the boot for another 2 weeks, but maybe I can do a little more.
__________________
8man-aka Robert 1948 on a S10 Frame, small block with a carb 1954 Cab, 53 Front and Bed, 50 Doors, S10 Frame, Power TBD Build thread: "]http://67-72chevytrucks.com/vboard/showthread.php?t=746899&highlight=wife%27s+48[/URL] [/URL]http://67-72chevytrucks.com/vboard/showthread.php?t=840204 |
|
|
|
|
04-23-2019, 07:21 PM
|
#17 | |
|
Senior Member
Join Date: Mar 2011
Location: West Plains, Missouri
Posts: 7,555
|
Re: Wife's 48
Quote:
 . Hang in there...Jim . Hang in there...Jim
__________________
my build thread: http://67-72chevytrucks.com/vboard/s...d.php?t=459839 Jimbo's long bed step build:http://67-72chevytrucks.com/vboard/s...t=464626<br /> |
|
|
|
|
|
04-25-2019, 02:32 PM
|
#18 | |
|
Senior Member
Join Date: May 2007
Location: Doodah Kansas
Posts: 7,762
|
Re: Wife's 48
Quote:
busted! 
__________________
the mass of men live lives of quiet desperation if there is a problem, I can have it. new project WAYNE http://67-72chevytrucks.com/vboard/s...d.php?t=844393 |
|
|
|
|
|
04-25-2019, 09:19 PM
|
#20 |
|
Senior Member
Join Date: Sep 2017
Location: Bryan, Texas
Posts: 2,296
|
Re: Wife's 48
I snuck out and in less than 30 minutes it was all straightened out. Pretty cool.
__________________
8man-aka Robert 1948 on a S10 Frame, small block with a carb 1954 Cab, 53 Front and Bed, 50 Doors, S10 Frame, Power TBD Build thread: "]http://67-72chevytrucks.com/vboard/showthread.php?t=746899&highlight=wife%27s+48[/URL] [/URL]http://67-72chevytrucks.com/vboard/showthread.php?t=840204 |
|
|
|
|
05-04-2019, 11:09 PM
|
#21 |
|
Registered User
Join Date: Nov 2014
Location: Yuba City, CA.
Posts: 678
|
Re: Wife's 48
Glad to hear your back at it. I think the reason its taking me so long on my build is as I get better at fabrication I go back and redo the old crappy looking stuff I did. Sometimes Im just going in circles.

__________________
Jan's 53 |
|
|
|
|
05-04-2019, 11:32 PM
|
#22 |
|
Senior Member
Join Date: Mar 2011
Location: West Plains, Missouri
Posts: 7,555
|
Re: Wife's 48
Glad you getting around better...Jim
__________________
my build thread: http://67-72chevytrucks.com/vboard/s...d.php?t=459839 Jimbo's long bed step build:http://67-72chevytrucks.com/vboard/s...t=464626<br /> |
|
|
|
|
05-23-2019, 01:06 AM
|
#23 |
|
Registered User
Join Date: Jul 2017
Location: Joshua, Texas.
Posts: 1,303
|
Re: Wife's 48
Look up threaded rivet nuts for that missing door panel nut. Sounds like a perfect candidate.
Will need to drill it out nice and round. Worse case patch and redrill but a threaded rivet nut would pop right in without needing to access the other side.
__________________
1950 Build |
|
|
|
|
05-23-2019, 02:22 AM
|
#24 |
|
Registered User
Join Date: Nov 2010
Location: calgary alberta
Posts: 7,941
|
Re: Wife's 48
just fab it up, less time and works the same anyway. maybe find a square nut at a farm store and it will fill the hole better. or
-measure off another door so you get the hole in the right place and mark an X on the door that extends out bigger than the hole but so the center of the X is the center of the spot where the nut should be. -find a non plated washer that's bigger than the torn out spot that needs repair if the center of the washer were to be placed on the center of the X you marked. -scribe a line around that washer. use a sharp pointed scribe so you get a fine line -weld a non plated nut on the back side of the washer that is the same thread as what the door hole is supposed to be. using a lubed bolt inside the nut will keep any slag from messing up the threads inside the nut, just ensure you remove the nut before the weld cools off. set it aside to cool -file or grind or burr out the metal from the inside of the circle you had drawn on the door, where the hole was. the washer should fit the hole and the center of the nut that you just welded to the washer should be in the center of the X you marked previously. a little space around the washer is ok, like the thickness of your mig wire (assuming you are mig welding) -using a piece of scrap longer than the washer is wide, drill a hole in the scrap so you can bolt it to the washer that has the nut welded on. the scrap should be a little bigger than the washer, like some flat stock, so you can use this as something to hold the washer into the hole you filed out. it will keep the washer flat with the door. you can hold the scrap to the door with a screw, a small tack weld or a magnet or something like that. it is just thee to hold the washer in place and flat with the door panel till you get the washer tacked in a couple of spots -once the washer is tacked in you can remove the scrap piece and finish welding the washer in. -finish the metal nicely -BOOM, done. and it looks like it was supposed to be there. generally, a round hole is easier to fit a patch to than a non round hole. same for filling other holes, like firewall or dash. better to drill the holes bigger and use a nice clean round patch that you can buy cheap than waste time trying to get a patch fabbed up to fit the torn out spot or a bunch of different sized holes. some places sell the "unholes" (welders series, google it) so that makes it easy. use a step drill instead of a twist drill to get the right size so the hole stays round as you drill |
|
|
|
|
05-23-2019, 08:45 AM
|
#25 |
|
Senior Member
Join Date: Sep 2017
Location: Bryan, Texas
Posts: 2,296
|
Re: Wife's 48
I like both ideas. Thanks guys.
__________________
8man-aka Robert 1948 on a S10 Frame, small block with a carb 1954 Cab, 53 Front and Bed, 50 Doors, S10 Frame, Power TBD Build thread: "]http://67-72chevytrucks.com/vboard/showthread.php?t=746899&highlight=wife%27s+48[/URL] [/URL]http://67-72chevytrucks.com/vboard/showthread.php?t=840204 |
|
|
|
 |
| Bookmarks |
|
|


 Hybrid Mode
