
|
|
|
 11-21-2018, 10:58 PM
|
#1 | ||
|
Registered User
 Join Date: Mar 2013
Location: Lenexa, KS
Posts: 547
|
Re: 1972 SWB Build
Quote:
Quote:
|
||

|

|
|
11-22-2018, 11:20 AM
|
#2 |
|
Almost Satisfied
 Join Date: Mar 2002
Location: Springfield, MO
Posts: 2,932
|
Re: 1972 SWB Build
I saw Boyd’s was having a sale with free shipping. I went ahead and ordered my tank. What radiator did you go with? Fans?
__________________
1971 C10 Stepside. LSx 6.0 with BTR Stage IV, Speed Engineering Headers, 4L80e transmission w/3200 Circle-D Stall. 3.73. Posi. Purchased this truck when I was 17. I started the rebuild (or take apart) in 1993. I have drug it around all over the country in pieces. Finally back on the road in 2021. "I can't complain, but sometimes I still do. Life's been good to me so far." |
|
|
|
|
11-22-2018, 07:52 PM
|
#3 | |
|
Registered User
Join Date: Mar 2013
Location: Lenexa, KS
Posts: 547
|
Re: 1972 SWB Build
Quote:
|
|
|
|
|
|
11-26-2018, 11:06 AM
|
#4 |
|
Registered User
Join Date: Mar 2013
Location: Lenexa, KS
Posts: 547
|
Re: 1972 SWB Build
The motor is in. We had a blizzard forcasted to come in on Sunday so we hoofed it and got the motor in on Saturday. Everything went smooth. The only problem was my mistake, I put the motor mounts in the wrong place on the adapter plates. Easy fix.
|
|
|
|
|
12-03-2018, 06:52 PM
|
#5 |
|
Registered User
Join Date: Mar 2013
Location: Lenexa, KS
Posts: 547
|
Re: 1972 SWB Build
A few black Friday goodies showed up today. I spent some time working on the truck this weekend. Stripped down the engine bay harness to rework it a little to work better with the LS harness and generally clean things up. I installed an AAW complete harness a few years back. I also took the seat out, removed the tank, removed the gauges and starting thinking about how I am going to run the LS harness. I believe I am going to mount the ECM, TAC, fuse panel under the seat, and Dakota modules under the seat . I want to keep the clutter under the dash to a minimum.
I also bought a filler neck and cap from Boyds to plug the hole in the side of the cab. I think it turned out perfect. I am going to weld a flat plate to the backside to seal the neck from water as well as use it as a keeper to keep the neck from being pulled out. Waiting on the Entropy rad to come in. Hopefully by Christmas. I am planning on hitting it hard again Wednesday night to knock out some of the piddly stuff. |
|
|
|
|
12-03-2018, 07:10 PM
|
#6 |
|
Almost Satisfied
Join Date: Mar 2002
Location: Springfield, MO
Posts: 2,932
|
Re: 1972 SWB Build
Keep me posted on the LS harness. I'm trying to decide where to run mine as well. Under seat or on the radiator support.
__________________
1971 C10 Stepside. LSx 6.0 with BTR Stage IV, Speed Engineering Headers, 4L80e transmission w/3200 Circle-D Stall. 3.73. Posi. Purchased this truck when I was 17. I started the rebuild (or take apart) in 1993. I have drug it around all over the country in pieces. Finally back on the road in 2021. "I can't complain, but sometimes I still do. Life's been good to me so far." |
|
|
|
|
12-04-2018, 12:02 PM
|
#7 | |
|
Registered User
Join Date: Mar 2013
Location: Lenexa, KS
Posts: 547
|
Re: 1972 SWB Build
Quote:
|
|
|
|
|
|
12-05-2018, 12:41 PM
|
#8 |
|
Registered User
Join Date: Jul 2012
Location: Rosenberg, Texas
Posts: 3,506
|
Re: 1972 SWB Build
After doing this myself, I'll give you a little heads up. The ECM should fit fine, provided your PSI harness is long enough. However, the Dakota Digital box isn't likely to work under there. The display cable they give you is too short. I believe you are required to run a specific type of cable, but I don't remember what that is (CAT5?). I want to say it has a maximum length per DD, but I could be wrong. You'll need to look into that a bit before you get too far along, or you may end up redoing some work. Good luck, I hope it works out for you.
Nice parts too!
__________________
-Duane C/10 Club Texas member 1971 Chevy C10 "Brutus" SWB Fleetside 2016 6.0L (L96) 6L90E (driver/project) 1965 Pontiac GTO "Royal Goat" 400/TH400 w/AC (my baby) |
|
|
|
|
12-05-2018, 12:45 PM
|
#9 | |
|
Registered User
Join Date: Mar 2013
Location: Lenexa, KS
Posts: 547
|
Re: 1972 SWB Build
Quote:
Where did you end up putting your ECM? |
|
|
|
|
|
12-05-2018, 01:10 PM
|
#10 | |
|
Registered User
Join Date: Jul 2012
Location: Rosenberg, Texas
Posts: 3,506
|
Re: 1972 SWB Build
Quote:
__________________
-Duane C/10 Club Texas member 1971 Chevy C10 "Brutus" SWB Fleetside 2016 6.0L (L96) 6L90E (driver/project) 1965 Pontiac GTO "Royal Goat" 400/TH400 w/AC (my baby) |
|
|
|
|
|
12-05-2018, 01:35 PM
|
#11 | |
|
Registered User
Join Date: Mar 2013
Location: Lenexa, KS
Posts: 547
|
Re: 1972 SWB Build
Quote:
|
|
|
|
|
|
12-06-2018, 02:58 PM
|
#12 | |
|
Registered User
Join Date: Jul 2012
Location: Rosenberg, Texas
Posts: 3,506
|
Re: 1972 SWB Build
Quote:
__________________
-Duane C/10 Club Texas member 1971 Chevy C10 "Brutus" SWB Fleetside 2016 6.0L (L96) 6L90E (driver/project) 1965 Pontiac GTO "Royal Goat" 400/TH400 w/AC (my baby) |
|
|
|
|
|
12-07-2018, 12:38 PM
|
#13 | |
|
Almost Satisfied
Join Date: Mar 2002
Location: Springfield, MO
Posts: 2,932
|
Re: 1972 SWB Build
Quote:
__________________
1971 C10 Stepside. LSx 6.0 with BTR Stage IV, Speed Engineering Headers, 4L80e transmission w/3200 Circle-D Stall. 3.73. Posi. Purchased this truck when I was 17. I started the rebuild (or take apart) in 1993. I have drug it around all over the country in pieces. Finally back on the road in 2021. "I can't complain, but sometimes I still do. Life's been good to me so far." |
|
|
|
|
|
12-07-2018, 12:43 PM
|
#14 | |
|
Registered User
Join Date: Mar 2013
Location: Lenexa, KS
Posts: 547
|
Re: 1972 SWB Build
Quote:
|
|
|
|
|
|
12-07-2018, 04:04 PM
|
#15 |
|
Registered User
Join Date: Mar 2013
Location: Lenexa, KS
Posts: 547
|
Re: 1972 SWB Build
I couldn't wait and had to slip the radiator in. Man it looks good in there. One thing of note, and I am sure I'm not the first to notice this, the top inlet of the radiator is lower than the fitting on the top of the water pump. I assume this doesn't matter. My thought are the hump in the hose is now going to be the highest point in the system. It may make purging the air a little tough. We shall see.
FYI, anyone local looking to buy odds and ends from LMC, they gave me a 30% off coupon when I was paying today. I spent a whopping $6 on new rubber isolator bushing for the lower radiator. |
|
|
|
|
12-07-2018, 06:35 PM
|
#16 |
|
Almost Satisfied
Join Date: Mar 2002
Location: Springfield, MO
Posts: 2,932
|
Re: 1972 SWB Build
I'll be in KC in March for a concert. I plan on going by LMC at that time to pick up some items. Radiator looks great. My research shows you need a Gates 21439 upper hose and a Gates 20687 lower hose. Let me know on the ones you use. I'm glad you are figuring all this out ahead of me LOL
__________________
1971 C10 Stepside. LSx 6.0 with BTR Stage IV, Speed Engineering Headers, 4L80e transmission w/3200 Circle-D Stall. 3.73. Posi. Purchased this truck when I was 17. I started the rebuild (or take apart) in 1993. I have drug it around all over the country in pieces. Finally back on the road in 2021. "I can't complain, but sometimes I still do. Life's been good to me so far." |
|
|
|
|
12-08-2018, 08:43 PM
|
#17 | |
|
Registered User
Join Date: Mar 2013
Location: Lenexa, KS
Posts: 547
|
Re: 1972 SWB Build
Quote:
I haven't looked in to the hoses yet. I'll check those out. Thanks! |
|
|
|
|
|
12-10-2018, 11:08 AM
|
#18 |
|
Registered User
Join Date: Mar 2013
Location: Lenexa, KS
Posts: 547
|
Re: 1972 SWB Build
Started working on the wiring harness layout. It looks like the PSI harness is the perfect length to mount the ECU under the seat. My plan is to mount the ECM and fuse/relay panel on the passenger side. The Dakota BIM and gauge modules on the drivers side. I'd like to mount the TAC module under the seat as well. but I would have to lengthen the the harness between the TAC and pedal about a foot. The harness from the ECM is long enough to reach under the dash, so I could mount it under there. I'll just see what is the best route to take.
Fun fact, when you select NO to "OIL PRESSURE WIRING (98-02 F-BODY GAUGES ONLY)" when ordering a PSI harness, they remove the oil pressure wiring completely from the harness. Luckily, the Dakota gauges come with a sender and harness to display oil pressure. Had I known this, I would have said yes to make the wiring a little easier. |
|
|
|
|
12-11-2018, 11:45 AM
|
#19 |
|
Registered User
Join Date: Dec 2009
Location: Independence Mo
Posts: 4,119
|
Re: 1972 SWB Build
Nice looking truck, hope to see it around next summer. As for the oil pressure wiring, almost no aftermarket wiring harness companies include that wire since its not needed for the engine to run, and it would only be a single tan wire that wouldn't have the correct end for your aftermarket gauges anyway. Also, don't be afraid to lengthen the TAC to pedal wires, it wont be an issue as long as your connections are good.
__________________
My '72 short bed build. http://www.ls1tech.com/forums/conver...6-0-4l80e.html 5.3 swap into my RUSTY '71 C10 http://ls1tech.com/forums/conversion...71-c-10-a.html |
|
|
|
|
12-11-2018, 01:50 PM
|
#20 | |
|
Registered User
Join Date: Mar 2013
Location: Lenexa, KS
Posts: 547
|
Re: 1972 SWB Build
Quote:
Im still not sure about the TAC module. It will fit under the dash no problem. I can make a plate to mount it and the Dakota modules behind the gauges. Im still not sure what to do. Going to work on it some more today to figure it out. |
|
|
|
|
|
12-17-2018, 11:37 AM
|
#21 |
|
Almost Satisfied
Join Date: Mar 2002
Location: Springfield, MO
Posts: 2,932
|
Re: 1972 SWB Build
How is the harness coming along? Ordered mine this morning...any lessons learned?
__________________
1971 C10 Stepside. LSx 6.0 with BTR Stage IV, Speed Engineering Headers, 4L80e transmission w/3200 Circle-D Stall. 3.73. Posi. Purchased this truck when I was 17. I started the rebuild (or take apart) in 1993. I have drug it around all over the country in pieces. Finally back on the road in 2021. "I can't complain, but sometimes I still do. Life's been good to me so far." |
|
|
|
|
12-17-2018, 11:54 AM
|
#22 |
|
Registered User
Join Date: Mar 2013
Location: Lenexa, KS
Posts: 547
|
Re: 1972 SWB Build
It's been slow going. Getting ready for #3 to arrive, so I haven't been able to spend a whole lot of time on it. So far, everything with the PSI harness has been great. My only gripes are nit picky type things. The corrugated loom is a pain in the rump to manipulate sometimes. Not enough to justify spending the extra $125 they want for the braided loom, but enough to make me cuss a little.
I spent a few hours this weekend and tapped in to power and signal wires for everything on the ECM and Dakota module. I also lengthened my TAC harness 2 feet to allow placement under the seat. I'm going work on it this afternoon and try to wrap up the wiring so I can move on to the fuel system and buttoning up loose ends. |
|
|
|
|
12-18-2018, 10:15 AM
|
#23 |
|
Senior Member
Join Date: May 2006
Location: Philadelphia, Pa. 19454
Posts: 9,516
|
Re: 1972 SWB Build
Wire care makes a split wrap F6, using it on my harness to get rid of the corragated wrap from FAST
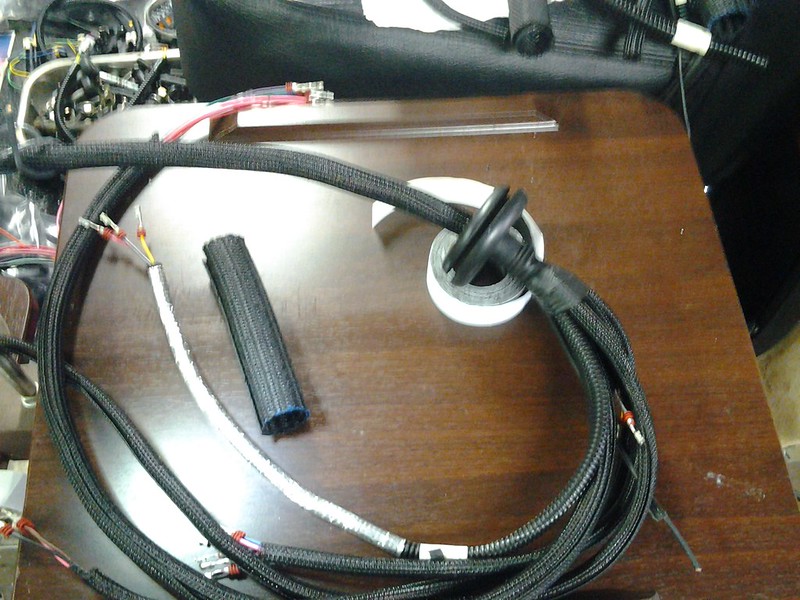 [url=https://flic.kr/p/2dcvTEa]20181127_104252 [url=https://flic.kr/p/2dcvTEa]20181127_104252
__________________
Semper Fi...Uncle Sam, you da man All parts offered to help are free, unless otherwise noted Dont try this stuff in my build thread, unless you have 55 years of mechanical OTJ training SAFETY FIRST AS usual, off topic They say your mind goes second, can't remember the first Jim |
|
|
|
|
12-18-2018, 11:52 AM
|
#24 | |
|
Registered User
Join Date: Mar 2013
Location: Lenexa, KS
Posts: 547
|
Re: 1972 SWB Build
Quote:
|
|
|
|
|
|
12-18-2018, 05:24 PM
|
#25 |
|
Registered User
Join Date: Jul 2012
Location: Rosenberg, Texas
Posts: 3,506
|
Re: 1972 SWB Build
I've been using a product made by Techflex called "Flexo F6" for years. It's very similar to what Jim uses, and I get it off Amazon. Pretty cheap compared to the name brand stuff and works really well. They also have other model products that come in different colors, or true sleeves if you don't want a split loom. Can't hurt to have a few options to choose from if you want the braided wrap stuff.
__________________
-Duane C/10 Club Texas member 1971 Chevy C10 "Brutus" SWB Fleetside 2016 6.0L (L96) 6L90E (driver/project) 1965 Pontiac GTO "Royal Goat" 400/TH400 w/AC (my baby) |
|
|
|
 |
| Bookmarks |
|
|


 Hybrid Mode
