
|
|
|
 08-29-2014, 11:38 PM
|
#1 |
|
Post Whore
 Join Date: Mar 2013
Location: Southern Oregon
Posts: 10,384
|
Re: Markeb01 Build Thread
Looks good!

__________________
1966 Chevy C10 "Project Two Tone" http://67-72chevytrucks.com/vboard/s...d.php?t=596643 1964 GMC "Crustine" semi-build:http://67-72chevytrucks.com/vboard/s...d.php?t=665056 My youtube channel. Username "Military Chevy": https://www.youtube.com/channel/UC_h...fzpcUXyK_5-uiw |

|

|
|
08-31-2014, 12:33 AM
|
#2 |
|
Senior Enthusiast
Join Date: Feb 2007
Location: Spokane Valley, WA
Posts: 8,356
|
Re: Markeb01 Build Thread
Completed another minor project this afternoon. I originally dismissed the idea of adding a manual override switch for the electric fans, but the more I thought about it I realized it would be nice to have the ability to test the fans or have to the ability to run them should the sensor/sender ever fail.
So per the instructions I simply added a toggle switch on the left bottom of the dash in an existing hole, and spliced it into the grey sender wire. Now I can power the fans manually any time needed: 
__________________
My Build Thread: http://67-72chevytrucks.com/vboard/s...d.php?t=444502 |
|
|
|
|
08-31-2014, 03:01 AM
|
#3 |
|
Registered User
Join Date: Apr 2011
Location: .
Posts: 3,104
|
Re: Markeb01 Build Thread
That Sir is a very good idea. I've done the very same thing to my rides and it does have its advantages.
Well done. |
|
|
|
|
08-31-2014, 09:32 AM
|
#4 |
|
Registered User
Join Date: Apr 2012
Location: Searcy, AR
Posts: 4,203
|
Re: Markeb01 Build Thread
Thanks Again for the awesome write ups
another tip to add to my expanding file of stolen ideas...
 Great Work Sir!!! 
__________________
DON Proverbs 27:17 US Air Force Retarded errr Retired My '65 Stepper Build:http://67-72chevytrucks.com/vboard/s...d.php?t=533920 My '60 Rusty Patina Build:http://67-72chevytrucks.com/vboard/s...66#post7402266 My '72 http://67-72chevytrucks.com/vboard/s...59#post7204359 SOLD |
|
|
|
|
09-01-2014, 05:35 PM
|
#5 |
|
Senior Enthusiast
Join Date: Feb 2007
Location: Spokane Valley, WA
Posts: 8,356
|
Re: Markeb01 Build Thread
We took a ride up to Newport this morning (about an hour away) and joined the annual Bobs Car Show. What a blast, and a tremendous variety of cars that rarely attend Goodguys events. There were 4 of our trucks, all of which Ive seen before. As can be seen in the first photo, the ground was a little uneven but there were shade trees everywhere:
    There was enough variety to satisfy any taste 4 speeds, big blocks, foreign cars, new and antique:     And as an added bonus, they had an outfit in attendance that photographed every car that came in, and offered the opportunity to have a magazine cover or special poster printed with the shot embedded. We picked this one:  We had it framed and matted, but my scanner bed isnt big enough to capture the whole image. They also provided everyone with a certificate of appreciation for attending their charity car show. Much nicer than a refrigerator magnet that replaced the dash plaques years ago. We had a great fun time. No pressure, lots of friendly people, and a couple of trinkets and souvenirs to remember the event.
__________________
My Build Thread: http://67-72chevytrucks.com/vboard/s...d.php?t=444502 |
|
|
|
|
09-01-2014, 09:39 PM
|
#6 |
|
Registered User
Join Date: Apr 2012
Location: Searcy, AR
Posts: 4,203
|
Re: Markeb01 Build Thread
Looks like an Awesome time...
Thanks for taking us along... 
__________________
DON Proverbs 27:17 US Air Force Retarded errr Retired My '65 Stepper Build:http://67-72chevytrucks.com/vboard/s...d.php?t=533920 My '60 Rusty Patina Build:http://67-72chevytrucks.com/vboard/s...66#post7402266 My '72 http://67-72chevytrucks.com/vboard/s...59#post7204359 SOLD |
|
|
|
|
09-02-2014, 09:44 AM
|
#7 |
|
Registered User
Join Date: Jun 2012
Location: Selkirk Ontario Canada
Posts: 1,141
|
Re: Markeb01 Build Thread
now that is cool
__________________
My 63 GMC Panel Slow Build http://67-72chevytrucks.com/vboard/s...=1#post5457281 63 
|
|
|
|
|
09-02-2014, 10:07 AM
|
#8 |
|
Rollin' Old Skool
Join Date: Jun 2007
Location: Hattiesburg, MS
Posts: 5,371
|
Re: Markeb01 Build Thread
Sounds like you scored on the SPAL fans! Do you have info for the eBay user you bought from? Curious to know the dimensions of the fans & whether he has more available. Also, looks like a nice show you guys attended. I really dig that teal '63(?) with the scallops. I added your pics of it to my Flikr photo collection.
__________________
_____________________________________________ Phillip My Build threads: 1966 Chevy C-10 "Black Betty" shortbed, fleetside, BBW, 327 V8/ Powerglide (under construction) http://67-72chevytrucks.com/vboard/s...ighlight=betty 1997 Chevy Tahoe, 2dr/2wd, mild custom (Daily driver) http://67-72chevytrucks.com/vboard/s...d.php?t=601142 Pics: '66 C-10 https://flic.kr/s/aHsjHWD4h9 '97 Tahoe https://flic.kr/s/aHsjGZ7wKP '93 C-1500 https://flic.kr/s/aHskxdpdnQ '88 S-10 Blazer https://flic.kr/s/aHsjYGx4Md Previous Rides: 1993 Chevy S-10 ext. cab, 4.3L, 4/5 drop (Sold) 1993 Chevy C-1500 short/step Retro-Rod (Sold) 1988 S-10 Blazer 2dr/2wd mild custom (Sold) |
|
|
|
|
09-02-2014, 01:31 PM
|
#9 |
|
Senior Enthusiast
Join Date: Feb 2007
Location: Spokane Valley, WA
Posts: 8,356
|
Re: Markeb01 Build Thread
Thanks for checking in guys.
The dual fans were purchased from Ebay seller univparts. The first link is to the fan, and the second link is the dual wiring harness. This includes two complete relay/harnesses and one sending unit: http://www.ebay.com/itm/NEW-SPAL-DUA...item43c9ff7a8e http://www.ebay.com/itm/DUAL-ELECTRI...item43cb49df16 Normally I dont deal with sellers having a rating as low as 99.3, but I checked his feedback and many of the complaints were not legitimate. At his volume of sales there are going to be some complainers. I was just blown away at how cheap his prices were compared to anywhere else. Other than sending an email the shipment had been made, he provided no tracking information, but the shipment arrived in less than a week. I would certainly deal with him again. Heres a tech drawing of the fan assembly showing dimensions:  596 mm = 23.46 wide 413 mm = 16.25 tall 108 mm = 4.25 thick It does draw 36 or 37 amps depending on which number you believe, but so far Im not having any issues with my 65 amp alternator. I wont know how well that works once the thermostat shows up for the air conditioner and I require maximum amps with the headlights on, etc. Theres a ton of information available on the Spal website, but it can be pretty tedious trying to find what youre looking for. Im thrilled with the fan(s). They work perfectly and a very quiet from what Im used to. As shown on the left end- of the tech drawing, the upper and lower line of rectangles are partially open indicating the path of free flow air at speed. All of those rectangles are rubber flaps that blow open, and are replaceable. Any other questions I can help with let me know.
__________________
My Build Thread: http://67-72chevytrucks.com/vboard/s...d.php?t=444502 |
|
|
|
|
09-02-2014, 08:49 PM
|
#10 |
|
Senior Member
Join Date: Mar 2011
Location: Tucson, Arizona
Posts: 2,069
|
Re: Markeb01 Build Thread
Thanks for posting the pics of the show. I've missed most of the shows I usually attend during the summer and this gives me somewhat of a fix for my car show withdrawal.
__________________
Sanity'66 http://67-72chevytrucks.com/vboard/s...d.php?t=515110 Long bed, Fleetside, Small back window I've Done So Much, With So Little, For So Long, That Now I Can Do Anything With Nothing.
|
|
|
|
|
09-04-2014, 04:13 PM
|
#11 |
|
Senior Enthusiast
Join Date: Feb 2007
Location: Spokane Valley, WA
Posts: 8,356
|
Re: Markeb01 Build Thread
Glad to hear the car show pics are worth posting for someone other than myself! I like looking at the photos others post as well, but Im not usually willing to go looking for them unless they are right in our forum.
Finally finished assembling GMC book #7, containing all the information for the Air Conditioning and Engine Fan installations.      The first section is everything for the A/C system and installation, including warranty paperwork, compressor details, and instructions for the air conditioning shop doing the purge and charge activities. Compressor bracket info from Alan Grove including belt dimensions and alignment details. The next section is fan related, covering everything from installation, dimensions, electrical demands, and wiring particulars. Final entries include purchase, shipping and receipt details, and any store receipts for any unique part or labor costs directly related to the addition of the Vintage Air or Spal fans. Having everything in one place sure makes it easy in the future if warranty or research questions come up.
__________________
My Build Thread: http://67-72chevytrucks.com/vboard/s...d.php?t=444502 |
|
|
|
|
09-04-2014, 06:23 PM
|
#12 |
|
Registered User
Join Date: Apr 2012
Location: Searcy, AR
Posts: 4,203
|
Re: Markeb01 Build Thread
Serious Documentation...
__________________
DON Proverbs 27:17 US Air Force Retarded errr Retired My '65 Stepper Build:http://67-72chevytrucks.com/vboard/s...d.php?t=533920 My '60 Rusty Patina Build:http://67-72chevytrucks.com/vboard/s...66#post7402266 My '72 http://67-72chevytrucks.com/vboard/s...59#post7204359 SOLD |
|
|
|
|
09-05-2014, 08:36 AM
|
#13 |
|
Registered User
Join Date: Jun 2012
Location: Selkirk Ontario Canada
Posts: 1,141
|
Re: Markeb01 Build Thread
i like that ..what did you use for the labeling on the binders mark
__________________
My 63 GMC Panel Slow Build http://67-72chevytrucks.com/vboard/s...=1#post5457281 63
|
|
|
|
|
09-05-2014, 11:37 AM
|
#14 |
|
Senior Enthusiast
Join Date: Feb 2007
Location: Spokane Valley, WA
Posts: 8,356
|
Re: Markeb01 Build Thread
I start with binders that have transparent covering on the face and spine. For the spine labels I just print what I want in Excel, using one row/cell per character. I center the alignment to keep them straight up and down, and cut them into strips just barely wider than the letters. The larger binders are easy to insert the strips by hand.
The smallest binders can be challenging to slide the labels into the transparent spine pockets, so on some I have to use 90 - 110 pound paper to make them stiff enough to slide all the way in, and on some that are extremely tight I also use tweezers to get them to the bottom without wrinkling. It also helps to open the binder completely flat, creating the largest gap possible in the pocket.
__________________
My Build Thread: http://67-72chevytrucks.com/vboard/s...d.php?t=444502 |
|
|
|
|
09-05-2014, 05:13 PM
|
#15 |
|
Senior Enthusiast
Join Date: Feb 2007
Location: Spokane Valley, WA
Posts: 8,356
|
Re: Markeb01 Build Thread
Well Im after another improvement again. The front bumper bullets have been bothering me since I first put them on. I like the concept, but they seemed to high and close together in their original position. So I sliced up the drivers side guide, made some more major modifications, and lowered it about 3. Now instead of lowest portion of the bullet intersecting at the top of the bumper, the centerline of the bullet aligns with the top of the bumper.
  Now I just have to modify the passenger bullet, strip both of them, and start over on the refinish and paint work. If Im not happy with them this time Ill scrap the whole project and reinstall stock guards. So far Im thinking they look a lot better compared to being mounted too high up.
__________________
My Build Thread: http://67-72chevytrucks.com/vboard/s...d.php?t=444502 |
|
|
|
|
09-05-2014, 10:21 PM
|
#16 |
|
Registered User
Join Date: Apr 2012
Location: Searcy, AR
Posts: 4,203
|
Re: Markeb01 Build Thread
Good Call on the adjustment to the Dagmars...
__________________
DON Proverbs 27:17 US Air Force Retarded errr Retired My '65 Stepper Build:http://67-72chevytrucks.com/vboard/s...d.php?t=533920 My '60 Rusty Patina Build:http://67-72chevytrucks.com/vboard/s...66#post7402266 My '72 http://67-72chevytrucks.com/vboard/s...59#post7204359 SOLD |
|
|
|
|
09-05-2014, 10:40 PM
|
#17 |
|
Rollin' Old Skool
Join Date: Jun 2007
Location: Hattiesburg, MS
Posts: 5,371
|
Re: Markeb01 Build Thread
Great job on the documentation, & thanks for the details on the fan setup. I like the reconfiguration of the bumper bullets as well.
__________________
_____________________________________________ Phillip My Build threads: 1966 Chevy C-10 "Black Betty" shortbed, fleetside, BBW, 327 V8/ Powerglide (under construction) http://67-72chevytrucks.com/vboard/s...ighlight=betty 1997 Chevy Tahoe, 2dr/2wd, mild custom (Daily driver) http://67-72chevytrucks.com/vboard/s...d.php?t=601142 Pics: '66 C-10 https://flic.kr/s/aHsjHWD4h9 '97 Tahoe https://flic.kr/s/aHsjGZ7wKP '93 C-1500 https://flic.kr/s/aHskxdpdnQ '88 S-10 Blazer https://flic.kr/s/aHsjYGx4Md Previous Rides: 1993 Chevy S-10 ext. cab, 4.3L, 4/5 drop (Sold) 1993 Chevy C-1500 short/step Retro-Rod (Sold) 1988 S-10 Blazer 2dr/2wd mild custom (Sold) |
|
|
|
|
09-05-2014, 10:52 PM
|
#18 |
|
Registered User
Join Date: Dec 2010
Location: Strathmore, Alberta
Posts: 470
|
Re: Markeb01 Build Thread
I agree, the bullets interfere with the bar in the grill when they are so high. It looks way better with it lower down, in my humble opinion. I really like that hood ornament also, saw it close up in Spokane this year.
|
|
|
|
|
09-06-2014, 08:00 PM
|
#19 |
|
Senior Enthusiast
Join Date: Feb 2007
Location: Spokane Valley, WA
Posts: 8,356
|
Re: Markeb01 Build Thread
Hot diggity we have air conditioning!! The 2nd replacement thermostat arrived today, and was at least the correct type with a rotary knob. It is the standard Vintage Air unit of this type, part number 11013-VUE for all Vintage Air systems needed this type & length of capillary tube. It looks like this:
 I was concerned at first if it would fit, as it looks nothing like the one that came in the evaporator:  I neednt have worried, the new one fit perfectly in place of the original. The only pitfall was it didnt come with an attaching nut, and the one from the other thermostat didnt fit. So I went through my stash of switch nuts, and out of about 100 of them I thankfully found two that fit. As soon as it was wired and back together, I turned it on and heard that reassuring snap of the compressor clutch! Firing up the engine and A/C system resulted in immediate cold out blowing out of the evaporator. After the Old Air debacle years ago, and weeks of waiting to see if this was going to work, its wonderful to actually have a system that works. Im very pleased with the Vintage Air product, and their customer service, but I am going to write them a letter suggesting they replace these thermostats with their own version. I initially thought perhaps the capillary tube was damaged during shipment due to the loose directional louvers in the case, but very close inspection shows no physical damage, and no odor of ether which is usually present with a ruptured capillary tube. I probably wont get much more use out of it this year, but summer travel in the truck will surely be more inviting in the future.
__________________
My Build Thread: http://67-72chevytrucks.com/vboard/s...d.php?t=444502 |
|
|
|
|
09-06-2014, 09:33 PM
|
#20 |
|
Registered User
Join Date: Dec 2010
Location: Strathmore, Alberta
Posts: 470
|
Re: Markeb01 Build Thread
I recall you saying you had an Old Air Products unit in there before. What was your experience with it, and why did you change to Vintage Air?
|
|
|
|
|
09-07-2014, 12:37 AM
|
#21 |
|
Senior Enthusiast
Join Date: Feb 2007
Location: Spokane Valley, WA
Posts: 8,356
|
Re: Markeb01 Build Thread
I can only speak regarding my own experience with Old Air, and it was not good. I bought their custom fit Hurricane system for my 1960 GMC back in 2000 and had nothing but trouble with it. It fit well and was reasonably easy to install, especially the firewall pass-thru and the receiver dryer lines. However:
1. I thought it looked crappy installed, as all the hoses drape under the dash connecting the evaporator to the under dash louvers. This may be the only photo I have showing it in the truck:  2. It never cooled off the cab of the truck adequately. 3. I live in the Northwest where it's cold 6-9 months of the year and the heater was completely ineffective. It wouldn't even defrost the windshield in the winter. 4. The flap diverter that controlled airflow between the windshield and floor was assembled incorrectly and "latched" in one position or the other and could not be budged without getting under the dash and forcing the lever by hand. After breaking the original dash controls, I utilized and t-handle choke cable until I pulled the handle off the cable. I discovered much later the rubber material had been incorrectly attached to the metal pivot parts causing it to catch inside the plastic housing. 5. The first motor assembly burned up and filled the car with smoke and electrical fire smell. To their credit, Old Air offered great customer service. They sent me a new motor assembly right away. About 2 months later the replacement motor did the same thing, and filled the cab with electrical smoke. At that point I was afraid my truck would be burned to the ground, so I pulled the Old Air fan assembly and after much research, installed a GM fan motor out of a Pontiac Fiero. No more fire problems after that. 6. Something in the system emitted a loud shrieking noise at certain rpms. I had 2 different A/C shops check it out and never could find the problem. (Years later I was told it might have been a bent compressor shaft). With no other place to turn for repair, the shrieking noise finally did me in and I tore the whole system out and threw it in the garbage. I didnt want to sell the problems to anyone else. Old Air must make good products, a lot of people buy their stuff, but other than great customer service my experience was a $1,000+ waste of money. I never intended to add air conditioning again. Recently my wife suggested we should try again as were intending to travel more in the truck during the good weather, so that was the motivation for the Vintage Air installation.
__________________
My Build Thread: http://67-72chevytrucks.com/vboard/s...d.php?t=444502 |
|
|
|
|
09-08-2014, 11:45 AM
|
#22 |
|
Registered User
Join Date: Dec 2010
Location: Strathmore, Alberta
Posts: 470
|
Re: Markeb01 Build Thread
Wow, that was a lot of grief. I have an Old Air System in mine, and for the most part it has been ok. I like that they use the original heater control rather than having a separate control panel that you have to mount somewhere like Vintage Air has. I also like that it doesn't take all of the glove compartment away to clear the unit that Vintage Air does. Old Air's only takes a couple inches off the back and you still have most of the glove compartment for storage.
That being said, I had trouble getting mine up and running. It was hooked up as per instructions, but I couldn't get power from the relay to turn on the compressor clutch. After a few phone calls with the tech guy, I found that one wire that was supposed to be blue, was black, and two spades in the one connector were reversed, both were black. Switched them over and away it went. It is very hard to diagnose electrical problems, especially over the phone. Mine works ok for the most part, but I wish it got colder. It gets down to 40F when it starts up, then gets not so cold after the engine warms up. I put a heat gun on both sides of the valve that stops the hot coolant from going into the unit, and it is not closing it right off. I have heat on both sides of the valve, although less on the other side of the valve. I'm not sure if the unit is supposed to allow the coolant in when the control is set at cold or not. I will have to call the tech guy again to find out if maybe the valve isn't doing its job. I plan to insulate the firewall better this winter, to reduce the heat getting into the cab from the engine compartment. I'm also wondering if the door between the heat side and the cold side is sealing. I think the unit has enough capacity, but one of those two scenarios I just mentioned might be limiting how effective it is. One other thing I would like to change is that the heater motor on the low position blows to fast. I wish it blew at less speed on low. Haven't tried the heater or defroster at all, it appears to work when I tested it, but haven't had a real cold day to try it. This unit draws it's air from inside the cab (recirculating), I wonder if Vintage Air's draws air from the cowl, and has a recirc position also. |
|
|
|
|
09-08-2014, 03:33 PM
|
#23 |
|
Senior Enthusiast
Join Date: Feb 2007
Location: Spokane Valley, WA
Posts: 8,356
|
Re: Markeb01 Build Thread
Im glad yours is providing better service than mine did, but sounds like it has some issues too. If the hot engine coolant is leaking into the system during the summer because the internal valve doesnt close it off completely, Id suggest adding a separate shut off valve in the heater hose ahead of the firewall. Back in the 70s when I worked at Peterbilt they did that on every truck. There are several types available at any parts store. The cheapest versions close off like a water faucet, although ball valves with a lever work easier. There are also cable and vacuum types, but since you only need to close the valve in summer and open it in winter, the mechanical type works just fine.
I also had a wiring issue with mine. The instructions were unclear, but the harness included I large diode that was turned the wrong direction (I found out much later). I always had to make sure the A/C system was turned off before killing the engine, or it would keep on running after the ignition was turned off until I shut off the A/C. I never knew exactly what the diode was for, but may have been part of the problem with the fan motors getting toasted. I dont know if the air/heat combo systems from Vintage Air offer fresh air intake of not. Since mine is an antique style knee freezer only, it is certainly the recirculating type. I tend to doubt they offer fresh air as part of their package, but the new Gen IV systems operate both the heat and air by microprocessor controls to keep the temperature at a specific setting like new cars. I think V/A is the only aftermarket manufacturer offering that feature.
__________________
My Build Thread: http://67-72chevytrucks.com/vboard/s...d.php?t=444502 |
|
|
|
|
09-08-2014, 10:12 PM
|
#24 |
|
Registered User
Join Date: Dec 2010
Location: Strathmore, Alberta
Posts: 470
|
Re: Markeb01 Build Thread
That's a good thought about the valve, and a fairly easy fix, but the A/C system's valve should do that. A small ball valve will be in order I think. I worked for Peterbilt in Calgary for a long time also, I guess we have another thing in common. I remember lots of the trucks with a couple of ball valves to cut off the hot coolant to the heater and bunk. Turned a few on too when it got cold outside and the driver came in with a complaint of no heat. It disappoints me that I have to do that, but it will make a big difference and less load on the A/C system. Good advice.
|
|
|
|
|
09-09-2014, 03:57 PM
|
#25 |
|
Senior Enthusiast
Join Date: Feb 2007
Location: Spokane Valley, WA
Posts: 8,356
|
Re: Markeb01 Build Thread
Heres an old Peterbilt story dealing with this very subject. Back around 1975 introduction of a new dashboard design which included new A/C and heater controls, inspired management to delete the under hood manual heater shut off valve claiming it was no longer needed. The truth was nothing had actually been improved on the heater controls, it just looked cosmetically different. The peekaboo door on the side of conventional tilt front hoods for checking the oil was also quietly deleted. Each item figured out to $1 per truck savings. The peekaboo door was actually featured in the advertising material as a benefit that separated Peterbilt from the competition.
I thought it was outrageous to delete both items over a matter of $2 a truck, and requested audience with Virgil Pound (Chief Engineer) to argue my opinion. He politely and patiently listened to my enthusiasm, then walked over and flipped back a leather cover concealing an easel with about 30 top priorities he was consumed with. At the time we were immersed in dealing with FMVSS121 which was the federally mandated anti-lock braking requirements. The other bullet points all had to deal with fatal/lawsuit related priorities. He explained if all went well he might be able to address the top 6 over the next year. He agreed with everything I said, however he would not embrace the argument as it was insignificant compared to the other priorities he was faced with. I felt my enthusiasm for the welfare of the company was respected, heard, and completely unimportant in the face of the bigger picture. I was satisfied Id done what I could, and that was the end of it. On a more recent topic, 20+ hours of reworking the Dagmars resulted in a cancelled concept. First of all, I just couldnt get both bullets aligned straight forward nor achieve exactly the same degree of level side to side. As shown in this photo, the driver side bullet appears to point downhill compared to the passenger side, and the gap between the rear of the bullets and the ends of the grille bar appears uneven: 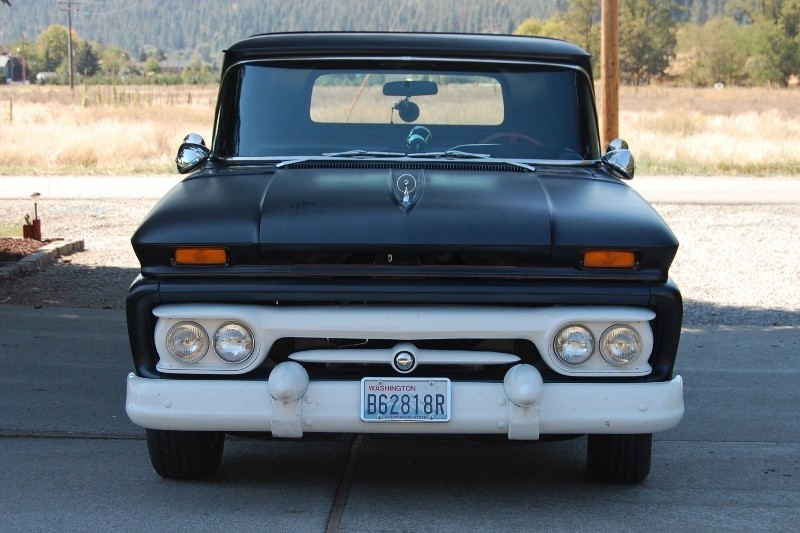 Also, the more I studied the photos I just wasnt happy with the size or shape of the bullets:  Being an old Jarhead, its hard for me to accept defeat. I firmly believe youre never defeated when youre beaten, youre only defeated when you quit. But with age also comes balance, and I sat down and thought it over and realized Im not having fun with this anymore. To my eye they needed to be bigger around and more pointed. I still think the concept has promise, but Im burned out on the project and returning to stock bumper guards. Since I completely gouged up the paint on the bumper fitting the bullets, I pulled the bumper, gave it a thorough sanding & cleaning and repainted it again with Rustoleum Professional spray paint. (The color is actually bright white, it just looks darker because of the poor lighting):   Im sure this is the same paint thats in the regular spray can, but this stuff flows a volume and pattern more like a real spray gun. I prefer using this stuff over having to do all the clean up afterward when using a spray gun. I also scratched up a couple of bumper bolt heads so those were sanded and reshot:  Additionally, I lowered my front license plate from the stock location years ago by slicing up a 5/16 steel plate and drilling holes in the peak of the bumper and attaching the license plate through the lower holes, the steel backing plate, and the bumper. Studying the photos, I got to thinking the license plate might look better positioned even lower, level with the top of the bumper. So I drilled two more holes in the backing plate, and chamfered the holes to accept flat head screws. Attaching these to the bumper through the original mounting holes, will drop it another ¾ while keeping it at the same angle:  Im not sure how this will look on the truck until I try it out, as lowering the license plate too much may make the grille bar appear to be mounted too high up in the cavity. Ah the fun never ends! Another pair of NOS bumper guards are due to arrive Saturday. Theyll need prep and repaint as well, which shouldnt take much effort. Once theyre slapped on it will be time to move on to some other new adventure!
__________________
My Build Thread: http://67-72chevytrucks.com/vboard/s...d.php?t=444502 |
|
|
|
 |
| Bookmarks |
|
|


 Hybrid Mode
