
|
 09-08-2014, 10:12 PM
|
#1701 |
|
Registered User
Join Date: Dec 2010
Location: Strathmore, Alberta
Posts: 470
|
Re: Markeb01 Build Thread
That's a good thought about the valve, and a fairly easy fix, but the A/C system's valve should do that. A small ball valve will be in order I think. I worked for Peterbilt in Calgary for a long time also, I guess we have another thing in common. I remember lots of the trucks with a couple of ball valves to cut off the hot coolant to the heater and bunk. Turned a few on too when it got cold outside and the driver came in with a complaint of no heat. It disappoints me that I have to do that, but it will make a big difference and less load on the A/C system. Good advice.
|

|

|
|
09-09-2014, 03:57 PM
|
#1702 |
|
Senior Enthusiast
Join Date: Feb 2007
Location: Spokane Valley, WA
Posts: 8,356
|
Re: Markeb01 Build Thread
Heres an old Peterbilt story dealing with this very subject. Back around 1975 introduction of a new dashboard design which included new A/C and heater controls, inspired management to delete the under hood manual heater shut off valve claiming it was no longer needed. The truth was nothing had actually been improved on the heater controls, it just looked cosmetically different. The peekaboo door on the side of conventional tilt front hoods for checking the oil was also quietly deleted. Each item figured out to $1 per truck savings. The peekaboo door was actually featured in the advertising material as a benefit that separated Peterbilt from the competition.
I thought it was outrageous to delete both items over a matter of $2 a truck, and requested audience with Virgil Pound (Chief Engineer) to argue my opinion. He politely and patiently listened to my enthusiasm, then walked over and flipped back a leather cover concealing an easel with about 30 top priorities he was consumed with. At the time we were immersed in dealing with FMVSS121 which was the federally mandated anti-lock braking requirements. The other bullet points all had to deal with fatal/lawsuit related priorities. He explained if all went well he might be able to address the top 6 over the next year. He agreed with everything I said, however he would not embrace the argument as it was insignificant compared to the other priorities he was faced with. I felt my enthusiasm for the welfare of the company was respected, heard, and completely unimportant in the face of the bigger picture. I was satisfied Id done what I could, and that was the end of it. On a more recent topic, 20+ hours of reworking the Dagmars resulted in a cancelled concept. First of all, I just couldnt get both bullets aligned straight forward nor achieve exactly the same degree of level side to side. As shown in this photo, the driver side bullet appears to point downhill compared to the passenger side, and the gap between the rear of the bullets and the ends of the grille bar appears uneven: 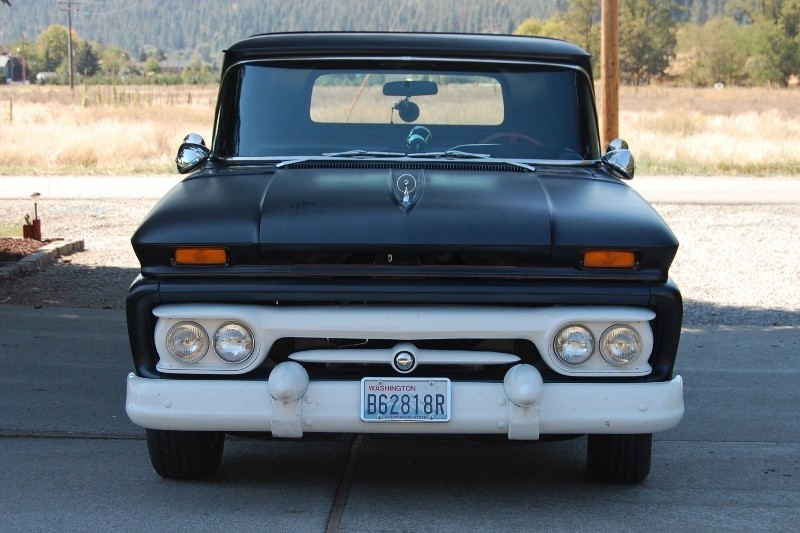 Also, the more I studied the photos I just wasnt happy with the size or shape of the bullets:  Being an old Jarhead, its hard for me to accept defeat. I firmly believe youre never defeated when youre beaten, youre only defeated when you quit. But with age also comes balance, and I sat down and thought it over and realized Im not having fun with this anymore. To my eye they needed to be bigger around and more pointed. I still think the concept has promise, but Im burned out on the project and returning to stock bumper guards. Since I completely gouged up the paint on the bumper fitting the bullets, I pulled the bumper, gave it a thorough sanding & cleaning and repainted it again with Rustoleum Professional spray paint. (The color is actually bright white, it just looks darker because of the poor lighting):   Im sure this is the same paint thats in the regular spray can, but this stuff flows a volume and pattern more like a real spray gun. I prefer using this stuff over having to do all the clean up afterward when using a spray gun. I also scratched up a couple of bumper bolt heads so those were sanded and reshot:  Additionally, I lowered my front license plate from the stock location years ago by slicing up a 5/16 steel plate and drilling holes in the peak of the bumper and attaching the license plate through the lower holes, the steel backing plate, and the bumper. Studying the photos, I got to thinking the license plate might look better positioned even lower, level with the top of the bumper. So I drilled two more holes in the backing plate, and chamfered the holes to accept flat head screws. Attaching these to the bumper through the original mounting holes, will drop it another ¾ while keeping it at the same angle:  Im not sure how this will look on the truck until I try it out, as lowering the license plate too much may make the grille bar appear to be mounted too high up in the cavity. Ah the fun never ends! Another pair of NOS bumper guards are due to arrive Saturday. Theyll need prep and repaint as well, which shouldnt take much effort. Once theyre slapped on it will be time to move on to some other new adventure!
__________________
My Build Thread: http://67-72chevytrucks.com/vboard/s...d.php?t=444502 |
|
|
|
|
09-09-2014, 06:35 PM
|
#1703 |
|
Senior Enthusiast
Join Date: Feb 2007
Location: Spokane Valley, WA
Posts: 8,356
|
Re: Markeb01 Build Thread
I reattached the front license plate and mount in the new lower position. So far I like it just fine. I think it will look even more balanced/finished once the new bumper guards go on:
 For that matter I suppose it would look okay with no guards at all if I got rid of the holes:  I can see perhaps I should also paint the aluminum tubes for the receiver/drier black as well.
__________________
My Build Thread: http://67-72chevytrucks.com/vboard/s...d.php?t=444502 Last edited by markeb01; 09-09-2014 at 06:41 PM. |
|
|
|
|
09-09-2014, 07:26 PM
|
#1704 |
|
Registered User
Join Date: Dec 2010
Location: Strathmore, Alberta
Posts: 470
|
Re: Markeb01 Build Thread
Jeez Mark, you're going to give yourself an ulcer. I like the bullets, and I also like what you did with the grill. Looks way nicer than the GMC letters. The hood ornament is cool also, and the Chevy hood. I think you have a pretty good eye for what looks good, but don't drive yourself nuts, maybe you are looking too close. Next time we meet there will be plenty of Peterbilt stories to tell each other. I spent a long time there and have worked on more than my share of 379s.
|
|
|
|
|
09-09-2014, 08:39 PM
|
#1705 |
|
Senior Member
 Join Date: Mar 2011
Location: Tucson, Arizona
Posts: 2,069
|
Re: Markeb01 Build Thread
Hey Mark, I like the lowered bullets much better, but you know, I really like the no guards at all look. It makes the floating center piece the focus of the front end and in my opinion (not worth much
 ) looks very cool. I wish I was at your stage where I could just go back and make changes as the mood suited me. I just hope to get mine finished the 1st time. ) looks very cool. I wish I was at your stage where I could just go back and make changes as the mood suited me. I just hope to get mine finished the 1st time.
__________________
Sanity'66 http://67-72chevytrucks.com/vboard/s...d.php?t=515110 Long bed, Fleetside, Small back window I've Done So Much, With So Little, For So Long, That Now I Can Do Anything With Nothing. 
|
|
|
|
|
09-13-2014, 11:10 AM
|
#1706 |
|
Registered User
Join Date: Apr 2012
Location: Searcy, AR
Posts: 4,203
|
Re: Markeb01 Build Thread
Partial to the Dagmar's, but with the grille treatment and Killer hood ornament, the bullets make the front end a bit busy for my taste, but all in all you are the one who needs to be satisfied...

__________________
DON Proverbs 27:17  US Air Force Retarded errr Retired My '65 Stepper Build:http://67-72chevytrucks.com/vboard/s...d.php?t=533920 My '60 Rusty Patina Build:http://67-72chevytrucks.com/vboard/s...66#post7402266 My '72 http://67-72chevytrucks.com/vboard/s...59#post7204359 SOLD |
|
|
|
|
09-13-2014, 02:15 PM
|
#1707 | |||
|
Senior Enthusiast
Join Date: Feb 2007
Location: Spokane Valley, WA
Posts: 8,356
|
Re: Markeb01 Build Thread
Quote:
Quote:
Quote:
 In the meantime the new pair of NOS bumper guards arrived a few minutes ago. The guards are mint, but really dirty like they had been in service all these years:   Its kind of funny, the original set I cut up came from Golden State Pickup Parts back in 1992 the first NOS accessories I bought for the truck. I dont remember them having any type of wrapping paper or anything in the box except the guards and the instruction sheet and they were in pristine condition. I mounted them on the original bumper without prep of any kind:  The new set of NOS guards are filthy, the original box is essentially destroyed, and they have the most unusual padding Ive ever seen. It is perforated cardboard in an interesting pattern that makes it look woven:   I find it somewhat ironic the set with no protection looked like new, and the padded pair look like theyve had 50+ years of hard life! Im heading out to the garage to get to work on painting the new guards. I should have them mounted on the bumper sometime this evening.
__________________
My Build Thread: http://67-72chevytrucks.com/vboard/s...d.php?t=444502 |
|||
|
|
|
|
09-13-2014, 06:10 PM
|
#1708 |
|
Senior Enthusiast
Join Date: Feb 2007
Location: Spokane Valley, WA
Posts: 8,356
|
Re: Markeb01 Build Thread
All didnt go exactly as planned. I started out sanding the guards with a D/A, and when that didnt remove enough imperfections, I switched to a rougher grit by hand. After an hour or so I realized the paint was too badly damaged to be saved. There were cracks in the paint and rust spots going to the metal, so it was time to bring out the big guns.
I stripped both guards to bare metal in about 30 minutes using a 3.5 angle grinder and a stripper disc. Here they are stripped, washed with wax and grease remover (again) and wiped off with a tack rag:   There should be a photo of them next sitting in etch primer, but it was too windy outside to paint so I had to move everything to the bench and by the time I got set up and sprayed I forgot to take a picture! Here they are painted white:   They turned out a beautiful glossy bright white except for the first time in as long as I remember, I found a run right on the top, in the same exact place, on both guards! I must not have brought the metal temperature up as high as I normally do before shooting the paint. I wicked out most of the runs with a Q-Tip and completed the job with a total of 2 more heavy flow coats. Evidence of the runs is hard to see and almost gone, but Ill always know they are there. The paint says recoat within 1 hour or after 48, so Im just going to leave them on the bench until Monday. Theyll get a really nice overall wet sanding followed by one more flow coat. That will also minimize/eliminate some of the minor wrinkles created in the stamping process. Overall Im pleased, just a bit disappointed I botched the paint.
__________________
My Build Thread: http://67-72chevytrucks.com/vboard/s...d.php?t=444502 |
|
|
|
|
09-14-2014, 10:28 AM
|
#1709 |
|
Registered User
Join Date: Jun 2012
Location: Selkirk Ontario Canada
Posts: 1,141
|
Re: Markeb01 Build Thread
they look good ...strange how they looked like they were used
__________________
My 63 GMC Panel Slow Build http://67-72chevytrucks.com/vboard/s...=1#post5457281 63 
|
|
|
|
|
09-14-2014, 03:28 PM
|
#1710 |
|
Senior Enthusiast
Join Date: Feb 2007
Location: Spokane Valley, WA
Posts: 8,356
|
Re: Markeb01 Build Thread
The box they came in must have suffered the worst "shelf storage" in history! They were NOS kind of like the cars and trucks from the Lambrecht auction. Brand new, but with 50 years of abuse!!
__________________
My Build Thread: http://67-72chevytrucks.com/vboard/s...d.php?t=444502 |
|
|
|
|
09-15-2014, 10:11 PM
|
#1711 |
|
Senior Enthusiast
Join Date: Feb 2007
Location: Spokane Valley, WA
Posts: 8,356
|
Re: Markeb01 Build Thread
I guess 3rd time is the charm as the saying goes. As noted above, the Rustoleum paint label stated to wait 48 hours before recoating. With my typical good sense I felt that meant 36 hours was close enough, so last night I wet sanded the finish with 400 grit paper, cleaned them again and laid on a nice light base coat just enough to cover.
I hadnt even finished covering the 2nd guard, when the entire surface of both guards flashed off with a nice uniform wrinkle finish! I dont remember ever seeing that happen before. So I gave up immediately and went back in the house figuring Id have to wait a week or more before attempting another sanding/paint application. After about an hour I thought what a stupid idea that was waiting another week and not knowing if it would turn out any better. So I headed back out in the garage, bolted a guard to the bench vice, and had at the finish with a razor blade scraper. An hour or so later both were 95% stripped to bare metal again. I was so bummed it never even occurred to me to take pictures. The only proof I have is this pile of paint scrapings that missed the cardboard and ended up on the floor:  So this morning I hit them again with the 3.5 angle grinder and stripper disc, and returned them to polished bare metal. I also gave them a hand sanding with 400 grit wet just for good measure, after which they were washed again with wax and grease remover and resprayed with UPOL #8 acid primer. That was given about 45 minutes to cure followed by 3 coats of white. All 3 coats were medium/heavy wet coats sprayed under the heat lamps. Although they dont look any different than the earlier pictures, this time they turned out perfect with no runs!  I also got a nice surprise in the mail today. There was a guy at the Goodguys show last month offering to take a picture of the truck and put it on a T-Shirt. It sounded legit so I accepted the offer and got matching shirts for both of us. When he suggested putting a name on it, I thought my username would be great, and more people might recognize me when were away from the truck at shows. Heres what the finished image looks like:  Im thinking of sending them back though. When I actually wear the shirt, the curvature of the image combined with the light refracting from Venus makes me look like an old fat guy instead of the refined hunk I see in the mirror every day!  By the way for anyone interested, he does excellent work and is easy to deal with. Here is his contact information:  66 66
__________________
My Build Thread: http://67-72chevytrucks.com/vboard/s...d.php?t=444502 |
|
|
|
|
09-16-2014, 12:03 AM
|
#1712 |
|
Senior Member
Join Date: Mar 2011
Location: Tucson, Arizona
Posts: 2,069
|
Re: Markeb01 Build Thread
The shirt is a great idea. Thanks for sharing the info. I've been considering putting guards on mine but I'm probably to cheap to pay what people want for them now and I'm going to use a painted bumper so the chrome repops won't do.
__________________
Sanity'66 http://67-72chevytrucks.com/vboard/s...d.php?t=515110 Long bed, Fleetside, Small back window I've Done So Much, With So Little, For So Long, That Now I Can Do Anything With Nothing.
|
|
|
|
|
09-16-2014, 01:02 AM
|
#1713 |
|
Registered User
Join Date: Jun 2012
Location: Selkirk Ontario Canada
Posts: 1,141
|
Re: Markeb01 Build Thread
just throwing this out there mark did you ever think of powder coating the guards..shirt looks awesome
__________________
My 63 GMC Panel Slow Build http://67-72chevytrucks.com/vboard/s...=1#post5457281 63
|
|
|
|
|
09-16-2014, 02:06 PM
|
#1714 | ||
|
Senior Enthusiast
Join Date: Feb 2007
Location: Spokane Valley, WA
Posts: 8,356
|
Re: Markeb01 Build Thread
Quote:
Quote:
 The cowl, grille support, bumper, original guards, grille, and headlight rims are all powder coated and remain shiny black on the back side or under the white paint. When I decided to return to a white front end, I wanted to be able to easily and inexpensively touch it up when needed. So Ive stayed with the Rustoleum gloss white ever since so the color will match. I also had trouble with some of the sheet metal pieces starting to rust around the edges like the tailgate, grille, and headlight rims. I lost my enthusiasm for powder coating except on heavy items like bumpers and wheels as they soak up more heat and seem to cure better. Today I got up early specifically to wash the truck before it got too warm out. It has been exceptionally filthy for the last few weeks. It still had bug guts all over the front end from out last road trip and working on the Dagmars I added several layers of body filler and JB Weld powder all over the truck and everything else in the garage. Once the bath was finished, the new bumper guards were installed. The lower bolt on the drivers side gave me fits getting started, but everything turned out perfectly, (no scars in the paint) once I finally got it started. Other than the license plate being lower this time, it looks like it did before the bumper bullet adventure. I avoided a dead on shot to minimize the phone pole directly behind the cab:   Ill be working on illuminating the dash clock later today after the mail arrives. Theres always something to keep busy with.
__________________
My Build Thread: http://67-72chevytrucks.com/vboard/s...d.php?t=444502 |
||
|
|
|
|
09-17-2014, 08:59 AM
|
#1715 |
|
Registered User
Join Date: Apr 2012
Location: Searcy, AR
Posts: 4,203
|
Re: Markeb01 Build Thread
Mark... "Im thinking of sending them back though. When I actually wear the shirt, the curvature of the image combined with the light refracting from Venus makes me look like an old fat guy instead of the refined hunk I see in the mirror every day!"
...and here I sit thinking I need to replace my camera lenses and mirrors... 
__________________
DON Proverbs 27:17 US Air Force Retarded errr Retired My '65 Stepper Build:http://67-72chevytrucks.com/vboard/s...d.php?t=533920 My '60 Rusty Patina Build:http://67-72chevytrucks.com/vboard/s...66#post7402266 My '72 http://67-72chevytrucks.com/vboard/s...59#post7204359 SOLD |
|
|
|
|
09-18-2014, 02:29 AM
|
#1716 |
|
Senior Enthusiast
Join Date: Feb 2007
Location: Spokane Valley, WA
Posts: 8,356
|
Re: Markeb01 Build Thread
I think theres some swamp gas figured in there too, so I probably wont do anything drastic yet!
Ive always had a thing for mechanical clocks and pocket watches, especially military versions. So when my brand new Autometer clock died within a week of purchase, I decided it was time to go with something more accurate and reliable. At the time, the only thing within my budget was a Mitchell electric/quartz model:  The beauty of this clock is its perfect timekeeping. Year after year, if it isnt unplugged it keeps perfect time to the second. With extended use however, many disadvantages appeared. The clock face is recessed ½ or more behind the crystal and the setting knob is centered in the crystal. From the drivers seat these two features block view of most of the dial vastly reducing the clocks usability. The face is very small compared to other clocks of this type, and the numerals and minute markings are also small making it difficult to pick out the time at a glance. So this first clock was repurposed to my home office where it continues to serve well, as it is mounted right in front of my face. I really wanted an authentic mechanical military clock, so my birthday present a while back was an A11 clock that was fitted to many warplanes and commercial aircraft:  It has been an excellent clock, although regardless of multiple readjustments, it cannot be corrected closer than gaining 1 minute a day. It was claimed to have been serviced, but over time this claim has proven to be untrue. It needs to be serviced now which involves complete disassembly and can run $300 not including repair parts, and finding somebody trustworthy enough to do the job. When this clock is removed from the truck, it will either be added to my collection, or sold off. In the meantime, this clock does not have internal lighting, as some of these clocks have odd lighting & wiring, and the addition of lighting frequently messes up the looks of the clock. Since retirement we now do most of our routine shopping late at night, and I decided Id like to add that feature. Checking out my options, I discovered cockpit pedestal lights. They can be used for dashboard lighting, or to illuminate individual gauges. And depending on brand and model, they can replace one the mounting screws and be attached directly to the gauge. So I took the plunge and picked one up recently and it arrived today. It can be seen here installed on the upper left corner of the clock:  Its very unobtrusive and fits right in with the other clock knobs. I bought a 28v version assuming I could replace the light with a 12v bulb. The 12v aircraft bulbs I have turned out to be too large and wouldnt fit, so I gutted the entire bulb retaining/operating mechanism and replaced it with a 12v LED from my hobby stash. Heres what it looks like in operation:  All the light shown on the face of the clock is coming from the pedestal light. The truck was sitting in a dark garage and I was holding my finger on the door/dome light switch. It almost looks phosphorescent in real life, and Im very pleased with the result. I wanted this external lighting, because Ive purchased yet another electric/quartz clock that should arrive in a few days. It is a Mid-Continent MD90 model, which also does not have internal lighting, so the new pedestal light will be swapped over to the new clock:  The face on this clock is large and easy to read, right up against the glass, has 11 hour numerals instead of 3, and the setting knob is at 5:00 where it wont interfere with reading the time from the drivers seat. Years ago I had a switch for killing the clock during the winter months to avoid draining the battery. Last winter I bought trickle chargers for the truck and my wifes tractor, so this new clock will receive constant power. Thats about it for todays update!
__________________
My Build Thread: http://67-72chevytrucks.com/vboard/s...d.php?t=444502 |
|
|
|
|
09-18-2014, 09:01 AM
|
#1717 |
|
Registered User
Join Date: Apr 2012
Location: Searcy, AR
Posts: 4,203
|
Re: Markeb01 Build Thread
As always, I am amazed at your attention to detail and ability to adapt and overcome
Well done Sir!!!
 
__________________
DON Proverbs 27:17 US Air Force Retarded errr Retired My '65 Stepper Build:http://67-72chevytrucks.com/vboard/s...d.php?t=533920 My '60 Rusty Patina Build:http://67-72chevytrucks.com/vboard/s...66#post7402266 My '72 http://67-72chevytrucks.com/vboard/s...59#post7204359 SOLD |
|
|
|
|
09-19-2014, 09:28 AM
|
#1718 |
|
Rollin' Old Skool
Join Date: Jun 2007
Location: Hattiesburg, MS
Posts: 5,371
|
Re: Markeb01 Build Thread
Came across this one on Facebook, & I thought you might find it interesting that someone has similar taste in front end style:
https://flic.kr/p/pfp9oq https://flic.kr/p/pfp9jh
__________________
_____________________________________________ Phillip My Build threads: 1966 Chevy C-10 "Black Betty" shortbed, fleetside, BBW, 327 V8/ Powerglide (under construction) http://67-72chevytrucks.com/vboard/s...ighlight=betty 1997 Chevy Tahoe, 2dr/2wd, mild custom (Daily driver) http://67-72chevytrucks.com/vboard/s...d.php?t=601142 Pics: '66 C-10 https://flic.kr/s/aHsjHWD4h9 '97 Tahoe https://flic.kr/s/aHsjGZ7wKP '93 C-1500 https://flic.kr/s/aHskxdpdnQ '88 S-10 Blazer https://flic.kr/s/aHsjYGx4Md Previous Rides: 1993 Chevy S-10 ext. cab, 4.3L, 4/5 drop (Sold) 1993 Chevy C-1500 short/step Retro-Rod (Sold) 1988 S-10 Blazer 2dr/2wd mild custom (Sold) |
|
|
|
|
09-19-2014, 09:59 AM
|
#1719 |
|
The 60-66 GMC/Pontiac guy....
Join Date: Oct 2010
Location: Apache Junction, Arizona
Posts: 1,306
|
Re: Markeb01 Build Thread
Cool
__________________
 Building Genuine Pontiac Firepowered cars and trucks for several decades.  Why Pontiac?? That's just me daring to be different.  Projects.. 63 C10 Short Wheel Base fleetside (The Pro-Street) currently under reconstruction. 440CID 2X4 Pontiac 
|
|
|
|
|
09-19-2014, 03:52 PM
|
#1720 | |
|
Senior Enthusiast
Join Date: Feb 2007
Location: Spokane Valley, WA
Posts: 8,356
|
Re: Markeb01 Build Thread
Thanks guys for stopping by.
Quote:
 Too bad I cant save the Flckr images to my collection. I like saving stuff like this for future reference. Also the outfit I ordered the new clock from notified me yesterday they are on backorder. Rather than get involved in that potential open ended cycle I cancelled out and will leave things alone for the moment.
__________________
My Build Thread: http://67-72chevytrucks.com/vboard/s...d.php?t=444502 |
|
|
|
|
|
09-19-2014, 04:10 PM
|
#1721 | |
|
Rollin' Old Skool
Join Date: Jun 2007
Location: Hattiesburg, MS
Posts: 5,371
|
Re: Markeb01 Build Thread
Quote:
__________________
_____________________________________________ Phillip My Build threads: 1966 Chevy C-10 "Black Betty" shortbed, fleetside, BBW, 327 V8/ Powerglide (under construction) http://67-72chevytrucks.com/vboard/s...ighlight=betty 1997 Chevy Tahoe, 2dr/2wd, mild custom (Daily driver) http://67-72chevytrucks.com/vboard/s...d.php?t=601142 Pics: '66 C-10 https://flic.kr/s/aHsjHWD4h9 '97 Tahoe https://flic.kr/s/aHsjGZ7wKP '93 C-1500 https://flic.kr/s/aHskxdpdnQ '88 S-10 Blazer https://flic.kr/s/aHsjYGx4Md Previous Rides: 1993 Chevy S-10 ext. cab, 4.3L, 4/5 drop (Sold) 1993 Chevy C-1500 short/step Retro-Rod (Sold) 1988 S-10 Blazer 2dr/2wd mild custom (Sold) |
|
|
|
|
|
09-19-2014, 04:37 PM
|
#1722 |
|
Senior Enthusiast
Join Date: Feb 2007
Location: Spokane Valley, WA
Posts: 8,356
|
Re: Markeb01 Build Thread
That would be great. Thanks Phillip.
__________________
My Build Thread: http://67-72chevytrucks.com/vboard/s...d.php?t=444502 |
|
|
|
|
09-19-2014, 06:07 PM
|
#1723 |
|
Rollin' Old Skool
Join Date: Jun 2007
Location: Hattiesburg, MS
Posts: 5,371
|
Re: Markeb01 Build Thread
__________________
_____________________________________________ Phillip My Build threads: 1966 Chevy C-10 "Black Betty" shortbed, fleetside, BBW, 327 V8/ Powerglide (under construction) http://67-72chevytrucks.com/vboard/s...ighlight=betty 1997 Chevy Tahoe, 2dr/2wd, mild custom (Daily driver) http://67-72chevytrucks.com/vboard/s...d.php?t=601142 Pics: '66 C-10 https://flic.kr/s/aHsjHWD4h9 '97 Tahoe https://flic.kr/s/aHsjGZ7wKP '93 C-1500 https://flic.kr/s/aHskxdpdnQ '88 S-10 Blazer https://flic.kr/s/aHsjYGx4Md Previous Rides: 1993 Chevy S-10 ext. cab, 4.3L, 4/5 drop (Sold) 1993 Chevy C-1500 short/step Retro-Rod (Sold) 1988 S-10 Blazer 2dr/2wd mild custom (Sold) |
|
|
|
|
09-19-2014, 08:31 PM
|
#1724 |
|
Senior Enthusiast
Join Date: Feb 2007
Location: Spokane Valley, WA
Posts: 8,356
|
Re: Markeb01 Build Thread
Thanks again!
__________________
My Build Thread: http://67-72chevytrucks.com/vboard/s...d.php?t=444502 |
|
|
|
|
09-19-2014, 10:05 PM
|
#1725 | |
|
Rollin' Old Skool
Join Date: Jun 2007
Location: Hattiesburg, MS
Posts: 5,371
|
Re: Markeb01 Build Thread
Quote:
__________________
_____________________________________________ Phillip My Build threads: 1966 Chevy C-10 "Black Betty" shortbed, fleetside, BBW, 327 V8/ Powerglide (under construction) http://67-72chevytrucks.com/vboard/s...ighlight=betty 1997 Chevy Tahoe, 2dr/2wd, mild custom (Daily driver) http://67-72chevytrucks.com/vboard/s...d.php?t=601142 Pics: '66 C-10 https://flic.kr/s/aHsjHWD4h9 '97 Tahoe https://flic.kr/s/aHsjGZ7wKP '93 C-1500 https://flic.kr/s/aHskxdpdnQ '88 S-10 Blazer https://flic.kr/s/aHsjYGx4Md Previous Rides: 1993 Chevy S-10 ext. cab, 4.3L, 4/5 drop (Sold) 1993 Chevy C-1500 short/step Retro-Rod (Sold) 1988 S-10 Blazer 2dr/2wd mild custom (Sold) |
|
|
|
|
 |
| Bookmarks |
|
|


 Linear Mode

