
|
|
|
 11-25-2007, 10:17 AM
|
#1 | |
|
Señor Member
Join Date: May 2002
Location: Edge of the world
Posts: 5,367
|
Re: progress pics
Quote:
If you're not getting any carrier bearing issues, he should be just fine.
__________________
|
|

|

|
|
11-09-2007, 06:27 PM
|
#2 |
|
Senior Member
Join Date: Nov 2005
Location: AL
Posts: 2,519
|
Re: progress pics
Couple questions, how long is your 4 link? How big of a notch did you install? Keep up the good work.
|
|
|
|
|
11-09-2007, 10:05 PM
|
#3 | |
|
Senior Member
Join Date: May 2004
Location: johnstown, NY
Posts: 2,393
|
Re: progress pics
Quote:
|
|
|
|
|
|
11-24-2007, 01:52 PM
|
#4 |
|
OG
Join Date: Sep 2007
Location: Orlando Florida
Posts: 146
|
Re: progress pics
Nice! I havent been up here in a while I must say! Real Clean work!
|
|
|
|
|
11-24-2007, 10:53 PM
|
#5 |
|
Cereal Killer
Join Date: Jan 2006
Location: Montgomery, Alabama
Posts: 639
|
Re: progress pics
why leave the trailing arm crossmember in if your not using the trailing arms?
__________________
If I dont do it....somebody else will. |
|
|
|
|
11-25-2007, 08:58 AM
|
#6 | |
|
Senior Member
Join Date: May 2004
Location: johnstown, NY
Posts: 2,393
|
Re: progress pics
Quote:
So I decided to have a local engine builder build me an engine over buying a crate. I think I'm getting a pretty darn good deal. He's building me a mild 350 with vortec heads for a little more than the cost of GM's 290 horse crate. I should have that by end of December. XXL was right on the money with the damn powder coaters. They said it should be around two weeks. Two weeks was yesterday. Their yet to call me with my final quote. I hate dealing with people like this... I guess I just have to be patient. |
|
|
|
|
|
11-25-2007, 10:20 AM
|
#7 | |
|
Señor Member
Join Date: May 2002
Location: Edge of the world
Posts: 5,367
|
Re: progress pics
Quote:
 Bastages! Bastages!
__________________
|
|
|
|
|
|
12-01-2007, 02:37 PM
|
#8 |
|
Registered User
Join Date: Mar 2007
Location: Ben Wheeler,Texas
Posts: 992
|
Re: progress pics
Very nice build! I love lowered trucks, mine is a worker so laying frame is out of the Q. One day when I retire the truck from working........
 AGAIN, GREAT JOB! AGAIN, GREAT JOB!
__________________
05 2500HD 6.0 excab 69 LWB-Gone but not forgotten! 68 Dodge Charger 383/727 69 Dodge Charger-440/4spd |
|
|
|
|
01-12-2008, 07:17 PM
|
#9 |
|
Complete Street Customization
Join Date: Jan 2007
Location: Knoxville, TN
Posts: 103
|
Re: progress pics
how bout the powder coating? still havent got it back? any word?
__________________
1968 GMC SWB (Build thread: http://67-72chevytrucks.com/vboard/s...d.php?t=269230) 1998 Chevrolet Silverado Z71 Southern Born Customs
Knoxville, TN 865-934-9126 |
|
|
|
|
01-13-2008, 05:30 AM
|
#10 |
|
Senior Member
Join Date: May 2004
Location: johnstown, NY
Posts: 2,393
|
Re: progress pics
Got it back on wednesday. What a PITA. These guys took their sweet a$$ time with it. They had it for 2 months. And listen to this, they called me Monday at about 10am to say they were going to start it and to confirm I didn't change my mind on anything which was nice. I actually ended up having them do just the frame and blast everything else for me to paint myself.(I wanted to save some $$) They called me back at around 2pm to tell me it was done. They made me wait 2 MONTHS for about 4 hours of work. They have some workflow/timing issues to say the least.
The frame came out good though. I will post pics soon. |
|
|
|
|
01-13-2008, 06:52 AM
|
#11 |
|
On the fast track to nowhere..
Join Date: May 2006
Location: Splendora, Texas
Posts: 5,316
|
Re: progress pics
Cool! At least you finally got it back. Can't wait to see some pics!
__________________
-Mike Owen- Norwood, Houston, Cecilia, Jackson, Monroe and counting |
|
|
|
|
03-17-2008, 06:17 PM
|
#12 |
|
Senior Member
Join Date: May 2004
Location: johnstown, NY
Posts: 2,393
|
Re: progress pics
Heres some updated pics of the front suspension:
So the only thing powdercoated is the frame. Everything else I sprayed with POR-15, then topcoated with POR Chassiscoat semi-gloss black. You can hardly tell the difference between the powder and por. Actually an average person would never know. Point being, it was a surprisingly good match. 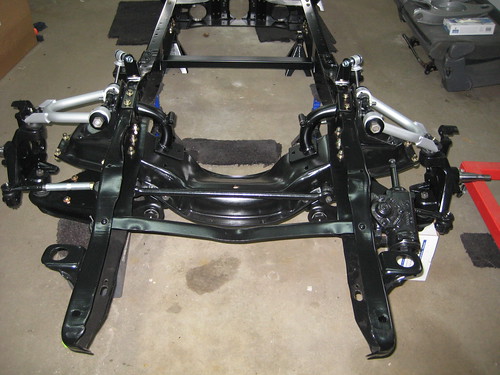 The silver parts are POR Sterling Silver. It's a little too matte for my liking, but oh well. I'm imagining it will probably mark up easy. Here's a good view of the CPP sleeves that I clearcoated over the bare metal. 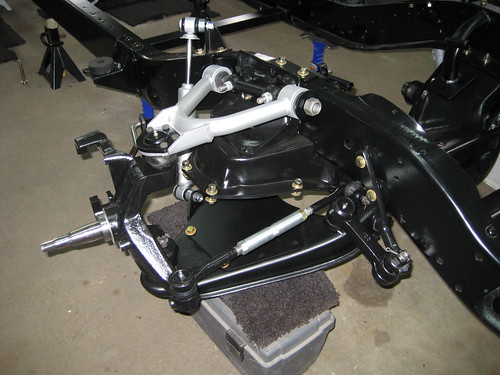 Heres a view of the new upper and lower shock mounts. I modified the lower mount and made a new upper mount for more travel and better alignment of the shock. The shocks are good ol monroes and I put poly shock bushings in. 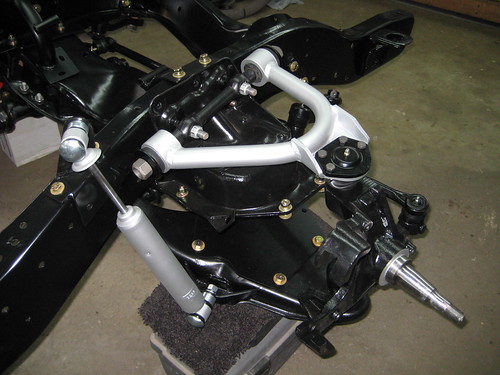 Close up of the upper shock mount: 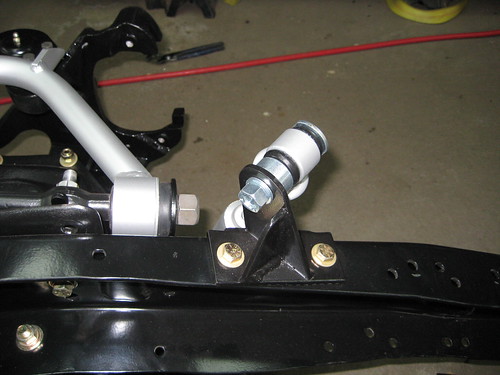 Super-duper cool performance online tubular engine mounts: 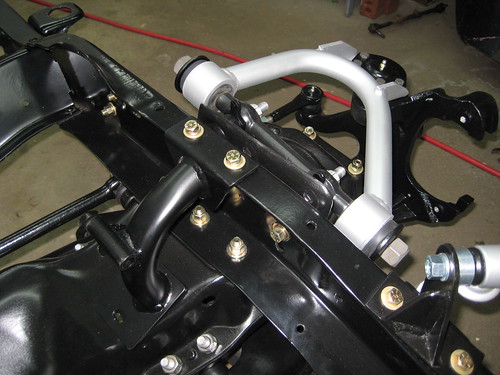 Manual steering box! oh yea! 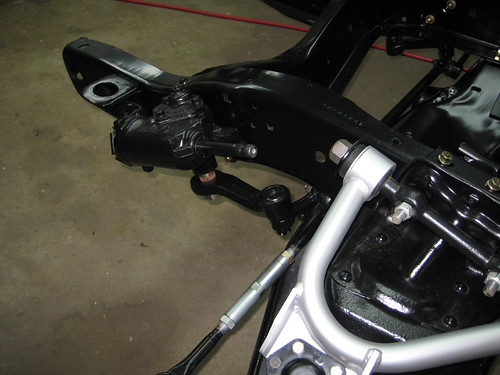
Last edited by jlaird; 03-17-2008 at 06:20 PM. |
|
|
|
|
01-21-2008, 10:38 AM
|
#13 |
|
Senior Member
Join Date: May 2004
Location: johnstown, NY
Posts: 2,393
|
Re: progress pics
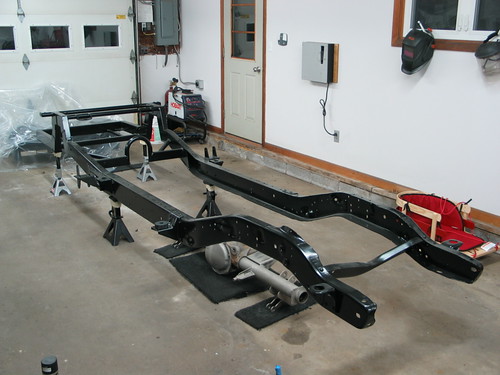
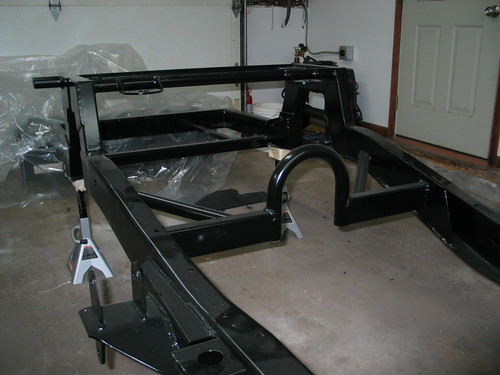
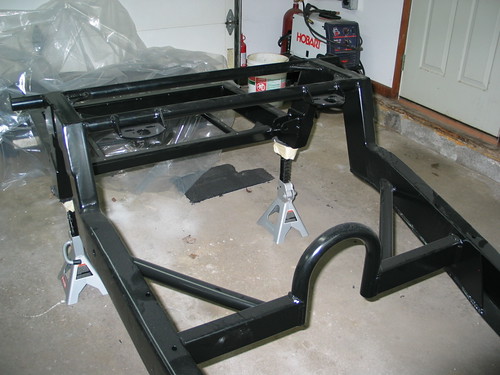
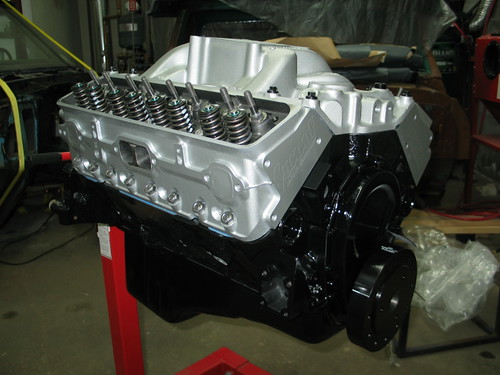
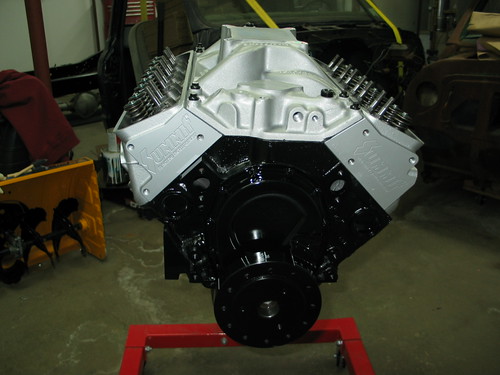
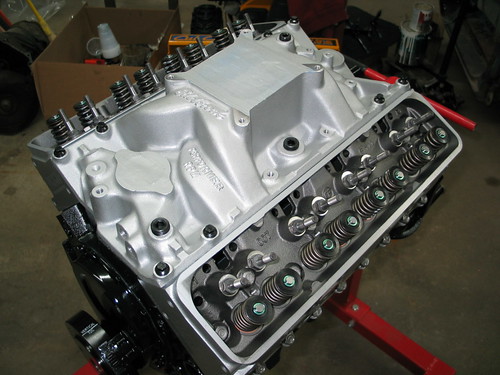
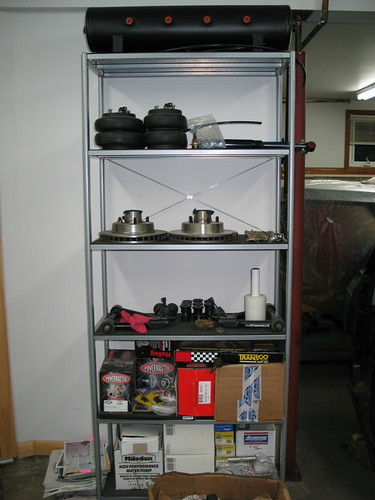
Not any progress on my end. I wanted to show these pics with the chassis put together, but I'm having some painting issues, so all my parts are not finished. So here is just the bare frame. Excuse the dust. Also are pics of my engine I just picked up from the builder. Its a 350 with summit racing vortec heads and an edelbrock intake. I'm going monday to talk with the builder about the exact specs on the internals. Last pic is a shelf of parts waiting to be used.
|
|
|
|
|
01-21-2008, 12:57 PM
|
#14 |
|
Registered User
Join Date: Mar 2007
Location: West Virginia
Posts: 481
|
Re: progress pics
That motor looks really good. Nice and clean look. Good Job
|
|
|
|
|
02-12-2008, 10:23 PM
|
#15 |
|
Registered User
Join Date: Oct 2007
Location: hopewell jct new york
Posts: 140
|
Re: progress pics
hey i have been following your build for a while and i wanan know any one can give me input how tall is your tires for a "lay frame " truck cause im gonna do it to my 67 thanks send me pm's if possiable thanks guys
|
|
|
|
|
02-13-2008, 04:17 AM
|
#16 | |
|
Senior Member
Join Date: May 2004
Location: johnstown, NY
Posts: 2,393
|
Re: progress pics
Quote:
progress pics soon fellas! Painting sucks!!!!!! Shoulda, woulda, coulda had it powder coated! Last edited by jlaird; 02-13-2008 at 04:18 AM. |
|
|
|
|
|
02-13-2008, 10:38 AM
|
#17 |
|
Registered User
Join Date: Oct 2007
Location: hopewell jct new york
Posts: 140
|
Re: progress pics
let me ask another question i know u didnt z your frame thats what im gonna do but what if i zed and sectiond my engine crossmember to the point where i would have to tranny tub the cab do you thiink the motor will be to low. it was just a thought i love your set up mines gonna be a little diff but u give me ideas great build. any one could answear this

|
|
|
|
|
02-13-2008, 11:53 AM
|
#18 |
|
Senior Member
Join Date: May 2004
Location: johnstown, NY
Posts: 2,393
|
Re: progress pics
Theres no need to do both a z and a sectioned crossmember. You can lay with either one.
|
|
|
|
|
02-13-2008, 12:37 PM
|
#19 |
|
Registered User
Join Date: Feb 2008
Location: Windsor, Ontario, CANADA
Posts: 15
|
Re: progress pics
Nice build. I didn't notice anyone else comment, but I have to tell you that you are laying some nice welds.
|
|
|
|
|
02-13-2008, 08:23 PM
|
#20 |
|
Registered User
Join Date: Oct 2007
Location: hopewell jct new york
Posts: 140
|
Re: progress pics
not sctioni it to the point where the crossmember moves up in the frame i wanna section it to moce the motor mounts down basicaly to drop the motor into the crossmember so there is no need to tun the cab and then you can keep your stock drive line set up and your radiator will be in the same spotso you can run a fan but the front member where the pully is will have to be modified. i think it may work but may need shorth headers
i need some input and thoughts i hope you dont mind me doing this i cant start my own threads yet i need to join as a supporting member soon. |
|
|
|
|
02-13-2008, 10:05 PM
|
#21 | |
|
Senior Member
Join Date: May 2004
Location: johnstown, NY
Posts: 2,393
|
Re: progress pics
Quote:
|
|
|
|
|
|
03-17-2008, 06:38 PM
|
#22 |
|
LAIDOUT
Join Date: Jan 2005
Location: NW Montana
Posts: 928
|
Re: progress pics
Looks very nice, great work and attention to detail!
|
|
|
|
|
03-17-2008, 08:29 PM
|
#23 | |
|
Registered User
Join Date: Apr 2006
Location: Arkansas
Posts: 835
|
Re: progress pics
Quote:

__________________
Jim '71 Blazer-Porterbuilt Dropmember C4/LS1/6L80E '57 VW beetle - Oct. 2006 Hot VW's pg. 87 - 350hp intercooled, turbocharged, EFI 2.3liter and 5spd in the works '87 BMW 325i - daily driver |
|
|
|
|
|
03-17-2008, 10:29 PM
|
#24 |
|
Senior Member
 Join Date: Aug 2006
Location: Atascadero, CA
Posts: 1,152
|
Re: progress pics
Man everything looks Great!!!!! Sweet Job!!!
Josh
__________________
(Project truck) 1970 C10 under complete transformation My current build thread http://67-72chevytrucks.com/vboard/s...d.php?t=212871 Other project: C5 corvette swap into 70 c10 http://67-72chevytrucks.com/vboard/s...=1#post2413517 On Hold |
|
|
|
|
03-17-2008, 11:08 PM
|
#25 |
|
Registered User
Join Date: Oct 2007
Location: hopewell jct new york
Posts: 140
|
Re: progress pics
whats with the plates on the lower a arm nor more pocket
|
|
|
|
 |
| Bookmarks |
|
|


 Hybrid Mode
