
 |
|
|
#151 |
|
Senior Enthusiast
Join Date: Feb 2007
Location: Spokane Valley, WA
Posts: 8,356
|
Re: Markeb01 Build Thread
Realizing how much dirt and crud was still stuck to the back of the trim; everything was scrubbed down with SOS earlier today. This allowed a better view to remove dents and made everything easier to handle. I was going to start with the worst dent first, but decided working in the reverse order might help develop better techniques as I went along.
The upper driver side piece was inspected again and requires only sanding and polishing. It really is in mint condition. As indicated in the next to the last photo above, the upper passenger side has problems which turn out to be so extensive it may cancel the project if I canít successfully correct them. It appears at some point in history this trim was indifferently installed off center and then beaten into submission to fit. The upper passenger side corner is so deformed the profile was changed from a flat surface to almost a half round. This both narrowed the trim and turned it in the wrong direction. It also reversed the banking from angled toward the windshield, to angled away from the windshield. In an effort to unroll the curl, a simple jig was assembled and clamped in the vise. 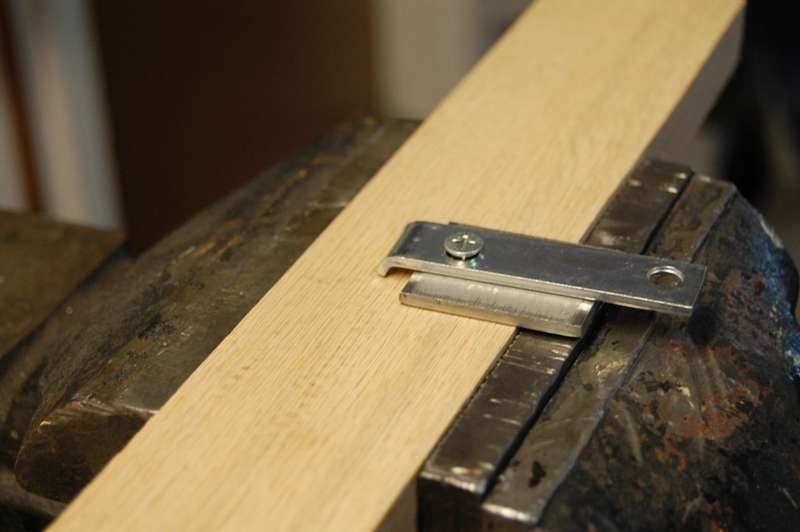 I didnít think to take a photo before straightening, but here are a couple of shots after about an hour of bending the trim back open and flattening the crown:  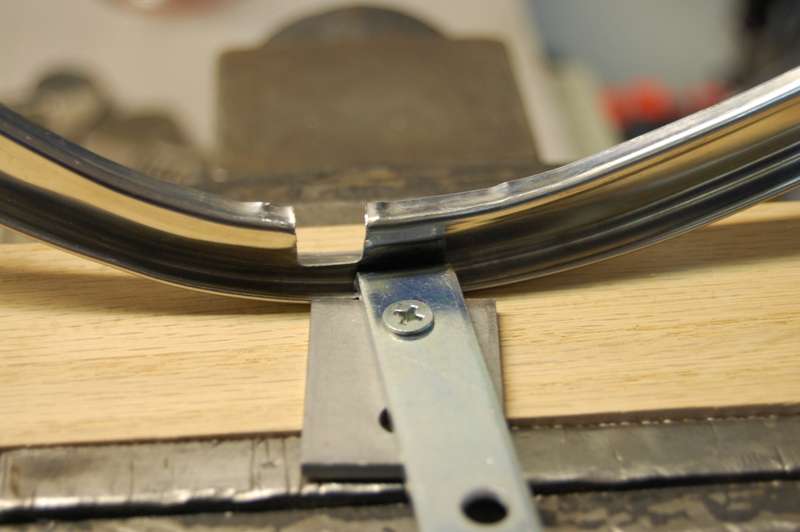 I did manage to flatten the trim to nearly its original ĹĒ width. Unfortunately off the truck and free to take its natural shape, the piece wonít presently fit a gasket. On the right is the compatible driver side part, the damaged passenger side on the left. In the last two photos the bottom of both parts are resting on the same platform. 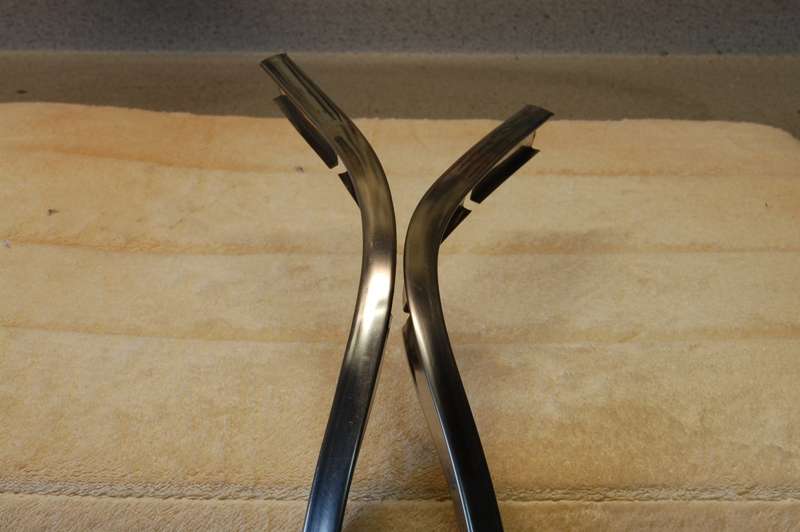 Not only do the ends not match up, the banking is wrong as well. Itís hard to show in a photograph, but the part on the right angles between 5-15 degrees towards the glass. The part on the left banks away from the glass about 5 degrees. Reversing the tilt hasnít proven all that easy. These photos were taken after about 2 and half hours of bending and twisting. I not only need to reverse the angle of the face, but after thatís done I have to shrink the attachment blade/hook back into alignment, which Iím not sure is possible. 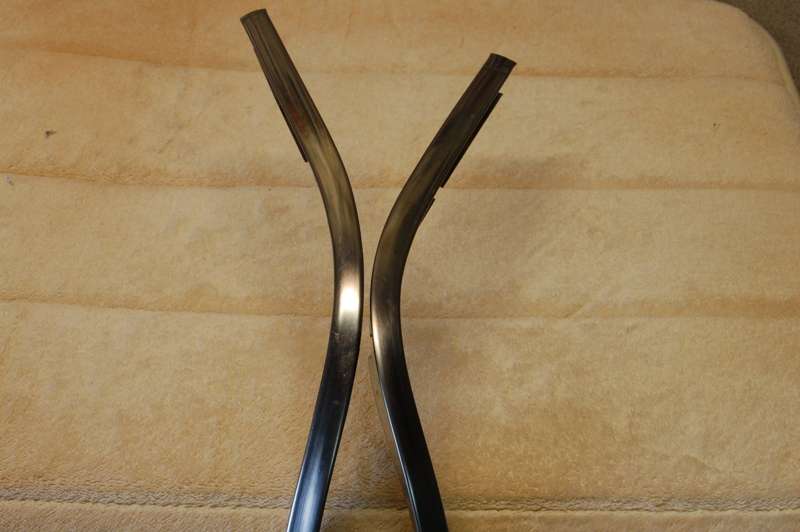 All focus will be on this part until corrected or ruined, since there isnít any point in restoring the other pieces if I donít have a complete set. More to follow.
__________________
My Build Thread: http://67-72chevytrucks.com/vboard/s...d.php?t=444502 |
|
|

|
|
|
#152 |
|
Senior Enthusiast
Join Date: Feb 2007
Location: Spokane Valley, WA
Posts: 8,356
|
Re: Markeb01 Build Thread
Last night and this morning I was about ready to abandon the windshield trim project. I kept picking up and studying the trim, but couldnít visualize a solution. Later this afternoon I decided to give it another try and after another 2 hours at the bench the damaged passenger side trim is nearly an identical match for the driver side piece:
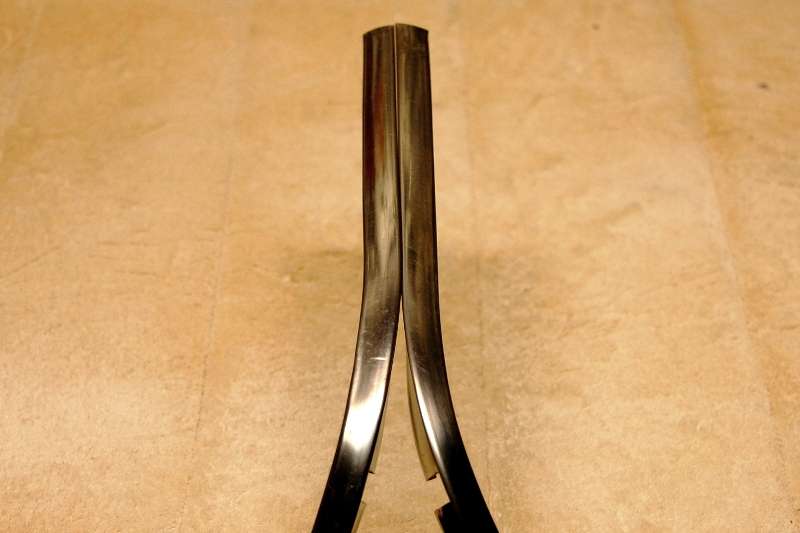 The biggest problem was the corner angled away from the glass, and the bottom of the trim pointed towards the back of the door. Pulling the trim around to fit the gasket caused the trim to roll over even farther, showing only the bottom edge of the trim instead of the face. Having nothing to lose, I decided to flatten the face of the trim even farther (which it still needed), and simultaneously bend the trim in the required direction. I changed the metal pieces of the jig to fit even tighter to the oak board (along with a smoother tip touching the trim). This created a wedge fit that still allowed linear trim movement. 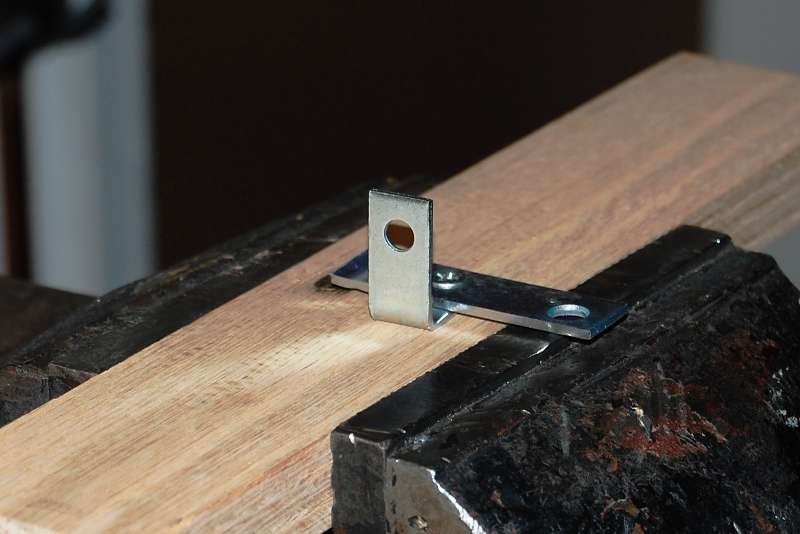 From there I latched the trim under the jig, pressed down on the opposite edge with maximum force, and started massaging the trim with gentle hammer blows from a lightweight body hammer. Two hours and about 7 million hammer blows later (okay maybe not that many), the entire surface of the trim was nearly restored to the correct flat profile, and in the process of hammering and bending the face of the trim was now correctly angled toward the glass. 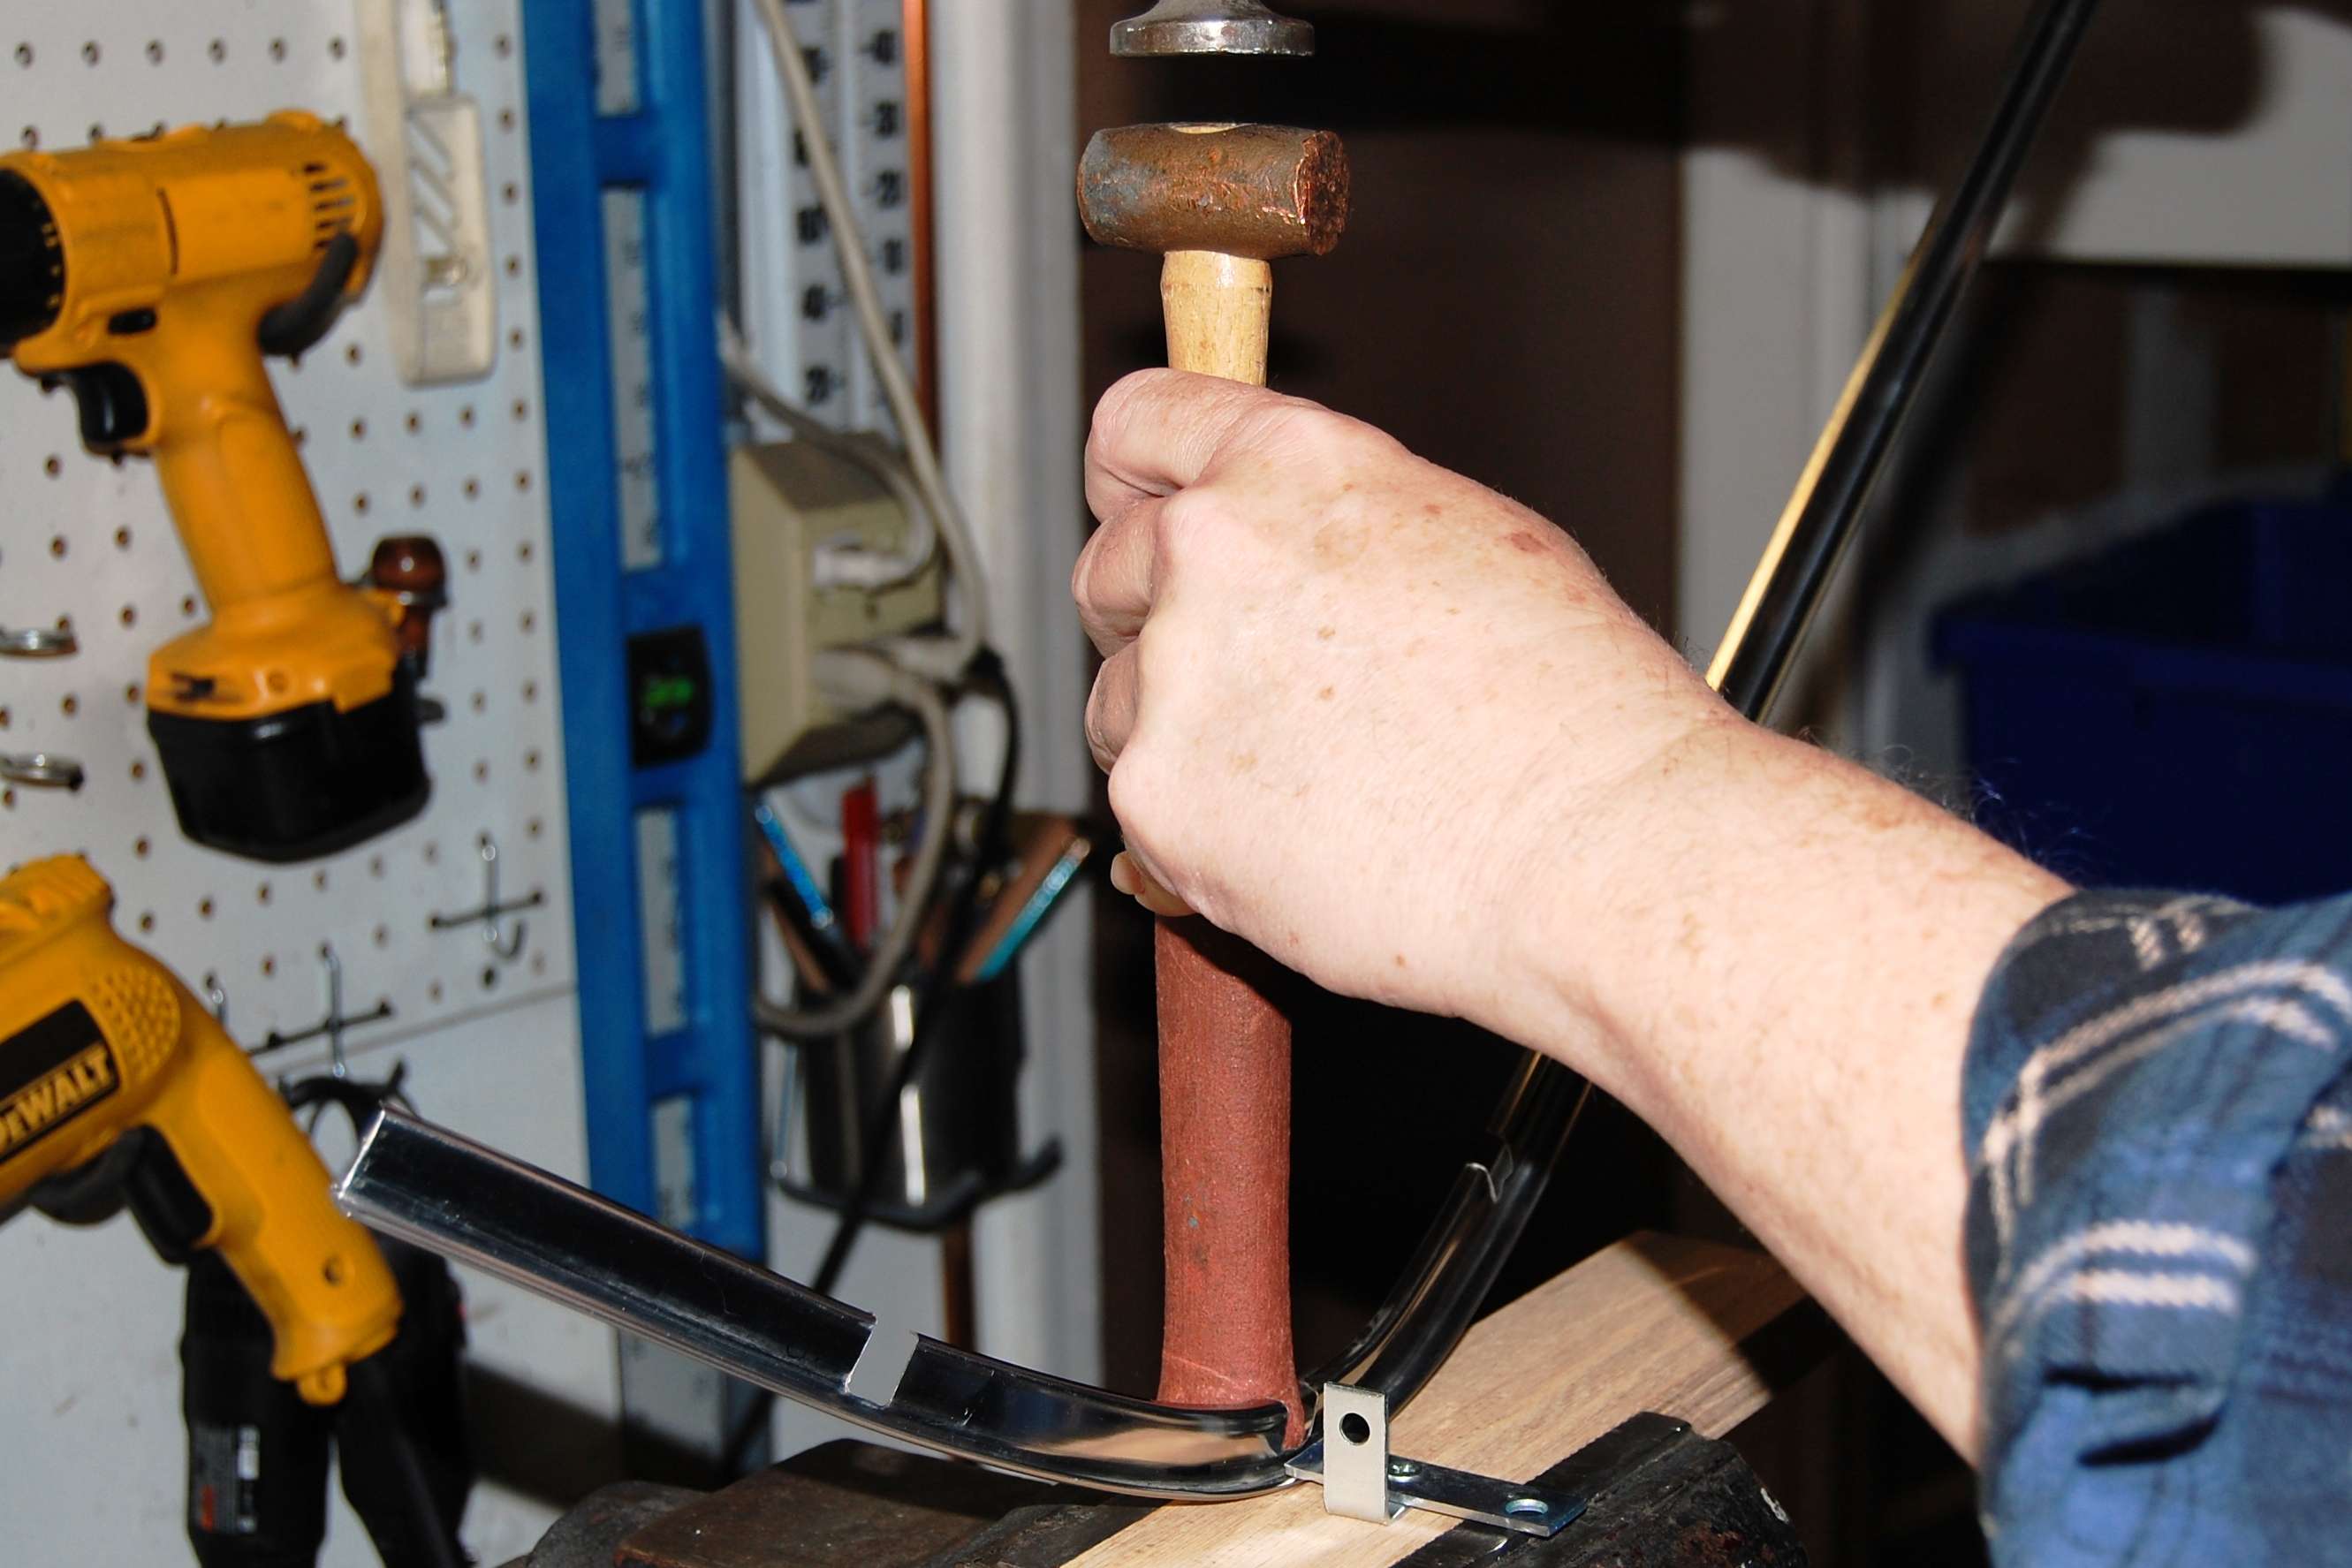 The only remaining issue was the overall curvature. The end of the trim still pointed too far to the rear. Again the trim was latched under the jig and bent using maximum hand pressure in small stages. I kept comparing the two sides and marking where it didnít match with a felt marker. Make an adjustment, wipe off the marks with lacquer thinner, compare again, mark again followed by more bending, over an over until the two pieces matched. I also discovered a side benefit in the process. I inadvertently removed one of the small dents by squashing it flat in the jig. I wasnít quite sure how I was going to attack some of the dents because they are right up against the J hook flange. Having this new knowledge, Iím going to cut a new metal jig plate that comes to a point, and has a rounded tip on the end. I may pad this with a small piece of plastic or leather and attempt to work some of the dents out with the jig where they cannot be reached with wooden tools. Iím actually enthusiastic now to get this piece sanded and polished to see how good the repairs look, but Iíll probably hold off until the dents are removed from the last two pieces so I can do all the sanding and all the polishing at the same time. So far so good. Weíll see what tomorrow brings.
__________________
My Build Thread: http://67-72chevytrucks.com/vboard/s...d.php?t=444502 |
|
|

|
|
|
#153 |
|
But Found Her 25yrs Later!
Join Date: Oct 2010
Location: Oregon City, Oregon
Posts: 10,530
|
Re: Markeb01 Build Thread
Determination!
 Good job, Mark Posted via Mobile Device
__________________
I lost my 65 - Found it 25 years later: http://67-72chevytrucks.com/vboard/s...d.php?t=426650 66 C20 Service Truck: http://67-72chevytrucks.com/vboard/s...d.php?t=428035 |
|
|

|
|
|
#154 |
|
Registered User
Join Date: Nov 2011
Location: fayetteville nc
Posts: 10,338
|
Re: Markeb01 Build Thread
I have two extra top pieces for the 60-63 if you get stalemated on the piece your working on. I have a top left and right side. I ran into the same problem with my trim. Was able to put a nice set together and about 5 hours of work to fix the rock dents, etc...
__________________
1963 Short bed step side SBW 427 big block and borg warner T-16 HD 3 speed manual http://67-72chevytrucks.com/vboard/s...d.php?t=519869 1963 Short bed fleetside BBW 348 1st gen big block w/Powerglide http://67-72chevytrucks.com/vboard/s...d.php?t=619024 1964 Short bed trailer |
|
|

|
|
|
#155 |
|
Senior Enthusiast
Join Date: Feb 2007
Location: Spokane Valley, WA
Posts: 8,356
|
Re: Markeb01 Build Thread
Thanks for the feedback and the kind offer. A couple of days ago I was thinking a replacement piece was going to be the only solution. Things are looking much better at this point. Judging by how long itís taken so far I figure I have at least another 5 hours to go as well, just removing dents before the polishing can start. No idea how long the polishing will take, but it should go easier with new compounds and buffing wheels.
Next step will be sanding and polishing the upper right trim. I want to confirm it looks corrected under a fully polished shine before moving on to dent repairs in the lower pieces. So far Iím reasonably impressed with the results, being this is the first stainless trim Iíve ever attempted to repair. I never needed to repair any previously. Years ago I simply selected pieces that were in perfect condition, because everything was readily available and relatively inexpensive. I kick myself now  for specifically not wanting the trim back in the 1990ís when mint examples were common in the local wrecking yards. At the time I preferred the simplicity of the black gasket, and obviously lacked future vision. for specifically not wanting the trim back in the 1990ís when mint examples were common in the local wrecking yards. At the time I preferred the simplicity of the black gasket, and obviously lacked future vision. My wife and I searched through what seemed like and endless supply (hundreds) of 1960-66 trucks in local yards at the time, and I only bought what I needed. Back then they were whole trucks, not stripped carcasses. Believing this bounty would last forever, left behind were dozens of Chevy deluxe instrument clusters, floor shift and automatic steering columns, floor pans, door panels, original radios, deluxe switches and knobs, etc. None of it was particularly interesting or worth investing in to haul home at the moment.  If only! If only!Iíll probably wait until next week before working on the trim again. Itís currently cold and damp, but next week is supposed to bring sunlight and 70 degree temps, which Iím really looking forward to.
__________________
My Build Thread: http://67-72chevytrucks.com/vboard/s...d.php?t=444502 |
|
|

|
|
|
#156 |
|
Registered User
Join Date: Feb 2011
Location: muskogee, ok
Posts: 1,091
|
Re: Markeb01 Build Thread
attention to detail like that is why ur truck is soooo clean!!!!! nice work
__________________
 bagged 66 longbed build http://67-72chevytrucks.com/vboard/s...d.php?t=449548 my favorite colors.. black, rust, and shiny!!!! instagram: @coulter918 |
|
|

|
|
|
#157 |
|
Registered User
Join Date: Nov 2011
Location: mid ga
Posts: 553
|
Re: Markeb01 Build Thread
Looks good Mark,what coulter said.
__________________
check out SANFORD build thread http://67-72chevytrucks.com/vboard/s...d.php?t=522019 |
|
|

|
|
|
#158 |
|
The 60-66 GMC/Pontiac guy....
Join Date: Oct 2010
Location: Apache Junction, Arizona
Posts: 1,306
|
Re: Markeb01 Build Thread
Hey, where are you putting this trim???
My 66, 63 and both 63 Chevy's don't have 1 inch of chrome trim that even resembles those pieces I see in your photos. What gives???
__________________
 Building Genuine Pontiac Firepowered cars and trucks for several decades.  Why Pontiac?? That's just me daring to be different.  Projects.. 63 C10 Short Wheel Base fleetside (The Pro-Street) currently under reconstruction. 440CID 2X4 Pontiac 
|
|
|

|
|
|
#159 |
|
Senior Enthusiast
Join Date: Feb 2007
Location: Spokane Valley, WA
Posts: 8,356
|
Re: Markeb01 Build Thread
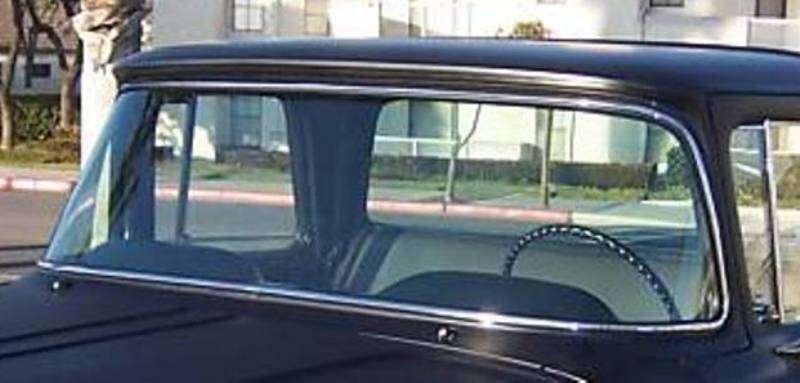
Thanks for the comments guys. If all goes well it will eventually look like this. The J flange on the backside hooks into a slot in the deluxe windshield gasket, as shown in the detail diagram below. This is the skinny trim, about 1/2" wide. The piece I’ve been trying to repair is the passenger side upper. It fits from the center of the windshield to half way down the passenger side. There are 4 small caps which cover the joints in the center and on the sides:
 And this is the fat trim (used on 60's and 61's I believe) which almost covers the gasket surface. I prefer the broader trim, but it is even more rare and harder to find, so the skinny type will have to do:  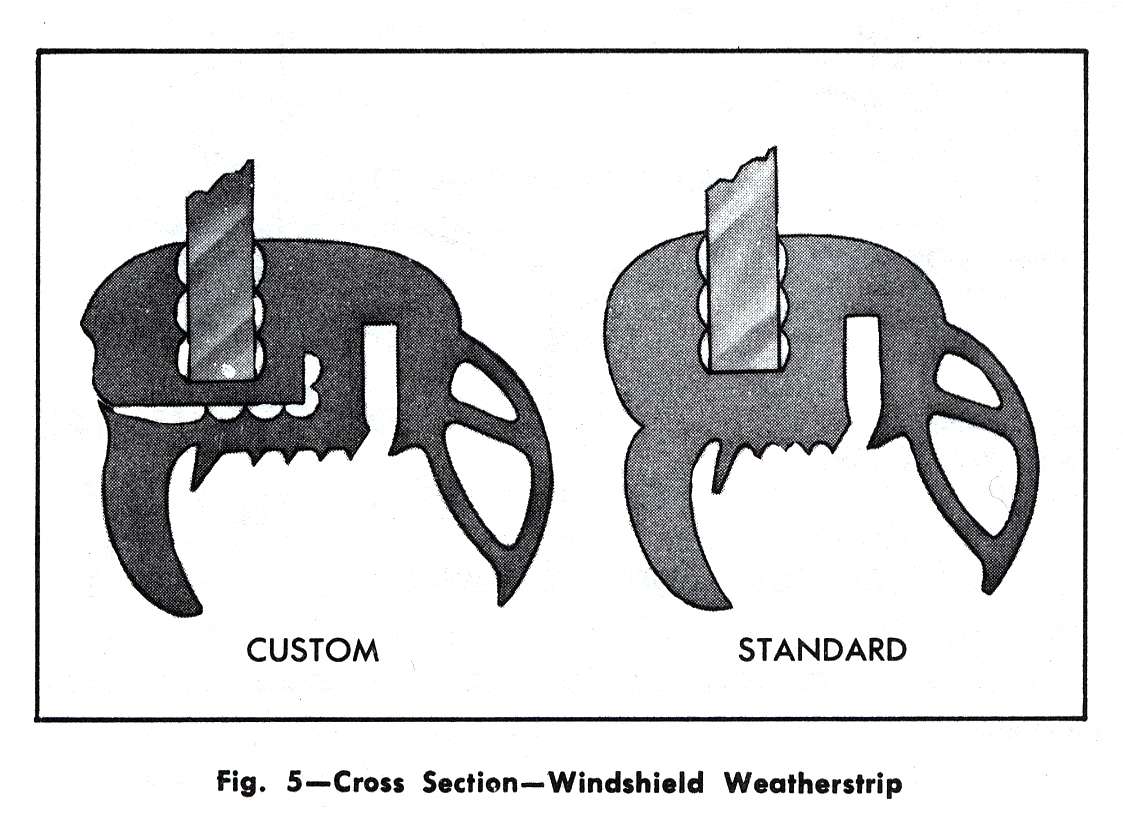 What I really like about the trim is that it visually shortens the windshield, especially on a flat black truck. Here’s a comparison photo from the Spokane Goodguys show last year. The black gasket makes the windshield look like the glass goes half way up into the roof. Comparing this photo with the first picture really demonstrates what the trim can do to change the appearance: 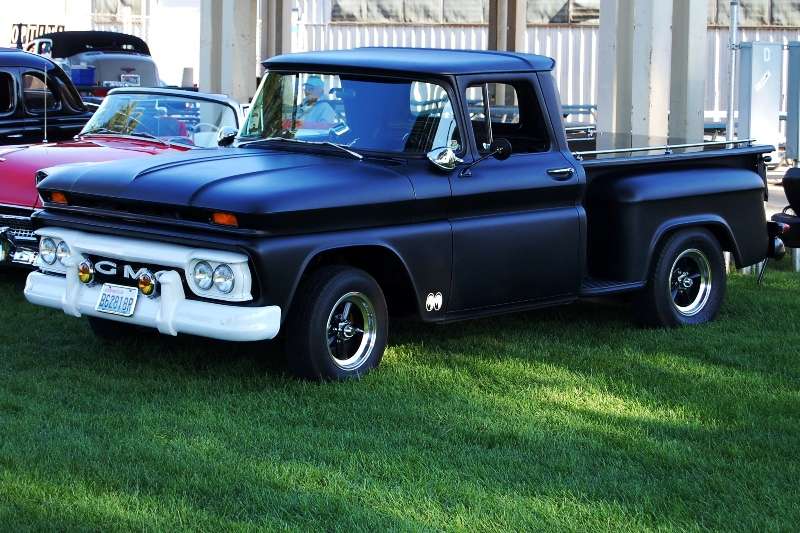
__________________
My Build Thread: http://67-72chevytrucks.com/vboard/s...d.php?t=444502 Last edited by markeb01; 05-04-2012 at 07:16 PM. |
|
|

|
|
|
#160 |
|
The 60-66 GMC/Pontiac guy....
Join Date: Oct 2010
Location: Apache Junction, Arizona
Posts: 1,306
|
Re: Markeb01 Build Thread
I don't have chrome trim on any one of the 4 trucks I own.
Never noticed it before... Funny how some things just stay hidden from me... another reason for my wife to call me old.. LOL
__________________
 Building Genuine Pontiac Firepowered cars and trucks for several decades.  Why Pontiac?? That's just me daring to be different.  Projects.. 63 C10 Short Wheel Base fleetside (The Pro-Street) currently under reconstruction. 440CID 2X4 Pontiac 
|
|
|

|
|
|
#161 |
|
Registered User
Join Date: Apr 2012
Location: Cambridge, Ontario, Canada
Posts: 1,771
|
Re: Markeb01 Build Thread
markeb, very interested to see how you go about these repairs, my side trim is in great overall condition, but has quite a number of dings here and there.
Craigerrr
__________________
Craigerrr My build thread, CRGRS 66 Winter Build: http://67-72chevytrucks.com/vboard/s...09#post5638709 |
|
|

|
|
|
#162 |
|
Senior Enthusiast
Join Date: Feb 2007
Location: Spokane Valley, WA
Posts: 8,356
|
Re: Markeb01 Build Thread
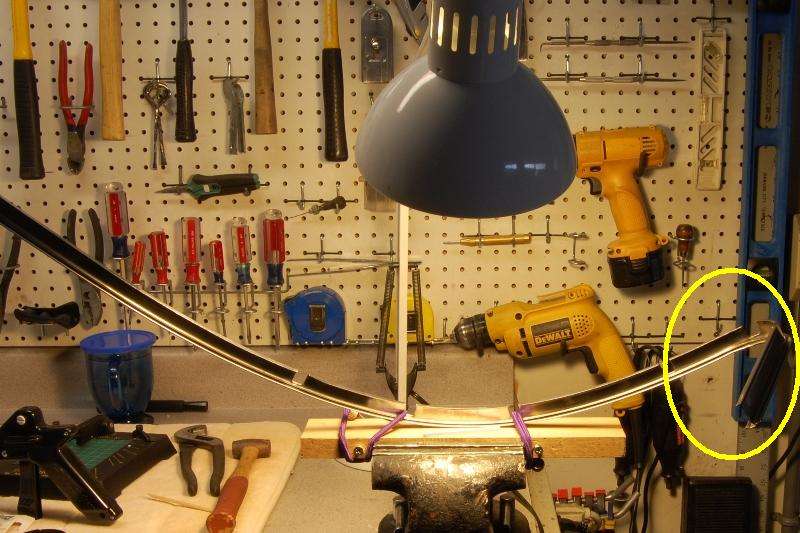
Finally saw some sunshine this evening, which inspired another 3 hour windshield trim repair session. This time I was focusing on dent removal. The first step was figuring a way to hold the trim in position. With the vertical windshield post portion nearby on the right side, I simply added some screws to the jig board and strapped the trim down with mini-bungee cords:
 This was the dent I was after. I can’t figure out which of the before pictures shows this dent, so I may have missed taking one of it. The first tool/punch I started with was a length of styrene plastic, but it failed to transfer enough energy to the trim to effectively move the metal. 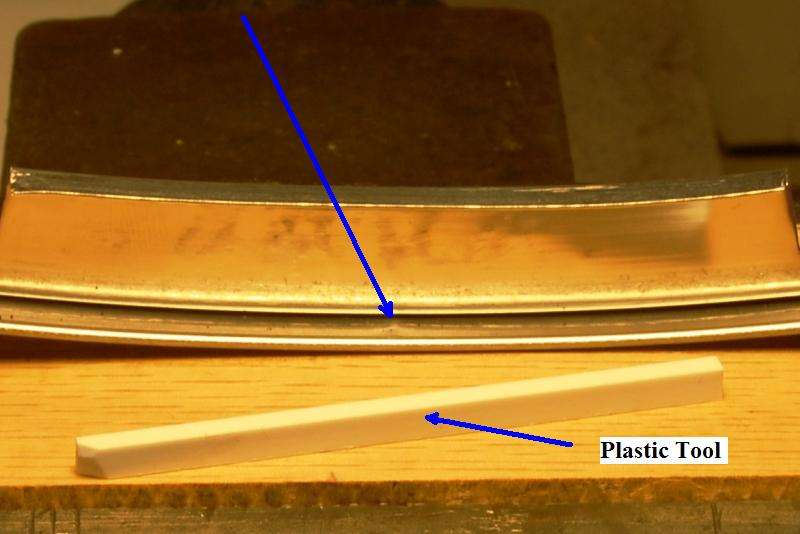 I switched to what used to be called “orange sticks”, designed for ladies fingernail maintenance. Both ends were used depending on the repair needed. Once the ends get smashed I trim them with fingernail clippers or grind a different shape on the Dremel sander. I also used the awl once to remove the very bottom of the dent once it was no bigger than a pit. This was done by hand without a hammer, because the risk of damage to the trim is so great. 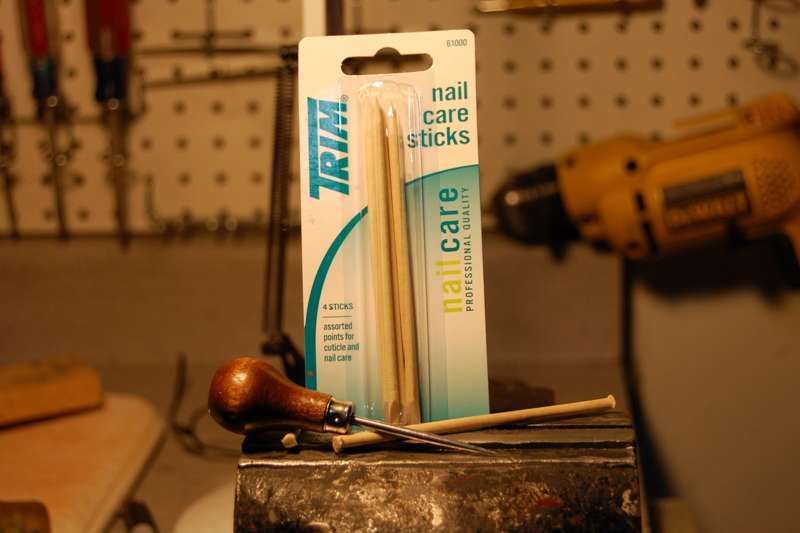 Not realizing I didn’t have a before picture, this is the first shot I took about half way through the repair. The dent was quite deep and took over an hour to get to this point. I’m sure trim repair experts can go a lot faster, but this is my first attempt so I’m taking my time. If I have it all done and installed by August I’ll be happy. 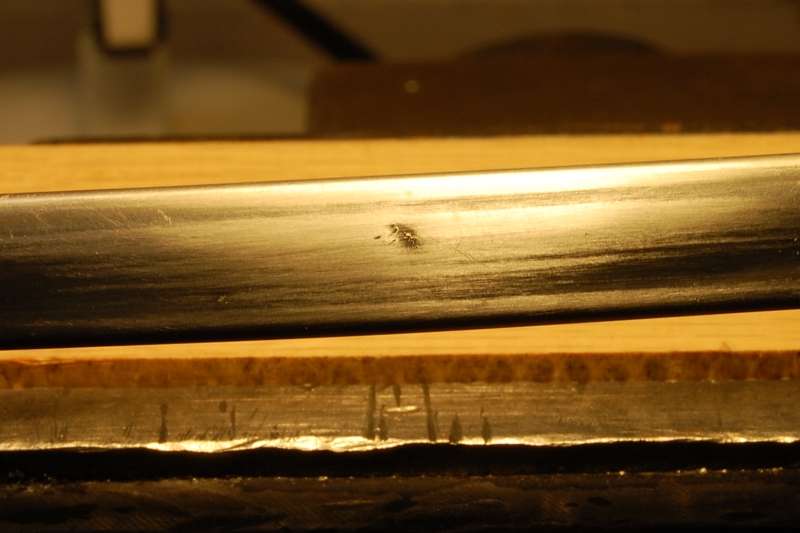 And this is the end result. I’m very anxious to start polishing these parts, but it is such a messy process I’m managing to hold off until I have everything ready to do at the same time. 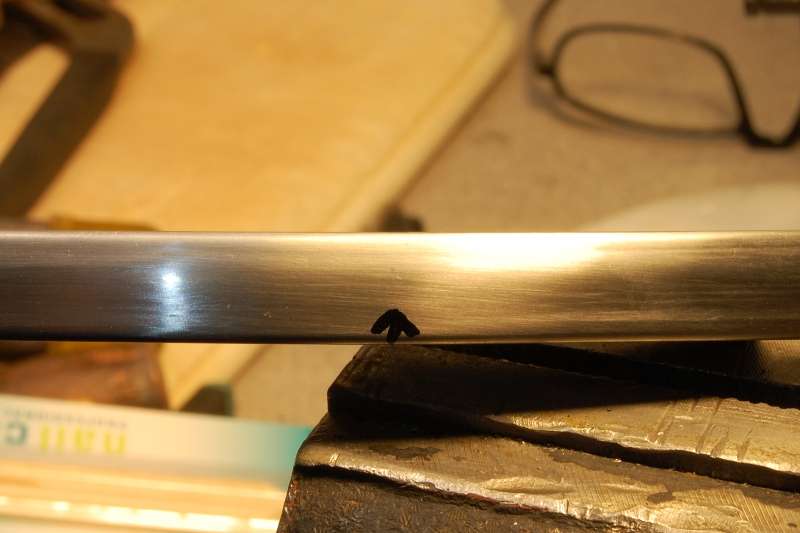 Moving on to the second dent placed the elbow in the trim precariously unsupported, so a makeshift tower was put in place to keep it from flopping around. 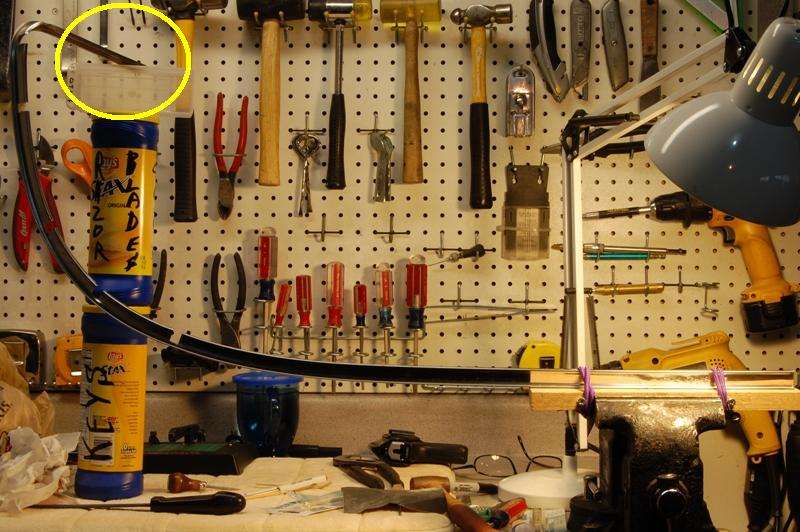 This was the dent I was after: 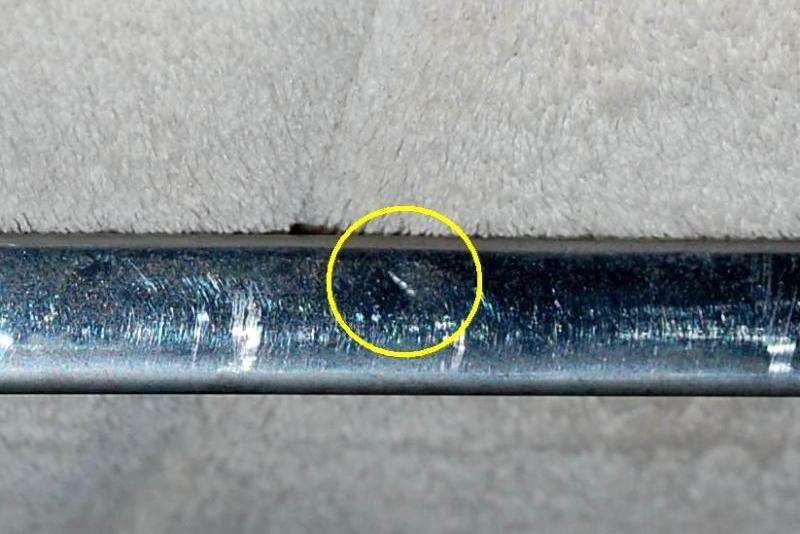 This one was much harder to work on, due to the design of the trim. I’ve rotated the photos so they are all oriented the same, but this dent is actually on the bottom half of the trim as installed on the truck. The difficulty being the half of the trim closest to the glass is single wall thickness. Dents can be accessed from the backside. Dents on the outboard edge of the trim are double wall thickness, the metal begin folded over to create the j hook flange. This prevents direct access to the dent. I went ahead and deformed the back edge in order to push the dent out in the front. Depending on where the dents are, it might be easier to drill a hole in the backside to reach the dent, but this could easily result in damaging the back side of the face with the drill bit. Care must also be taken to avoid flattening the edge of the trim, which will show when installed. 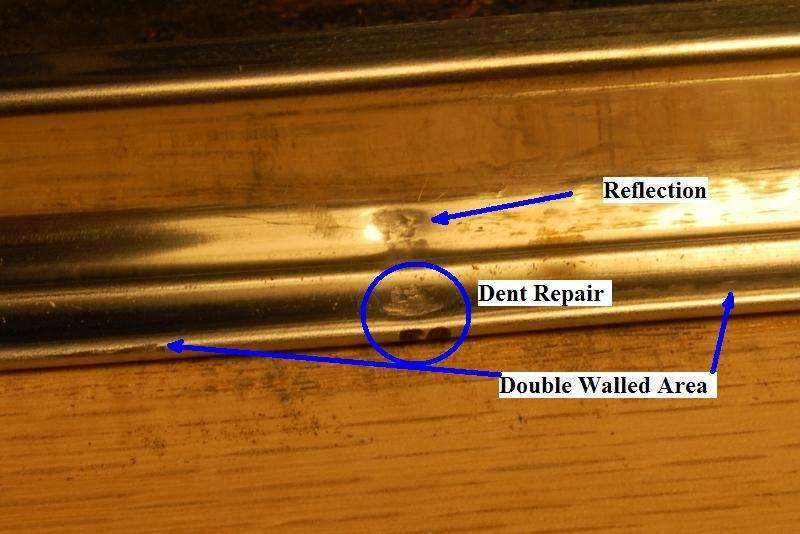 Again, this is about half way through the repair:  And this is a very poor photo of the semi-completed repair. I'll replace this photo with a better example next time I'm working on it. Almost all of the dent is gone, but a small “pit” remains. I was burned out by this point, so I’ll start again on this defect next time. 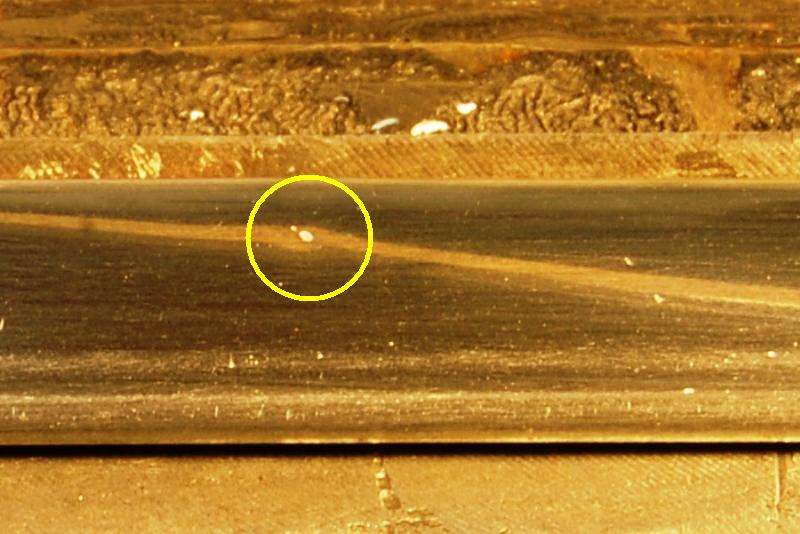
__________________
My Build Thread: http://67-72chevytrucks.com/vboard/s...d.php?t=444502 Last edited by markeb01; 05-06-2012 at 02:43 AM. |
|
|

|
|
|
#163 |
|
Senior Enthusiast
Join Date: Feb 2007
Location: Spokane Valley, WA
Posts: 8,356
|
Re: Markeb01 Build Thread
Well Iíve decided to abandon the skinny windshield trim project. I prefer the beefier looking trim from the 60-61 trucks, and the larger trim would be much easier to repair having more open space on the back side. So Iím going to shut down until I find a good set of wide trim, or learn to find happiness with the black rubber gasket.
For me, the thin trim just isnít enough of an improvement to warrant the work required or the risks involved with changing the windshield. Before I quit however I wanted to see how the first dent I removed looked after being polished. I sanded it with 600 grit wet, followed by 800, 1000, and 1500. Moving to the buffer the surface was cut with Harbor Freight green cutting compound on a spiral wheel. A second pass with grey polishing compound on a loose cotton buff, was followed by white compound on a loose flannel buff. Here are the results. The light reflection across the top of this first shot is from a twin tube fluorescent shop light directly above the trim. The white stripe on the right side is another shop light. The round light between them is a bare ceiling bulb. The dull area on the left is unpolished: 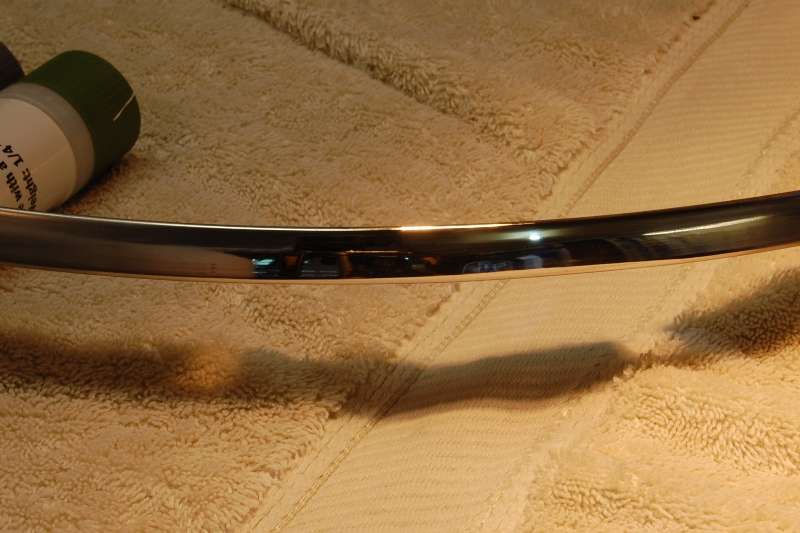 This shot again shows the unpolished area on the left, and the finished/polished repair right in the center of the photo: 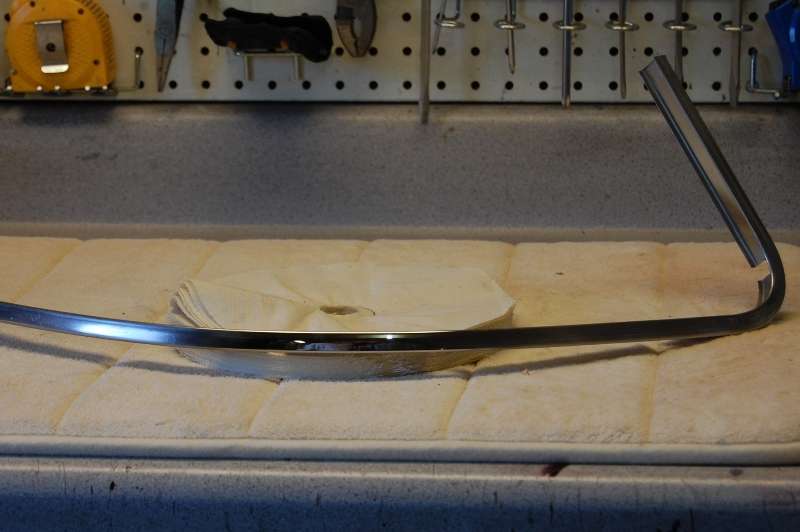 This is probably the best reflection I could capture. Itís pretty hard to photograph a shine, but the comparison between the unpolished and shiny portions are readily apparent. The first light reflection near the center is looking down the length of the shop light over the clean bench on the far side of the garage, and the two lights on the right side are two ceiling lights. The dark reflection under the center light bulb is the upper cab of my truck. The image is distorted due to curvature of the surface, but it does indicate the level of shiny reflection: 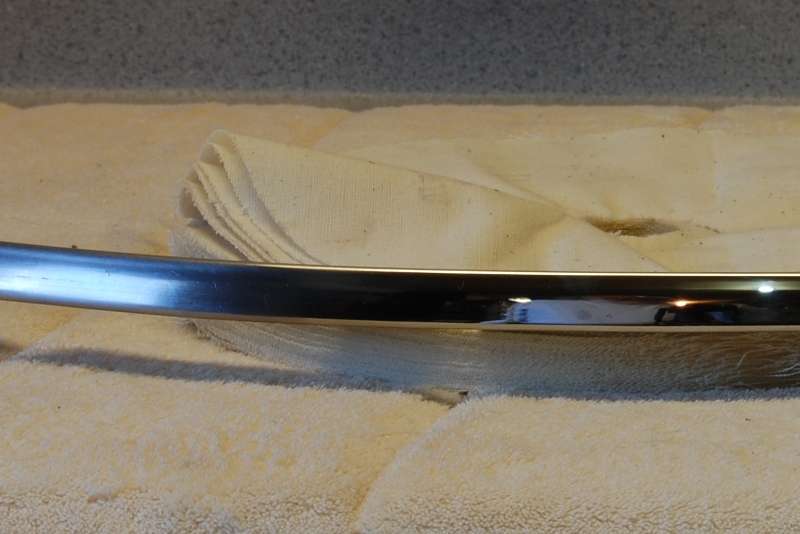 Iím glad I at least polished up the biggest repair because it does convince me the process works well and can produce show quality results with enough enthusiasm. One final note Ė Harbor Freight polishing compounds seem to do a decent job, but the same cannot always be said for their buffing wheels. The spiral wheel and the cotton buff were badly out of round. Only a small portion of the facing surface ever touched the part I was polishing. The flannel buff turned out to be concentric with the hub hole and worked rather well, but the other two caused such tremendous vibration I had to keep my foot on the stand to keep the buffer in one place. And it weighs about 100 pounds and is sitting on top of a rubber floor pad. Previously I had been using my sonís commercial quality buffing wheels and the performance difference is like night and day. Here are the worst two wheels after less than 5 minutes of use. They are so non-concentric almost 3/4 of the face remains untouched, and the loose wheel on the left is already coming apart from centrifugal force. These are rated for 3600 rpms. The data plate on the buffer Iím using indicates an operating speed of 3450, and a statement ďuse with wheels rated at 3600 rpmĒ: 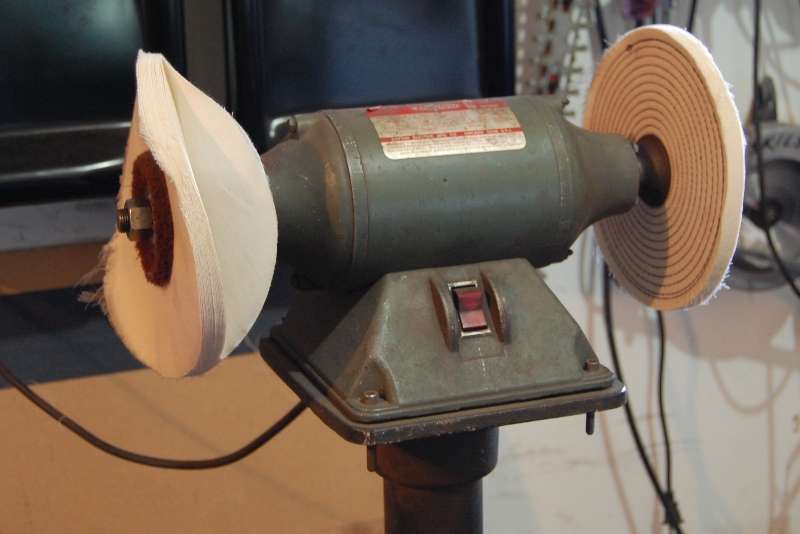 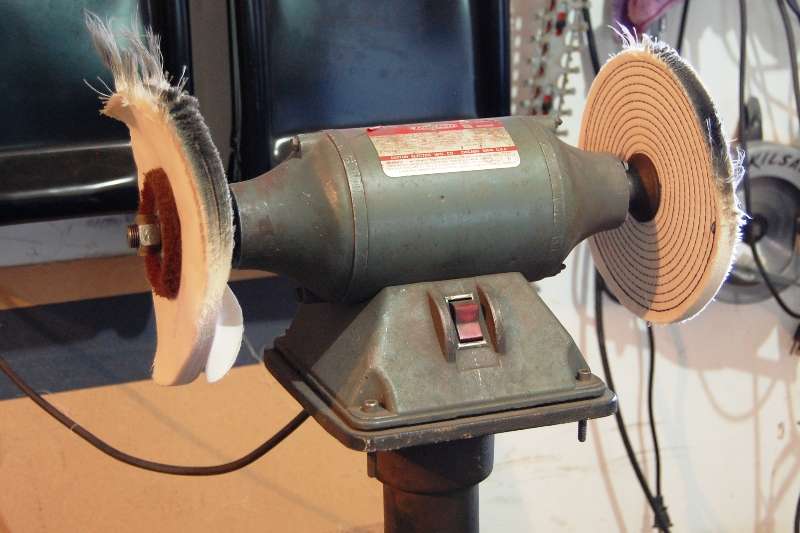 Sometimes you do indeed get what you pay for!
__________________
My Build Thread: http://67-72chevytrucks.com/vboard/s...d.php?t=444502 |
|
|

|
|
|
#164 |
|
Registered User
Join Date: Feb 2008
Location: Sidney,b.c.
Posts: 4,425
|
Re: Markeb01 Build Thread
usually those are fairly concentric. usually I mount them on the lathe
ron |
|
|

|
|
|
#165 |
|
Senior Member
 Join Date: Mar 2011
Location: Tucson, Arizona
Posts: 2,085
|
Re: Markeb01 Build Thread
That looks like a great job Mark. I have been following closely and appreciate you sharing your techniques. I will be attempting to repair an aluminum grill in the future and this info will help a lot. Of course I know that the aluminum is much softer and will be worked a little differently but the general technique will be similar.
|
|
|

|
|
|
#166 |
|
Senior Enthusiast
Join Date: Feb 2007
Location: Spokane Valley, WA
Posts: 8,356
|
Re: Markeb01 Build Thread
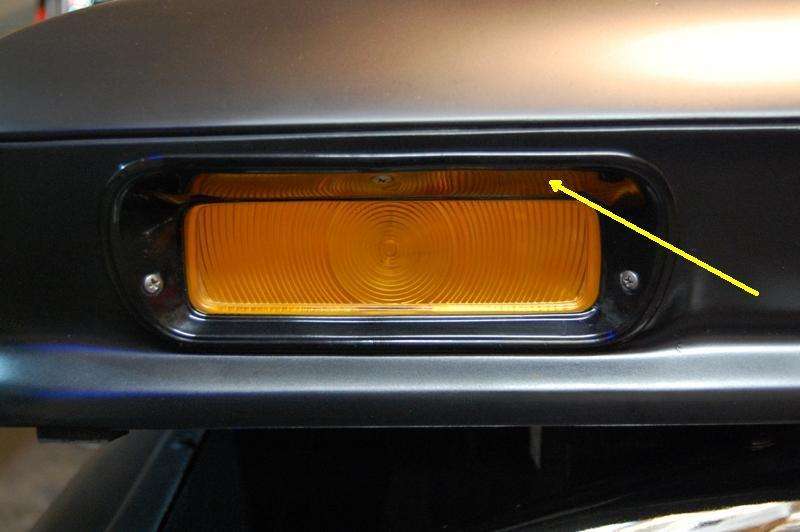
Big time project today. My right parking light rim had a good sized rock dent in it (arrow) and the upper screw has been missing for over a year. It looked like the speed nut was missing on the hood, but it was there and in good shape. I pressed out most of the dent from the back against a rubber sanding block and reinstalled it, adding a new stainless screw. Took all of five minutes, and will do until I can paint the spare set of bezels. Itís not perfect but I know Iíll sleep better tonight having done something important on the truck!
__________________
My Build Thread: http://67-72chevytrucks.com/vboard/s...d.php?t=444502 |
|
|

|
|
|
#167 |
|
But Found Her 25yrs Later!
Join Date: Oct 2010
Location: Oregon City, Oregon
Posts: 10,530
|
Re: Markeb01 Build Thread
Goodnight.

__________________
I lost my 65 - Found it 25 years later: http://67-72chevytrucks.com/vboard/s...d.php?t=426650 66 C20 Service Truck: http://67-72chevytrucks.com/vboard/s...d.php?t=428035 |
|
|

|
|
|
#168 |
|
Senior Enthusiast
Join Date: Feb 2007
Location: Spokane Valley, WA
Posts: 8,356
|
Re: Markeb01 Build Thread
To make a long story short, I have missing spinal discs and over the years I have reduced the rear coil spring capacity from 1500 pounds (stock), to 400 lbs (custom), to 150-200 pounds (Skyjacker brand) Jeep 2.5Ē lifting springs. With the bed cover off and the bed absent of any contents including a spare tire, the Jeep springs provided a comfortable ride, although they made cornering somewhat soggy. Since I put the Gaylord bed cover back on, the Jeep springs provide almost no load capacity, so Iím going back to the 400 lb capacity custom springs. My son is going to come over next Friday and pop them in for me, so I wanted to make sure they were presentable.
Today they were plopped on the bench and stripped using a 3.5Ē angle grinder and a severely coarse wire cup. A couple of good cleanings finished up with wax and grease remover, and they were ready for paint. I preheated the springs under the lamps and painted them one at a time on a turntable with a swivel mount holding them from above. An entire can of high quality enamel was used to cover all the surfaces inside and out on both springs, turning each spring over once in the process. I wish the rest of the chassis looked this nice.  Just one more thing accomplished on the checklist. Tomorrow the new gas pedal trim is due to arrive from ChevyDuty, replacing the poor quality substitute received from LMC.
__________________
My Build Thread: http://67-72chevytrucks.com/vboard/s...d.php?t=444502 |
|
|

|
|
|
#169 |
|
The 60-66 GMC/Pontiac guy....
Join Date: Oct 2010
Location: Apache Junction, Arizona
Posts: 1,306
|
Re: Markeb01 Build Thread
Why don't you convert to rear air springs??? Two schrader valves and line and the bags with brackets are all you need...
__________________
 Building Genuine Pontiac Firepowered cars and trucks for several decades.  Why Pontiac?? That's just me daring to be different.  Projects.. 63 C10 Short Wheel Base fleetside (The Pro-Street) currently under reconstruction. 440CID 2X4 Pontiac 
|
|
|

|
|
|
#170 |
|
Senior Enthusiast
Join Date: Feb 2007
Location: Spokane Valley, WA
Posts: 8,356
|
Re: Markeb01 Build Thread
I seriously thought about that for about a year before opting for custom springs instead. Two things bothered me. 1. I didn’t know if I'd have any problems in the sub zero temperatures we experience during extremely cold winters where I live. 2. At the time I was checking into kits and components it seemed that virtually everything on the market was sized for a lowered truck, and I wanted the ride height to remain unchanged.
I subsequently bought the custom fabricated springs while I was still working, and they cost a small fortune. Now I'm pretty much committed to keeping them because they work perfectly with the bed cover installed, and I've got too much invested in them to try anything different.
__________________
My Build Thread: http://67-72chevytrucks.com/vboard/s...d.php?t=444502 Last edited by markeb01; 05-10-2012 at 09:53 PM. |
|
|

|
|
|
#171 |
|
Senior Member
 Join Date: Oct 2009
Location: Fayetteville, Arkansas
Posts: 1,925
|
Re: Markeb01 Build Thread
just read this build thread... all i can say is, wow.
great concept. great craftsmanship. to me the best part was the photo documentation of your life and the cars from your past. thanks, clem |
|
|

|
|
|
#172 |
|
Senior Member
 Join Date: Sep 2011
Location: Hanford, CA
Posts: 1,027
|
Re: Markeb01 Build Thread
Mark,
I'm truly in awe of your patience, craftsmanship and "sticktoitiveness". I love reading your upgrades and your photos are always spot on. Thank you!
__________________
Poor and content is Rich...and Rich enough! - William Shakespeare 1966 C10 Custom Cab "Luigi" Big Window - SWB Fleetside 350 V-8 - Powerglide My not so much a build thread as a "Slow Progression Thread":http://67-72chevytrucks.com/vboard/s...d.php?t=486894 |
|
|

|
|
|
#173 |
|
Senior Enthusiast
Join Date: Feb 2007
Location: Spokane Valley, WA
Posts: 8,356
|
Re: Markeb01 Build Thread
Thank you for the compliments guys. Iíve tried to accurately share things a person might find interesting or possibly helpful. And Iíll admit to a hidden agenda - establishing this stuff online so that in the future a descendent or two may enjoy discovering this segment of our family history, when I may not be available to provide details.
Itís interesting looking back, model cars in my youth were directly responsible for teaching me patience. Multiple failures quickly taught me to slow down and take my time. Being basically bull headed in the first place combined with four years in the Marines taught me determination. The consequences of not fulfilling a task were always bad, inspiring a zealous enthusiasm for seeing things through that has never diminished. I really do appreciate the feedback. Thanks again.
__________________
My Build Thread: http://67-72chevytrucks.com/vboard/s...d.php?t=444502 |
|
|

|
|
|
#174 |
|
Senior Enthusiast
Join Date: Feb 2007
Location: Spokane Valley, WA
Posts: 8,356
|
Re: Markeb01 Build Thread
Backing up a few days to post #126, I reordered new gas pedal trim from Chevy Duty and it arrived yesterday. I thought Iíd take the opportunity to take some better comparison photos of the difference between the unbranded LMC part and the Counterpart branded Chevy Duty item.
The first improvement being the part was shipped in a box instead of a padded envelope, so it arrived in perfect condition: 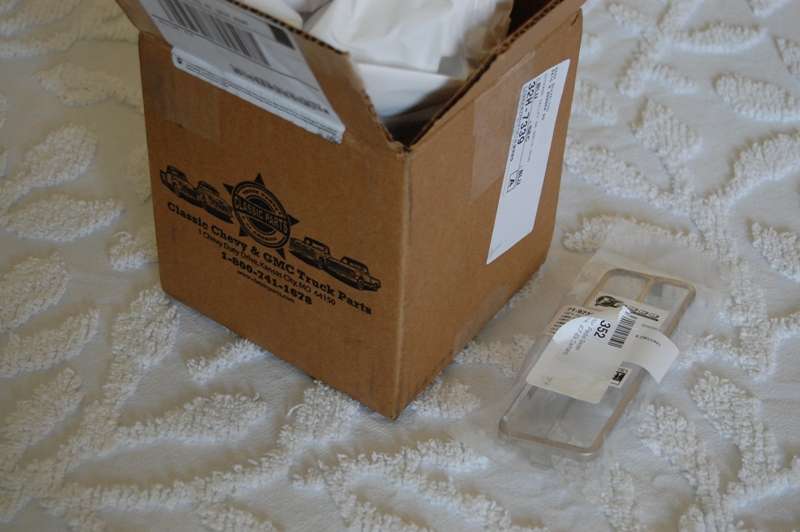 Interestingly they slap their own sticker over the original which lists all the different pedals the trim fits, but it peels back somewhat to reveal the details below. For anyone interested, this trim (and presumably the identical pedal) fits the following applications: 71-72 Chevy/GMC (deluxe) 68-72 Chevelle/El Camino 67-81 Camaro 68-72 Nova 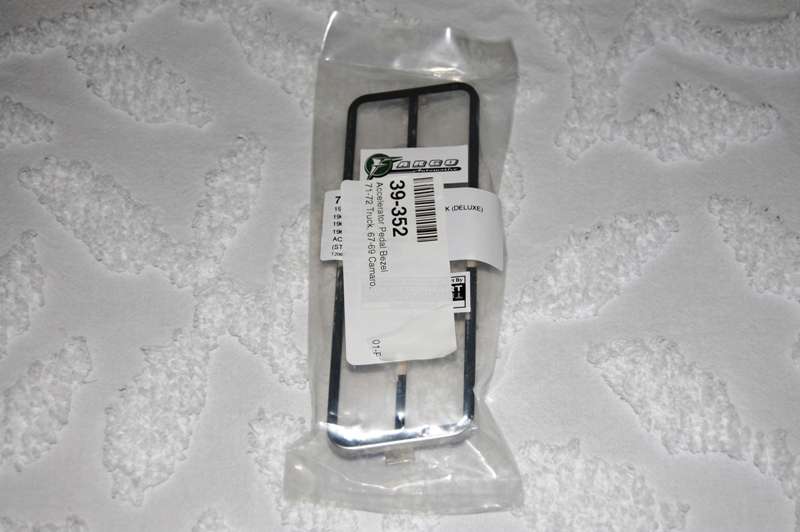 I understand many have been disappointed with Counterpart quality, but the three piece pedal trim they produce has all been top notch. Hereís a comparison of the two pieces Ė LMC on the left, Chevy Duty on the right. I didnít get them lined up very straight, but the differences are pretty obvious in a decent photo. On the LMC part the corners are too square, the center strip is too wide, the overall finish is poor with sharp edges on the front side, and worst of all the bottom and top of the insert openings are not parallel with the outside edges. A casual observer probably wouldn't notice anything was wrong, but it was the first thing I saw, and annoyed me every time I got in the truck. 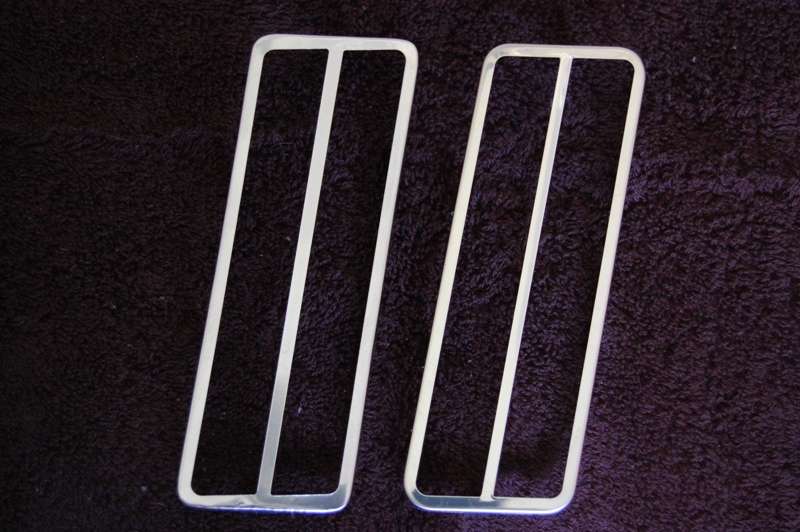 Hereís the pedal with the LMC trim. It doesnít look too bad, but the photo doesnít show the lousy surface finish either: 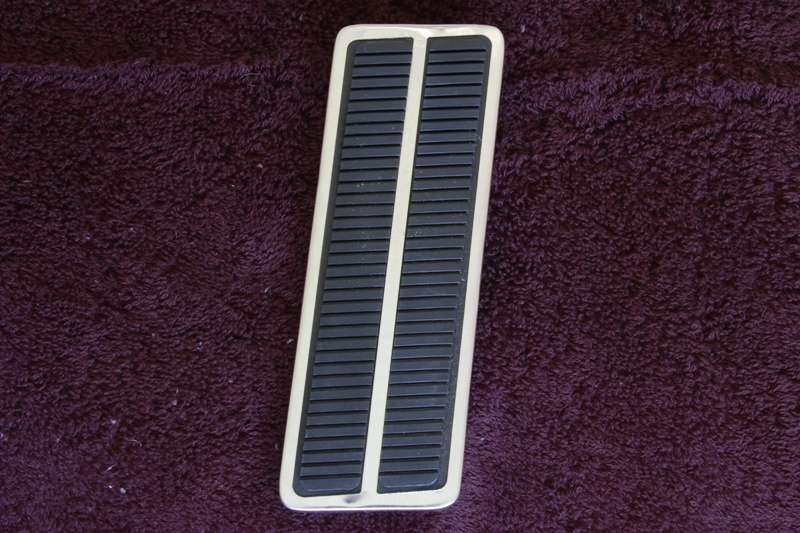 And finally hereís the assembled pedal with the Counterpart trim installed. To me this looks just like OEM and Iím very pleased with it: 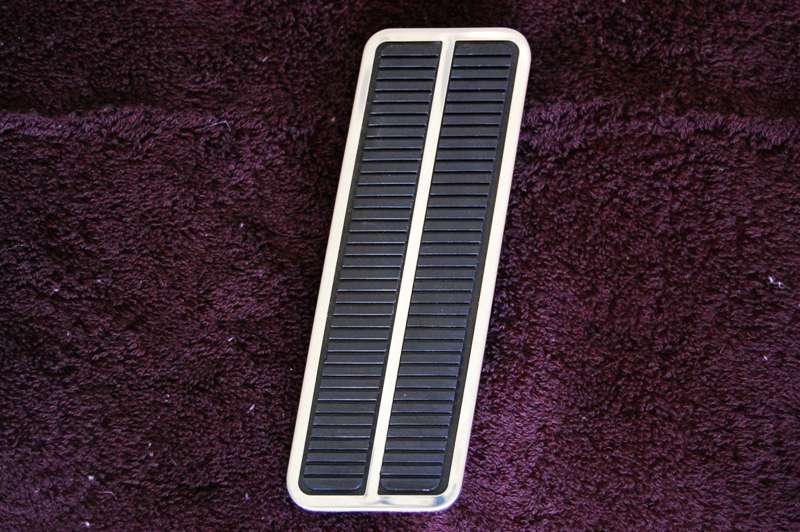 That's it for now.
__________________
My Build Thread: http://67-72chevytrucks.com/vboard/s...d.php?t=444502 |
|
|

|
|
|
#175 | |
|
Rollin' Old Skool
Join Date: Jun 2007
Location: Hattiesburg, MS
Posts: 5,371
|
Re: Markeb01 Build Thread
Quote:

__________________
_____________________________________________ Phillip My Build threads: 1966 Chevy C-10 "Black Betty" shortbed, fleetside, BBW, 327 V8/ Powerglide (under construction) http://67-72chevytrucks.com/vboard/s...ighlight=betty 1997 Chevy Tahoe, 2dr/2wd, mild custom (Daily driver) http://67-72chevytrucks.com/vboard/s...d.php?t=601142 Pics: '66 C-10 https://flic.kr/s/aHsjHWD4h9 '97 Tahoe https://flic.kr/s/aHsjGZ7wKP '93 C-1500 https://flic.kr/s/aHskxdpdnQ '88 S-10 Blazer https://flic.kr/s/aHsjYGx4Md Previous Rides: 1993 Chevy S-10 ext. cab, 4.3L, 4/5 drop (Sold) 1993 Chevy C-1500 short/step Retro-Rod (Sold) 1988 S-10 Blazer 2dr/2wd mild custom (Sold) |
|
|
|

|
 |
| Bookmarks |
|
|