
 |
|
|
#1901 |
|
Registered User
Join Date: Dec 2012
Location: Rochester, KENT
Posts: 10,580
|
Re: Markeb01 Build Thread
Insomnia..... Let's you read a lot of forums.
 Looking at your Spock comment, it drove Nicola nuts when I built the Teardrop and much of the measurement and straight lunes came from my head. I am fortunate to have a reasonable eye for it too. Great little modification again, Mark.
__________________
MY BUILD LINK: http://67-72chevytrucks.com/vboard/s...585901]Redneck Express - 1966 C10 Short Fleetside MY USA ROADTRIPS http://forum.retro-rides.org/thread/...2018-humdinger IF YOU CAN'T FIX IT WITH A HAMMER, YOU'VE GOT AN ELECTRICAL PROBLEM MATE. |
|
|

|
|
|
#1902 |
|
Senior Enthusiast
Join Date: Feb 2007
Location: Spokane Valley, WA
Posts: 8,356
|
Re: Markeb01 Build Thread
Isn't it funny. I remember the first time I got in trouble for drawing a straight line. It was about 4th grade maybe, and the teacher asked for a student to volunteer to come up and draw a straight line on the chalk board about 4-5 feet long. So I walked up, drew one, and went back to my seat.
When she finished what she was doing, she turned around and accused me of cheating using the long rubber eraser as a straight edge. I told her I just drew it, but she didn't believe me (even with the other kids supporting my statement)! So she erased the line and said "okay, if you're so good come up and do it again". Which I did! It seemed silly to me, as it was so natural and easy. I didn't care one way or the other, but I think her mind was blown and I'm not sure if she's over it yet! 
__________________
My Build Thread: http://67-72chevytrucks.com/vboard/s...d.php?t=444502 |
|
|

|
|
|
#1903 |
|
Registered User
Join Date: Apr 2012
Location: Cambridge, Ontario, Canada
Posts: 1,771
|
Re: Markeb01 Build Thread
Trying real hard to picture you in the 4th grade......
__________________
Craigerrr My build thread, CRGRS 66 Winter Build: http://67-72chevytrucks.com/vboard/s...09#post5638709 |
|
|

|
|
|
#1904 |
|
Senior Enthusiast
Join Date: Feb 2007
Location: Spokane Valley, WA
Posts: 8,356
|
Re: Markeb01 Build Thread
It's not that easy for me either, and I was there!

__________________
My Build Thread: http://67-72chevytrucks.com/vboard/s...d.php?t=444502 |
|
|

|
|
|
#1905 |
|
Old and crusty
 Join Date: Jan 2009
Location: Surprise, AZ
Posts: 462
|
Re: Markeb01 Build Thread
Good morning, Mark
How do you like your Gaylord cover? I'm thinking of adding one to my '64' for the same reasons you stated. Do you have any pics of the mounting? How does it fit along the bed rails? Is the underside carpeted or plain? Dean
__________________
65 Chevy long wide daily driver - SOLD! 64 Chevy Short Step LS |
|
|

|
|
|
#1906 |
|
Registered User
Join Date: Apr 2012
Location: Cambridge, Ontario, Canada
Posts: 1,771
|
Re: Markeb01 Build Thread
I can just see this little guy with a beard and a bad back showing the autoshop teacher the right way to do things

__________________
Craigerrr My build thread, CRGRS 66 Winter Build: http://67-72chevytrucks.com/vboard/s...09#post5638709 |
|
|

|
|
|
#1907 |
|
Senior Enthusiast
Join Date: Feb 2007
Location: Spokane Valley, WA
Posts: 8,356
|
Re: Markeb01 Build Thread
Well thereís some truth in that thought. I had a bit of trouble growing facial hair in the 4th grade, but by the time I got to autoshop the teacher definitely didnít like me. Most of the other guys thought I knew more about cars than he did, and when he tried to show me up it generally went badly for him! Not that I gloated or rubbed it in or anything!
Well I accomplished a couple of other minor improvements this evening. The last time I adjusted the headlights, I had the snow tires on. With the street tires back on, the low beams headlights were pointing down at the ground and didnít reach out nearly far enough. So I parked the Honda in the driveway and stuck masking tape on the garage door indicating the factory alignment on those bulbs. I then parked the truck in the same place, and about 3 turns of the upper screw corrected the headlight alignment. Itís so nice having the H4 low beams, the flat top of the beam projection makes them super easy to adjust. And still having a surplus of energy, I pulled the steering wheel adapter and rotated it one tooth clockwise. Now it will be perfectly straight up and down instead of 10 degrees or so to the left when driving down the street. Itís the little things!
__________________
My Build Thread: http://67-72chevytrucks.com/vboard/s...d.php?t=444502 |
|
|

|
|
|
#1908 |
|
Registered User
Join Date: Apr 2012
Location: Searcy, AR
Posts: 4,203
|
Re: Markeb01 Build Thread
It's the little things that matter...

__________________
DON Proverbs 27:17  US Air Force Retarded errr Retired My '65 Stepper Build:http://67-72chevytrucks.com/vboard/s...d.php?t=533920 My '60 Rusty Patina Build:http://67-72chevytrucks.com/vboard/s...66#post7402266 My '72 http://67-72chevytrucks.com/vboard/s...59#post7204359 SOLD |
|
|

|
|
|
#1909 |
|
Senior Enthusiast
Join Date: Feb 2007
Location: Spokane Valley, WA
Posts: 8,356
|
Re: Markeb01 Build Thread
After completing a ton of stuff on the honey do list, I found a few more minutes for a couple of interior adjustments on the truck. The 2nd vacuum gauge was reinstalled for the brake reserve tank. It fit perfectly below the defroster knob and to the left of the A/C evaporator. I needed to fabricate an aluminum wedge adapter to angle it downhill so the sunlight coming through the back window didnít shine directly into the driverís eyes.
I also switched back to the chrome Hurst shift handle and classic white knob. Bolted to the upper two holes of my custom 3 hole shifter adapter, the knob is in the perfect comfort position. 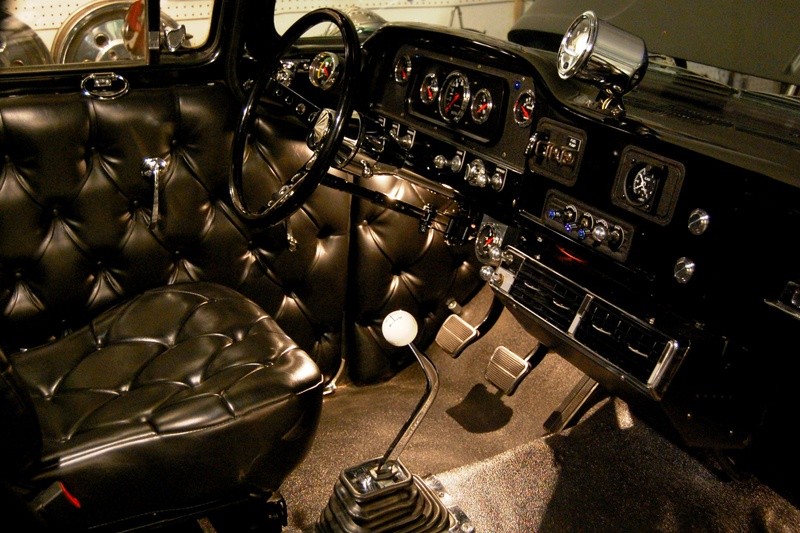 Iím also going to be trying out a Grant 502 high gloss vinyl steering wheel later this week (when it arrives):  I like the 3 hole styling as it looks more like a Covico wheel, and the rim appears a bit thicker. Weíll see.
__________________
My Build Thread: http://67-72chevytrucks.com/vboard/s...d.php?t=444502 |
|
|

|
|
|
#1910 |
|
Senior Enthusiast
Join Date: Feb 2007
Location: Spokane Valley, WA
Posts: 8,356
|
Re: Markeb01 Build Thread
Between stripping more kitchen cabinet doors, I managed to give the truck its first spring bath. I was amazed how filthy the back half was. I should be able to keep up with garage dust from now on anyway as I recently purchased one of the California Car Cover Duster brushes. I’ve wanted one for years but only recently discovered Amazon sells the brand name item for only 15 bucks.
The Grant 502 steering wheel showed up, and was pretty much as I expected. It was worth what I paid for it. It’s pretty much a throw away item after serving its purpose. Here’s a photo of it installed: 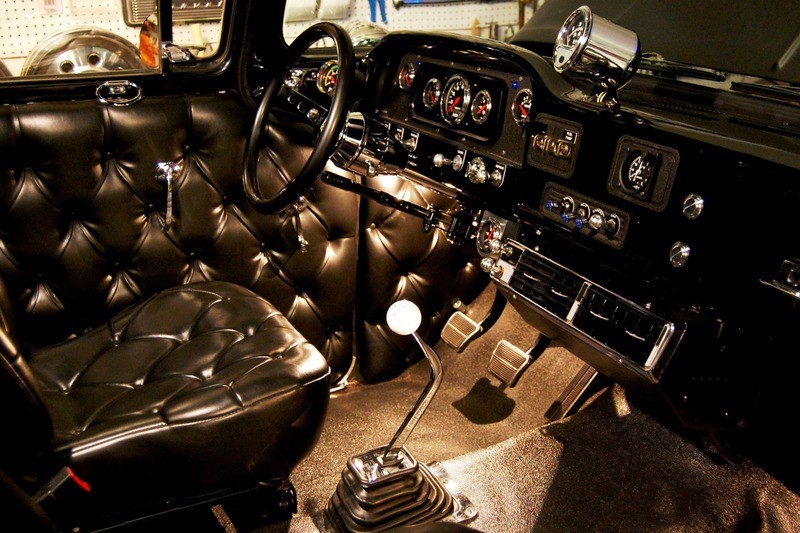 Driving the truck with the smaller diameter wheel had a nice feel to it, making the steering tighter when cornering. But as predicted I couldn’t see the speedometer above 35 mph without scrunching down in the seat. It was in place for one day when my son came over and looked at it. He promptly offered to buy me a Mooneyes blue metalflake wheel (for my upcoming birthday) to get it out of the truck. From a quality standpoint, it was pretty pathetic. Compared to my 40 year old Covico wheel the overall finish is relatively poor. Held up against a new Mooneyes wheel, the quality is terrible. The chrome on the front is beautiful, but the back side of the chrome spokes have deep grinding marks covering the surface and the edges of the spokes look like they were stamped with dull dies. The “gloss” vinyl rim isn’t. It’s a dull rubbery looking surface more like an old tool handle than a nice vinyl steering wheel. It’s somewhat comfortable, but feels sticky like something is on the surface but isn’t. It would be far more desirable if it had the gloss vinyl surface advertised instead of the look and feel of an old inner tube. So I pulled it back out, and today the new blue wheel showed up. Here are a couple of shots with it in the truck. 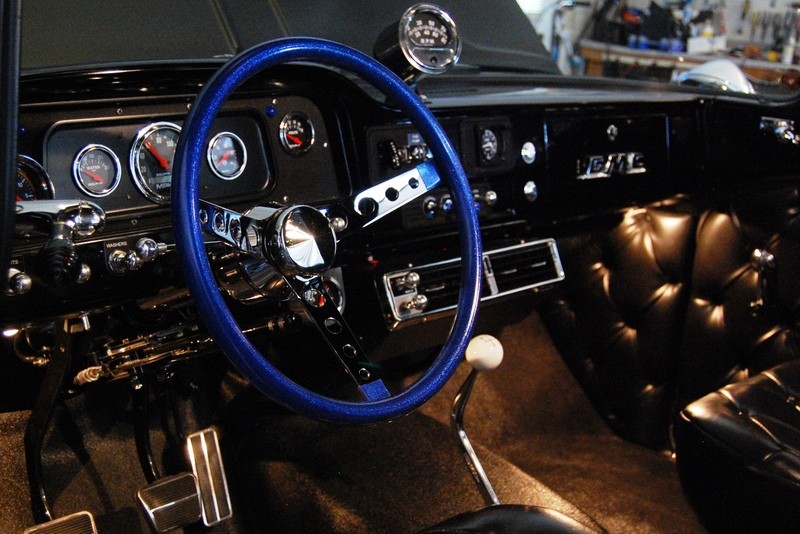 On further reflection, I decided the blue shift knob looked way better than the white one, even if it isn't as comfortable: 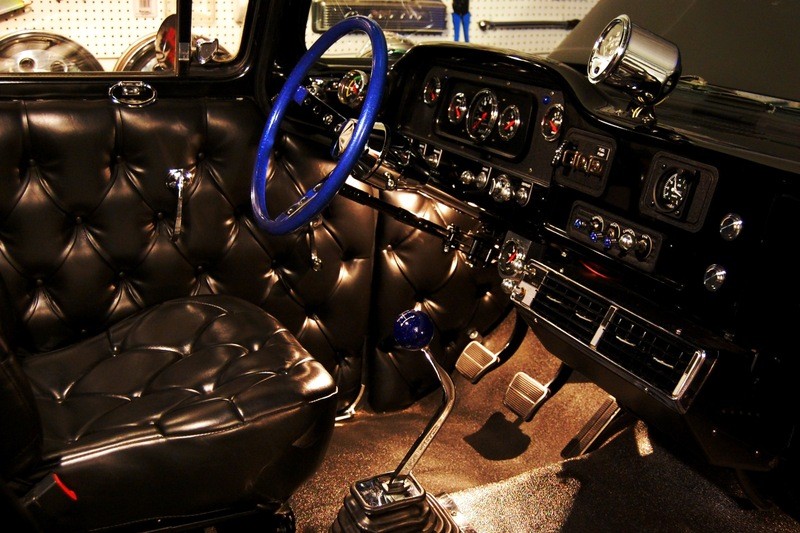 It’s a funny realization, but the dish of the new blue wheel looks shallower/flatter than the identical black wheel. But I measured both and they are 3.5” deep as advertised. Just an optical illusion. I’ll be posting a tech article soon pertaining to all the little differences I’ve discovered over the years of living with three bolt steering wheels. Hopefully it will prove interesting.
__________________
My Build Thread: http://67-72chevytrucks.com/vboard/s...d.php?t=444502 Last edited by markeb01; 03-12-2015 at 03:11 AM. Reason: Changed my mind. |
|
|

|
|
|
#1911 | |
|
Senior Enthusiast
Join Date: Feb 2007
Location: Spokane Valley, WA
Posts: 8,356
|
Re: Markeb01 Build Thread
Quote:
I have a simple hinge system with a tongue on both sides of the front bed wall. Angle brackets were added for additional strength. The back is latched with a simple key lock on both sides. Mine has plastic welting along the bottom edge, but this was deleted on later models. They also have a scissors type latch mechanism now, but I donít know if that is extra cost or standard. Here are a bunch of pictures taken a few minutes ago that may help answer some of your questions: This is looking between the bed and passenger side of the cab. There are two forward latches. To remove or install the cover, simple unsnap one end of both gas rams and lift the cover to near vertical and disengage the brackets: 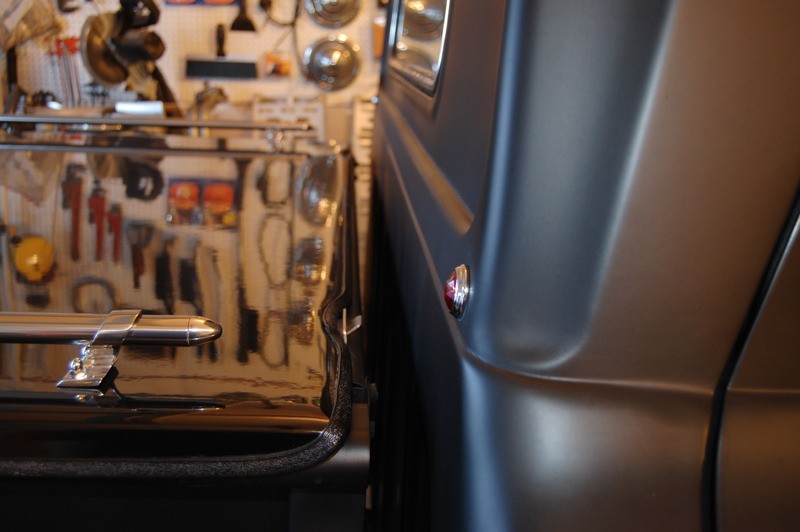 Hereís a close up of the passenger side latch: 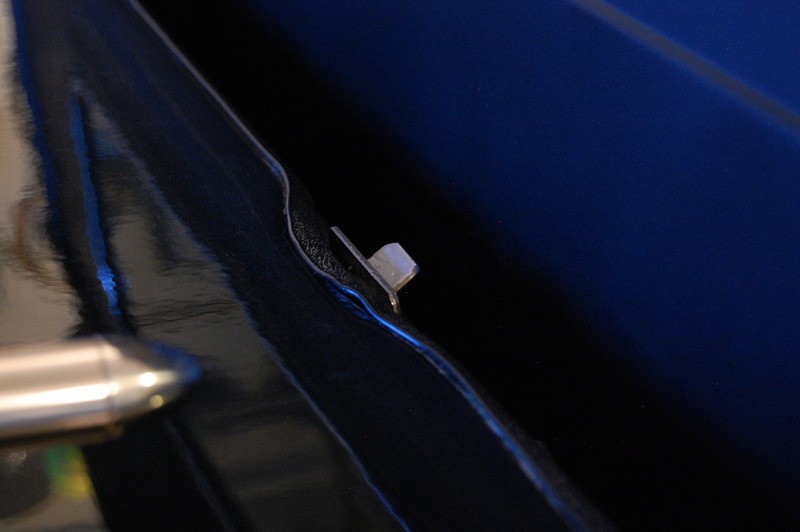 This is the rear passenger side lock. There are two on mine (one of each side): 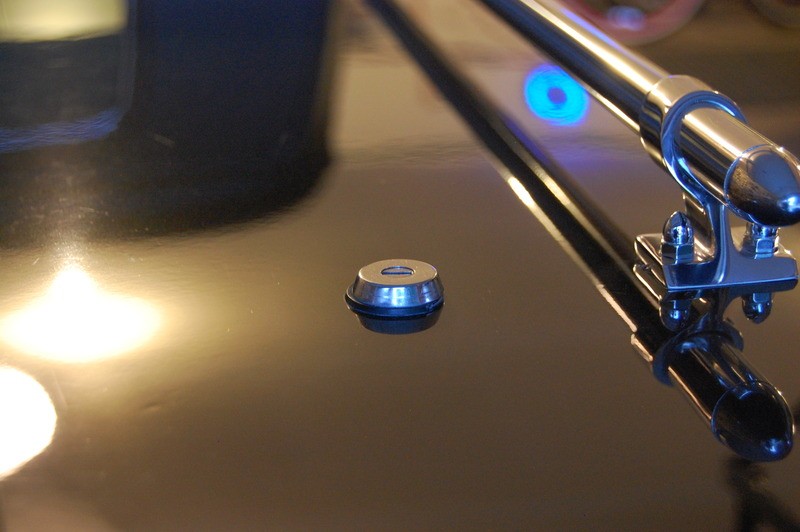 This is the underside of the lock:  And this is the catch the lock slides under: 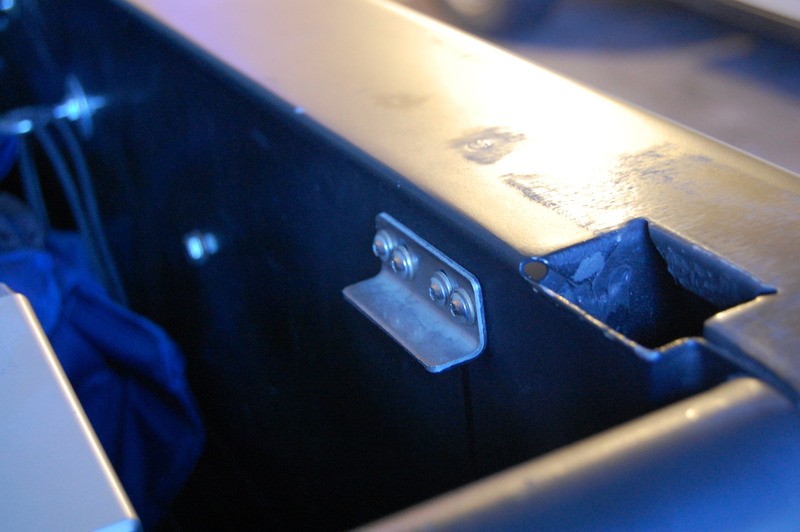 This view shows the front driver side latch and reinforcement bracket: 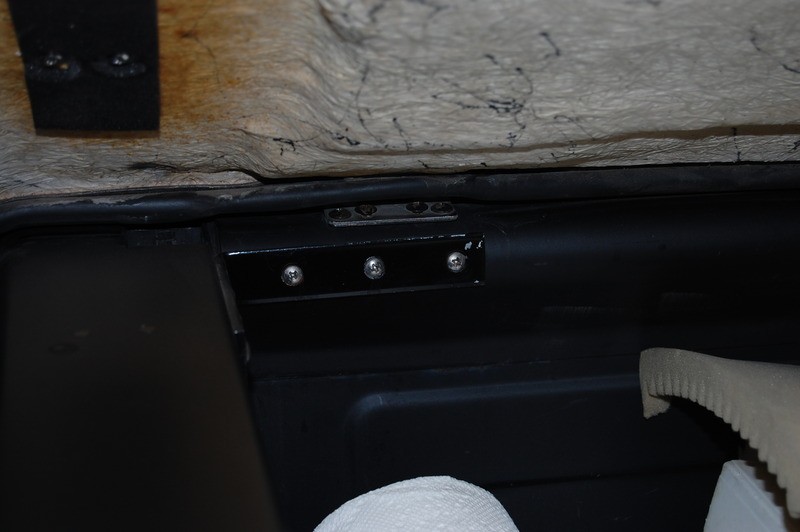 This shows the bottom of the cover and the alignment with the bed sides. No carpet on mine: 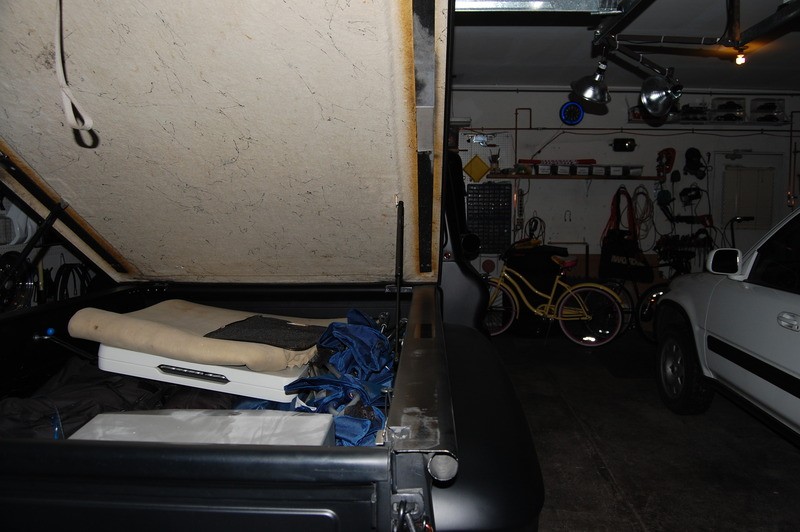 If I can help further please let me know. Regards, Mark.
__________________
My Build Thread: http://67-72chevytrucks.com/vboard/s...d.php?t=444502 |
|
|
|

|
|
|
#1912 |
|
Old and crusty
 Join Date: Jan 2009
Location: Surprise, AZ
Posts: 462
|
Re: Markeb01 Build Thread
Thanks, Mark
That's what I needed to see. PM sent. Dean
__________________
65 Chevy long wide daily driver - SOLD! 64 Chevy Short Step LS |
|
|

|
|
|
#1913 |
|
Senior Enthusiast
Join Date: Feb 2007
Location: Spokane Valley, WA
Posts: 8,356
|
Re: Markeb01 Build Thread
Between investing in research on the 1973-86 rear fender option mentioned in the main 60-66 forum: http://67-72chevytrucks.com/vboard/s...d.php?t=663382 and stripping kitchen cabinet doors, Iíve also been a bit distracted the last couple of days on a very important mission. The DVD ďThe Creeping TerrorĒ was running in the garage while I was working on cabinet doors, when I looked up and noticed the monster eating the couple in the little roadster:
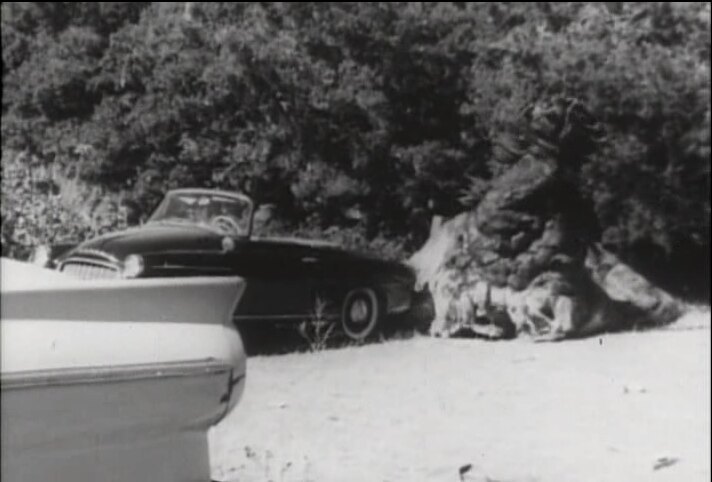 For years I assumed the car was a Borgward, but for the first time in the history of the universe (and needing a distraction) I decided it was essential to confirm its identity. So I looked up Borgward on Google Images and was surprised to find none had the wrap around windshield shown in the movie. Having grown up in the 50ís when ďforeignĒ cars were at the height of their popularity, I started looking through every brand and model I could remember, seeking the true identity of the car. I knew it had to be late 50ís or early 60ís because of the wrap around windshield and recessed steering wheel: 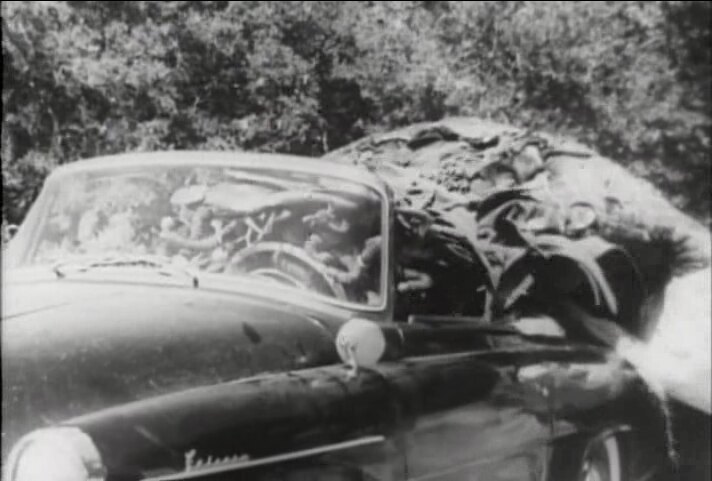 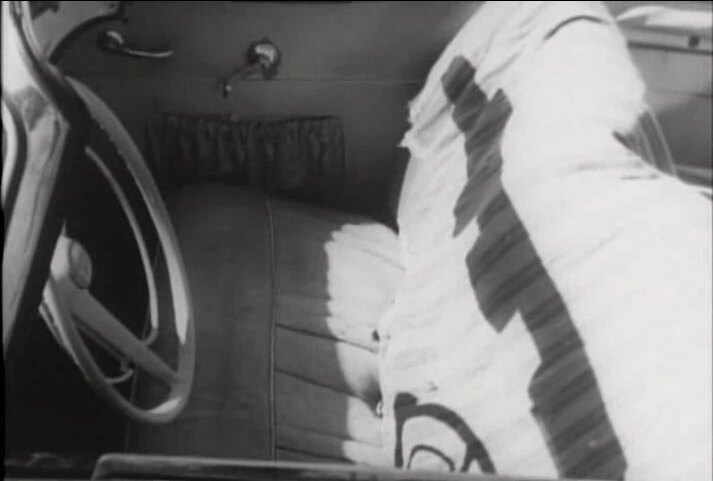 I tried every brand and model I could remember, plus the oddballs that werenít very popular like DKW, Lancia, NSU, Peugot, Saab, Simca, etc. This went on for a couple of days until I tried Vauxhall, and came up with a few models with wrap around windshields. They still werenít the right car but a photo of a Skoda was also included, a brand I had never heard of. When I got around to searching under Skoda, I hit the jackpot. The letters on the fender emblem even matched up (although the car pictured below is missing the emblem). It spells out Felicia. I could see the 1st and 3rd letters were tall, but couldnít make out any of the individual figures. I had tried a variety of Tís, Lís, and Cís, but never came up with a word that made sense. Further confirmation proved the vehicle to be a Skoda Felicia:  These were made in the Czech Republic from 1959-1964. Now the only question remaining is how it got to California at the height of the cold war! What does this have to do with truck? Absolutely nothing. But now that Iíve resolved the mystery, I can shift focus back on the rear fender analysis! I have as many mixed feelings as others have opinions on how well the late fenders would look on my truck, but I still think it could be made to work and look great: 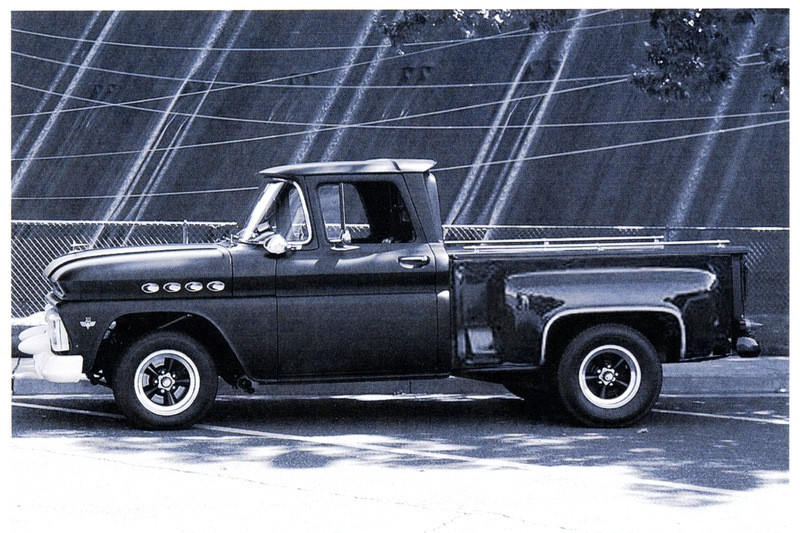 Iím wondering if I could add the new fenders while retaining the stock 1960 steps, and Iím thinking the stock 73 wheel wells might make the tires look more centered than they do in the 1956 openings. Especially with 275/60/15 tires on 8.5Ē rims.
__________________
My Build Thread: http://67-72chevytrucks.com/vboard/s...d.php?t=444502 |
|
|

|
|
|
#1914 |
|
Registered User
 Join Date: Oct 2013
Location: lousiville Ky
Posts: 2,645
|
Re: Markeb01 Build Thread
Mark,
Good luck with your deliberations on the 73 to 87 fender project. A very interesting subject! Wish you were closer, have an extra step side bed you could set on yours. And, then try out different designs, maybe by using contrasting colored tape to illustrate your concepts on the newer bed. I am no artist and need to see things in real life to know how they look to me, often with lots studying time. Would a 73 to 87 Stepside truck sitting next to yours, help in making your decision? Les |
|
|

|
|
|
#1915 |
|
Senior Enthusiast
Join Date: Feb 2007
Location: Spokane Valley, WA
Posts: 8,356
|
Re: Markeb01 Build Thread
Iím the same way Les. The 73-87 rear fenders are something I wanted since before I ever bought the truck. It was a relatively popular swap back in the late 70ís. So Iíve been considering, studying, and pondering this for a long time.
The primary affection for the 73 fenders is their increased width (equal to the cab Ė allowing for wider wheels and tires) and the upper corners that I find flattering to the cab styling. On the minus side I donít care for the late model steps as they are visually too short vertically, and donít extend to the bottom of the cab even on the trucks they came on. My observation is they donít even reach to the bottom front of the rear fenders, and those are a couple inches above the bottom of the cab. On the photochop above, I didnít blend these items digitally, I printed a picture of the truck and a picture of the late model bed, adjusting the sizes until the length of the beds were identical. I then physically cut the bed side off the new truck, stuck it on the photo of my truck, and scanned the results. It can be seen that the original 1960 step resides somewhat below the new step and below the front of the fender. (I need to do a better photochop effort). Rather than swapping beds my preferred approach would be to obtain at least one 73+ fender for use as a test mule, remove one of mine and stick the new one in place to evaluate what would be needed to bolt everything together. In my mindís eye, this would bolt together with no more effort than replacing the original fender (after drilling and patching a few holes in the bed side). The lower inner corner of the fender would require a filler panel where the newer step would have gone, but that wouldnít prove much trouble. The late model fender in the photo above has stainless trim around the wheel well, where there is none on the front fender. If this trim was removed I donít believe the disparate shape of the wheel wells would be so attention grabbing, especially at the ride height of my truck. My own observation is the 1955 rear wheel well openings donít match the fronts any better than the square versions on the later bed, and on my particular truck the rear axle is located behind the centerline of the fender opening. 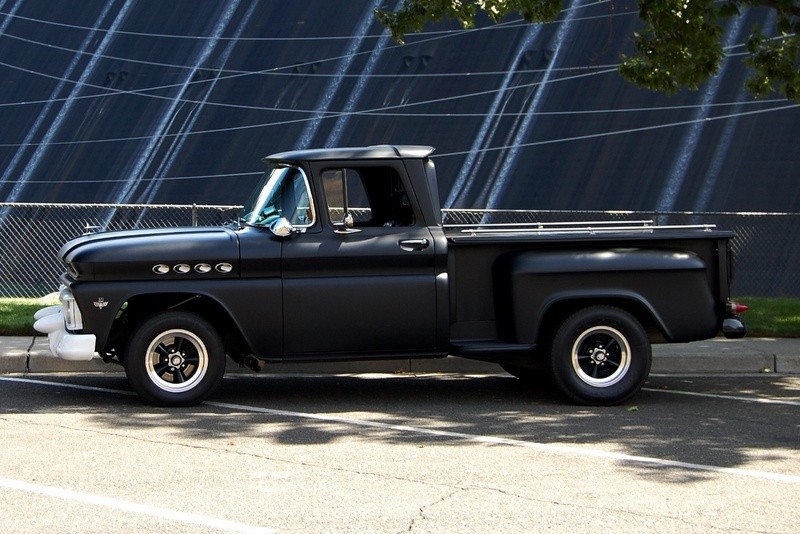 Iím thinking the stock 73 wheel wells might make the tires look more centered than they do now. The real answer is if Iím going to seriously consider this change I need to go to a local wrecking yard or Craigslist, and pick up a fender (either one). Then I could pull one of my existing fenders, locate the new one in position and see what can be done. I think Iíll create a better photo effort first and see how close the step/fender will actually fit and go from there. One last thought, in an earlier exchange I mentioned I thought the earlier fenders had fewer holes in them. I now believe that was incorrect information. It seems some of the 79-87 rear fenders have no side marker or gas filler holes at all, so those would be more desirable for my purposes. Thanks to everyone for stopping by and offering comments.
__________________
My Build Thread: http://67-72chevytrucks.com/vboard/s...d.php?t=444502 |
|
|

|
|
|
#1916 |
|
Registered User
Join Date: Apr 2012
Location: Searcy, AR
Posts: 4,203
|
Re: Markeb01 Build Thread
Wow, I don't envy the decision making process on this oneÖ
 But, I will be watching, and the research on the SkodaÖ Too Cool! 
__________________
DON Proverbs 27:17  US Air Force Retarded errr Retired My '65 Stepper Build:http://67-72chevytrucks.com/vboard/s...d.php?t=533920 My '60 Rusty Patina Build:http://67-72chevytrucks.com/vboard/s...66#post7402266 My '72 http://67-72chevytrucks.com/vboard/s...59#post7204359 SOLD |
|
|

|
|
|
#1917 |
|
Registered User
Join Date: Dec 2011
Location: Donaldsonville, La.
Posts: 1,024
|
Re: Markeb01 Build Thread
You'd be better off getting a whole bed. They can be had sometimes for around $400.00
|
|
|

|
|
|
#1918 |
|
The 60-66 GMC/Pontiac guy....
Join Date: Oct 2010
Location: Apache Junction, Arizona
Posts: 1,306
|
Re: Markeb01 Build Thread
I'll throw my 2 centavos in here.
I like the 73-87 fenders on the 60-66 trucks, I think the lines, overall, work well, but can't get past the non-matching wheel opening lip. Also, IMHO.... if a retrofit of the later fenders is going to be done, the wheel openings should be made to match. I bought a 73-87 stepside bed for $250... they are anything but rare... literally 10's thousands of those beds were made. I'd think they would be easy to find. 
__________________
 Building Genuine Pontiac Firepowered cars and trucks for several decades.  Why Pontiac?? That's just me daring to be different.  Projects.. 63 C10 Short Wheel Base fleetside (The Pro-Street) currently under reconstruction. 440CID 2X4 Pontiac 
|
|
|

|
|
|
#1919 |
|
Senior Enthusiast
Join Date: Feb 2007
Location: Spokane Valley, WA
Posts: 8,356
|
Re: Markeb01 Build Thread
We’ve been going through old videos, films, and photos eliminating surplus that just isn’t interesting any longer, and discovered this picture of the first gloss black lacquer paint job I put on the truck back in 1998. I’m not sure it’s been seen before. We just got the new hood on and were out for an evening cruise in Spirit Lake where my wife served as an EMT at the time:
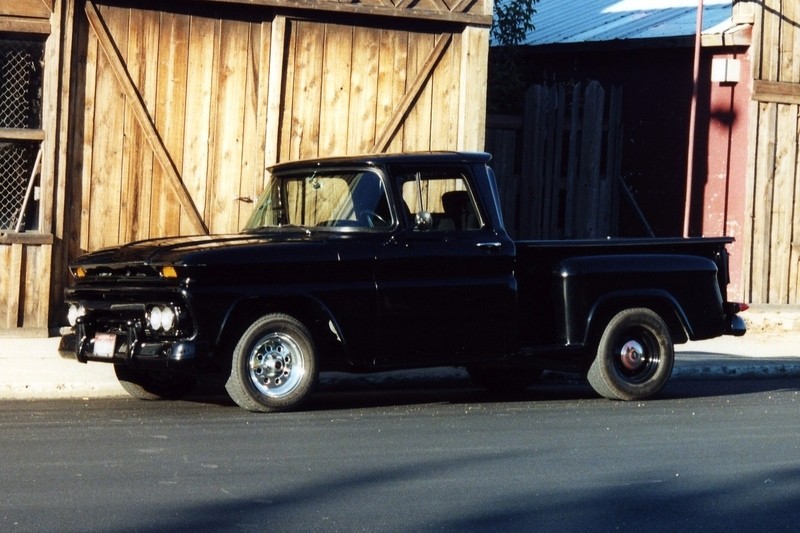 It sure did inspire a lot of looks and comments when it was fresh.
__________________
My Build Thread: http://67-72chevytrucks.com/vboard/s...d.php?t=444502 Last edited by markeb01; 03-19-2015 at 10:24 PM. |
|
|

|
|
|
#1920 |
|
Senior Enthusiast
Join Date: Feb 2007
Location: Spokane Valley, WA
Posts: 8,356
|
Re: Markeb01 Build Thread
Iím going through a midlife crisis, really enjoying how my truck sounds with the exhaust cutouts open, which leads to disappointment when they have to be closed as we resume driving on ďpublic highwaysĒ. It isnít the noise thatís illegal where I live, itís running with a bypass around the muffler. Thatís a no no.
Iíve been running Flowtech chambered mufflers for decades. They sound a lot like Flowmasters, but were a lot cheaper at one time and last indefinitely. They rumble like an early Corvette at idle, but get quieter at speed. For years Iíve thought that was cool, now I find it too tame and boring. So Iíve decided to ditch my existing mufflers and go with something louder to better fit the personality of the truck. I donít care how obnoxious it is in the cab as we donít travel long distances in it. Even my wife wants the change as she hates closing the cutouts as well! After a bunch of research and input from some experienced friends, I decided on a pair of Flowtech Purple Hornies:  Iím glad they are a Flowtech product, as Iíve had such fantastic results with their other mufflers. I ordered them through Amazon instead of Summit, saving the cost of shipping. I was thinking about installing them myself, but for about the cost of clamps, hangers, and turn downs I can afford to have the muffler shop do the installation, and spare myself the backache of crawling around on the garage floor. Iíll post a video once they are in place.
__________________
My Build Thread: http://67-72chevytrucks.com/vboard/s...d.php?t=444502 |
|
|

|
|
|
#1921 |
|
Registered User
Join Date: Sep 2012
Location: Leander, TX
Posts: 969
|
Re: Markeb01 Build Thread
Mark,
Are these 2.5" inlet and outlet. I am wanting to run some glass packs in place of my current Flowmasters, but everything I have seen is on 2.25" for glass packs. I guess I am a rebel I run a cutout on my Camaro all the time. My valve broke one day under hard acceleration and I haven't ever fixed it. So I just took it off and run the straight cutout. It does still have cats though so its about as loud as dual exhaust. I have to climb under there and put the cap on when I get it inspected. Look forward to hearing how these sound.
__________________
64' Build Thread http://67-72chevytrucks.com/vboard/s...d.php?t=586955 |
|
|

|
|
|
#1922 |
|
Senior Enthusiast
Join Date: Feb 2007
Location: Spokane Valley, WA
Posts: 8,356
|
Re: Markeb01 Build Thread
I think I'm the oddball, my exhaust system is 2.25", so these Purple Hornies will fit perfectly. I see where Cherry Bomb offers 2.5" in & out on some of their glasspacks.
__________________
My Build Thread: http://67-72chevytrucks.com/vboard/s...d.php?t=444502 |
|
|

|
|
|
#1923 |
|
Registered User
Join Date: Apr 2012
Location: Searcy, AR
Posts: 4,203
|
Re: Markeb01 Build Thread
Happy Easter!!!
 Can't wait to see and hear the upcoming video... 
__________________
DON Proverbs 27:17  US Air Force Retarded errr Retired My '65 Stepper Build:http://67-72chevytrucks.com/vboard/s...d.php?t=533920 My '60 Rusty Patina Build:http://67-72chevytrucks.com/vboard/s...66#post7402266 My '72 http://67-72chevytrucks.com/vboard/s...59#post7204359 SOLD |
|
|

|
|
|
#1924 |
|
Senior Enthusiast
Join Date: Feb 2007
Location: Spokane Valley, WA
Posts: 8,356
|
Re: Markeb01 Build Thread
The following update was posted yesterday in the ďWhat did you do to your truck todayĒ thread: (I didnít have a video put together at that time).
A nice new pair of Flowtech Purple Hornies (glasspack mufflers) arrived today. We headed straight for the muffler shop and had them installed within 45 minutes! He retained all my hangers, and even my turn downs. He just surgically removed the old mufflers and inserted the new ones in the same exact locations. I hung on to the old mufflers as they last indefinitely. I'll probably have them installed in my daughterís truck. The dash cam videos turned out lousy, so we'll be shooting some new stuff with an IPhone hopefully tomorrow. (Note Ė I cropped and combined a couple of decent shots using Microsoft Movie Maker). In this photo the passenger side glasspack is installed, while the Flowtech Terminator (chambered muffler) remains to be done:  Man these things sound sweet. At idle, the muffler rumble is noticeable. At full throttle they are about 80% as loud as when the cutouts are open! And here is a combined video taken over the last couple of days. The 1st segment is the old Flowtech chambered mufflers turning right at the corner of Trent and Pines in Spokane Valley. The 2nd segment is the truck leaving on a green light at Pines, and the 3rd segment is turning right again on Trent. Segments 2 & 3 have the new Flowtech Purple Hornies glasspack mufflers in place, for a direct comparison to the earlier mufflers. The sound breaks up at the end, but that is caused by my cheap import dash cam, not the engine: https://www.youtube.com/watch?v=fU2f8ag7zuo
__________________
My Build Thread: http://67-72chevytrucks.com/vboard/s...d.php?t=444502 |
|
|

|
|
|
#1925 |
|
Registered User
Join Date: Nov 2011
Location: fayetteville nc
Posts: 10,338
|
Re: Markeb01 Build Thread
Sounds good Marke.....bet it sounds even better in person.
__________________
1963 Short bed step side SBW 427 big block and borg warner T-16 HD 3 speed manual http://67-72chevytrucks.com/vboard/s...d.php?t=519869 1963 Short bed fleetside BBW 348 1st gen big block w/Powerglide http://67-72chevytrucks.com/vboard/s...d.php?t=619024 1964 Short bed trailer |
|
|

|
 |
| Bookmarks |
|
|