
 |
|
|
|
|
#1 |
|
Senior Enthusiast
Join Date: Feb 2007
Location: Spokane Valley, WA
Posts: 8,356
|
Re: Markeb01 Build Thread
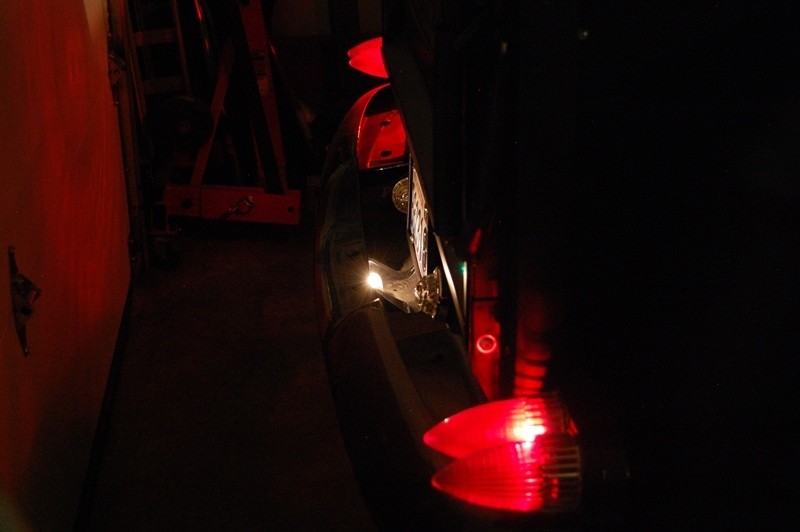
So I was out checking my porthole lights the other night (and they all work perfectly), but I also realized I lost another tail light bulb. It’s the near bulb in this photo, which was the last one I replaced about a year ago:
 These aren’t exactly easy to replace, and I hate doing it. So this time I figured I’d step up to some led bulbs and see it they hold up any better. I bought 10 of these from Amazon along with an electronic flasher: They will all arrive this Tuesday and get installed the same night. Hopefully that will be a long lasting solution.
__________________
My Build Thread: http://67-72chevytrucks.com/vboard/s...d.php?t=444502 |
|
|

|
|
|
#2 |
|
Registered User
Join Date: Dec 2012
Location: Rochester, KENT
Posts: 10,565
|
Re: Markeb01 Build Thread
Morning Mark,
Hopefully you will be able to feed back on that too, which is the better option for longevity, regular or LED. I like the brightness of LED, but often see cars, moderns that is, with them out, and in the kitchen they do not seem to have all the benefit that gets mentioned. Cool photo too.
__________________
MY BUILD LINK: http://67-72chevytrucks.com/vboard/s...585901]Redneck Express - 1966 C10 Short Fleetside MY USA ROADTRIPS http://forum.retro-rides.org/thread/...2018-humdinger IF YOU CAN'T FIX IT WITH A HAMMER, YOU'VE GOT AN ELECTRICAL PROBLEM MATE. |
|
|

|
|
|
#3 |
|
Registered User
Join Date: Jun 2012
Location: Selkirk Ontario Canada
Posts: 1,141
|
Re: Markeb01 Build Thread
nice choice mark hope you like them ...want to see these for sure
__________________
My 63 GMC Panel Slow Build http://67-72chevytrucks.com/vboard/s...=1#post5457281 63 
|
|
|

|
|
|
#4 |
|
Senior Enthusiast
Join Date: Feb 2007
Location: Spokane Valley, WA
Posts: 8,356
|
Re: Markeb01 Build Thread
The first reports I received indicated I’d receive the flashers and led bulbs last Tuesday, so I went ahead and removed the dead bulb from the right hand tail light. It turned out the filaments appear okay, however the glass dome has turned black for whatever reason:
 So the flashers turned up Monday, but Tuesday provided no bulbs. By Thursday (today) they still had not shown up, so I started researching why. It turned out the original display page stated the bulbs were coming from the USA, however they actually shipped from China, so they won’t be here for a couple of weeks. So I popped in another stock incandescent 1157 bulb and slapped the assembly back together for now. I also ordered up a white 2” shift knob tonight as I this is my preferred size, but the only 2” knob I currently own is black with white engraving. The new version should be in hand within a couple of weeks.
__________________
My Build Thread: http://67-72chevytrucks.com/vboard/s...d.php?t=444502 |
|
|

|
|
|
#5 |
|
Senior Enthusiast
Join Date: Feb 2007
Location: Spokane Valley, WA
Posts: 8,356
|
Re: Markeb01 Build Thread
Well the white shift knob showed up and works perfectly. The LED bulbs showed up and were installed, and they didn’t work. Stepping on the brakes or using the turn signal showed no increase in light output. So they were pulled and replaced with standard 1157 bulbs. Then I realized how much trouble I was having reassembling the lamps. I also began to wonder why the far right bulb kept failing.
So I decided to completely disassemble the lamps and see if anything was up. They look really simple on the outside, but are somewhat complicated inside. Here’s what I’ve been working with for the last 18 years: My son machined these up for me based on my drawings, but he improved the insides to eliminate all but two mounting screws between the lenses: Here’s the back: 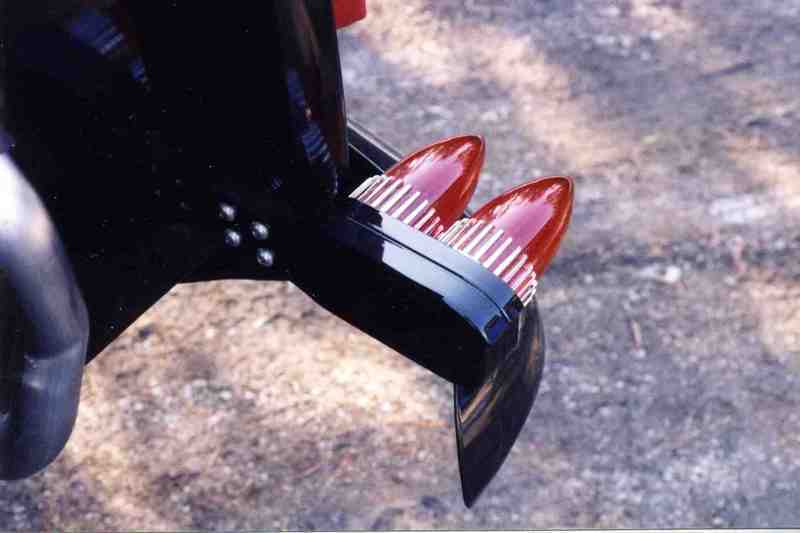 And here’s the front: 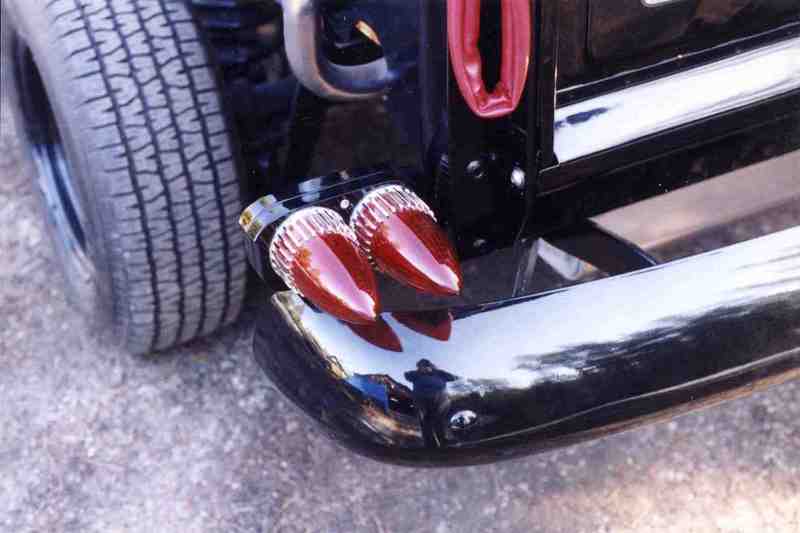 And here’s the lens assembly: 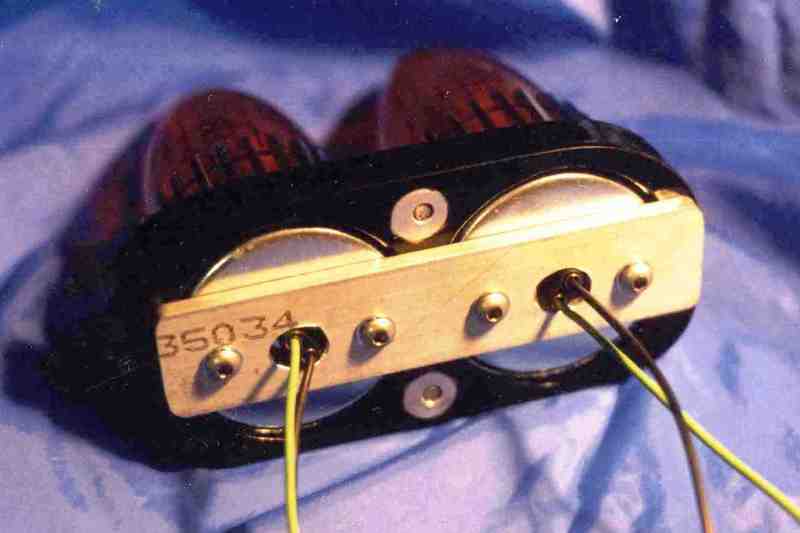 All the wires are supposed to feed through the inner channel to connection under the bed. Sadly – the wires tend to fall out of the channel when changing bulbs, and the wires get trapped behind the 1/4” thick mounting strap and the ¼” deep cavity in the mounting bracket bolted to the bed. 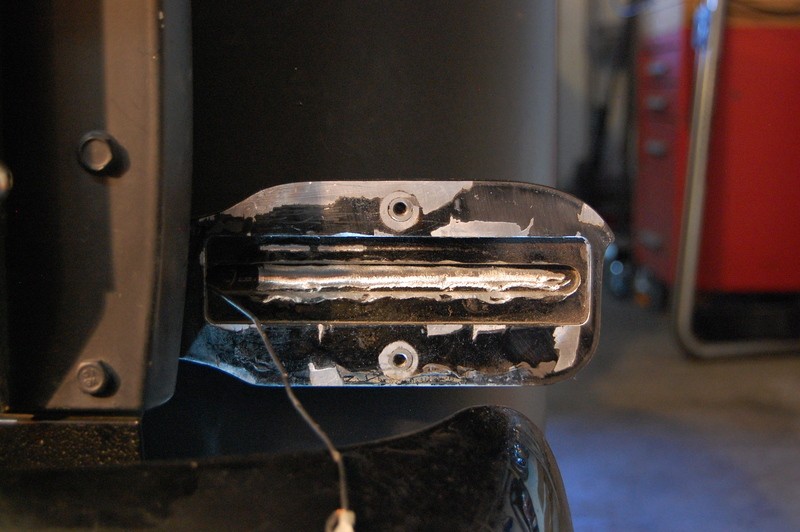 Close inspection showed the black wire for the farthest bulb on the right got squashed: 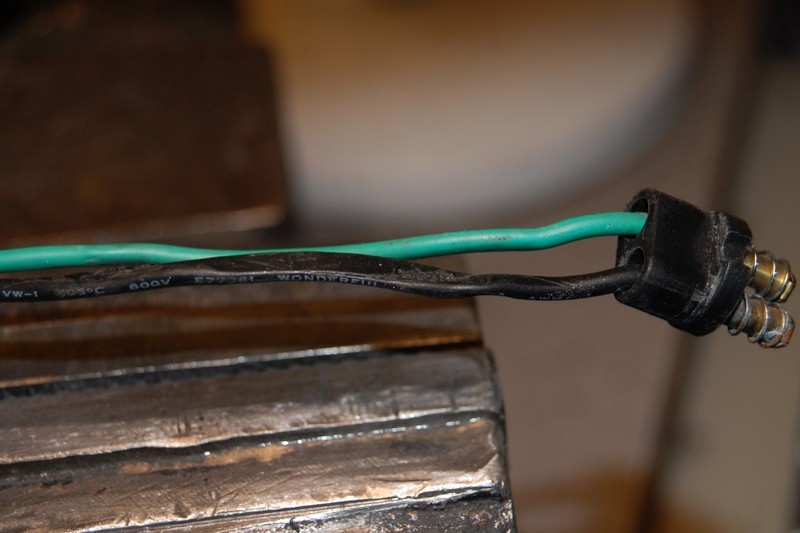 So I pulled everything apart for the first time since new, and obviously everything was really cruddy: 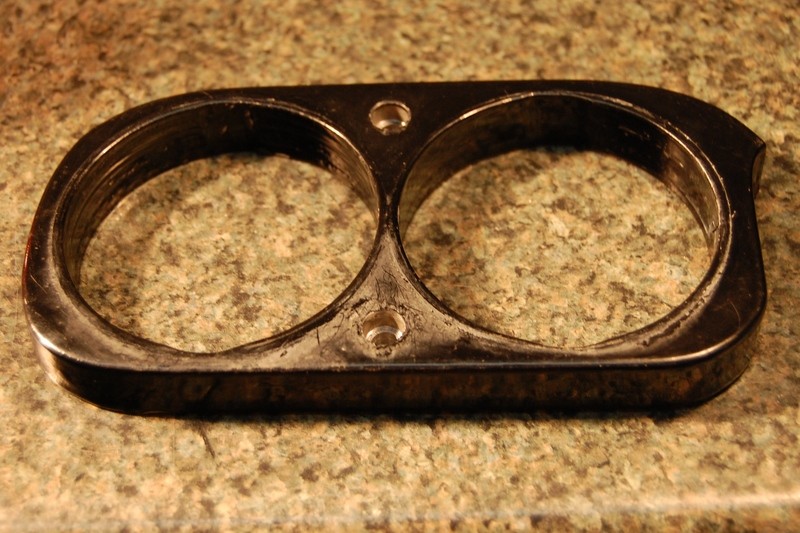 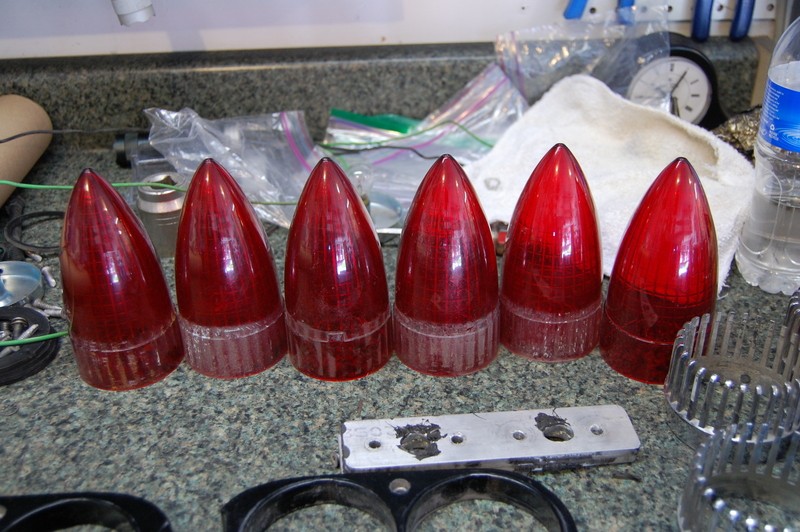  To eliminate the crushed wire problem, I replaced both ¼” thick aluminum lamp brackets with new 1/8” thick steel brackets. These will provide clearance between the mounting base and the body mounting bracket, so no more smashed wires. 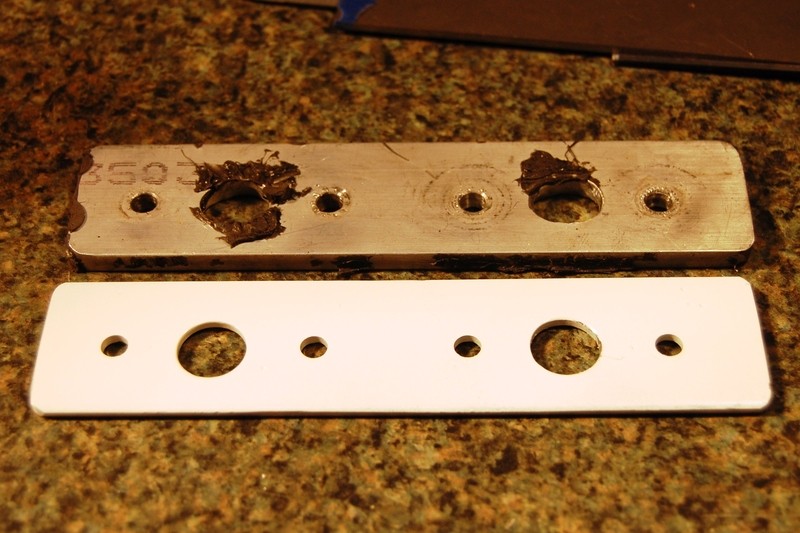 This shot shows the Maglite reflectors which I added years ago (attached with JB Weld) and the 1/4x20 nuts glued to the base for more rigid attachment: 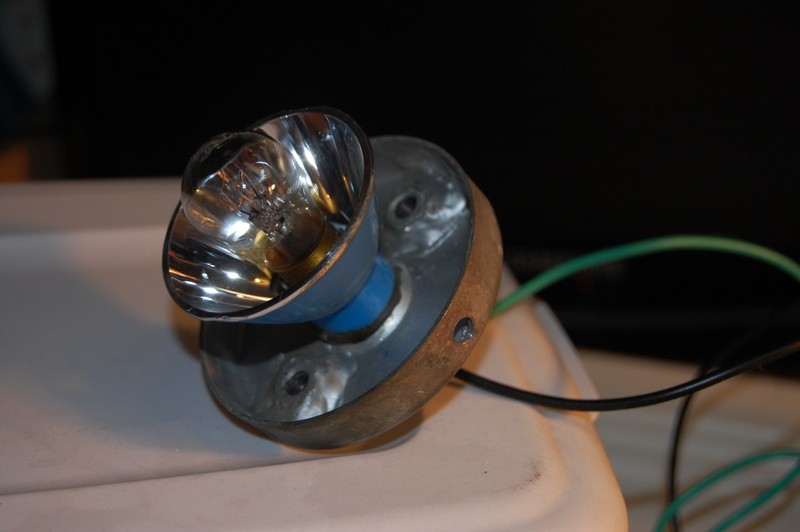
__________________
My Build Thread: http://67-72chevytrucks.com/vboard/s...d.php?t=444502 |
|
|

|
|
|
#6 |
|
Senior Enthusiast
Join Date: Feb 2007
Location: Spokane Valley, WA
Posts: 8,356
|
Re: Markeb01 Build Thread
Here the red lenses have been fully polished with Semi-Chrome, and the chrome brackets cleaned up by my wife. In the forefront new gaskets have been cut which wedge between the edge of the base and the bottom of the lens. It makes for a nice water tight seal in the bulb area, and eliminates any vibration or movement in the lens.
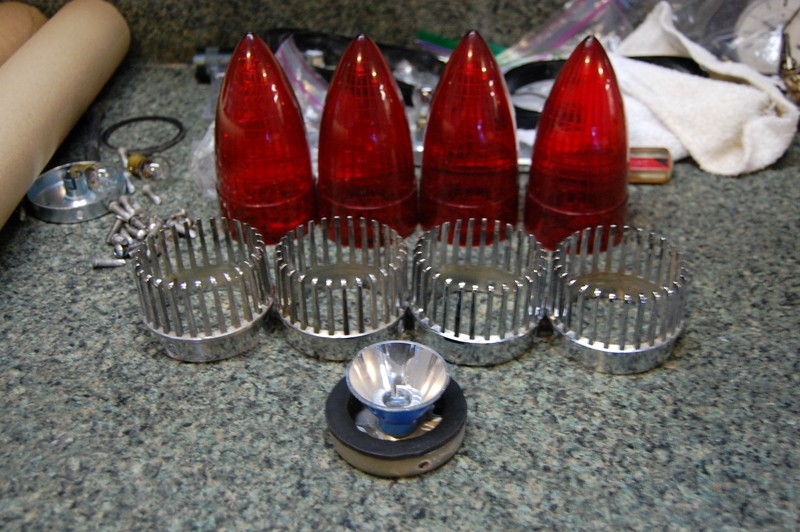 Here the components are stuck together without any bulbs or wiring: 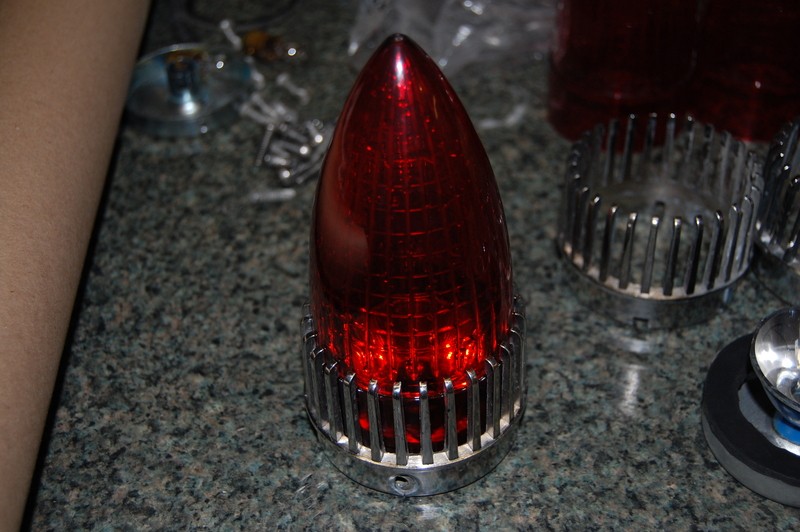 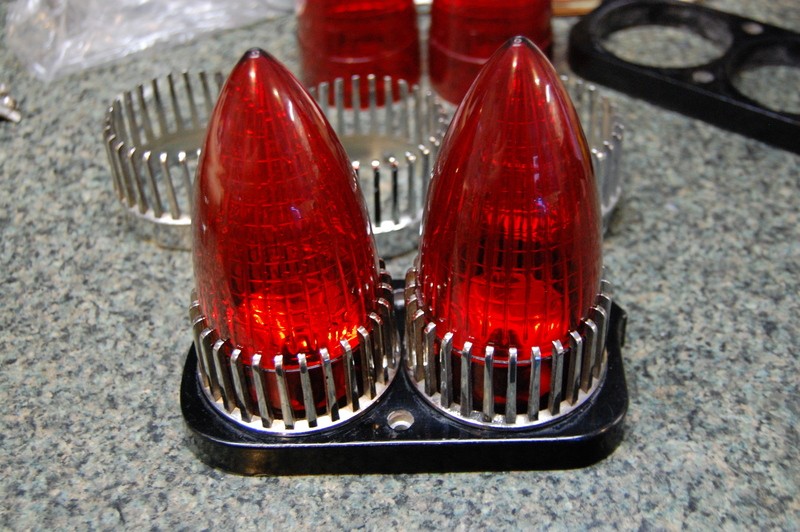 Now it’s a matter of waiting until Monday for the new wire leads to show up, at which point everything will be reassembled.
__________________
My Build Thread: http://67-72chevytrucks.com/vboard/s...d.php?t=444502 |
|
|

|
|
|
#7 |
|
Registered User
Join Date: Apr 2012
Location: Searcy, AR
Posts: 4,203
|
Re: Markeb01 Build Thread
Very Nice! I always enjoy the attention to detail and your in-depth write-ups...
 Those taillights have always been favorites of mine, and your mods are over the top... 
__________________
DON Proverbs 27:17  US Air Force Retarded errr Retired My '65 Stepper Build:http://67-72chevytrucks.com/vboard/s...d.php?t=533920 My '60 Rusty Patina Build:http://67-72chevytrucks.com/vboard/s...66#post7402266 My '72 http://67-72chevytrucks.com/vboard/s...59#post7204359 SOLD |
|
|

|
|
|
#8 | |
|
Registered User
Join Date: Dec 2012
Location: Rochester, KENT
Posts: 10,565
|
Re: Markeb01 Build Thread
Quote:
What he said....... Love the lights Mark.
__________________
MY BUILD LINK: http://67-72chevytrucks.com/vboard/s...585901]Redneck Express - 1966 C10 Short Fleetside MY USA ROADTRIPS http://forum.retro-rides.org/thread/...2018-humdinger IF YOU CAN'T FIX IT WITH A HAMMER, YOU'VE GOT AN ELECTRICAL PROBLEM MATE. |
|
|
|

|
|
|
#9 |
|
Senior Enthusiast
Join Date: Feb 2007
Location: Spokane Valley, WA
Posts: 8,356
|
Re: Markeb01 Build Thread
Thanks for the comments guys!
While waiting until Monday for the new tail light wires to arrive, I did a few updates on the interior. I’ve decided to stay with the red metalflake steering wheel, so I went back and stripped the GMC emblem on the dash and repainted it red. It turned out perfectly again. I also added a 2 gauge Eelco under dash panel with the external top center light source. The right gauge is currently the vacuum gauge for the brake boost chamber, and eventually the left gauge with be for transmission temperature. The new 2” white 4 speed knob also appears in this photo, along with the original style disc brake pedal pad. 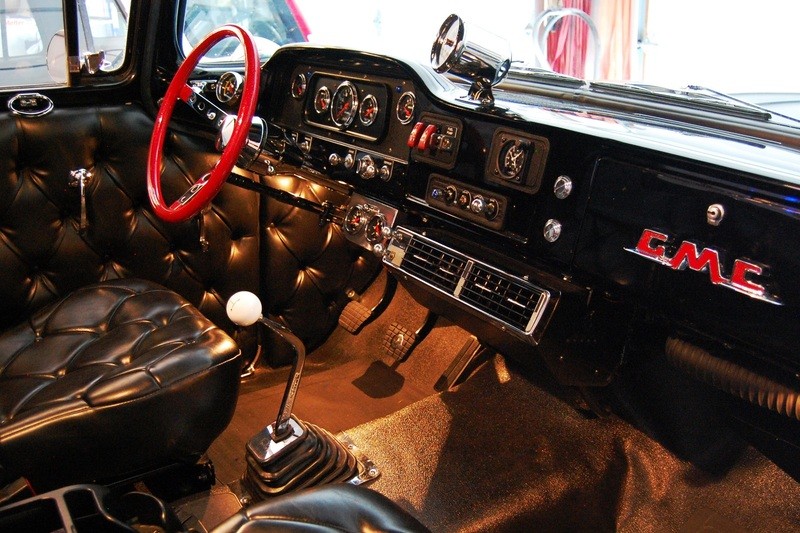
__________________
My Build Thread: http://67-72chevytrucks.com/vboard/s...d.php?t=444502 |
|
|

|
|
|
#10 |
|
Registered User
Join Date: Oct 2014
Location: Location:
Posts: 8,436
|
Re: Markeb01 Build Thread
|
|
|

|
|
|
#11 |
|
Registered User
Join Date: Apr 2012
Location: Searcy, AR
Posts: 4,203
|
Re: Markeb01 Build Thread
Consistently Amazed!

__________________
DON Proverbs 27:17  US Air Force Retarded errr Retired My '65 Stepper Build:http://67-72chevytrucks.com/vboard/s...d.php?t=533920 My '60 Rusty Patina Build:http://67-72chevytrucks.com/vboard/s...66#post7402266 My '72 http://67-72chevytrucks.com/vboard/s...59#post7204359 SOLD |
|
|

|
|
|
#12 |
|
Registered User
Join Date: Apr 2011
Location: .
Posts: 3,104
|
Re: Markeb01 Build Thread
Coolest of the cool Mark.
Diggin' those tail lights and always enjoy pics of the cockpit. |
|
|

|
|
|
#13 |
|
Registered User
Join Date: Aug 2015
Location: Kelowna, B.C, Canada
Posts: 1,747
|
Re: Markeb01 Build Thread
By far the coolest interior I have ever seen!
__________________
Nik...................____ 62 lwb c10 step-side 261 5 spd .........________//__{\_____ ,,,,,,,/__(O)___//___/__(O)_/ my build thread. Sending unit solution |
|
|

|
|
|
#14 |
|
Senior Enthusiast
Join Date: Feb 2007
Location: Spokane Valley, WA
Posts: 8,356
|
Re: Markeb01 Build Thread
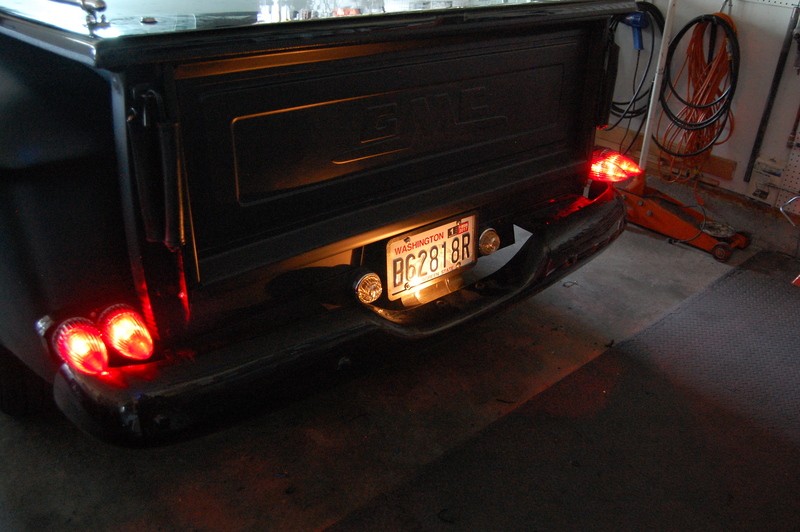
The new tail light wires showed up this morning, and after a mere 4 hours I finally got everything hooked up. Here’s the tail lights – (they actually look much better in real life):
 And the brake lights: 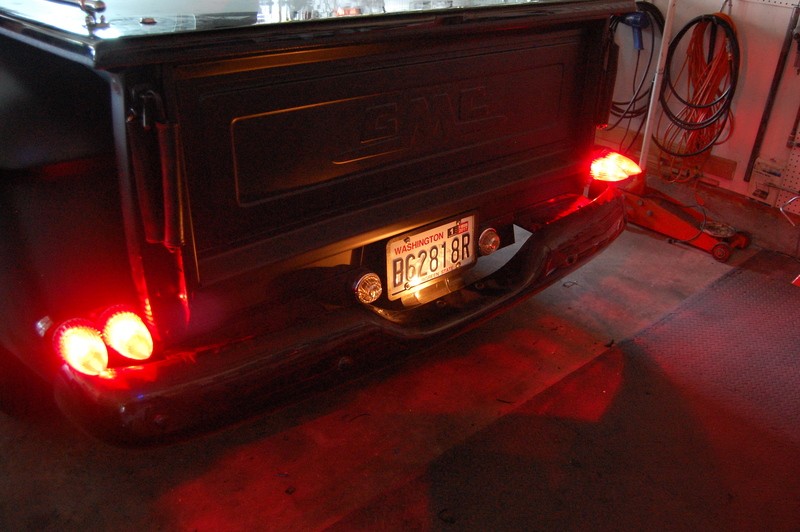 I also went back to the red metalflake shift knob just to keep everything similar. I think it looks pretty cool with all the red: 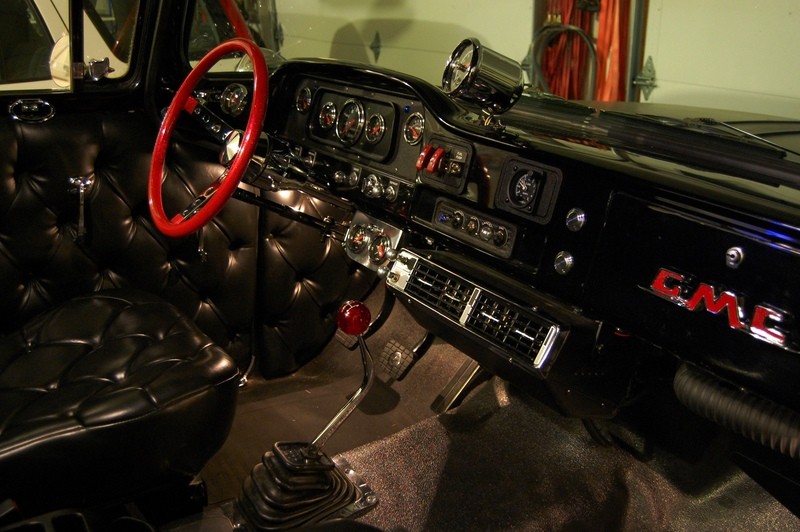
__________________
My Build Thread: http://67-72chevytrucks.com/vboard/s...d.php?t=444502 |
|
|

|
|
|
#15 |
|
Registered User
Join Date: Apr 2012
Location: Cambridge, Ontario, Canada
Posts: 1,771
|
Re: Markeb01 Build Thread
Details, details, details, nice improvements, looks great Mark!
__________________
Craigerrr My build thread, CRGRS 66 Winter Build: http://67-72chevytrucks.com/vboard/s...09#post5638709 |
|
|

|
|
|
#16 |
|
Registered User
Join Date: Nov 2014
Location: Omaha
Posts: 558
|
Re: Markeb01 Build Thread

|
|
|

|
|
|
#17 |
|
Registered User
 Join Date: May 2007
Location: Deale Md
Posts: 4,663
|
Re: Markeb01 Build Thread
It's always fun to drop in and catch up.
__________________
James 63 GMC V6 4speed carryall 65 chevy swb bbw V8 auto 68 K20 327/4 speed, buddy buckets 2002 GMC CC Dually Duramax 64 GMC lwb 3/4 V6 4speed SOLD 66 GMC swb bbw buddy buckets SOLD IG duallyjams The only thing that stays the same is constant change! |
|
|

|
|
|
#18 |
|
Senior Member
 Join Date: Oct 2009
Location: Fayetteville, Arkansas
Posts: 1,923
|
Re: Markeb01 Build Thread
Best hotrod interior on the forum… always loved the caddy taillights.
Way to go Mark. |
|
|

|
|
|
#19 |
|
Senior Enthusiast
Join Date: Feb 2007
Location: Spokane Valley, WA
Posts: 8,356
|
Re: Markeb01 Build Thread
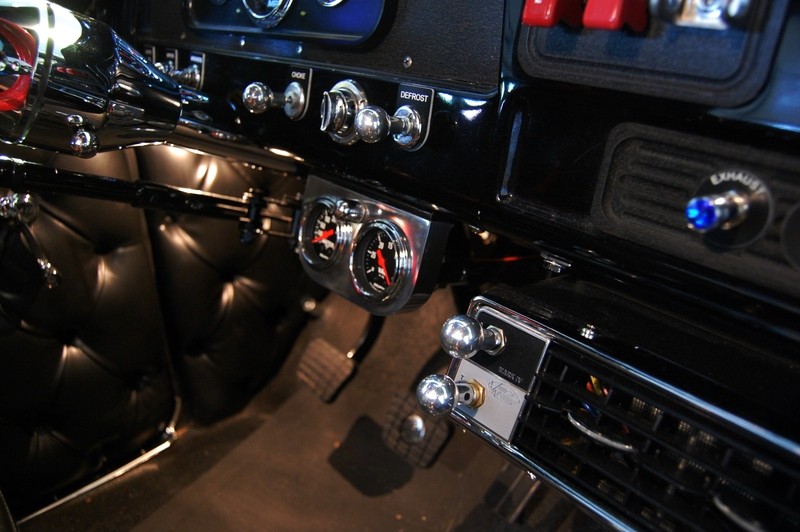
It turned out I wasn’t all that happy with the Eelco 2 gauge panel under the dash. It turned out to have a big dent in the face, just to the left of the left hand gauge and it really showed up in the driver’s seat. So I picked up an NOS Offenhauser panel, drilled it for the exterior light and mounting bolts, and slapped it in instead. It’s much cleaner looking:
 Never really coming up with an exact answer as to the purpose of the two vertical plugs in the dash to the left of the glovebox door, I finally came up with a solution for putting them to good use. They now hold two USMC emblems. The upper is for the 1st Marine Aircraft Wing, Vietnam (the unit in which I served). And the lower is a laser engraved EGA with a beautiful clear coat over it (which doesn’t show up in the photo). It is really a beautiful piece. 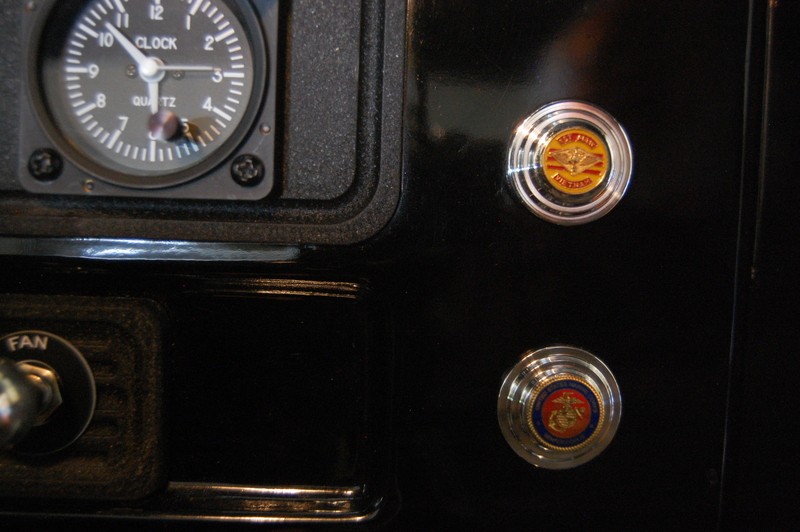 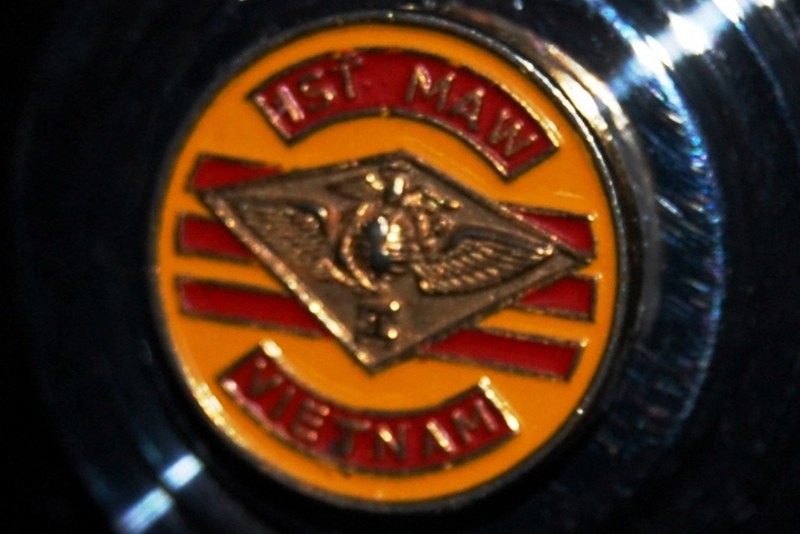 
__________________
My Build Thread: http://67-72chevytrucks.com/vboard/s...d.php?t=444502 |
|
|

|
|
|
#20 |
|
Registered User
Join Date: Feb 2011
Location: Senatobia, MS
Posts: 1,295
|
Re: Markeb01 Build Thread
Quote:
looks great.
__________________
Once a Marine, always a Marine! My (Her) 57 Build "Beverly" My 66 Build "Betty" My 85 C10 "Old Blue" Help Me Find "Old Blue" OLD BLUE PART II |
|
|

|
|
|
#21 |
|
Registered User
Join Date: Apr 2012
Location: Searcy, AR
Posts: 4,203
|
Re: Markeb01 Build Thread
Very Cool!!! I always enjoy checking in...

__________________
DON Proverbs 27:17  US Air Force Retarded errr Retired My '65 Stepper Build:http://67-72chevytrucks.com/vboard/s...d.php?t=533920 My '60 Rusty Patina Build:http://67-72chevytrucks.com/vboard/s...66#post7402266 My '72 http://67-72chevytrucks.com/vboard/s...59#post7204359 SOLD |
|
|

|
|
|
#22 |
|
Senior Enthusiast
Join Date: Feb 2007
Location: Spokane Valley, WA
Posts: 8,356
|
Re: Markeb01 Build Thread
Thanks for the comments. If all goes well today, my new floor console will arrive in the mail and get installed between the seats later today. New photos to follow soon. And thanks for stopping by.
__________________
My Build Thread: http://67-72chevytrucks.com/vboard/s...d.php?t=444502 |
|
|

|
|
|
#23 |
|
Registered User
Join Date: Apr 2012
Location: Searcy, AR
Posts: 4,203
|
Re: Markeb01 Build Thread
Looking forward to seeing the direction you go... grabbing a bag of popcorn as I will surely enjoy the show!

__________________
DON Proverbs 27:17  US Air Force Retarded errr Retired My '65 Stepper Build:http://67-72chevytrucks.com/vboard/s...d.php?t=533920 My '60 Rusty Patina Build:http://67-72chevytrucks.com/vboard/s...66#post7402266 My '72 http://67-72chevytrucks.com/vboard/s...59#post7204359 SOLD |
|
|

|
|
|
#24 |
|
Senior Enthusiast
Join Date: Feb 2007
Location: Spokane Valley, WA
Posts: 8,356
|
Re: Markeb01 Build Thread
Well here it is! I intend to paint it black, but I'm thinking of leaving it alone until I get tired of the reddish color:
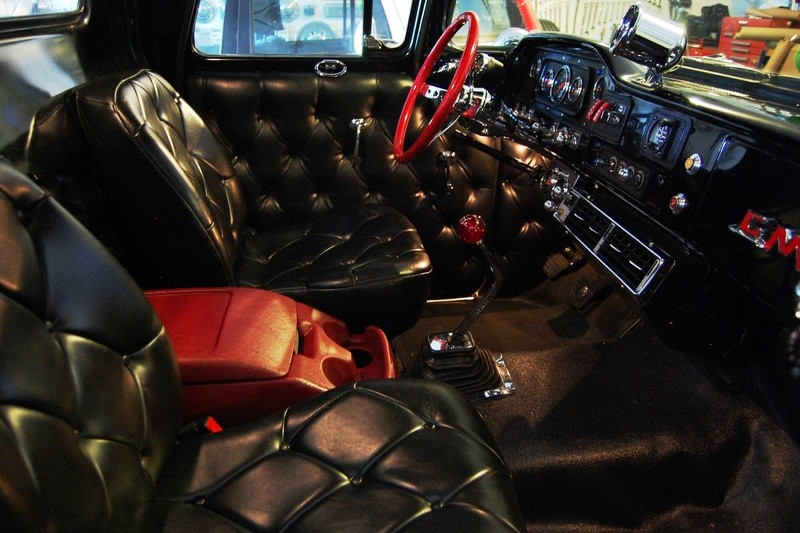 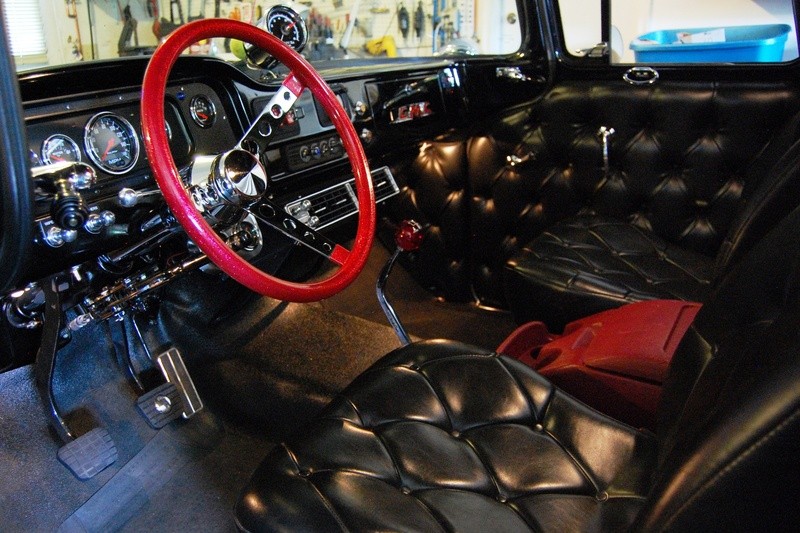 It absolutely fits perfectly, with space all around and room to open the lid easily. Seat belts fit/work perfectly, and there's room for two drinks in front. And now I have a place for the paperwork that shows vehicle ownership.
__________________
My Build Thread: http://67-72chevytrucks.com/vboard/s...d.php?t=444502 |
|
|

|
|
|
#25 |
|
Registered User
 Join Date: May 2007
Location: Deale Md
Posts: 4,663
|
Re: Markeb01 Build Thread
It's more important not spill your cold beverage while slapping the 4 speed.
__________________
James 63 GMC V6 4speed carryall 65 chevy swb bbw V8 auto 68 K20 327/4 speed, buddy buckets 2002 GMC CC Dually Duramax 64 GMC lwb 3/4 V6 4speed SOLD 66 GMC swb bbw buddy buckets SOLD IG duallyjams The only thing that stays the same is constant change! |
|
|

|
 |
| Bookmarks |
|
|