
 |
|
|
#201 |
|
Senior Member
Join Date: Aug 2002
Location: Valley Center KS
Posts: 3,524
|
Re: Project No-buck!
Pictures!
Here is the new engine in its home 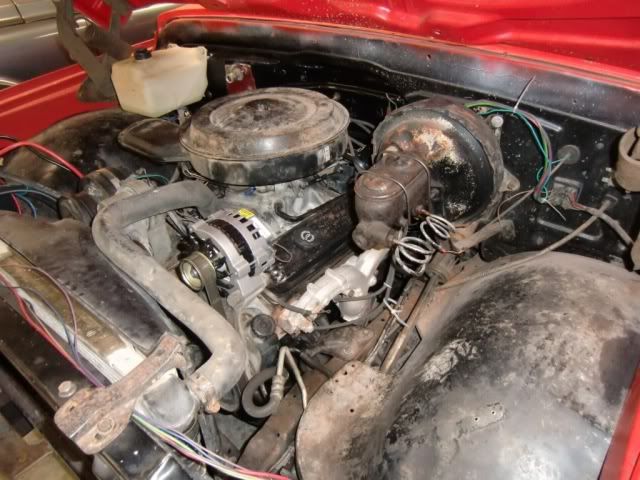 Here is the fuse block I used and the ALDL connector. I won't have a glove box, which is kind of annoying since I just got a new cardboard glove box in Sept. Oh well. 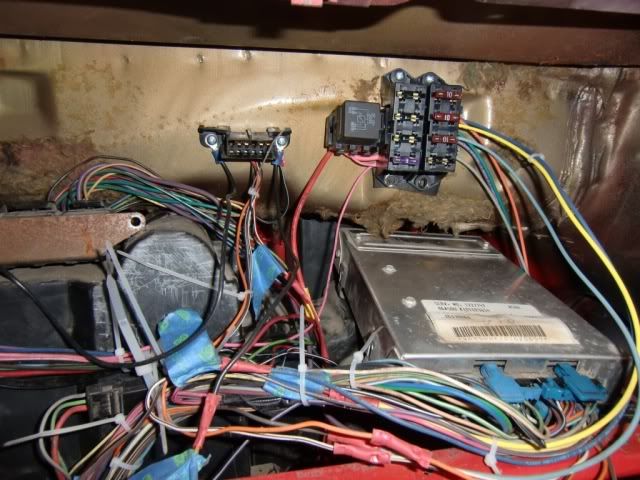 Here is a shot with no air cleaner so you can see the distribution block a little better. Also, the maroon panel is not finished yet. Basically it will be removable so you can get the A/C unit out. I have to make a sheetmetal frame around it that I'll weld to the red panel and then it will screw to the firewall and then seal with some foam weather stripping. 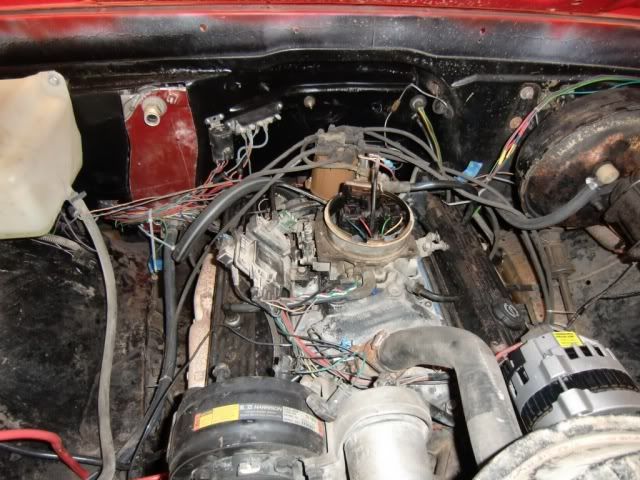 Here is the heater controls. I'm not sure if I'm going to mount it in the radio spot or down in the original location. The little control box is pretty deep, so I'm not sure where I'll have room for it. Or the ashtray (not that I need one), or the radio. I'll figure that out when I get to the diverter box. 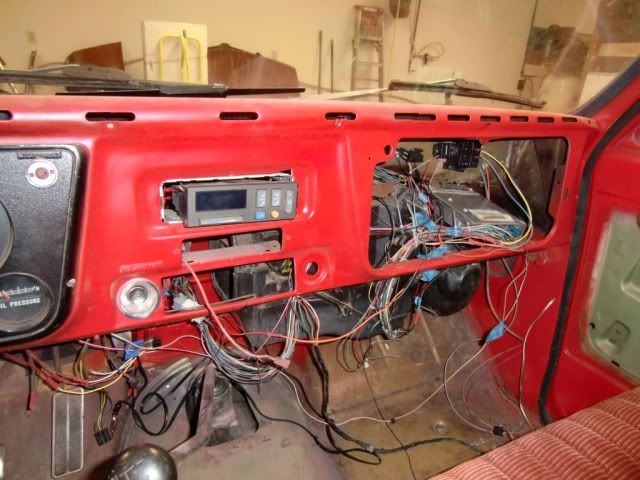 Here you can see how much I had to move the firewall out. In addition to this and the cutout area, I also had to trim about an inch off the bottom of the dash. 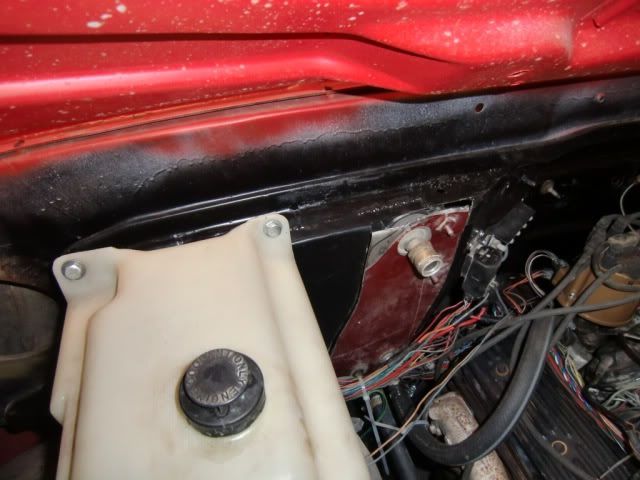 Like I said in an earlier post, I wouldn't recommend doing this and I'm not even done with it. I still have the diverter box, R-134 retrofit and posibbly the fresh air conversion. |
|
|

|
|
|
#202 |
|
Senior Member
Join Date: Aug 2002
Location: Valley Center KS
Posts: 3,524
|
Re: Project No-buck!
So today I had the alternator tested at the parts store. Just as it showed during my bench testing, it was bad. So new alternator got installed as well as a new fusible link. The previous fusible link was a 16g, and now (and the original one) is a 12g feeding a 8g wire down to the starter.
After I got that figured out I mounted up the overflow tank with an L bracket and a bolt. Hooked up a few misc. wires and took it out for a spin around the block. Went around the block with no hood, pretty classy! I made it back home with no issues. No the engine was warm, so I set the timing. I had stabbed the dist in as close to 6 degrees advanced as I could (I set the timing mark on 6, then tried to align the cap with the #1 location). When I checked, the initial timing was 0.....so not too bad. Bumped it up to 6 with the timing light (after disconnecting EST connector). Then I put the hood on. In the process of doing that my air rachet got away from me and knocked me smack dab in the middle of the forehead. It started bleeding, and swelled up, but that didn't stop me  I went for a "real" test drive. Got down the street and had the first "issue" The water pump bolts were hitting the e-fan motor (just a little) as the engine/chasis moved. I loosened the radiator mounts and pulled the radiator as far forward as I could using those mounts. It was good enough for the rest of the test drive. Continuing on, I drove around for about 20 min. getting up to about 60mph. Engine just chucks along. It has more power than my worn out carbed 350 I took out and is quieter. However, it does have an exhaust leak. I'm pretty sure it is coming from the manifold to head sealing surface. Some old gasket material is baked onto it. I tried scraping/grinding/sanding it flush, but obviously not good enough. I'll probably get a different exhaust manifold. Its really annoying though. I went for a "real" test drive. Got down the street and had the first "issue" The water pump bolts were hitting the e-fan motor (just a little) as the engine/chasis moved. I loosened the radiator mounts and pulled the radiator as far forward as I could using those mounts. It was good enough for the rest of the test drive. Continuing on, I drove around for about 20 min. getting up to about 60mph. Engine just chucks along. It has more power than my worn out carbed 350 I took out and is quieter. However, it does have an exhaust leak. I'm pretty sure it is coming from the manifold to head sealing surface. Some old gasket material is baked onto it. I tried scraping/grinding/sanding it flush, but obviously not good enough. I'll probably get a different exhaust manifold. Its really annoying though.Then I had a collision during the test drive. A bird flying low to the ground got in my way and go hit. I felt it when I hit him. When I got home I looked for where it hit....the wheel. There is blood, guts, and feathers all over the front pass. side wheel. I guess at 60mph, Boss 338s can be deadly  I'll get that cleaned up shortly so it doesn't mess up my wheels. I'll get that cleaned up shortly so it doesn't mess up my wheels.Once I got home I removed the radiator mounts and slotted the holes so I could move the radiator forward a little more. Now I have plenty of room between the e-fan and the water pump bolts. Finally, I was planning on using the donor trucks bench seat. I know these are pretty popular swaps, but I just didn't like it. So I'll be sticking with my stock bench. Eventually I may get it recovered. My biggest complaint is that it has been recoverd before and is kind of "overstuffed". Oh well. |
|
|

|
|
|
#203 |
|
Still Learning
Join Date: Jul 2009
Location: Central Oklahoma
Posts: 10,108
|
Re: Project No-buck!
I know you said it was "easy" but you made that engine swap look like a weekend oil change....... Just saying. I am impressed. Too bad for the little bird getting in your way
 Keep the pictures coming. Keep the pictures coming.
|
|
|

|
|
|
#204 |
|
Senior Member
Join Date: Aug 2002
Location: Valley Center KS
Posts: 3,524
|
Re: Project No-buck!
A little progress on the A/C diverter box setup. Last night I did a little measuring, and found that I needed to take out an additional 1-1/2". So I did that, and did a little fitting up, cut the blades to length, epoxied one of the blades together and welded the other blade together.
As I was cutting the box apart with my body saw (very handy little air powered hack saw if you don't know what they are) I noticed that the plastic would melt from the heat of the blade, and stick back together, so after the cut, I had to break the piece apart...no big deal though. So today I was at work and thought about this and figured rather than epoxing the diverter box halves together and having to wait a day for the epoxy to set up before moving on, why don't I "weld" them together. So I made a couple of metal reinforcing plates and riveted them to the box and then used my soldering iron (cheapy I've had for awhile) to melt the pieces together. I used some of the scrap pieces as my "filler rod" and kinda worked it like a tig welder. It worked incredibly well actually. Here are a few pictures: Lower half: 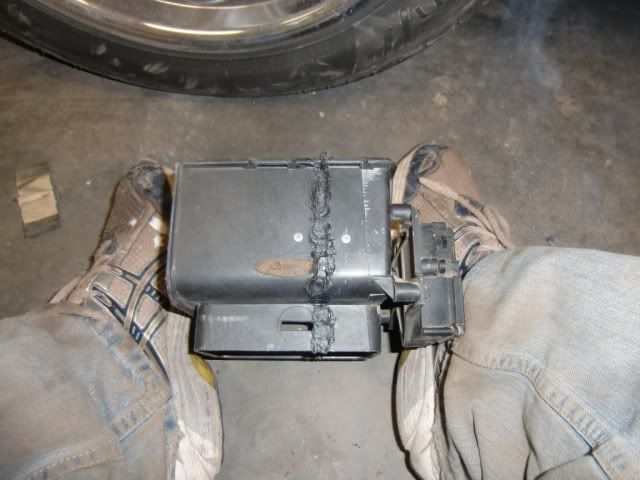 Upper half after being welded. You can also see that a little sanding cleaned up the "bead". A little black paint will make it look nicer. 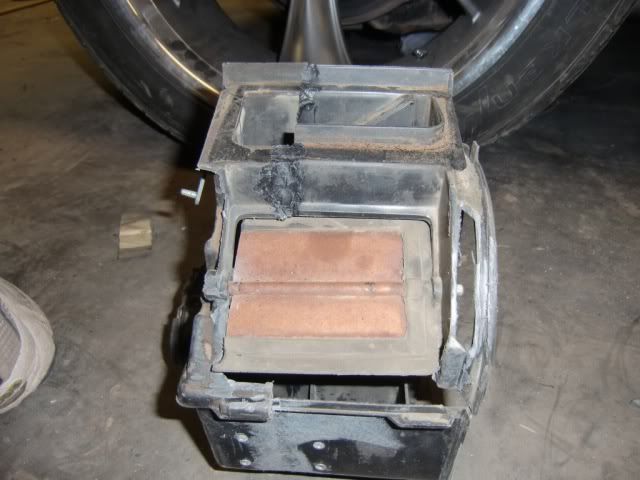 Then I tried to put it in the truck for a test fit. Well guess what? It doesn't fit. The lip on the upper piece is preventing it to move high enough to mount into the rest of the box. It was getting late, so I called it a night. |
|
|

|
|
|
#205 |
|
Still Learning
Join Date: Jul 2009
Location: Central Oklahoma
Posts: 10,108
|
Re: Project No-buck!
That sucks. Sorry to hear about that.
|
|
|

|
|
|
#206 |
|
Man of Mini-Talents
Join Date: Sep 2009
Location: Oklahoma City, OK
Posts: 4,295
|
Re: Project No-buck!
That's some cool ingenuity!
Posted via Mobile Device
__________________
Steve Project - Ruth 66 Skylark Project - Lola 60 Biscayne Project - Iron Ox 54 GMC 100 Project - Darth 69 Camaro |
|
|

|
|
|
#207 |
|
Senior Member
Join Date: Aug 2002
Location: Valley Center KS
Posts: 3,524
|
Re: Project No-buck!
My diverter box fits in the space I have now, a little more modification was needed, but it fits. Now I need to get at least defroster working.
My initial thought was to use the "defrost" outlet on the diverter box, which is the upper rear outlet to possibly allow for "things" in the dash to be mounted there. I made a nice little sheet metal attachement to go on the rear outlet, and it fit the diverter box quite well. When I went to install it, it was a no go. It was hitting the wiper motor/pump and the radius on the back of the cowl. So Plan B on the diverter box: First the linkage to control the upper diverter flaps are broken/missing so I don't know that I could get that to work anyways. However the lower diverter does move fine (tested it tonight) so rather the fuss with the upper diverter flaps, I'm just going to remove them. Second, I'm going to use the front "vent" outlets for my defroster. I did a little measuring and there isn't enough room to mount the 2 defroster vents directly to it. So I was thinking of using something like a 4" x 2.5" tee. Maybe in PVC from the hardware store or use some scrap exhaust pieces from an exhaust shop. Kinda depends what is available. Then I can make another set of tees (later) that connect the defrosters and the vents (which there aren't holes in the dash for vents anyways). I'm thinking the exhaust would be easier, cause I can just weld the exhaust pipe to the sheet metal plate I"ll put over the diverter box and rivet the plate to the box, but we'll see. Also, my carpet is supposed to be showing up tomorrow, so I'm going to throw down some sound deadner and then the carpet! |
|
|

|
|
|
#208 |
|
Senior Member
Join Date: Aug 2002
Location: Valley Center KS
Posts: 3,524
|
Re: Project No-buck!
So today is my birthday, so I took the day off and worked on the truck!
So I put down my leftover sound deadner. I saved two sheets for the door panels I'm going to make. 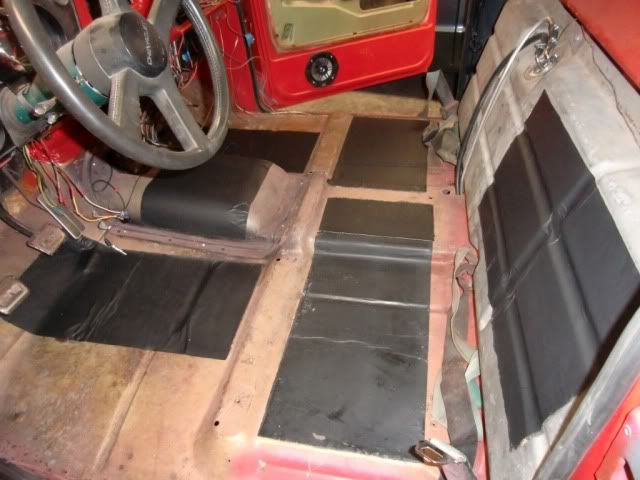 Later, I got the carpet installed: 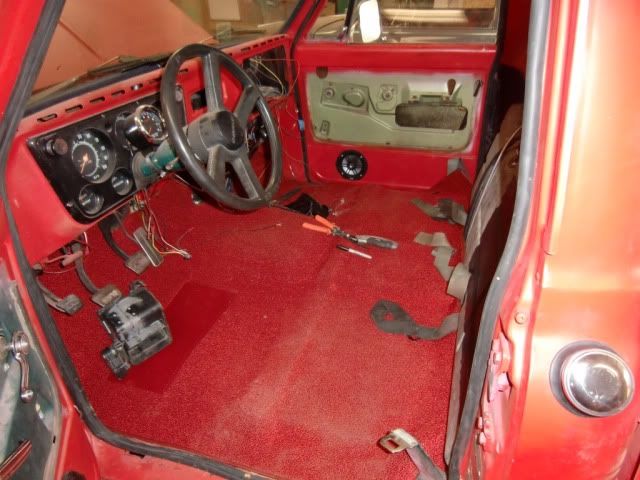 Mixed in the day I continued working on the diverter box. I stopped by the parts store on my way home from dropping my son off at day care. I got a 3" exhaust adapter and figured I could use the 2-1/4" exhaust to make a T out of. I also cut out the middle "bar" in the top of the diverter box: 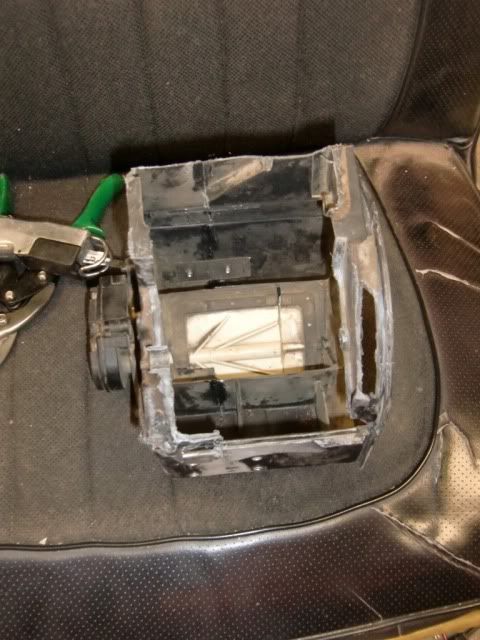 And made a sheemetal cover for it: 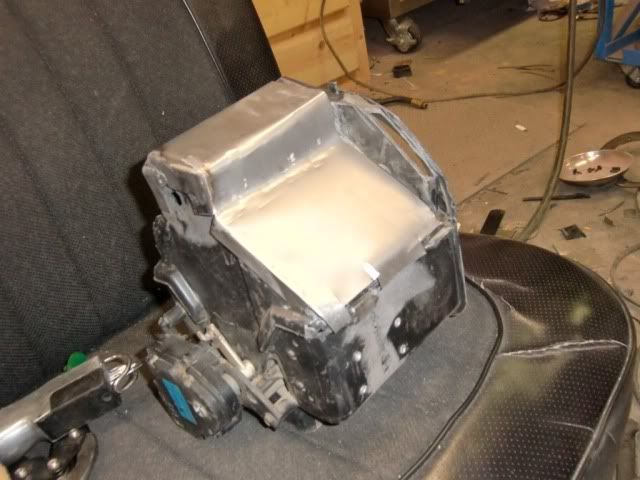 And then welded the tee up, and welded it to the cover, riveted the cover to the box, and hit it with a little spray paint. Here's the finished product: 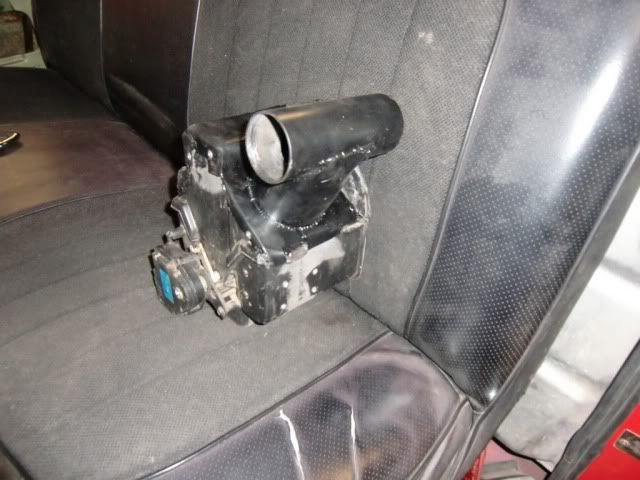 The tee is rotated just a little to help it clear the wiper motor. Then I turned my attention to the bench seat. I picked up some cable the other day at home depot to fix the lever that lets you move the seat forward and backwards. I used a turnbuckle to make it adjustable: 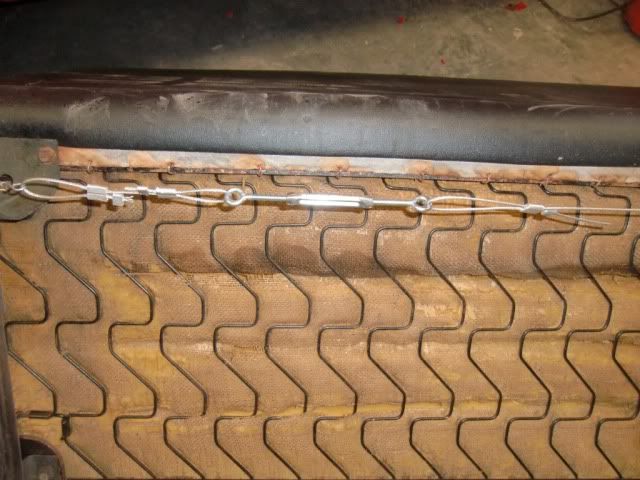 The spring retainer on the pass. side was broken, so we'll see if I can find someone who sells a replacement. Then I moved back to the A/C controls. The A/C unit makes behind the dash space very tight. The A/C controls (in stock form) angles downwards and is fairly deep. I thought the spot for the radio would be a good place for it. Initially it was hitting the tee that I'd made and wouldn't slide in unless the face was really angled down. I got to looking at it and the controler would come apart. I took it apart and there is a circuit board that sticks out from the face. I was able to gently bend the circuit board up, remount the cover and used a spacer the maintain its new angle, and put the screws back in. Slid it in place and it looks pretty good: 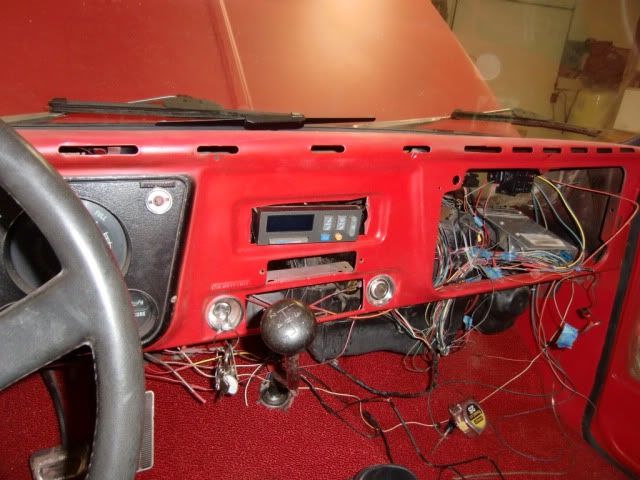 I'll have a little more work to do to actually mount it in place, as well as make a plate to cover the gaps around the controls. Also, no room for the ash tray. Right now the ash tray is removed as well as the "track" that it slides on. I'm going to remove just the front cover plate and put in place just to cover the hole in the dash. I haven't decided how I'll mount it there. I'm leaning towards rivets, but we'll see if I can come up with something that can't be seen from the front. For the hole where the original heater controls were I'll probably just make a blank off plate. I really wish I could mount my CD player there, but there just isn't any room for it. I may eventually mount some other guages there, but not for sure. So I also need to figure out where to mount the CD player. Not sure what I"m going to do yet. My last thing I did was replaced the exhaust manifold gasket on the pass. side. Then I took it out for a test drive. The exhaust leak was stopped and with the sound deadening and carpet it was MUCH quieter. I drove around for about 20 min, getting up to 70 mph and the engine drives real smooth. It did have some pinging, especially when I shifted, so I'll have to back the timing off just a little. Overall the truck ran great, and the heat was working great. I had to turn it down cause it started to get a little warm driving around  Best of all, no animals were harmed during this test drive. Best of all, no animals were harmed during this test drive.
|
|
|

|
|
|
#209 |
|
State of Confusion!
  Join Date: Jul 2002
Location: Gulfport, MS USA
Posts: 47,216
|
Re: Project No-buck!
Well Happy Birthday. You got a good bit done..
__________________
Bill 1970 Chevy Custom/10 LWB Fleetside 2010 Toyota Tacoma PreRunner SR5 Double Cab - DD Member of Louisiana Classic Truck Club (LCTC) Bill's Gallery Life isn't tied with a bow, but it's still a gift. Live simply. Love generously. Care deeply. Speak kindly. Leave the rest to God! |
|
|

|
|
|
#210 |
|
Man of Mini-Talents
Join Date: Sep 2009
Location: Oklahoma City, OK
Posts: 4,295
|
Re: Project No-buck!
You got a lot accomplished on your birthday! I hope you had some time for some cake. Sounds like you had a great time do
Posted via Mobile Device
__________________
Steve Project - Ruth 66 Skylark Project - Lola 60 Biscayne Project - Iron Ox 54 GMC 100 Project - Darth 69 Camaro |
|
|

|
|
|
#211 |
|
Man of Mini-Talents
Join Date: Sep 2009
Location: Oklahoma City, OK
Posts: 4,295
|
Re: Project No-buck!
Happy Birthday!
You got a lot accomplished, hope you had time for some cake. Posted via Mobile Device
__________________
Steve Project - Ruth 66 Skylark Project - Lola 60 Biscayne Project - Iron Ox 54 GMC 100 Project - Darth 69 Camaro |
|
|

|
|
|
#212 |
|
Still Learning
Join Date: Jul 2009
Location: Central Oklahoma
Posts: 10,108
|
Re: Project No-buck!
Happy belated birthday! I wish I had half the energy of you younger guys. It makes me feel old just reading how much you get done in short period of time. Super impressed with the climate control install.
|
|
|

|
|
|
#213 |
|
Senior Member
Join Date: Aug 2002
Location: Valley Center KS
Posts: 3,524
|
Re: Project No-buck!
Got a little more done yesterday. Not real exciting though.
I got the flywheel cover installed Dipstick installed, forgot about this, so it was blowing a little oil out the hole and my starter had a little oil on it. No biggie  Then I started on the cruise control. First I mounted the cruise control module on the firewall. I was able to use an existing hole and an existing stud to mount it. Sorry no pictures, but it is right above where the wiring factory wiring harness comes through the firewall. I had to drill one hole for the third bolt. Then I routed the cable over the MC bracket and to the throttle body. Easy  Now on to the wiring. It needs a power supply and ground as well as a speed signal. I tapped into my new fuse box for an ignition power source. I tapped into the same speed signal wire that is going to the ECM. Now on to the wiring. It needs a power supply and ground as well as a speed signal. I tapped into my new fuse box for an ignition power source. I tapped into the same speed signal wire that is going to the ECM. Then I needed the switch. What to do? I thought about using the donor trucks cruise/turn signal zip tied to my regular turn signal lever. Then I got to thinking, why not just make it all one. So I removed both turn signal levers, marked the length and orientation, and then welded them together (sorry for the crappy cell phone pics): 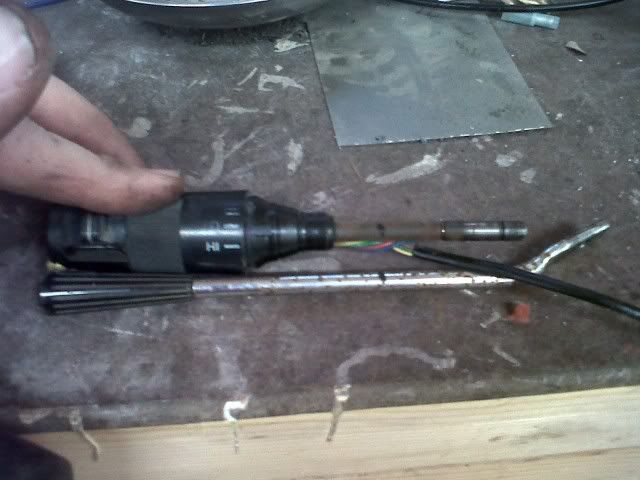 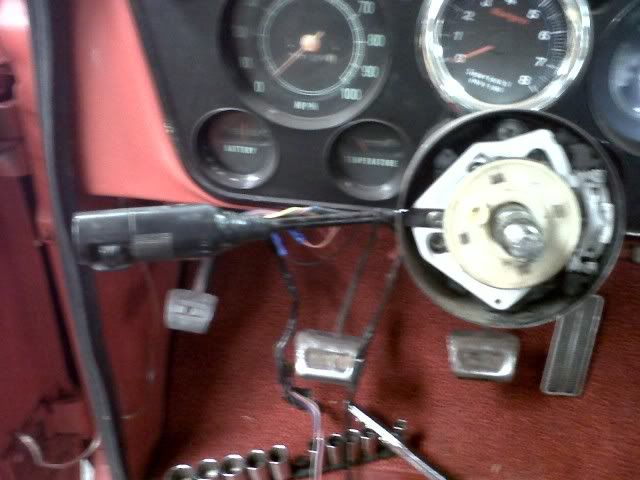 Then since I don't have the appropriate brake switch (nor a clutch switch) I jumpered those to wires for testing purposes. I went for a test drive up to about 55mph. I couldn't get the cruise to engage. I have a couple of suspicions why its not working. My first is the min. engage speed. First my speedo is off, when I'm going 55, my speedo read 35. And then the cruise control box is supposed to recieve a 4000 pulse/mile signal. My VSS sensor is putting out a 2000 pulse/mile signal required by the ECM. So rather than the cruise control thinking I'm going 55 (like I was) it was thinking I was going ~17. I'm trying to verify there is a min. speed, but IIRC there is. Next I'll also check the wiring, making sure everything is getting power and is grounded, the switch is working correctly, bla bla bla. I may have to get a little converter box to get the speed signal corrected to get the cruise to work. Dakota digital sells one that I know of. I drove the truck to work today, so its back to daily driver duties  No radio sucks! Its on my to do list No radio sucks! Its on my to do list 
|
|
|

|
|
|
#214 |
|
Senior Member
Join Date: Aug 2002
Location: Valley Center KS
Posts: 3,524
|
Re: Project No-buck!
I was talking to a guy at work about No-Buck and describing all of the little modifications and stuff I've done (he's restoring a 40s Pontiac with a sbc 400 in it) and he has started calling me the mad scientist
 Last night I did lots of little things. I realized that I didn't have any taillights, so I got those plugged in, got the reverse lights working, got the internal button lights on my heater controls working, cleaned and installed the passenger side sun visor, and backed off the timing a little to stop the pinging. I also installed a cool retractable underhood light from the donor truck. My mirrors vibrate a lot while driving so I attempted to tighten the drivers side down a little. Well it was still moving. I looked at it and there is basically a threaded "tube" inside of the thin wall outer metal tube holding the arm on. So when I was tightening the bolt, the outer metal tube was just slightly moving up the inner tube (poor design) so I took that off and tack welded the two together and re-installed. Now it doesn't seem to vibrate as much. After doing some research on the cruise control, I'm thinking I'm going to have to spend some more money to get it to work. I'm going to have to buy this converter box: http://www.summitracing.com/parts/DAK-SGI-5/ 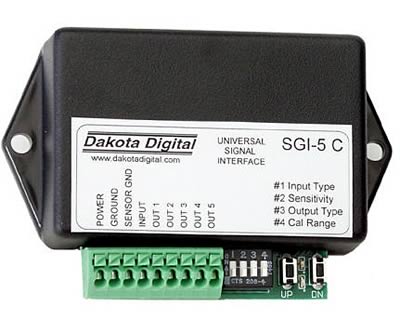 It will put out the proper sine wave signal to the cruise control box. Not real happy about spending more money, but hey, I want cruise control. I'm driving this truck for work now, and quite often I make a 300 mile roundtrips to power plants I'm doing work at. I also got to thinking about the location of the radio and heater controls. Here is what I came up with. I'm going to cut the dash (its already cut) and move the radio opening up about 1-1/2" and that willl give me the room to put the radio in. This should put it just below the dash pad (when I get one). I'll then fill everything in and hopefully you won't notice it unless you know what you are looking for (so all of US would notice :P). For the heater controls I'm going to do some modifications. The controls consist of 2 circuit boards mounted at 90 degrees to each other. The display and circuit board 1 are about 2" deep. The second circuit board is about 6 inches deep and is attached to the first circuit board with soldered jumper connections, and then held in place with the plastic cast that slides over it. So I'm going to unsolder the jumpers, and make them 2 separate piece. I can remote mount the large circuit board somewhere and just have to worry about mounting the small part with the actual controls where they're accessible....in the stock heater control location. I'll have to make a connector/wiring setup to go between the two. I'm also going to add an H-pipe. I cut the exhaust off before the axle, so I have extra exhuast pipe just laying there, so I figure why not? It should help power/mileage just a little, and possibly make it a little quieter. |
|
|

|
|
|
#215 |
|
On the fast track to nowhere..
Join Date: May 2006
Location: Splendora, Texas
Posts: 5,316
|
Re: Project No-buck!
Looks like you already have the cruise figured out but it does carry a 25 mph minimum for the cruise to engage.
__________________
-Mike Owen- Norwood, Houston, Cecilia, Jackson, Monroe and counting |
|
|

|
|
|
#216 | |
|
Still plays with trucks
Join Date: Jul 2009
Location: Spokane, WA
Posts: 3,556
|
Re: Project No-buck!
Quote:
The TBI build tread gives a bunch of info on them and how to modify them to fit your combination. They have several outputs. One of the primary outputs is the correct signal for cruise to work properly.
__________________
miSSed opportunity - ground up creation of an AWD 1994 454 SS that never was http://67-72chevytrucks.com/vboard/s...d.php?t=795577 69 C10 shortbed stepside 400 small block - built like what a super sport truck could have been 69 K20 lwb TBI 350 4L60E NP208 14-bolt Dana-44 w/disc 68 Camaro SS / RS 500hp 439 inch roller cam big block 4L80E 79 Malibu TPI 350 4L60 w/ Z28 steering & sway bars |
|
|
|

|
|
|
#217 | |
|
Senior Member
Join Date: Aug 2002
Location: Valley Center KS
Posts: 3,524
|
Re: Project No-buck!
Quote:
|
|
|
|

|
|
|
#218 |
|
67cheby
 Join Date: Sep 2008
Location: siloam springs ar 72761
Posts: 17,890
|
Re: Project No-buck!
if you end up not using the 2000 pulse one i would be interested in it
|
|
|

|
|
|
#219 |
|
Senior Member
Join Date: Aug 2002
Location: Valley Center KS
Posts: 3,524
|
Re: Project No-buck!
Got a few things done this weekend.
Removed the throttle body and rebuilt it (kinda like rebuilding a carb) Nothing exciting there. I'm going to run some injector cleaner in the tank too. When I get on the freeway, and start to accelerate, it seems to kinda have a hard time about 2800rpms, a little past that its ok. So I figured I'd clean the tbi and see if that doesn't help. I also removed the hot air diverter flap in the air cleaner assembly for the same reason. I took out the steering column and installed a new lower bearing. While I had it out, I repainted it a gloss red. The dash is satin red, so the contrast of finishes kinda give it a nice pop. I also started on the R134 retrofit. Went to autozone and got a "retrofit kit" which basically includes the quick disconnects for the A/C lines and some refrigerant. While I was there I also got new O-rings. Figure since I have it all apart I might as well do that (and it seems like somewhere I read that you needed to change them for the retrofit....but it wasn't included in the "kit". I also got a new orifice tube. I was thinking you were supposed to use a new one for the retrofit too, but their computer listed it for both refrigerants. I figured for $1.99 I'd go ahead and put a new one in. Then I got home and finished up my removable firewall plate by welding a ~1-1/2' "frame" around the removable piece. I welded the "frame to the removable piece, and then was able to use some sheet metal screws to attach it to the rest of the firewall. I also put some weather striping on the back of it, so hopefully hot air doesn't leak through. Then I attached the acummulator and some of the hoses. Finally I put in the condensor. I pretty much just fits in front of the radiator opening. I had to bend one of the tubes a little and then the hood latch plate kinda smashes it a little (not much at all). I secured it using another sheetmetal screw and a zip tie on one side. I'll make a little bracket to replace the zip tie some time, but for now it will work. I'll get some pictures later. |
|
|

|
|
|
#220 |
|
Senior Member
Join Date: Aug 2002
Location: Valley Center KS
Posts: 3,524
|
Re: Project No-buck!
I took my first long trip in this truck last Friday.
The good news: I drove about 300 miles without any issues. The bad news: My gas mileage and power were not very good. Most of the way is turnpike going 75mph. With my setup this puts the truck right about 2500 rpms. On the way (Topeka to Wichita for some of you locals) there are many long hills to climb. Well on several of them, the truck couldn't maintain speed "comfortably" meaning I would have really had to push it hard if I wanted to maintain 75. At 2500 rpms, I would think that it would have plenty of HP available to maintain that speed. I filled up before I left, drove to my destination and filled up again (~150 miles): 11.6 mpg  . The I drove back home (another 150 miles) and filled up once I got home again: 12.2mpg . The I drove back home (another 150 miles) and filled up once I got home again: 12.2mpg   Nothing close to the 20mpg I was hoping for. Nothing close to the 20mpg I was hoping for.I'm going to do a couple of things. First, hook up my vss. On the TBI engines the ECM is supposed to use the vss to lean out the engine at highway speeds as well as other things. I had it hooked up for awhile and didn't notice any differences, and I was trying to get the cruise control to work (still working on that, but I think I have a plan to get it working). Next I'm going to change out the oxygen sensor. I didn't change it when I put the engine in and I'm not getting any check engine lights, but for $20 I don't think it can hurt and a bad O2 sensor could be causing both the poor economy and poor power conditions I'm seeing. Overall the truck was fun to drive. It is however, very loud. This is mainly due to the vent windows leaking air....and at 75 it gets loud. I have to make essentially the same trip again this Friday, and hope to get these changes made before then and I'll report back with the results. |
|
|

|
|
|
#221 |
|
Registered User
Join Date: Nov 2010
Location: Chandler, Arizona
Posts: 295
|
Re: Project No-buck!
Very Nice built.
__________________
My build thread for Project TiC TaC/Jazzmin Oh Yeahhh Cheap work is never good and good work is never cheap. Lesson = learn to do it all the right way on your own.  SqueegeeMan |
|
|

|
|
|
#222 |
|
Still plays with trucks
Join Date: Jul 2009
Location: Spokane, WA
Posts: 3,556
|
Re: Project No-buck!
There is no reason you should be getting that bad of gas mileage if everything in the TBI system is working right. Definitely hook up the VSS.
My 91 Z71 with 33x12.50 tires and 1000 pounds more vehicle weight than you have knocked down 17 mpg on freeway trips at a very similar RPM. There is something not working right in the system. Is your check engine light working? Can you check for codes? Do you have a data cable so you could hook up a laptop and run TunerPro RT on there while you are driving to data log what is going on?
__________________
miSSed opportunity - ground up creation of an AWD 1994 454 SS that never was http://67-72chevytrucks.com/vboard/s...d.php?t=795577 69 C10 shortbed stepside 400 small block - built like what a super sport truck could have been 69 K20 lwb TBI 350 4L60E NP208 14-bolt Dana-44 w/disc 68 Camaro SS / RS 500hp 439 inch roller cam big block 4L80E 79 Malibu TPI 350 4L60 w/ Z28 steering & sway bars |
|
|

|
|
|
#223 | |
|
Senior Member
Join Date: Aug 2002
Location: Valley Center KS
Posts: 3,524
|
Re: Project No-buck!
Quote:
I'm not sure that the VSS is working correctly. Like I said I could tell no difference with it hooked up, and on the dakota digital box, it has a light that is supposed to blink when it is seeing a speed signal and it never did blink when it was hooked up. I'm going to borrow a fancy dmm from work that will read ac frequency and see if it shows anything, and if not send it back for a different one. I have a data cable, but not sure if it will work. I originally got it for my volkswagen jetta tdi, but I think its just a generic cable. I'll have to look into that more. Got a place to go read some info on what all is needed for tunerpro? |
|
|
|

|
|
|
#224 | |
|
Still plays with trucks
Join Date: Jul 2009
Location: Spokane, WA
Posts: 3,556
|
Re: Project No-buck!
Quote:
What about swapping the speedo guts for one from a square body that uses the speedo mounted optical VSS system that runs the stock TBI trucks? Do you have the neutral safety switch wired into the ECM as well? I guess it would be the clutch engaged switch on your truck with the SM465. The ECM changes things tune wise when it thinks the rig is in park / neutral vs. in gear.
__________________
miSSed opportunity - ground up creation of an AWD 1994 454 SS that never was http://67-72chevytrucks.com/vboard/s...d.php?t=795577 69 C10 shortbed stepside 400 small block - built like what a super sport truck could have been 69 K20 lwb TBI 350 4L60E NP208 14-bolt Dana-44 w/disc 68 Camaro SS / RS 500hp 439 inch roller cam big block 4L80E 79 Malibu TPI 350 4L60 w/ Z28 steering & sway bars |
|
|
|

|
|
|
#225 | |
|
Senior Member
Join Date: Aug 2002
Location: Valley Center KS
Posts: 3,524
|
Re: Project No-buck!
Quote:
|
|
|
|

|
 |
| Bookmarks |
|
|