
 |
|
|
#201 |
|
Registered User
Join Date: Aug 2011
Location: Barnum, Mn
Posts: 795
|
Re: Greg's 50 Build
That GTO is really coming along now and is mostly in primer. It sat idle today while we worked on my truck. Well, just my motor but I am really happy with it. This is both my and my dad's first engine build so we went slow and took our time. The only hiccup was that when I took the rebuilt heads out of the bags I saw the marks from past corrosion looked like crap. I wanted them to stay raw aluminum but I just painted them silver to match the front cover.
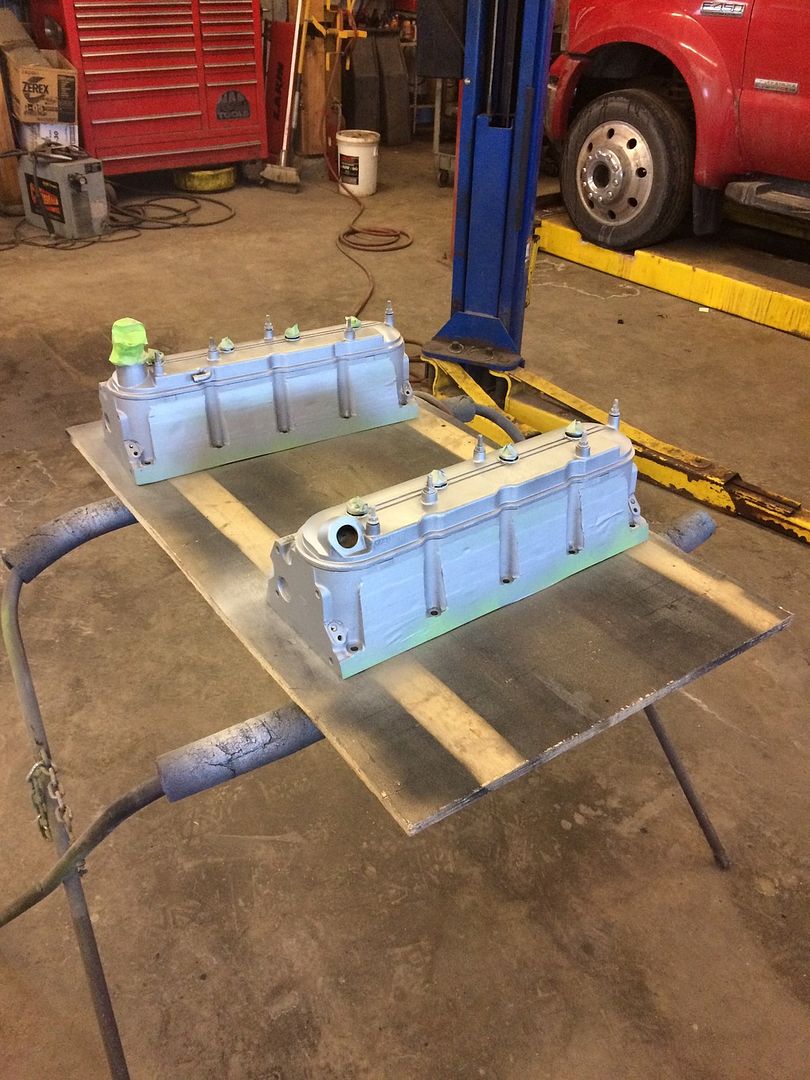 I then put it together. I think it looks really good. You might be able to see that I upgraded to the LS6 valley pan and PCV set up. 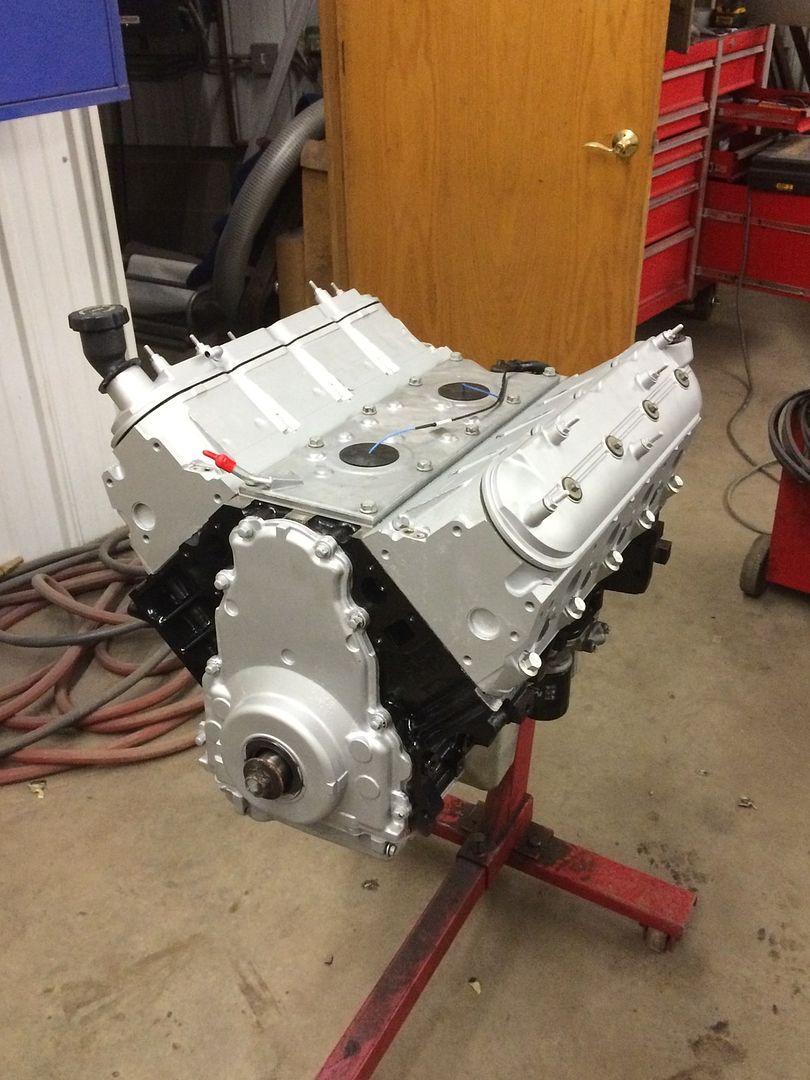 My intake is still in primer but I just had to sit it up there. I already sanded it smooth and removed all casting marks. Soon it will be gloss black. 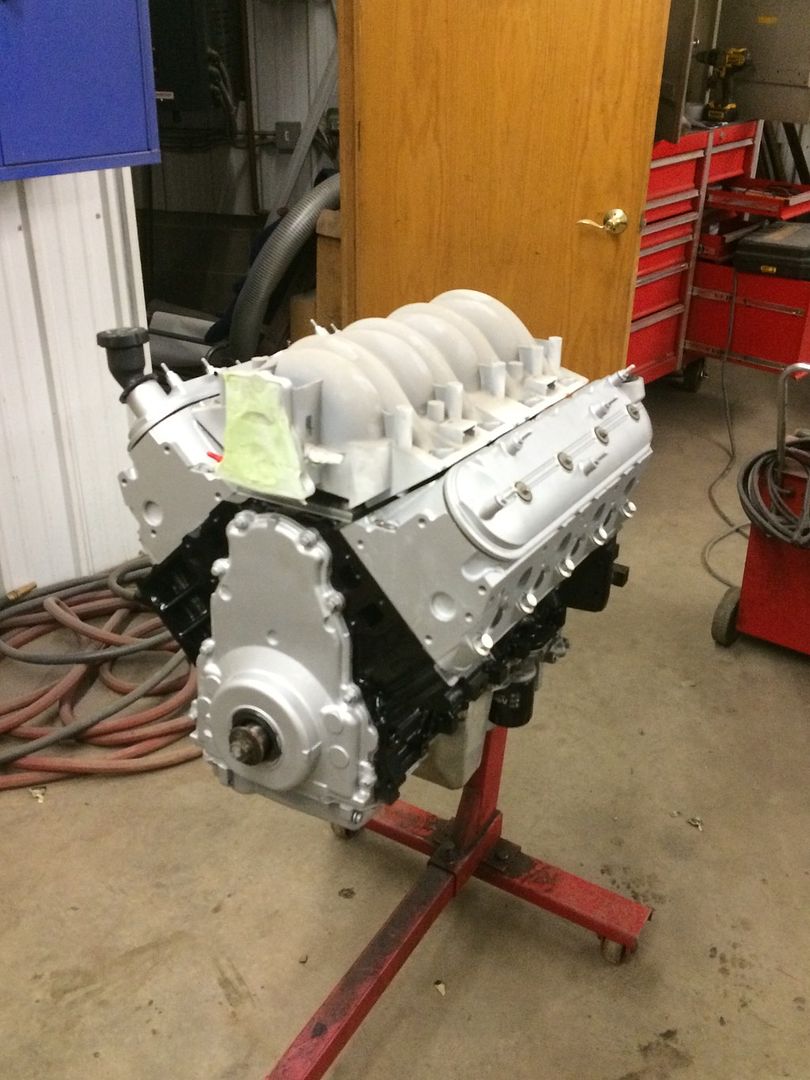
|
|
|

|
|
|
#202 |
|
Registered User
Join Date: Jan 2010
Location: Titusville, PA
Posts: 3,585
|
Re: Greg's 50 Build
looking good, always exciting to get an engine rebuilt and put back together. The little things most people wouldn't ever notice go a long way.
__________________
51' 99toLife finished 2011,355 sbc,5speed, patina, redoing whole truck, inter, bags, etc http://67-72chevytrucks.com/vboard/s...d.php?t=382481 49Hardtimes s/10 susp- bagged, vortec sbc, 5 speed, patina, sold http://67-72chevytrucks.com/vboard/s...d.php?t=594874 VIDEOS https://youtu.be/E8zHhjgS_lA https://youtu.be/E8zHhjgS_lA Geronimo 54' LS engine, static drop IFS, Client build, just about done http://67-72chevytrucks.com/vboard/s...62#post7399162 52' 3100 Slowly in progress, will be painted two toned, have 235 with a t-5, lowered OG frame Other projects, 49' farmuse 3100, killer Patina, will be slammed, LS engine, full done interior up next! www.coffeeandcustoms.com |
|
|

|
|
|
#203 |
|
Senior Member
 Join Date: Mar 2011
Location: West Plains, Missouri
Posts: 7,555
|
Re: Greg's 50 Build
Looks good...Jim
__________________
my build thread: http://67-72chevytrucks.com/vboard/s...d.php?t=459839 Jimbo's long bed step build:http://67-72chevytrucks.com/vboard/s...t=464626<br /> |
|
|

|
|
|
#204 |
|
Registered User
Join Date: Aug 2011
Location: Barnum, Mn
Posts: 795
|
Re: Greg's 50 Build
Thanks for the nice words on my motor. I have also had that intake project going. I had originally ordered an LS6 intake with throttle body, rails, and injectors which wasn't cheap used.. I think I paid around $400 or so but I forget. Unfortunately the box was damaged in shipping and the intake was broken. The seller sent me a new one with everything so I ended up with two of everything. I wanted to try my hand at smoothing and painting my intake so the broken one was a prime candidate for practice and if I blew it I had a good one on the shelf.
All the guys on LS1tech said that you can't repair the Nylon 6/6 thermo plastic so the intake was junk. I'm too stubborn for that so I did some research. I mean why put all the time in to making it pretty if its junk, practice or not. I had to try and fix it. Lets start with the damage,its dirty but you can see the hole where the MAP and vaccume for the brakes got smashed though... 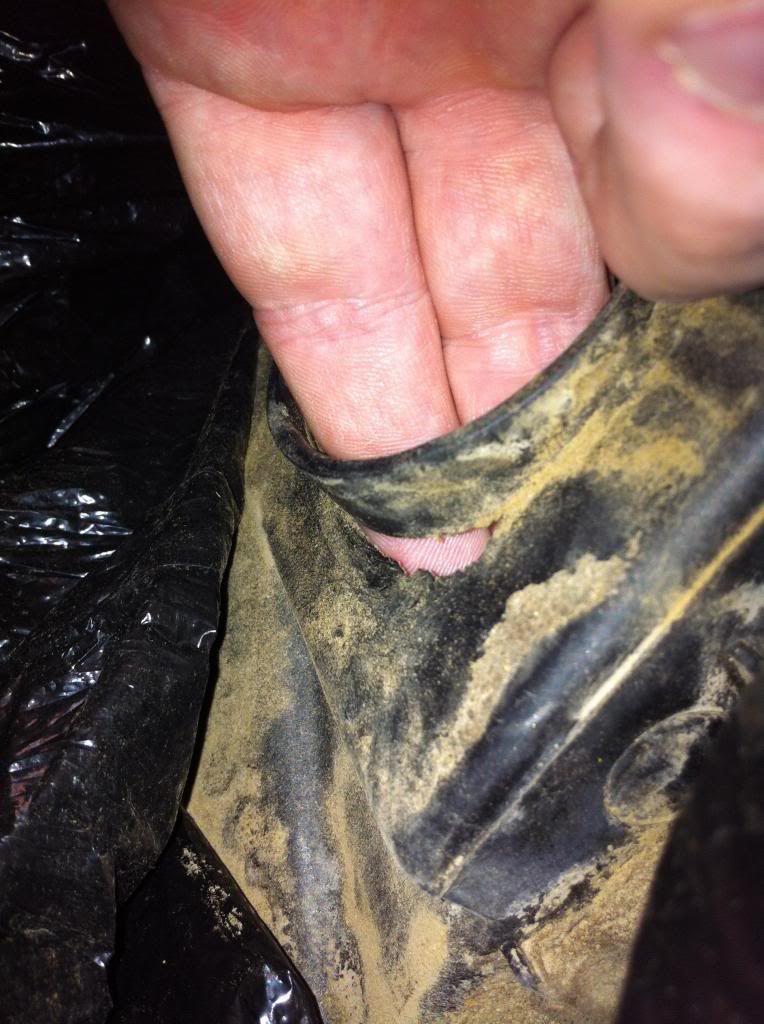 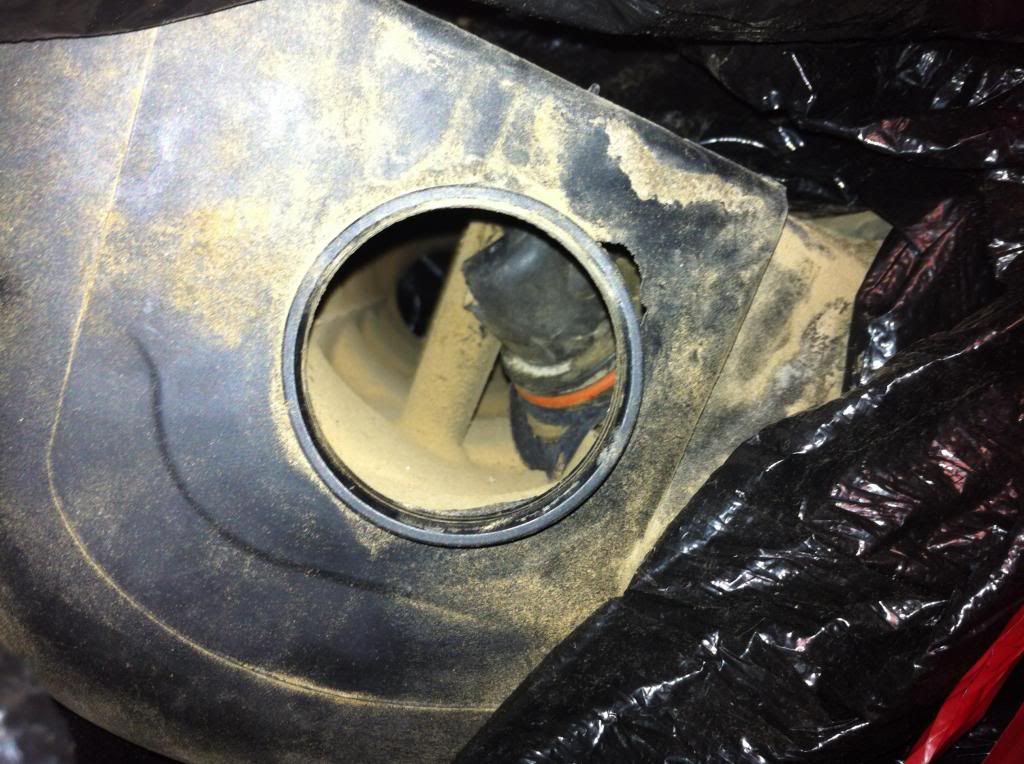 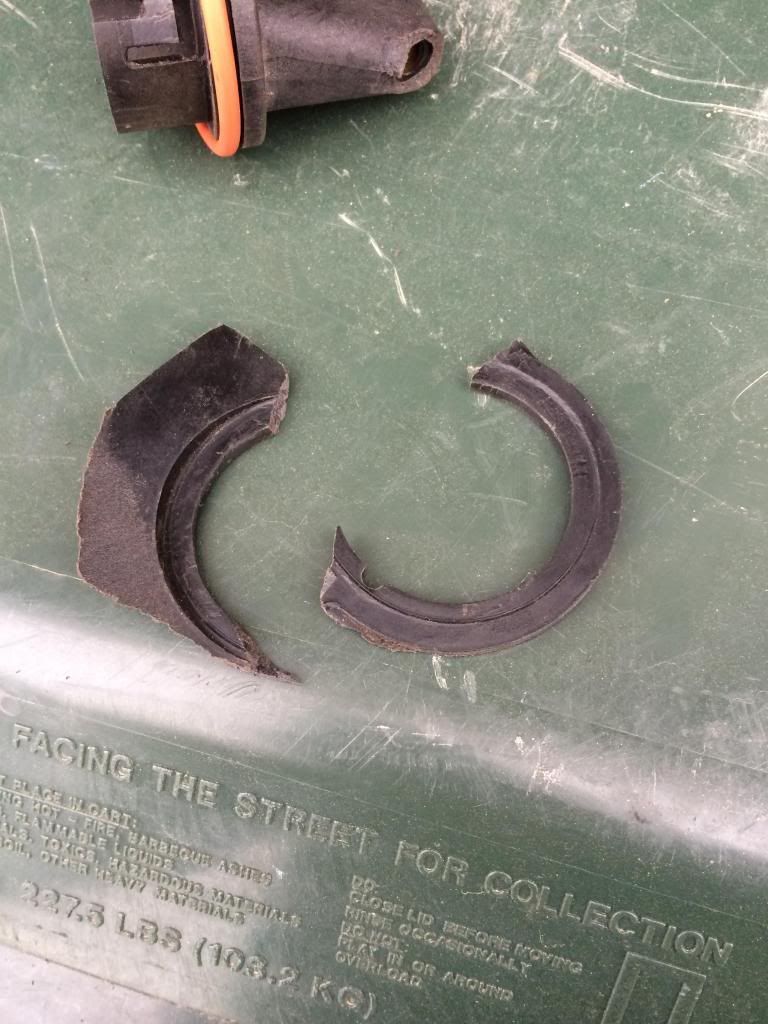 So I did my research and I found a chemical manufacturer that had a new epoxy specially formulated for thermoplastics including Nylon 6/6. It wasn't cheap by any means, If I remember right it was about $40 for 5ml. It sets up really fast so you have to work quick. The only catch is that its not made to fill holes larger than around a millimeter so I was lucky I had all the broken pieces. I had to reassemble the puzzle, not just fill the hole. I only had one shot so I applied the excess liberally to the area after I made the repair so that I could sand the excess off smooth. 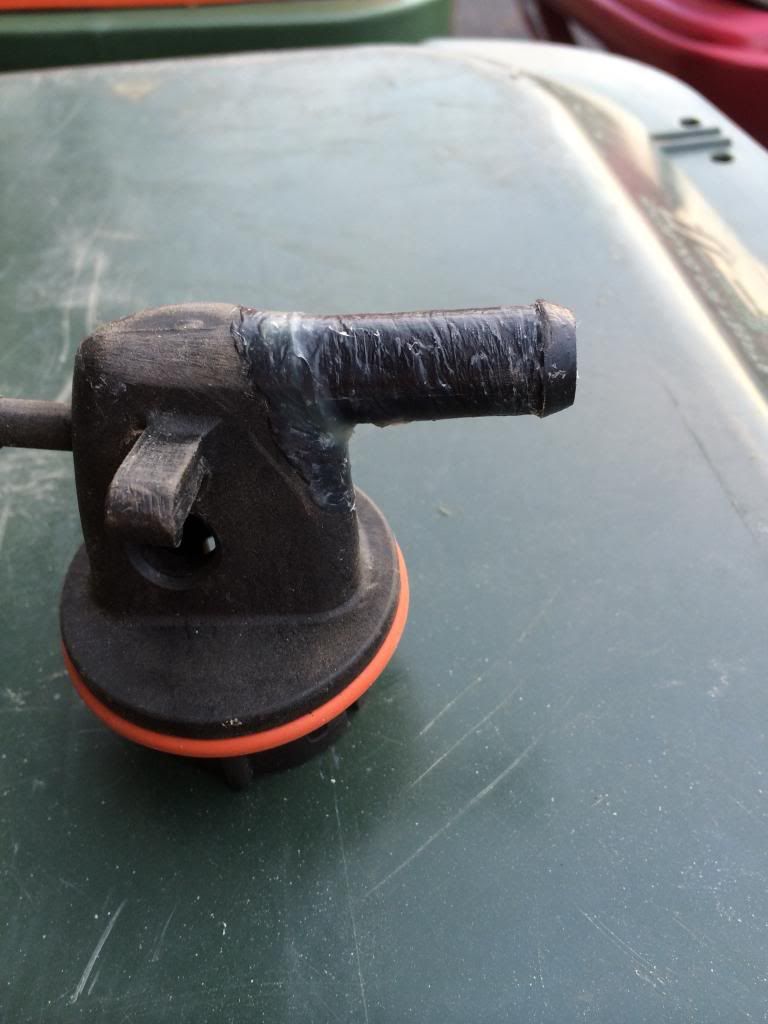 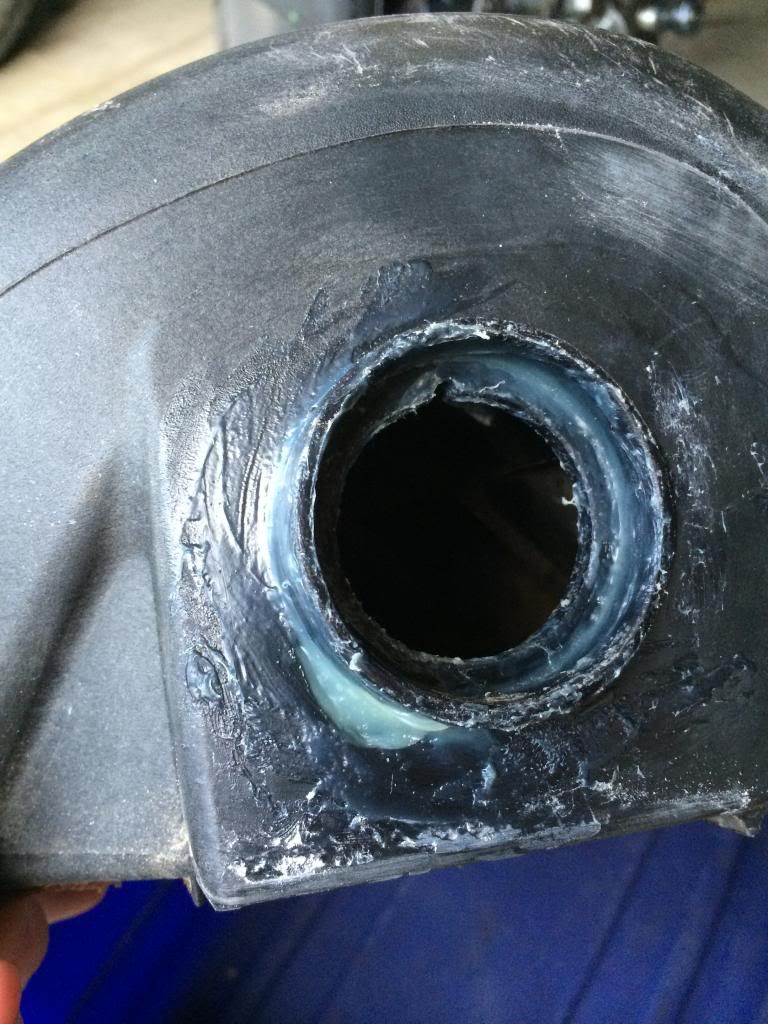 The stuff dried rock hard so I got out the tools to smooth the repair. Then I started to sand off all the casting marks. I needed to mask the repair with paint so I might as well make the whole intake awesome looking. 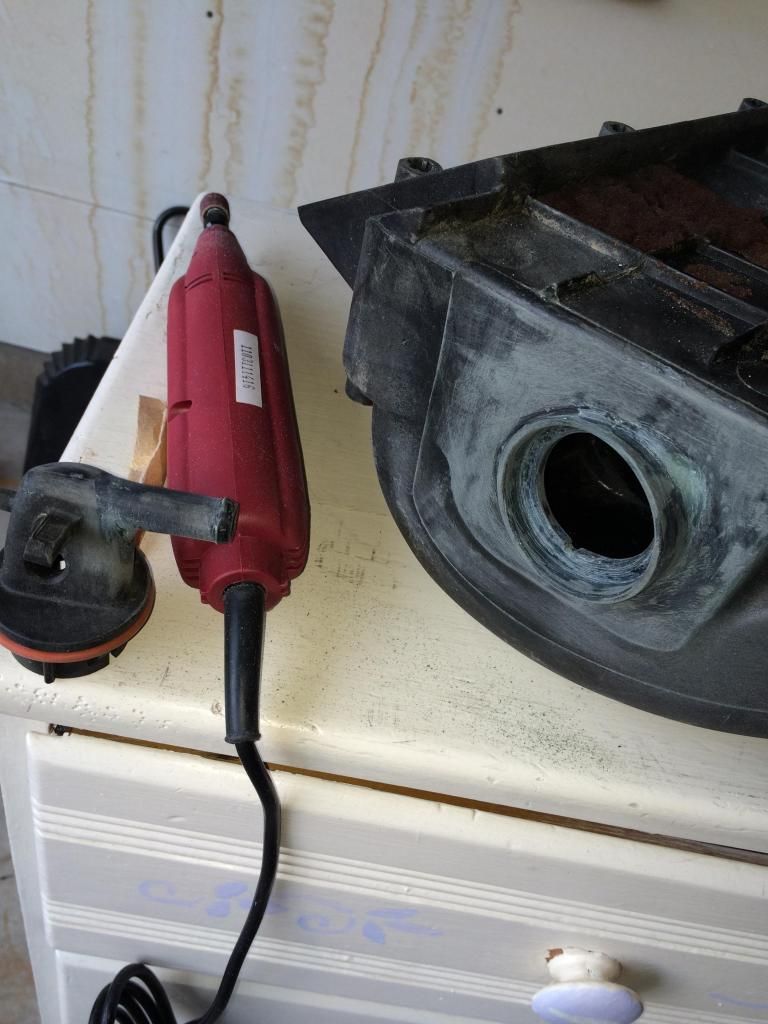 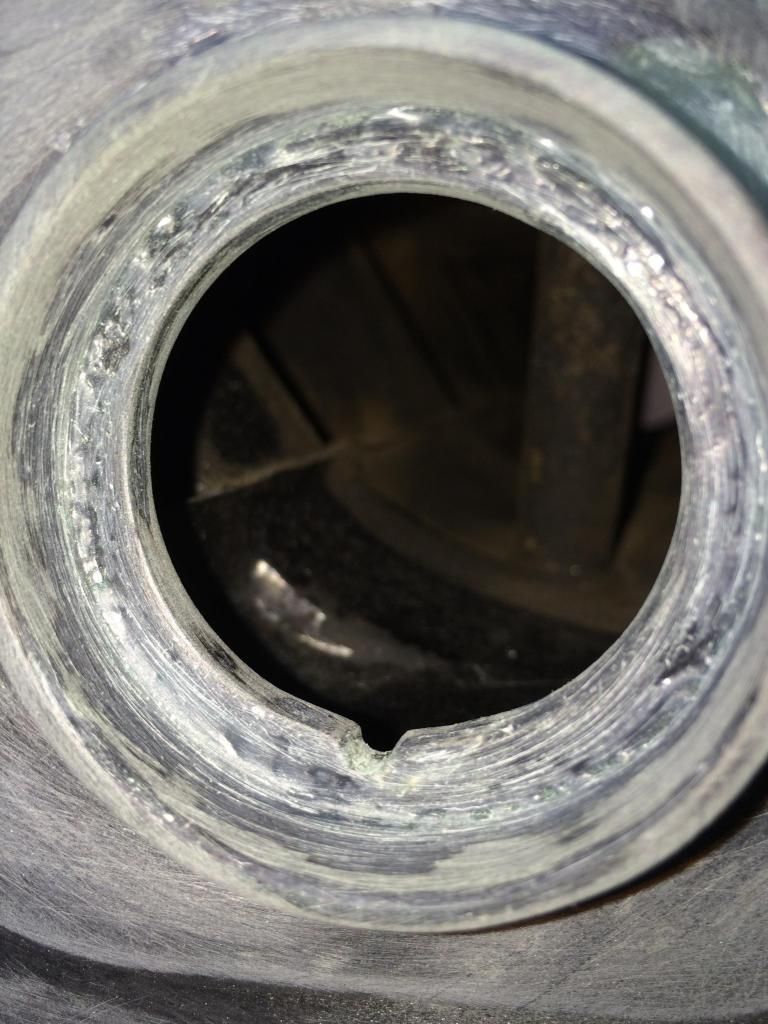 Skip ahead to prime, sand, prime, sand, prime, sand, paint, and then clear. You see the primed picture in my last post so I'll skip it. Its glossy black now. 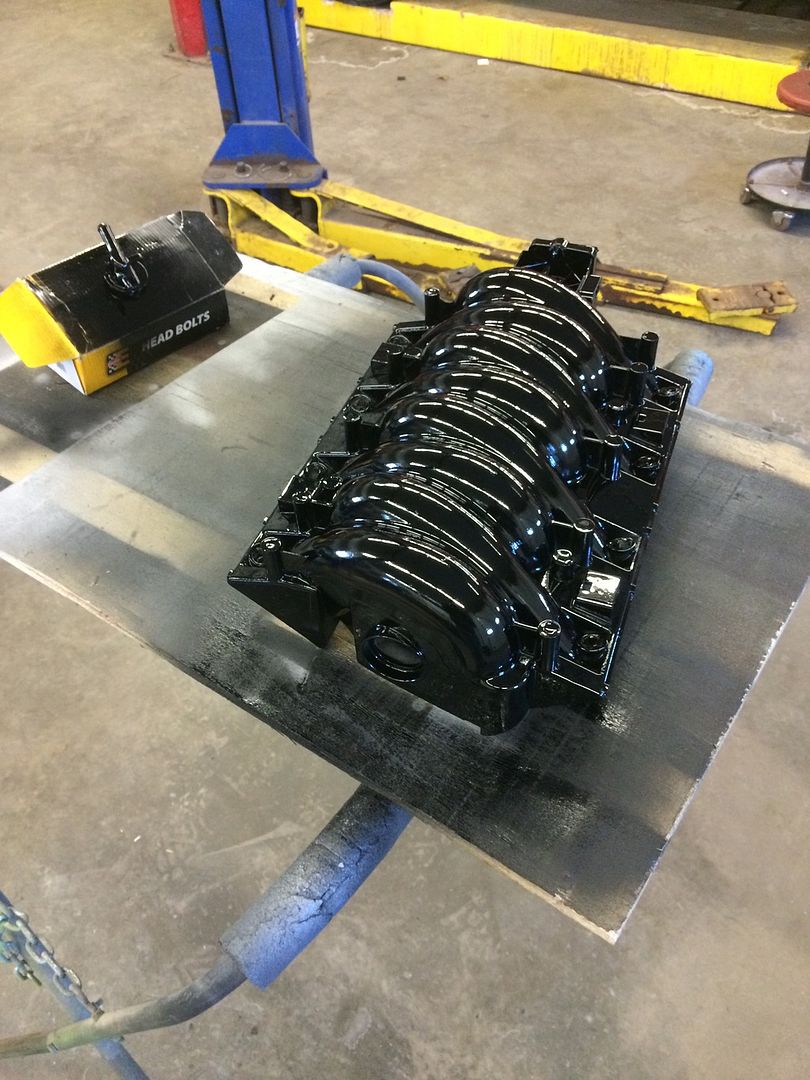 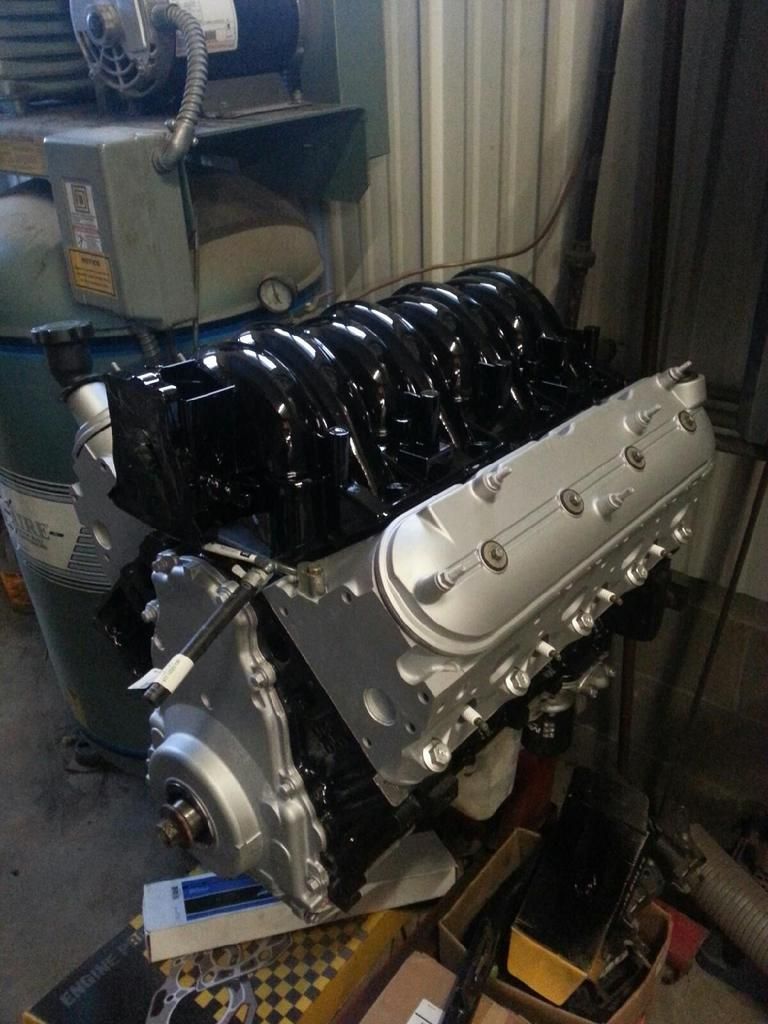 I know its not a big glorious project but I am happy with it. I was told it can't be done and I did it. Now I just have to wait to fire the motor and make sure it doesn't leak around the o-ring and that the repair holds. If it fails I grab the one off the shelf and I'm out some time and a little money. Best case, I have two LS6 intakes for the price of one. I'm now moving on to trying and wrap my head about the accessory drive and the cooling system. So much to learn..... More to come. Last edited by Root2812; 01-13-2016 at 12:22 AM. |
|
|

|
|
|
#205 |
|
Registered User
Join Date: Aug 2011
Location: Barnum, Mn
Posts: 795
|
Re: Greg's 50 Build
I see some of you viewing my thread... Sorry I had to go back and edit that big post because some pictures showed up wrong and after I reread it I needed to go back and fix some stuff.
|
|
|

|
|
|
#206 |
|
Senior Member
 Join Date: Jul 2012
Location: Oblong, Illinois
Posts: 7,017
|
Re: Greg's 50 Build
Nice looking intake!
|
|
|

|
|
|
#207 |
|
Registered User
Join Date: Jan 2010
Location: Titusville, PA
Posts: 3,585
|
Re: Greg's 50 Build
thats awesome research and patience. I agree, why listen to nay sayers and waste a nice intake. Moch up looks sweet.
__________________
51' 99toLife finished 2011,355 sbc,5speed, patina, redoing whole truck, inter, bags, etc http://67-72chevytrucks.com/vboard/s...d.php?t=382481 49Hardtimes s/10 susp- bagged, vortec sbc, 5 speed, patina, sold http://67-72chevytrucks.com/vboard/s...d.php?t=594874 VIDEOS https://youtu.be/E8zHhjgS_lA https://youtu.be/E8zHhjgS_lA Geronimo 54' LS engine, static drop IFS, Client build, just about done http://67-72chevytrucks.com/vboard/s...62#post7399162 52' 3100 Slowly in progress, will be painted two toned, have 235 with a t-5, lowered OG frame Other projects, 49' farmuse 3100, killer Patina, will be slammed, LS engine, full done interior up next! www.coffeeandcustoms.com |
|
|

|
|
|
#208 |
|
Registered User
Join Date: Aug 2011
Location: Barnum, Mn
Posts: 795
|
Re: Greg's 50 Build
Thanks guys. Not this weekend but next I should have it sitting between the frame rails for the last time. Then I can bring it home and start on all the small things to get it running. I can't wait to hear it run.
There are days I am tempted to just put it back together and run a patina truck because I miss driving it so much. I'd never be fully happy though so I will stay the course and get it to paint. First, I'll get it to run and then I can start the metal work. Yikes... |
|
|

|
|
|
#209 |
|
Registered User
Join Date: Jan 2010
Location: Titusville, PA
Posts: 3,585
|
Re: Greg's 50 Build
yah have fun with metal work and paint. by the time you are done you'll dread building another and be so freaked out if someone touches it. I'd just put this together, drive it and find a clean rustfree body (premium price these days) and work on it while you drive the one you got now. just a thought. I can't just have one of these things, so its nice to have different styles of them.
__________________
51' 99toLife finished 2011,355 sbc,5speed, patina, redoing whole truck, inter, bags, etc http://67-72chevytrucks.com/vboard/s...d.php?t=382481 49Hardtimes s/10 susp- bagged, vortec sbc, 5 speed, patina, sold http://67-72chevytrucks.com/vboard/s...d.php?t=594874 VIDEOS https://youtu.be/E8zHhjgS_lA https://youtu.be/E8zHhjgS_lA Geronimo 54' LS engine, static drop IFS, Client build, just about done http://67-72chevytrucks.com/vboard/s...62#post7399162 52' 3100 Slowly in progress, will be painted two toned, have 235 with a t-5, lowered OG frame Other projects, 49' farmuse 3100, killer Patina, will be slammed, LS engine, full done interior up next! www.coffeeandcustoms.com |
|
|

|
|
|
#210 |
|
Registered User
Join Date: Aug 2011
Location: Barnum, Mn
Posts: 795
|
Re: Greg's 50 Build
Well its never easy but atleast the motor is in.. for now. I had a hell of a time and it seemed like nothing wanted to work this weekend. Some of it was my mistake and some was just fate. Either way there was a lot of learning and everything can be fixed with money.
Lets start with my transmission mistake. A while back I bought a can of VHT exhaust manifold paint for my manifolds. It was late and the stores were closed so I used it to paint my heads instead. Stuff worked great and looked good. This weekend I wanted to paint my transmission and decided to use the same stuff except I didn't have enough left. I went to the store and they didn't have the VHT brand so I got exhaust manifold paint from another brand. I didn't read the can, I just assumed it would work. I sprayed it on and it never dried. The crap had to cure with heat. The transmission would never get hot enough so I had to get the paint off. The paint came off super easy with the pressure washer. I took extra care to not spray near any openings or ports just incase. I let it dry and painted it with a different stuff which worked. Yay..... or not... I pressure washed the transmission over a drain in the shop and muddy dirt flew up into the bell housing. We wiped if off the input shaft and I blew dirt and water out with an air hose. My dad had replaced the front seal with a new one recently so hopefully that helps but I am afraid some dirt got up past the seal. Only time will tell and my dad assures me its fine but I am a worry wart so I'll worry about it until I have a few thousand miles on the truck. Since the shaft was clean we put in the converter and installed the transmission. I felt like a total fool for not thinking about the dirt in the drain, I was just distracted by the paint. So I got the drive train installed! 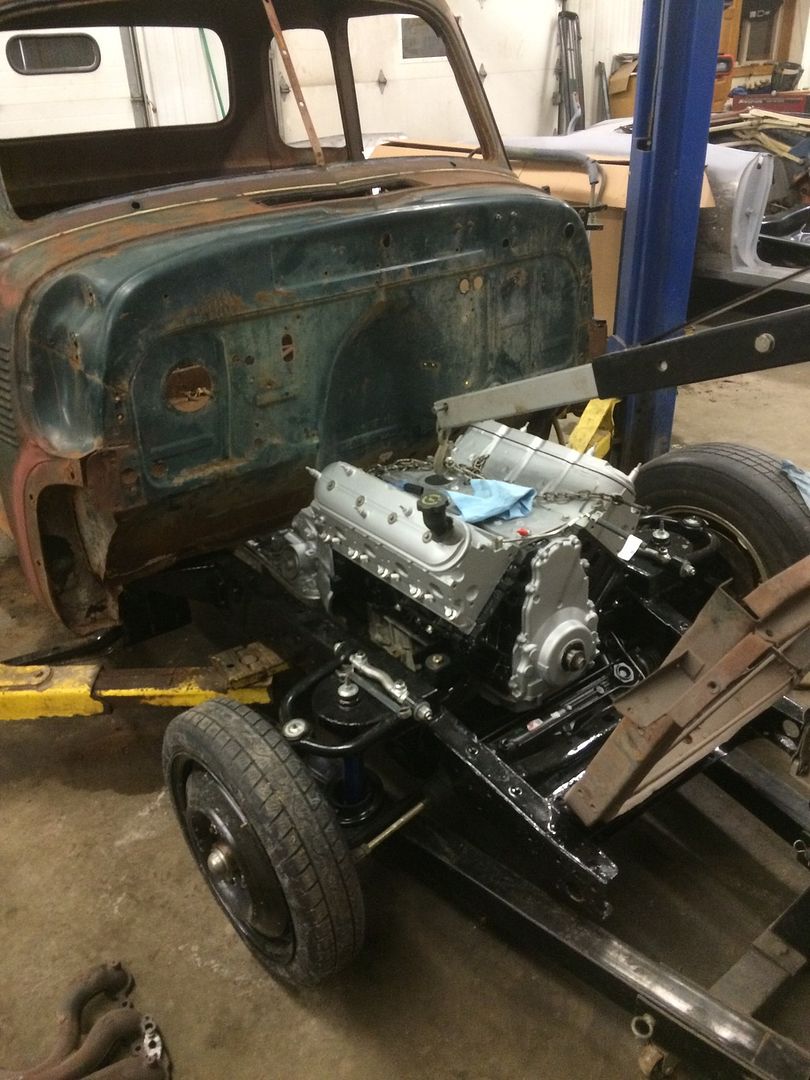 Still more issues popped up that I thought were solved. This was the first time the cab and drivetrain were together on my new suspension. The weight threw my driveline angles all out of wack. This is minor but I may need to shim the transmission mount and the rear end to adjust the pinion angle. Minor but still a problem but atleast I identified it. Something told me to check. Now I know you guys like low and mean and some times use pop cans to show how low your bagged rigs can go. Mine is not bagged but here is a pic to show how low it will be. This is the front of the frame where the bumper bracket will go. 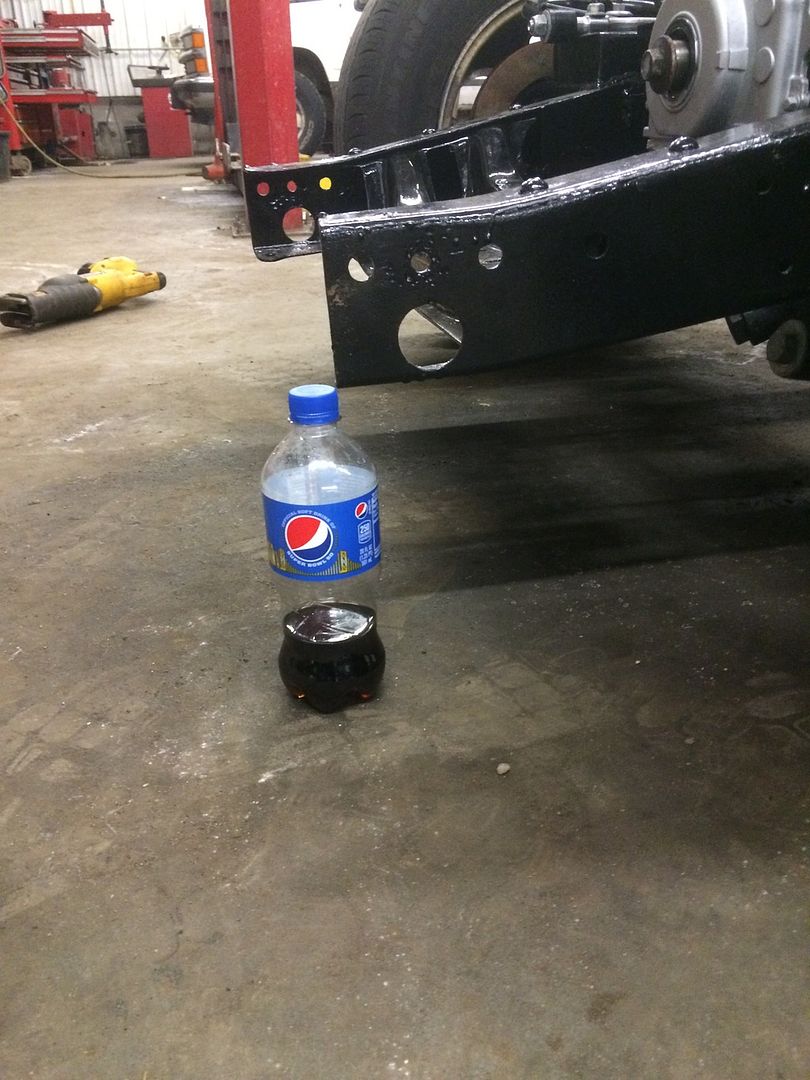 Moving along, I think I am going to have to raise the motor. I am concerned about both the crank pulley clearance to the steering rack and the oil pan to the ground. I thought I had this covered but with weight on the suspension I have problems. Raising the motor might do it but I may also need to swap oil pans. Last bugger issue is exhaust. I had bought and test fit 2002 corvette exhaust manifolds and after trimming up my boxing plates they fit, barely. I wasn't comfortable with the small amount of clearance to the frame but the deal breaker was that there was no easy way to make the steering linkage. Who can recommend a good block hugger header for an LS? Here is a pic of my engine mounts. I should be able to raise them easy. 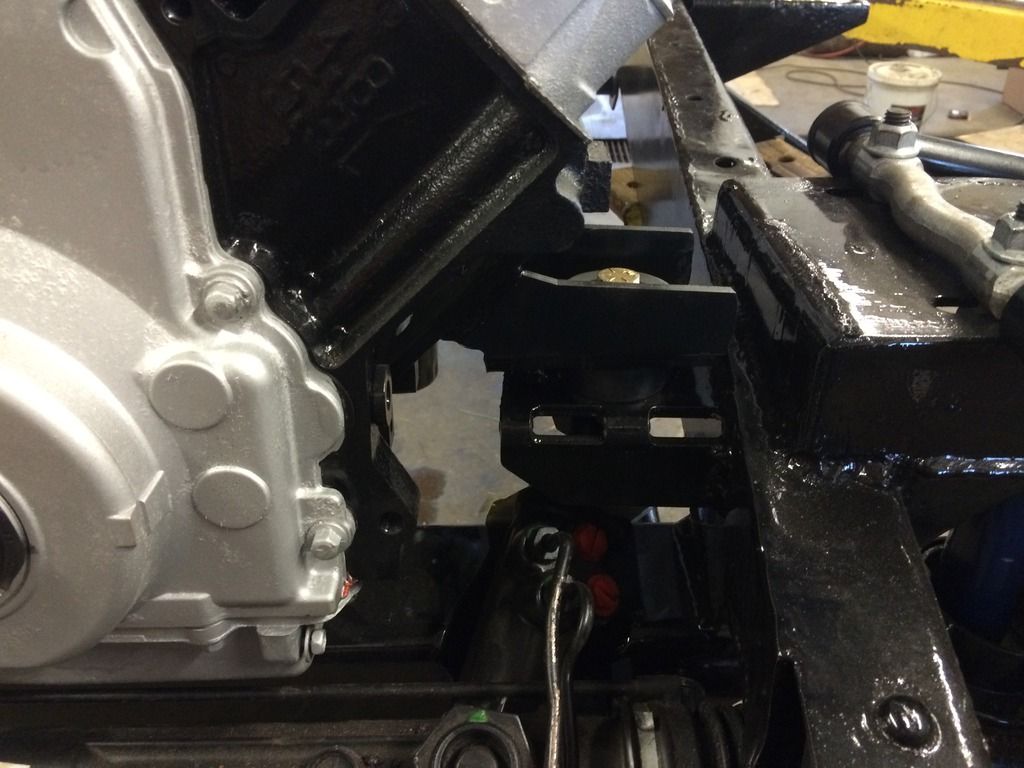 Well it looks like I have my work cut out for me but I'll get it. Wish me luck. On a side note, I knew my build will take time and I wanted to get something fun to drive in the mean time. I picked up a nearly rust free (rare for a mopar) 74 Roadrunner with the high performance 360 engine. I'll throw up a pic or two later but keep it to a minimum since this is a chevy forum and its just a dirty old Plymouth. 
Last edited by Root2812; 02-03-2016 at 12:06 AM. |
|
|

|
|
|
#211 |
|
Senior Member
 Join Date: Jul 2012
Location: Oblong, Illinois
Posts: 7,017
|
Re: Greg's 50 Build
I copied FarmerSid and am using these Hooker manifolds.
|
|
|

|
|
|
#212 |
|
Registered User
Join Date: Apr 2010
Location: Oregon
Posts: 1,183
|
Re: Greg's 50 Build
The Hooker manifolds that AD shows above or the Sanderson headers are a good fit. They both fit tight and exit toward the rear, leaving some room for the steering linkage.
|
|
|

|
|
|
#213 |
|
Registered User
Join Date: Jan 2010
Location: Titusville, PA
Posts: 3,585
|
Re: Greg's 50 Build
Hey don't wanna clog up your post with my pics, but I agree I think your engine should come up higher. Makes the headers easier, also the use of the truck pan is much more feasible. DL angles are easy fix. I do think you may want to consider how far forward your engine is. If you see where my placement is and with and EFan centered up, its close. You can move the efan up or down and gain just enough, but it def helps to have all that there when moching up. as for huggers, they sell stainless ones on ebay for cheap, same quality as the ones I have here. Can't beat the price. quality is nice.
I wouldn't worry about the trans, some dirt isn't going to destroy it in my opinion. Good progress though, keep at it.
__________________
51' 99toLife finished 2011,355 sbc,5speed, patina, redoing whole truck, inter, bags, etc http://67-72chevytrucks.com/vboard/s...d.php?t=382481 49Hardtimes s/10 susp- bagged, vortec sbc, 5 speed, patina, sold http://67-72chevytrucks.com/vboard/s...d.php?t=594874 VIDEOS https://youtu.be/E8zHhjgS_lA https://youtu.be/E8zHhjgS_lA Geronimo 54' LS engine, static drop IFS, Client build, just about done http://67-72chevytrucks.com/vboard/s...62#post7399162 52' 3100 Slowly in progress, will be painted two toned, have 235 with a t-5, lowered OG frame Other projects, 49' farmuse 3100, killer Patina, will be slammed, LS engine, full done interior up next! www.coffeeandcustoms.com |
|
|

|
|
|
#214 |
|
Registered User
 Join Date: Aug 2012
Location: West Side of the valley, CA
Posts: 878
|
Re: Greg's 50 Build
Is it me or do LS engines look good stuffed into these trucks?
|
|
|

|
|
|
#215 |
|
Registered User
Join Date: Jan 2010
Location: Titusville, PA
Posts: 3,585
|
Re: Greg's 50 Build
I feel like it could go either way. I personally like seeing the carbed versions of them. but a nice LS6 intake looks cool even though a truck intake usually out performs them.
__________________
51' 99toLife finished 2011,355 sbc,5speed, patina, redoing whole truck, inter, bags, etc http://67-72chevytrucks.com/vboard/s...d.php?t=382481 49Hardtimes s/10 susp- bagged, vortec sbc, 5 speed, patina, sold http://67-72chevytrucks.com/vboard/s...d.php?t=594874 VIDEOS https://youtu.be/E8zHhjgS_lA https://youtu.be/E8zHhjgS_lA Geronimo 54' LS engine, static drop IFS, Client build, just about done http://67-72chevytrucks.com/vboard/s...62#post7399162 52' 3100 Slowly in progress, will be painted two toned, have 235 with a t-5, lowered OG frame Other projects, 49' farmuse 3100, killer Patina, will be slammed, LS engine, full done interior up next! www.coffeeandcustoms.com |
|
|

|
|
|
#216 |
|
Registered User
Join Date: Feb 2015
Location: MN
Posts: 9
|
Re: Greg's 50 Build
Greg-
How did the 4L60E install? Does it look like a tunnel will be in order? The install looks to be going well. I was thinking about installing my motor and trans this weekend but I think I will let you iron out the details for me. keep up the good work. Evan |
|
|

|
|
|
#217 |
|
Registered User
Join Date: Jan 2012
Location: Eastern Ontario, Canada
Posts: 1,041
|
Re: Greg's 50 Build
I think my engine is a little higher than yours. Check my build out to see where I have my 4L60e located. May give you and idea or two
__________________
1952 Canadian Chevy 1300 C4 IFS & D44 IRS 5.3 HO L33 My Build: http://67-72chevytrucks.com/vboard/s...d.php?t=632938 
|
|
|

|
|
|
#218 |
|
Registered User
 Join Date: Jun 2015
Location: Glendale
Posts: 414
|
Re: Greg's 50 Build
Nice job on the engine. I too have an LS1 and did the LS6 valley cover to clean up the external PCV plumbing. Got aluminum dust all over the place grinding down the block! What a mess. Since then I invested in a Dremel kinda funny investing in tools after needing them. Awesome paint work and paint on the intake!
|
|
|

|
|
|
#219 | |||||||
|
Registered User
Join Date: Aug 2011
Location: Barnum, Mn
Posts: 795
|
Re: Greg's 50 Build
Quote:
Quote:
 I do think I am going to move the engine up, it should be easy. I hope to retain the truck pan for cost but I won't rule out the Fbody pan just yet. I do think I am going to move the engine up, it should be easy. I hope to retain the truck pan for cost but I won't rule out the Fbody pan just yet. Are you running the truck accessories? My engine accessories? I didn't want to mess with my firewall because I like the look of it uncut so I bought the corvette accessories. It should buy me an inch and a half vs the truck parts. I will move it if I have to but I haven't bought a radiator to measure off of yet and I will have the option of running a pusher fan if need be but I hope to run a puller. Quote:
Quote:
Quote:
By all means install yours so I can cheat and look at yours to figure out how to fix all my messes.  Quote:
I am really proud of my engine. I started to feel in over my head but I just took my time and stuck to the book. I sure hope it runs. |
|||||||
|
|

|
|
|
#220 |
|
Registered User
Join Date: Apr 2010
Location: Oregon
Posts: 1,183
|
Re: Greg's 50 Build
I tried the Sanderson part# CCLS1, they are around $325. I think the Speedway headers are center dump. Make sure you get some like 99tolife has that dump toward the rear. Like he said there are some on eBay , they are about half the price of the Sandersons and stainless.
|
|
|

|
|
|
#221 |
|
Registered User
Join Date: Aug 2011
Location: Barnum, Mn
Posts: 795
|
Re: Greg's 50 Build
Sometimes timing can suck. I'm going to have to take a break from the truck for a while and then probably move on to metal work since I already have most of the sheet metal. Everything will work out but I just have bad timing. I'm enjoying this build but I've missed driving a classic so I bought a driver (1974 Roadrunner). Its a great car and will be fun to drive while I build the truck but of course the week after I buy the car I get nailed with surprise medical bills and now the bank is empty.
I can still do things that won't cost much money or already have money spent, like raise the motor and make my wiring harness in addition to the metal work. Car guys who like all makes and models keep reading. If you are bowtie only its best you don't look down.  All of the mopar forums I have found so far kinda suck. Maybe my standards are high after getting used to this online community. I might even make a thread in the alternate tinkering's section just for fun. My roadrunner is going to be a great driver to enjoy while I do this build but it needs tires and brakes. Hopefully I can do that before spring anyway. The car comes from San Bernardino, CA so it has almost no rust. Just a few blisters but all the panels are original. Most mopars rusted away after just a few years especially here in Minnesota. Interior is rough but I'd rather do that than metal work (after the truck is done). It was supposed to be a numbers matching car but after I got the car here I found out that it has a fresh rebuilt transmission in it and the original numbers matching tranny is still in California, for an extra price....  I can't blame the tranny thing on that guy because the car changed hands between him and me. The guy who sold me the car said its numbers matching when he flipped it to me but its the guy before him who still has the tranny. I talked to him and it sounds like he reluctantly sold the car due to health reasons right after he had a tranny put in it. I can't decide if its worth trying to get. Numbers are great and all but I have a rebuilt tranny and I'd be spending money later on a bad one. What would you guys do? For now its a driver and won't be a show car and I don't think the tranny will be going anyplace soon. I talked to the old owner about the tranny and he told me he has the factory limited slip 3rd member too. He said that it had a pinion bearing go out so he swapped in an open unit. Only $600 for the 3rd member that needs rebuilding. No way, open if just fine by me until I buy an aftermarket upgraded unit years down the road. Whats with mopar guys and these prices. Geesh.. I would have sold the original parts with the car if it was me. That's it for the bad. Its got a 360 high performance engine and runs great. The front end is rebuilt, carb rebuilt, new plugs, wires, distributer cap and rotor, new fuel tank, and fuel pump. I won't clutter up my thread with pics of the car but if you are interested you can look at my photobucket. http://s901.photobucket.com/user/Roo...0Runner?sort=3 I'll update you guys when I finish some more truck stuff. |
|
|

|
|
|
#222 |
|
Registered User
Join Date: Aug 2011
Location: Barnum, Mn
Posts: 795
|
Re: Greg's 50 Build
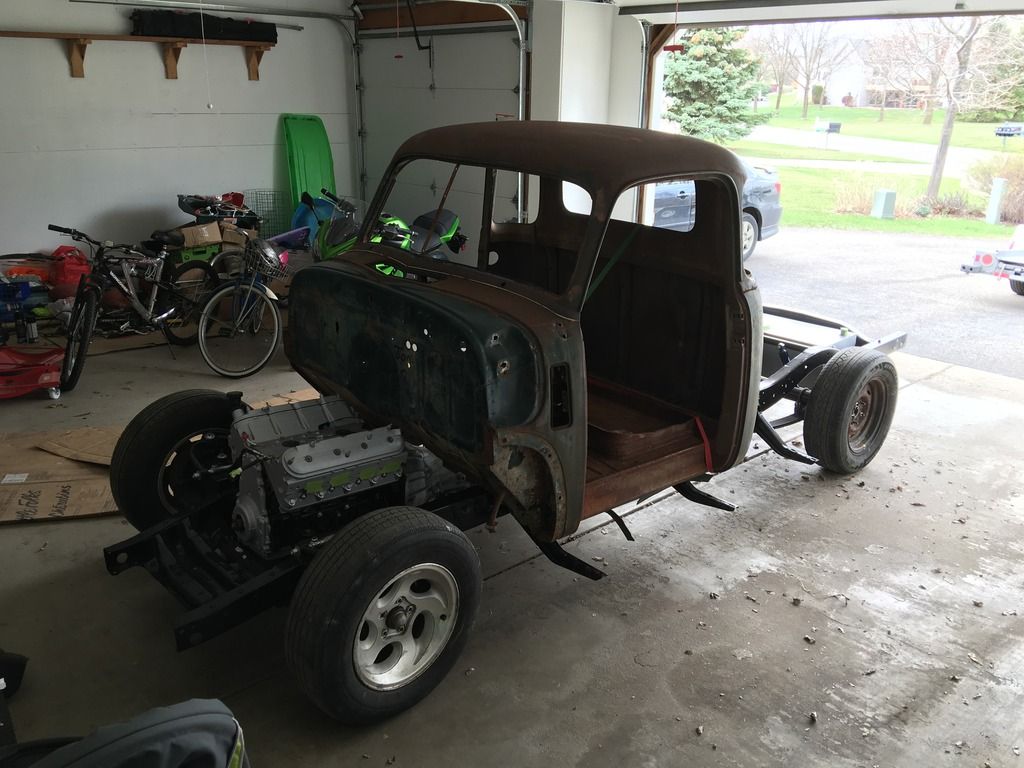
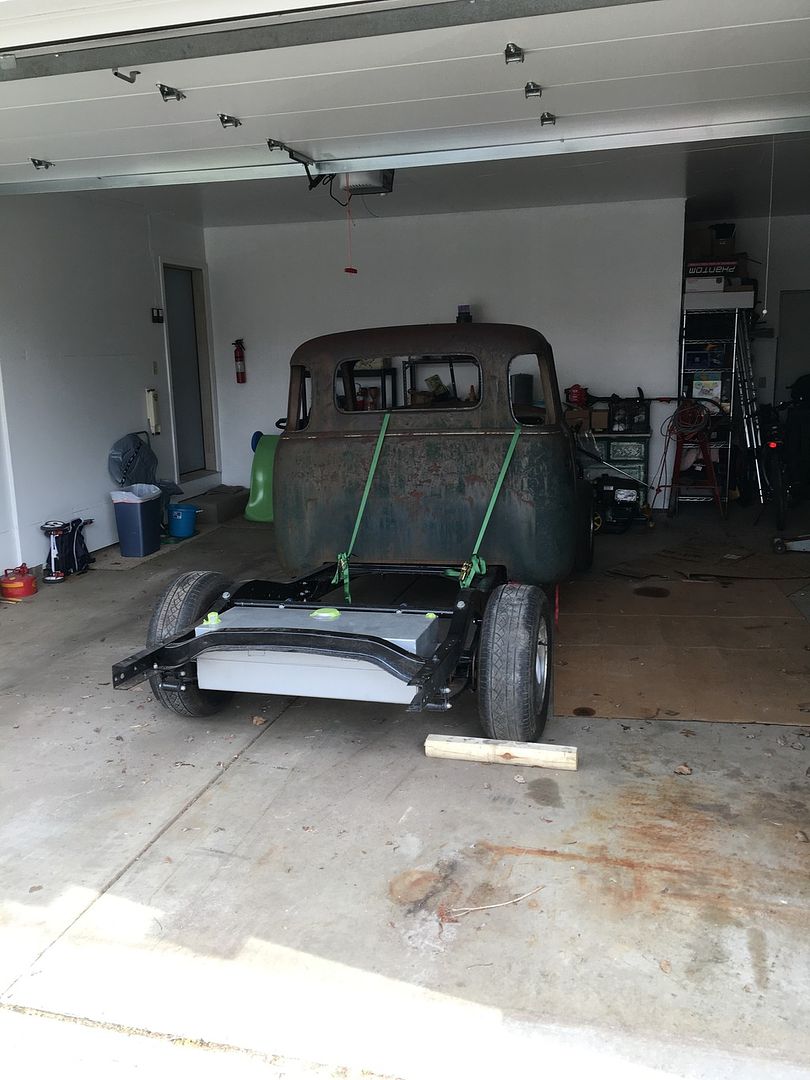
Well today was a big day. The truck is home. Current goal is to hear the engine run before fall. Things may go slow but I am happy to have it back. I think the stance is looking pretty good.
  Then I tossed on my spare intake just to see how it looks. Sorry the lighting sucks. 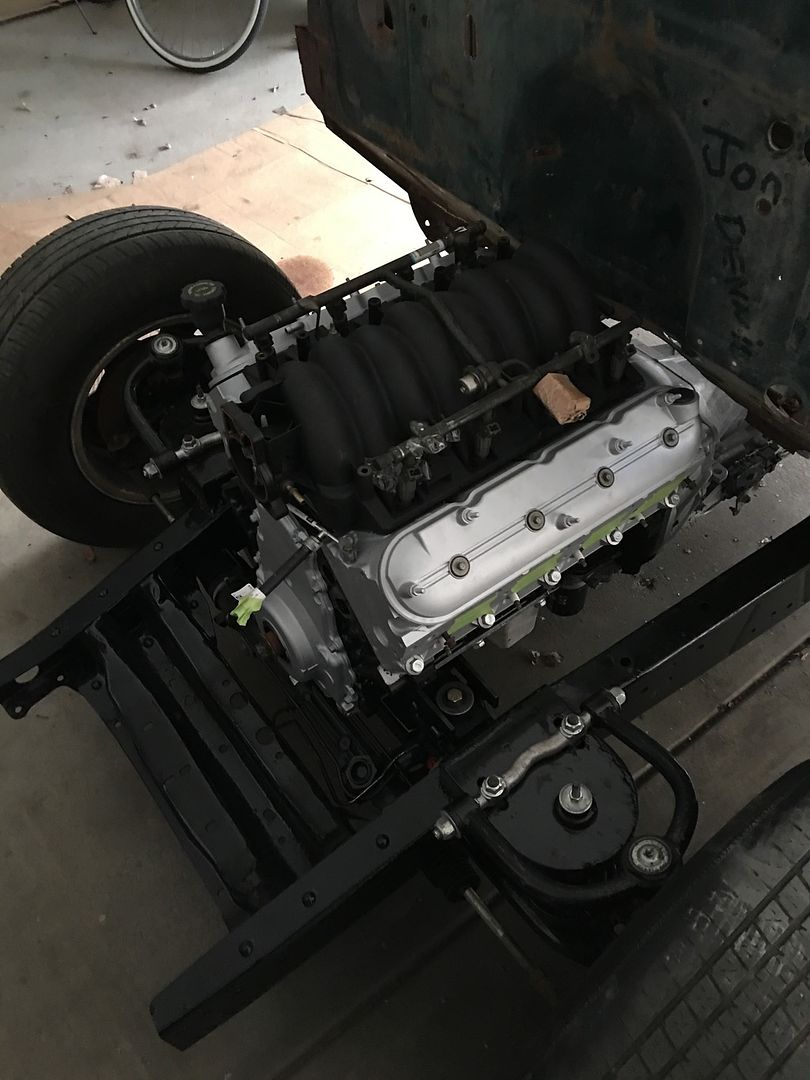 I did look it over closely and I am going to have to swap to the f-body pan. The truck pan hangs too low. |
|
|

|
|
|
#223 |
|
Registered User
Join Date: Sep 2011
Location: Golden Valley,MN
Posts: 639
|
Re: Greg's 50 Build
Looking good Greg. It will be nice to have it at home. So now when you have a spare moment, you can run out to the garage and get a little "truck therapy".
__________________
My build http://67-72chevytrucks.com/vboard/s...d.php?t=495795 |
|
|

|
|
|
#224 | |
|
Registered User
Join Date: Aug 2011
Location: Barnum, Mn
Posts: 795
|
Re: Greg's 50 Build
Quote:
I also decided to go with the hooker manifolds. I hope to order those in June. Spending has to be in small increments right now. |
|
|
|

|
|
|
#225 |
|
Senior Member
 Join Date: Jul 2012
Location: Oblong, Illinois
Posts: 7,017
|
Re: Greg's 50 Build
The Roadrunner is a solid piece. Living here in the rust belt it is amazing to see solid panels on an older vehicle.
Progress, a little at a time, is still a good thing. |
|
|

|
 |
| Bookmarks |
|
|