
|
 02-16-2022, 11:04 AM
|
#1 |
|
Registered User
Join Date: Nov 2015
Location: Jenks, OK
Posts: 234
|
Alignment
I think the frame is done. I had to notch it a little bit to get fuel tank in where it would drop out the bottom but otherwise hoping Ive got it all finished. C6 Corvette suspension and driveline, 51 AD 3100 body on top is plan.
Got to thinking I should take it down and have an initial alignment done and local shop is willing to do that. Planning to do final alignment after built and loaded -everything done. Using stock C6 rims and the tires that came with it to roll it around now but will change that out before driving it. I cut the leaf springs on stock C6 out and put coil overs on it to give me some adjustability but not sure how its all going to work out on ride height until its assembled have a little flexibility there. Any experience from you guys who used custom frames from a shop or build your own like I did on this process? I had not really thought about getting in mid build alignment until I was sitting staring at it the other day and realized if I had to do some cutting and welding and adjustment now would be the time to get that done before the body was on it. Posted via Mobile Device |

|

|
|
02-16-2022, 02:56 PM
|
#2 |
|
Registered User
 Join Date: Mar 2007
Location: Scotts, Michigan
Posts: 3,765
|
Re: Alignment
Great idea. These AD fenders especially if you have a low ride height can create challenged to align. That is if you can find an alignment shop tackle it. I have to redo my alignment as it is off (long story) and I chewed up from front tires before I realized. Mine is really toed in.
Marc
__________________
...........__________ .................. ((__|__||___\____ ..;.;;.:;:;.,;..;((_(O))____ (_(O)) 1948 Chevy Truck - Finished SOLD!! 1953 Chevy Suburban "Family Truckster" Completed: Spring of 2021 http://67-72chevytrucks.com/vboard/s...d.php?t=605484 1994 4x4 Blazer - "Field Find" https://67-72chevytrucks.com/vboard/...ferrerid=30857 |
|
|
|
|
02-16-2022, 03:30 PM
|
#3 |
|
Registered User
Join Date: Jul 2007
Location: Toppenish, WA
Posts: 15,405
|
Re: Alignment
I was an alignment specialist for years and truthfully that is a waste of time and money. Without the actual full weight of the truck all settings will be too far off to count. That is the full weight of the vehicle sitting on the tires at static height.
You could get ball park settings with one of those 10 buck caster camber gauges off Ebay or Amazon but that is probably a waste of time. Even the adds for those showing the magnet stuck to the brake rotor aren't truthful as the camber will be different with the lower control arms sitting on Jack stands than it is with the weight on the tires.
__________________
Founding member of the too many projects, too little time and money club. My ongoing truck projects: 48 Chev 3100 that will run a 292 Six. 71 GMC 2500 that is getting a Cad 500 transplant. 77 C 30 dualie, 454, 4 speed with a 10 foot flatbed and hoist. It does the heavy work and hauls the projects around. |
|
|
|
|
02-16-2022, 05:58 PM
|
#4 |
|
Registered User
Join Date: Nov 2015
Location: Jenks, OK
Posts: 234
|
Re: Alignment
The rims and tires on this came with the rolling drive train.
Im not hundred percent that theres not any damage or bent rims there. Does condition or tread wear or inflation on any of the tires and any damage to the rims affect alignment? Should I go ahead and get the final rims and tires to get this done? Was trying to hold off on that a little bit in case I needed to adjust stance and offset but didnt want those things sitting around aging out while Im filling the rest of the truck. I know Im going to be tight on the fenders because of the width of this assembly. Alignment will definitely come in to play and I may end up having to widen fenders and Im assuming I will have to tub the bed |
|
|
|
|
02-16-2022, 07:47 PM
|
#5 |
|
Registered User
Join Date: Jul 2007
Location: Toppenish, WA
Posts: 15,405
|
Re: Alignment
Truthfully when you say "rims" I wouldn't buy "rims" and tires until the truck was finished to the point that it only needed them to be ready for its first show and tell outing.
As you mentioned, the tires aging out issue. plus if you have rims rather than wheels your rims will most likely be outdated and out of style the day you take the truck to it's first show as that is the way those things work. Where my 15 inch white walls and hubcaps on steel wheels are pretty well ageless in the group I travel in, those big rims tend to be a gotta have the lastest cool stuff or else thing. I'd wait and see if I liked the hot lick of the week when I was ready rather than buying now. That said, my 15 inch rollers on the wheels I will most likely use are probably older than some of the younger members. I'm not sure that I even trust them for the 3 mile run to the tire store. The only real reason for buying wheels and tires early is that you have to build the truck around a certain size tire/wheel combo. Stance you can figure out to some degree with what you have now.
__________________
Founding member of the too many projects, too little time and money club. My ongoing truck projects: 48 Chev 3100 that will run a 292 Six. 71 GMC 2500 that is getting a Cad 500 transplant. 77 C 30 dualie, 454, 4 speed with a 10 foot flatbed and hoist. It does the heavy work and hauls the projects around. |
|
|
|
|
02-16-2022, 07:54 PM
|
#6 |
|
Registered User
Join Date: Oct 2020
Location: CHURCHVILLE NY
Posts: 454
|
Re: Alignment
I am with mr48chev wait until you have all the weight in it before alignment. I would also wait to get wheels and tires until final assembly is done to get the correct offset. Steve
__________________
My 57 Fleetside C4 build. http://67-72chevytrucks.com/vboard/s...d.php?t=817054 |
|
|
|
|
02-16-2022, 08:00 PM
|
#7 |
|
Registered User
Join Date: Jul 2007
Location: Toppenish, WA
Posts: 15,405
|
Re: Alignment
There is a thread over on the 67/72 side where they compare notes on how many sets of wheels and tires, they have bought and then swapped out for different ones before their trucks ever hit the road or because they constantly see something new. If I remember right one had at least three different sizes of Coys stacked in his garage because they were always coming out with a larger diameter wheel.
__________________
Founding member of the too many projects, too little time and money club. My ongoing truck projects: 48 Chev 3100 that will run a 292 Six. 71 GMC 2500 that is getting a Cad 500 transplant. 77 C 30 dualie, 454, 4 speed with a 10 foot flatbed and hoist. It does the heavy work and hauls the projects around. |
|
|
|
|
02-16-2022, 09:00 PM
|
#8 |
|
Registered User
Join Date: Nov 2013
Location: Show Low, Arizona
Posts: 767
|
Re: Alignment
When my chassis was at the stage yours is, I did a 'rough-in' alignment. Wheels and tires come later, and you'll need to be approximately aligned to figure that out anyway.
Because I didn't have all the body components to bring the suspension to its nominal ride height, I removed the springs and blocked the chassis at the ride height. My truck has air bags, so this was easy to do. Looks like you have coilovers, so it should be easy for you too. I leveled the chassis on the shop floor and blocked it up on jack stands. I took the wheels off and blocked the spindles to ride height. To set my caster, I made this out of an old pushrod, a spring and piece of scrap tube.  The ball ends fit in the upper and lower ball joint studs and are held in place with an internal spring. Most digital levels will work - this is a cheap one I use to set up my miter saws. To set the camber, I just placed the digital level against the brake disk and adjusted till it came into spec To rough-in the front toe, I clamped a 3' piece of angle iron to the brake disks and ran a tape front and back till and adjusted to about 1/8" toe in. (I did make sure the angle iron was straight by checking it on the wife's granite countertop) The only thing I wish I'd done at the alignment rough-in was the rear thrust angle. I ended up doing this after the truck was done and it was kind of a PITA to shim the IRS to correct a toe-out condition. Lots of videos on the interwebs on checking thrust angles with fishing-line, jack stands and a couple pieces of conduit. My Rube Goldberg setup. 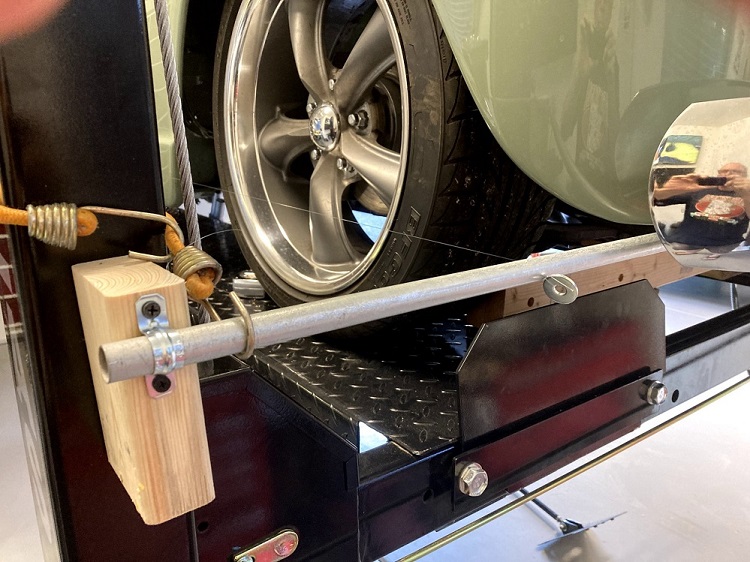 Just to amplify Youngrodder's remarks, most franchise/chain auto service places won't want anything to do with aligning your truck. They lack the experience and understanding to do anything unique and they certainly don't want to take on the liability. You'll likely have to search around for an 'old timer' in an independent shop that knows what he's doing Last edited by e015475; 02-16-2022 at 09:08 PM. |
|
|
|
|
02-16-2022, 09:15 PM
|
#9 |
|
Registered User
Join Date: Nov 2013
Location: Show Low, Arizona
Posts: 767
|
Re: Alignment
With all due respect to Mr48Chevy, now's the time to find out if your chassis is 'align-able'. Much easier to correct now
You said "The rims and tires on this came with the rolling drive train." This implies you didn't build it, and if so, there's double the reason to check alignment now. I don't trust anyone's work but my own, and I still wonder if I did it right and go back and check Last edited by e015475; 02-16-2022 at 09:22 PM. |
|
|
|
|
02-16-2022, 09:24 PM
|
#10 |
|
Registered User
Join Date: Nov 2013
Location: Show Low, Arizona
Posts: 767
|
Re: Alignment
BTW, that's an impressive looking chassis. That looks like an excellent foundation for a build.
|
|
|
|
|
02-17-2022, 02:09 AM
|
#11 |
|
Registered User
Join Date: Nov 2015
Location: Jenks, OK
Posts: 234
|
Re: Alignment
You got me laughing here, I definitely need to get rid of that rims language! Spray it with round up, propane torch it, dig it up and burn that.
Smiling as I respond here maybe this will break me of that habit - they are truly wheels! Sad to say, I created a little bit of a monster here. Corvette had 18 x 8 1/2 in front and 19 x 10 in the back. Plan is to get some tires 1 to 1 1/2 inches taller with more sidewall and diamondback wide whites-as much as will fit and look good on the bigger wheel and tire combo. I am stuck with this crazy high positive offset. Corvette hubs are maybe 1 1/2 or 2 inches from the outside edge of the tire. Getting a nice classic dish look, I would have to really widen those fenders. Trying to avoid that. As it is, super tight. Talked with a guy out in California who can make me some one off wheels. They will be a little expensive but I might spend the money to get rid of that modern Corvette wheel look in these pictures. He said he thought he could do kind of a modern take on an artillery style wheel that would curve back and then where it attaches to the inside of the wheel and still give me the offset I needed. They may look terrible, I dont know but he said he could get me a cad design at least before he cuts them. Probably would have them powder coated maybe chrome center cap to cover Lugnuts. Planning to roll that edge on the fender and I think I can get a couple of fingers in their but not looking good right now. Cant go any smaller on the wheels because the whole rotating assembly calipers and all is inside the wheel itself. |
|
|
|
|
02-17-2022, 02:42 AM
|
#12 |
|
Registered User
Join Date: Nov 2015
Location: Jenks, OK
Posts: 234
|
Re: Alignment
e015475:
Wow, thanks for all that advice thats exactly what I was looking for and really from all of you guys Im soaking it up. I bought the Corvette from Cleveland power and performance as a rolling drive line and it had about 2 feet chunk of frame on each of the four corners to keep the suspension together. I bought those aluminum adapters from Rick Dobbertin up in the Northeast. They pick up the suspension and cradle points perfectly and have a L-shaped trough on top to lay frame rail in. I then sat down and did a whole lot of measuring and figuring and planned out the frame. It is 2 by 4 x 3/16 tube. I had two rails mandrel bent on the East Coast to my specs and then I will did the rest up myself using a whole lot of levels in measuring. Its perfectly square corner to corner diagonally and I think its good otherwise but just not sure. That was the reason for the rough alignment beforehand - make sure everything straight and it doesnt drive like a crab later on going down the road! I will grab in assemble some gear like you did to check it out myself first The guy who I found for alignment today does a lot of hot rods and custom frames - old place with lots of experience. He agreed with 48 Chev that we would only get something really rough until the truck was weighted and loaded and ready to go then a final alignment. Im not even completely sure how they do these four wheel independents but I know its got to be a bear. |
|
|
|
|
02-18-2022, 12:10 AM
|
#13 |
|
Registered User
Join Date: Jul 2007
Location: Toppenish, WA
Posts: 15,405
|
Re: Alignment
Looking at your photos again I'd say that you are already well within the ball park from the looks of it inside the baselines to boot. From the looks of things what adjustment it will need when all is said and done will be so minor it is mind blowing.
Those cute home made cobbled together alignment rigs like E15475 while cute, are a waste of time as far as I am concerned. Ok for setup to make sure that you have the rear wheels pretty well square with the fronts but pretty well useless for actual alignment as they just flat aren't as accurate as you think they will be. The big advantage is that you don't have to depend on a helper taking care to make sure they are measuiring off the correct spots while you are at the other end of the tape.
__________________
Founding member of the too many projects, too little time and money club. My ongoing truck projects: 48 Chev 3100 that will run a 292 Six. 71 GMC 2500 that is getting a Cad 500 transplant. 77 C 30 dualie, 454, 4 speed with a 10 foot flatbed and hoist. It does the heavy work and hauls the projects around. |
|
|
|
|
02-18-2022, 10:35 AM
|
#14 | |
|
Registered User
Join Date: Mar 2007
Location: Scotts, Michigan
Posts: 3,765
|
Re: Alignment
Quote:
That's an unnecessary dig at someone offering to help. Have you ever looked at e15475's build? It is top notch (nothing says cobbled to me). Let's see some recent/current pics of your truck. Your so quick to always criticize and turn your nose up to others ideas. I'm sure you have quite a well executed well planned out truck......I'll wait. Thanks Marc
__________________
...........__________ .................. ((__|__||___\____ ..;.;;.:;:;.,;..;((_(O))____ (_(O)) 1948 Chevy Truck - Finished SOLD!! 1953 Chevy Suburban "Family Truckster" Completed: Spring of 2021 http://67-72chevytrucks.com/vboard/s...d.php?t=605484 1994 4x4 Blazer - "Field Find" https://67-72chevytrucks.com/vboard/...ferrerid=30857 Last edited by youngrodder; 02-18-2022 at 02:53 PM. |
|
|
|
|
|
02-18-2022, 10:52 AM
|
#15 |
|
Senior Member
  Join Date: Oct 2014
Location: Eagle, ID
Posts: 2,979
|
Re: Alignment
Ok fellas. Easy now and let's get back on topic. There's no need to respond to this, "I'm sure you have quite a well executed well planned out truck......I'll wait."
|
|
|
|
|
02-18-2022, 06:10 PM
|
#16 | |
|
Registered User
Join Date: Jul 2007
Location: Toppenish, WA
Posts: 15,405
|
Re: Alignment
Quote:
I do understand his reason for doing it as my wife is horrid at holding the end of a tape measure in the correct spot and he may not have anyone around to help measure and having the grid around the car gives him a degree of accuracy. Possibly if he were to show us how it works overall and how he uses it I would think different. When I first saw it it reminded me of the guys who suggest setting 2x4s against the sidewall of tires to check toe in with rather than doing it in a known accurate and very simple method. Again, I apologize if my wording offended anyone, but I tend to call things as I see them.
__________________
Founding member of the too many projects, too little time and money club. My ongoing truck projects: 48 Chev 3100 that will run a 292 Six. 71 GMC 2500 that is getting a Cad 500 transplant. 77 C 30 dualie, 454, 4 speed with a 10 foot flatbed and hoist. It does the heavy work and hauls the projects around. |
|
|
|
|
|
02-19-2022, 02:46 PM
|
#17 |
|
Registered User
Join Date: Nov 2013
Location: Show Low, Arizona
Posts: 767
|
Re: Alignment
"show us how it works"
Pretty simple. The angle between imaginary line running through the top and bottom ball joints and level is the definition of caster. The threaded studs on the ball joints fall on that imaginary line. (the roundy-round race guys have a camber gauge that screws on to a ball joint threads and uses the same digital level I used - $150 - that's where the idea came from) The end of the stud on the ball joints usually has a pilot to facilitate machining. The round ball ends of the push-rods fit in that tapered pilot and once the internal spring in the tube that holds the scrap push-rods tight, the rod should be in the imaginary line that defines the caster. Then it is just a matter of zeroing the digital level to the ground and measuring the angle. I wiggled the tube back and forth to measure the variation from the tolarance in the slip tube and it was a couple tenths of a degree. I took it on and off a couple times to measure the repeatability and it was also within a couple tenths of a degree - plenty good for a 'rough-in' caster set I needed. When I'd first fabricated the mounts for my front suspension a few years ago, I used a Longacre caster gauge and swung the steering +/- 20 on a slip plate to measure the caster. My home-made tool was within a degree of what the Longacre tool said a few years ago (no longer have the Longacre tool) i used my carpenter square and a steel rule for a really rough check of the caster. This was measured to about the nearest 1/8" and when I trig'd it out, it was within a half degree of my home-made tool. All three methods I used agreed within about a degree, so I didn't have any reservations about suggesting it to the OP who wanted a quick check of his alignment settings before he started hanging sheet metal on his chassis It is about this time in my long-winded explanations that I get "you're an engineer, aren't you?" Remember you did say "show us how it works overall" Hope this will help someone out who just wants to get their truck out for a first drive or down to the alignment shop without scrubbing off tires or winding up in a ditch! |
|
|
|
|
02-19-2022, 04:29 PM
|
#18 |
|
Registered User
Join Date: Jul 2007
Location: Toppenish, WA
Posts: 15,405
|
Re: Alignment
Thanks for the explanation. It stills seems to be a very complicated effort to do something that has a rather simple solution though. I have to say that was my fuss in the first place. Presented something that took a half day or more to create that is essence quite complicated to in the end do a simple job that can actually be done for the most part with a simple angle finder.
Most of us have a simple angle finder with dial in our tool stash  That will let you figure out the camber easily enough. A far simpler solution would be an inexpensive caster camber gauge from China off Ebay or Amazon https://www.ebay.com/itm/27510386407...4AAOSwmalh3PMu and a pipe coupler just large enough to fit over the spindle nut if you have wheels on the truck that let you pop the dust cap off and expose the machined surface of the hub. That would match how my SnapOn caster camber gauge works. Maybe not quite as accurate but well within the + / - for home use during setup and if done right it may be spot on.
__________________
Founding member of the too many projects, too little time and money club. My ongoing truck projects: 48 Chev 3100 that will run a 292 Six. 71 GMC 2500 that is getting a Cad 500 transplant. 77 C 30 dualie, 454, 4 speed with a 10 foot flatbed and hoist. It does the heavy work and hauls the projects around. |
|
|
|
|
02-21-2022, 12:07 AM
|
#19 |
|
Registered User
Join Date: Nov 2010
Location: calgary alberta
Posts: 7,925
|
Re: Alignment
ok, my simple toe in tool, for a quick check, is a wooden block with a sharp nail pounded through it. get the wheels off the ground, place the block on the floor so the nail nearly touches the tire, spin the wheel without allowing the wheel to turn left or right, move the block closer till the nail scratches the tire all the way around. it should leave a mark that doesn't deviate like cutting a thread. do that to both tires and then the reference marks can be measured with the help of a wife or buddy and the vehicle back on the ground. remember to move the vehicle ahead or back some so the suspension settles after being jacked up. the tape messure also needs to have the L shaped bracket on the end modified so the bracket is tight to the rule section as some have a lot of play bwteen the bracket and the rule. good enough to get it to the alignment shop. for a quick camber check I use a digital level on the rotor face. again, good enough to get it to the alignment shop. most of the time I don't concern myself with the angles except for the toe in, its not far to the alignment shop, haha
|
|
|
|
|
02-21-2022, 12:33 AM
|
#20 | |
|
Registered User
Join Date: Jul 2007
Location: Toppenish, WA
Posts: 15,405
|
Re: Alignment
Quote:
The scribed line compensates for any and all wheel/tire runout that you might get with some measuring systems including the Quicktrick alignment set that I bought primarily to get the plates a few years ago. That set even came with a matched pair of dedicated tape measures.
__________________
Founding member of the too many projects, too little time and money club. My ongoing truck projects: 48 Chev 3100 that will run a 292 Six. 71 GMC 2500 that is getting a Cad 500 transplant. 77 C 30 dualie, 454, 4 speed with a 10 foot flatbed and hoist. It does the heavy work and hauls the projects around. |
|
|
|
|
|
02-21-2022, 02:44 AM
|
#21 |
|
Registered User
Join Date: Nov 2015
Location: Jenks, OK
Posts: 234
|
Re: Alignment
Im reading and re-reading your experience at this. You know way more than I do about even how to adjust these parameters once the measurements are taken.
These Dobbertin adapters have a slot on the cradle attachment on each side. I welded the X frame and front radiator support, rear upper brace bolted in. Measures square and level but now is my time for last adjustment before finish fluid lines, body on. If I do bail and have someone do it and take the roller in for stage 1 check, would it be crazy to throw sand bags/weight on it to simulate body weight front and rear for that trip? Anybody know what usual above the driveline and chassis weighs all in? Posted via Mobile Device |
|
|
|
|
02-21-2022, 03:49 AM
|
#22 |
|
Registered User
Join Date: Jul 2007
Location: Toppenish, WA
Posts: 15,405
|
Re: Alignment
Not crazy at all, in fact that is the only you are going to come close to being half way accurate at all or it is just a waste of time to even load it up and haul it down there before you have it all together. Your 100 bucks your call.
I know I sound critical, but I hate to see guys waste time and good money doing something that is in all effect pretty meaningless at this point. The best thing you could do is replace the coil overs with some proper static height struts that gave you the expected finish ride height. Then you could set it up reasonably accurately. If you don't have it at the proper final static height the angles will be off and the toe will probably be off.
__________________
Founding member of the too many projects, too little time and money club. My ongoing truck projects: 48 Chev 3100 that will run a 292 Six. 71 GMC 2500 that is getting a Cad 500 transplant. 77 C 30 dualie, 454, 4 speed with a 10 foot flatbed and hoist. It does the heavy work and hauls the projects around. |
|
|
|
|
02-21-2022, 10:30 AM
|
#23 |
|
Registered User
Join Date: Feb 2016
Location: Hebron
Posts: 1,136
|
Re: Alignment
I'm with the ones that have said, WAIT, till the full weight of the truck is on the tires. Alignment will be close but not accurate until you've gotten it fully assembled.
__________________
 RUBBER DOWN AND HIT THE ROAD!!! RUBBER DOWN AND HIT THE ROAD!!!1940 Ford Dlx Coupe 1969 Mach1 |
|
|
|
|
02-21-2022, 10:55 AM
|
#24 |
|
Registered User
Join Date: Nov 2010
Location: calgary alberta
Posts: 7,925
|
Re: Alignment
if you are worried about the front wheel positioning in the fender openings due to axle center line changes when the alignment is done, then load'er up and get a base alignment done if possible. like mentioned in another post, your hundred bucks. your piece of mind also. just ensure that the ride height and rake angle are pinned first is my advice. it's tough to know how much the weight of the truck will change the ride height but that can be dealt with later as well. if coil overs then they can be adjusted or even swapped for a different set as required. if you think the set up is way outta whack and the axle center lines are gonna change a bunch then go for it. the cost of an alignment isn't gonna break the bank. otherwise start putting stuff together until you run outta parts, haha.
|
|
|
|
|
02-21-2022, 06:12 PM
|
#25 |
|
Registered User
Join Date: Nov 2015
Location: Jenks, OK
Posts: 234
|
Re: Alignment
Im still taking it in, thanks for your comments. I had not thought about how wheels aligned with fender openings changes with body weight and compression but that is so true especially I think on these Corvettes the rear suspension probably travels forward under load. I went ahead and threw the bed on the frame with a few bolts in it and put a fender on some blocks on top of the tire to see how things look.
These are Ride Tech coil overs -adjustable 2 ways. On top of that, those guys have great support when I have called them. He let me know that if I was careful with the coils and did not damage them, when we load the truck down if everythings not quite right or the truck is too stiff we can swap them out for a different coil as well. If that affects alignment, I guess sorting that all out before final alignment would be best. And Im thinking that getting the final wheels and tires on it before that is done is wise as well. I think what Im really trying to find out is if it will even be alignable when Im done. Couple more pictures Ive taken as this conversation evolved. Maybe you can see on those Dobbertin adapters from Corvette cradle up to the frame there is a pin coming up through it that has lateral movement side to side. I guess worst case scenario a person could put some shims in between the frame rail and the adapter if you needed to swing things further in other direction. A lot of the rest of the adjustability is probably beyond my understanding. Also-Interesting- this week I have been getting busy ordering stuff like gauges, custom wiring harness for driveline, body wiring harness, vintage air and stuff like that. Crazy how long its taking to get some of those things - up to six months behind from some places. Sure is good to see the aftermarket and hot rod industry doing so well! Cant even keep up with orders, must be a lot of guys like us out there having fun building stuff! I guess everybodys different but a lot of the joy I get out of projects like this is not only figuring it out but learning from other people like you guys. Now, if I can just remember what I learned for more than a few months. Seems like halfway through a problem I remember that I had already figured out the solution for that a few years back then forgot about it the next time I came across it. Last edited by Rickysnickers; 02-22-2022 at 10:27 AM. |
|
|
|
 |
| Bookmarks |
|
|


 Linear Mode

