
 |
Register or Log In To remove these advertisements. |
|
|
|
|||||||
 |
|
|
Thread Tools | Display Modes |
|
|
#1 |
|
Registered User
Join Date: Jul 2014
Location: South East Ohio
Posts: 644
|
Salvaging (Early) Round Top Cover NV4500
Most problems with the early round top trans covers can be resolved by purchasing the new part required. There is one condition that I haven't seen a solution to yet and that is the shifter stub seat worn out. I think there may be a solution to this also. At least it has worked for me. So far.
I have read some excellent threads penned by the members here, some of which have (and yet will) spare me agony of catastrophic failure, economic attrition or at least undue agony while I plod through the restoration of a 1970 C-30 dually. My expertise at turning a wrench has been limited to knowing which way to turn the bolt depending upon whether one desires to tighten or remove it. Basically, I'm as green as they come on the subject of transmission rebuild and replacement so any advice or critique is welcome. If I can do it, then nearly any one can, provided the idea is sound. I find that I have to work on a very restricted budget and should a situation arise that I wasn't prepared for, I better be able to devise a working solution. Well, that has happened. When I bought my NV4500 I knew it was a high mileage part. I expected to do the typical rebuild, replace synchros, bearing, seals, hubs, rings and springs and things...And there is a lot of good advice on how to do that from people more qualified than me. Some have advised me to just buy a rebuilt trans and be done with it. Good advice to be sure but my curiosity for whats inside the mechanical box over turned the vote put forth by common sense. Nevertheless, I am arriving at a point that I understand a great deal more about trans rebuild/swap than I did before, and that was part of the goal. One of the things I learned is that the shifter stub seat on the round (early) style top covers will wear. That thought might have been obvious to more experienced people but it was a secondary notion (at best) when I considered my rebuild. The trans I eventually bought came as an assembly, though it was evident the covers had been removed some time long passed and the shifter which came with it had simply never been returned to it's moorings. I figured these things were to be expected. It wasn't until after I had performed a good cleanup on all my parts, rebuilt my main shaft assembly and began to put it all back together that I discovered the top cover was headed for the recycle bin. A new top cover assembly can easily cost 400 dollars or more, an expense that isn't always necessary or in my case, well outside my budget. This '93 had seen many miles which was evident on disassembly and the top cover had seen better days.The shifter stub had worn into the seat and as you will see, the bottom of the shifter was wearing into the center rail so much that it locked the shifter from moving. While working on the top cover, I discovered one of the shifter pins that the stub pivots on, was also broken. And while I could have purchased a small parts kit to fix the broken pin, the seat was still a problem. To my knowledge (and I searched high and low) there seems to be no method to repair the seat inside the shifter stub tower on the one-piece, round style top covers. What follows is a brief description of how I managed to solve this problem and quite possibly save a few hundred dollars (that I didn't have anyway). This worked for me and maybe it can help some others but it has yet to be time tested. I think it will last at least as long as the transmission but given that I've never run across this technique before, that's just a weighted guess. I'll try to be as clear as possible and answer any questions as well as I can. The beginning This is the top cover I'll be working with throughout this write-up. It will go through some changes [IMG] 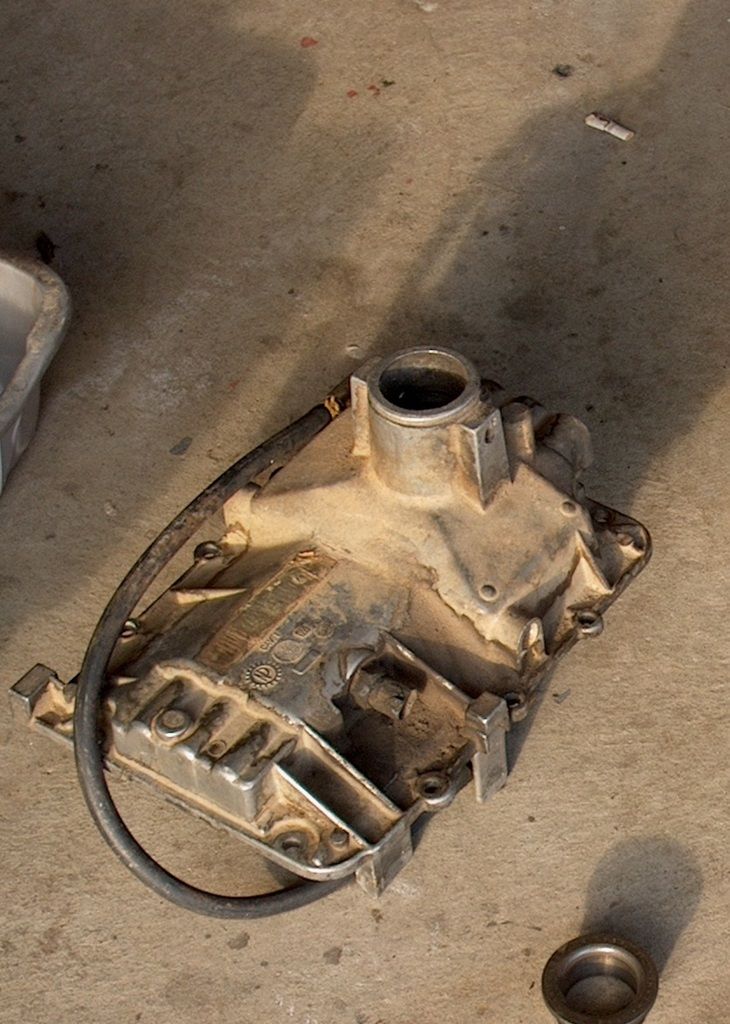 [/IMG] [/IMG]
|
|
|

|
|
|
#2 |
|
Registered User
Join Date: Jul 2014
Location: South East Ohio
Posts: 644
|
Re: Salvaging (Early) Round Top Cover NV4500
TC gets a bath
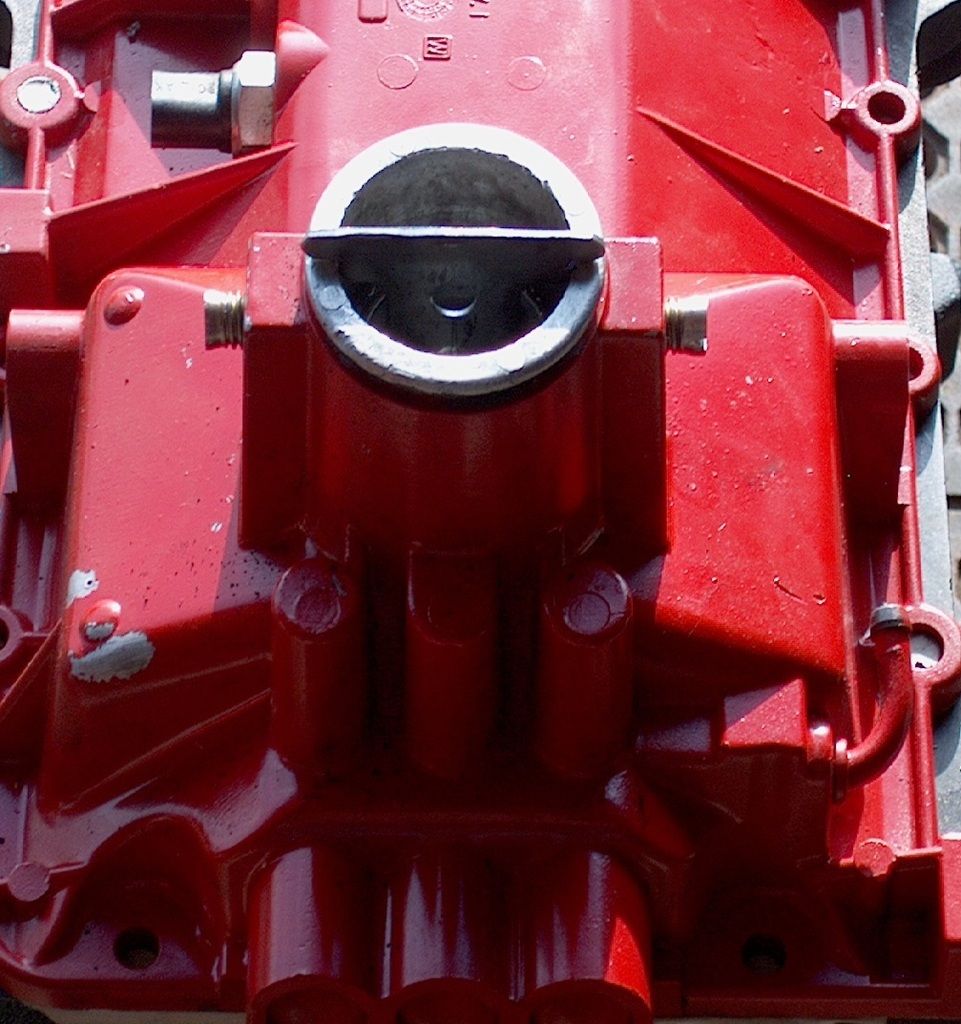
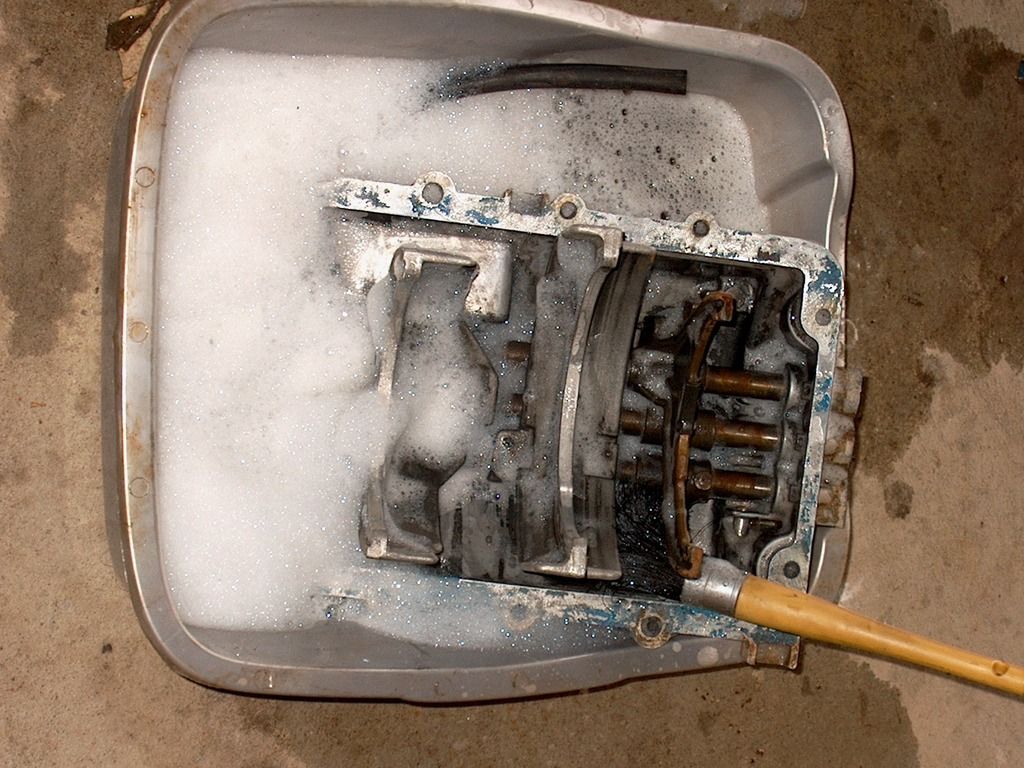 Boiling water and Dawn dish detergent cut away most superficial debris.Then a good wash with carb cleaner and engine degreaser. Diesel fuel works well also 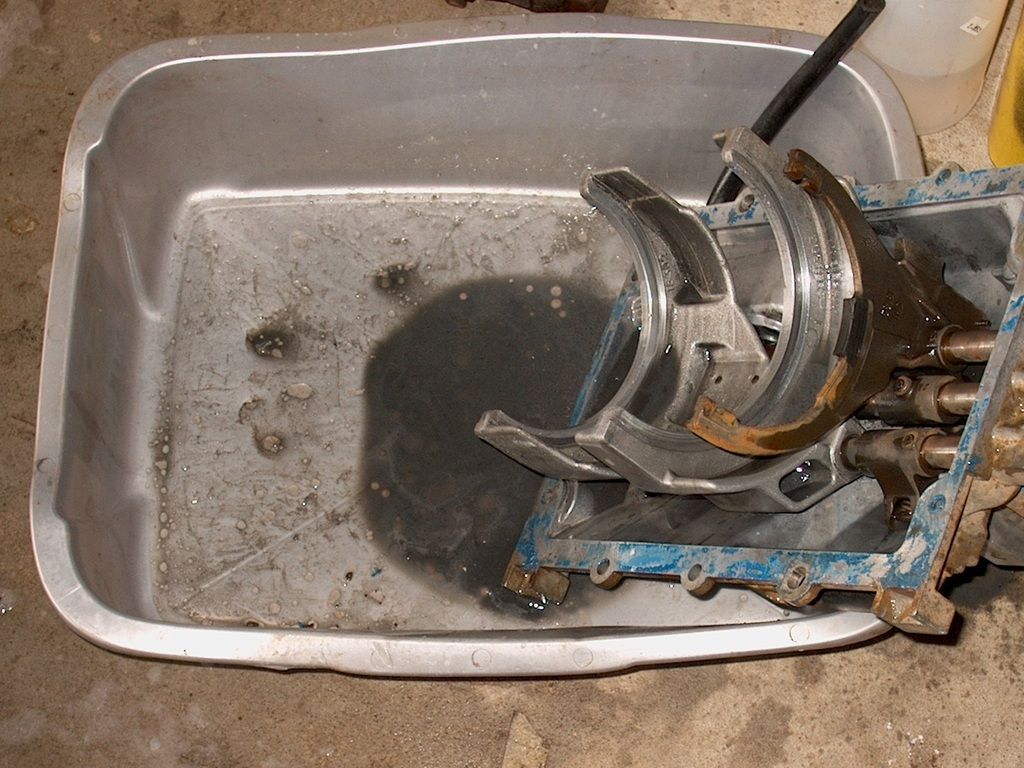 Then an acetone rise. Using a one gallon can of acetone I rinsed the TC until the acetone ran clear. (about 4 times) 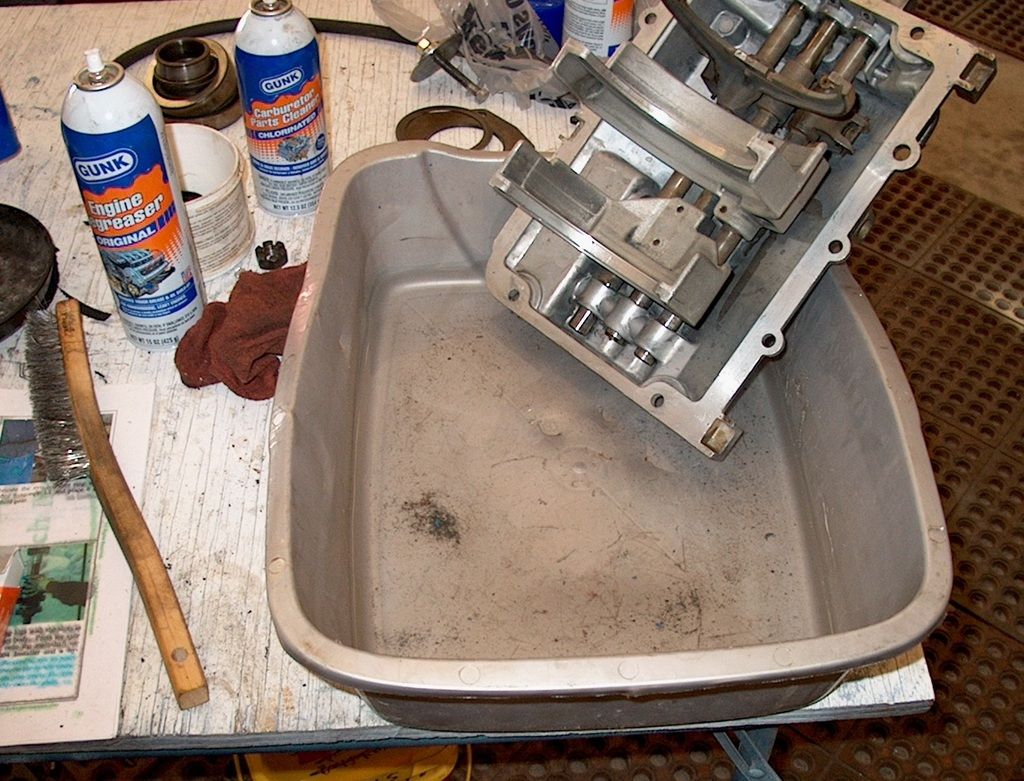 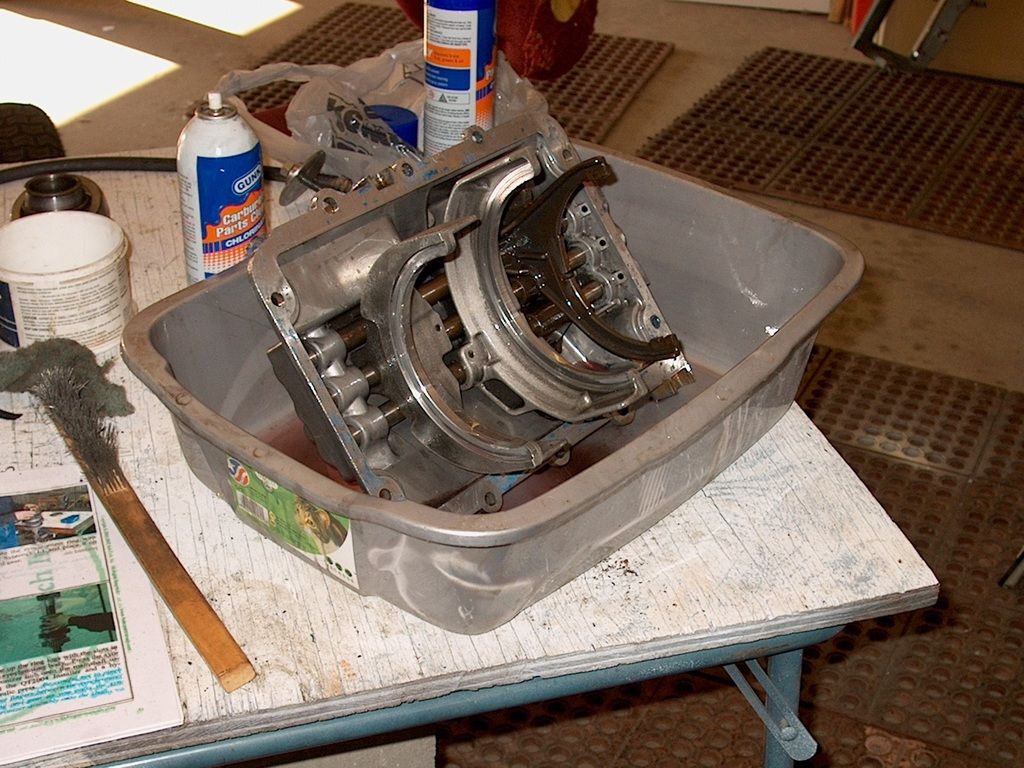 And finally, after much elbow grease and sweat equity, I have a reasonably clean part. Washing alone did not produce this result. Hours spent with wire brushes and a cordless drill also helped. 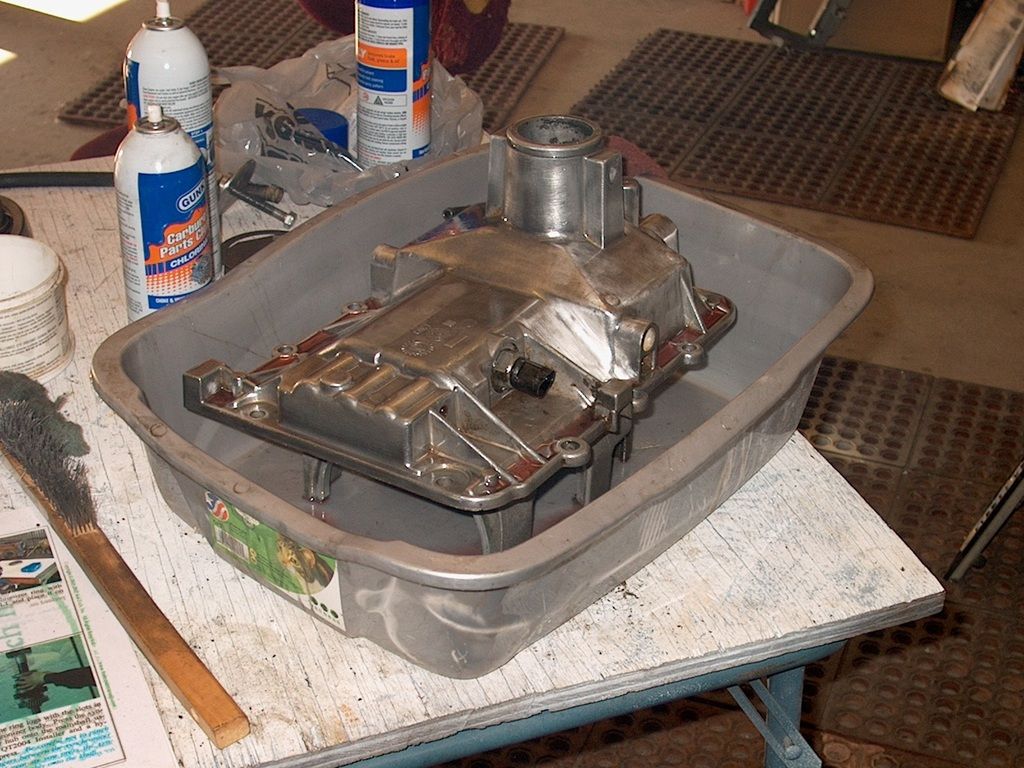 Add a coat or three of caliper paint, lube the internals and we're good to go ...right? Wrong. I just couldn't be that fortunate. In this picture, a close look down the throat of the shift tower shows the original pivot pins for the shift stub. At this point, I had not yet tried to attch the shifter to the top cover. And having put that much effort into cleanin' it up I wasn't ready to throw it in the trash. 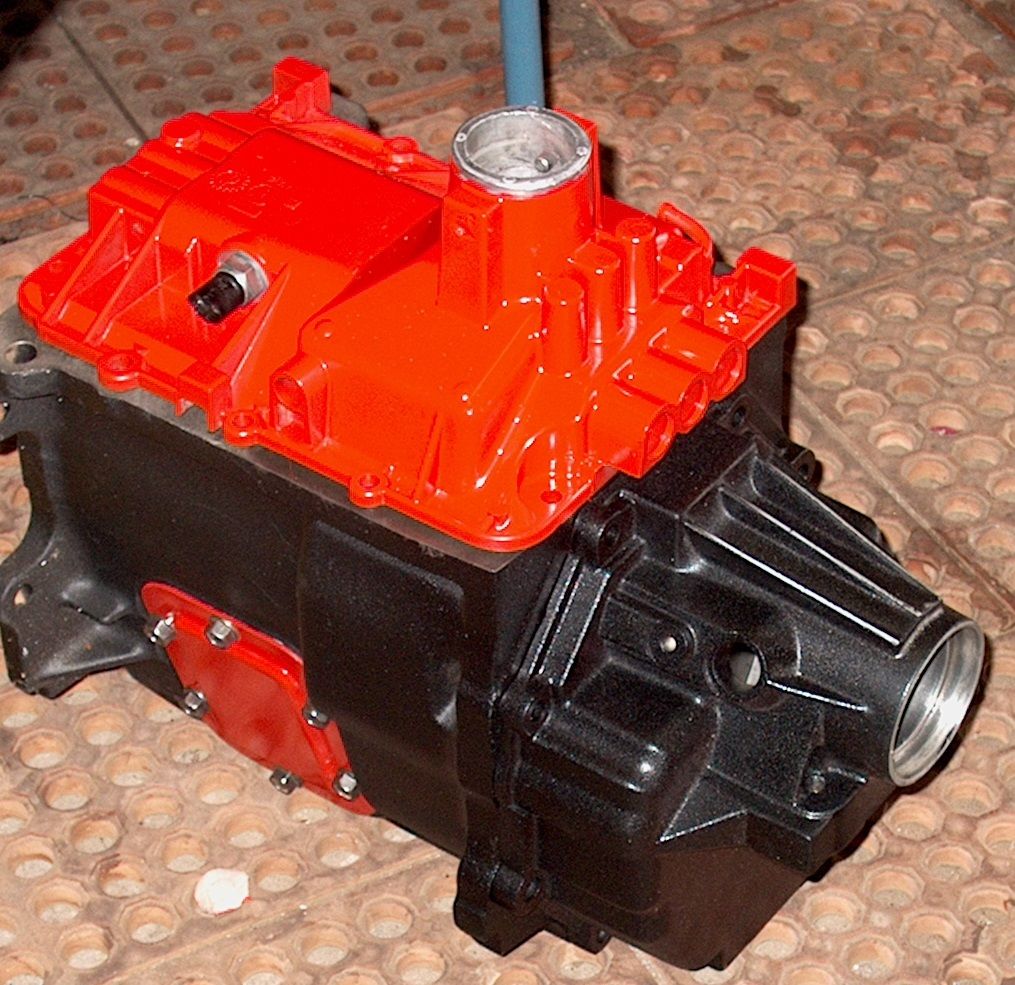 So begins the repair of the shifter stub seat. |
|
|

|
|
|
#3 |
|
Registered User
Join Date: Jul 2014
Location: South East Ohio
Posts: 644
|
Re: Salvaging (Early) Round Top Cover NV4500
The Kit
These are the parts I used to effect the repair A= Is the first mistake I made. (Well, not "ever" but...) It is a 2 inch bolt, 7/16 x 14, grade 8 with the head cut off. But the bolt had a smooth shank about an inch above the threaded portion that you see in the picture. I cut the smooth shank portion off along with the head of the bolt. Don't Do That. Just take a hacksaw or an angle grinder or the abrading device of your choice and remove the bolt head only. Keep as much of the shank as possible (for now). You'll see why shortly. B= The two replacement pivot pins. They are roughed in but you can see the length has been shortened and the the end has been reduced in diameter. C= The hemispherical shim but since I dont like to type, I'm calling it a "cup". It is a stainless steel shim that goes inside the shift tower and the shifter stub rests on it. The cup is made to slide over the end of the shifter stub. D= The centering tool. More on this later. 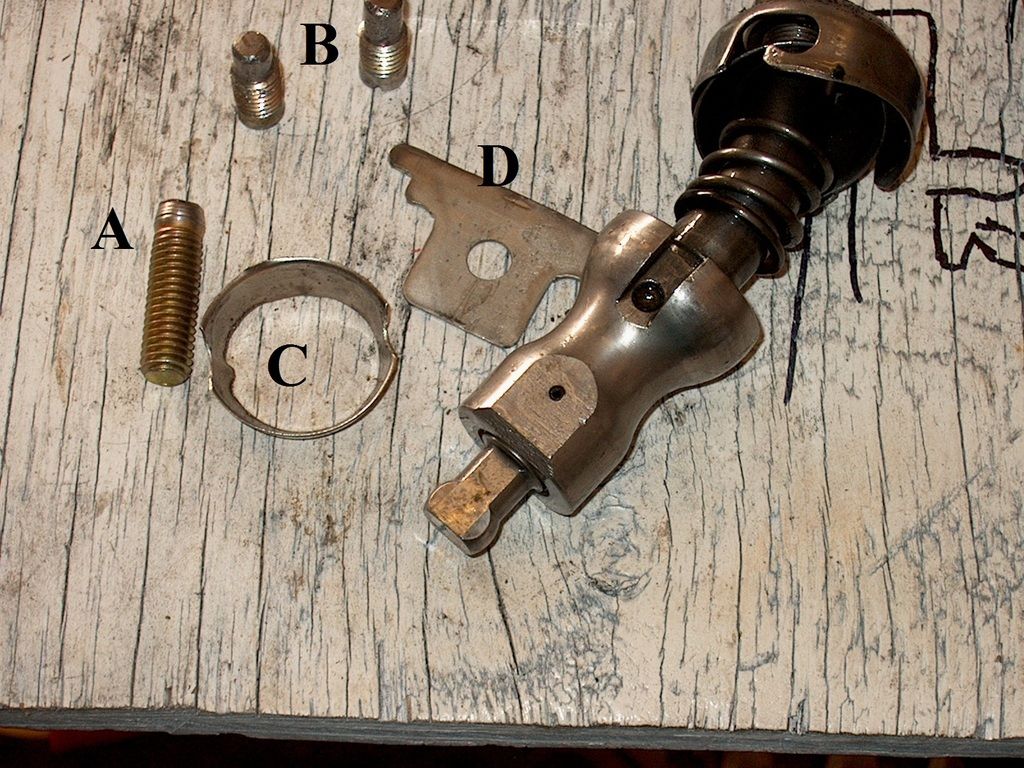 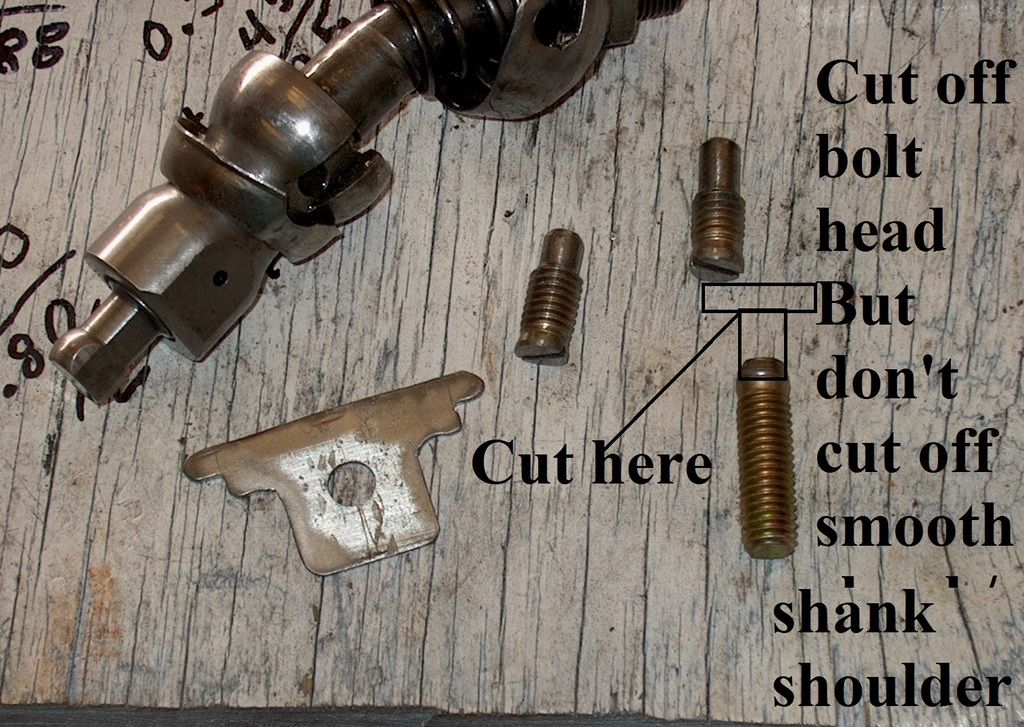
Last edited by Richard2112; 07-16-2017 at 07:07 PM. |
|
|

|
|
|
#4 |
|
Registered User
Join Date: Jul 2014
Location: South East Ohio
Posts: 644
|
Re: Salvaging (Early) Round Top Cover NV4500
|
|
|

|
|
|
#5 |
|
Registered User
Join Date: Jul 2014
Location: South East Ohio
Posts: 644
|
Re: Salvaging (Early) Round Top Cover NV4500
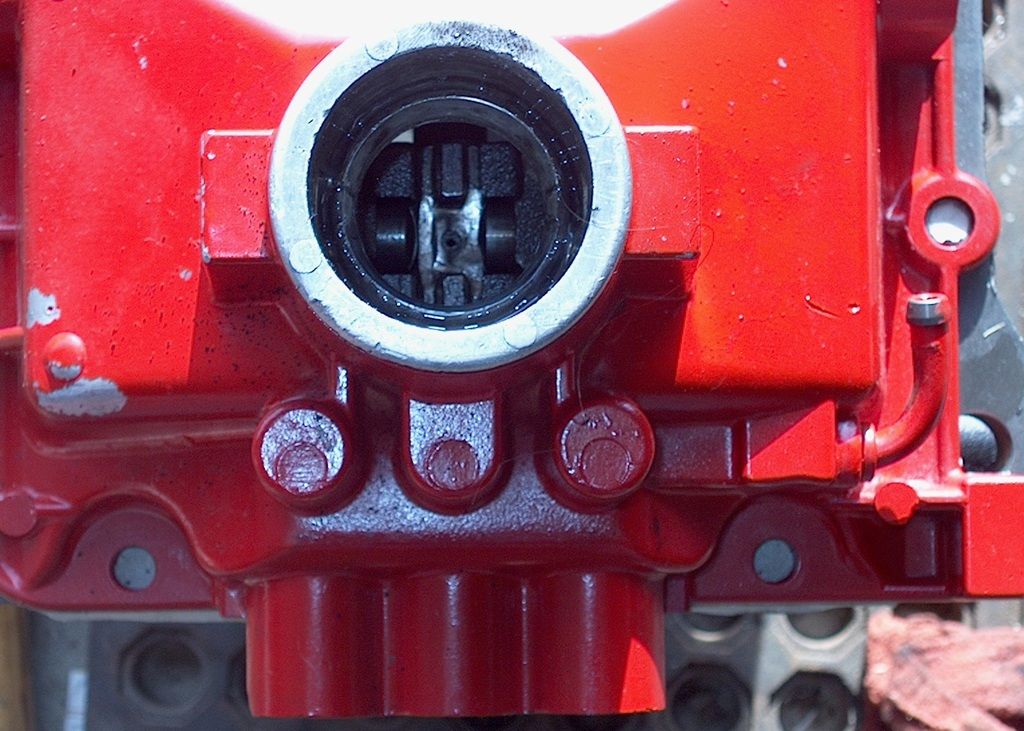
Here is a look straight down the throat of the shift tower. You can see the shiny metal where the shifter has worn into the center rail. This was preventing the shifter from shifting. The cup will lift the shift stub just enough to clear the rail. Also note the original pivot pins are gone. I drove them through with a punch and a small sledge.
|
|
|

|
|
|
#6 |
|
Registered User
Join Date: Jul 2014
Location: South East Ohio
Posts: 644
|
Re: Salvaging (Early) Round Top Cover NV4500
After the pins were punched out, I opened the holes out in three steps, working up to a 23/64 size bit or 0.3680. These are the bit sizes (pick one) that allows for a 7/16 x 14 tap.
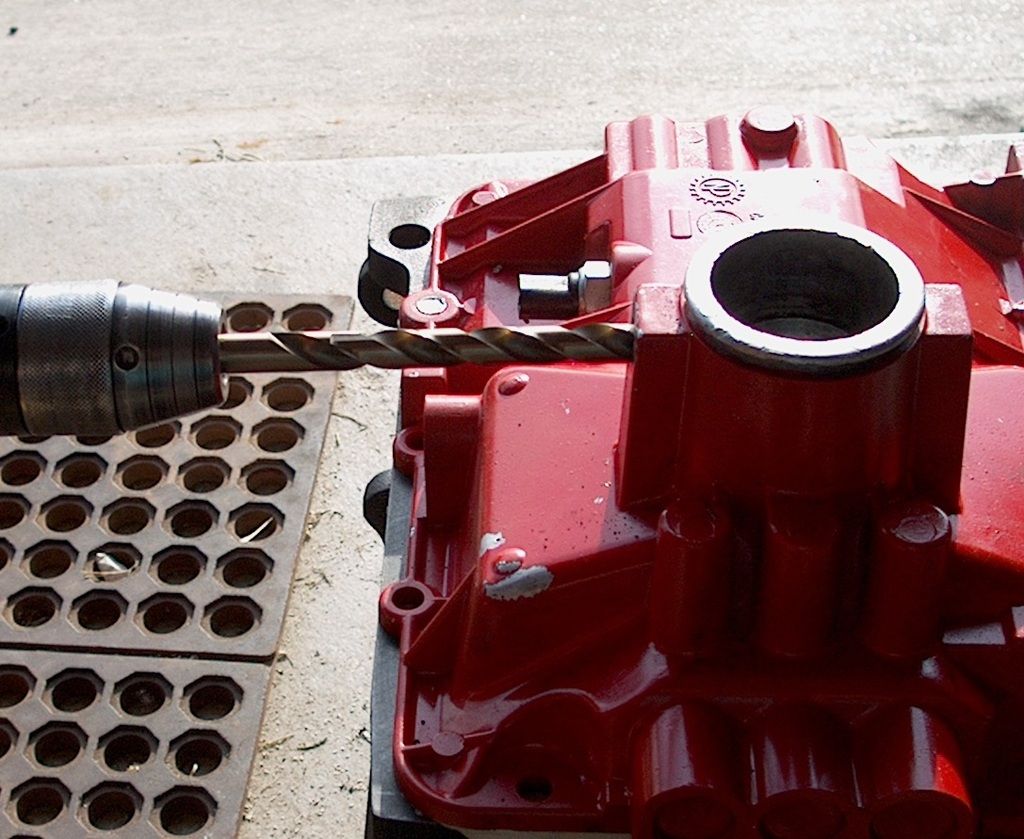 I know, I was supposed to use tap oil. I didn't wear safety glasses either. Now that we're punched, drilled and tapped we need to use the bolts to make the pins. 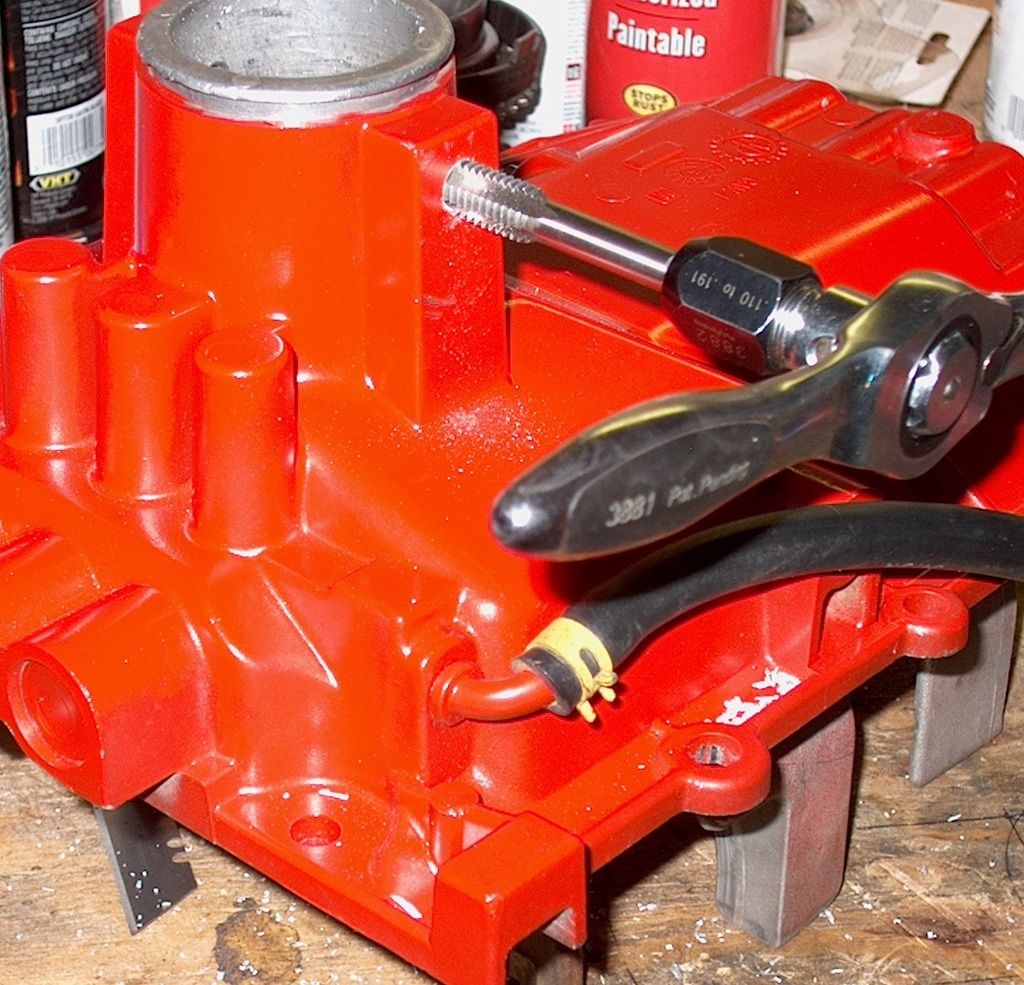
Last edited by Richard2112; 07-16-2017 at 07:53 PM. |
|
|

|
|
|
#7 |
|
Registered User
Join Date: Jul 2014
Location: South East Ohio
Posts: 644
|
Re: Salvaging (Early) Round Top Cover NV4500
#A Note About The Bolt Size
I chose a 7/16 bolt for two reasons. One is because the final diameter of the pivot pin was determined by measuring the slot in the shifter stub. Using a 7/16 bolt means I only had to remove the threads and polish the pin end of the bolt. The other reason is that had I chosen a larger (1/2 inch for example) the shank of the bolt may not fit into the drill that I am going to use to cut the threads off. The shoulder of the bolt is larger than the diameter of the threads. Pic's coming. |
|
|

|
|
|
#8 |
|
Registered User
Join Date: Jul 2014
Location: South East Ohio
Posts: 644
|
Re: Salvaging (Early) Round Top Cover NV4500
After cutting the head off the bolt,insert the smooth shank of the bolt into a drill or drill press. This is why you only want to cut off the head of the bolt and leave the shank to be cut later. I'm sure there are better ways of doing this but this is just how I did it. Using a flat file I removed the threads on the lower portion of the bolt.
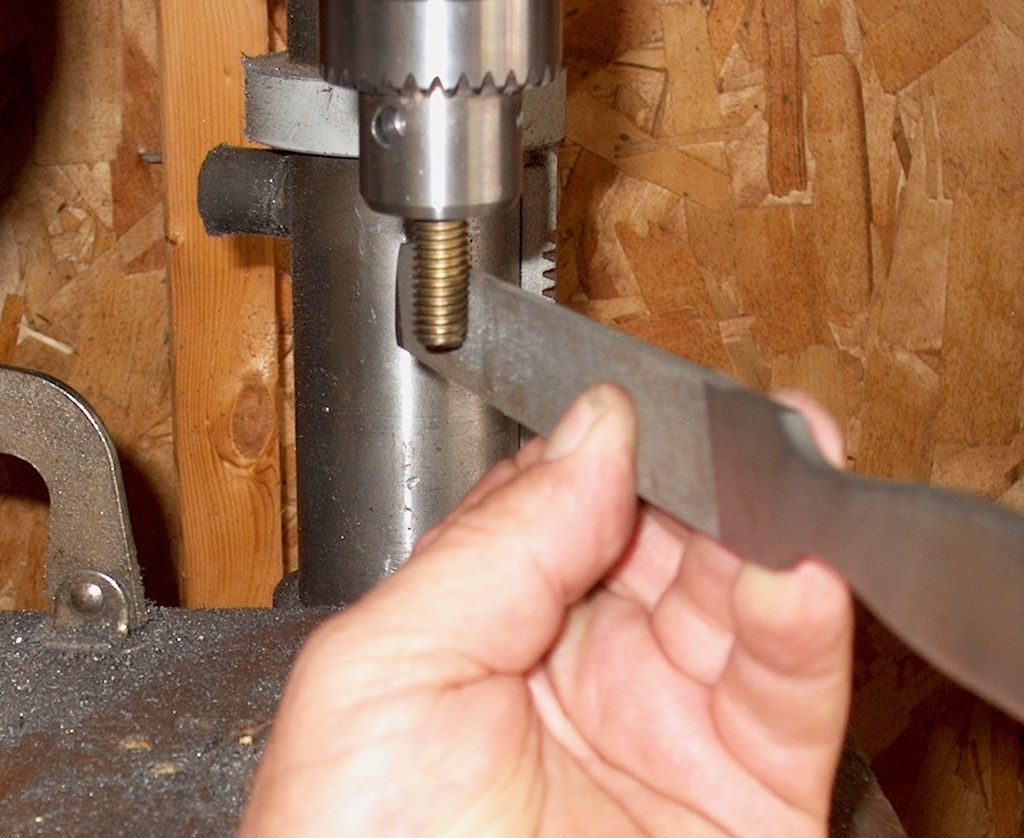 Once the threads are filed off, you have to start checking the diameter. In my case, the target diameter was 0.325. How much thread you leave on the bolt above this area is entirely your choice. I left about 5/8 or 8 threads. This picture (below) is really disproportionate. The filed end would actually be longer but this is just an example using a finished pin. That is also why it is crooked in the drill vise (there's no shank remaining to insert) 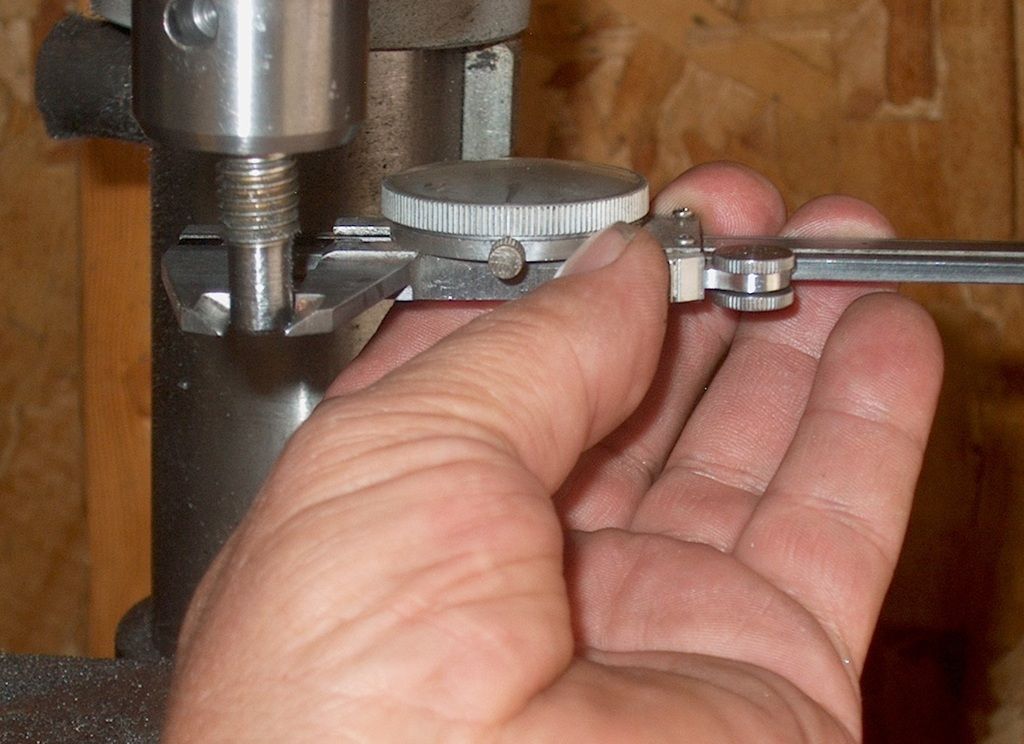
|
|
|

|
|
|
#9 |
|
Registered User
 Join Date: Dec 2012
Location: Vancouver, Washington
Posts: 1,644
|
Re: Salvaging (Early) Round Top Cover NV4500
Sweet refurbishment! Turned out awesome!
__________________
1968 Chevrolet C/10 LWB - 327, TH350 - 4/5 Drop |
|
|

|
|
|
#10 |
|
Registered User
Join Date: Jul 2014
Location: South East Ohio
Posts: 644
|
Re: Salvaging (Early) Round Top Cover NV4500
Two pins
One of the pins shown is cut to length on the pin end and both are cut to length on the other (smooth end). I'll show you how to accurately cut the pin end in a minute but now is the time to cut the shank down. Cut off the shank just above the threaded portion of the bolt leaving a bit of the shoulder as shown. The shoulder will provide a positive stop when you thread the pin into the hole in the shift tower. Now cut a slot into the top of the pin so you can use a screw driver to run it into its hole. Also, the shoulder portion is small enough that it can be recessed into the hole in the shift tower by counter boring with an oversize drill bit. I used a 1/2 bit for this. I counter bored "free hand" with a cordless drill but I don't recommend it. The counter bore depth wont be accurate. That's not really a big deal but the pins will be different lengths and not interchangeable from side to side on the shift tower. 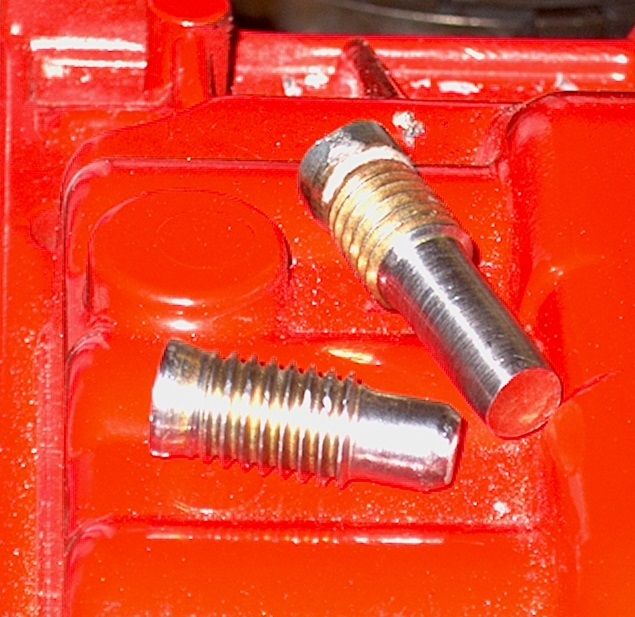 For the counter bore, find a piece of pipe or tube that just fits over the drill bit. A 9/16 ID tube will work well slipped over a 1/2 inch bit. Cut the pipe or tube so that the drill bit (after it is inserted in the drill) only protrudes the amount that you want to recess the pin. Drill your counter bore with the tube over the bit and the tube will cause the bit to stop at the depth you selected. Apologies for lack of pics here. So far our holes are drilled, tapped and counter bored, the pins have been turned down to an appropriate diameter, the shank has been cut off and slotted. But the pin end still needs cut and they need to be cut accurately. Last edited by Richard2112; 07-16-2017 at 07:57 PM. |
|
|

|
|
|
#11 |
|
Registered User
Join Date: Jul 2014
Location: South East Ohio
Posts: 644
|
Re: Salvaging (Early) Round Top Cover NV4500
Now remember back in the original picture of the kit with parts labeled, A, B, C...Well the part labeled "D" is a centering tool. It makes life much easier when doing this project.
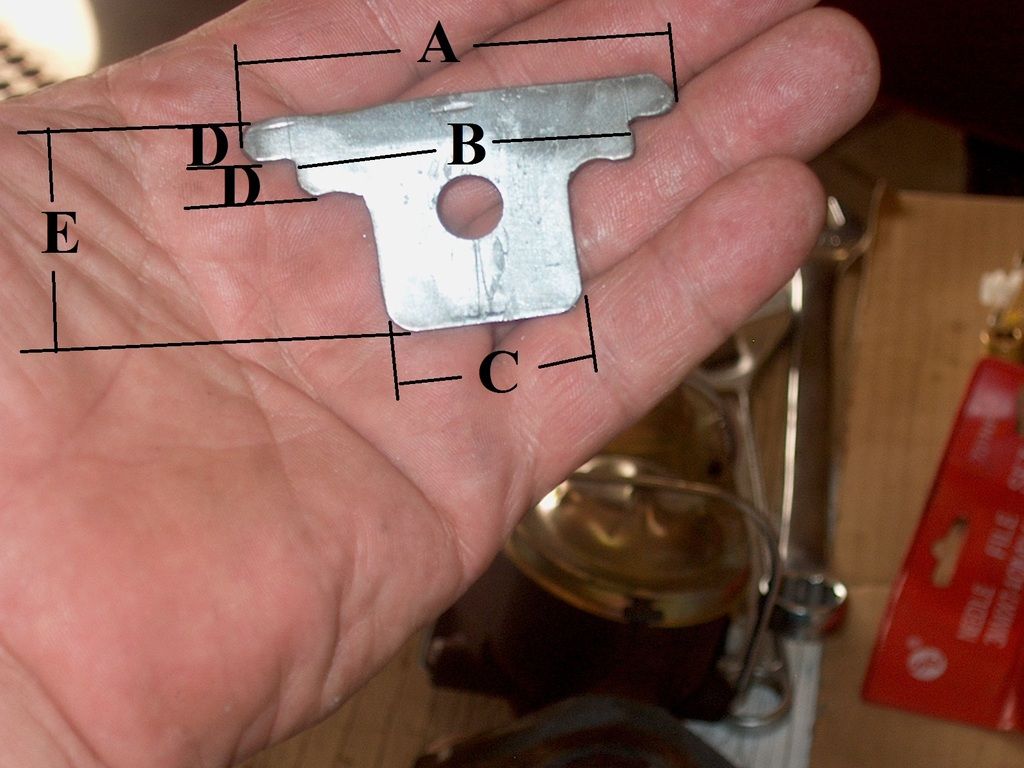 Tool Dimensions A= The outside diameter of your shift tower B= The exact inside diameter of your shift tower C= the distance measured on your shifter stub, from inside the slots that the pivot pins recess into. C MUST be centered on B. C is the stop point that keeps your stub centered... Pics comming. D=3/16 (both) E= arbitrary just as long as it goes deep enough into the shift tower to get past the pin holes and doesnt contact the stub seat. |
|
|

|
|
|
#12 |
|
Registered User
Join Date: Jul 2014
Location: South East Ohio
Posts: 644
|
Re: Salvaging (Early) Round Top Cover NV4500
This picture shows the tool in use and the two pins inserted in the sides of the tower. You really want to do one pin at a time. So, drop the tool into the tower making sure it is centered on the holes. The tool shouldn't be loose across the diameter but it should be able to swing or pivot a little. Thread one of the pins through it's hole. It will hit the tool before the pin goes all the way in. Allow the tool to pivot out of the way and run the pin full depth.
 Inside the tower, the blade of the tool should be resting against the shank of the pin. Use a sharp tool (scribe) and scratch a mark in the pin along the edge of the blade. This is the length you'll want to cut the pin end. It will be a very small mark so look closely to make sure the mark is distinct. Back out the pin and cut it evenly. File the end flat if necessary. Use a screw driver and run the pin back in. It should touch the edge of the blade but not press against it. If it puts pressure on the tool, it will put pressure on the shifter stub when it is installed. Re-cut, file or grind until it fits properly. Once it fits, remove it and do the other pin. Chamfer or round the edges of the pins back with a file after they're fitted. With the tool in place, run both pins in to full stop and tighten them up, one at a time, checking to see if they contact the edge of the tool. You want a tiny amount of clearance. The tool should be free to pivot or swing back and forth with both pins in at full stop. A little more clearance is better than not enough. |
|
|

|
|
|
#13 |
|
Registered User
Join Date: Jul 2014
Location: South East Ohio
Posts: 644
|
Re: Salvaging (Early) Round Top Cover NV4500
Now we can focus our attention on part C, the "cup". Granted the one I show you is in a rough stage of finish but I've since buffed it up and it looks good and performs well.
To make this part you'll have to find something made of stainless steel that is small and hemispherical. This is the only trick part of this project. After that, making the part isn't difficult. Don't bother to look in any automotive catalogs because it wont be in there. However, If you go into the kitchen, you know that drawer where the wife keeps all the miscellaneous utensils like the apple corer, the potato peeler, etc... Yeah, that one. Open it and take a good look. Stainless steel everywhere. Now take a close look at her set of measuring spoons and ask yourself these questions: #1-are they stainless steel, #2-are they half-round and #3-does one of them look like a good match for the diameter of the shifter stub? If all three answers are yes then you have struck gold and won't have to make a trip to Walmart. That's right, the stainless steel shim (cup) that's about to save you 400 dollars once lived its sedentary life as a 2 dollar measuring spoon. Haha! Now snag the spoon and take it to the garage, take your calipers and measure the inner diameter of the spoon and the outer diameter of the shifter stub where it meets the seat. Close? If not you might still have to make that trip. Once you have the appropriate size (and shape) stainless steel device, turn it in to something useful. Cut or grind the little handle off and file the area so it is smooth. Put it aside and go get your shifter stub. Stare at it. Anything happen? Ok so were going to have to cut a passage into the stainless steel hemisphere (sounds a lot better than "measuring spoon") which is the same shape as the bottom of the shifter stub. Our only difficulty here is the bottom of the shifter stub is flat, and the "cup" is round. No worries. Find some masking tape at least as wide as the shifter stub. Take two or three pieces (a couple inches long) and laminate them together so you have one thick piece of tape (three layers). Clean the shifter stub with acetone or alcohol so the tape will stick. Cut a hole in the center (close counts) of the tape strip you made so the end of the stub will just pass through. Slide the tape over the end of the shift stub and carefully press the tape over the bottom of the stub so it sticks everywhere. Don't worry about the excess just apply it so it doesn't move then trim the shape of the shifter bottom. Carefully remove the template you just made, being cautious that it doesn't stretch too much. carefully center this template on your stainless steel hemisphere. There are many ways to do this and at this point it just has to be close. Mark the shape onto the hemisphere with a sharp tool (scribe) and cut it out with the abrasive tool of your choice, file, bench grinder, band saw... Then smooth the cut edges with a small file. Try to slide your part over the shifter stub. If you have done you work accurately, it wont fit. But that's ok. Examine your part. Chances are it needs some "tuning" to bring the passage onto its actual center but it shouldn't be far off. Grind or file the points of contact on the part so that the interference with the shifter stub is minimal and it tends to bring the passage closer to center. Keep working in this manner until the part slides smoothly over the shifter stub and cup rests against the matching surface of the stub. Again, it just needs to be a close fit but the closer it fits, the better it will work. Now look at this picture ... 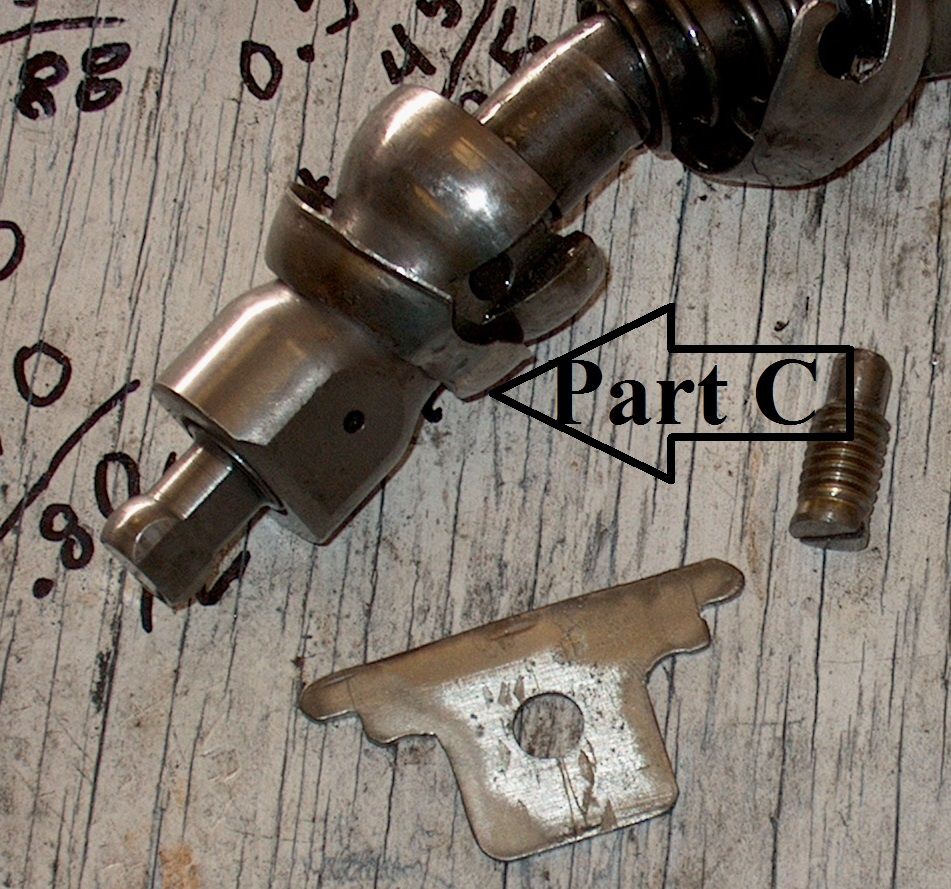 Notice there is a small half-round relief in the edge of the cup for the pivot pins. There's nothing special about them except that they need to be roughly in line with the pivot pin channel cut into the shifter stub. This will help to limit the movement of the shim cup once the shifter is installed but still allow freedom of movement with the shifter. Use a grinder or file and cut the two half round areas. Just gotta be close. A good estimate works but for greater accuracy just scribe their locations while holding the cup against the shifter stub seat area. You may note that the diameters of the cup and the shifter stub seat area differ slightly. If you used the right sized measuring spoon, this difference will be negligible but we're going to use that difference anyway. As long as its close (and it should be pretty close) then the slight difference is to our advantage. At this point you should be able to try to install the shifter stub with the shim cup. It could be a real struggle and it may not even be possible to get it installed. That's because of the difference in radii between the seat in the top cover, the seat area on the shifter stub and the cup. To install the cup correctly we're going to have to "seat" it. Seating the shim cup will force it to conform to its new environment. Place the shifter stub and shim cup into their respective positions in the shift tower. Put the two pivot pins in and tighten them. Don't try to depress the spring and lock the shifter stub. In fact, it's best if the spring and the upper parts aren't there at this time. They'll just be in the way so go ahead and remove them if you haven't already. Now there is a nut that threads over the top of the shifter stub. Bring this nut to the top of the stub and make sure the nut is flush with the top of the stub. Place the top cover in your empty tans case. We are preparing to strike this with a heavy hammer and do not want to ruin the threads. A small three pound sledge works great for this but it doesn't require much force. So with the stub in place between the pins and our cup in place where it will go and the nut protecting the stub threads, give the nut a fair blow. One should be all it takes. Now try to lift the stub out of its hole. You may find that it gets caught on the cup and the cup gets caught on the pivot pins. This is a good thing. Just use a screw driver and back out the pivot pins. It means that the shim has flexed (seated). Your stub might just pull out easily and that is ok too. The shim cup probably seated but the passage you cut in the hemisphere may have been slightly larger than mine. That's fine as long as the shim cup seated. How can we tell if the shim cup seated when the shifter stub slides out easily? Well, look again at the picture of the cup and your cup. In the picture, there are now two small dents in the cup, one on each side, just below the half-round relief you cut for the pivot pins. Those two indentations should be in you cup after seating. They are made by the two small protrusions that are in the seat of the shift tower. Those two small protrusions are what prevented you from being able to install the shifter completely. Believe me when I tell you, it is a serious pain to try to install the shifter without seating the shim cup. Now, if you had to back out the pivot pins to remove the shifter stub then the shim cup is sorta stuck on your stub. That's ok but who knows, that cup may have to be replaced some day. So though it might take a little force to remove your stainless steel shim cup, it'll come off and with a little filing it will fit like a custom made part. After all, that's what it is. I would recommend a final filing/fitting so it works nicely. It isn't hard and you've gone this far. It's a nice touch. Put some trans fluid on your parts as lubricant and assemble/install your shifter. It will roll through the gear pattern smooth as silk, perhaps better than new. Don't forget to put some thread locker on the pivot pin threads. otherwise the shifting action will loosen them. 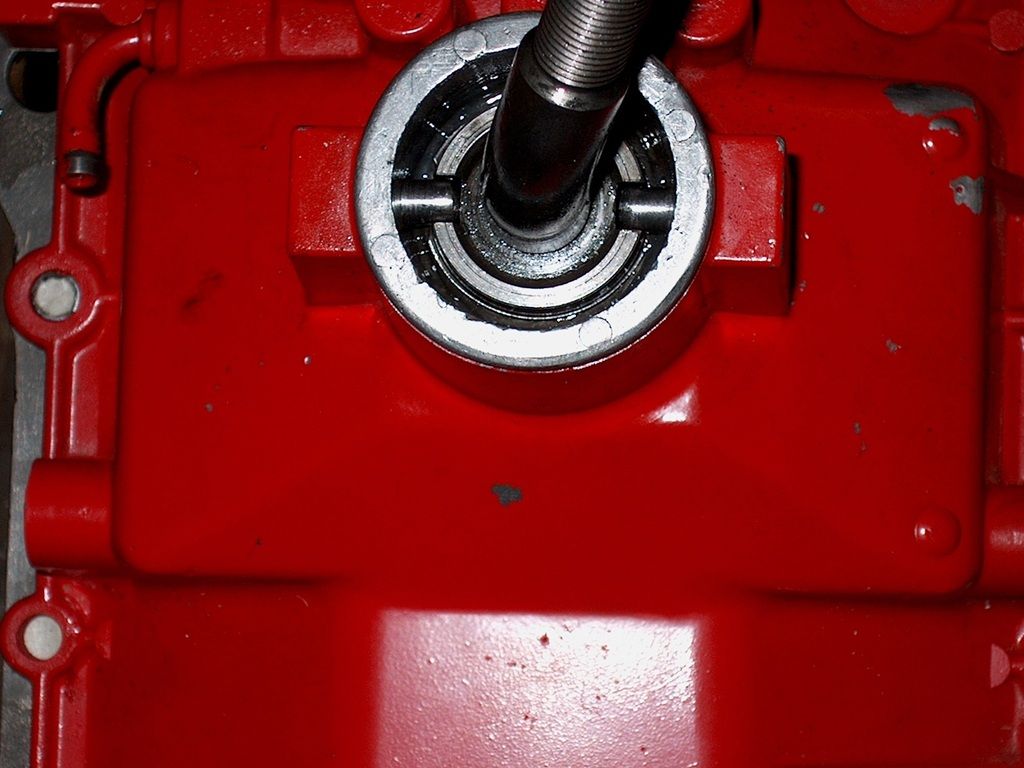 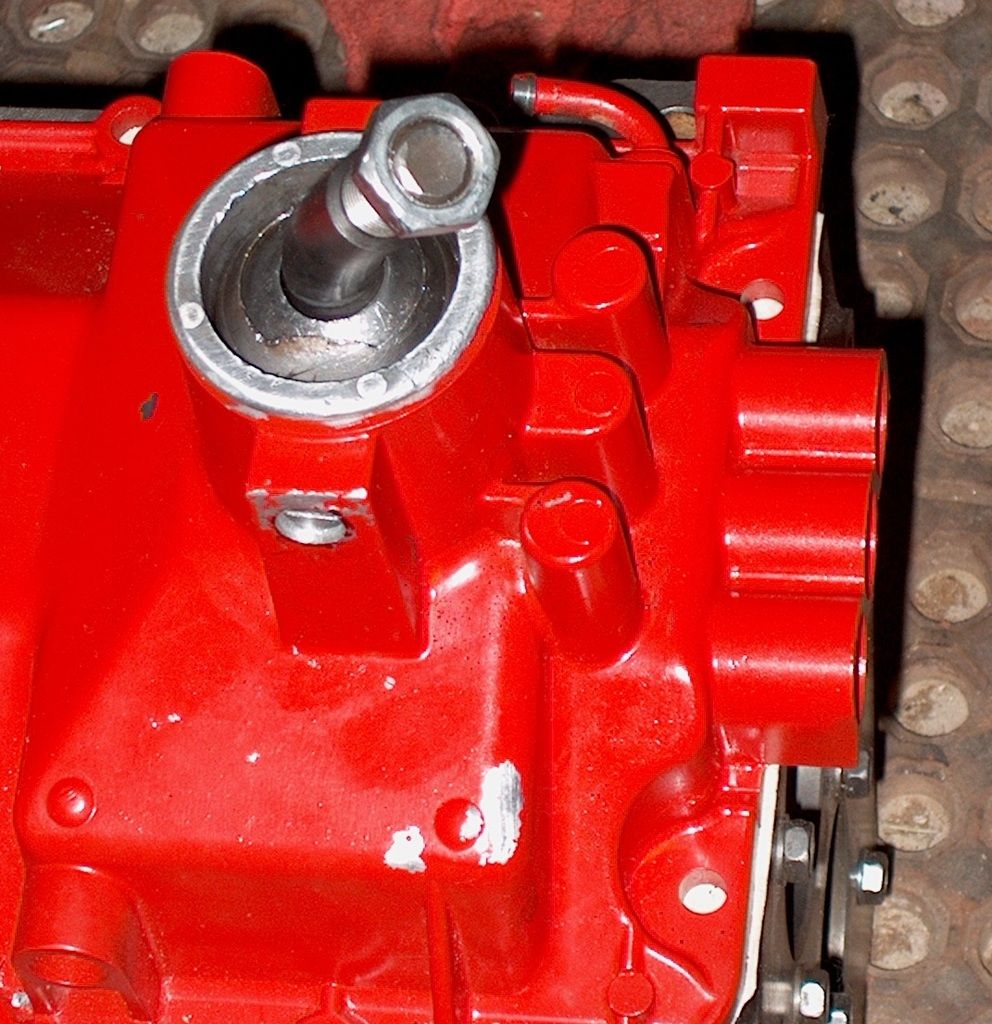 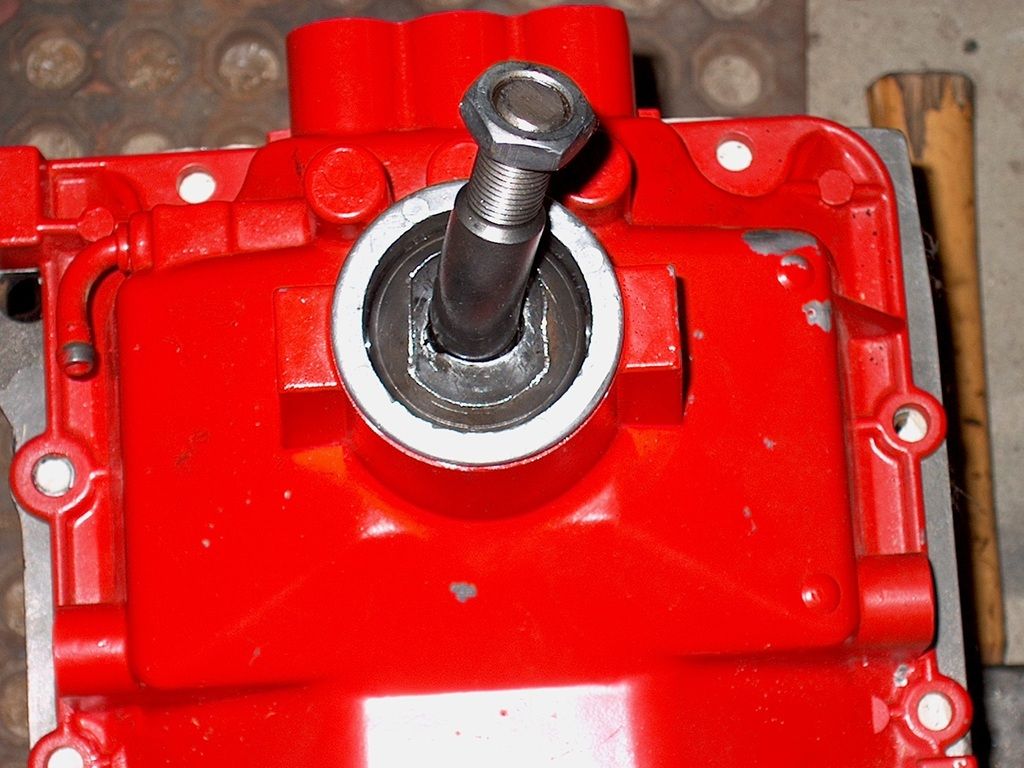
Last edited by Richard2112; 07-19-2017 at 07:20 PM. |
|
|

|
|
|
#14 |
|
Registered User
Join Date: Jul 2014
Location: South East Ohio
Posts: 644
|
Re: Salvaging (Early) Round Top Cover NV4500
Thank you, OregonNed. For the money I have tied up in this rebuild, I could have just bought a rebuilt trans. But then, I wouldn't be able to provide much feed back to the forum. The TC shifts really smooth and indexes into the gear pattern with a decisive "Click". Kinda like a bolt action chambering a round.
Last edited by Richard2112; 07-16-2017 at 07:24 PM. |
|
|

|
|
|
#15 |
|
Registered User
Join Date: Feb 2011
Location: Under the Truck Dreaming
Posts: 727
|
Re: Salvaging (Early) Round Top Cover NV4500
Richard,
You win the "American Ingenuity" award for this month. Awesome write up.
__________________
72 K20 Custom Camper, D60, 14BFF, full roller 406 TPI w custom built ECU and yes..it has tow hooks... |
|
|

|
|
|
#16 |
|
Registered User
Join Date: Jul 2014
Location: South East Ohio
Posts: 644
|
Re: Salvaging (Early) Round Top Cover NV4500
|
|
|

|
|
|
#17 |
|
Registered User
Join Date: Feb 2011
Location: Under the Truck Dreaming
Posts: 727
|
Re: Salvaging (Early) Round Top Cover NV4500
I have a round top NV4500 that needs a rebuild before I install it.
__________________
72 K20 Custom Camper, D60, 14BFF, full roller 406 TPI w custom built ECU and yes..it has tow hooks... |
|
|

|
|
|
#18 |
|
Registered User
Join Date: Jul 2014
Location: South East Ohio
Posts: 644
|
Re: Salvaging (Early) Round Top Cover NV4500
I am still hoping that I do not have to rebuild my top cover. I believe it is in fair shape. The forks look good and the rails look straight. The pivot pin and the seat was worn.
Last edited by Richard2112; 07-16-2017 at 11:22 PM. |
|
|

|
|
|
#19 |
|
Registered User
Join Date: Feb 2011
Location: Under the Truck Dreaming
Posts: 727
|
Re: Salvaging (Early) Round Top Cover NV4500
I meant rebuild the whole transmission, syncro's, bearings, bushings ect. It seems to shift OK just sitting on the engine stand, but I will take a look at the pins you remade and the location to the lower boss where yours made contact (now shimmed with a "spoon" ha).
__________________
72 K20 Custom Camper, D60, 14BFF, full roller 406 TPI w custom built ECU and yes..it has tow hooks... |
|
|

|
|
|
#20 | |
|
Registered User
Join Date: Jul 2014
Location: South East Ohio
Posts: 644
|
Re: Salvaging (Early) Round Top Cover NV4500
Quote:
|
|
|
|

|
|
|
#21 |
|
Registered User
Join Date: Feb 2011
Location: Under the Truck Dreaming
Posts: 727
|
Re: Salvaging (Early) Round Top Cover NV4500
It is a 1993 with 6.34 1st gear. It is 4X4 and I have a 6 bolt round NP205 that mates with it nicely. I did buy a cast iron adapter just for the added peace of mind. I have yet to buy the TH400 input shaft for the NP205 and then of course the NV4500 rebuild kit also. I'm obviously in no hurry as my TH350 still works just fine.
__________________
72 K20 Custom Camper, D60, 14BFF, full roller 406 TPI w custom built ECU and yes..it has tow hooks... |
|
|

|
|
|
#22 |
|
Registered User
Join Date: Jul 2014
Location: South East Ohio
Posts: 644
|
Re: Salvaging (Early) Round Top Cover NV4500
Yeah I hear the cast iron housings are a good upgrade, especially for the 4x4. I'm doing a 2wd so the complexity of my project is reduced to minimal. Once the trans is rebuilt I just plan to drill my case for the BH bolts, shorten the drive shafts and tweak my drive line angle.
I plan on doing the entire rebuild without any "special tools" but a heavy duty pair of snap ring pliers woulda paid for themselves in spades on the heavy ring. |
|
|

|
|
|
#23 |
|
Registered User
Join Date: Feb 2011
Location: Under the Truck Dreaming
Posts: 727
|
Re: Salvaging (Early) Round Top Cover NV4500
Pictures of the install are mandatory.....!
__________________
72 K20 Custom Camper, D60, 14BFF, full roller 406 TPI w custom built ECU and yes..it has tow hooks... |
|
|

|
|
|
#24 |
|
Registered User
Join Date: Jul 2014
Location: South East Ohio
Posts: 644
|
Re: Salvaging (Early) Round Top Cover NV4500
Haha! Where's the pics of your rebuild?
 Yeah, I plan on posting pics of the install, both the successes and the not so successes. Yeah, I plan on posting pics of the install, both the successes and the not so successes.I had hoped to post a tutorial on my rebuild but I'm not confident that I can do as well as the ones that others have posted and I don't want to muddy the waters. However, I might start a thread on how to make certain simple tools that make the rebuild possible, depending upon whether one wants to purchase or make the tools. Getting the bearing cup outta the input bearing retainer (for example) can be done with a metal disk and a large socket. Otherwise, I'm uncertain how to do it without the specially made puller. |
|
|

|
|
|
#25 |
|
Registered User
Join Date: Jul 2014
Location: South East Ohio
Posts: 644
|
Re: Salvaging (Early) Round Top Cover NV4500
Photobucket blows.
|
|
|

|
 |
| Bookmarks |
| Tags |
| 5 speed, nv4500, round top cover, shifter stub, top cover |
|
|