
|
Register or Log In To remove these advertisements. |
|
|
|
|||||||
 |
|
|
Thread Tools | Display Modes |
 05-01-2012, 10:34 PM
|
#1 |
|
Senior Member
 Join Date: May 2011
Location: Cypress, Tx.
Posts: 1,504
|
A little desperate here!
I'm having some problems. I posted on my project thread, but I guess it got overlooked.
Here I have my mock up engine in my stock '59. The engine mounts are from Kimbrigde. They are bolt it, but I'd be welding them in if all was well, right now they're just tack welded in place. The mock engine the way it is in the photo is at it's correct level (photo taken from behind the engine). The truck is level. With the actual Th350 tranny connected, the bell housing is against the firewall, and the driveshaft will hit the crossmember immediately behind the newest tranny crossmember. If the tranny tailshaft was lower, it would clear that crossmember behind the new tranny crossmember. I think the engine mounts are too high, but the man at Kimbridge says they should be correct. I did send him some photos, but havent heard from him. Just tell am I going nuts, but is this engine sitting too high? Do these engine mounts look too high? This has really slowed my progress, and I'm kind of begging for some advice! THank you! dne' 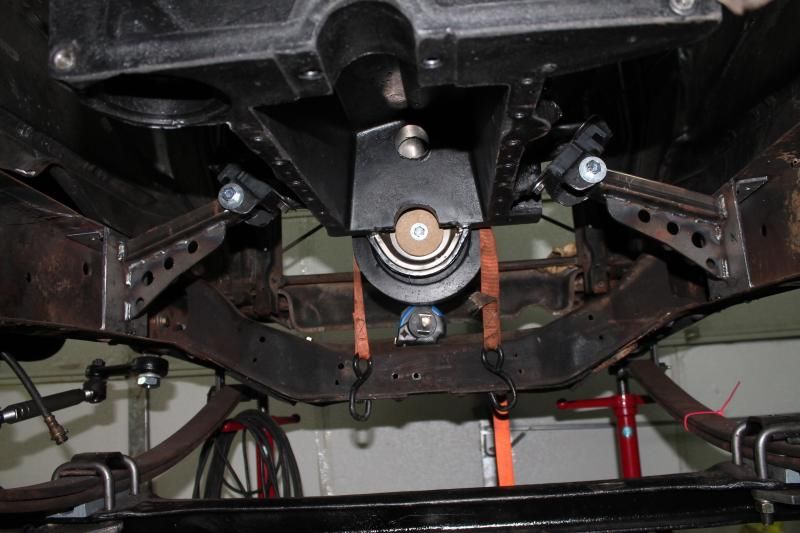 I had the distrubutor about .5" away in an earlier pic, but with the tranny connected, I can only get the dist this close. 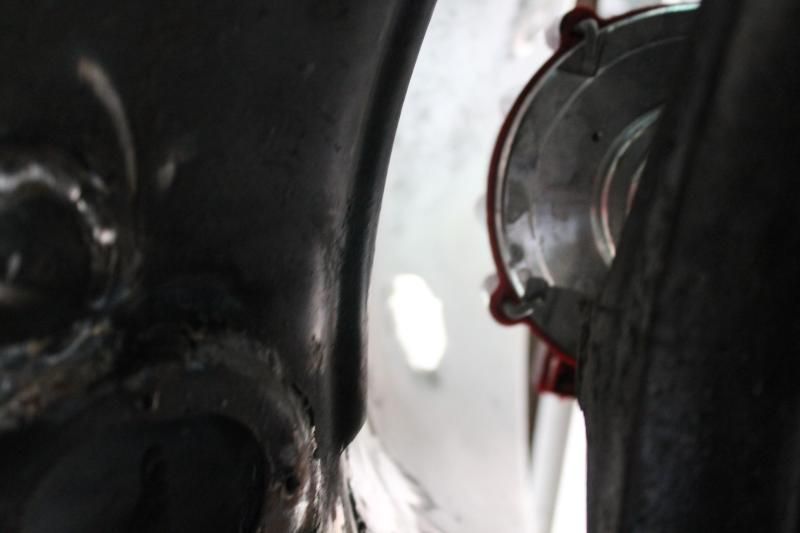
|

|

|
|
05-01-2012, 11:07 PM
|
#2 |
|
Registered User
Join Date: Jun 2006
Location: Idaho
Posts: 8,800
|
Re: A little desperate here!
I went out and measured mine (yes 4wd but engine and trans to body relationship is the same). My oil pan rail is 8" above the front crossmember BOTTOM flange. My TH350 bellhousing has about 1" clearance from the radiused vertical flange at the bottom of the firewall. I fabbed my engine mounts to match the height of a stock v8 truck I saw at the time. My big HEI sits about 1" from the firewall.
__________________
1959 Chevy Short Fleetside w/ 74 4WD drive train (current project) OrrieG Build Thread 1964 Chevelle Malibu w/ 355-350TH (daily driver) Helpful AD and TF Manual Site Old Car Manual Project |
|
|
|
|
05-01-2012, 11:27 PM
|
#3 |
|
Senior Member
Join Date: May 2011
Location: Cypress, Tx.
Posts: 1,504
|
Re: A little desperate here!
Yikes! Gee Orrie, Im a little discombobulated! Thank you for the pics and info!!
So technically, compared to what you showed me, i shouldn't be having any problems. But i am! Where you show 1" where the the bell housing is, mine is up against that part of the firewall. I even looked at my cab mounts looking for signs that maybe my cab was sagged or something, but I don't know what to compare to. I may wind up having to lower the engine after all if I don't find a reason. : ( Posted via Mobile Device Last edited by Denee007; 05-01-2012 at 11:29 PM. Reason: Info |
|
|
|
|
05-01-2012, 11:59 PM
|
#4 |
|
Registered User
Join Date: Aug 2007
Location: Corona, California
Posts: 7,998
|
Re: A little desperate here!
Denee
Where is your engine compared to Orrie's front to rear. Is your front pulley in the same position as his? Kim |
|
|
|
|
05-02-2012, 12:14 AM
|
#5 | |
|
Registered User
Join Date: Aug 2007
Location: Corona, California
Posts: 7,998
|
Re: A little desperate here!
Quote:
It's hard to give a definite answer without being there to see exactly what's happening. If you're going to lower the engine I would make sure the pan doesn't sit below the front cross member. Moving it forward may be an option. How much room is there between the trans and floor? I would think about modifying the rear cross member. Sorry if it's not much help. Kim |
|
|
|
|
|
05-02-2012, 01:20 AM
|
#6 |
|
Senior Member
Join Date: May 2011
Location: Cypress, Tx.
Posts: 1,504
|
Re: A little desperate here!
Kim, my bell housing touches the firewall where Orrie shows in his smaller photo. That is where my engine is at approx the 4degrees, but I have to push the tranny tailshaft upwards to get that 4 degrees, so at that point the tranny would be against the firewall and that crossmember is in the way for the driveshaft to clear. Keeping in mind that the rear axle is hanging down too, so when placed on the ground, the clearance would be worse.
I'm worried to move the engine forward, I have the long water pump, and I don't have a radiator to check the front clearance. Guess I could run an electric fan. I'll take a much better look tomorrow, guess I'll call kimbridge and tell him what's going on, it's not his fault . Thank you ; ) As for the measurement that Orrie showed between the crank pulley and the front cm, my clearance was more like 6", but I measured quickly, but it was not 8"! Posted via Mobile Device |
|
|
|
|
05-02-2012, 09:34 AM
|
#7 |
|
Senior Member
Join Date: May 2011
Location: Cypress, Tx.
Posts: 1,504
|
previous pics of engine
I was going through some old photos, I don't even remember taking these!
My old bell housing. noting the relationship between it and the firewall? 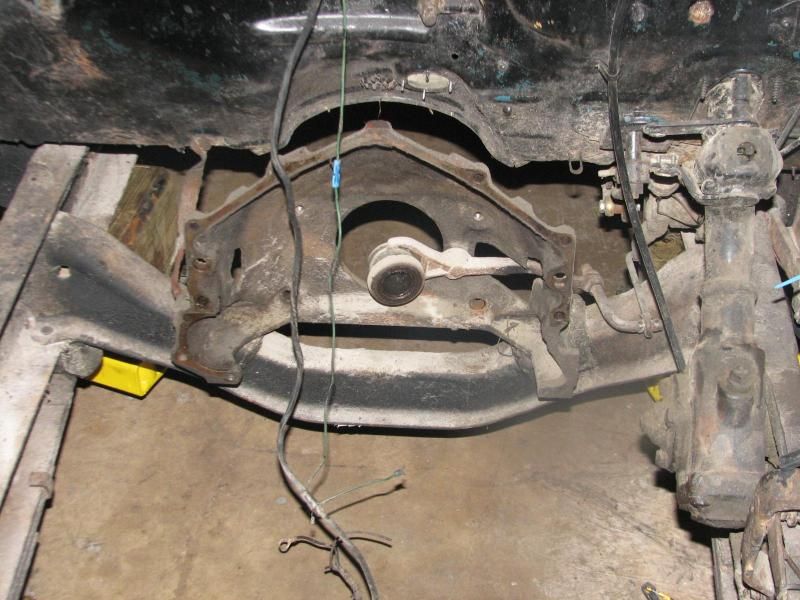 Here I had bolted up my mock engine to the old bell housing. Good clearance! 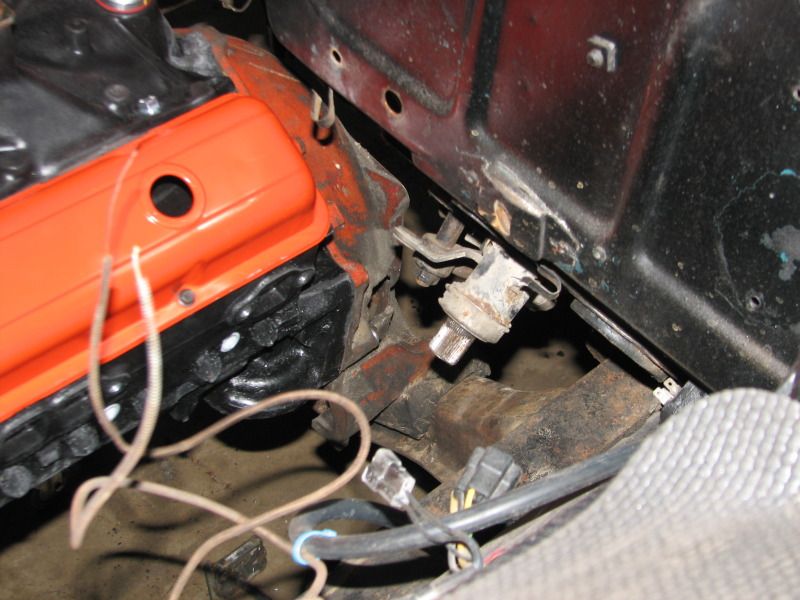 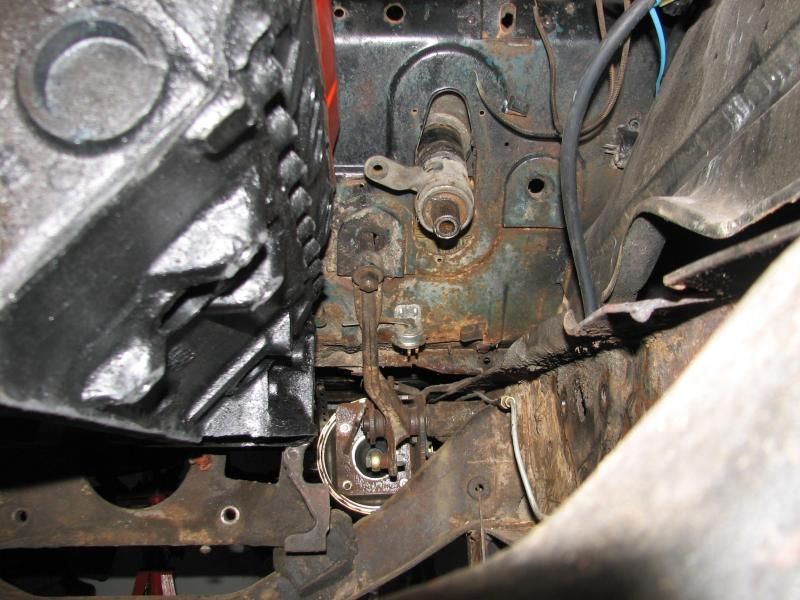 Here I had bolted my waterpump/fan, I was worried about clearance to the potential radiator. At this time, I didn't have the mock up balancer. But actually looks like the engine sits back too far here, imagining a radiator in place. 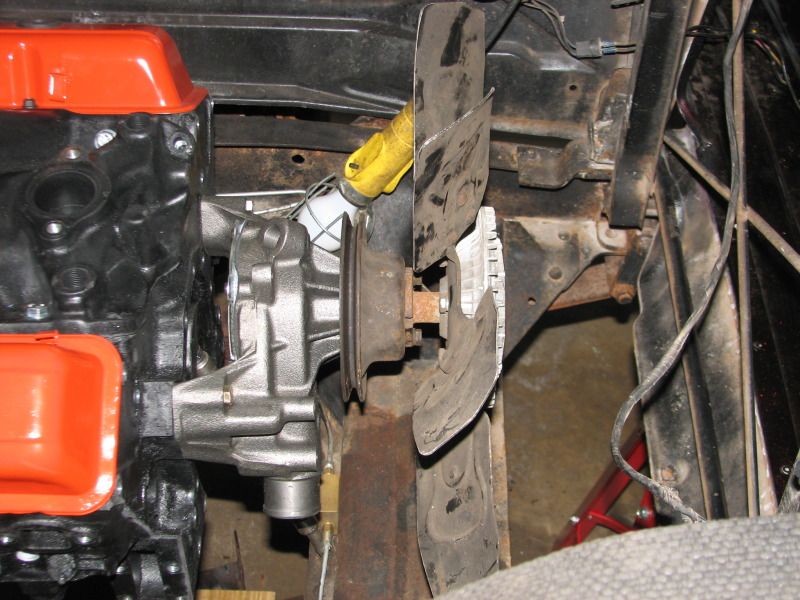 Here is someone's engine (It's NOT Mine), I don't know who owns it, but I was looking at engine supports at this time i guess. I note how far the engine sits in the frame. Bottom line, I need to lower my engine. So, this morning~ lower the engine! 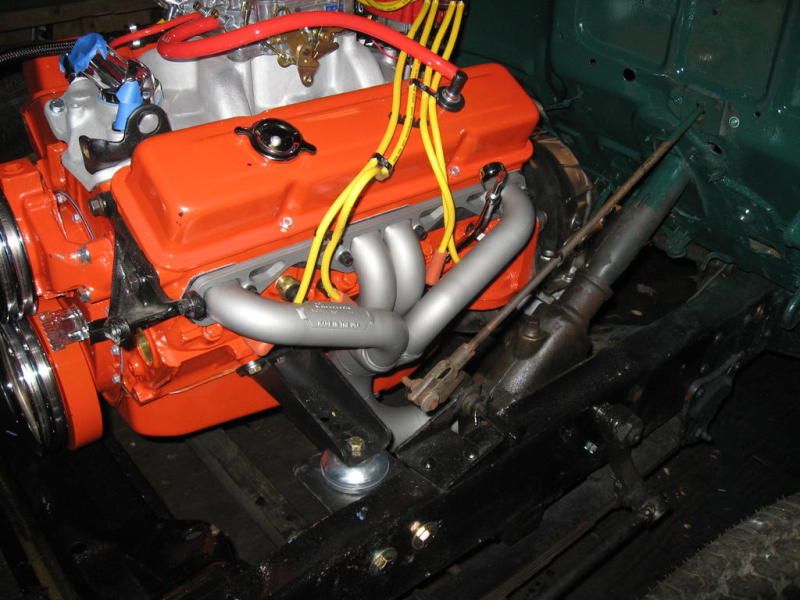
Last edited by Denee007; 05-02-2012 at 10:00 AM. Reason: added info and photo |
|
|
|
|
05-02-2012, 10:20 AM
|
#8 |
|
Registered User
Join Date: Jan 2007
Location: tacoma wa.
Posts: 1,037
|
Re: A little desperate here!
your new engine mounts should be in the stock position, if not i would consider the mounts wrong. did the person who made the mounts send you a picture of a engine in a TF truck showing engine location?
|
|
|
|
|
05-02-2012, 10:30 AM
|
#9 |
|
Senior Member
 Join Date: Aug 2010
Location: Shasta Lake, CA.
Posts: 1,619
|
Re: A little desperate here!
If you haven't already removed or modified the cross member that the rear engine is mounted to, you will have to so that you can gain clearance for the TH350 trans.
The first two pic's are the stock V-8 set up. Notice the rad is set back. The third pic is the stock 6 cylinder set up. You have room to move the V-8 forward. |
|
|
|
|
05-02-2012, 10:46 AM
|
#10 |
|
Senior Member
Join Date: May 2011
Location: Cypress, Tx.
Posts: 1,504
|
Re: A little desperate here!
Those photos helped tremendously! I see I have room to go forwardly now, or just about where I'd want to put the engine(within reason). Didn't realize how long the stock six was. Mine had a 230(not a 235) in it, wasn't correct by any means.
55dude, I just went by the reputation of Kimbridge enterprizes things. I never looked up photos or requested, I just assumed(I hate that word) that all would be good with his product/s. I ordered them over the phone. Under normal circumstances, these are probably exceptional products. As simple as this should be, it's really daunting my ability and reasoning. I've never installed an engine/tranny to where there were no mounts. I'm probably making it more complicated than it should be. Just difficult handling the Th350 tranny as well. My husband didn't want me spending the money for a mock up tranny : ( |
|
|
|
|
05-02-2012, 11:55 AM
|
#11 |
|
Registered User
Join Date: Jun 2006
Location: Idaho
Posts: 8,800
|
Re: A little desperate here!
My 8" was from the oil pan rail (since that is what you had on your mock up) to the front crossmember bottom horz. piece. Keeping the radiator in the stock 6 cylinder location (removing the extension pieces) gives you lots of room for a long water pump and fan. You will just need to fab a shroud to direct the air. I ran this set up (pic below) for 15 years with no heating problems, key was the shroud. Long WP, 1" fan spacer and still have 3-4" clearance to radiator.
__________________
1959 Chevy Short Fleetside w/ 74 4WD drive train (current project) OrrieG Build Thread 1964 Chevelle Malibu w/ 355-350TH (daily driver) Helpful AD and TF Manual Site Old Car Manual Project |
|
|
|
|
05-02-2012, 01:13 PM
|
#12 | |
|
Senior Member
Join Date: May 2011
Location: Cypress, Tx.
Posts: 1,504
|
Re-fabbing
Your pics really help!
 I was going to ask the question about the radiator very soon, in fact, I should shop for one soon, I should have kept the old radiator I was going to ask the question about the radiator very soon, in fact, I should shop for one soon, I should have kept the old radiator ! Right now I'm dropping the engine bracket an inch and moving it forwardly, maybe a .5". When I've tacked things together, I'll re-assemble(not so sure about connecting the tranny, I hate that part of handling it!). Grabbing a bite and back out~ actually fabbing is fun, only when errors arise is fabbing not so fun! lol ! Right now I'm dropping the engine bracket an inch and moving it forwardly, maybe a .5". When I've tacked things together, I'll re-assemble(not so sure about connecting the tranny, I hate that part of handling it!). Grabbing a bite and back out~ actually fabbing is fun, only when errors arise is fabbing not so fun! lolthank you Orrie!!! Quote:
|
|
|
|
|
|
| Bookmarks |
|
|


 Linear Mode

