
|
 05-22-2011, 08:45 PM
|
#1 |
|
Registered User
Join Date: Apr 2011
Location: San Diego CA
Posts: 241
|
It begins.... BED R&R
Decided with the great so cal weather I should start removing the bed and get at any rust I might find. I found plenty, but it is all pretty easy to get to and I think a easy job of cutting out and patching up. I tricked a few buddys over to help by telling them about the cuban cigars I brought back from my vacation to jamaica. I never knew those guys smoked!! Once I had every thing loose it was just pick, walk and place on a set of saw horses I had ready to go.
First I went at the 1/2 plywood that the PO had covered the original wood slats with and found a lot of roted oak,. I took that out with a hatchet and a sawzall. No pics of the old wood, just imagine a jigsaw puzzle made of roted out oak. The steel strips were also scrap and rust so I have to order a set of those. Will probably go with stainless just to avoid having to deal with it again. 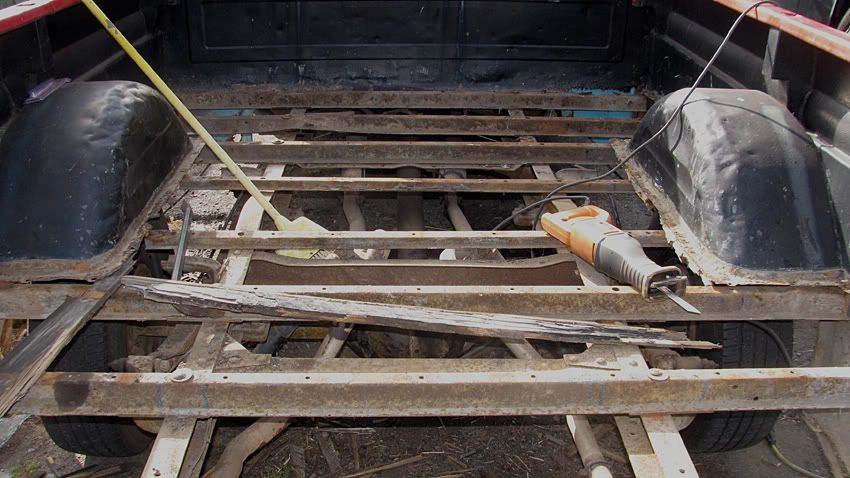 I found a lot of rust at the flanges that bolt the bed to the wood. Easy fix to weld in new sheet metal here, 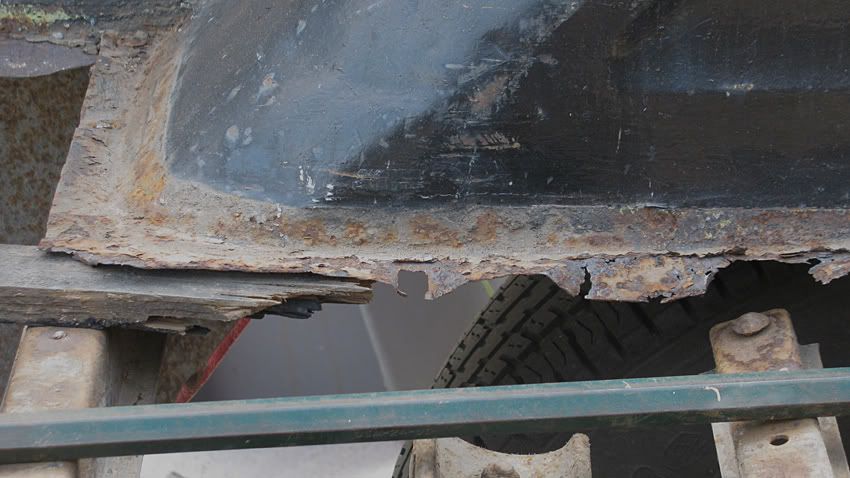 Someone in a past life liked the use of bondo, they liked it a lot I guess. 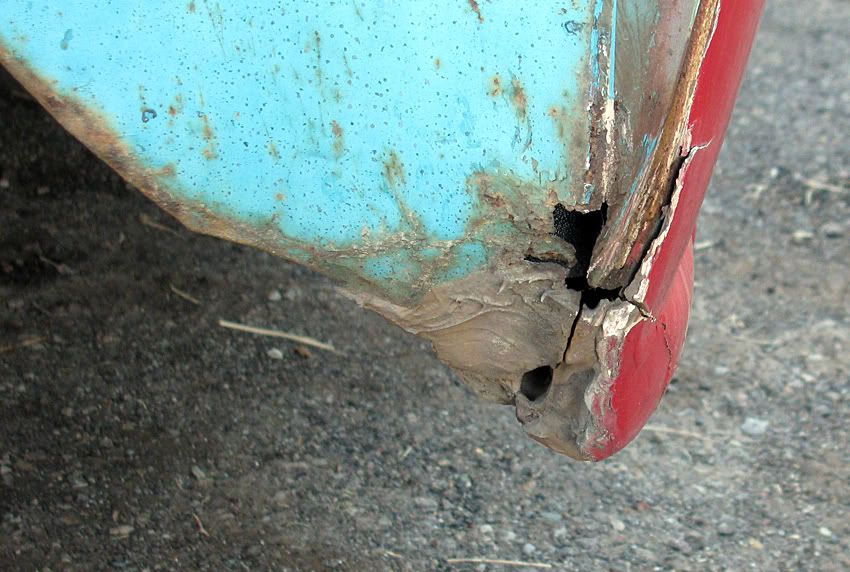 They also liked the idea of shabby patch work combined with bondo.  I bolted the rear bumper back on, added a set of cheapo trailer lights and can now drive as I refab the bed. I do still need to add mud flaps to keep the police from having to keep piulling me over and asking WTH?  I have a order in with LMC for some patches and new rubber for mounting the front sheet metal up. But first the welding starts tuesday when my buddy returns my mig welder and bottle. Last edited by FFredo; 05-23-2011 at 09:05 AM. |

|

|
|
05-22-2011, 11:51 PM
|
#2 |
|
Senior Member
  Join Date: Nov 2008
Location: Glendora, CA
Posts: 6,336
|
Re: It begins.... BED R&R
Fredo,
Whew, you've got your work cut out for you...but I admire you getting in there and going for it. Iwill watch this thread with great interest. What paint are you planning to use for your frame? I ask because I just ordered some KBS Rust Seal and I'm wondering what everyone else is planning. |
|
|
|
|
05-23-2011, 11:06 AM
|
#3 |
|
Registered User
Join Date: Apr 2011
Location: San Diego CA
Posts: 241
|
Re: It begins.... BED R&R
Hey Dan, yeah it looks like a project but I'm feeling pretty good about it. This is nothing compaired to the econoline I did. I should get my welder back today or tomorow, loaned it to a buddy to weld a frame up for his bike. Once that happens it's all about grinding and welding cracks and patches.
Not sure what paint I'll use on the frame but more then likely it will be a epoxy type paint. I've actualy had real good luck with appliance epoxy in rattle cans. I've used that on a cpl of motorcycle frames I've made and it holds up real well. Time will tell I guess. PS: Are you going to Pomona? It's June 5th. http://www.pomonaswapmeet.com/ |
|
|
|
|
05-23-2011, 11:14 AM
|
#4 |
|
Senior Member
Join Date: Nov 2008
Location: Glendora, CA
Posts: 6,336
|
Re: It begins.... BED R&R
Oh man, I've missed the last couple times at Pomona and looks like I'm missing it again because I'm going to Laughlin that weekend with family. BIG sacrifice, huh? Taking the Jetski's out to play, ha ha. I'd have been glad to meet and talk trucks; maybe the next one after?
I don't know if I posted it, but I bought a near new Hobart Handler 140 MIG off a friend, but I have none of the accessories. I haven't welded since college (stick) and I sucked then! I need to buy a bottle/gas, hood, leathers, gloves, etc. Planning on getting the leathers and gloves from Harbor Freight. I've heard good and bad about their autodarkening hoods - mostly "it's your eyesight, don't be cheap" warnings - which of course I agree with. Other guys say they've had excellent results. These are guys that are very occasional welders - like I will be. Please, throw in your $.02 too! |
|
|
|
|
05-23-2011, 11:51 AM
|
#5 |
|
Registered User
Join Date: Apr 2011
Location: San Diego CA
Posts: 241
|
Re: It begins.... BED R&R
I bought an auto-dark helmet from Harbor Freight, I do not recomend that. I kept my eyes open and found a speedglass hood on CL a cpl of yrs ago. I'm here to tell you that there is no substitute for a good hood. If you've never experienced something called welders falsh you'll know what it is when your eyes start to feel like you've poured ground glass into them. It SUCKS but is not the end of the world. Just kick back and place a cpl of slices of potato on your lids and relax, It will go away. BE CAREFUL OF CRAPY HOODS! Welder's flash will manifest itself 3-6 hrs after you burn your eyes. In my case it woke me up about 2 in the morning.
If you need to then buy a quality old school helmet and save up for your auto dark. The Hobart will do every thing you need, nice machine. Of course you can always run shielded wire (flux core) until you get a bottle and regulator. It will work fine however you will spend a bit of time cleaning everything up. The flux core produces a good amount of splater. Just check your welders manual for proper set up between the two types of wire. Have fun scaring the fish!! |
|
|
|
|
05-23-2011, 12:03 PM
|
#6 |
|
Senior Member
Join Date: Nov 2008
Location: Glendora, CA
Posts: 6,336
|
Re: It begins.... BED R&R
Thanks for the info Fredo. Yeah, I pretty much had made up my mind not to cut corners on the hood. I WILL cut corners on some things, but when you're talking my eyes (I had the laser surgery a few years ago) or my...uh...er..."nether regions" I go the safest route I can find!
 As it happens I have the cash right now to buy the hood & bottle, I just don't know which of the name brand hoods is best for my use. I am not and NEVER will be a pro so I don't need the "latests/bestest". I don't need or WANT a hood with a skull or a Spiderman face or any of the other stupid crap (IMHO) they have, just a reliably safe one, somewhat comfortable to wear. For the bottle can I just look up local welding supply houses and ask for a small (size?) bottle of MIG gas? Co2 & Argon, right? I've been told there are wire sizes & types specifically better for sheet metal repairs but I admit I have no idea what to ask for. Any help appreciated on size/type. Then I just need to review my DVD's on it and go practice I suppose. I'll be watching what you do closely. Please take closeup pictures and explain for the idiots out here (ME!) what you did and why. |
|
|
|
|
05-24-2011, 09:37 AM
|
#7 |
|
Registered User
Join Date: Apr 2011
Location: San Diego CA
Posts: 241
|
Re: It begins.... BED R&R
Dan, you are correct. Any locall welding supply house will be glad to set you up with bottle and MIG Mix (argon/C02) I use Stoody's welding here in San Diego because they are less expensive then some of the bigger houses like West Air.
Wire size can be Matched to the sheet metal guage however I find that .28 wire works fine for about everything I've done. I just make a pass or two on scarap to make sure my settings are right for the job I'm doing. I've welded sheet metal and frames for my choppers with the same wire. There's an old joke, How do you get to Carnegi Hall? Practice, practice practice... |
|
|
|
|
05-29-2011, 11:16 AM
|
#8 |
|
Registered User
Join Date: Apr 2011
Location: San Diego CA
Posts: 241
|
Re: It begins.... BED R&R UPDATE
Well I decided to to quit taking half steps and just jump in. Since I will be doing all of the wedling I want to tackle as much as possible at one time.
I took the front fenders off to look for any rust damge (also to replace with a set I bought last month). I found plenty, enough for me to think maybe I bit off more then I can chew. Like the man once said, "too late to turn back now" I'll start cutting out the damaged areas today and then order up the patches I need. These pics are from the area on the bottom directly in front of both doors. 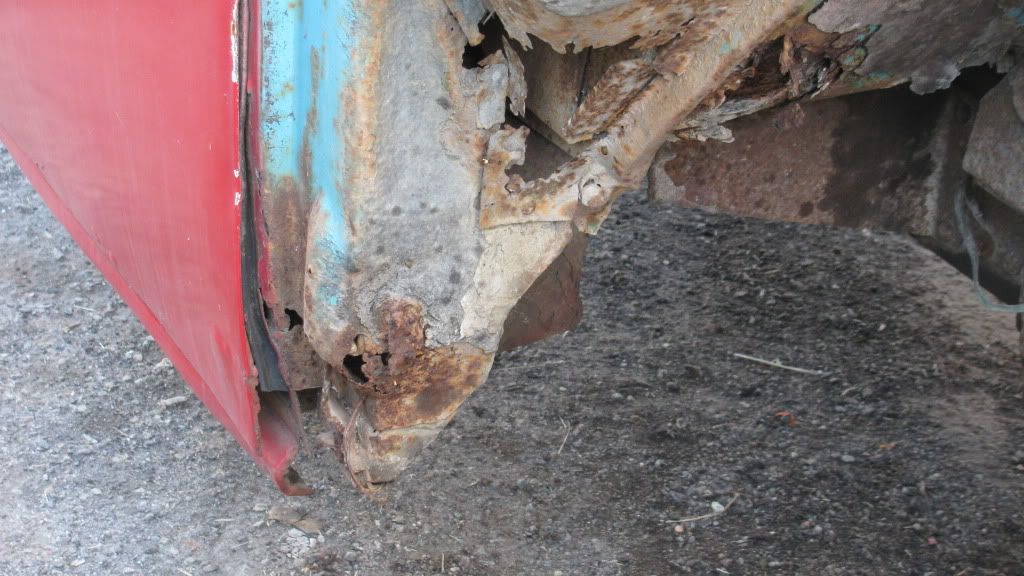 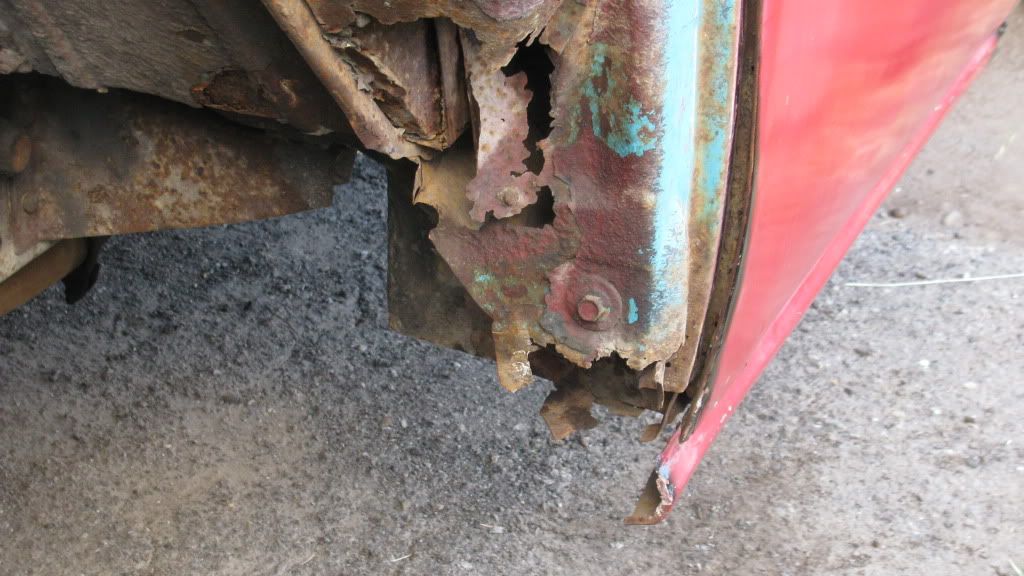 And just for giggles and grins a "small" hunk of boundo that came out as I was removing the fenders. It's about 1 1/2" thick at it's thickest point. 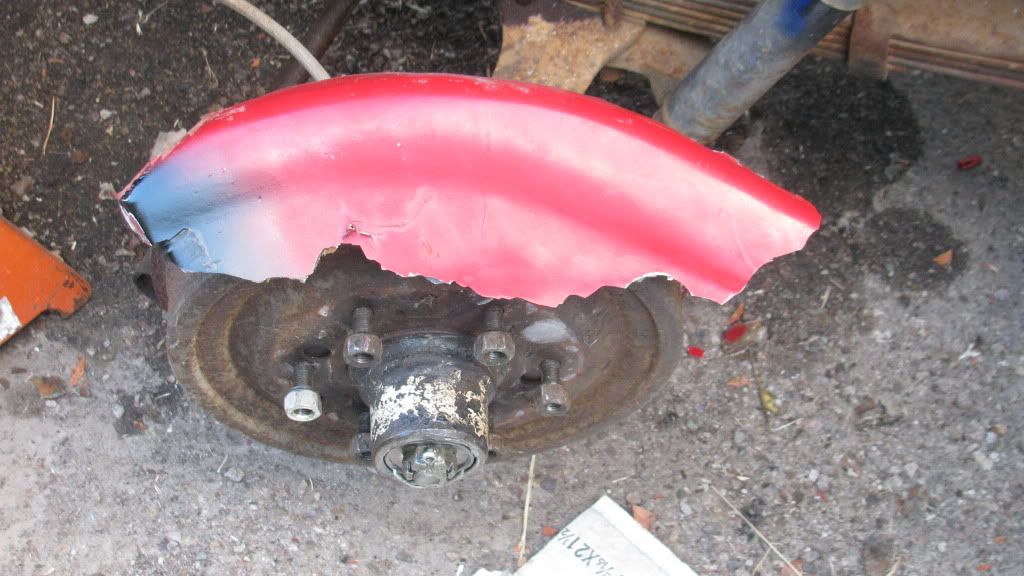
|
|
|
|
|
05-29-2011, 12:08 PM
|
#9 |
|
Registered User
Join Date: Dec 2010
Location: seattle, wa
Posts: 529
|
Re: It begins.... BED R&R
I got the HF helmut for mig tacks, never once have I got flashed with it. I have got flashed many times with the old school one though, and at much higher current settings.
|
|
|
|
|
05-29-2011, 02:12 PM
|
#10 |
|
Senior Member
Join Date: Nov 2008
Location: Glendora, CA
Posts: 6,336
|
Re: It begins.... BED R&R
Fredo,
I'm flabbergasted at the amount of bondo people will use. Even in the timeframe when these were "just a truck" (though I NEVER feel that way about ANY vehicle, not even a Vega as a 17 year old) I could never stand to Mickey Mouse and half-a$$ stuff. It just bugs me. Please post pictures of the truck when you get all the rust cut out. I'm curious just how extensive it is. I assume you'll be bracing the door ways, etc with steel as structural parts get cut out? P.S. I've just about decided on a Miller Elite helmet with the larger window. Looks like about $175 will get it for me on eBay. I came THIS CLOSE to just saying "EFF-IT" the other day at Harbor Freight. I actually put their helmet in my cart...but finally I put it back. Just can't quite make myself risk it. Maybe I'm kidding myself, I've heard plenty say the HF works fine but I just don't feel good about it. |
|
|
|
|
05-29-2011, 04:40 PM
|
#11 |
|
Registered User
Join Date: May 2010
Location: Lawrenceville, Ga
Posts: 2,640
|
Re: It begins.... BED R&R
I also have a Harbor Freight auto-darkening shield (Western Safety brand) and it works really well. I have no complaints with it at all. Mine has a darkness adjustment on the side and a slow-fast slide switch inside. I've never switched it from fast to slow to see if I would see any flash before it darkened.
I love nice equipment but after having this Harbor Freight shield for four years I really can't see why I would spend almost $200 for a different one, and I definitely wouldn't want one with flames or some monster face painted on it, LOL.. FFredo, I feel your pain, man. I just replaced my drivers side lower hinge panel, inner and outer hinge covers, and I'm almost finished replacing the bottom twelve inches of my drivers door including the lower hinge mounting bracket inside the door. Thank goodness for patch panels. Just keep reading this forum for inspiration and don't get discouraged. |
|
|
|
|
05-30-2011, 02:03 PM
|
#12 |
|
Registered User
Join Date: Apr 2011
Location: San Diego CA
Posts: 241
|
Re: It begins.... BED R&R
I've wasted a day and a half trying to get my new presure pot sand blaster to work. Not sure what the problem is but it bwill not feed any sand at all. I'm using play ground sand that i let dry out completely. I have a huge air comp and it is definately not a air supply issue.
A google search is pointing me to valve manipulation. This unit has 4 valves so some how there is a secret combination I have to figure out. I just came in to have a cup of coffee and whine..  Oh well back at it. Last edited by FFredo; 05-30-2011 at 02:03 PM. |
|
|
|
 |
| Bookmarks |
|
|


 Linear Mode

