 |
Register or Log In To remove these advertisements. |
|
|
|
|||||||
 |
|
|
Thread Tools | Display Modes |
|
|
#1 |
|
Registered User
Join Date: Dec 2000
Location: Boise, Idaho
Posts: 6,003
|
"Basics of Basics" rebuilding hinges.
“Basics of Basics” Rebuilding old door hinges.
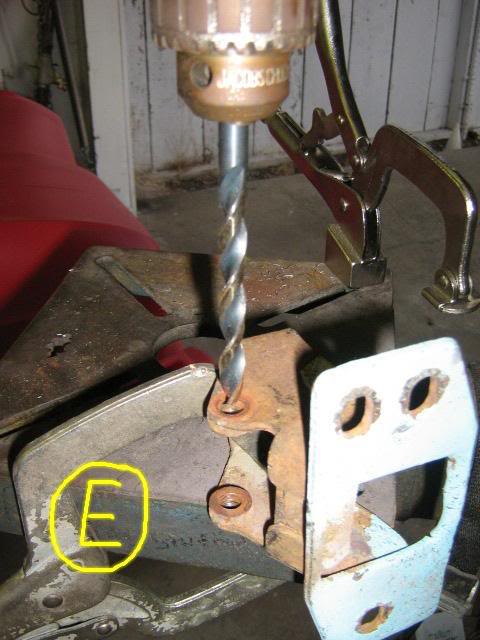
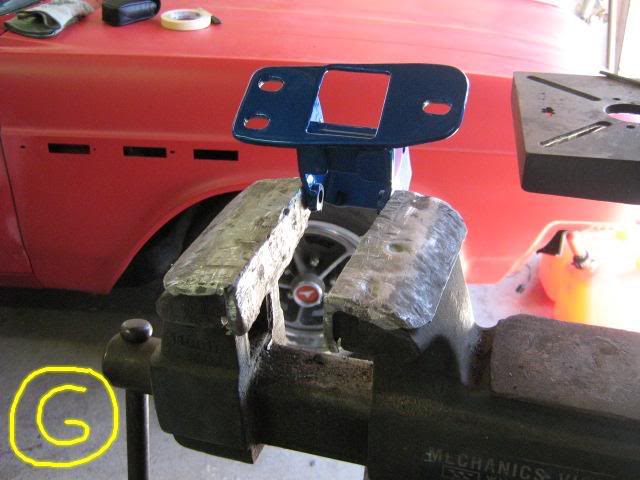
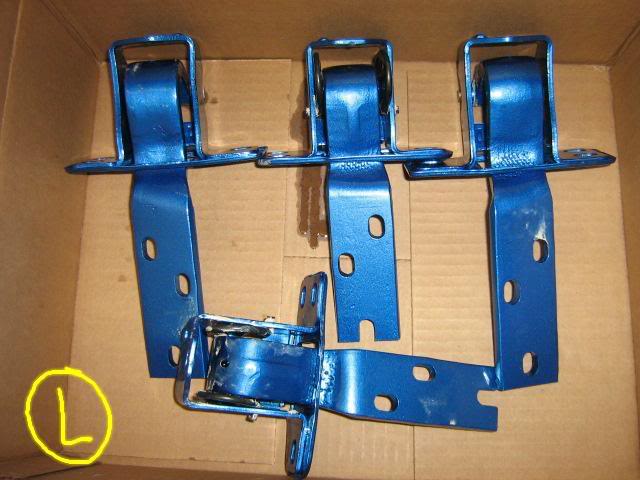
By Brian Martin The “AD” Chevy pickup (1947-54) along with most cars of the day had no bushings in the door hinges. They simply put the pin thru a hole and that was that. With age and wear the holes for the pins have become enlarged. Instead of replacing a worn out bushing and installing a new pin, you have to drill out the holes to a larger size and install new oversized pins. You could update it as well and install bushings at this time. The way I look at it is if it took fifty or sixty years go wear these out, they will last even longer being the truck is being driven a lot less than it was when used as a work truck. I have eighty or a hundred years before I have to rebuild them again. The first step, mark the pieces. It may sound easy, but all the pieces are different yet, look so similar. I mark mine with a letter stamp so I can pick up the piece and not have to figure out where it goes (see photo). Without a doubt the toughest part of the job is knocking the old pins out. In the hinges that I have done, I have found them to every extreme. From the pins almost falling out and taking no effort what so ever, to having them rusted in the hinge like they have became one piece of metal! I started doing them by grinding off the peened head (red arrow photo A) with a burr cutter on a die grinder (at the red arrow in photo A). Then with a tip from a fellow Stovebolter I tried the approach you see in photo A where you cut thru the pin with a hacksaw. Now, there is usually a little gap to get the saw blade through to the pin. There is however very little gap on some hinges. But don’t sweat it, if you gouge up the side of the hinge in this area you can “dress” it later with a file prior to painting and assembly. It is still much easier to remove the pins this way. The problem with grinding off the peened head is that this peening “fattened” up the pin in the hinge. Even after grinding away head flush with the hinge body surface it is “fattened” up inside as well. This fattened pin is not going to go thru the forged part of the hinge without a big fight! Cutting the hinge as shown worked like a charm. I wish I had done them all that way. In photo B you can see that the pin is cut off flush. The small pieces left on the hinge body came out without a fuss. This piece however can put up a heck of a fight. I wanted to see if I could remove these pins without heat so I could show you guys without a torch out to get them out. However, I couldn’t do it. I have no press as most home hobbiests so I resorted to the vice. I tried pressing them out using the vice in the same way I used the vice to press in the new ones in photo J. I had no luck, that pin was in there TIGHT. So, I pulled out the torch. Come on now guys, if you are going to be working on an old truck like this you are going to need a torch! I heated up the hinge and drove the pin out with a drift punch and a few good blows of a four pound sledge hammer using the vice to rest the hinge on (photo C). Two very important things here, you need something SOLID when you do this. Not a piece of wood, not your concrete driveway, you need a solid piece of metal. Anything else will only absorb the energy of the hammer. You MUST have something solid underneath the hinge. And, you should always use a LARGE hammer. This is a misconception of a lot of people, that a large hammer will do damage. Yes, it will if used to smash something, sure, the bigger the hammer the more damage. However when doing something like this, with some simple common sense you will do much LESS damage with the larger hammer. First off, you don’t have to swing it hard, just “drop” the thing on the drift punch and you get the job done. Secondly, it takes far less blows, this means far less damage to your tools and the hinge. Of course you need to support the hinge well but allow a “hole” under it for the pin to go into as it exits the hinge. You can see that the vice is open a little to allow for the exiting pin. If you have an old impact socket (thick wall) you can use it. The thing is you still need something VERY solid under that, an anvil of some kind. I have a couple of short (6”) pieces of railroad track that are invaluable around the shop. I also have a 15” round piece of 2” steel I bought at the steel supply place that is great for this kind of thing. A couple of the small spacers (washer looking things) on the hinge bodies were badly worn, a couple even fell off when the hinge came apart. I went to the local ACE hardware store and found that they had spacers exactly like these in stock. They were not “washers”, they were thicker just as the original ones on the hinge. If you couldn’t find any, I don’t see a big deal in putting a couple of washers in their place. As long as the forged part of the hinge is tight in the hinge body it is going to be fine. But I put the new spacers I bought on the hinge with a bolt going thru it to hold it in place and welded them onto the hinge just as they were from the factory. This needs to be done prior to drilling out the holes to the new size. Once all welded in place and drilled, you have perfection just like from the factory, maybe even better. After knocking out the pin and dealing with the spacers the next step is to drill out the hinge pin holes (photos D&E) to your new pin size. I found this to be a little more than that. The pins were advertised as 11/32 inch so I went and bought a nice new 11/32 inch drill. After drilling the holes I found that the pin wouldn’t go through it, not even close. The pins were not round at the end, so, I cut them off and chamfered the edge. I then cleaned them up a little with a surface conditioning disc on my angle grinder. They still wouldn’t go in. I took the pins and drill back to the store to see if they had a little larger drill bit. When there we checked the pins with a digital micrometer and found that they were a fraction bigger than 11/32! So, I bought a letter S drill (used in machine work which is less than a thousandths of an inch larger than 11/32 inch and drilled the hinges out to that. By the way, this was done in a drill press. I know one photo looks like the drill is at an angle but that is only my camera work, the drill and hinge were perfectly vertical. Does it have to be a drill press? I don’t think so, with the hinge clamped in the vice the drill bit will go right thru where the old hole was pretty easy. If the hole is out of shape from extreme wear, having it clamped in a drill press is going to be needed. However, if you were to drill that hole out and it is slightly at an angle because of the worn hole, it will simply bolt to your door the same way being it has slotted holes and in the real world make little to no difference in the operation of the door. This is not a Swiss watch here, it is a truck door. We can over analyze this stuff, but honestly if the hinges are not loose you can adjust the door on less than perfect hinges. Heck, where the hinges mount on the cab is probably out a of square a 32nd or 16th inch from original anyway. Don’t sweat it, make the hinges tight and bolt them back in. Photo F shows the hinges back after being bead blasted and painted. When cleaning up the hinges for paint pay careful attention to the holes that run through the forged pieces into the pin hole. These are for oiling your hinge after they are assembled and during maintenance. Be sure you clean them out! You don’t want to leave a bunch of crusty grease and certainly not sand from sand blasting in them! Prior to assembly first thing I did was to file off the spacers so the forged piece will be resting on nice flat, greased metal instead of paint. I found that with a trial fit the forged piece was a little loose in one hinge, probably one that I beat the pin out of instead of cutting it off as in photo A. Anyway, I squeezed it a little tighter with the vice, done deal (photo G). Photo H are the pins, before and after. I found that the little grooves in the pin to keep it from spinning once pressed in to the hinge were too long. They would have went down into the forged piece of the hinge, this made no sense being you want the pin to stay stationary in the hinge body and the forged piece to move freely on it. So, I took my angle grinder with a 50 grit disc and carefully ground off a little of these grooves. I then cut the pin to the proper length. This length was determined by resting the pin on the side of the hinge and allowing an eighth inch or so to peen the end. These pins were hardened steel, unlike the original which cut easily in with a hacksaw (photo A). These pins laughed at the hacksaw! I cut them with my die grinder with a cut off disc. Then chamfered the end and cleaned them up real nice with the surface conditioning disc. In photo I you can see the final assembly of an upper hinge. These uppers with the springs take a little finesse holding it all together while you insert the pin. It really isn’t nearly as hard as you would think. You will have two different springs for each door. Don’t go nuts trying to put the bottom one on the top, it won’t work, they are different. I took a photo of the hinge (I actually had a few originals to look at as well) before I took the hinge apart to be sure I knew how the springs went back in. I put a fair amount of white grease on each end of the spring, sat it resting in it’s hole in the hinge body while holding it in my right hand as you see in photo I. I then put the forged piece thru with the upper spring in place in it’s hole in the forged piece and with my left hand and slid the piece in until the pin holes lined up and dropped the pin in. One note here, the grease isn’t only for lubrication later, it is sort of a “glue” holding parts together during assembly. The spacers were well lubed, the pin was coated in oil prior to assembly. The pin took a little pushing to get it thru to where it needed to be pressed. With the pin almost all the way through I set it up in the vice with a socket on the other end so the pin has somewhere to go when pressed thru (photo J). After pressing the pin thru, I peened the end so it won’t fall out. I thought about using a press on retainer like some later model hinges us (the ones on the axle of a tricycle). But I got to thinking, again, peening can’t be beat so I peaned it (photo K). Photo L is the set done. One of the hinges had a little “wiggle” movement, just a tad. But it has zero in and out movement which is really all that matters. But the rest were tighter than a drum. A huge improvement over the worn mess I started with.          
__________________
1948 Chevy pickup Chopped, Sectioned, 1953 Corvette 235 powered. Once was even 401 Buick mid engined with the carburetor right between the seats! Bought with paper route money in 1973 when I was 15. "Fan of most anything that moves human beings" Last edited by augie; 04-03-2011 at 12:36 PM. |
|
|
|
|
#2 |
|
Registered User
Join Date: Dec 2000
Location: Boise, Idaho
Posts: 6,003
|
Re: "Basics of Basics" rebuilding hinges.
Continued from previous post..
  
__________________
1948 Chevy pickup Chopped, Sectioned, 1953 Corvette 235 powered. Once was even 401 Buick mid engined with the carburetor right between the seats! Bought with paper route money in 1973 when I was 15. "Fan of most anything that moves human beings" Last edited by augie; 04-03-2011 at 12:38 PM. |
|
|
|
|
#3 |
|
Registered User
Join Date: Oct 2007
Location: West Newton, PA
Posts: 1
|
Re: "Basics of Basics" rebuilding hinges.
Great post Brian!
I've got two (relatively stupid) questions... #1 What pins did you use? I have mostly idiots in the local parts stores... if I don't tell them exactly what to look for, they tend to give me a blank stare. #2 It looks like you used new springs... mine are rusted to nothing and broken, where did you get them? Thanks! Joe '49 Chevy 3100 |
|
|
|
|
#4 |
|
Registered User
Join Date: Dec 2000
Location: Boise, Idaho
Posts: 6,003
|
Re: "Basics of Basics" rebuilding hinges.
I used stuff that my buddy gave me to use. But looking thru my LMC (www.lmctruck.com) catalog and my "Classic truck parts of America (www.classicparts.com) both have them. They both show them with bushings though. They both have the springs as well.
If you plan on running the bushings, here is a how-to on that as well... http://www.hotrodders.com/forum/tip-...-a-111097.html Brian
__________________
1948 Chevy pickup Chopped, Sectioned, 1953 Corvette 235 powered. Once was even 401 Buick mid engined with the carburetor right between the seats! Bought with paper route money in 1973 when I was 15. "Fan of most anything that moves human beings" Last edited by MARTINSR; 10-09-2007 at 10:22 PM. |
|
|
|
|
#5 |
|
67-72 Addict!
Join Date: Feb 2002
Location: The TAX State!
Posts: 7,857
|
Re: "Basics of Basics" rebuilding hinges.
Brian, I like the bolt trick on the bushings!. How did you remove the old bushings on your brothers s-10 without removing the door???
__________________
Jim 1970 C/10 Fleetside w/Ghost Flames Lowered 4.5" front and 4" rear (Raked) 355/350 Turbo w/shift kit 10" Redneck Performance Verter w/2500 stall Hooker Super Comps part#2808-1 Performer RPM Air-Gap 12 Bolt w/3:73 gears- Eaton Posi Comp Cams XE262 with 1.6 Crane Energizers, Road Demon 625 and Brodix IK 180 heads |
|
|
|
|
#6 |
|
Registered User
Join Date: Dec 2000
Location: Boise, Idaho
Posts: 6,003
|
Re: "Basics of Basics" rebuilding hinges.
I only replaced the top hinges bushings. I simply knocked out the pin, leaned the door over on a floor jack with a 2x4 on top. I busted up the bushings with a small, sharp chisel until the pieces just fell out. I could have done both top and bottom this way but the bottom was barely loose. After replacing the top, the door worked almost perfect and I stopped there instead of doing the bottom too.
You can see in the bottom photo how the door side of the hinge is right there in the picture. So the space is a little cramped but do-able.  Brian
__________________
1948 Chevy pickup Chopped, Sectioned, 1953 Corvette 235 powered. Once was even 401 Buick mid engined with the carburetor right between the seats! Bought with paper route money in 1973 when I was 15. "Fan of most anything that moves human beings" |
|
|
 |
| Bookmarks |
|
|