
|
 09-20-2008, 05:17 PM
|
#1 |
|
Registered User
Join Date: Feb 2008
Location: WA
Posts: 189
|
Rocker progress pics
Its slow going, but one side is almost done. I have replaced corners of the floor, footwell, rear cab support, front door pillar, inner and outer rockers. I just need to hit the backside with the grinder.
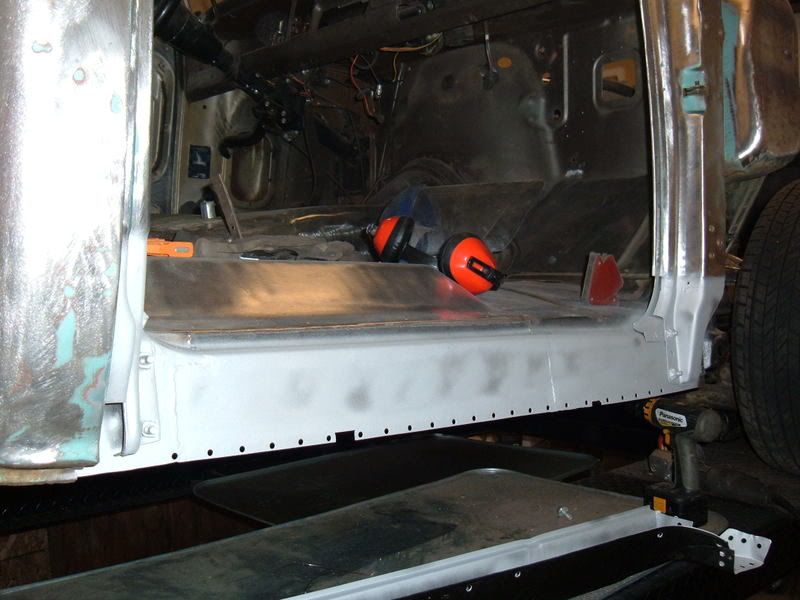 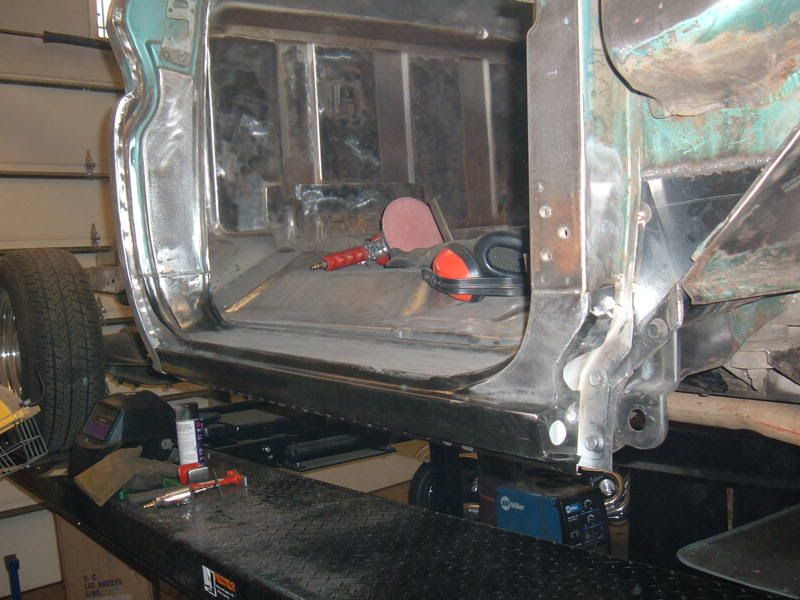 Now I need to get the other side done. Chop |

|

|
|
09-20-2008, 05:53 PM
|
#2 |
|
Registered User
Join Date: Dec 2007
Location: PA
Posts: 326
|
Re: Rocker progress pics
Looking good! It must be easier having your work at eye level instead of bending over all the time. Hows the DA sander working to strip the paint?
|
|
|
|
|
09-20-2008, 07:14 PM
|
#3 |
|
Registered User
Join Date: Mar 2002
Location: Forney TX
Posts: 4,512
|
Re: Rocker progress pics
Looks good did you use the complete outter floor pan that goes from the footwell to the back of the cab? I am needing to do the same process soon.
__________________
Troy 1965 Chevy Bagged,361 sbc,voodoo cam,1.5 full roller rockers,patriot 185cc vortec heads 2.02-1.60,vortec weiand polished intake,demon carb my truckhttp://67-72chevytrucks.com/vboard/s...d.php?t=332884 Big Red Dog build http://67-72chevytrucks.com/vboard/s...d.php?t=572274 |
|
|
|
|
09-20-2008, 07:21 PM
|
#4 |
|
Registered User
Join Date: Feb 2008
Location: WA
Posts: 189
|
Re: Rocker progress pics
I should have bought a lift years ago. Best tool in the shop. The DA works ok. I was using it with the spindle locked to sand the plug welds down. I have been using the Norton stripping wheels a lot. They take off paint and rust pretty quick. They do generate some heat, so you need to keep them moving over large unsupported areas.
I used part of the front floor patch and a separate inner rocker. The full piece would have been easier. Chopster |
|
|
|
|
09-20-2008, 10:47 PM
|
#5 |
|
Its Deja Vu time again
Join Date: Aug 2008
Location: Marysville, North of Seattle WA
Posts: 815
|
Re: Rocker progress pics
Looks good. I'm not looking forward to tackling that myself, but its in my future as well. Must be a feature in the 60's-66's
My wife calls it the Fred Flintstone breaking system. 
|
|
|
|
|
09-21-2008, 12:27 AM
|
#6 |
|
Registered User
Join Date: Jun 2008
Location: pensacola fl
Posts: 3,072
|
Re: Rocker progress pics
Got any more pics of the replacement in action? I am doing this now and some ref pic's would help. As always found more rust then I thought, but have never done this before.
Thanks |
|
|
|
|
09-21-2008, 12:34 AM
|
#7 |
|
60-66 Nut
  Join Date: Mar 2007
Location: Coeur d'Alene, Idaho
Posts: 23,246
|
Re: Rocker progress pics
Looks good ChopperDr.....usually lots of sheetmetal to replace on these trucks. It's a good feeling when you get one side done, but then you realize you've got to do it all again on the other side.....kinda sucks sometimes.
__________________
Power Steering Box Adapter Plates For Sale HERE Power Brake Booster Adapter Brackets For Sale '63-'66 HERE and '67-'72 HERE and '60-'62 HERE and "60-'62 with clutch HERE Rear Disc Brake Brackets For Sale. Impala SS calipers HERE Camaro Calipers HERE D52 Calipers HERE 6 Lug HERE Hydroboost Mounting Plates HERE |
|
|
|
|
09-21-2008, 09:10 AM
|
#8 |
|
UCA63
Join Date: Aug 2005
Location: Lloydminster AB Can.
Posts: 1,637
|
Re: Rocker progress pics
looking great Doc
I'll be there soon too T
__________________
member#7816 "63 sb ss bbw 350\350 12 bolt rear Pwr Fr Disc PS tilt '61 GMC in progress '63 GMC to use for parts '90 Chevy Ext cab sbfs 5.7l (current d d) |
|
|
|
|
09-23-2008, 10:54 AM
|
#9 | |
|
Registered User
Join Date: Jan 2006
Location: Santa Cruz Mountanins, CA
Posts: 14
|
Re: Rocker progress pics
Quote:
I am about to start on my rockers/floorpans and being new to bodywork/rustrepair I tend to overthink everything. Thanks Jacob |
|
|
|
|
|
09-23-2008, 01:31 PM
|
#10 | |
|
Registered User
Join Date: Oct 2005
Location: oklahoma
Posts: 663
|
Re: Rocker progress pics
Quote:
Being sure about where to start drilling out spot welds is a bit intimidating to me - I don't want to make swiss cheese out of the pillars; I have the diagram showing their locations and I've knocked off the old paint, but they're not easy to see Any tips? |
|
|
|
|
|
10-01-2008, 06:38 PM
|
#11 |
|
Registered User
Join Date: Jan 2006
Location: Santa Cruz Mountanins, CA
Posts: 14
|
Re: Rocker progress pics
nm....and i can't delete post.
Last edited by fast64chevy; 10-01-2008 at 06:42 PM. |
|
|
|
|
10-01-2008, 07:28 PM
|
#12 | |
|
1 thing at a time is progress.
Join Date: Jun 2007
Location: Ball Ground GA
Posts: 5,511
|
Re: Rocker progress pics
Awesome job!!
Quote:
Did you get used "A" pillars? I built mine from 67-72 pieces which included the inner kick and "A" post little dog leg. It woked,but was a pain. You did a nice and clean job.
__________________
Alan
Philippians 2:14-16 |
|
|
|
|
|
10-01-2008, 11:46 PM
|
#13 |
|
Registered User
Join Date: Feb 2008
Location: WA
Posts: 189
|
Re: Rocker progress pics
The parts were not the 67-72 parts. I did look them over though. I guess the 60-66 parts are fairly new to the market. Even though they are made for 60-66 they required a fair bit of tweaking, but the general shape was there. My front pillars were not that bad, but why not do it right while I was in that far. I hope my repair will last 40 years like the origional did.
Chopzilla |
|
|
|
|
10-02-2008, 09:58 AM
|
#14 | |
|
Registered User
Join Date: Sep 2008
Location: Newport, North Carolina
Posts: 622
|
Re: Rocker progress pics
Quote:
|
|
|
|
|
|
10-02-2008, 08:38 PM
|
#15 |
|
Registered User
Join Date: Jul 2008
Location: Kansas
Posts: 707
|
Re: Rocker progress pics
Hey Chopper, you're doing exactly what I'm saving up to do. Man, I wish we were closer so I can learn as I go, but I'm prepared for the fact that I'll mess something up. I'm saving for a mig welder then I'll get the floor pans.
Thanks for the pics. Joe |
|
|
|
 |
| Bookmarks |
|
|


 Linear Mode

