
|
Register or Log In To remove these advertisements. |
|
|
|
|||||||
| View Poll Results: If you had the option, which of these grills would you use? | |||
| Original 66 painted grill |
|
1 | 20.00% |
| 64-66 C60 painted grill |
|
2 | 40.00% |
| an original aluminum grill that needs to be restored |
|
2 | 40.00% |
| the repo aluminum grill that is now available |
|
0 | 0% |
| Voters: 5. You may not vote on this poll | |||
 |
|
|
Thread Tools | Display Modes |
|
|
 11-19-2012, 12:04 PM
|
#1 |
|
Registered User
Join Date: Jun 2012
Location: Rathdrum, Idaho
Posts: 305
|
Re: pdx-sanity66
You're about where I want to be in 6 months.....starting on the rust repair and having some fresh knowledge in welding. I will be interested in your pics!
|

|

|
|
11-24-2012, 11:49 PM
|
#2 |
|
But Found Her 25yrs Later!
 Join Date: Oct 2010
Location: Oregon City, Oregon
Posts: 10,507
|
Re: pdx-sanity66
Have you welded the vent cover back on yet?
If so, did you do anything to seal this seam within the red line? I will need to dig into my 65 cab to do something about this area. I recently found a leak coming through in this location. 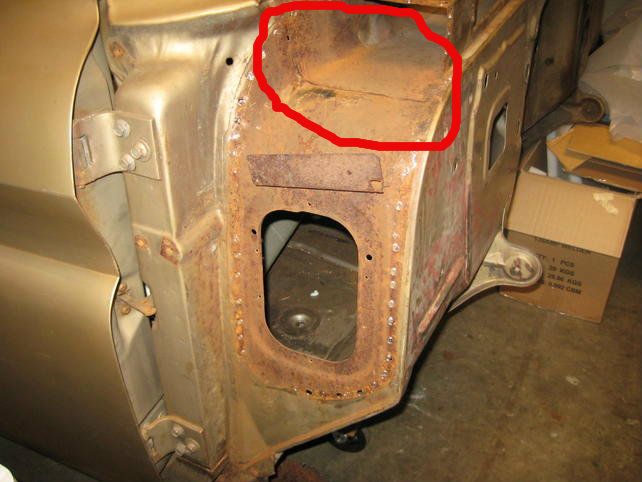
__________________
I lost my 65 - Found it 25 years later: http://67-72chevytrucks.com/vboard/s...d.php?t=426650 66 C20 Service Truck: http://67-72chevytrucks.com/vboard/s...d.php?t=428035 |
|
|
|
|
11-25-2012, 12:06 AM
|
#3 |
|
Registered User
Join Date: Aug 2012
Location: Bibb CO.Alabama
Posts: 321
|
Re: pdx-sanity66
Very nice
Posted via Mobile Device
__________________
1966 C10 short stepper KMHK 
|
|
|
|
|
11-25-2012, 01:00 AM
|
#4 |
|
Registered User
Join Date: Apr 2011
Location: .
Posts: 3,104
|
Re: pdx-sanity66
Very Nice. Verrrrrrrry Nice! You had mentioned about doing a tad bit of body work left on the passengers side. I take it that you will be putting in seam sealer too.,? and covering it with epoxy to keep all your work safe from rust.??
Low Elco mentioned on my thread #251 (LORD Fusor 800EZ) is what he uses for a seam sealer. Hope the info on patch part numbers was of some help. Great job. Keep it up. You keep me motivated to keep working on the '66.
|
|
|
|
|
11-26-2012, 08:51 AM
|
#5 | |||
|
Senior Member
Join Date: Mar 2011
Location: Tucson, Arizona
Posts: 2,063
|
Re: pdx-sanity66
Quote:
Quote:
Quote:
|
|||

|
|
|
11-27-2012, 08:46 PM
|
#6 |
|
Registered User
Join Date: Jun 2012
Location: Rathdrum, Idaho
Posts: 305
|
Re: pdx-sanity66
Nice work, I'm a few months behind you on the patch work but I'll be looking back here for inspiration. My truck just lost daily driver status and I ended up getting a commuter. That's not necessarily a bad thing though, it will take the pressure of having to have everything done by a certain time.
|
|
|
|
|
11-29-2012, 10:34 PM
|
#7 | |
|
Senior Member
Join Date: Mar 2011
Location: Tucson, Arizona
Posts: 2,063
|
Re: pdx-sanity66
Quote:
My first day off today so I was back out working on my Sanity (truck that is) Here are a few pics of the driver side rocker removal. Now that it's off I know what I need to order for patch panels so I'm kind of in limbo on this phase until a get some. I've got plenty of stuff to keep me busy, though.
|
|
|
|
|
|
04-20-2013, 05:04 PM
|
#8 | |
|
But Found Her 25yrs Later!
Join Date: Oct 2010
Location: Oregon City, Oregon
Posts: 10,507
|
Re: pdx-sanity66
Quote:
Mine has been just sitting. First on my list is to get that same area fixed. Was it difficult to get things lined back up?
__________________
I lost my 65 - Found it 25 years later: http://67-72chevytrucks.com/vboard/s...d.php?t=426650 66 C20 Service Truck: http://67-72chevytrucks.com/vboard/s...d.php?t=428035 |
|
|
|
|
|
05-06-2013, 03:52 PM
|
#9 | |
|
Senior Member
Join Date: Mar 2011
Location: Tucson, Arizona
Posts: 2,063
|
Re: pdx-sanity66
Quote:
Even though I haven't posted in a while, I have been getting some things done. After all the floor patching I decided I needed to step away from the metal work for a bit and do something mechanical. I decided to get the brakes finished up and get my brake lines ran and some other misc. stuff. I realized after I had my new 5 lug axles made up that I had had them made with the center hub the same as the 6 lug axles instead of the smaller diameter of the 5 lug axles. Rookie mistake: dohh: So I took them back out and had the machine shop turn them down. The next thing is to get the brake lines ordered and installed and get the front calipers, etc. installed. And also finish up the emergency cables as far as I can with the body off. Luckily, the cables are all in excellent condition so I'm bead blasting them and WD40ing them to freshen them up. I just slipped the drums on to check them out. I still need to clean the packing stuff off of them and then paint them. I also got my bead blast cabinet finished and I've been blasting the crap out of a lot of small parts laying around and also the emergency brake hardware to do my brakes. Here are a few pics of what I've accomplished lately: |
|
|
|
|
|
12-19-2012, 05:09 PM
|
#10 |
|
Registered User
Join Date: Apr 2012
Location: Searcy, AR
Posts: 4,203
|
Re: pdx-sanity66
Finally found your build, Impressive, Subscribed!!!
__________________
DON Proverbs 27:17  US Air Force Retarded errr Retired My '65 Stepper Build:http://67-72chevytrucks.com/vboard/s...d.php?t=533920 My '60 Rusty Patina Build:http://67-72chevytrucks.com/vboard/s...66#post7402266 My '72 http://67-72chevytrucks.com/vboard/s...59#post7204359 SOLD |
|
|
|
|
12-20-2012, 03:25 PM
|
#11 |
|
I'm just glad to be here!
Join Date: Jan 2008
Location: Longview, TX
Posts: 4,788
|
Re: pdx-sanity66
Like what you have done so far. Just found this thread and read thru the whole thing. I completly understand the job thing. I lost my job in March with a company that I had been with for nearly 10 years. Go luck and found one locally with a larger company and I could nto be happier with my new job.
Your rust issues look similar to mine in the fact that the kick panels and floor are worse than the outer rockers themselves. I might have to tackle them this winter once I have Korbin's truck more complete...
__________________
Karl 1965 Chevy Stepside(Grandpa's Old Blue) and (July 2015 Shop Build!)(2020, the Saga Continues) http://67-72chevytrucks.com/vboard/s...d.php?t=372424 The LST Challenge: http://67-72chevytrucks.com/vboard/s...=1#post7812257 Korbin's 1st Square: "Sunburn" http://67-72chevytrucks.com/vboard/s...d.php?t=418618 1985 GMC Sierra: "White Trash", Korbin's 2nd now... http://67-72chevytrucks.com/vboard/s...d.php?t=632305 Henry - 1984 Chevrolet, Owen's 1st Square |
|
|
|
|
12-23-2012, 04:34 AM
|
#12 | |||
|
Senior Member
Join Date: Mar 2011
Location: Tucson, Arizona
Posts: 2,063
|
Re: pdx-sanity66
Quote:
Quote:
Quote:
The weather has still been keeping me from doing much in the garage right now.  I'm still hoping Santa brings me heat for the garage. I'm still hoping Santa brings me heat for the garage. I did get all my patch panels that I ordered and I want to take a moment and give a shout out to Classic Parts. Their customer service has been fantastic every time I have ordered from them. Their parts and prices are some of the best, also. I ordered parts and forgot to add a code for 10% discount offered during the holidays. I emailed them and they were back to me within a couple of hours with the adjustment to my charges. The parts got to my door in 4 days and all of the patch panels look great, even the rear cab corner. You just can't beat that.
|
|||
|
|
|
|
12-31-2012, 10:46 PM
|
#13 |
|
Senior Member
Join Date: Mar 2011
Location: Tucson, Arizona
Posts: 2,063
|
Re: pdx-sanity66
I got the gift of heat for Christmas. I got a propane heater/blower. I robbed my bbq grill of its propane tank and got it filled and hooked up. I propped the back door of the garage open a little for ventilation so I wouldn't die of carbon monoxide and fired it up. I had the garage as warm as the house in about 30 min.. I have no excuses now. Back to work.I cut out some more of the floor/ toe board rust and started fitting the replacement panels. I've got the first piece tacked in and another fitted, but I ran out of welding gas and had to quit. Now it's back to work until Wed. I'll post some updated pix then. Happy New Year Everybody |
|
|
|
|
12-31-2012, 11:30 PM
|
#14 | |
|
Registered User
Join Date: Apr 2011
Location: .
Posts: 3,104
|
Re: pdx-sanity66
Quote:
Can't wait to see some pics. I wanted to get a chance to talk to you face to face at the forum meeting thingy but the weather and distance was just too much. Maybe someday. Do you use 75-25 mix or straight co2? If you get a chance try 75-25. |
|
|
|
|
|
01-01-2013, 11:12 AM
|
#15 |
|
Registered User
Join Date: Dec 2006
Location: SLC, UT
Posts: 706
|
Re: pdx-sanity66
Just read through your build so far. Great job and I can't wait to see what you accomplish in 2013!
|
|
|
|
|
01-01-2013, 12:15 PM
|
#16 |
|
UCA63
Join Date: Aug 2005
Location: Lloydminster AB Can.
Posts: 1,637
|
Re: pdx-sanity66
You're making great progress Brett
Looking fantastic,keep it up T
__________________
member#7816 "63 sb ss bbw 350\350 12 bolt rear Pwr Fr Disc PS tilt '61 GMC in progress '63 GMC to use for parts '90 Chevy Ext cab sbfs 5.7l (current d d) |
|
|
|
|
01-01-2013, 10:54 PM
|
#17 | ||
|
Senior Member
Join Date: Mar 2011
Location: Tucson, Arizona
Posts: 2,063
|
Re: pdx-sanity66
Quote:
Quote:
|
||
|
|
|
|
01-01-2013, 11:40 PM
|
#18 |
|
Senior Member
Join Date: Mar 2011
Location: Tucson, Arizona
Posts: 2,063
|
Re: pdx-sanity66
Here's my new heater for the garage and a few shots of the driver's side floor patching so far. I hope to finish it up in the next few days.
Even though I bought the full length inner rocker/outer floor patch, I decided to cut it in half so it would be easier to work with while fitting pieces together. I also found another piece from the passenger side floor patch that I had left over that has almost the same bend in it to match what I needed for the remaining floor to toe board piece I needed. I just had to bend the flange and massage the curve slightly to fit. I have the larger piece tacked in now but I'm at work and for some reason didn't get the pics of that part downloaded. |
|
|
|
|
01-02-2013, 01:06 AM
|
#19 |
|
Registered User
Join Date: Apr 2011
Location: .
Posts: 3,104
|
Re: pdx-sanity66
Nice seein your progress.
When I was fitting my floor pieces together and sometimes had a gap I used a copper welding spoon from harbor freight tools to back the gap and filled the gap with weld wire slowly.  Posted via Mobile Device Posted via Mobile Device |
|
|
|
|
01-02-2013, 01:14 AM
|
#20 |
|
Senior Member
Join Date: Mar 2011
Location: Tucson, Arizona
Posts: 2,063
|
Re: pdx-sanity66
Yes, I've used the copper spoon a few times in the past. Actually the panels fit up better than this when I started tacking. I did a little more fitting after I took these pix. I did have one screw up, though. I measured things 900 times before cutting and still cut too much off of one patch and had to weld a patch on the patch. UGGH!
Other than that it's working out well.
|
|
|
|
|
01-02-2013, 08:00 AM
|
#21 |
|
UCA63
Join Date: Aug 2005
Location: Lloydminster AB Can.
Posts: 1,637
|
Re: pdx-sanity66
LOL dead slow,still looking for a workspace so I can continue on with my cab.
Still getting the smalls done though. T
__________________
member#7816 "63 sb ss bbw 350\350 12 bolt rear Pwr Fr Disc PS tilt '61 GMC in progress '63 GMC to use for parts '90 Chevy Ext cab sbfs 5.7l (current d d) |
|
|
|
|
01-04-2013, 06:16 PM
|
#22 |
|
Senior Member
Join Date: Mar 2011
Location: Tucson, Arizona
Posts: 2,063
|
Re: pdx-sanity66
I had quite the day trying to get the small floor piece on the right to work. I had a piece I thought was going to work that you can see in the previous pix. Well, it didn't.
 I cut it wrong. Now, I could have probably welded a piece back on and made it work but I got this brilliant idea I cut it wrong. Now, I could have probably welded a piece back on and made it work but I got this brilliant idea  that I would make one from scratch rather than use the pre-bent piece I had. What was I thinking? I don't have any tools for forming metal. I finally got it made and tacked it in. Still a little massaging needed at the flange. that I would make one from scratch rather than use the pre-bent piece I had. What was I thinking? I don't have any tools for forming metal. I finally got it made and tacked it in. Still a little massaging needed at the flange.
|
|
|
|
|
01-04-2013, 07:14 PM
|
#23 |
|
Registered User
Join Date: May 2005
Location: Beaverton, OR
Posts: 3,728
|
Re: pdx-sanity66
Nice work.
I need to upgrade my heater, it's freezing in my garage.
__________________
New Project: 1966 LWB C20 Plans: 1/2 ton conversion Dropmember front Dropmember rear Corvette discs Restored raised bed http://67-72chevytrucks.com/vboard/s....php?p=4295210 |
|
|
|
|
01-05-2013, 12:10 AM
|
#24 |
|
Registered User
Join Date: Dec 2010
Location: sanford nc
Posts: 499
|
Re: pdx-sanity66
Nice work on the floor. I had to do the same repair that your doing. Im so glad im done with that. Keep at it, your doing a nice job. Also your heater looks almost like mine. I bought mine from big lots about 4 years ago. 30,000 btu and has a fan and runs on propane. Best thing is it was only 50 dollars.
__________________
  69 chevelle malibu, 64 C-10 shortbed 69 chevelle malibu, 64 C-10 shortbed
|
|
|
|
|
01-05-2013, 06:30 AM
|
#25 | ||
|
Senior Member
Join Date: Mar 2011
Location: Tucson, Arizona
Posts: 2,063
|
Re: pdx-sanity66
Quote:
Quote:
I'm getting a lot more done this winter with the heater. The price of propane is worth it to be able to get out in the garage. |
||
|
|
|
|
| Bookmarks |
|
|


 Hybrid Mode
