
|
Register or Log In To remove these advertisements. |
|
|
|
|||||||
 |
|
|
Thread Tools | Display Modes |
 12-26-2008, 08:30 PM
|
#1 |
|
Long Fleet Club
Join Date: Aug 2006
Location: Deer Park, TX
Posts: 5,666
|
DIY Converting Alternators
This is the simple and easy way to upgrade your alternator to a newer style alternator. There are two GM alternators you can upgrade to that are internally regulated. One is a SI model and the other is a CS model. The SI model is what has been run for many years after the external regulated ones and the CS model is the newest. You can upgrade to either with the use of a filament light bulb or a 35 to 350 ohm resistor.
First is getting rid of the external regulator. All you have to do is cap off the red and white wires and join the brown and blue. Where you join the brown and blue (if you don't have a dash indicator light) you need to put a resistor or a light. This gives the resistance needed to not burn up the alternator. 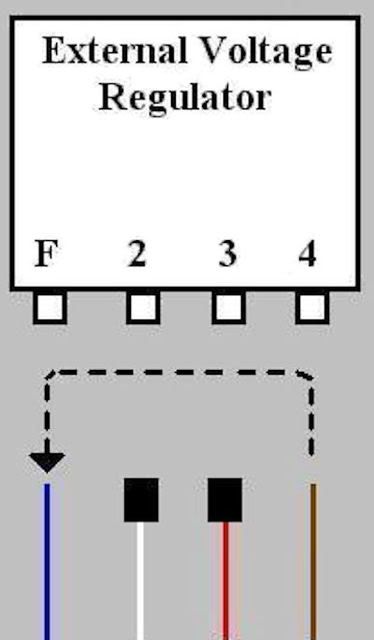 For the SI models. You will take a wire from the battery positive to the post on the back. I have a 14g wire now but going to go to 10g later. you will also go from that same post to the number 2 terminal on the side (red wire in pic) and the last hook up you will need is the brown wire with the light or resistor connected to terminal 1 on the side (white wire in the pic). That is all you need to do to get this set up going. 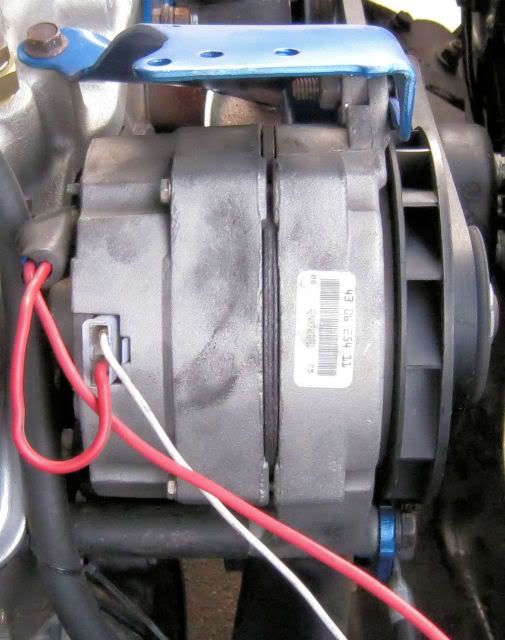 Now for the CS models. The ones you will be seeing in most of the serpentine conversions. There were several different ways I found on the Internet on how to do this but this is how I did mine and it works with no problems. Just take the wire from the battery to the post on the back of the alternator then take your brown wire with the light or resistor to terminal "L" on the top. 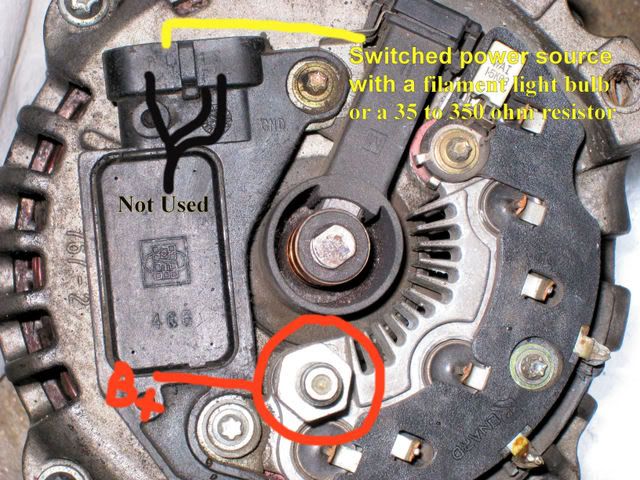 I know there are plugs you can buy to do this But they run around $35. A resistor runs you about 20 cents. So the choice is yours.
__________________
Chris Meeks '69 Chevy Custom/10 Long Bed <-- Thread of the work I did before selling. Truck is now finished to the new owners design and running around. I was shown some pictures of the finished product. At least it survived the junk yard. FAQ Index by Krue Site Vendors Subscribe Here Forum Rules Last edited by cameeks; 12-26-2008 at 11:38 PM. |

|

|
|
12-26-2008, 08:57 PM
|
#2 |
|
The Older Generation
   Join Date: Aug 2006
Location: Montezuma, Iowa
Posts: 25,405
|
Re: DIY Converting Alternators
-
Good deal Chris... One question though, on the instructions for the CS models it says "Just take you wire from the alternator to the post on the back then take your brown wire with the light or resistor to terminal "L" on the top." Should it say "Just take you wire from the "BATTERY" to the post on the back then take your brown wire with the light or resistor to terminal "L" on the top" or am I thinking wrong.... LockDoc
__________________
Leon Locksmith, Specializing In Antique Trucks, Automobiles, & Motorcycles (My Dually Pickup Project Thread) http://67-72chevytrucks.com/vboard/s...d.php?t=829820 - |
|
|
|
|
12-26-2008, 11:23 PM
|
#3 | |
|
Long Fleet Club
Join Date: Aug 2006
Location: Deer Park, TX
Posts: 5,666
|
Re: DIY Converting Alternators
Quote:

__________________
Chris Meeks '69 Chevy Custom/10 Long Bed <-- Thread of the work I did before selling. Truck is now finished to the new owners design and running around. I was shown some pictures of the finished product. At least it survived the junk yard. FAQ Index by Krue Site Vendors Subscribe Here Forum Rules |
|
|
|
|
|
03-06-2013, 06:39 PM
|
#4 |
|
Registered User
Join Date: Aug 2011
Location: Little River, SC
Posts: 255
|
Re: DIY Converting Alternators
I know this is an old thread, but found it in my search. Just for some clarity, I'm reading this as running the "L" wire directly into the brown wire in the regulator plug, without doing anything else. Basically, unplug the voltage regulator harness, loop the two outer wires into each other at the plug, and plug the brown wire directly to the 'L' terminal of the cs130 alt. nothing happens with the fourth terminal on the regulator plug, nothing happens with the small square plug or the black ring terminal at the alternator. Correct?
Posted via Mobile Device
__________________
1955 Chevy 3100 Task Force Pro Street - Sold! 1957 Chevy 3100 Task Force "Rat Rod" a.k.a. SLOTH - Sold! 1971 C10 Longbed factory A/C all stock 350/350 1979 Jeep CJ7 - Build date on the day I was born! -Keeper 2004 Expedition - Family Hauler 2007 Accord - Wife's around towner; I have more but not enough lines to post them! |
|
|
|
|
03-06-2013, 07:35 PM
|
#5 |
|
Msgt USAF Ret
 Join Date: Jan 2005
Location: Kalamazoo, Michigan
Posts: 8,709
|
Re: DIY Converting Alternators
I recommend this thread....
.........http://67-72chevytrucks.com/vboard/s...d.php?t=567472
__________________
VetteVet metallic green 67 stepside 74 corvette convertible 1965 Harley sportster 1995 Harley wide glide Growing old is hell, but it beats the alternative. |
|
|
|
|
03-06-2013, 10:51 PM
|
#6 |
|
Registered User
Join Date: Aug 2011
Location: Little River, SC
Posts: 255
|
Re: DIY Converting Alternators
Yeah, still isn't answering all my questions. Does anyone have a flat out simple write up of plug this wire directly here, and this one directly there, and leave this one alone for a cs130 with the ammeter gauge?
Posted via Mobile Device
__________________
1955 Chevy 3100 Task Force Pro Street - Sold! 1957 Chevy 3100 Task Force "Rat Rod" a.k.a. SLOTH - Sold! 1971 C10 Longbed factory A/C all stock 350/350 1979 Jeep CJ7 - Build date on the day I was born! -Keeper 2004 Expedition - Family Hauler 2007 Accord - Wife's around towner; I have more but not enough lines to post them! |
|
|
|
|
03-07-2013, 02:56 AM
|
#7 | |
|
Msgt USAF Ret
Join Date: Jan 2005
Location: Kalamazoo, Michigan
Posts: 8,709
|
Re: DIY Converting Alternators
Quote:
If you have a stock system and you want the amp gauge to work then here is how I would do it. 1. Remove the brown wire from the external regulator plug. 2. solder a resistor I described inline with the brown wire 3 remove the red wire from the external regulator plug 4 get a pigtail from the parts yard for the CS alternator that matches the alternator you have . There are 2 main types, one will say P L F S and the other one will say P L I S. You will most likely need the one that is labeled P L F S make sure the plug has enough wire on it to splice another wire into. Here's the plug. You will only use the 2 terminals labeled L and S. 5. connect the brown wire with the resistor to the L terminal wire. 6. connect the red wire to the S terminal, you may have to extend the red wire to reach the S terminal wire. 7. The large red wire on the back of the stock alternator will connect to the square block stud on the back of the CS alternator. This wire and the smaller red wire to S go back into the harness to a soldered connection with the feed wire from the battery gauge. At the risk of confusing you, you should replace the 12 gauge feed wire from the alternator with an 8 gauge and undo the soldered junction and use a junction or a relay and fuse panel and wire all the wires together that were soldered in the stock harness. You have a much more powerful alternator in the CS than the old stock original one. If you don't plan on adding any accessory loads like a stereo or a set of bags then the 12 gauge stock wire will be fine. Once you add electric cooling fans and halogen lights and stereo amps then the 8 gauge will be needed . This diagram is how I have wired my 12 SI alternator in from stock, I didn't need the resistor and the two small wires could be the S and L wires instead of the 1 and 2 wires that they are now. I already have an 8 gauge feed wire and a large junction block for accessories. Ok now you are done as far as wiring the alternator and the amp gauge will still work if it did before.
__________________
VetteVet metallic green 67 stepside 74 corvette convertible 1965 Harley sportster 1995 Harley wide glide Growing old is hell, but it beats the alternative. |
|
|
|
|
|
03-07-2013, 12:17 PM
|
#8 |
|
Registered User
Join Date: Jul 2008
Location: Eastern Oregon
Posts: 2,310
|
Re: DIY Converting Alternators
Vette Vet, A close friend who ran a automotive electrical shop for 45 years and is still working at 82 told me that upgrading from an external regulator is not needed ? He noted a lack of proper charging at times ? If properly working the factory set up works just fine? Please settle this debate once and for all....Thanks
Posted via Mobile Device
__________________
71 C-20 07 Magnum RT AWD |
|
|
|
|
03-07-2013, 01:53 PM
|
#9 | |
|
Registered User
Join Date: Jun 2010
Location: San Diego Co.
Posts: 1,160
|
Re: DIY Converting Alternators
Quote:
They still sell the external voltage regulators for these trucks....I've seen em in a catalog or online somewhere. And I guess they still sell alternators that are externally regulated. So you could restore your electrical in a way that is totally stock if you wanted to. But I think a lot of folks just want the cleaner install, and maybe a more powerful system if they have a lot of accessories (power windows, bags, etc..), and this thread and others like it are HOW you do that......if you WANT to.
__________________
1972 Chevy C-10, SWB, Fleet, 350/350, PS, PB, HEI, mostly stock, Survivor. 
|
|
|
|
|
|
03-07-2013, 03:17 PM
|
#10 | |
|
Msgt USAF Ret
Join Date: Jan 2005
Location: Kalamazoo, Michigan
Posts: 8,709
|
Re: DIY Converting Alternators
Quote:
What debate? I'm a big nostalgia fan myself having been around 20 years before these trucks were new. Your friend is right if one never intends to add any accessories to his truck. When we start adding cooling fans, stereo amps, lift bag compressors, trailer wiring and winches and dual batteries, and so on, the demand for more power from the charging system is a must. The puny little 32 amp alternator with the mechanical points external voltage regulator just won't cut it. You can upgrade the 32 amp alternator to 65 for $$$$$ but you can buy an internal regulated alternator for about the same amount of money and get more amps at idle so the lights don't dim and the wipers,don't slow down and the heater fan don't blow as fast etc. and so on. I can give several examples for other systems to upgrade as well. HEI from points. Fuel injection, remote starting, electric door locks, computer controlled transmissions. But like I said if one is never going to upgrade from stock then the EVR and the 32 amp alternator will work just fine, at least until the points stick in the EVR and burn up the wiring harness and the alternator. JMHO.....
__________________
VetteVet metallic green 67 stepside 74 corvette convertible 1965 Harley sportster 1995 Harley wide glide Growing old is hell, but it beats the alternative. |
|
|
|
|
|
03-07-2013, 03:35 PM
|
#11 |
|
Registered User
Join Date: Jul 2009
Location: Houston, Tx
Posts: 1,133
|
Re: DIY Converting Alternators
good stuff
__________________
1972 SWB Medium Olive South Houston Instagram: Antbish84 |
|
|
|
|
03-07-2013, 04:46 PM
|
#12 |
|
Registered User
Join Date: Jul 2008
Location: Eastern Oregon
Posts: 2,310
|
Re: DIY Converting Alternators
OK You win ! Does any one make a plug in play harness ? I see one for head light relay upgrade's ? Or do you have to tear into your harness to upgrade to IR alt ?......thanks
 Posted via Mobile Device
__________________
71 C-20 07 Magnum RT AWD |
|
|
|
|
03-07-2013, 05:43 PM
|
#13 |
|
Registered User
Join Date: Jan 2011
Location: Chattanooga, TN
Posts: 2,144
|
Re: DIY Converting Alternators
Do a bit of research before you convert to a CS130 alternator. The failure rate is very high. The CS144 is a much better unit. If you must use a CS130, only use a Genuine rebuilt by Delco unit. The generic rebuilds do not always (usually) do the upgrades on the bearings to make these live.
__________________
'83 K20-TPI '73 C10 '79 C10-ex-diesel(SOLD) '07 Tahoe(Son driving) '14 Suburban-DD '71 C10-current project |
|
|
|
|
03-07-2013, 05:45 PM
|
#14 |
|
Registered User
Join Date: Aug 2011
Location: Little River, SC
Posts: 255
|
Re: DIY Converting Alternators
Well, I just went to Radio Shack on a search for resistors. The closest thing I could find was a 100 ohm 1W resistor. Is this going to be ok? I read another thread that said it would be ok, but I may be misreading.
Posted via Mobile Device
__________________
1955 Chevy 3100 Task Force Pro Street - Sold! 1957 Chevy 3100 Task Force "Rat Rod" a.k.a. SLOTH - Sold! 1971 C10 Longbed factory A/C all stock 350/350 1979 Jeep CJ7 - Build date on the day I was born! -Keeper 2004 Expedition - Family Hauler 2007 Accord - Wife's around towner; I have more but not enough lines to post them! |
|
|
|
|
03-07-2013, 06:52 PM
|
#15 |
|
Registered User
Join Date: Jul 2011
Location: sutton WV
Posts: 1,822
|
Re: DIY Converting Alternators
I'm going to subscribe also, I have a GM Performance serpentine system I purchased for my build. I'm not high jacking this thread , but I'm not sure what alternator I have. I still need to wire mine in also. I have a pic of the box. Sorry about the sideways pic.....
Posted via Mobile Device
__________________
Jason '70 C-10 short fleet 427BB TH400 (SOLD) '10 Ford F 350 '13 Ford RAPTOR 6.2 MY BUILD THREAD http://www.67-72chevytrucks.com/vboa...d.php?t=612623 |
|
|
|
|
03-07-2013, 08:44 PM
|
#16 |
|
Registered User
Join Date: Jul 2011
Location: sutton WV
Posts: 1,822
|
Re: DIY Converting Alternators
ttt
Posted via Mobile Device
__________________
Jason '70 C-10 short fleet 427BB TH400 (SOLD) '10 Ford F 350 '13 Ford RAPTOR 6.2 MY BUILD THREAD http://www.67-72chevytrucks.com/vboa...d.php?t=612623 |
|
|
|
|
03-08-2013, 12:59 AM
|
#17 | |
|
Registered User
Join Date: Nov 2011
Location: Sheffield, ALA
Posts: 2,471
|
Re: DIY Converting Alternators
Quote:
I agree with VetteVet also, you don't have to do the upgrade as I am also all original or close but I did the the upgrade to my 71 recently,just waiting to drive to see how well it works.Will do the upgrade to the 72 now that I know how to do it and not burn the truck down.hahaha Its easy to do. |
|
|
|
|
|
03-08-2013, 10:31 PM
|
#18 |
|
Registered User
Join Date: Aug 2011
Location: Little River, SC
Posts: 255
|
Re: DIY Converting Alternators
Ok, so I looked into a few things. American Auto Wire sells a conversion harness (also available through Summit Racing) for around $20. This includes a cap for the voltage regulator plug and a stock wiring pigtail to CS130 pigtail. It is supposed to make everything plug and play with no cutting required. HOWEVER, I called AAW and found that the pigtail does NOT include the resistor, and that I would have to cut their harness and install it inline. Also found by looking through their pictures that this is only one wire which connects the brown wire. The 'sensor' wire is not in place. I chose not to order this part, although I will say that their customer svc was very good the three times I called. I went to my local alternator shop and purchased a CS130 pigtail with all 4 wires. Cost me $2.50. I think with that and a few extra pieces of wire, I can make this pigtail a plug and play also. The only other thing I need to figure out is whether or not to make this a reversible upgrade, or just remove the wiring I no longer need and make everything nice and clean.
Other BIG question I have is this: while I was talking to the old man at the alternator shop, he went on to tell me that the CS130 is a self exciting alternator and that the only thing I really NEED to have connected is the red battery terminal wire. Everything else is just "fluff"(my words, not his). The brown wire is there to act as a feedback wire so that the alternator doesn't feed power back through the ignition circuit and keep the truck running even after it is shut off, hence the reason for the resistor to stop the feedback. Does this sound even remotely right? I have taken a LOT of alternators and generators to him and he has always done exceptional work. This just contradicts most of what I am reading online. Posted via Mobile Device
__________________
1955 Chevy 3100 Task Force Pro Street - Sold! 1957 Chevy 3100 Task Force "Rat Rod" a.k.a. SLOTH - Sold! 1971 C10 Longbed factory A/C all stock 350/350 1979 Jeep CJ7 - Build date on the day I was born! -Keeper 2004 Expedition - Family Hauler 2007 Accord - Wife's around towner; I have more but not enough lines to post them! |
|
|
|
|
03-09-2013, 03:25 AM
|
#19 | ||
|
Msgt USAF Ret
Join Date: Jan 2005
Location: Kalamazoo, Michigan
Posts: 8,709
|
Re: DIY Converting Alternators
Quote:
If you are going to run the brown wire then you will need at least a 35 ohm resistor if your truck has the idiot light dash and at least a 50 ohm resistor if it has the gauge dash. Painless says to use an 85 ohm 5 watt resistor and other sources say to use a 3 watt resistor with anything from 35 to 300 ohms. You might need a diode as well if you get drain back with the engine off or if the engine continues to run with the key turned off. The resistor should take care of that problem though. Quote:
The brown wire will excite the alternator internal regulator at idle speed and control the field voltage a lot better than relying on just the alternator fields to do it. The sensing wire to the S terminal will allow the regulator to control the field in the alternator to allow for greater output in case of a voltage drop down line from the back of the alternator. If you don't use the sensing wire then you'll just get field voltage based on the output of the alternator at the BAT post on the alternator. This is the same as looping the S wire to the large post on the back of the alternator like a lot of conversions direct us to do. Now if you want to keep the harness reversible then all you'll need to do is follow the directions in the first few posts of this thread or follow the directions in the diagram below. It involves jumping the wires in the plug for the stock external regulator. The brown wire jumps to the white wire which goes to the L terminal on the CS alternator. You will have to solder the aforementioned resistor in this line and connect it to the L wire that comes from the CS plug. The next step is to jump the red wire in the plug to the blue wire and continue that on to the S terminal in the CS plug. You can solder that wire to a wire that runs from the CS plug. All that's left is to run the large wire from the back of the alternator to the junction in the stock harness and I recommend that you replace it with an 8 gauge wire for better current carrying capacity. You might also consider replacing the soldered junction with a relay fuse panel or a distribution block to provide circuits for additional accessories. I have posted all this before so i'm not going to be redundant here.
__________________
VetteVet metallic green 67 stepside 74 corvette convertible 1965 Harley sportster 1995 Harley wide glide Growing old is hell, but it beats the alternative. |
||
|
|
|
|
03-10-2013, 12:07 PM
|
#20 |
|
Registered User
Join Date: Aug 2011
Location: Little River, SC
Posts: 255
|
Re: DIY Converting Alternators
VetteVet, quick question. The original post shows hooking blue and brown together, capping red and white. Yours shows hooking blue and red together, and brown and white together. Which is correct? Are they both correct and just two different ways of doing things? What is the benefit to each if so?
Posted via Mobile Device
__________________
1955 Chevy 3100 Task Force Pro Street - Sold! 1957 Chevy 3100 Task Force "Rat Rod" a.k.a. SLOTH - Sold! 1971 C10 Longbed factory A/C all stock 350/350 1979 Jeep CJ7 - Build date on the day I was born! -Keeper 2004 Expedition - Family Hauler 2007 Accord - Wife's around towner; I have more but not enough lines to post them! |
|
|
|
|
03-10-2013, 10:11 PM
|
#21 |
|
Registered User
Join Date: Aug 2011
Location: Little River, SC
Posts: 255
|
Re: DIY Converting Alternators
Ok, sorry for those last questions. I finally went out and dive in, finding that the blue and white wires don't really go to anything, so it doesn't matter how they are hooked up. I chose to leave all the stock parts in place, no wires cut. I used the jumper from brown to blue to put my resistor in line. Then jumped the red to white and just made male spade terminals on the ends of the 130cs plug and plugged them into the factory plug. Easily reversible if I ever choose to go that route. I may decide to rip half that wiring out, down the road. We shall see.
Posted via Mobile Device
__________________
1955 Chevy 3100 Task Force Pro Street - Sold! 1957 Chevy 3100 Task Force "Rat Rod" a.k.a. SLOTH - Sold! 1971 C10 Longbed factory A/C all stock 350/350 1979 Jeep CJ7 - Build date on the day I was born! -Keeper 2004 Expedition - Family Hauler 2007 Accord - Wife's around towner; I have more but not enough lines to post them! |
|
|
|
|
03-11-2013, 01:19 AM
|
#22 | |
|
Msgt USAF Ret
Join Date: Jan 2005
Location: Kalamazoo, Michigan
Posts: 8,709
|
Re: DIY Converting Alternators
Quote:
1. It's for a car older than 1967, a Buick I think. 2. The horn relay is used as a junction block for the battery, alternator, cab power connection. 3. The blue wire is shown as the extension of the brown wire. And it goes to the L terminal on the CS alternator. 4. There is no resistor shown in the brown/blue wire either it was left out or the poster did not realize he needed one. 5. The red wire from the old regulator is not extended by the white wire to the S terminal but is just looped back to the large alternator output red wire on the back of the alternator.This works, but it fails to utilize the voltage sensing ability of the alternator. This is as simple as I can make it so that anyone can wire up the CS alternator in any of out trucks. Just remember that the brown wire from the firewall block goes to the L pin on the CS alternators and it needs the resistor and the Red wire from the soldered connection I posted earlier goes to the S terminal. It needs to be wired this way if the ammeter gauge is going to work. The small wires with the fuses in them are for the ammeter.
__________________
VetteVet metallic green 67 stepside 74 corvette convertible 1965 Harley sportster 1995 Harley wide glide Growing old is hell, but it beats the alternative. |
|
|
|
|
|
03-11-2013, 08:26 AM
|
#23 |
|
Registered User
Join Date: Aug 2011
Location: Little River, SC
Posts: 255
|
Re: DIY Converting Alternators
Yup, that's pretty well how I did mine. Your diagram itself threw me off a little as it is for an SI alt. I kept seeing/reading that everyone swapped to SI first, then converted to CS. They even make upgrade harnesses for this. I was looking to bypass that step. Once I actually went out and opened up all of my wiring, your explanations made more than enough sense. I appreciate the help. Only thing I did for simplicity is I used the resistor in my actual jumper wire from the brown to blue instead of actually cutting the brown wire and adding it inline. That way everything is completely reversible, in case I decide to put the stock motor and setup back in the truck at any point in time.
Posted via Mobile Device
__________________
1955 Chevy 3100 Task Force Pro Street - Sold! 1957 Chevy 3100 Task Force "Rat Rod" a.k.a. SLOTH - Sold! 1971 C10 Longbed factory A/C all stock 350/350 1979 Jeep CJ7 - Build date on the day I was born! -Keeper 2004 Expedition - Family Hauler 2007 Accord - Wife's around towner; I have more but not enough lines to post them! |
|
|
|
|
| Bookmarks |
|
|


 Linear Mode

