
|
Register or Log In To remove these advertisements. |
|
|
|
|||||||
 |
|
|
Thread Tools | Display Modes |
|
|
 08-24-2011, 10:15 AM
|
#1 |
|
Registered User
Join Date: Feb 2000
Location: Modesto, CA
Posts: 1,842
|
Re: My Build Thread (year+) on 71 Jimmy 4x4
Holy Crap!!
YYYYYYYYEEEEEEEEEEEEHHHHHHHHHHHAAAAAAAAAAAAAAAAAAAAAAAAAaa!!!!  Hell Ya! Looks like a blast!! Are thoes boys asleep or praying hahahahaaa  Good Times!! Thanks for sharing!  
__________________
1972 K5 MPFI454/Sm465/Np205/D60/14FFd/Re-Centerd H1s w/Swamper Iroks
|

|

|
|
08-24-2011, 10:41 PM
|
#2 |
|
Registered User
Join Date: Nov 2010
Location: San Antonio Tx
Posts: 209
|
Re: My Build Thread (year+) on 71 Jimmy 4x4
This is a really nice rig! Great work I like your build a lot. The speakers, the tool boxes, the wiring, the below seat drawers, the attention to detail is really nice to (chrome accents on the door sill, the gauge cluster, the diff covers) everything on this truck is really nice buddy! Congrats!
__________________
Thank you god for all your blessings! My mini build (I had a great starting point) http://67-72chevytrucks.com/vboard/s...d.php?t=440743 |
|
|
|
|
08-25-2011, 10:40 AM
|
#3 |
|
Registered User
Join Date: Apr 2007
Location: Meridian, Idaho
Posts: 316
|
Re: My Build Thread (year+) on 71 Jimmy 4x4
Its hard to tell what those boys are ever doing lol....from what I can remember they were rocking out to Metallica - you know its SAD BUT TRUUEEEEEEE, and then they would do the whole head banging thing in unison. Eventually we wore them slam out and they relaxed a bit and took various naps and quiet short lived brakes.
I really appreciate all the kind words on my build. I dont think im ever going to do it again - but I sure enjoyed finishing this one! and it will get used a bunch - and im the kind who will tear things up at a moments notice if I get the itch to point it somewhere and go
__________________
71 Jimmy: D60/14BFF, 9"F/11"B Lift, 350-350-203-205, Crossover Hydro steering, Beadlocks, Tube stuff and the bottomless cooler
|
|
|
|
|
08-25-2011, 01:00 PM
|
#4 |
|
Registered User
Join Date: Apr 2007
Location: Meridian, Idaho
Posts: 316
|
Re: My Build Thread (year+) on 71 Jimmy 4x4
Fun times and its going back on another trip, Labor Day weekend
 .....If i can convince Erica to ride with me again lol - I got her puckered up a couple times. We teased her all weekend that she put dents in the roll bars from her grip as we traversed some side-hills
__________________
71 Jimmy: D60/14BFF, 9"F/11"B Lift, 350-350-203-205, Crossover Hydro steering, Beadlocks, Tube stuff and the bottomless cooler
|
|
|
|
|
08-25-2011, 01:08 PM
|
#5 |
|
Broke and still trying
Join Date: Apr 2003
Location: Alameda, CA
Posts: 562
|
Re: My Build Thread (year+) on 71 Jimmy 4x4
CONGRATS ON THAT BUILD! Looks sweet and functional. Great job!
|
|
|
|
|
08-26-2011, 09:58 AM
|
#6 |
|
Registered User
Join Date: Feb 2000
Location: Modesto, CA
Posts: 1,842
|
Re: My Build Thread (year+) on 71 Jimmy 4x4
Rock On Brother!!!
I will be wheeling up to Coyote Lake that same weekend (High above Fresno) so we will both be wheeling and someday maybe the same trail somewere  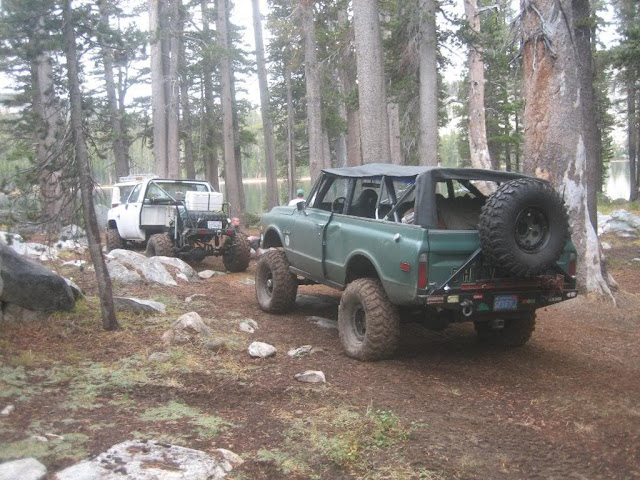 
__________________
1972 K5 MPFI454/Sm465/Np205/D60/14FFd/Re-Centerd H1s w/Swamper Iroks
|
|
|
|
|
08-30-2011, 07:10 PM
|
#7 |
|
Registered User
Join Date: Apr 2007
Location: Meridian, Idaho
Posts: 316
|
Re: My Build Thread (year+) on 71 Jimmy 4x4
WOOOOOt right on manSure hope we can wheel the same trail someday - I still owe you a beer or two im thinking. That area looks beautiful
__________________
71 Jimmy: D60/14BFF, 9"F/11"B Lift, 350-350-203-205, Crossover Hydro steering, Beadlocks, Tube stuff and the bottomless cooler
|
|
|
|
|
08-31-2011, 09:45 AM
|
#8 |
|
Registered User
Join Date: Feb 2000
Location: Modesto, CA
Posts: 1,842
|
Re: My Build Thread (year+) on 71 Jimmy 4x4
We owe eachother beer
Your territory is still on my "Ta Do" list! So one of thease years!
__________________
1972 K5 MPFI454/Sm465/Np205/D60/14FFd/Re-Centerd H1s w/Swamper Iroks
|
|
|
|
|
04-30-2012, 07:29 PM
|
#9 |
|
Registered User
Join Date: Apr 2007
Location: Meridian, Idaho
Posts: 316
|
Re: My Build Thread (year+) on 71 Jimmy 4x4
Well guys...it looks like im going to get to turn wrenches with you all some-more.
I dont know how it happened, but this 69 K20 kinda fell in my lap, and some girl (Erica) convinced/persuaded me to build it for her.... Stay tuned and will get a build thread going somwhere LMAO.
__________________
71 Jimmy: D60/14BFF, 9"F/11"B Lift, 350-350-203-205, Crossover Hydro steering, Beadlocks, Tube stuff and the bottomless cooler
|
|
|
|
|
06-06-2012, 10:53 PM
|
#10 |
|
Registered User
Join Date: Mar 2011
Location: Oak Ridge NC
Posts: 957
|
Re: My Build Thread (year+) on 71 Jimmy 4x4
Do you have any pictures of how the both sets (front and rear) of Tahoe seats are mounted to the floor? I just got a set for my 72.
|
|
|
|
|
06-07-2012, 10:57 AM
|
#11 |
|
Registered User
Join Date: Apr 2007
Location: Meridian, Idaho
Posts: 316
|
Re: My Build Thread (year+) on 71 Jimmy 4x4
Unfortunately I didnt take alot of pictures during that step..but I do remember the research I had done.
If you wanted to take the time to do it Super nice, then I would order online, or find in a junkyard - the striker pin pockets that mount in the floor and allow the seat to rotate, fold forward, and lock down via the lever in the back of seat. You would have to fab them into your floor and reinforce but would be pretty tight. The route I took was a quicker easier cheaper one but it accomplished a couple things i wanted that the first way wouldnt. I wanted my seats to sit up higher off the floor so that knees wouldnt be in your chin all the time. Also I wanted space under the seat for storage, and wanted them pushed forward more so the rear cargo area increased. All I did was pull the fabric off the bottom to gain access to the frame, and welded some 2" pipe legs with 4"x4" flat plate feet for support and then sandwiched the other side with another plate exactly like mounting a roll bar. I made new holes in the floor about 3 to 4" forward of the the original seat mount holes. Overall i like how it turned out with the pull out drawers.
__________________
71 Jimmy: D60/14BFF, 9"F/11"B Lift, 350-350-203-205, Crossover Hydro steering, Beadlocks, Tube stuff and the bottomless cooler
|
|
|
|
|
07-11-2012, 01:41 PM
|
#12 |
|
Registered User
Join Date: Apr 2007
Location: Meridian, Idaho
Posts: 316
|
Re: My Build Thread (year+) on 71 Jimmy 4x4
Couple recent 4th Weekend pics.
Recently made some mods on the rear cargo area: First I moved the seats about 4" more forward leaving enough room to lay the tire flat in the back, and use all the tailgate for storage with a rack. To increase my range and get rid of all the gas cans I took a 15 gallon external tank with vented cap and pulled the hand pump setup out. installed a handle check/ball valve to give me a manual on/off gravity feed into the main underbody tank. I used the previous seat mount holes to build a Riser for the tank above the tire behind the new seat location. I pulled the old side gas cap and put a flush mount marine boat deck cap into the side body in same hole, and ran new piping and vents down to the tank. In the metal elbow between the filler neck and tank I welded in a port to accept the gravity flow from the second tank. The tire uses the old mounting hardware for the hub, and a trailer pin to attach it to the fuel rack, essentially becoming a 3rd leg support for the tank. It worked really good over the weekend 5 day trip. I left out with 33 gallons on board and when the main tank got down to around a 1/4 i would throw the handle and watch it fill me back up to full on the guage. Cargo room greatly increased as well as range
__________________
71 Jimmy: D60/14BFF, 9"F/11"B Lift, 350-350-203-205, Crossover Hydro steering, Beadlocks, Tube stuff and the bottomless cooler
|
|
|
|
|
07-11-2012, 01:47 PM
|
#13 |
|
Registered User
Join Date: Apr 2007
Location: Meridian, Idaho
Posts: 316
|
Re: My Build Thread (year+) on 71 Jimmy 4x4
Will add more river running pics soon - whole nother story in itself
__________________
71 Jimmy: D60/14BFF, 9"F/11"B Lift, 350-350-203-205, Crossover Hydro steering, Beadlocks, Tube stuff and the bottomless cooler
|
|
|
|
|
07-11-2012, 01:50 PM
|
#14 |
|
Registered User
Join Date: Feb 2000
Location: Modesto, CA
Posts: 1,842
|
Re: My Build Thread (year+) on 71 Jimmy 4x4
Awesome!
Post up pics of your gas cap re-do...curious
__________________
1972 K5 MPFI454/Sm465/Np205/D60/14FFd/Re-Centerd H1s w/Swamper Iroks
|
|
|
|
|
07-11-2012, 02:19 PM
|
#15 |
|
Registered User
Join Date: Apr 2007
Location: Meridian, Idaho
Posts: 316
|
Re: My Build Thread (year+) on 71 Jimmy 4x4
Sure will Burt man! Left the Rig up north at a buddies for another trip out next weekend so will def snap some pics for you when I head back to get her.
We went to this place called Theodores Tree which was pretty wicked ponderosa pine, biggest ive seen in person....and also explored old ghost remnants of gold dredges
__________________
71 Jimmy: D60/14BFF, 9"F/11"B Lift, 350-350-203-205, Crossover Hydro steering, Beadlocks, Tube stuff and the bottomless cooler
|
|
|
|
|
08-28-2012, 12:45 PM
|
#16 |
|
Registered User
 Join Date: Jan 2007
Location: Central Coast California
Posts: 1,026
|
Re: My Build Thread (year+) on 71 Jimmy 4x4
Is that safe? Concerns being backfires, gas smell, melted wires...
How about a snorkel?
__________________
1972 K20 Suburban 5.7/700r4/NP205 Dana 44/H052 Sold  1972 C10 5.3L/4L60E 12bolt 5Lug - Sold 1971 K5 Blazer 6.0L LQ9 4L60E NP205 Dana 44/H052!!! 1970 K3500 1ton CrewCab 8.1L/Allison1000/NP205 Dana 60/14B!!!! - Sold 1984 K10 SWB 7.4L/4L80e/NP208 Corp 10/12 bolt Sold 1988 V30 CCLB 7.4L/TH400/NP205/Dana 60/Dana 70/3.73!!! (Sold) 2003 K2500HD 8.1/Allison1000/NP263
|
|
|
|
|
08-28-2012, 01:07 PM
|
#17 |
|
Registered User
Join Date: Apr 2007
Location: Meridian, Idaho
Posts: 316
|
Re: My Build Thread (year+) on 71 Jimmy 4x4
Is what safe?
The transfer tank is no different than any other found in trucks today...or the ones behind the back seat in the cab stock on the pickups of this era. The aux tank is vented, as well as the boat side cap, about 8" apart literally inside the body panels and also to the charcoal filter. Without Doors or a top i doubt any fumes build up. There are no wires to melt in the area - just a gravity tube safer in the cab than anywhere under the body lol. The truck burns 15 gallons in a couple hours of running anyway so that tank is usually empty lmao If you meant the intake, it sucks air from the cab, rather than discharging fumes, heat etc....nothing to get melted from cooler than underhood temp air coming in. I rerouted all the wires from the picture to alleviate restrictions to the air movement. The stock Foot/flap vents bring in more stinky under hood air than the intake thats for sure. I thought of a snorkel first, but anything that hangs on the body on the outside would get removed unwillingly by a tree or rock on the first trip. Getting it higher may or may not be usefull - any water at that elevation would be above the distributor, in my lap, and ripping the radiator fan apart. Its pretty nice to see if the water level is safe for your intake from the driver seat as well. 99% of the benefit will come from not getting repeatedly spashed and sprayed when punching through mud holes or the river. I left it dual use and will use stock underhood cleaner on everything except crossing days.
__________________
71 Jimmy: D60/14BFF, 9"F/11"B Lift, 350-350-203-205, Crossover Hydro steering, Beadlocks, Tube stuff and the bottomless cooler
Last edited by RckyMntnKng; 08-28-2012 at 01:12 PM. |
|
|
|
|
12-05-2012, 03:14 PM
|
#18 |
|
Registered User
Join Date: Aug 2012
Location: Hartford, TN
Posts: 56
|
Re: My Build Thread (year+) on 71 Jimmy 4x4
bump for a hell of a read and an awesome Jimmy! I'm just beginning my build and I'm basing a lot of what I'm doing off of your build.
Anything new here since the last post? |
|
|
|
|
12-05-2012, 05:40 PM
|
#19 |
|
Registered User
Join Date: Apr 2007
Location: Meridian, Idaho
Posts: 316
|
Re: My Build Thread (year+) on 71 Jimmy 4x4
Jc right on !
Its a great feeling to think someone would base something for their own rig off my old heap -Right on, its def cyclical - I sure as hell based mine off several board rigs and when something works well then reinventing the wheel is crazy right. I will def be following your build thread and throwing my 2 cents in as you go! My first piece of advice is, enjoy the work while you work and enjoy the play when you play - and its a win/win all the way around. I couldnt even begin to tell you all the crap I learned along the way. My second piece of advice is, when you get frustrated at something that isnt falling into place the way you want; stop, take a breather, and mostly drink a beer for inspiration. I have a few updates in the works for mine - mostly in the Air intake / snorkel department. Incoming soon. Been held up a bit working on a 69 pickup for the last couple months while the Jimmy in the other bay keeps me company.
__________________
71 Jimmy: D60/14BFF, 9"F/11"B Lift, 350-350-203-205, Crossover Hydro steering, Beadlocks, Tube stuff and the bottomless cooler
Last edited by RckyMntnKng; 12-05-2012 at 05:48 PM. |
|
|
|
|
07-31-2013, 11:17 AM
|
#20 |
|
Registered User
Join Date: Apr 2007
Location: Meridian, Idaho
Posts: 316
|
Re: My Build Thread (year+) on 71 Jimmy 4x4
On going work to dial the Jimmy in the way I want it -
One 3" Air tube was too small and lost too much "go" at altitude, and even introduced some rough throttle at times after wot. Decided to go dual 4" pipes - plenty of air. I want the filter(s) back under the hood again because the first attempt allowed in some gas fumes / smell - going to twin inline cone boxes under the hood i can seal up. To get the air inlets up higher i went even more drastic. I decided to narrow the glove box a few inches and modify the dash with some extra real estate for a couple of intakes on the inside of the cab. its very easy to throw on an elbow and go up higher from there anytime its needed. I took the Glovebox face off, cut the curved portion of the dash opening out on the right side, and re-welded it back into position 4" towards the driver side from stock. Then I took a thick piece of flat stock with two 4" holes and welded it in place to the passenger side to cover the remaining hole. I then cut 4" out of the center of the glove box lid itself and reinstalled. Used two dash vents from a garden drain that fit nicely for the intake ports Took it out last weekend this way and it worked very nicely. Also - I finally pulled the trigger on my range / fuel issue. Im running a 41 gallon tank under the bed now with a new skid and the in-bed tank is no longer needed so opened up a ton of room there.
__________________
71 Jimmy: D60/14BFF, 9"F/11"B Lift, 350-350-203-205, Crossover Hydro steering, Beadlocks, Tube stuff and the bottomless cooler
Last edited by RckyMntnKng; 07-31-2013 at 11:46 AM. |
|
|
|
|
08-01-2013, 08:34 AM
|
#21 | |
|
Registered User
Join Date: Jul 2013
Location: Austin, TX
Posts: 60
|
Re: My Build Thread (year+) on 71 Jimmy 4x4
Quote:
What an innovative idea! Posted via Mobile Device |
|
|
|
|
|
07-17-2014, 01:12 PM
|
#22 |
|
Registered User
Join Date: Apr 2007
Location: Meridian, Idaho
Posts: 316
|
Re: My Build Thread (year+) on 71 Jimmy 4x4
More build stuff. Hopefully furthering the Jimmy's carb'd air/fuel trail for weathering the elements at elevation.....
A day of wheeling in Idaho for me has large ranges in elevation change (2500' - to 8500'). The roads can be anywhere from soupy flower dust, to boulder laden, to deep water crossings. Daily driving/ jetting is at the lower elevation so it does run rich up high and will want as much air as possible. I know I know - EFI is the answer. Well not for me - I like it old school as much as possible mechanical. This season the Eddy got a dipped cleanup and rebuild with off road needles to help cut down additional flooding on inclines. Also added a large Phenolic spacer to better deal with heat soak to the carb and helps the efficiency of the burn. The twin enclosed K&N oiled filters I used last season are going to have to take a hike after seeing all the oily dust they let clog things up. Say what you like - but good quality paper type elements have always left me cleaner carbs, and on diesel pickups -cleaner turbos. They (prob due to smaller size) also seemed to be starving the motor for CFM, even down low. Went to a good self regulated fuel pump for the 1405 carb as well. The 600 cfm carb has a rec'd range of 5-6 psi of fuel pressure. Well the stock chevy mech. pump is/was quite a bit higher than that. This should help cut down on some more of the overly rich conditions. Air wise - Go big or go home they always say. I picked up a Cummins Opti-Air 1100 series that has the real CFM rating this carb/engine seems to want. A few Pros right of the bat is the internal dust scavenger and valve, nearly water tight case, big 5" inlet/outlet, and spot to add a filter restriction gauge. Ive fought having a snorkel setup even though in theory I could use it. I don't like the intake pipe mounting along the body - I'd rip that off squeezing through something on the first day. I don't trust the typical forward facing snorkel head to stop water from making its way to the motor. I cant always mosey through a crossing and get to the other side - its gonna splash a wake up on the windshield a lot of time. Ok - the hat style cap that you often see on Humvee's seems to be what I really should use. Water has less of a chance to splash into the intake - it would have to change directions 3 times in mid air before it could fall down the pipe. Depth wise i'm not going to drive much deeper than the cowl and come out the other side anyways - without a ton more water-proofing of other components. Its getting cooler air than it would under the hood, and its not in the cab itself - possibly letting too many fumes fly around. Its not going to block my forward progress in a tight squeeze, if anything a heavy steel pipe could save me a windshield repair on a tree branch impact lol. There is a small amount of vision restriction to that side of truck, but also on the same token you can visually see the limit of trying to go any deeper in a pinch. Mods needed for intake exiting the cowl....but in the long run probably my best option. Here goes nothin'.
__________________
71 Jimmy: D60/14BFF, 9"F/11"B Lift, 350-350-203-205, Crossover Hydro steering, Beadlocks, Tube stuff and the bottomless cooler
|
|
|
|
|
07-17-2014, 01:17 PM
|
#23 |
|
Registered User
Join Date: Apr 2007
Location: Meridian, Idaho
Posts: 316
|
Re: My Build Thread (year+) on 71 Jimmy 4x4
Mock-up, prep and paint etc
__________________
71 Jimmy: D60/14BFF, 9"F/11"B Lift, 350-350-203-205, Crossover Hydro steering, Beadlocks, Tube stuff and the bottomless cooler
|
|
|
|
|
07-17-2014, 01:26 PM
|
#24 |
|
Registered User
Join Date: Apr 2007
Location: Meridian, Idaho
Posts: 316
|
Re: My Build Thread (year+) on 71 Jimmy 4x4
Field fitting - going to take it out on test run with this setup.
I welded and reinforced two 5" ID steel exhaust sleeve into the cowl so I could bolt in / swap intake pipe length sizes whenever I need or want to. Right now the carb hat I have is cast aluminum with 4" inlet, So I used a 5" to 4" reducer on the 90deg elbow from the airbox until I find a 5" carb hat. Used 5" steel flex tubing for a short stretch to go into the cab and align, another 90 elbow and then up through the 3 cowl layers with solid pipe.
__________________
71 Jimmy: D60/14BFF, 9"F/11"B Lift, 350-350-203-205, Crossover Hydro steering, Beadlocks, Tube stuff and the bottomless cooler
|
|
|
|
|
07-19-2014, 10:28 PM
|
#25 |
|
Registered User
Join Date: Jan 2010
Location: columbus, ohio
Posts: 972
|
Re: My Build Thread (year+) on 71 Jimmy 4x4
Looks like you've been enjoying it. We bought a Polaris RZR last Fall and finally got it out in the woods the Sunday of Memorial weekend, a place called Powerline Park here in Ohio, it was a blast. I can't wait to do it again, maybe I should bring it out west
__________________
Going through life's daily grind, I can feel the effects of this physical body's fleeting days, But with a young spirit I look toward a brighter day, knowing that in the eyes of eternity, I am but a babe in the arms of my Lord......... |
|
|
|
|
| Bookmarks |
|
|


 Hybrid Mode
