
|
Register or Log In To remove these advertisements. |
|
|
|
|||||||
 |
|
|
Thread Tools | Display Modes |
|
|
 10-04-2011, 04:12 PM
|
#1 |
|
Registered User
 Join Date: Aug 2010
Location: Fargo, ND
Posts: 51
|
Start of 72 ochre Blazer build thread
I started cutting apart my blazer and had a couple questions that I posted and was given the advice from another member that starting a build thread was the way to go, so here is the start of this thread. I will add some pics as I go, and I will be asking a lot of questions. So thanks in advance.
The first pics will be of the starting point. It has some major rust issues. |

|

|
|
10-04-2011, 04:18 PM
|
#2 |
|
Registered User
Join Date: Jan 2011
Location: Delaware and Long Island, New York
Posts: 3,451
|
Re: Start of 72 ochre Blazer build thread
One of my favorite colors. Good luck on the build.
|
|
|
|
|
10-04-2011, 04:43 PM
|
#3 |
|
Registered User
Join Date: Aug 2010
Location: Fargo, ND
Posts: 51
|
Re: Start of 72 ochre Blazer build thread
Adding some pics of the start of cutting rust. There is a lot of rust. I thought the driver side would be less rust, but I'm not so sure.
|
|
|
|
|
10-05-2011, 11:36 AM
|
#4 |
|
Registered User
Join Date: Aug 2010
Location: Fargo, ND
Posts: 51
|
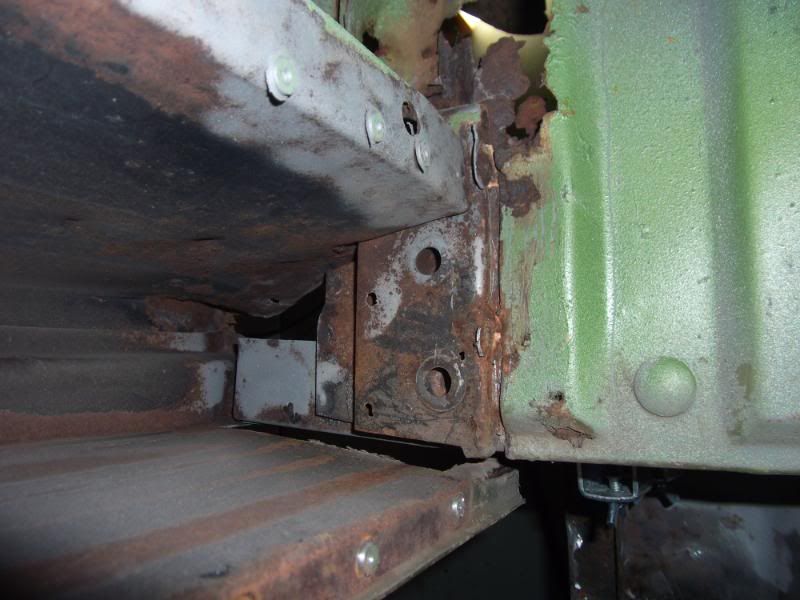
Rockerbox reinforcement plate two upper holes
Does anyone have ideas for how to deal with the top 2 bolts on the rockerbox reinforcement plate? I will post a pic of the new part. On the truck these 2 bolts appear to be buried behind the pillar which I didnt plan on cutting out.
I was thinking of trying to torch these two bolts out then spot welding the new plate in those two holes on top and bolting the rest of it like factory. Any thoughts or experience would be appreciated. |
|
|
|
|
10-05-2011, 04:35 PM
|
#5 |
|
Registered User
Join Date: Mar 2011
Location: Havertown Pa
Posts: 392
|
Re: Start of 72 ochre Blazer build thread
I removed the inner B pillar cover to get to the 2 bolts, It's not that bad when you use a spot weld drill bit. Ounce it's off you can clean up any hidden rust.
|
|
|
|
|
10-05-2011, 05:15 PM
|
#6 |
|
Registered User
Join Date: Aug 2010
Location: Fargo, ND
Posts: 51
|
Re: Start of 72 ochre Blazer build thread
Ah, I see. Looks like about 10 spot welds per edge. Wish they would have bolted this cover on like a lot of this stuff is bolted. Although not fun when the bolts break off either. Thanks for the tip!
|
|
|
|
|
10-06-2011, 11:55 PM
|
#7 |
|
Registered User
Join Date: Aug 2010
Location: Fargo, ND
Posts: 51
|
Re: Start of 72 ochre Blazer build thread
Next question on welding floor pan patches: When you guys weld in your floor pan patches, do you leave a little metal and overlap and weld or do you cut the old floor extremely precise and butt weld? Thanks
|
|
|
|
|
10-07-2011, 09:20 PM
|
#8 |
|
Registered User
Join Date: Mar 2011
Location: Havertown Pa
Posts: 392
|
Re: Start of 72 ochre Blazer build thread
I like to butt weld panels in, it does takes a long time fitting and grinding, and I have a lot of grinding left to do. here's mine.
|
|
|
|
|
10-07-2011, 10:28 PM
|
#9 | |
|
Registered User
Join Date: May 2006
Location: Philadelphia, Pa. 19454
Posts: 9,428
|
Re: Start of 72 ochre Blazer build thread
Quote:
__________________
Semper Fi...Uncle Sam, you da man All parts offered to help are free, unless otherwise noted Dont try this stuff in my build thread, unless you have 55 years of mechanical OTJ training SAFETY FIRST AS usual, off topic They say your mind goes second, can't remember the first Jim |
|
|
|
|
|
11-29-2011, 11:30 AM
|
#10 |
|
Registered User
Join Date: Aug 2010
Location: Fargo, ND
Posts: 51
|
Re: Start of 72 ochre Blazer build thread
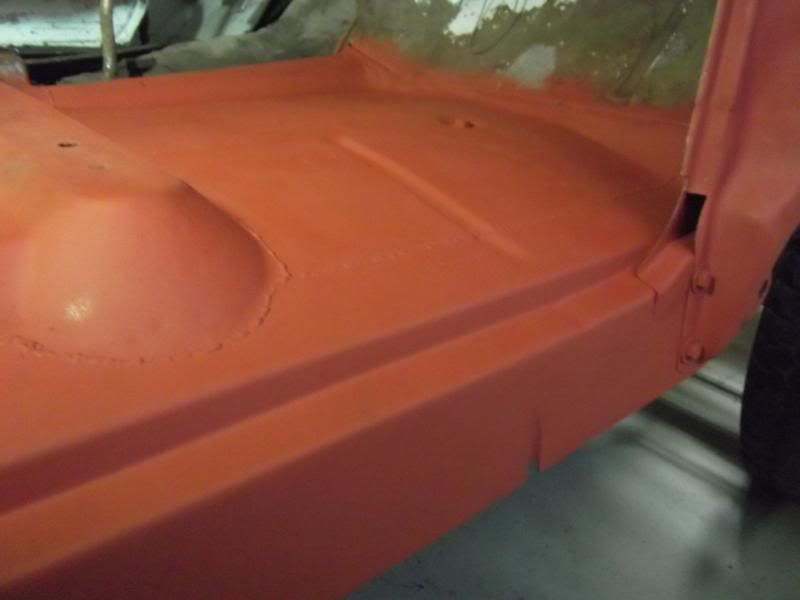
I got the bottom of the pillar patched in, and also the floor support piece. Now I have to try to get some floor in. I am trying to do this with the torque box and fender in position (I loosened the fender so I can pull it out a little). I have a couple questions. I have both the front floor patch and also the inner rocker with 4 inches of floor included. My floor patch goes up past that seam a few inches, can I just cut out where this patch would end up above the seam? I looked at a build where the panel was cut and bent over at the seam is this absolutely necessary? Also, I will need to try to sneak this inner rocker between the floor support and the pillar patch, then try to bolt it together not sure if this is possible with the torque box on, can some of these things that were previously bolted, be welded instead or is that not good practice?
Thanks! |
|
|
|
|
10-07-2011, 09:37 PM
|
#11 |
|
Registered User
Join Date: Aug 2010
Location: Fargo, ND
Posts: 51
|
Re: Start of 72 ochre Blazer build thread
I was afraid of that. I suppose its better to not have that lip on the underside catching stuff. Yours look good, thanks. Not sure when I will get to the floor pan welding but wanted to get an opinion.
|
|
|
|
|
11-30-2011, 12:41 PM
|
#12 |
|
Registered User
Join Date: Aug 2010
Location: Fargo, ND
Posts: 51
|
Re: Start of 72 ochre Blazer build thread
Sorry, I just re-read my previous post and it is unclearly written.
The two questions I was attempting to ask you guys are as follows. 1. do I have to cut my floor patch to match that seam or can I cut above that seam since the patch panel goes above it? (not sure about structural issues within that seam) 2. That area where the ends of the floor support, front pillar, and inner rocker meet together and are bolted with 4 bolts. Can any of this be welded together or should it all be bolted somehow again? (not sure how with my current situation) Thanks in advance for any instruction on these items! |
|
|
|
|
11-30-2011, 03:51 PM
|
#13 |
|
Registered User
Join Date: Jan 2007
Location: Columbus, Ohio
Posts: 4,339
|
Re: Start of 72 ochre Blazer build thread
1. I did the floor patch to the firewall by cutting the floor patch to the seam and then folding it over to recreate the factory look. I would then fill it with seam sealer like the factory did. I guess you could do it without the seam...
2. The bolt area could be welded up solid if you wanted to...I know a few members have done it. It is easier to unbolt and fix the rust since all parts are 'seperate', but when years of rust have their way with a truck - they might as well be welded up anyway. |
|
|
|
|
11-30-2011, 04:22 PM
|
#14 |
|
Registered User
Join Date: Aug 2010
Location: Fargo, ND
Posts: 51
|
Re: Start of 72 ochre Blazer build thread
Thanks lks dcvn. May I ask how you got a nice bend on your patch at that seam? That is what concerns me, kinda worried about mutilating the piece with a plier trying to bend it.
On that intersection of parts, I wish I could get to the underside for bolting it together, but with the inner rocker as part of the floor patch and the torque box still on I think I would have to cut a chunk out of the new floor patch to get the bolts and nuts on there. Maybe that is what I'm suppose to do?? Thanks again |
|
|
|
|
11-30-2011, 04:59 PM
|
#15 |
|
Registered User
Join Date: Jan 2007
Location: Columbus, Ohio
Posts: 4,339
|
Re: Start of 72 ochre Blazer build thread
I used a set of wide jaw welding pliers to get the bend at the seam.
|
|
|
|
|
11-30-2011, 10:02 PM
|
#16 |
|
Registered User
Join Date: May 2006
Location: Philadelphia, Pa. 19454
Posts: 9,428
|
Re: Start of 72 ochre Blazer build thread
Looks good so far...it looks like installed the lower portion of the A post already. It might make it difficult to fit the kick panel, floor patch,rocker panel backer, and body mount doghouse, if the A pillar patch is welded to the doghouse body mount
As far as the seam goes, it just makes it look more finished, as that was the way the factory did it. Plus, you dont want to use up all of the patch panel so you can still make future repairs if need be.... The bend can be made with a piece of 90 degree channel and some vice grips, just about all of us have made repairs in that area, common rust area, so ask away if you have questions
__________________
Semper Fi...Uncle Sam, you da man All parts offered to help are free, unless otherwise noted Dont try this stuff in my build thread, unless you have 55 years of mechanical OTJ training SAFETY FIRST AS usual, off topic They say your mind goes second, can't remember the first Jim |
|
|
|
|
12-07-2011, 07:53 PM
|
#17 |
|
Registered User
Join Date: Aug 2010
Location: Fargo, ND
Posts: 51
|
Re: Start of 72 ochre Blazer build thread
Thanks jaros44sr for the advice. I decided I will try the folding over of the patch panel, so I took out that floor section up to the seam. I realized I need a lower piece of kick panel so I ordered those. In the meantime I decided to go and work on that back pillar with the rocker box reinforcement plate. I installed the new plate, but thought I could patch the pillar part on this side. I will load a picture of it, unfortunatly I am NOT an elite welder. I patched the lower part of the pillar and made a new bolting flange. I probably should have bought a new part, but hopefully this will work. I sprayed everything with a rust inhibitor (phosphoric acid I think) then a weld through primer hoping that will help hold back some future rust. If anyone has any thoughts or ideas on if I should change anything please let me know. Thanks.
|
|
|
|
|
12-20-2011, 05:26 PM
|
#18 |
|
Registered User
Join Date: Aug 2010
Location: Fargo, ND
Posts: 51
|
Re: Start of 72 ochre Blazer build thread
Looking for some more advice. I have been working on the inner rocker and have it tacked in place. I clamped the outer rocker where it is suppose to go and between the inner and outer rocker I have a 3/8" gap on the back end and a 5/8" gap on the front. It is hard to see in the pic but the gap I am talking about is where the rubber seal goes. I am thinking if the outer rocker is lined up properly the with the front and back that the difference in the gap with the inner rocker shouldnt be the end of the world, but I would like some feedback if anyone else has run into this??
Thanks |
|
|
|
|
12-21-2011, 09:18 PM
|
#19 |
|
Registered User
Join Date: Dec 2011
Location: Vancouver Island British Columbia
Posts: 3
|
Re: Start of 72 ochre Blazer build thread
off to a good start! gives me some motivation to start tearing into mine
__________________

|
|
|
|
|
12-23-2011, 01:13 PM
|
#20 |
|
Registered User
Join Date: Aug 2010
Location: Fargo, ND
Posts: 51
|
Re: Start of 72 ochre Blazer build thread
Thanks for the advise Jaros and 49GMC. I agree that something isnt quite right with that inner rocker/floor section making it off a little. I did get the door back on (that was a lot of fun!) when I close the door and look from the inside it is a pretty consistant gap between the bottom of the door and the outer rocker lip where the seal goes so I think it should be fine that way since the outer rocker lip is lined up with the lip on the front and back pillar areas. Maybe I should order a new seal (since mine is long gone) and try it with the door closed?
I got all the pieces of the A pillar area bolted back together (another fun time) and the kick panel tacked in place. Last edited by jthomass; 12-23-2011 at 01:40 PM. |
|
|
|
|
12-23-2011, 01:23 PM
|
#21 |
|
Registered User
Join Date: Aug 2010
Location: Fargo, ND
Posts: 51
|
Re: Start of 72 ochre Blazer build thread
I patched an area upper left of the floor seam.
I transfered that bolting strip for the transmission tunnel cover from the old floor to the new floor by trying to hold the new floor patch in place with the tunnel cover on to mark it, (what are the chances the 3 bolts will line up once everything is welded up??) The floor patch top seam didnt go very well, I cut it a little short and have some gaps. I guess I will have to tack it well and go heavy on the seam sealer  here is a pic of the floor after i put a few tack welds on it. |
|
|
|
|
12-23-2011, 01:31 PM
|
#22 |
|
Registered User
Join Date: Aug 2010
Location: Fargo, ND
Posts: 51
|
Re: Start of 72 ochre Blazer build thread
I agree that this rust work is bad news, it takes way more time than I expected and causes a lot of metal slivers in the fingers.
I showed my kids the progress last night and they don't think I've done much  My pictures dont look very good compared to you guys, are you using a real camera? I have been using my phone. |
|
|
|
|
12-23-2011, 01:35 PM
|
#23 |
|
Registered User
Join Date: Aug 2010
Location: Fargo, ND
Posts: 51
|
Re: Start of 72 ochre Blazer build thread
I still haven't tacked the outer rocker, kind of nervous about the height. Do you guys have any gap between the door and rocker on the outside or is it pretty much a very tight fit? right now with it screwed in place I have maybe a 1/8" gap between them so I could maybe lift it a little if necessary??
|
|
|
|
|
| Bookmarks |
|
|


 Hybrid Mode
