
 |
|
|
#1 |
|
Senior Member
Join Date: May 2009
Location: Fort Worth, TX
Posts: 6,370
|
4L60E Tech
Member Low Elco wanted too know whats involved in turning a 4wd 4L60E into a 2wd 4L60E. If anyone else has any requests for any 4L60E related tech.....I will answer them here.
The 4L60E is the EASIEST trans too convert from 4wd-2wd or vice versa. PARTS..... 2wd Output Shaft W/ 40 tooth Reluctor wheel. 2wd Extension Housing. VSS Sensor. 6 10mm-1.50 bolts about 1"/25mm long. TOOLS.... Torx Plus 50 socket to remove the bellhousing bolts.....DO NOT try to use a standard Torx bit! A strong Impact is recommended for removal, Torque to 35 ft lbs upon assembly. 10mm socket 13mm socket 15mm socket Pocket sized flat screwdriver Regular size flat screwdriver Lock Ring Pliers with a small 90 degree tip. Get the trans in vertical position, A hole in a work bench, Or a Flexplate over a 5 gallon bucket for the output shaft to stick through. Remove the Torx Plus bolts holding the bellhousing. Black bolts in the pic, Remove bellhousing. 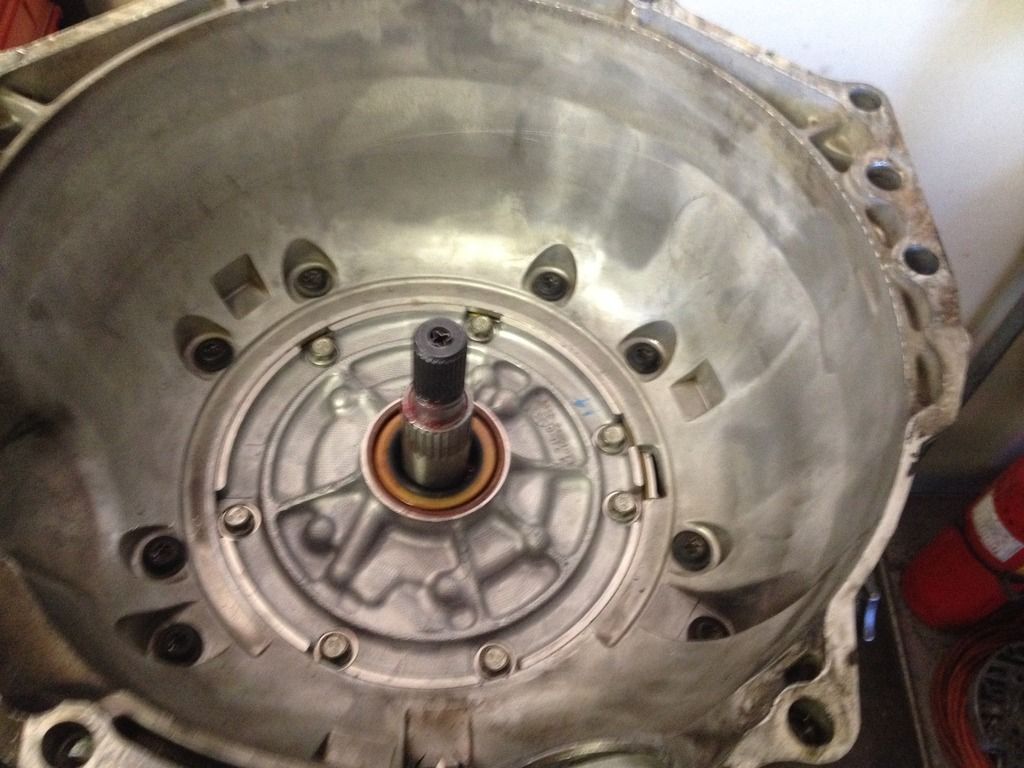
|
|
|

|
|
|
#2 |
|
Senior Member
Join Date: May 2009
Location: Fort Worth, TX
Posts: 6,370
|
Re: 4L60E Tech
Remove the Pan & Filter.
Remove the TCC PWM Solenoid buy removing the Clip with a pocket screwdriver, Careful.....The clip will launch into orbit if your not. Remove Solenoid. Remove the 2 10mm headed bolts holding the TCC Enable Solenoid, Carefully lift out the Solenoid with the same screwdriver. Red arrow is the slot where the TCC PWM Solenoid Clip is. The Blue arrows are where the 2 bolt were for the TCC Enable Solenoid. 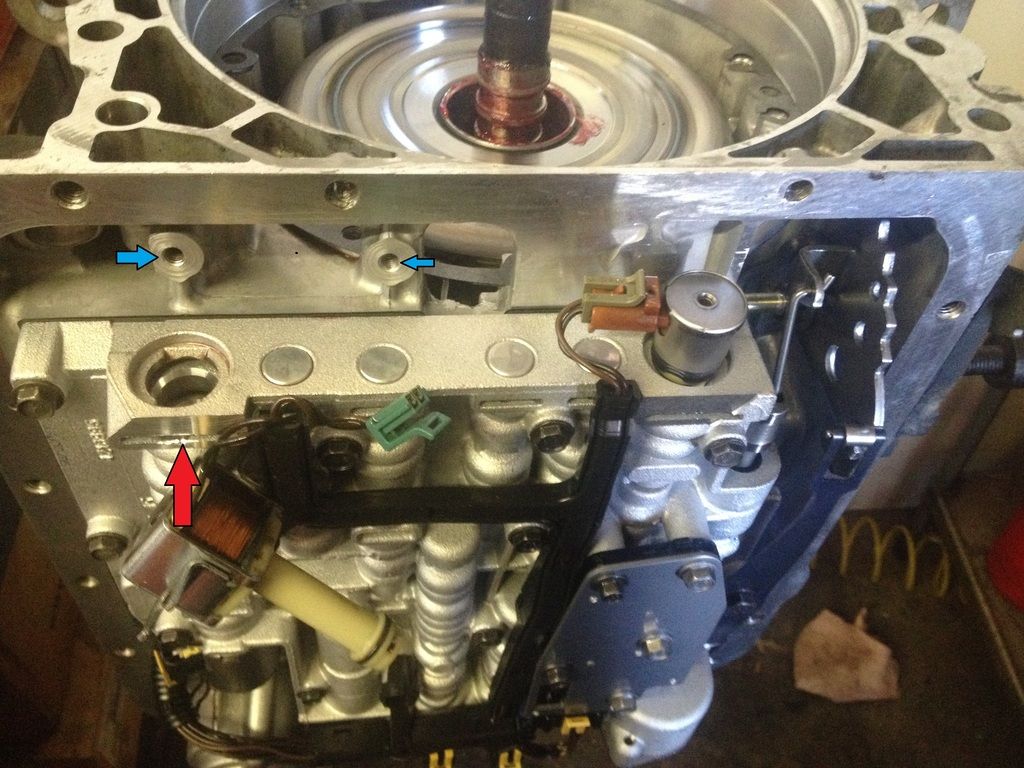
|
|
|

|
|
|
#3 |
|
Senior Member
Join Date: May 2009
Location: Fort Worth, TX
Posts: 6,370
|
Re: 4L60E Tech
Removal of the 2nd & 4th Band Servos.
Press the Servo Cover in the direction of the Red arrow, Then Remove the Servo Snap Ring with a pocket screwdriver, The Blue arrow is highlighting the Snap Ring & access window. With the Snap Ring removed, Walk the Servo Cover out 'til is stops. Through the access window.....You will now see the Servo Cover O-Ring. Using the pocket Screwdriver, Work the tip under the O-Ring & lift up through the window, This stretches the O-Ring making it smaller so you can work the Servo Cover out of the Case. A Awl maybe easier for some to get under the O-Ring. It also may be easier for some to cut the O-Ring & pull it out completely, Sometimes the O-Ring has been cooked by the exhaust & it breaks just by stretching it. If the O-Ring sucks back in after cutting/snapping, Take a sharp Awl & fish one end out & remove the O-Ring. Remove the Servo Cover, 4th apply piston, 2nd apply piston, & Servo Return Spring. More to come later....... 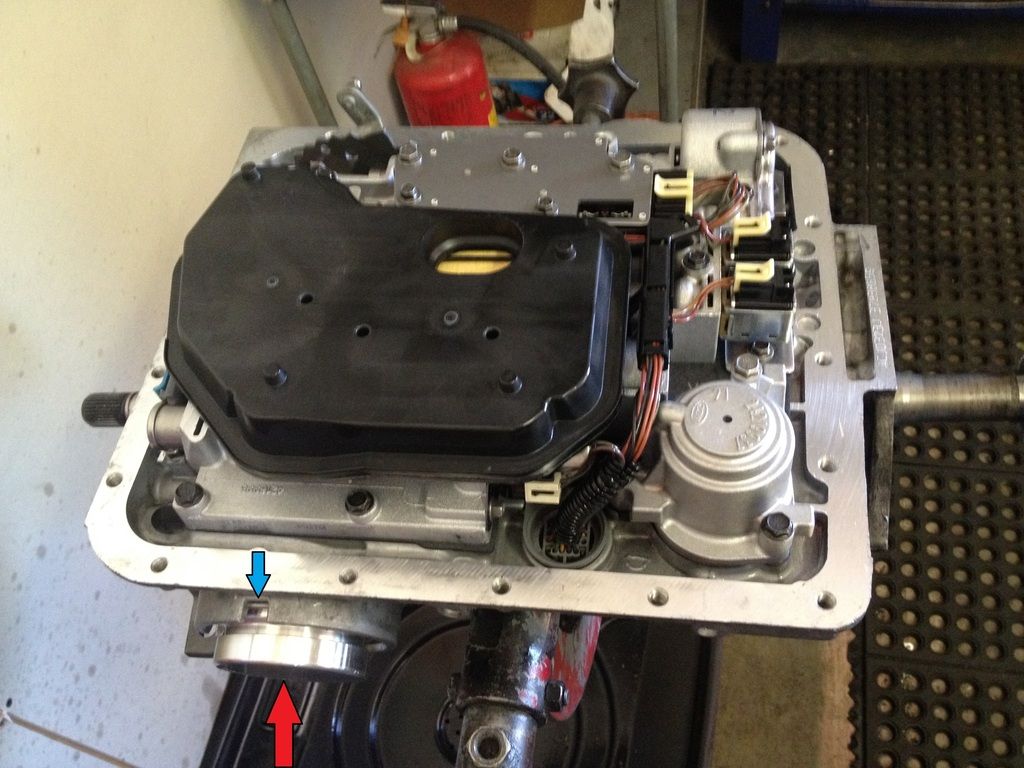
Last edited by clinebarger; 10-12-2016 at 09:17 PM. |
|
|

|
|
|
#4 |
|
Registered User
Join Date: Dec 2009
Location: Independence Mo
Posts: 4,118
|
Re: 4L60E Tech
Oh man, you're killing me! Now this is something I could actually see myself trying to attempt! Seems like there's always way more 4wd transmissions around here.....
__________________
My '72 short bed build. http://www.ls1tech.com/forums/conver...6-0-4l80e.html 5.3 swap into my RUSTY '71 C10 http://ls1tech.com/forums/conversion...71-c-10-a.html |
|
|

|
|
|
#5 |
|
Registered User
Join Date: Apr 2003
Location: Indep, MO
Posts: 5,893
|
Re: 4L60E Tech
Oh, Dude..... Do you think between the two of us, we could cause an actual explosion?
Thanks, Cline! This is awesome!
__________________
Boppa's Old Yeller Truck Build, Old Yeller's New Heart! Project Buzz Bomb Flyin' Low! |
|
|

|
|
|
#6 |
|
Senior Member
Join Date: May 2009
Location: Fort Worth, TX
Posts: 6,370
|
Re: 4L60E Tech
Time to pull the Pump.
Remove the 13mm headed pump bolts, The have seals under the heads....Don't lose any of them! Remove the Turbine Shaft O-Ring, You can reuse it if you don't damage it. It is best to use a Pump Puller here, But you can rig one up if you have a small Bearing Splitter & a 2-Jaw Puller. Clamp the Bearing Splitter below the Stator Splines (Black Line), Then Hook onto the Splitter with a 2-Jaw Puller & press against the Input/Turbine Shaft. Another option is to break the Pump loose with a screwdriver, Get up under the pump with the tip & carefully rock the Pump Loose, Blue Arrow is where you can get under the Pump. After it is broke loose, You still need to Clear the Reverse Input Drum Bushing with the 2 Sealing Rings that are on the back of the Pump (Stator Support). Clamp a pair of Vise Grips on the Stator below the splines (Black Line) & work the Pump clear of the Reverse Input Drum, You will hear the Drum fall back down 2 times. After the Pump is removed, A Thrust Washer will most likely be left behind on the Reverse Input Drum, Remove & keep track of it.....Stick it to the Stator Support with Vasoline or TransJel before reassembly. 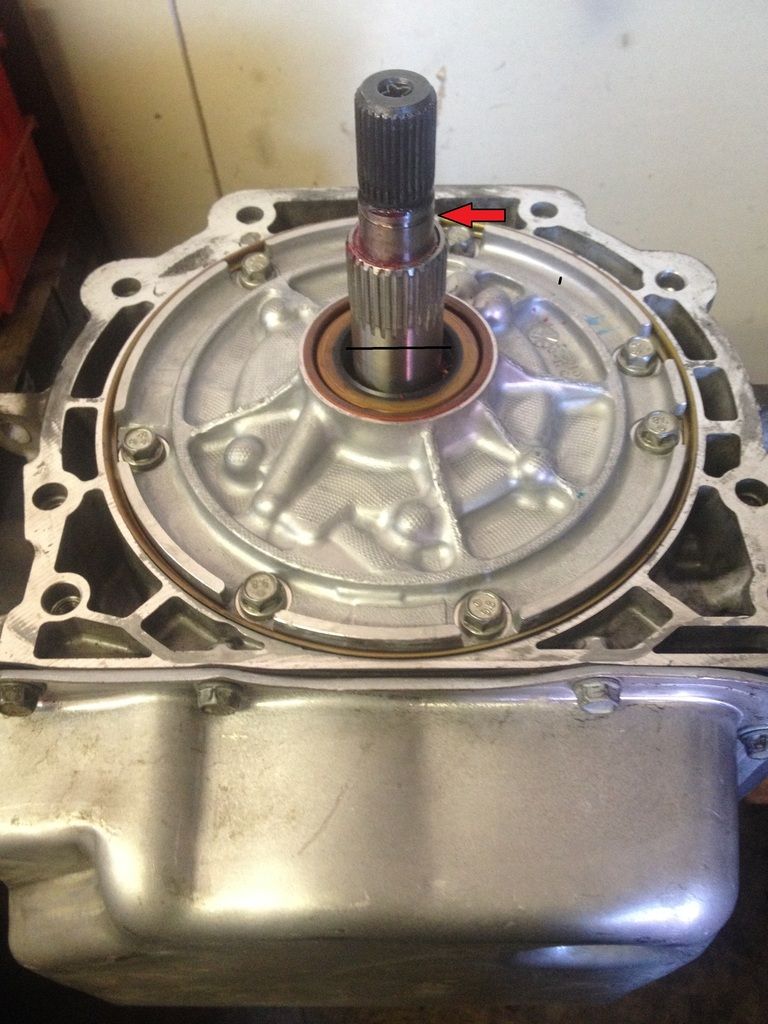 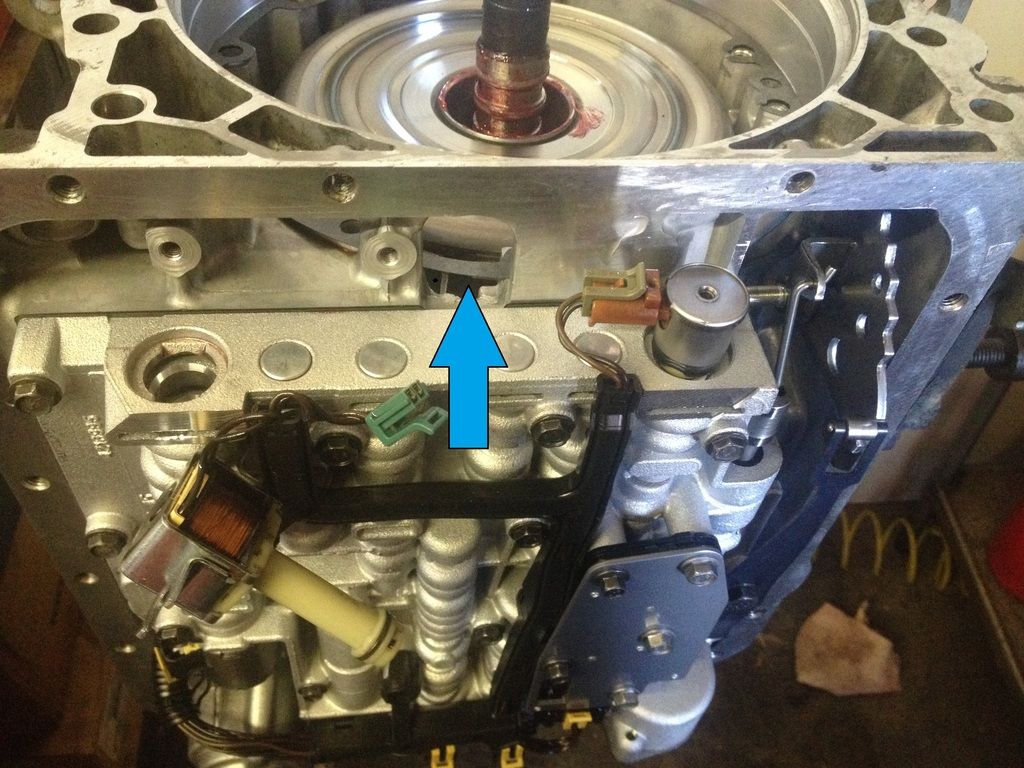
|
|
|

|
|
|
#7 |
|
Senior Member
Join Date: May 2009
Location: Fort Worth, TX
Posts: 6,370
|
Re: 4L60E Tech
We are going to cheat here, To keep from removing the Valve Body, Separator Plate, & 2nd Accumulator to remove the 2-4 Band Anchor.......
We are going to Un-Hook the Band off the Anchor! At the bottom/closest to the Pan Rail, You will see the 2 Ends of the Band, The Right End is what is hooked on the Anchor Pin. Lean the Turbine Shaft toward the top on the Case, Using a screwdriver, Get under the Band & lift it off the Anchor & push it to the right off the Anchor. The Red Arrow highlight where the end of the Band is..... 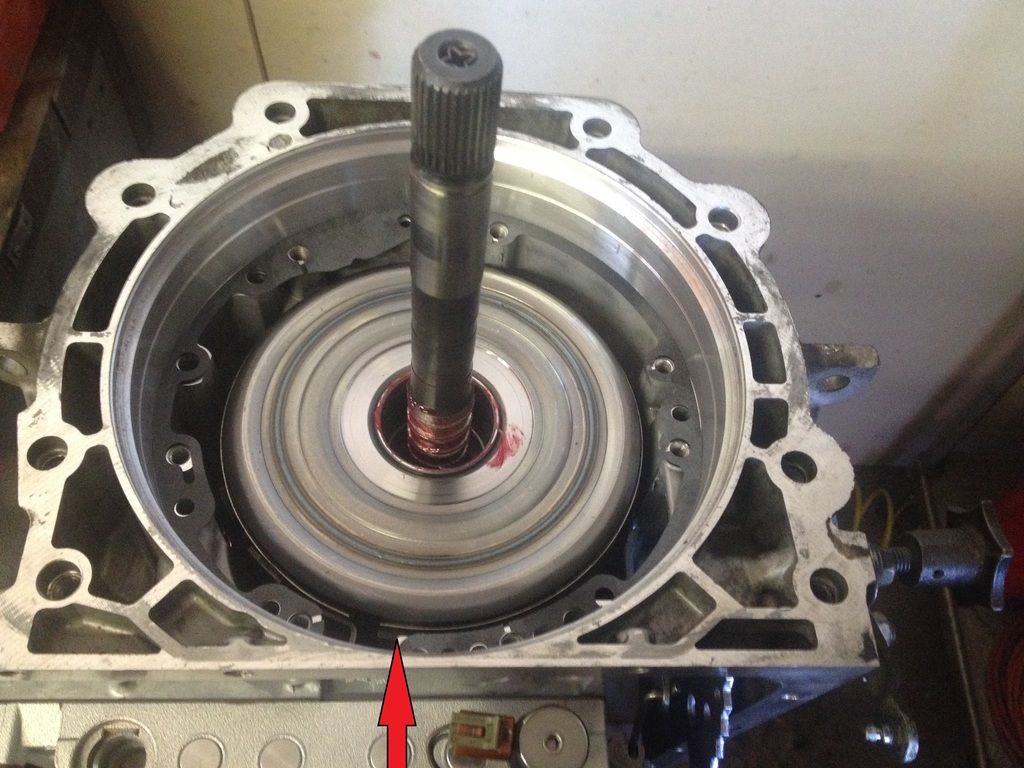
|
|
|

|
|
|
#8 |
|
Senior Member
Join Date: May 2009
Location: Fort Worth, TX
Posts: 6,370
|
Re: 4L60E Tech
Now you are ready to pull The Input Drum & Reverse Input Drum, Lift straight up on the Turbine Shaft & both Drums will come out together, Sit them aside just like they come out.
The 2-4 Band will be left behind, Remove it & set aside......You put it in AFTER the 2 Drums are back in the Case!!!!! You will now be looking at the Input Carrier, In the center or the Input Carrier is the Output Shaft & Lock Ring (Red Arrow). Remove the Lock Ring & the Output Shaft will slide out the back of the Case, They get stuck sometimes on the Splines, A light tap with a hammer handle will break it free. 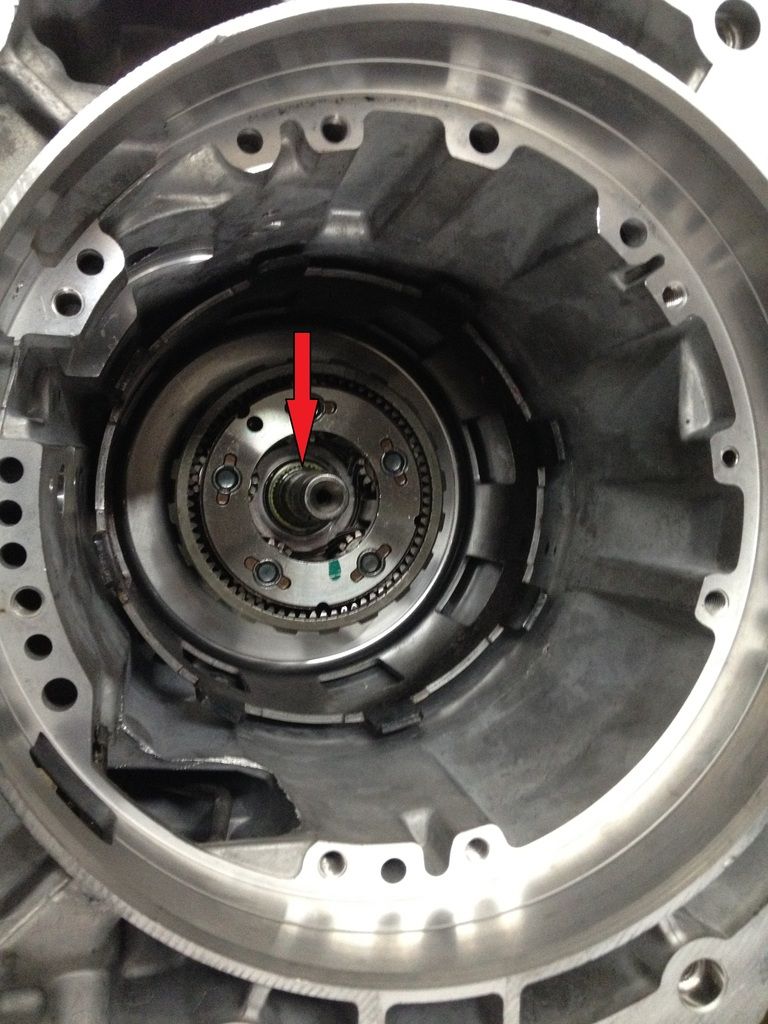
|
|
|

|
|
|
#9 |
|
Registered User
Join Date: May 2014
Location: ID
Posts: 663
|
Re: 4L60E Tech
Great tutorial, I didn't know they could be converted. Got a question about the tail shaft on 2wd. I was cleaning up the tail shaft of a low mile 4L60e yesterday. There is quite a bit of side play. Is this normal? Or does the slip yoke keep the tail shaft centered?
|
|
|

|
|
|
#10 |
|
Registered User
Join Date: Apr 2013
Location: Nor-Cal
Posts: 632
|
Re: 4L60E Tech
CLINE! this is an awesome write up. I am totally following this one.
I will definitely be doing this in the near future, I have NINE 4wd transmissions and one single 2wd trans, and 4 projects going on at once. LOL lots of good info. your the man! -Izzy
__________________
WHO_DCTC - Wifes 05 Z-71 Build - Now defunct as she decided she wants an Escalade too Cream Puff - LS'd Square - Slow going on the back burner Tripple Threat - 3 Wrecks for the price of one build thread Project Delongdium - Step-Sons Plastic Clad 2003 Avalanche - DONE and Delivered. |
|
|

|
|
|
#11 |
|
Registered User
Join Date: Apr 2003
Location: Indep, MO
Posts: 5,893
|
Re: 4L60E Tech
Dude, this is fantastic. Thank You. This is about a half click short of a full rebuild, yes? Also, can you buy just the output shaft from tranny suppliers? It's easy to yard the external stuff, I imagine the innards are a tough grab.
__________________
Boppa's Old Yeller Truck Build, Old Yeller's New Heart! Project Buzz Bomb Flyin' Low! |
|
|

|
|
|
#12 | |
|
Senior Member
Join Date: May 2009
Location: Fort Worth, TX
Posts: 6,370
|
Re: 4L60E Tech
Quote:
Trans parts suppliers will have output shafts. Once you get the old shaft out, Insert the new one through the back of the trans & reinstall the Lock Ring. Time to "Lace" the 3-4 Clutches, Put the Trans in Park, Take the Input Drum & Reverse Drum assembly by the Turbine shaft & sit it in the trans. Take a pair of large pliers & turn the Turbine Shaft back & forth by the Splines while using your other have to take some of the weight of the Drum & work the 3-4 over the Input Carrier Hub..... You will know the 3-4's are seated when there is endplay between the Input Drum & Reverse Input Drum...... The Red arrow is where the Reverse Input Drum sits on top of the Sun Shell, The Input Drum that the Turbine shaft is part of will drop down a little further than the Reverse Input Drum, When seated lift up on the Turbine Shaft....It should lift up 1/8"-3/16" before lifting the Reverse Input Drum.... 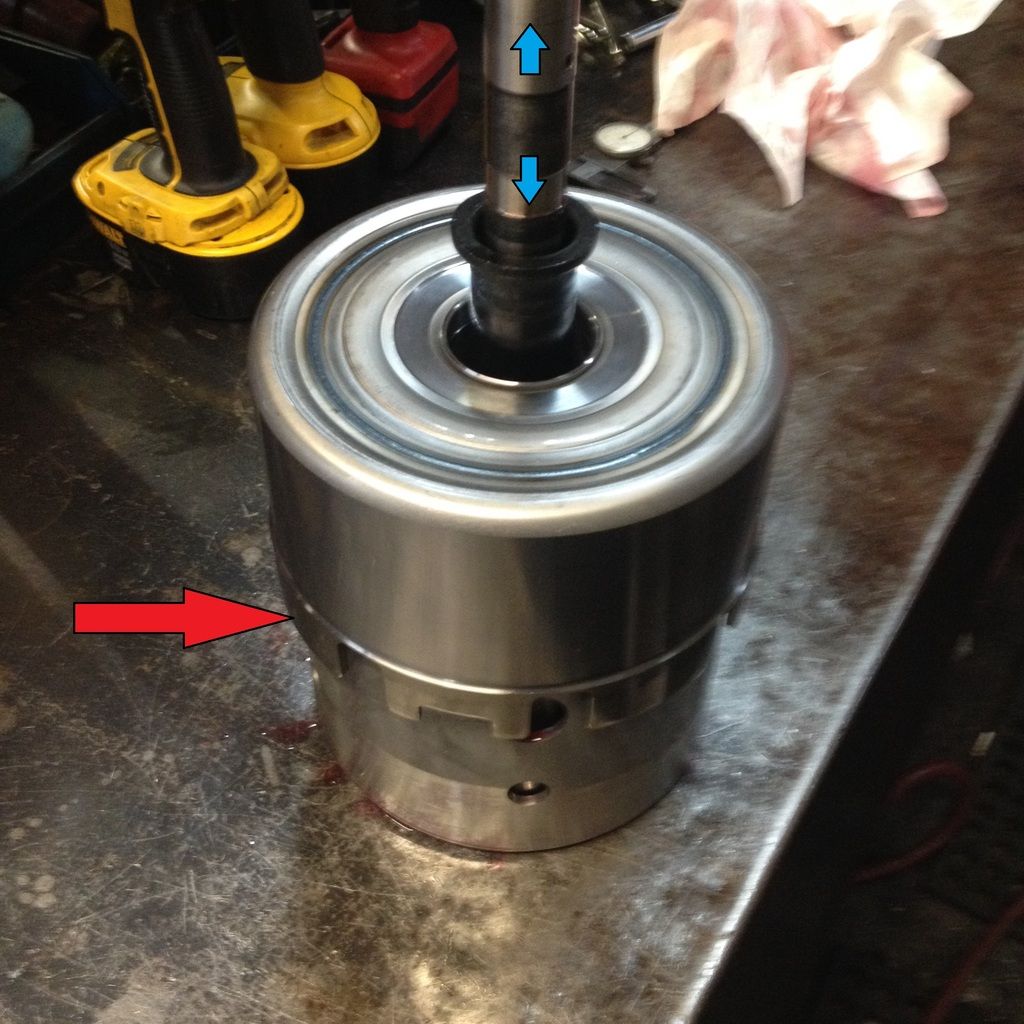
|
|
|
|

|
|
|
#13 |
|
Registered User
Join Date: Jan 2013
Location: Imperial, MO
Posts: 999
|
Re: 4L60E Tech
Excellent thread! I'd really like to see any recommended parts to swap in, valvebody mods, etc. too (Corvette servo would be one example).
|
|
|

|
|
|
#14 |
|
Registered User
Join Date: Apr 2003
Location: Indep, MO
Posts: 5,893
|
Re: 4L60E Tech
I'm diggin' it!
__________________
Boppa's Old Yeller Truck Build, Old Yeller's New Heart! Project Buzz Bomb Flyin' Low! |
|
|

|
|
|
#15 |
|
Registered User
Join Date: Jul 2005
Location: AL
Posts: 1,828
|
Re: 4L60E Tech
Watching !
__________________
" |
|
|

|
|
|
#16 |
|
Senior Member
Join Date: May 2009
Location: Fort Worth, TX
Posts: 6,370
|
Re: 4L60E Tech
|
|
|

|
|
|
#17 |
|
Senior Member
Join Date: May 2009
Location: Fort Worth, TX
Posts: 6,370
|
Re: 4L60E Tech
Install the 2nd & 4th Servos next.
Clean the Snap Ring Groove of all dirt & debris. Hang the Servo Return Spring on the "Nub" in the Servo Bore of the Case. Lubricate all seals with TransJel/Vasoline/ATF. Install the 2nd Servo Assembly first, 1st pic. The 4th Servo Piston will be installed into the Servo Cover with the "Tall Nub" Facing the Servo cover......AWAY from the Trans! Install the Servo Cover along with the 4th Servo Piston with a new Cover seal. Depress the Cover & install the Snap Ring. ***If the Snap Ring is a Oval Wire vs a Round Wire.....You have a early 2004 production Trans.....DO NOT reuse the Oval Snap Ring!!! It can break the CASE*** Order one from GM if you have too! The offending snap ring was only in production a few months, But....I somehow ended up with one. A TSB was released, But no recall was ever issued. 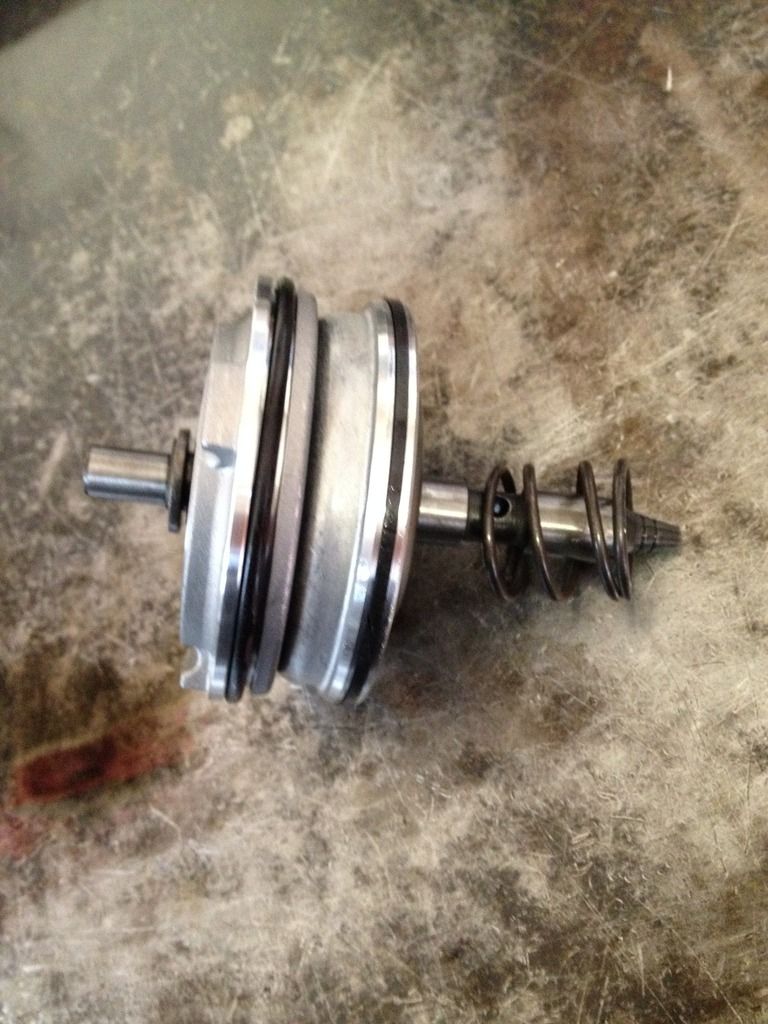
|
|
|

|
|
|
#18 |
|
Registered User
Join Date: Apr 2003
Location: Indep, MO
Posts: 5,893
|
Re: 4L60E Tech
Innnnteresting...
__________________
Boppa's Old Yeller Truck Build, Old Yeller's New Heart! Project Buzz Bomb Flyin' Low! |
|
|

|
|
|
#19 |
|
Registered User
Join Date: Apr 2011
Location: Klein Texas
Posts: 3,852
|
Re: 4L60E Tech
I getting ready to go to the parts store now.
I have two student transmissions on the bench (2000 and 2001 models). Both high mileage trucks but it looks like the transmissions have been rebuilt fairly recently. I'd say within the last two years. Both appear to have pressure problems. Smoked 3-4 clutches, forwards very distressed and the band has been slipping on the reverse input drum. Is there a common failure point for this type of damage? Force motor? PR spring fatigue? TIA
__________________
My Classics: '72 K20 Suburban + '65 Dodge Town Wagon '72 Corvette Roadster +'67 Corvette Roadster '73 Z-28 Camaro '63 Ford SWB Uni Pickup '50 Ford Coupe |
|
|

|
|
|
#20 | |
|
Registered User
Join Date: Dec 2002
Location: Cactus Patch So. Az
Posts: 4,749
|
Re: 4L60E Tech
Quote:
__________________
53 TuTone Extended Cab 350 4-Spd 3:08 (SOLD) 53 Chevy Moldy pearl green ZZ-4 4L60E 9" 3:25 55 GMC 1st Black Mll (ZZ4) ZZ6 TKO 600 5 sp 3:73 62 Solidaxle Corvette Roman Red (327 340hp 4spd 3:36) C4 & C5 suspension tube chassis LS 3 4L70E 65 Corvette Coupe 327 350hp 4spd 4:11 78 Black Silverado SWB (350/350) 5.3 & 4L60E 3:42 2000 S-Type 3.0 (wife cruiser) 2003 GMC SCSB 5.3 4L60E 3:42 |
|
|
|

|
|
|
#21 |
|
Senior Member
 Join Date: Mar 2000
Location: Saskatoon,SK,Canada
Posts: 2,476
|
Re: 4L60E Tech
What kind of time to do the same thing to a 4L80E that's in good condition? What things would you consider are must do while you are in there on the 4L80E if the 4-2wd swap is done?
__________________
Saskatoon, Saskatchewan Canada |
|
|

|
|
|
#22 | |
|
Senior Member
Join Date: May 2009
Location: Fort Worth, TX
Posts: 6,370
|
Re: 4L60E Tech
Quote:
It would have been ideal to install a pressure gauge before removing the unit.....This has saved my A$$ several times! But I understand this is not always possible. How do the Pumps look? Rotor Pocket & Pump Cover? Install the Pump Slide with the Pivot Pin & Wiper Seals, Omit the Primer Spring & the Support O-ring under the Slide, Torque the Pump halves together & make SURE the Slide moves freely by shaking the Pump. Though you can usually see if the Slide was getting stuck in the Pump Pocket. PR Spring fatigue is possible with all the cycles these units have been through, The PR Spring decides Minimum Regulated Pressure. Torque Signal & the Boost Valve are what effects pressure rise more than anything. If you have a weak PR spring....The greatest reduction in pressure will be with the Boost Valve at rest/100% EPC Duty Cycle. If your 30 PSI short at minimum pressure....You may only be 20 PSI short at full Boost. You should be able to feel a PR Spring that is weak enough to distress the Forwards.....Take a pocket screwdriver too the end of the PR Valve & see what the PR Spring feels like. The Sonnax LB1 490" Boost Valve comes with a 10% Over PR Spring......I use one in every Stock/Mild Performance 4L60E I build! A worn Boost Valve Sleeve will allow Torque Signal too leak into the Reverse/Intermediate Spool & out of the R/I Orifice......This would explain the Reverse Input & Lo/Reverse frictions coming out unscathed. Failed "Black Can" EPC Solenoids is not very common, Of coarse it does happen......But to have 2 on your bench at 1 time?? This brings up another habit I have been getting into.....Replacing the EPC 100%. GMT800 Trucks are BAD about spitting out the Cooler Lines at the Radiator from the clips wearing through, Later "2005/2006" had brackets to keep the lines from vibrating so much. These are your student's transmissions? Ask them if they had a Cooler Line pop off recently, Or a leak causing the units too run low frequently. How are the Overrun Frictions? A crossleak between the Forwards & Overruns will SMOKE the Overruns & 3-4 Clutches & Distress the Forwards & 2-4 Band. |
|
|
|

|
|
|
#23 | |
|
Senior Member
Join Date: May 2009
Location: Fort Worth, TX
Posts: 6,370
|
Re: 4L60E Tech
Quote:
|
|
|
|

|
|
|
#24 |
|
Registered User
Join Date: May 2011
Location: Raleigh, NC
Posts: 240
|
Re: 4L60E Tech
Great thread! I just wish you had made this thread over the summer when I did this!
 The only thing I will add, is the importance of cleanliness when doing trans rebuilds. Making sure the unit is as clean as possible before tearing it down is very important. I work at a facility that manufactures automatic transmissions and am amazed at how small a piece of foreign material can be to stick a valve in the valve body and burn up the transmission. Awesome job! |
|
|

|
|
|
#25 |
|
Registered User
Join Date: Jul 2007
Location: Sims, NC
Posts: 531
|
Re: 4L60E Tech
Is this process essentially the same for a 700r4?
Thanks, Mike
__________________
All things Chevy truck: 1986 SWB "Jolene" boosted 5.3/4l80e project |
|
|

|
 |
| Bookmarks |
|
|