
|
Register or Log In To remove these advertisements. |
|
|
|
|||||||
 |
|
|
Thread Tools | Display Modes |
 10-30-2006, 09:29 PM
|
#1 |
|
Chris
Join Date: Nov 2004
Location: Monaville, WV
Posts: 3,737
|
Do-it-Yourself dash repair.
I figured I'd make a post about my latest project in case somebody else would like to fix there dash.
Tools and supplies needed: 1.Compressor to run die grinder 2.Die grinder, I used a right angle style one 3.Surface condition disc, or sanding disc, I used 36 grit, was old one half worn out. Plenty of others would work. Theese are to be used on the die grinder. 4.Sand paper, I used dry paper only, 36 grit and 220. 36 was old worn out junk just to cut it down fast. 5.Automix flexible repair compound, it's a 2 part system, designed for bumper cover repair. A little costly, like $35 for small pack(more then enough) or $55 for the large pack. I had half tube left of each to use on this dash. 6.Some scrap cardboard or mixing board. 7.Bondo spreader. 8.Sanding block, like 4-6" long. 9.Grease and wax remover, I had some R&M left over, fairly cheap stuff. 10.vinyl paint, I used some plastic kote stuff from wal-art for like $4 a can. 11.Maybe some cleaning/primer thinner for extra cleaning measure. or tack rags. Here's what I started with.... 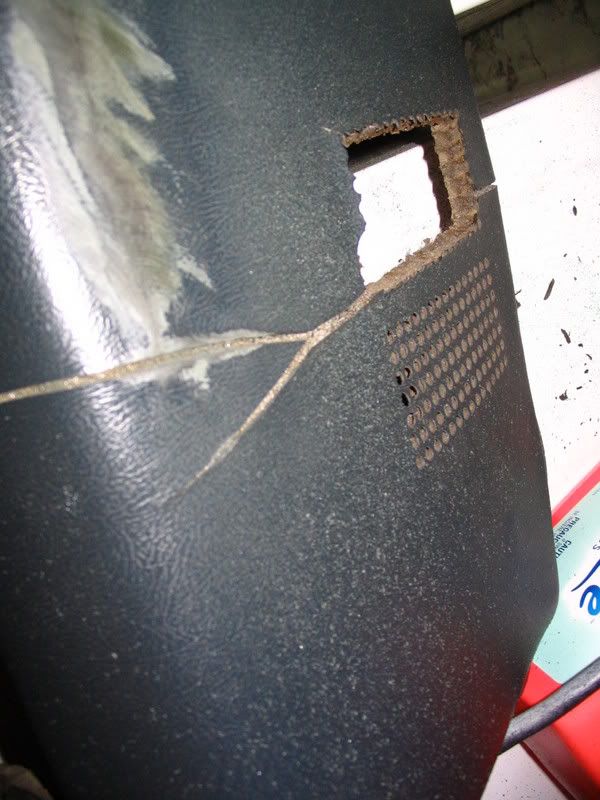 You can clearly see how it's cracked. The first thing I did was to knock down the cracks, since they were bulged upwards. I done this with a right angle die grinder and a grinding disc like 36 I think. I also broke loose the cracked or loose pieces, and used the grinder to smooth the edges. That step may or may not have been a great idea, doing so took out some of the foam underlay, which made me need to use more filler. it looked like this once done... 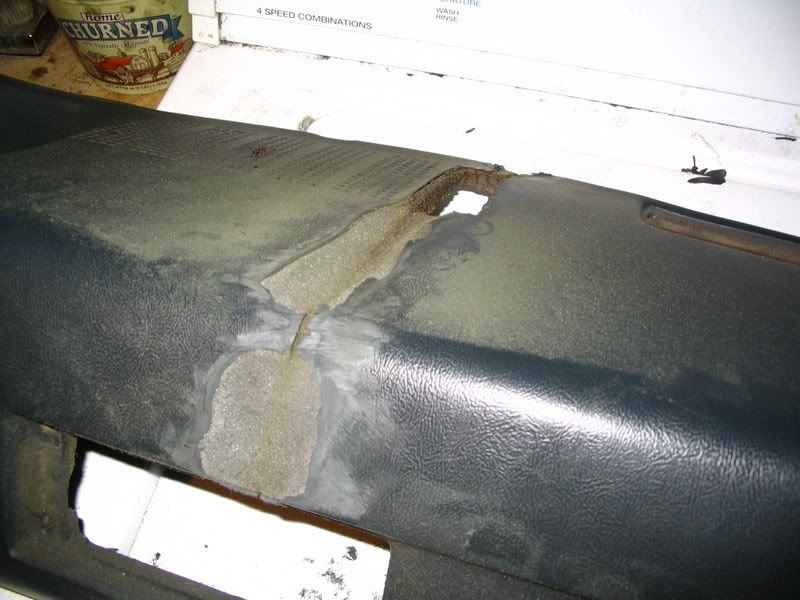 You can see I had like 4 big spots to deal with. 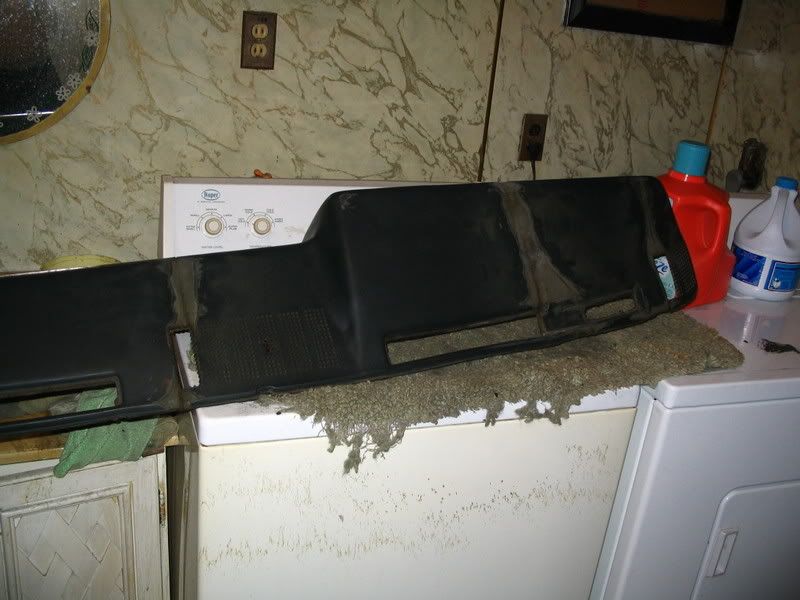 Next step was to mix and apply the automix compounds. it's easy, it mixes 50/50 squeeze out a line about 4-6 inches long of both tubes, then mix to even color. Apply just like bondo. it dires in about 30 minutes and can be sanded. once that was done I needed more because I had low spots. i sanded mine with a rubber sanding block and some 36 grit paper on it, using an X-pattern, like blocking a body down to keep it flat and level. After the 36 I went back over it with some 220. 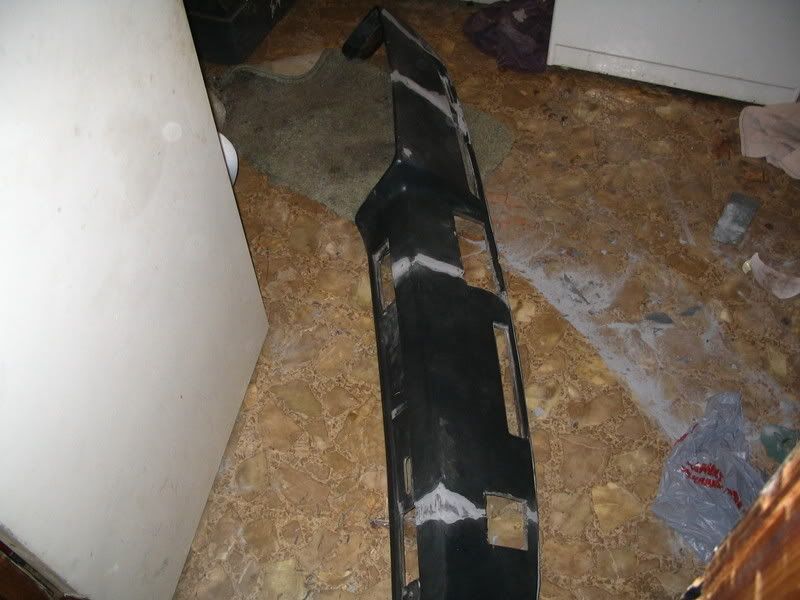 Now since I had used half of the automix previouly I ran out, and mainly due to the fact that I cut into the foam too deep, left me short on the automix. I used some glazing putty to fill in some low spots, I wouldn't recomend it though, by all means if you can use the automix as the only filler. Once I had it all sanded and smooth I took it outside, wiped it down with the grease and wax remover, then followed that with some laquer thinner, just to be safe. I knew I had alot of armor all on the dash. 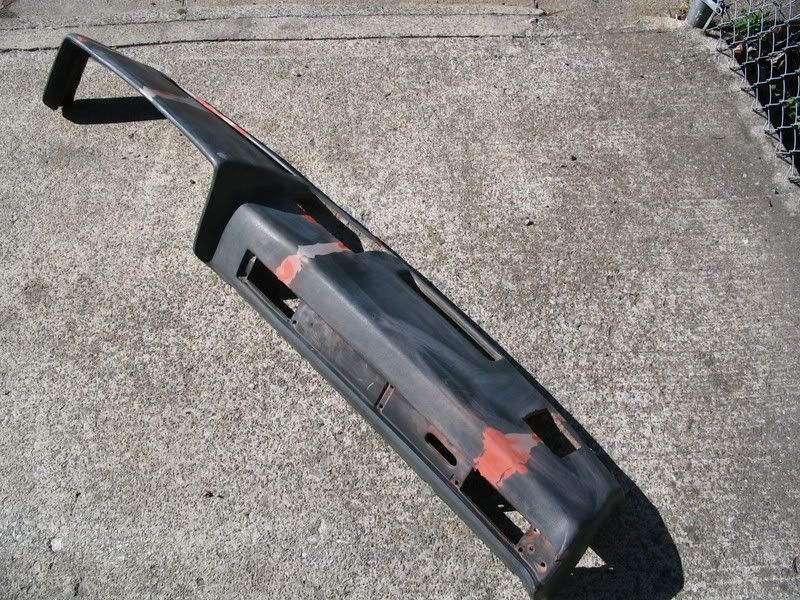 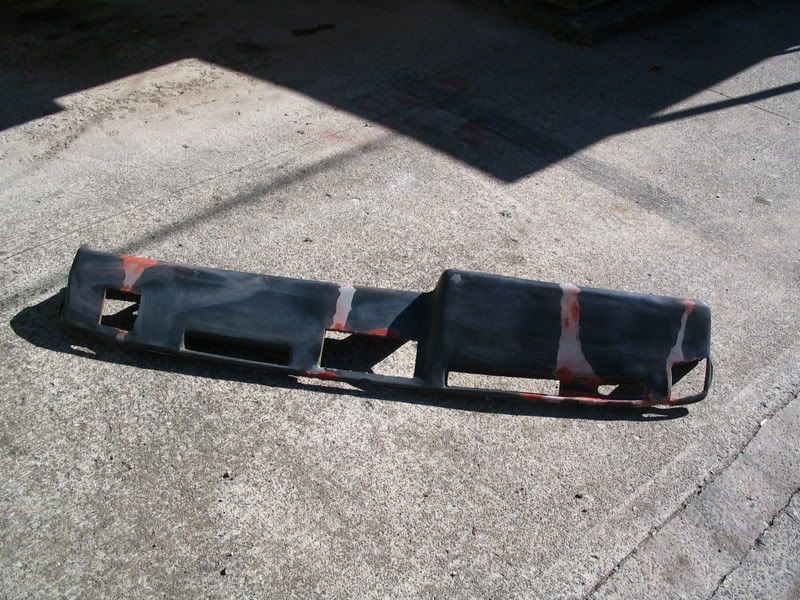 I laid it out in the sun to warm it up also, next I shook up the vinyl paint, and sprayed it using light coats, then allowed some dry time between coats, just a minute or two. it dried very quick. I put about 4-6 coats on it total, I noticed it you got it on too heavy it would fisheye/seperate, but would dry out smooth. So light coats is the key. once you get a few coats on, you can get a little heavier with the coats. Just watch yourself, don't get too carried away or it could run or seperate badly. Here's how it looks now.... 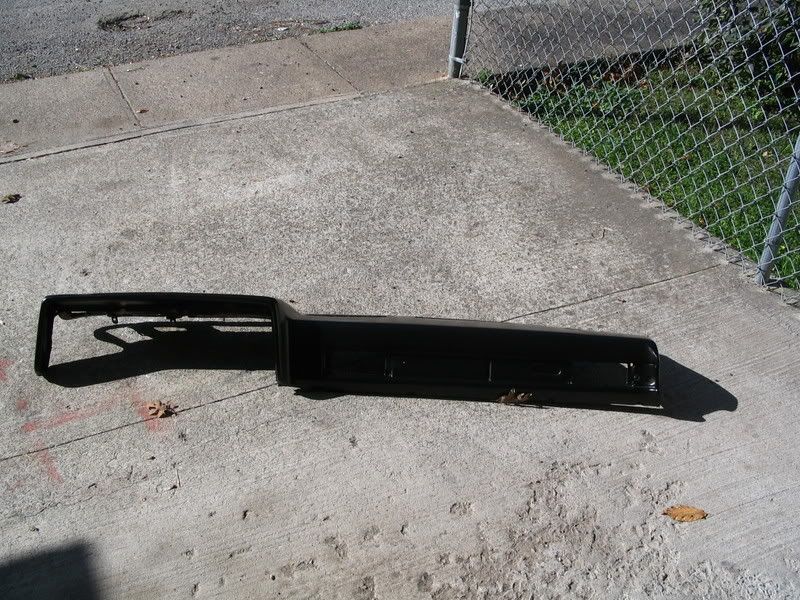 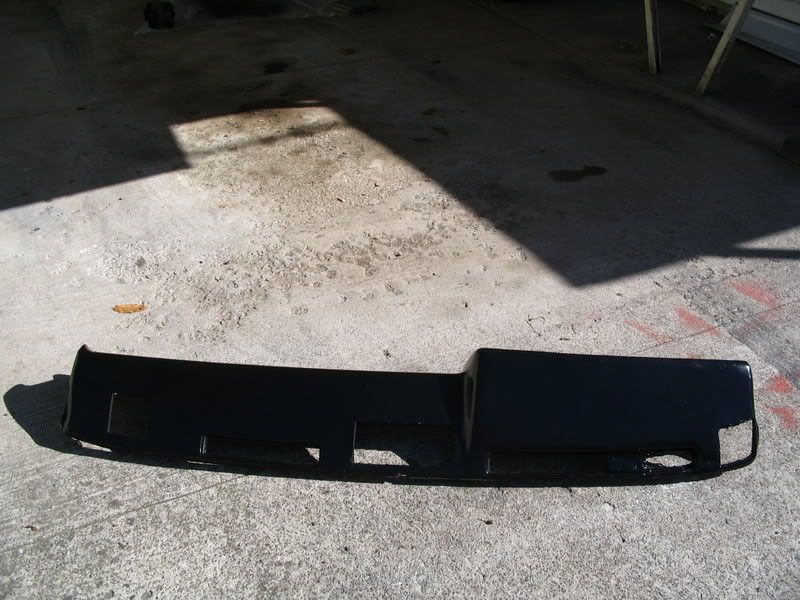 It turned out really well, so well in fact I pulled the door panels, cleaned them in the same way as listed above and painted them with the same vinyl paint. 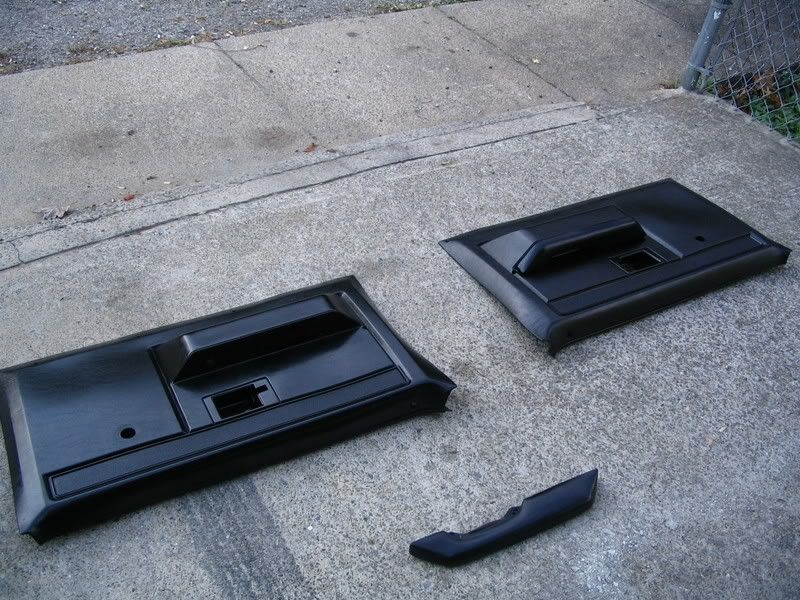 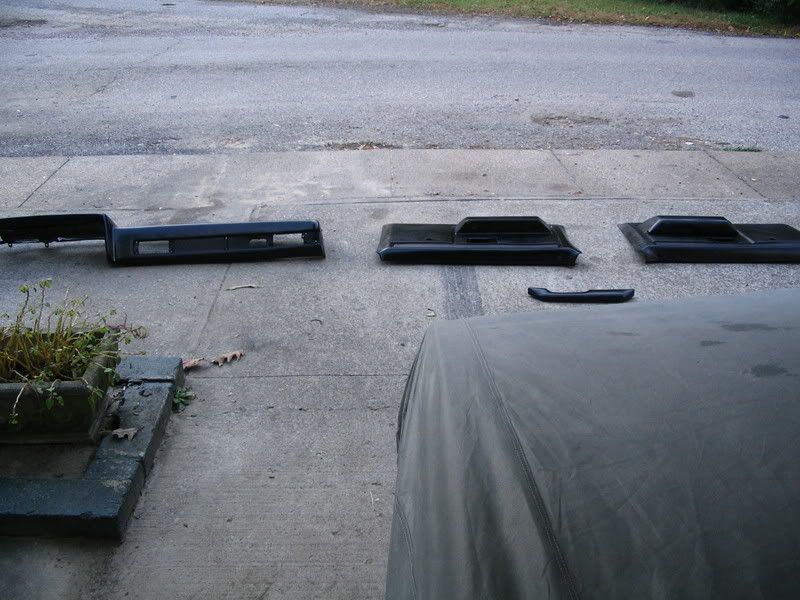 Also I'm sure most of you noticed the speaker opens are all broken out, I done this on purpose because they were all cracked, se 1st pic. I am going to make some custom ones out of wire mesh to put back in. I'll post some pics once I get this stuff put back in hopefully tomorrow. One final note I did not try to duplicate the grain pattern, I just left the repair spots the way they were after the 220 paper. I also went over the whole dash some with the 220. if you'd like texture consider using some textured paint(not trunk paint) or some vinyl top paint, or try to spray some paint on and dab it with a rag, that leaves some texture to it.
__________________
Chris GIT R DONE!!!!!! Check out all our rides, http://www.cardomain.com/id/benwa454 |

|

|
|
10-30-2006, 09:44 PM
|
#2 |
|
Senior Member
 Join Date: Mar 2004
Location: Somewhere
Posts: 985
|
Re: Do-it-Yourself dash repair.
cool looks good. when you get a chance could you post some close ups of the repair areas on the dash?
O |
|
|
|
|
10-30-2006, 10:32 PM
|
#3 |
|
Chris
Join Date: Nov 2004
Location: Monaville, WV
Posts: 3,737
|
Re: Do-it-Yourself dash repair.
I can do that. I messed up using the glazing putty as mentioned because it didn't featheredge/blend as well, and some areas got scimped on the edges.
I wasn't happy about them, but this was just a first time trail and error deal, plus it looks better then them huge cracks LOL.
__________________
Chris GIT R DONE!!!!!! Check out all our rides, http://www.cardomain.com/id/benwa454 |
|
|
|
|
10-30-2006, 10:48 PM
|
#4 |
|
Chris
Join Date: Nov 2004
Location: Monaville, WV
Posts: 3,737
|
Re: Do-it-Yourself dash repair.
Only spots that messed up were the passenger side where I had to use the spot putty to fill in low spots, on the front, the tops turned out good. The driver's side turned out better because it used only the automix no putty needed.
Here's the same spot shown in the 3rd. pic up top. 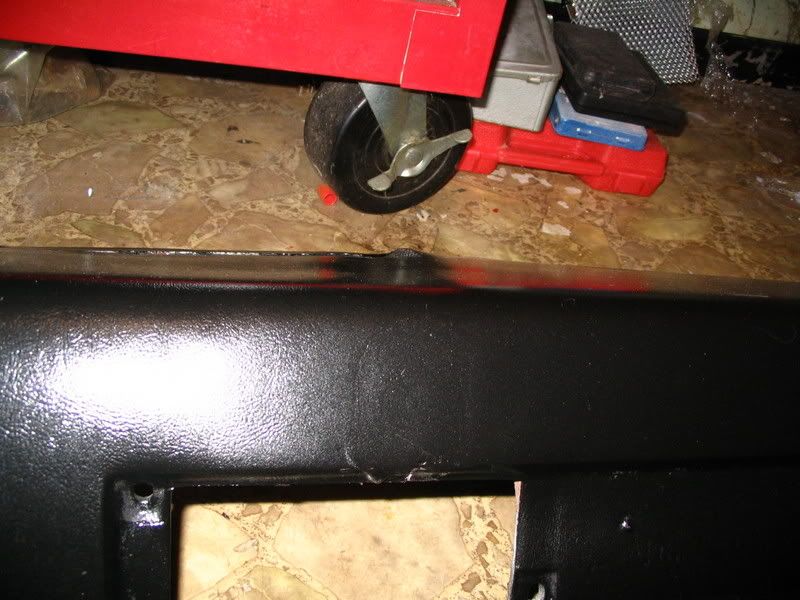 This is the top part of that same spot(sorry about the dust showing up and dog hair.)  Driver's side top... 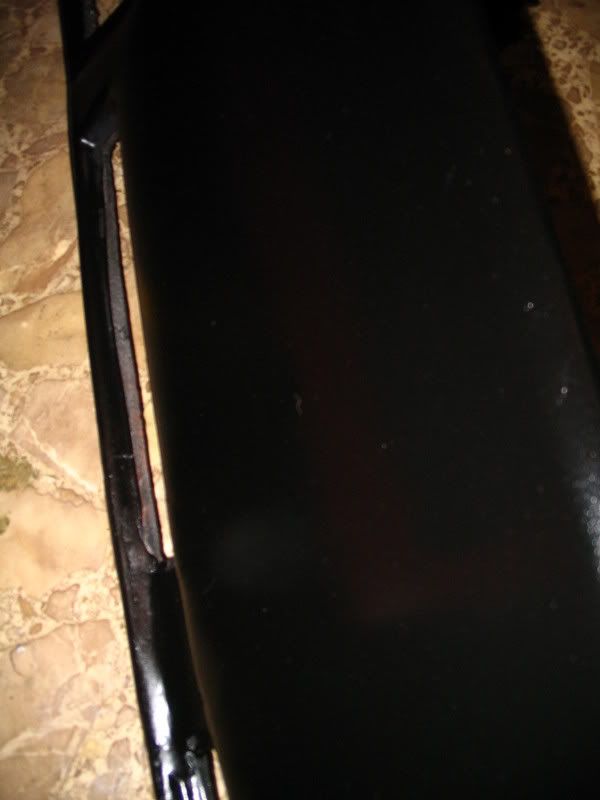 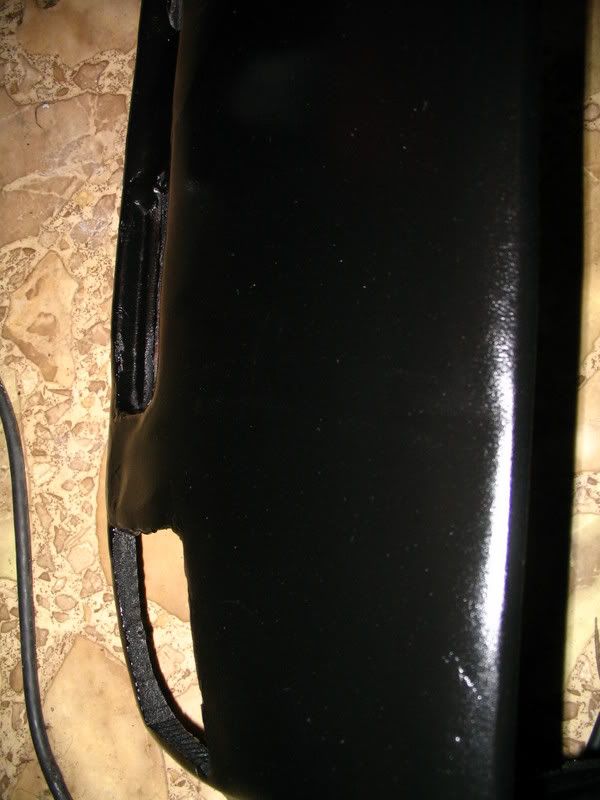
__________________
Chris GIT R DONE!!!!!! Check out all our rides, http://www.cardomain.com/id/benwa454 |
|
|
|
|
10-30-2006, 11:56 PM
|
#5 |
|
Registered User
Join Date: Jun 2004
Location: Medford,Oregon
Posts: 390
|
Re: Do-it-Yourself dash repair.
Looks good to me only question i have is once it's installed in the truck will it crack if some one puts their hand on it? I ask because that spot on the passenger side is right where every one puts their hand while climbing in my truck.
|
|
|
|
|
10-31-2006, 01:01 AM
|
#6 |
|
Registered User
Join Date: Apr 2005
Location: Ar
Posts: 558
|
Re: Do-it-Yourself dash repair.
Good write up. Good job for the first time attempt.
|
|
|
|
|
10-31-2006, 10:05 AM
|
#7 |
|
Registered User
Join Date: Oct 2006
Location: nj
Posts: 54
|
Re: Do-it-Yourself dash repair.
Looks good I will have to give it a try I was trying to figure what to use the patch the dash and if its designed for bumper covers it should remain flexable.
|
|
|
|
|
10-31-2006, 11:43 AM
|
#8 |
|
Chris
Join Date: Nov 2004
Location: Monaville, WV
Posts: 3,737
|
Re: Do-it-Yourself dash repair.
Yes that would be correct it's for rubber bumpers and supposed to stay flexible. So no it shouldn't crack if people lay there hand on it.
That's probably why yours is cracked, old and hard dash, hand on it, pressure=CRACK!!!!! Mine might due to me using some spot putty as filler for low spots, it's not flexible. That's why i recomend using ONLY the duramix, or automix flexible repair stuff.
__________________
Chris GIT R DONE!!!!!! Check out all our rides, http://www.cardomain.com/id/benwa454 |
|
|
|
|
10-31-2006, 12:38 PM
|
#9 |
|
Registered User
Join Date: Aug 2002
Location: Crittenden, KY
Posts: 1,965
|
Re: Do-it-Yourself dash repair.
Okay a few questions. What are you going to do for those portions that you've cut out where the speakers usually are? Stainless mesh or something? Also, I know I'm just thinking here, but what about bedliner material like linex or whatever, would it adhere to a dash if properly prepped? As long as taped off to keep it from filling in the places where you wouldnt want it to build up, it could work right? NO?
Brandon |
|
|
|
|
10-31-2006, 04:55 PM
|
#10 |
|
Chris
Join Date: Nov 2004
Location: Monaville, WV
Posts: 3,737
|
Re: Do-it-Yourself dash repair.
No idea on bedliner stuff.
Yea I have some aluminum mesh. I have it all finished, my dad done the mesh didn't turn out as well, but we were in a hurry to get it done so we can drive it tomorrow. Yesterday and today we were driving my monte carlo ss since it was nice, but tomorrow is supposed to be cold and rainy, and the truck is the only one with a heater.
__________________
Chris GIT R DONE!!!!!! Check out all our rides, http://www.cardomain.com/id/benwa454 |
|
|
|
|
11-01-2006, 03:56 PM
|
#11 |
|
Sb 400 club
Join Date: Nov 2005
Location: NH / MA
Posts: 2,746
|
Re: Do-it-Yourself dash repair.
wow great idea and thad!!!! post up some pics of the interior if you get a chance all back to geather
__________________
 1984 chevy c10, built 400sb,.(SOLD 1984 chevy c10, built 400sb,.(SOLD ) )77 K10 Project / daily driver "The Grinch" http://67-72chevytrucks.com/vboard/s...d.php?t=318363 1956 Willys Wagon (327 chevy) Project (Now Buick 225) 1980 Corvette L-48 4 speed 1992 Mustang GT built 5.0 5 speed  1985 C10 LWB Sold 1982 K10 SWB plow truck Parted out 1986 D30 M1028 fire brush truck Parted out |
|
|
|
|
11-01-2006, 04:49 PM
|
#12 |
|
Chris
Join Date: Nov 2004
Location: Monaville, WV
Posts: 3,737
|
Re: Do-it-Yourself dash repair.
DUH!! I keep forgetting sorry about that, I'll be in and out of the truck rest of this week one day I'll remember to get pictures hopefully LOL.
__________________
Chris GIT R DONE!!!!!! Check out all our rides, http://www.cardomain.com/id/benwa454 |
|
|
|
|
11-01-2006, 07:23 PM
|
#13 |
|
Waiting for Paul to Open Safe
Join Date: May 2005
Location: Everett, WA
Posts: 4,570
|
Re: Do-it-Yourself dash repair.
Nice job thanks for the write-up love to see that kind of stuff. My dash looks just like yours used to.

|
|
|
|
|
11-01-2006, 08:21 PM
|
#14 |
|
Active Member
Join Date: Mar 2006
Location: Arlington, TX
Posts: 111
|
Re: Do-it-Yourself dash repair.
Great job - looks great.
|
|
|
|
|
11-01-2006, 09:09 PM
|
#15 |
|
Chris
Join Date: Nov 2004
Location: Monaville, WV
Posts: 3,737
|
Re: Do-it-Yourself dash repair.
Thanks guys.
I just wanted to pass along the info to help out as much as possible.
__________________
Chris GIT R DONE!!!!!! Check out all our rides, http://www.cardomain.com/id/benwa454 |
|
|
|
|
11-01-2006, 09:44 PM
|
#16 |
|
Registered User
Join Date: Sep 2005
Location: Bellaire,Mich
Posts: 10
|
Re: Do-it-Yourself dash repair.
Hello and thanks for the pictures, I have a 91 burb with the dash that looks
as bad or worse as yours. I have been afraid to tackle it as I am totally confused as to the removal of the dash. Can you share any tips or help on the dash removal, Is it very difficult? Thanks for the help Perhaps you can give us a step by step removal and install for the dash! Thanks Mixednuts |
|
|
|
|
11-02-2006, 03:37 AM
|
#17 | |
|
Until Seventy Times Seven
Join Date: Feb 2005
Location: Rocky Mountain Front Range
Posts: 1,301
|
Re: Do-it-Yourself dash repair.
Quote:
Reverse the process to install dash. Note:
Good job, benoit. 
__________________
boxRODz 1983 C10 SWB Fleetside When two halves is gone, there's nuthin left. Two nothings is nuthin. That's mathematics son. You can argue with me but you can't argue with figures. Two half nothings is a whole nuthin... |
|
|
|
|
|
11-02-2006, 11:34 AM
|
#18 |
|
Chris
Join Date: Nov 2004
Location: Monaville, WV
Posts: 3,737
|
Re: Do-it-Yourself dash repair.
Exactly right, but let me add this job be done without removing the cluster, the part around the guages, but man is it EASIER to take them out and remove the dash pad and reinstall.
Now removal of the pad with guage surround in isn't bad, but reinstall is a real PITA. I'd definately reccomend removing the bezel or surround around the guages. If you leave it in you have to remove like 5 or 6 of it's screws anyways. I did mine w/o removing the bezel only because I have a cd player in the truck, and the cage for it has the tabs bent holding it to the surround and metal dash, and has to be fought to get in or out, and unplugged so it's extra work and a PITA. Also don't forget some radios have little nuts on the dials that you have to take off after the knobs are removed. I think that's only aftermarket ones though, not sure on factory, never had one.
__________________
Chris GIT R DONE!!!!!! Check out all our rides, http://www.cardomain.com/id/benwa454 |
|
|
|
|
11-03-2006, 04:05 PM
|
#19 |
|
Account Suspended
Join Date: Nov 2002
Location: Winnipeg, Manitoba, Canada
Posts: 798
|
Re: Do-it-Yourself dash repair.
Wow!!! That looks pretty terrific.
I've been away from the forum for quite a while (just too busy it seems), and just stopped by today for a look around - and found this little piece of information. Looks great Benoit. I think I might have to try this for myself. |
|
|
|
|
11-03-2006, 04:19 PM
|
#20 |
|
Chris
Join Date: Nov 2004
Location: Monaville, WV
Posts: 3,737
|
Re: Do-it-Yourself dash repair.
Sorry for the delay guys here's some reinstalled pics.
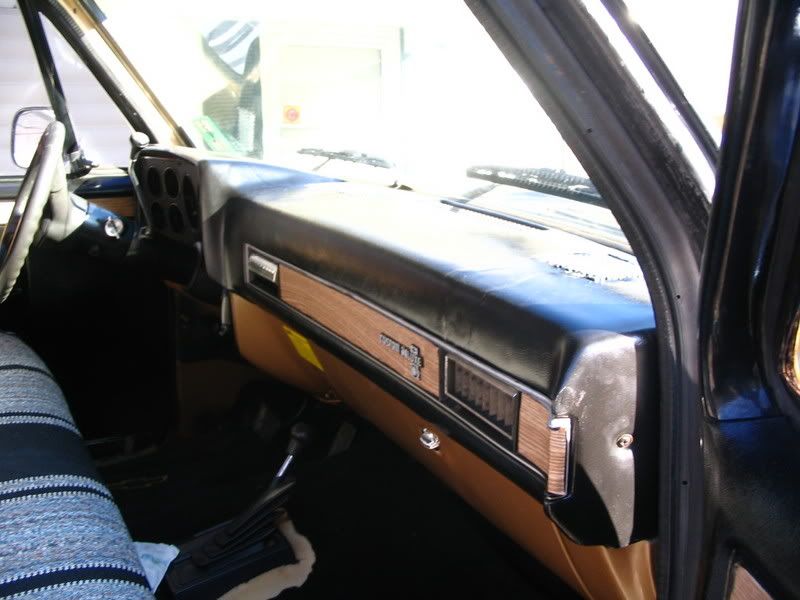 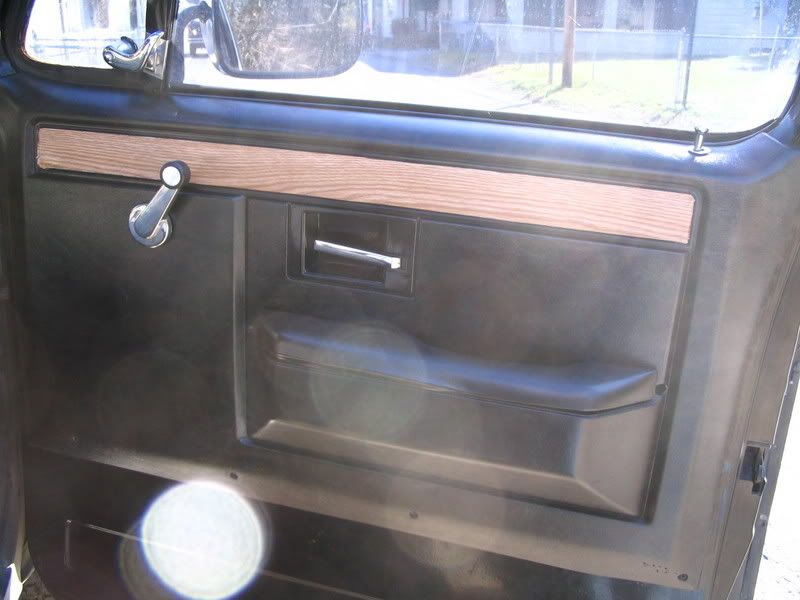 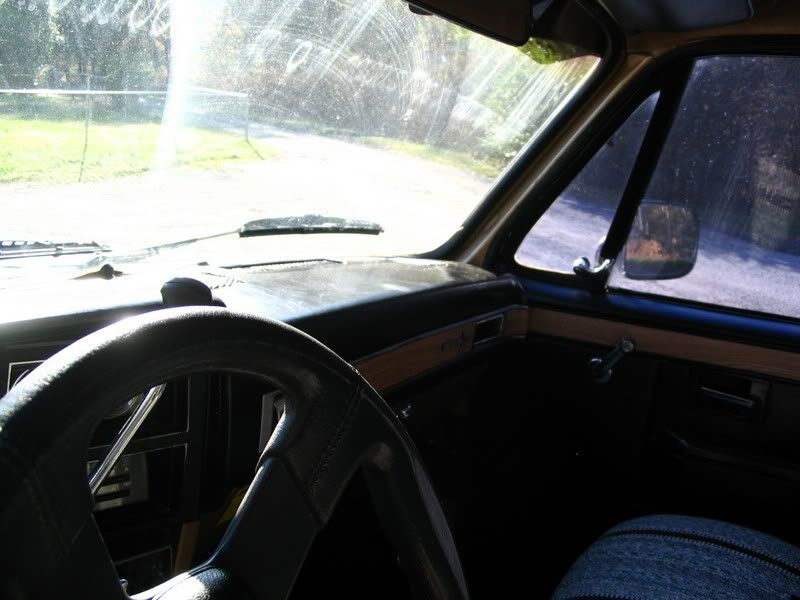 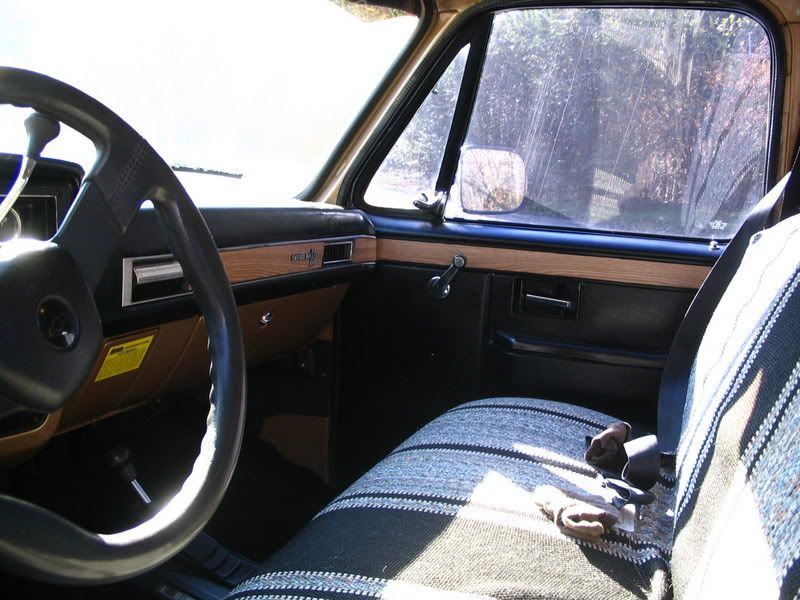 You can see the end 2 grilles aint that great but th emiddle turned out ok.
__________________
Chris GIT R DONE!!!!!! Check out all our rides, http://www.cardomain.com/id/benwa454 |
|
|
|
|
11-03-2006, 06:43 PM
|
#21 |
|
I'm back with 2nd truck!
Join Date: Feb 2002
Location: Texas
Posts: 3,774
|
Re: Do-it-Yourself dash repair.
That looks great with the new oak finish panels in there as well. Did you make those or did you get it from somewhere?
__________________
1979 Chevrolet Bonanza Big10 "Tootsie Roll" 1985 Chevrolet Silverado (wife's) Member of the Southern Bowties Club "Don't underestimate how sexy a fat man who drinks to excess can be." Homer Simpson |
|
|
|
|
11-03-2006, 09:15 PM
|
#22 |
|
Chris
Join Date: Nov 2004
Location: Monaville, WV
Posts: 3,737
|
Re: Do-it-Yourself dash repair.
I made thoose myself. They are gonna be changed out for a wood trim kit soon probably. One that has the door pieces, dash and around the guages. I want one of thoose high gloss ones that uses the 3m tape on the back.
Thing is most of the kits are burlwood or zebrano or whatever. The zebrano looks like what's in there now but not as light, and the burlwood is funny and swirly looking lol, its also alot darker.
__________________
Chris GIT R DONE!!!!!! Check out all our rides, http://www.cardomain.com/id/benwa454 |
|
|
|
|
11-04-2006, 02:36 PM
|
#23 | |
|
Until Seventy Times Seven
Join Date: Feb 2005
Location: Rocky Mountain Front Range
Posts: 1,301
|
Re: Do-it-Yourself dash repair.
hmmm....
I wonder how the speaker openings would look if they were trimmed out with some stock that matches the wood trim kit. Quote:
__________________
boxRODz 1983 C10 SWB Fleetside When two halves is gone, there's nuthin left. Two nothings is nuthin. That's mathematics son. You can argue with me but you can't argue with figures. Two half nothings is a whole nuthin... |
|
|
|
|
|
01-09-2011, 06:36 PM
|
#24 |
|
Registered User
Join Date: Oct 2009
Location: LBC California
Posts: 497
|
Re: Do-it-Yourself dash repair.
Nice...I wonder if there's a tool to create the same wrinkley texture of the existing dash.
|
|
|
|
|
| Bookmarks |
|
|


 Linear Mode

