
 |
Register or Log In To remove these advertisements. |
|
|
|
|||||||
 |
|
|
Thread Tools | Display Modes |
|
|
#1 |
|
Registered User
Join Date: Jul 2010
Location: Houston,Tx.
Posts: 241
|
putting trim on and cargo light
Im in process of painting my truck all black but I wanted to put the trim under the back windshield but how do I find the measurement or even if I can do it if it didn't come with it also is it possible or has any one install a cargo light
Posted via Mobile Device |
|
|

|
|
|
#2 |
|
Watch out for your cornhole !
 Join Date: Jun 2003
Location: Azle, Texas
Posts: 14,162
|
Re: putting trim on and cargo light
I'm in the process of doing my cab right now too. You need to know that there are two different versions of the trim across the back of the cab. The earlier version (I think 73-80) is wider while the later (81-87) is narrower.
I wound up getting the later stuff because the junkyard had a nice set for 10 bucks. When I took it off the donor truck, I measured and it was a thumb width between the bottom of the window rubber and top of the trim. The side pieces actually wind up being beneath the raised lip of the rain gutters that are bolted above the door. That is, you have to bolt the cab trim on first, before the rain gutters, as they actually hang over the cab trim. To remove the corner trim pieces I had to slightly bend the rain gutters up out of the way since I didn't have the tools with me to remove them. Clear as mud ?
__________________
I'm on the Instagram- @Gearhead_Kevin |
|
|

|
|
|
#3 |
|
Registered User
Join Date: Jul 2010
Location: Houston,Tx.
Posts: 241
|
Re: putting trim on and cargo light
so i guess i would have to go to the junk yard to get measurements if i can find one with the trim on it but either one of the styles will fit these trucks
|
|
|

|
|
|
#4 |
|
Watch out for your cornhole !
 Join Date: Jun 2003
Location: Azle, Texas
Posts: 14,162
|
Re: putting trim on and cargo light
I just stole this picture from another member's thread. You can see how the rain gutters actually hang over the molding a bit. That should be a good bench mark to go off of.
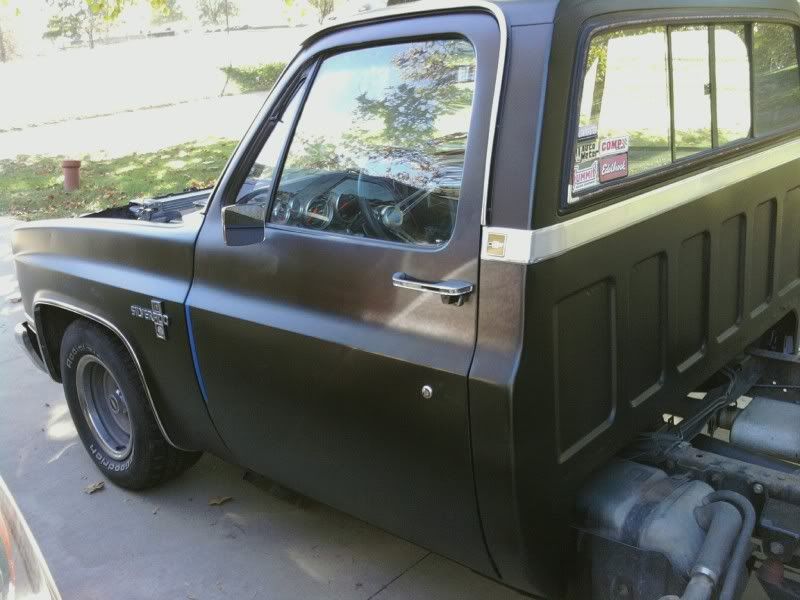 I figure I'll tape it all in place with masking tape and mark the edges with a marker so I can remove it and get the locations for the clips.
__________________
I'm on the Instagram- @Gearhead_Kevin |
|
|

|
|
|
#5 |
|
Registered User
Join Date: Jul 2010
Location: Houston,Tx.
Posts: 241
|
Re: putting trim on and cargo light
but how do the clips go in with rivets or what
|
|
|

|
|
|
#6 |
|
Watch out for your cornhole !
 Join Date: Jun 2003
Location: Azle, Texas
Posts: 14,162
|
Re: putting trim on and cargo light
The clips are held on by nubs that are welded onto the cab from the factory. Since my cab (and apparently yours too) are lacking these nubs, we have to choose another option.
I'm going to do pop rivets, but small sheetmetal screws will work fine too. Also, I looked around and found a picutre of the earlier, wider style of molding. Compare this picture to the later model one in the picture above and you can see the width and style difference.
__________________
I'm on the Instagram- @Gearhead_Kevin |
|
|

|
|
|
#7 |
|
Registered User
Join Date: Jul 2010
Location: Houston,Tx.
Posts: 241
|
Re: putting trim on and cargo light
so this last pic is the earlier model ones and will both fit the same or do i got to putthe newer one on my 87 i bought one at a swap meet last year the whole thing corners and the long piece for 20 bucks
|
|
|

|
|
|
#8 |
|
Registered User
Join Date: Feb 2010
Location: Fort Worth, TX
Posts: 727
|
Re: putting trim on and cargo light
Could you not use double sided foam tape to attatch it to the cab? Like what is used to hold emblems and such.
|
|
|

|
|
|
#9 |
|
Watch out for your cornhole !
 Join Date: Jun 2003
Location: Azle, Texas
Posts: 14,162
|
Re: putting trim on and cargo light
I'm sure you could use trim tape to hold it on if you wanted to. Thing is, modern molding is usually flat on the back so the tape has plenty of surface area to grip against. These moldings are somewhat hollow on the back so you'd need real thick tape or a couple of layers stacked.
I'm doing rivets and the original clips because I feel it will be more secure. I'm actually going to start putting it and the cab lights on my cab today so I'll snap some pictures while I'm working on it.
__________________
I'm on the Instagram- @Gearhead_Kevin |
|
|

|
|
|
#10 |
|
Watch out for your cornhole !
 Join Date: Jun 2003
Location: Azle, Texas
Posts: 14,162
|
Re: putting trim on and cargo light
Here is a little follow up to the discussion about cab molding.
I finally got around to putting mine on today so I took pictures. Mind you, this installation is on a cab that never had molding so I had to figure out where to mount it without any guidance from the factory. First, here are the OEM clips that I removed off the donor truck that I got my molding off of out of the junkyard. 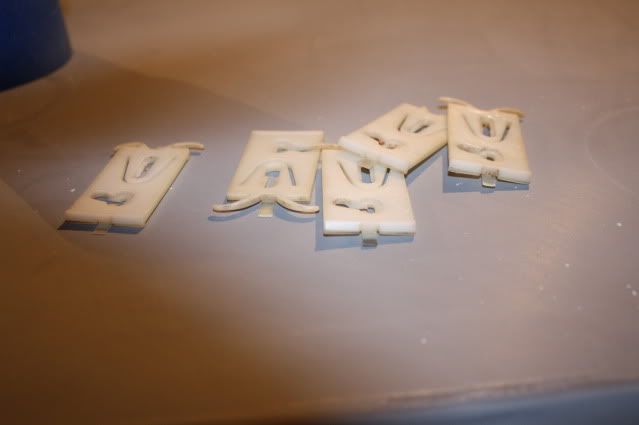 The end pieces are held on by a clip with a threaded stud. You will have to drill a hole on each side of the cab for these studs. Notice how I made a tick mark with a marker where the center of the stud is to give me reference. 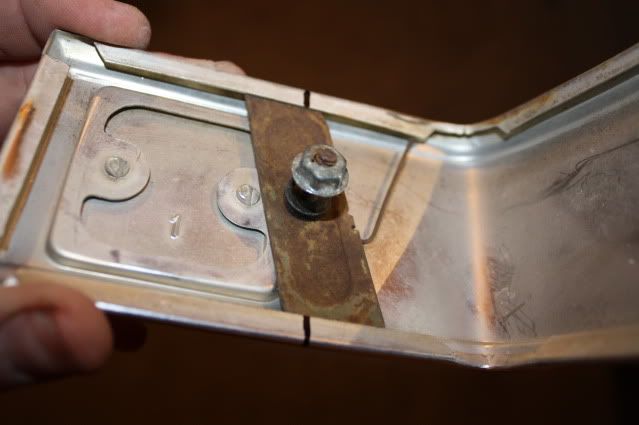 Now remove the studded clips from the end pieces and install the molding where you like it. I chose about a quarter of an inch below the rear window rubber. Hold it all into place with tape and make sure it's level when viewed from the back of the cab. 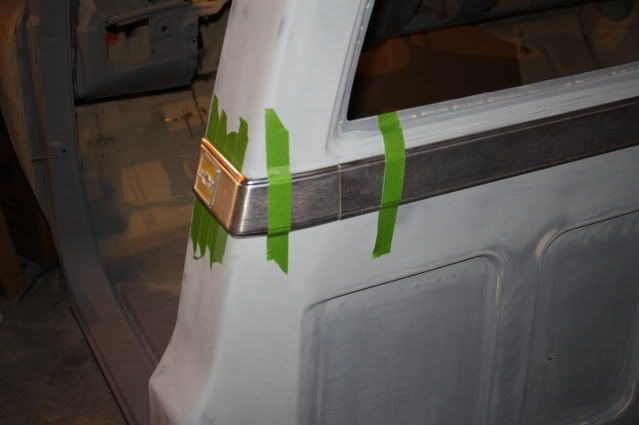 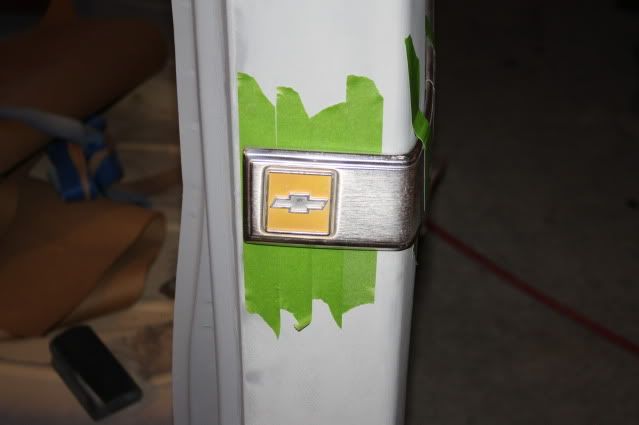 Make a mark top and bottom of the end pieces as well as a reference mark where your stud tick mark is. 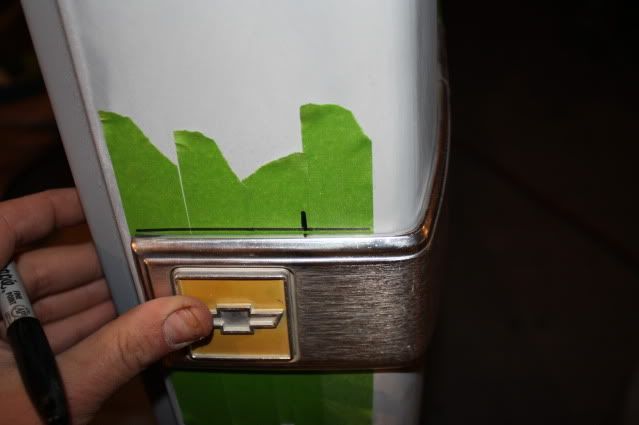 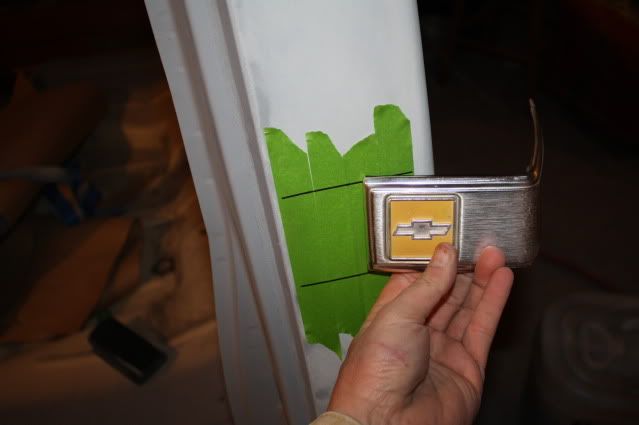 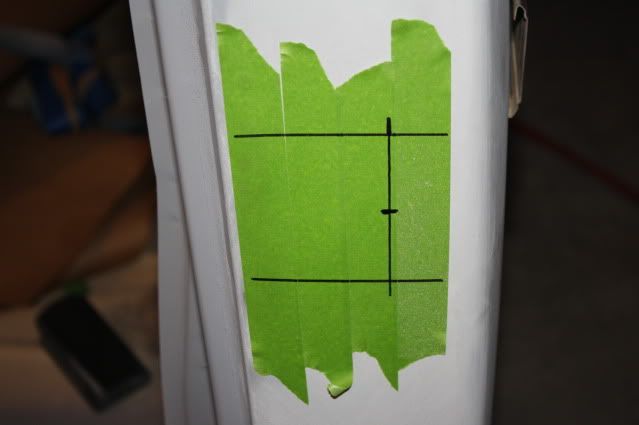
__________________
I'm on the Instagram- @Gearhead_Kevin |
|
|

|
|
|
#11 |
|
Watch out for your cornhole !
 Join Date: Jun 2003
Location: Azle, Texas
Posts: 14,162
|
Re: putting trim on and cargo light
Now drill the hole on each side of the cab for your studs and you can test fit everything. And for you paint and body nazis who will notice the spots of guide coat left, I know I still have a lot of hours left block sanding it before paint
 The next step is to get the 5 little plastic clips mounted along the back of the cab. Like was mentioned above, modern double sided tape is an option too. 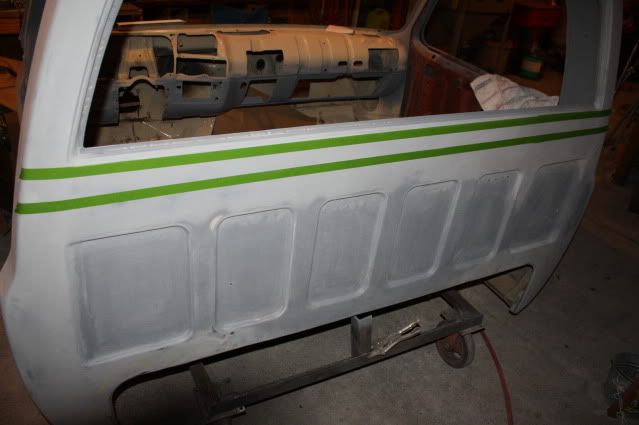 After laying out the spacing for the 5 clips, I actually decided that I will likely use the tape method too. If I do wind up using the original clips, I will install them after I paint the cab. I can't see any effective way to lay them out and drill the holes without going ahead and riveting the clips down as I don't have any clekos around here. I might get the paint work completed and snap a chalk line along the back of the cab to go off of.
__________________
I'm on the Instagram- @Gearhead_Kevin Last edited by Tx Firefighter; 02-09-2011 at 04:09 PM. |
|
|

|
|
|
#12 |
|
Registered User
Join Date: Jul 2010
Location: Houston,Tx.
Posts: 241
|
Re: putting trim on and cargo light
man i really like the way you marked up everything up but you dont think that the double sticky tape will get wet and soon fall off also did you drill the holes for the corners
|
|
|

|
|
|
#13 |
|
Watch out for your cornhole !
 Join Date: Jun 2003
Location: Azle, Texas
Posts: 14,162
|
Re: putting trim on and cargo light
If I use the tape, I'll get the proper tape at the auto body store. Since the 80s, most all side molding on cars and trucks have been held on by double sided tape. The body supply houses carry the good all weather stuff meant for exposure to the elements.
Yes, I drilled one 3/16 hole on each side of the cab for the stud mount for the end pieces. The end pieces firmly bolt down tight and the center piece is captured by the end pieces, so you could actually get away without running any tape or clips on the center piece but I'm sure it would rattle and vibrate.
__________________
I'm on the Instagram- @Gearhead_Kevin |
|
|

|
|
|
#14 |
|
Registered User
Join Date: Jul 2010
Location: Houston,Tx.
Posts: 241
|
Re: putting trim on and cargo light
well that is smart thinking the side pieces do hold the long piece but like you said i would put the tape cuz it would rattle the trim you have what year is that one from
|
|
|

|
|
|
#15 |
|
Watch out for your cornhole !
 Join Date: Jun 2003
Location: Azle, Texas
Posts: 14,162
|
Re: putting trim on and cargo light
Don't worry, I'll definitely use either the factory center clips or the proper molding tape. No rattles or half baked work on this truck. I'm doing it from the bare cab and frame all the way out. I spent 6 hours today doing bodywork on the back of the cab where you won't even be able to see with the bed installed. I'm doing it full on nice.
The moldings are off a 81-86 model truck. I didn't pay attention at the junkyard. I do remember it was a square eye truck though and not fuel injected.
__________________
I'm on the Instagram- @Gearhead_Kevin |
|
|

|
|
|
#16 |
|
Registered User
Join Date: Jul 2010
Location: Houston,Tx.
Posts: 241
|
Re: putting trim on and cargo light
oh ok well post up when you do get it on there i will let you know how i do mine
|
|
|

|
|
|
#17 |
|
Registered User
Join Date: Jul 2007
Location: Ontario Canada
Posts: 1,006
|
Re: putting trim on and cargo light
Go find some screws with small heads , drill your holes then you can take the screws back out and install the clips after paint
|
|
|

|
|
|
#18 |
|
Registered User
Join Date: Nov 2009
Location: Sherman, ME
Posts: 2,366
|
Re: putting trim on and cargo light
^ x2 They make special small-headed screws just for this type of thing. They're made for replacing those welded studs in situations where they've broken off, body panels have been replaced, and such.
As Tx Firefighter mentioned in his first reply, the 73-80 molding is wider than 81-87 and the side pieces fit up under the rain gutters a little. That causes the wider 73-80 molding to have an interference issue with 81-87 rain gutters. You need to use pre-81 gutters if you're going to use the wider cab molding. I found that out the hard way when doing dad's 77. Found some nice dent/ding free gutters off an 81-87. Polished them all up and went to put them on but they wouldn't quite clear the original cab molding. |
|
|

|
|
|
#19 |
|
Watch out for your cornhole !
 Join Date: Jun 2003
Location: Azle, Texas
Posts: 14,162
|
Re: putting trim on and cargo light
I pooped out on fitting the center clips due mainly to it being 8 degrees in my shop and my having just sanded until my fingers were bleeding. Literally, my fingers split open and bled. I kind of lost interest after that and came inside the house and uploaded the pictures. Oh, and put some of that girly hand lotion of my wife's on my hands to soothe the wounds.
After thinking about it this afternoon, I likely will use some double sided molding tape to hold the center snug. The end pieces capture it in place so it can't fall off even without any clips. Plus, my welder will be mounted on the front of the bed so there's no way to even see the molding once installed anyway. The welder completely obscures the back of the cab and rear window so the molding won't be subject to any abuse.
__________________
I'm on the Instagram- @Gearhead_Kevin Last edited by Tx Firefighter; 02-09-2011 at 09:38 PM. |
|
|

|
|
|
#20 | |
|
Registered User
Join Date: Jul 2010
Location: Houston,Tx.
Posts: 241
|
Re: putting trim on and cargo light
Quote:
|
|
|
|

|
|
|
#21 | |
|
Registered User
Join Date: Nov 2009
Location: Sherman, ME
Posts: 2,366
|
Re: putting trim on and cargo light
Quote:
I used some Mother's Mag & Aluminum polish. It works good on stainless steel too, and I think the gutter trim pieces are stainless. I used a small 1/4" open-ended wrench to remove the gutter screws. I think some years use 7mm metric though. And if I remember correctly, you have to loosen all the screws and gently pull the gutter away from the cab a little before you'll have enough room to completely remove the screws. An alternative removal method is to gently pry the stainless trim cap off the retainer rail. The retainer rail has notches to clear the screw heads so you have easy access with a small socket. However, this method carries an increased risk of bending the thin stainless trim when prying it off and/or snapping it back on. |
|
|
|

|
 |
| Bookmarks |
|
|