 |
|
|
#1 |
|
Registered User
Join Date: Jun 2011
Location: Gibsonville, NC
Posts: 334
|
Dynamat Installation
I am going to install Dynamat inside the door panels on my 1953 Chevy truck. The problem as I see it is that there are two small openings in which I will need to get each strip into and use the roller to secure each piece onto the door facing. Any hints that may be of benefit doing this? Don't say get a very skinny arm person to do this. I don't want to cut the door facing out because to me this would make the inside of the panel very unstable and create more problems than it solves. I di think about cutting an 8" - 12" section out all the way across in the middle, but if this can be avoided I would feel better because I don't want to do any cutting unless it is absolutely necessary. I am going to use ABS plastic to make a full door panel. I would really like to hear from as many of you as possible who had the same issue and solved the problem. Thanks for your support.
|
|
|

|
|
|
#2 |
|
Senior Member
 Join Date: Mar 2011
Location: West Plains, Missouri
Posts: 7,559
|
Re: Dynamat Installation
gag1025, here's a pic of what I did to mine. Now I was also installing power windows, which made is necessary to cut the hole. I just welded some tabs on the door panel and then screwed the piece back in place. I covered the inside of my doors with sound material, etc. after all my fitting, etc was done. Hope this helps...Jim
__________________
my build thread: http://67-72chevytrucks.com/vboard/s...d.php?t=459839 Jimbo's long bed step build:http://67-72chevytrucks.com/vboard/s...t=464626<br /> |
|
|

|
|
|
#3 | |
|
Registered User
Join Date: Jan 2012
Location: el campo texas
Posts: 322
|
Re: Dynamat Installation
Quote:
|
|
|
|

|
|
|
#4 |
|
Registered User
Join Date: Jun 2013
Location: Brooksville Ky
Posts: 531
|
Re: Dynamat Installation
You could put plastic behind the dr panel. Seal it around every hole like any late model car. You could put the rope type seal, like they use to use on windshields, around the holes and around the edge. Have your plastic cut to fit and stick it on.
|
|
|

|
|
|
#5 |
|
Registered User
Join Date: Jun 2011
Location: Gibsonville, NC
Posts: 334
|
Re: Dynamat Installation
Great ideas. Good point about covering the hole. That would make it easier at a later date if I wanted to add electric windows. I probably will at some point in time swap out the stock window for a one piece. Now I am wondeering how water affects the Dynamat. I guess you could actually seal it off with plastic as well. Spray the foil with a good spray on glue and stick a piece of plastic on it making sure to lap the plastic over the Dynamat at the top and glue it to the metal above the Dynamat. Plus glue plastic to the inside wall of the metal frame and punch holes where the door handle and window handle goes through. Keep the thoughts coming.
|
|
|

|
|
|
#6 |
|
Registered User
Join Date: Jun 2011
Location: Gibsonville, NC
Posts: 334
|
Re: Dynamat Installation
Over the past few days I have learned a lot about sound and heat insulating products. I discovered that it is better to use a product that is made from Butyl rubber than to use a product made from asphalt because the asphalt will break down over time and run and you will see the results coming through openings, seams and through upholstery fabric. I found a product called Fat Mat that was a lot cheaper and was a butyl based product. Have any of you used this product?
__________________
1953 Chevy 3 Window Truck 3100 Series |
|
|

|
|
|
#7 |
|
Registered User
Join Date: Aug 2011
Location: Tucson, AZ
Posts: 917
|
Re: Dynamat Installation
That's what I used. Not far enough down the road to know anything but it went on good and got good price on E bay for 2 rolls. I'd do it again but I guess it's "caveat emptor".
|
|
|

|
|
|
#8 |
|
Registered User
Join Date: Jun 2011
Location: Gibsonville, NC
Posts: 334
|
Re: Dynamat Installation
$240 for 100 sq ft sure beats all the others I have seen. I bought mine straight from the Fat Mat people.
Mega Mat Xtreme 100 SqFt Butyl Sound Deadener "The Best"! Free Dynamat Sample Item # 121092666831. Mega Mat is 70 Mils Nominal Thickness Other Top Brands are Only 67 Mils Fatmat Sound Control has been servicing the sound dampening industry for many years now. When we started we made one product and that was our FatMat Extreme. Slowly throughout the years we added new products to our line. Our goal is and always will be to offer our customers the best products at the best prices possible. Butyl is a very expensive product, and that's why so many others make false claims of offering a true butyl product, and the ones that do have a true butyl product sell it at ridiculous prices. FatMat has finally found a way to offer you a true butyl product and we did this while still making it very cost effective. Our new Mega Mat is thicker and it contains less fillers giving you a true rubberized butyl compound.
__________________
1953 Chevy 3 Window Truck 3100 Series |
|
|

|
|
|
#9 |
|
Registered User
Join Date: Jan 2012
Location: Motown
Posts: 7,680
|
Re: Dynamat Installation
after a lot of research i used raammat
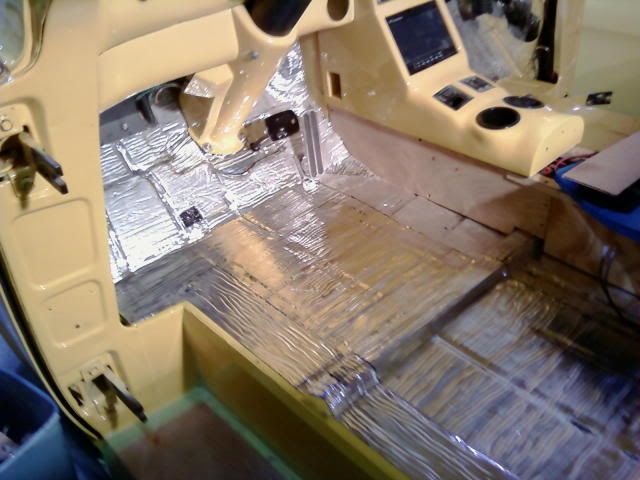
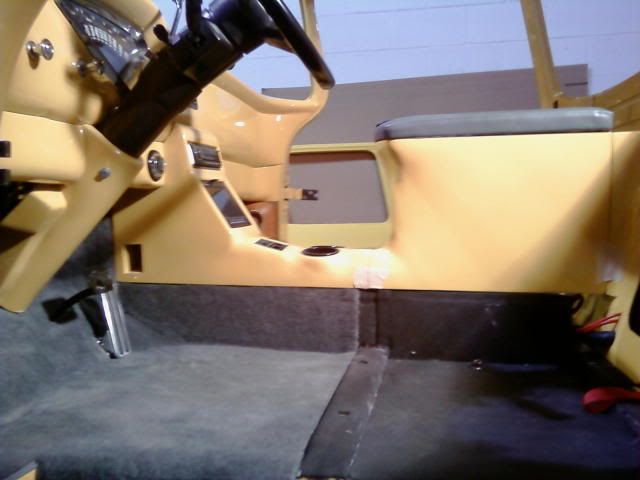
2 layers on most surfaces, 2 layers of ensolite foam and carpet over that  black is ensolite foam, grey is carpet 
__________________
cool, an ogre smiley  Ogre's 58 Truk build Ogre's 58 Truk buildhow to put your truck year and build thread into your signature shop air compressor timer |
|
|

|
|
|
#10 |
|
Registered User
Join Date: Jun 2011
Location: Gibsonville, NC
Posts: 334
|
Re: Dynamat Installation
Ogre, nice looking truck. I looked at all your build photos and was impressed. You did an outstanding job.
__________________
1953 Chevy 3 Window Truck 3100 Series |
|
|

|
 |
| Bookmarks |
|
|