 |
Register or Log In To remove these advertisements. |
|
|
|
|||||||
 |
|
|
Thread Tools | Display Modes |
|
|
#1 |
|
Account Suspended
Join Date: Oct 2013
Location: murfreesboro, tn
Posts: 109
|
Another seat swap thread.
Needing to replace a later model bench seat in my 69. It sits way on up there and I need it to be a couple of inches lower than what I remember the stock height being. I see the tahoe/silverado seats that I like, the center seats, the bonneville and so on. Ideally I'd like non-electric and something not needing and fabrication, just new holes.
1-what would you do or have done? I've seen the giant thread on seats but most guys added no detail. 2-if I do get electric is there room in the stock fuse box to connect them? Buckets are fine. Bench is ok. Again, ideally a center jump/armrest w/cupholders in maybe a 60/40. |
|
|

|
|
|
#2 |
|
Easy Does It
Join Date: Apr 2007
Location: Dirdy Mo , North Carolina
Posts: 450
|
Re: Another seat swap thread.
1988-98 chevy truck bench seats work , front hole lines up just need to drill out for rear holes,
|
|
|

|
|
|
#3 |
|
Registered User
Join Date: Jan 2014
Location: Tulsa, OK
Posts: 360
|
Re: Another seat swap thread.
__________________
-Jason USN Retired |
|
|

|
|
|
#4 |
|
Account Suspended
Join Date: Oct 2013
Location: murfreesboro, tn
Posts: 109
|
Re: Another seat swap thread.
Yeah, I saw these. That looks great. Have you looked at a hump hugger?
|
|
|

|
|
|
#5 |
|
Registered User
Join Date: Jan 2014
Location: Tulsa, OK
Posts: 360
|
Re: Another seat swap thread.
No, is that a console? I am building my own so I can install a down firing sub in the bottom of it. I'm not much of a carpenter though, so it's going a little slow. There is also tubing that runs the width of the seats that would prevent me from setting anything directly on the floor between the seats.

__________________
-Jason USN Retired |
|
|

|
|
|
#6 |
|
Account Suspended
Join Date: Oct 2013
Location: murfreesboro, tn
Posts: 109
|
Re: Another seat swap thread.
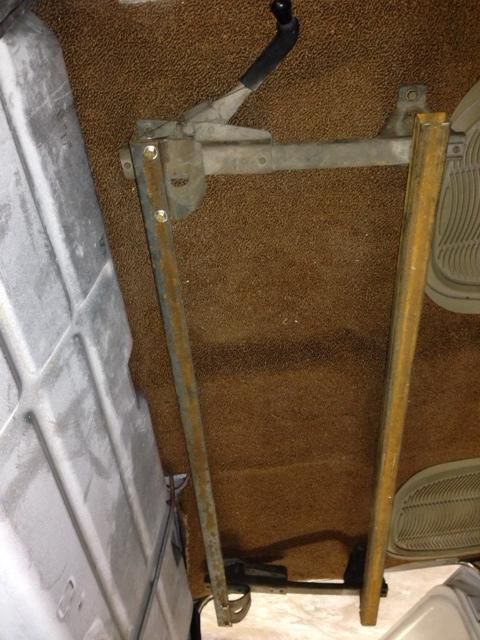
Yeah, I had to go back and look at your thread I saw the other day. I was just getting ready to paste in this picture and ask exactly what you did. You laid square tubing in there and then.....just pretend I have no idea what you did from there and explain....
Are you saying you welded that in? Bolted it to the exisiting bracket, etc? And the 1/8" drop, is that from laying flush or did you have to shim the front? And yes a hump hugger lays on the hump. Console, cup holders, etc. It won't work for you here. Somebody had mentioned a dodge ram jump seat to fit in there. |
|
|

|
|
|
#7 |
|
Registered User
Join Date: Jan 2014
Location: Tulsa, OK
Posts: 360
|
Re: Another seat swap thread.
I removed the brackets from the factory bench. I didn't want to damage them in case I ever wanted to reinstall the bench seat. I used thin wall 1.5" square tubing on the front and 1/8" x 2 x 2 angle in the back. I drilled holes to match the mounting holes in the seat brackets and bolted all that together with 3/8" grade eight bolts and stainless nyloc nuts. Then I removed all the brackets from the bottoms of the seats and matched the holes on the front with the tubing and drilled holes through the tubing. I mounted the front with long bolts through the tubing into the factory threaded holes int he seats. The back required a square piece of flat bar be welded onto the angle then holes drilled in it to match the factory threaded holes in the back of the seat. I have not welded these in yet. They are bolted to the seat and this forms a sort of clamp to the rear angle. It is secure this way, but I will definitely be welding them in to make sure they stay where they need to be. Once I get these pieces welded in I will soda blast the whole thing and paint it.
Is that clear as mud? 
__________________
-Jason USN Retired Last edited by Hugh Mongus; 03-07-2014 at 12:22 PM. |
|
|

|
|
|
#8 |
|
Account Suspended
Join Date: Oct 2013
Location: murfreesboro, tn
Posts: 109
|
Re: Another seat swap thread.
Now I see what you mean. When you said angle I was thinking...angle. You mean a piece of angle iron as we used to call it. Now I can see it that I understand what you did. This is excellent. Thanks.
|
|
|

|
|
|
#9 |
|
Registered User
Join Date: Jan 2014
Location: Tulsa, OK
Posts: 360
|
Re: Another seat swap thread.
You're welcome. I will be taking this out this weekend so if you need any pictures let me know what you need and I'll get them for you.
__________________
-Jason USN Retired |
|
|

|
 |
| Bookmarks |
|
|