
|
Register or Log In To remove these advertisements. |
|
|
|
|||||||
 |
|
|
Thread Tools | Display Modes |
 01-13-2015, 02:03 PM
|
#1 |
|
Registered User
Join Date: Apr 2014
Location: Beaumont, TX
Posts: 34
|
My DIY Dash Restoration
My post on my door panel restoration (seen here) generated some interest for my dash restoration, so here goes nothing. This is a step by step look at what we did to restore the dash from a 1984 GMC Stepside.
When we pulled the dash out initially, we had no intentions of fixing it because it was in such bad shape. In fact, we left it outside for a while! But as the end of our restoration project gets nearer, the financing pool is getting emptier. So after seeing that some other people had restored their dashes, we decided to give it a whirl, and I'm glad we did! Here is the dash in all it's nastiness:   The first thing we did was cut out all of the cracks and damage, including removing the completely rotted speaker grilles. My son decided that he didn't want in-dash speakers, and so for a cleaner look we decided to just fill in all of the speaker areas. We taped some cardboard on the undersides of the dash where the grilles were, and then filled all the voids with spray foam insulation. We then took a serrated knife and cut the foam off even with the surface of the dash. 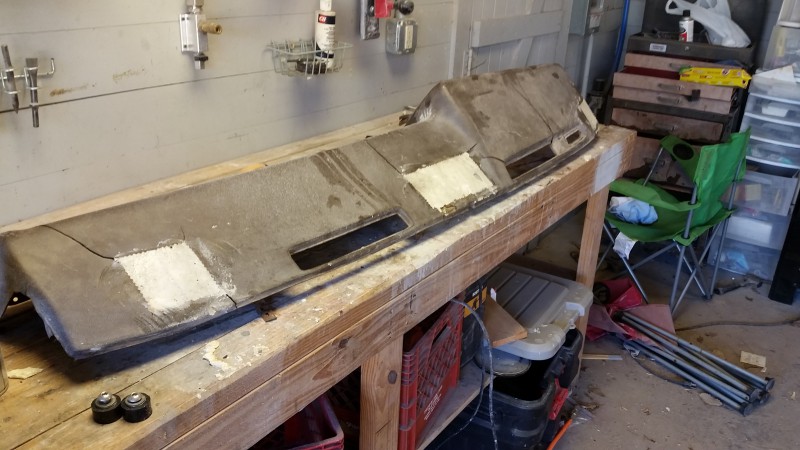 If I had it to do over again, I might have just left what remained of the speaker grilles and foamed in and around them to give it a little bit more support. The thin layer of foam gave me a tiny bit of problem when I was sanding later due to its flexibility. The next step was to cut out all the material that had cracked in order to remove any raised part of the vinyl. I should have sanded the edges down a bit more than I did, because it caused me some problems with the filler later on. The more gradual the edge, the better the filler bonds with it. For filler I used Padded Dash Filler from Urethanesupplycompany.com. It is better than regular body filler because it is built to expand and contract with the conditions, rather than being solid and immovable. It was a little over 20 bucks a pint, and I ended up buying two due to the fact that I had so much to fill with the speaker grille voids. If you are just filling cracks, one should be plenty.  Once the filler was dry, I sanded it first with a jitterbug sander and 60 grit, then moving to 120. Once I had the shape mostly accomplished, I moved to a hand block sanding. For the edges and for the vent holes and VIN window, I had to use a Dremel with a sanding attachment to get into the small places. This process was very similar to body work, if you've ever done any of that. I had to sand, reapply, and sand, and reapply to get it just right. I ended up with a "skim coat" of filler in the major areas to make sure that it feathered out enough to have a fairly uniform smoothness and surface. This process takes a lot longer to do than to describe. I probably spent 4-5 hours on this part over the course of a few days in order to let the filler cure properly. Once I had it the way I wanted it, I went over the entire dash with a jitterbug and 220 grit sandpaper. Then came a cleaning with wax and grease remover and two coats of plastic adhesion promoter.   Next came the texture coat. I used texture coat for a couple of reasons: first, I wanted to hide any minor differences in the surface and second, I had sanded off most of the previous texture. Oh, and I wanted my door panels to match texture-wise as well. I used SEM Texture Coat and gave it about 6 coats of texture. Then I gave it a light sanding with 800 grit to ensure a uniform appearance.   Next came the paint. I wanted to color match the red paint of the interior, so I had to spend a little more than I wanted on paint. I ended up getting PPG Deltron DBC which was around 100 bucks a pint. But I had enough for my dash, my door panels, and I think I have enough to do the rest of the plastic trim as well. The paint went on very nicely.   Here you can see how well it matched the original paint, that is the glove box under the dash:  When I painted the dash, I also painted the vent inserts (the square ones on top, not the heater/ac) after a couple of coats of plastic adhesion promoter. One mistake I made is that I hadn't sanded down the hole for the insert in one place good enough and when I pushed the insert down, it was a little tight, and I ended up with a hairline crack in the corner. I put some clearcoat on it, and don't expect it to cause any problems, and it's not really noticeable. Also, there were a couple of small cracks (less than a half of an inch) in some hard to see places that I missed until I painted it. They will likely be hidden by the trim/vents. I haven't put the dash back in yet, but all in all I'm pleased. There are a couple of places in which you can see a small difference in surface, but nothing to complain too much about. This wasn't a super-easy job, but I think it is very doable! If you have any questions, let me know, I'd love to help. |

|

|
|
01-13-2015, 02:44 PM
|
#2 |
|
Robert Olson Transport
 Join Date: Oct 2002
Location: recent transplant to NC USA
Posts: 20,345
|
Re: My DIY Dash Restoration
sent in as a tech tip thanks
__________________
Bob 1951 International running on a squarebody chassis "If a man's worth is judged by the people he associates himself with, then i am the richest man in the world knowing some of the fine people of this board" http://67-72chevytrucks.com/vboard/a...t.php?f=25&a=9 (you can review the site rules here!) PM Me for your vehicle/parts hauling needs in the North East US or see my Facebook page Robert Olson Transport Live each day to the fullest.. you never know when fate is going to pull the rug out from under you... I hate cancer!! |
|
|
|
|
01-13-2015, 02:48 PM
|
#3 |
|
Registered User
Join Date: Apr 2014
Location: Beaumont, TX
Posts: 34
|
Re: My DIY Dash Restoration
Thanks guys! Much appreciated. I've gotten some great help from this site, so I'm happy to help when I can.
|
|
|
|
|
01-13-2015, 02:57 PM
|
#4 |
|
Senior Member
 Join Date: Jul 2014
Location: Indy, IN
Posts: 637
|
Re: My DIY Dash Restoration
Awesome. Beats spending all that dough for a new one.
__________________
Andrew 1953 3100 292 T5 1985 K5 Blazer 350 700R4 208 |
|
|
|
|
01-13-2015, 03:14 PM
|
#5 |
|
Registered User
Join Date: May 2013
Location: Houston Texas
Posts: 713
|
Re: My DIY Dash Restoration
Nice!
|
|
|
|
|
01-13-2015, 05:11 PM
|
#6 |
|
Registered User
Join Date: Aug 2012
Location: Clovis, NM
Posts: 2,705
|
Re: My DIY Dash Restoration
Awesome job! That's something I may consider.
__________________
2018 Audi S5- wife's ride 1980 Chevy Scottsdale http://67-72chevytrucks.com/vboard/s...d.php?t=543511 1981 Chevy Silverado- in pieces 1964 Chevy c10 2017 Jeep Wrangler JKU |
|
|
|
|
01-13-2015, 05:26 PM
|
#7 |
|
Senior Member
Join Date: Jul 2000
Location: North Texas
Posts: 3,663
|
That is some very nice work! I may remove the wavy aftermarket cover on mine and see what I have to work with.
__________________
Mike 1969 C10 LWB -- owned for 36 years. 350/TH350, 3.08 posi, 1st Gen Vintage Air, recent AAW wiring harness, 5-lug conversion, 1985 spindles and brakes. 1982 C10 SWB -- converted from 250-six to roller cam 350, Vortec heads -- sold 1981 C10 Silverado LWB, 305, TH350C -- sold, but wish I still had it! 1969 C10 (not the current one) that I bought in the early 1980s. Paid $1200; sold for $1500 a few years later. Just a hint at the appreciation that was coming. Retired as a factory automation products salesman. Worked part-time over the years for an engine builder and a classic car repair shop. Member here for 24 years! This is the very first car/truck Internet forum I joined. I still used a dial-up modem back then! |
|
|
|
|
01-14-2015, 10:52 AM
|
#8 |
|
Registered User
Join Date: Apr 2014
Location: Beaumont, TX
Posts: 34
|
Re: My DIY Dash Restoration
Yeah, I think there are some ways to cut a little more cost than I did (paint, for example). But when I was looking at over $300 for a repop dash that MIGHT fit okay, this seemed like a good thing to try. I'll try to remember to put some pics up after I get it back in the truck.
|
|
|
|
|
01-14-2015, 12:30 PM
|
#9 |
|
Registered User
Join Date: Aug 2011
Location: Gallatin, TN
Posts: 782
|
Re: My DIY Dash Restoration
Is it just me or does anyone else see a red X instead of a picture?
__________________
77 C10, 6.0LS/4L80E, 3:73 12 bolt. Boss 338's 20" x 10" w/ 285/50/20 rear. 20" x 8.5" w/ 245/40/20 front. Vintage Air. Full Autometer gauges recessed in factory bezel (Thanks bigblock73!) Gm Storm Grey Metallic paint "Cool ain't ever cheap and cheap ain't ever cool" |
|
|
|
|
01-14-2015, 12:36 PM
|
#10 |
|
Registered User
Join Date: Apr 2014
Location: Beaumont, TX
Posts: 34
|
Re: My DIY Dash Restoration
Yes, somebody chime in here and let me know if the pictures are showing up. Maybe I need to fix something? It does show up for me though.
|
|
|
|
|
01-14-2015, 12:48 PM
|
#11 |
|
Registered User
Join Date: Aug 2011
Location: Gallatin, TN
Posts: 782
|
Re: My DIY Dash Restoration
Did you use photobucket?
__________________
77 C10, 6.0LS/4L80E, 3:73 12 bolt. Boss 338's 20" x 10" w/ 285/50/20 rear. 20" x 8.5" w/ 245/40/20 front. Vintage Air. Full Autometer gauges recessed in factory bezel (Thanks bigblock73!) Gm Storm Grey Metallic paint "Cool ain't ever cheap and cheap ain't ever cool" |
|
|
|
|
01-14-2015, 01:00 PM
|
#12 | |
|
Registered User
Join Date: Apr 2009
Location: New Freedom Pa.
Posts: 1,335
|
Re: My DIY Dash Restoration
Quote:
Desert |
|
|
|
|
|
01-14-2015, 01:03 PM
|
#13 |
|
Registered User
Join Date: Oct 2014
Location: somewhere . . .
Posts: 976
|
Re: My DIY Dash Restoration
now that is nice =0)
I rather do this than buying one that doesn't fit nor looks as nice ....
__________________
dont want to hear excuses, i want to hear solution(s) |
|
|
|
|
01-14-2015, 01:20 PM
|
#14 |
|
Registered User
Join Date: Apr 2014
Location: Beaumont, TX
Posts: 34
|
Re: My DIY Dash Restoration
77c10, no, I hosted them on my son's blog that he made about this truck.
Thanks everybody! |
|
|
|
|
01-14-2015, 01:26 PM
|
#15 | |
|
Registered User
Join Date: Aug 2011
Location: Gallatin, TN
Posts: 782
|
Re: My DIY Dash Restoration
Quote:
__________________
77 C10, 6.0LS/4L80E, 3:73 12 bolt. Boss 338's 20" x 10" w/ 285/50/20 rear. 20" x 8.5" w/ 245/40/20 front. Vintage Air. Full Autometer gauges recessed in factory bezel (Thanks bigblock73!) Gm Storm Grey Metallic paint "Cool ain't ever cheap and cheap ain't ever cool" |
|
|
|
|
|
01-14-2015, 01:27 PM
|
#16 |
|
Registered User
Join Date: Apr 2014
Location: Beaumont, TX
Posts: 34
|
Re: My DIY Dash Restoration
Sorry to post pics so scandalous that they didn't pass your filters!
 And thanks! |
|
|
|
|
01-14-2015, 02:05 PM
|
#17 |
|
Senior Member
Join Date: Apr 2009
Location: Lawrence KS
Posts: 821
|
Re: My DIY Dash Restoration
rock on.
__________________
1981 Chevy C30 440 Holmes 42K one owner miles |
|
|
|
|
01-15-2015, 08:48 AM
|
#18 |
|
Registered User
Join Date: Dec 2014
Location: Knoxville,TN
Posts: 54
|
Re: My DIY Dash Restoration
Looking good. Thanks for the info
|
|
|
|
|
01-15-2015, 11:12 AM
|
#19 |
|
Moderator
 Join Date: Oct 2008
Location: Wentworth, NH
Posts: 5,020
|
Re: My DIY Dash Restoration
If you're looking to have speaker grilles you could drill a pattern or two in some MDF or sheet metal and transfer them to the pad with a hand drill before you paint it with the texture coats. With a little care it'd look close to stock.
OTOH the speaker grilles are where the foam rot seems to start. That dash pad looks real good. Nice work...
__________________
1959 M35A2 LDT465-1D SOLD 1967 Dodge W200 B383, NP420/NP201 SOLD 1969 Dodge Polara 500 B383, A833 SOLD 1972 Ford F250 FE390, NP435/NP205 SOLD 1976 Chevy K20, 6.5L, NV4500/NP208 SOLD 1986 M1008 CUCV SOLD 2000 GMC C2500, TD6.5L, NV4500 2005 Chevy Silverado LS 2500HD 6.0L 4L80E/NP263 2009 Impala SS LS4 V8 RTFM... GM Parts Books, GM Schematics, GM service manuals, and GM training materials...
And please let us know if and how your repairs were successful. |
|
|
|
|
01-15-2015, 11:22 AM
|
#20 |
|
Registered User
Join Date: Apr 2014
Location: Beaumont, TX
Posts: 34
|
Re: My DIY Dash Restoration
Hatzie,
That's a good point, and I had considered doing that. I decided that it would take a long time to drill those holes, and like you said, the more edges, the more likely cracking would happen again. I didn't know how it would turn out when I started, so I decided to eliminate all that work drilling in case it was a disaster in the end. But I agree, if someone wanted a true stock look, I bet you could pull that off. And thanks! |
|
|
|
|
01-15-2015, 11:38 AM
|
#21 |
|
Post Whore
Join Date: Aug 2014
Location: Sacramento, CA
Posts: 10,884
|
Re: My DIY Dash Restoration
I got next!,
Meaning I am on my way over to your house with my piece of junk dash for you to repair it, let me just get my pants! Outstanding work mate, the best I have seen and I have watched enough YouTube videos on this to make me a self proclaimed dash pad repair expert. |
|
|
|
|
01-15-2015, 12:20 PM
|
#22 |
|
Registered User
Join Date: Apr 2014
Location: Beaumont, TX
Posts: 34
|
Re: My DIY Dash Restoration
Wow, thanks Gregski! I appreciate your kind words. And I appreciate you adhering to social protocol by wearing pants!
|
|
|
|
|
01-15-2015, 02:20 PM
|
#23 |
|
Registered User
Join Date: Mar 2014
Location: West Monroe, Louisiana
Posts: 79
|
Re: My DIY Dash Restoration
Dash turned out great, thanks for sharing.
|
|
|
|
|
01-22-2015, 08:57 AM
|
#24 |
|
Registered User
Join Date: Nov 2014
Location: Boston
Posts: 139
|
Re: My DIY Dash Restoration
Wow... This looks really great. Beginning to end, how long did this take and how much did it cost?
|
|
|
|
|
01-22-2015, 12:13 PM
|
#25 |
|
Registered User
Join Date: Apr 2014
Location: Beaumont, TX
Posts: 34
|
Re: My DIY Dash Restoration
Thanks!
I had several things going on at once, so I think it took me about a week or so overall. If I were focused on it alone, I probably could have knocked it out in about 4 days, sooner if I didn't choose to let the filler cure overnight. It would be feasible to knock it out over a weekend, or over the course of a week during the evenings after work. Cost-wise, here are my estimates: Can of spray foam insulation - $6 Filler - $50 Plastic adhesion promoter - $20 Texture coat - $25 Paint - $120 You could probably get by on less filler depending on your project (about 25 bucks a pint), and the adhesion promoter and texture coat was enough to do all my plastic parts as well. The paint I used was expensive because I color matched it, but I also bought some black interior paint for 35 bucks. The paint covered all my interior parts as well. Here is the dash installed:   The bad news and a caveat... I moved the dash in and out a lot due to some windshield installation issues, and other trim work. This caused me a couple of problems. Because I flexed it so much moving it in and out between the cab pillars, a small crack started from the corner of the vent grill on the drivers side. I'm absolutely convinced this is because I flexed the dash too hard and too often. I also dropped it (yep, I'm an idiot) and there is a small crack on the edge on the passenger side. Finally, I almost dropped it again (yep, idiocy confirmed) and when I grabbed it I found a soft spot and caused a small crack. I say all that to say 1. Be careful! and 2. Remember that your dash is still old, and unless you recover the entire thing with filler, there may still be some soft spots you weren't aware of in the old material. All in all, those cracks are barely noticeable (except to me, which ticks me off!) and the dash looks pretty good installed! |
|
|
|
|
| Bookmarks |
|
|


 Linear Mode

