
 |
Register or Log In To remove these advertisements. |
|
|
|
|||||||
 |
|
|
Thread Tools | Display Modes |
|
|
#51 |
|
Senior Member
 Join Date: Jul 2012
Location: Oblong, Illinois
Posts: 7,028
|
Re: 1968 Chevy Bel Air Wagon Project
Best of luck in achieving your goal! Sounds like a fun time.
Great job on the tail lights and the bumper. Excellent work! |
|
|

|
|
|
#52 |
|
Registered User
Join Date: Apr 2015
Location: Finland
Posts: 133
|
Re: 1968 Chevy Bel Air Wagon Project
Thank you Ol Blue K20 and Advanced Design. I really hope that I
can make it. I just had winter vacation the last week, and it went by real fast. I got the tail lights done, and some granding and sanding, not much else. Just got to keep on every night, I guess. Anyway, I think it looks even better now, with the tail gate stripped and sanded. 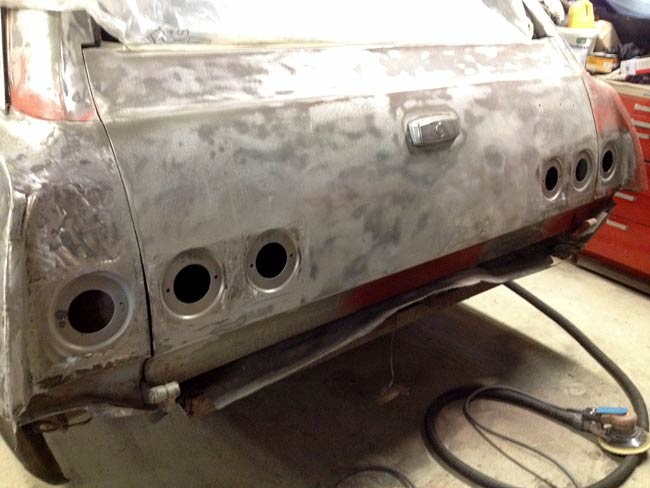 It's soon time for the first epoxy to go on. Last edited by flatbed67; 03-05-2019 at 04:45 AM. |
|
|

|
|
|
#53 |
|
Proprietor of Dale's Corner
 Join Date: Nov 2012
Location: Vacaville , CA
Posts: 16,246
|
Re: 1968 Chevy Bel Air Wagon Project
Looks great! You have a great start on your goal.
__________________
"Some Days Chickens And Some Days Feathers" Dale XNGH ECV Sam Brannan 1004 R.I.P. 67ChevyRedneck R.I.P. Grumpy Old Man R.I.P. FleetsidePaul |
|
|

|
|
|
#54 |
|
Registered User
Join Date: Apr 2015
Location: Finland
Posts: 133
|
Re: 1968 Chevy Bel Air Wagon Project
Thank you Ol Blue K20, it's getting pretty close to the first coat of epoxy
primer. I got the grille removed today, and it should be one of the last things that has to be removed before paint. The rear side windows have to be removed too, the glue strips have dried out on both sides, so they hang by the top and sides only. After that, hopefully, it will be mostly "progress", in that to this point, I've been removing parts from the car almost daily. 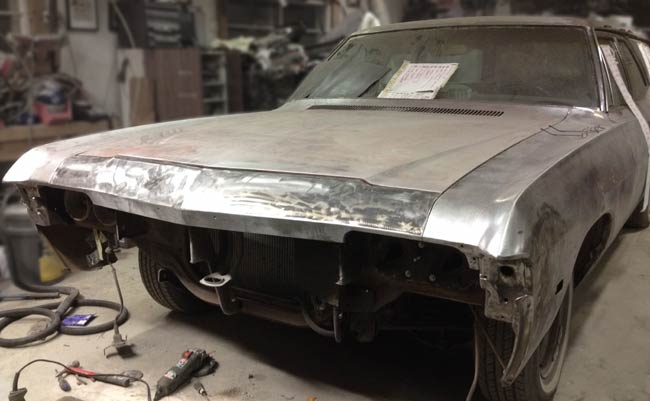
|
|
|

|
|
|
#55 |
|
Post Whore
  Join Date: May 2015
Location: Alabama
Posts: 14,674
|
Re: 1968 Chevy Bel Air Wagon Project
The recessed taillights are a nice touch...most people would never know it was a custom mod...
__________________
Mongo...aka Greg RIP Dad RIP Jesse 1981 C30 LQ9 NV4500..http://67-72chevytrucks.com/vboard/s...d.php?t=753598 Mongos AD- LS3 TR6060...http://67-72chevytrucks.com/vboard/s...34#post8522334 Columbus..the 1957 IH 4x4...http://67-72chevytrucks.com/vboard/s...63#post8082563 2023 Chevy Z71..daily driver |
|
|

|
|
|
#56 |
|
Proprietor of Dale's Corner
 Join Date: Nov 2012
Location: Vacaville , CA
Posts: 16,246
|
Re: 1968 Chevy Bel Air Wagon Project
Now the fun begins...
|
|
|

|
|
|
#57 |
|
Registered User
Join Date: Apr 2015
Location: Finland
Posts: 133
|
Re: 1968 Chevy Bel Air Wagon Project
My aim is to make it look kinda factory, so people who don't know Chevrolets
that good won't notice, as you said, mongocanfly. '68 Chevrolets are rare here, so it might just work  And yup, Ol Blue K20, the fun has begun! Honestly, spraying epoxy isn't the most fun thing you can do, but at least it feels like progress. In a couple days I hope to be able to block the better looking parts of the body, and then start working with body filler. It will probably take a copious amount of body filler to make this sea of sheetmetal look any kind of straight. Not only because of its size, but also, since it's been dented in all corners, and along the right hand side, the roof has been welded on, and someone sandblasted the bejeezus out of the hood. 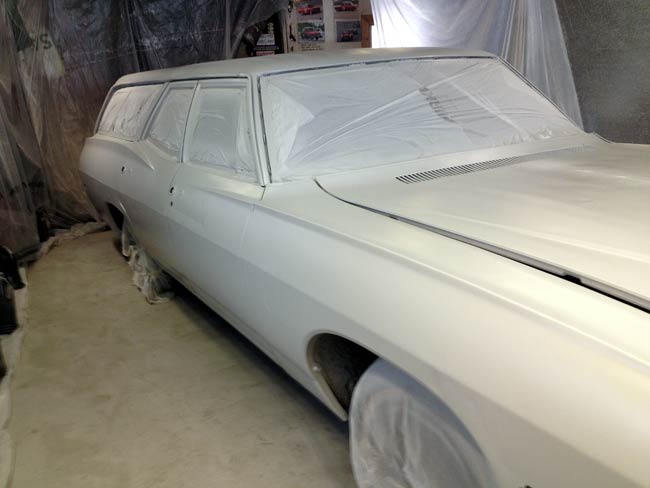 It looks better already. Amazing what a uniform color can do. |
|
|

|
|
|
#58 |
|
Proprietor of Dale's Corner
 Join Date: Nov 2012
Location: Vacaville , CA
Posts: 16,246
|
Re: 1968 Chevy Bel Air Wagon Project
Much better.
__________________
"Some Days Chickens And Some Days Feathers" Dale XNGH ECV Sam Brannan 1004 R.I.P. 67ChevyRedneck R.I.P. Grumpy Old Man R.I.P. FleetsidePaul |
|
|

|
|
|
#59 |
|
Senior Member
 Join Date: Dec 2009
Location: TN.
Posts: 8,451
|
Re: 1968 Chevy Bel Air Wagon Project
Great job.
It is taking shape.  Looks like you will have it ready for your cruise.
__________________
________________________________________________________________________________________ ____________________________________________ 84 Chevy K-20 63 Impala (my high school car) http://67-72chevytrucks.com/vboard/s...Crew Cab Build |
|
|

|
|
|
#60 |
|
Registered User
Join Date: Oct 2014
Location: somewhere . . .
Posts: 974
|
Re: 1968 Chevy Bel Air Wagon Project
nice progress and keep those foto(s) coming ....
__________________
dont want to hear excuses, i want to hear solution(s) |
|
|

|
|
|
#61 |
|
Registered User
Join Date: Apr 2015
Location: Finland
Posts: 133
|
Re: 1968 Chevy Bel Air Wagon Project
Not really much to show, photowise, just can after can of poyester filler going
on the hood. I didn't realize how big the dents still were. In any case it starts looking like a hood again. Good thing is, after the hood is done, the rest will be easy. Yeah, I know, I'm just trying to kid myself. 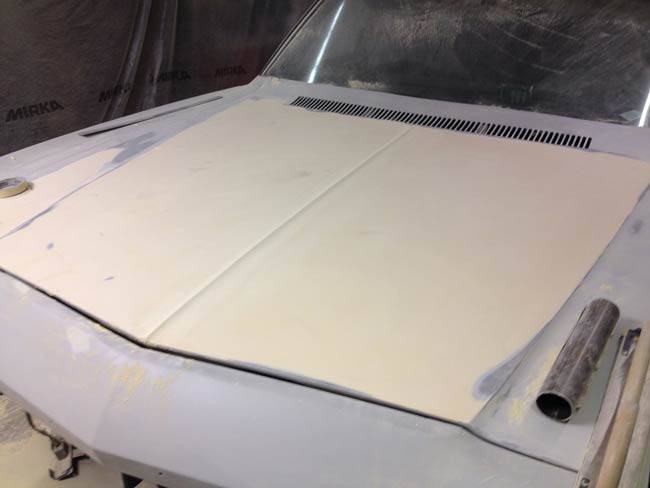
|
|
|

|
|
|
#62 |
|
Proprietor of Dale's Corner
 Join Date: Nov 2012
Location: Vacaville , CA
Posts: 16,246
|
Re: 1968 Chevy Bel Air Wagon Project
Looking good, keep going and keep posting your progress
__________________
"Some Days Chickens And Some Days Feathers" Dale XNGH ECV Sam Brannan 1004 R.I.P. 67ChevyRedneck R.I.P. Grumpy Old Man R.I.P. FleetsidePaul |
|
|

|
|
|
#63 |
|
Registered User
Join Date: Apr 2015
Location: Finland
Posts: 133
|
Re: 1968 Chevy Bel Air Wagon Project
You probably won't beleive this, four pounds per can:
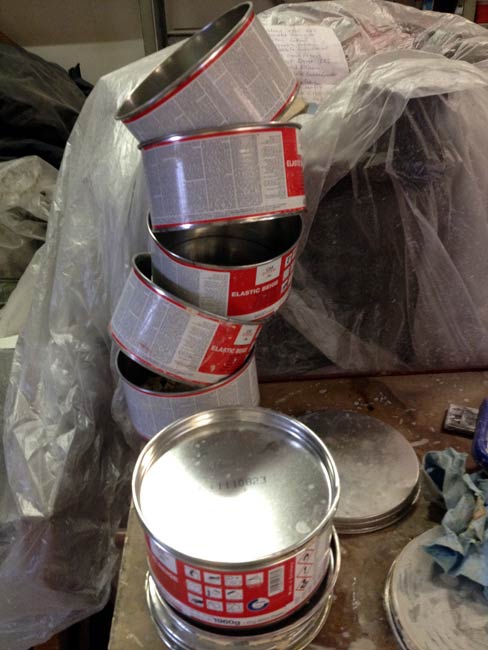 This pic is taken before I started woking on the front piece, which too is/was pretty dented, and needed a nice amount of filler. I'll post a pic when it's done, in a few days. I think I'll avoid dents, next time I buy a project car... |
|
|

|
|
|
#64 |
|
Registered User
 Join Date: May 2004
Location: Miss Co Arkansas
Posts: 679
|
Re: 1968 Chevy Bel Air Wagon Project
Shaping up nicely!
__________________
76/77/78 Cheyenne 1997 K3500 454 soon to be 496 |
|
|

|
|
|
#65 |
|
Registered User
Join Date: Apr 2015
Location: Finland
Posts: 133
|
Re: 1968 Chevy Bel Air Wagon Project
Slow progress now, even if I'm in the shop several hours almost every day of the
week. I had to make a composite photo to convince myself that I am making some kind of progress. 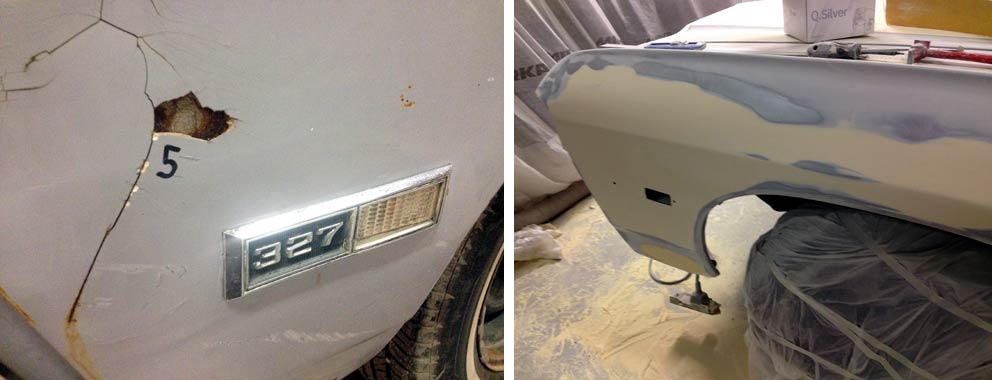 To the left a pic from when I started working on the wagon. Five millimeters of bondo on the front of the fender, a bit less than a quarter of an inch. I did some bumping and hitting from the inside, and got it decimated by a lot. It looks like a lot of bondo in the new pic too, but it's more the acerage than the thickness. The left side is shaping up, and I put on the first filler in all the places that needed it on the right hand side today. Actually looks like there's less work on that side. The roof is getting close too. |
|
|

|
|
|
#66 |
|
Registered User
Join Date: Apr 2015
Location: Finland
Posts: 133
|
Re: 1968 Chevy Bel Air Wagon Project
I noticed that I hadn't posted a pic of the hood and front piece after I had them
done. I decided to go all out Kustom and made the hood peak continue over to the front piece. Might as well have some fun while I'm at it  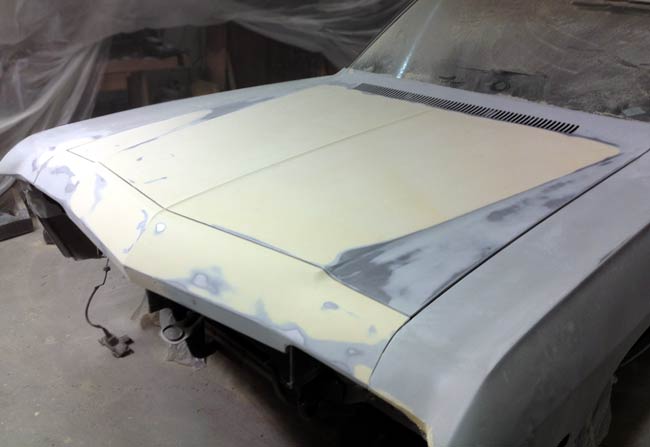
|
|
|

|
|
|
#67 |
|
Registered User
Join Date: Apr 2015
Location: Finland
Posts: 133
|
Re: 1968 Chevy Bel Air Wagon Project
It's been less than three weeks since I epoxied the wagon, and started filling
and sanding. It already feels like an eternity. There's not one piece of sheet metal on this car that isn't either dinged, welded, crashed or smashed, so it's been a lot of work, even if the result won't be anything close to perfect. Getting close, only the tail and right hand side rear quarter to go before moving on to the next stage. Here's a pic of the tail gate and rear corner. Pretty work intense details. 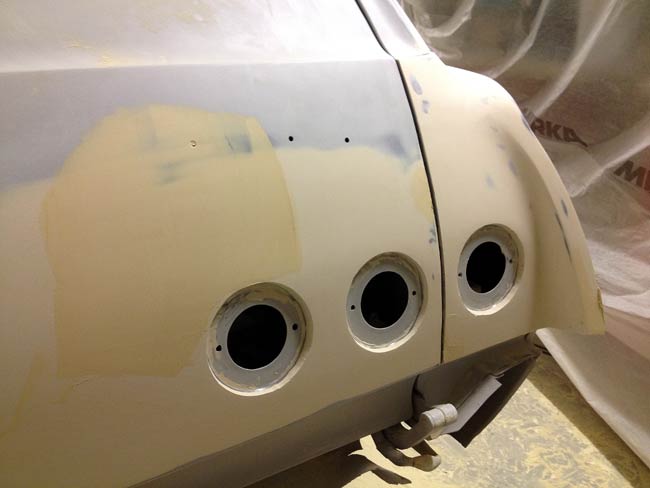 And yes, before anybody comments, I do bondo better than sheet metal 
|
|
|

|
|
|
#68 |
|
Proprietor of Dale's Corner
 Join Date: Nov 2012
Location: Vacaville , CA
Posts: 16,246
|
Re: 1968 Chevy Bel Air Wagon Project
Looks pretty good. There's a lot details in that corner
__________________
"Some Days Chickens And Some Days Feathers" Dale XNGH ECV Sam Brannan 1004 R.I.P. 67ChevyRedneck R.I.P. Grumpy Old Man R.I.P. FleetsidePaul |
|
|

|
|
|
#69 |
|
Senior Member
 Join Date: Jul 2012
Location: Oblong, Illinois
Posts: 7,028
|
Re: 1968 Chevy Bel Air Wagon Project
Wow, you are putting in the hours on this one! Going to be nice when you get to paint stage.
|
|
|

|
|
|
#70 |
|
Registered User
Join Date: Apr 2015
Location: Finland
Posts: 133
|
Re: 1968 Chevy Bel Air Wagon Project
Thank you Ol Blue K20, lots of shaping, round corners and stuff. Almost
there on this side now, I just had to fill a few pin holes a few moments ago, so they will be sanded tomorrow. Nice of you to notice, Advanced Design  Every day in the shop the last Every day in the shop the last three weeks, save for a couple days when I have been busy otherways. 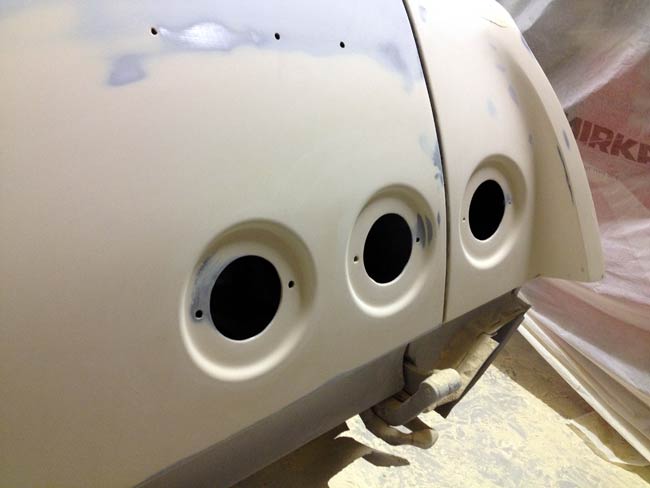 Still some sanding to do on the left hand side tail light recesses. Roof is done too, so only the right hand side rear quarter still to do, and then it's time to undust the garage for another layer of epoxy. I have cheap epoxy, and will use it as sanding sealer before the paint goes on. |
|
|

|
|
|
#71 |
|
Proprietor of Dale's Corner
 Join Date: Nov 2012
Location: Vacaville , CA
Posts: 16,246
|
Re: 1968 Chevy Bel Air Wagon Project
It's looking good.....
__________________
"Some Days Chickens And Some Days Feathers" Dale XNGH ECV Sam Brannan 1004 R.I.P. 67ChevyRedneck R.I.P. Grumpy Old Man R.I.P. FleetsidePaul |
|
|

|
|
|
#72 |
|
Registered User
Join Date: Apr 2015
Location: Finland
Posts: 133
|
Re: 1968 Chevy Bel Air Wagon Project
Thank you Ol Blue K20.
Everything checked on the to do list! The fill&sand list, that is. The wagon was backed out of the garage for some air, as the garage floor was washed. Actually a good idea to blow off the dust outside. Obviously. 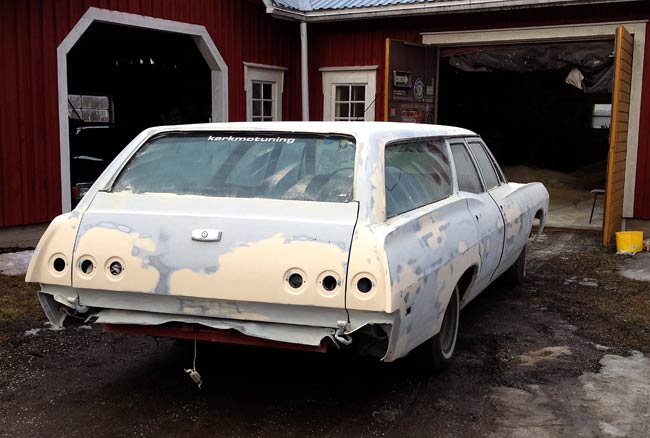 At this moment, almost everything is masked off, ready for another coat of epoxy which is planned to go on tomorrow. Fun thing: When the car was outside, I was kinda planning to get out. No handles or cranks! I was just going to call a pal, when I got the good idea of opening the tail gate window as a blan B. I finally got the door open pretty easily by sticking my hand in through a hole and getting the latch mechanism to unlatch. Sometimes you just get yourself into trouble 
|
|
|

|
|
|
#73 | |
|
Proprietor of Dale's Corner
 Join Date: Nov 2012
Location: Vacaville , CA
Posts: 16,246
|
Re: 1968 Chevy Bel Air Wagon Project
Quote:
__________________
"Some Days Chickens And Some Days Feathers" Dale XNGH ECV Sam Brannan 1004 R.I.P. 67ChevyRedneck R.I.P. Grumpy Old Man R.I.P. FleetsidePaul |
|
|
|

|
|
|
#74 |
|
Registered User
Join Date: Apr 2015
Location: Finland
Posts: 133
|
Re: 1968 Chevy Bel Air Wagon Project
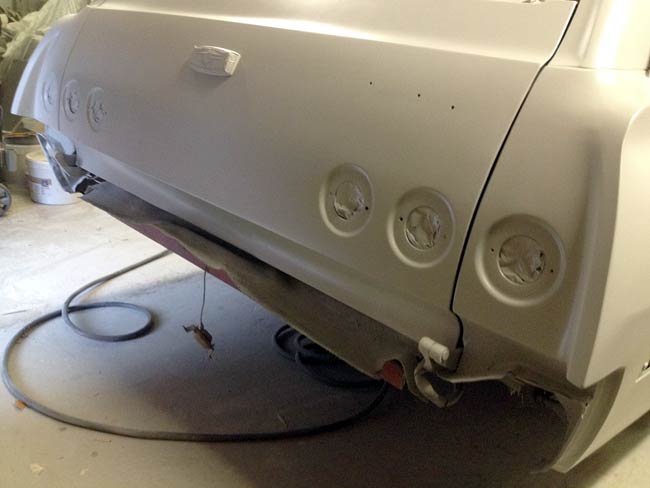
Epoxied, according to plan.
|
|
|

|
|
|
#75 |
|
Proprietor of Dale's Corner
 Join Date: Nov 2012
Location: Vacaville , CA
Posts: 16,246
|
Re: 1968 Chevy Bel Air Wagon Project
Awesome headway
__________________
"Some Days Chickens And Some Days Feathers" Dale XNGH ECV Sam Brannan 1004 R.I.P. 67ChevyRedneck R.I.P. Grumpy Old Man R.I.P. FleetsidePaul |
|
|

|
 |
| Bookmarks |
|
|