
|
 01-04-2026, 07:03 PM
|
#476 |
|
Senior Member
 Join Date: Sep 2017
Location: Bryan, Texas
Posts: 2,522
|
Re: Long Time Coming......
Nice work!
__________________
8man-aka Robert 1948 on a S10 Frame, small block with a carb 1954 Cab, 53 Front and Bed, 50 Doors, S10 Frame, Power TBD Build thread: "]http://67-72chevytrucks.com/vboard/showthread.php?t=746899&highlight=wife%27s+48[/URL] [/URL]http://67-72chevytrucks.com/vboard/showthread.php?t=840204 |

|

|
|
01-05-2026, 06:47 PM
|
#477 |
|
Registered User
Join Date: Feb 2021
Location: WestCentral MN,
Posts: 50
|
Re: Long Time Coming......
This is exactly the situation I would break out the lead as a demo to my students. (the leadlight area)
Block sanding plastic filler on a compound curve doesn't sound like a whole lotta fun either..... I don't envy you there. |
|
|
|
|
01-06-2026, 11:28 PM
|
#478 |
|
Registered User
Join Date: Nov 2010
Location: calgary alberta
Posts: 9,039
|
Re: Long Time Coming......
nice work on the inner fender mount. better to make a new piece like you did than do a bunch on extra welding, adding all that heat and extra chance of a problem.
thanks for posting the pics as well as the explanation. great work as always. |
|
|
|
|
01-10-2026, 07:01 AM
|
#479 | |||
|
Registered User
Join Date: Jan 2022
Location: Conn.
Posts: 297
|
Re: Long Time Coming......
Quote:
Quote:
Quote:
__________________
Glenn 1951 3100, Area51 1955 BelAir, 4EVER17 1987 R10, Ethel Copper Hill Rod & Custom http://67-72chevytrucks.com/vboard/s...d.php?t=829856 |
|||
|
|
|
|
01-10-2026, 07:10 AM
|
#480 |
|
Registered User
Join Date: Jan 2022
Location: Conn.
Posts: 297
|
Re: Long Time Coming......
This week I brought the front stone guard and both running boards to school. With the help of my juniors we stripped them of all the black primer that is on them. These are aftermarket parts and I don't trust their processes and primer. So I strip them, metal prep wash and then black epoxy.
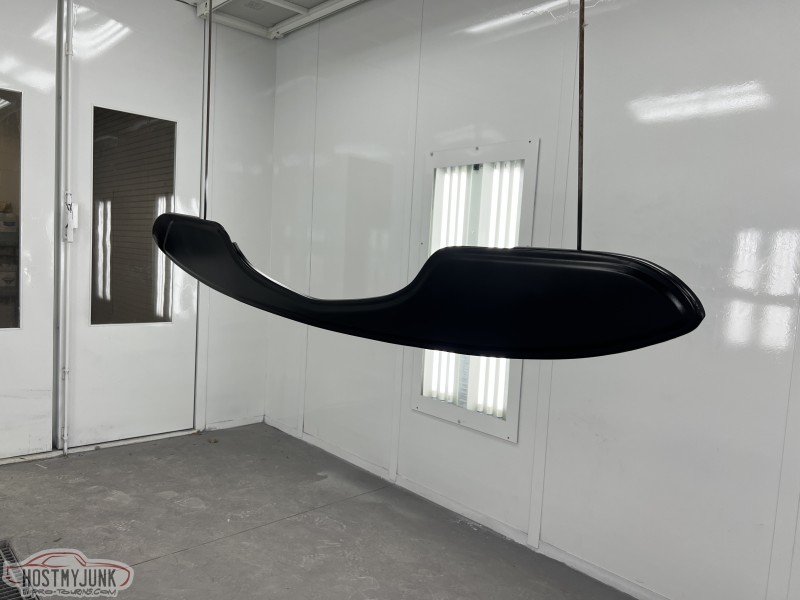 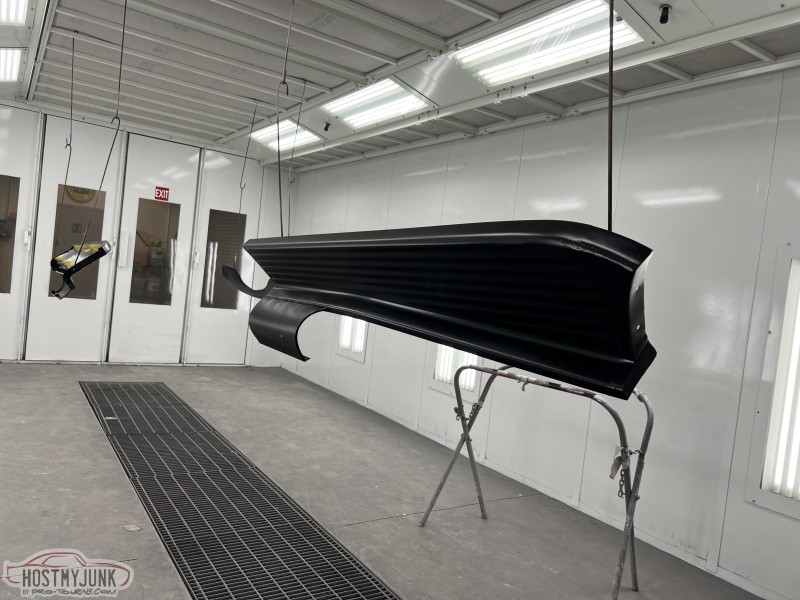 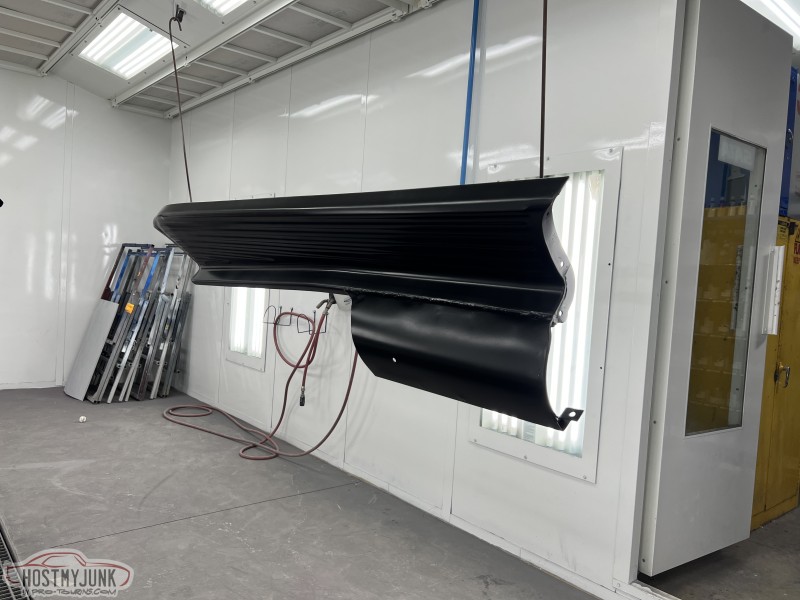 After letting them sit in the bed overnight, I then sprayed three coats of primer surfacer. 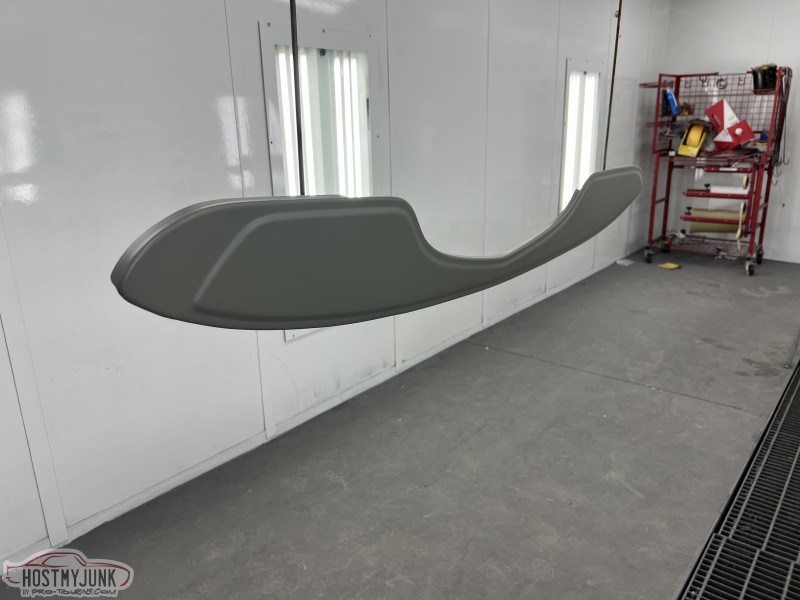 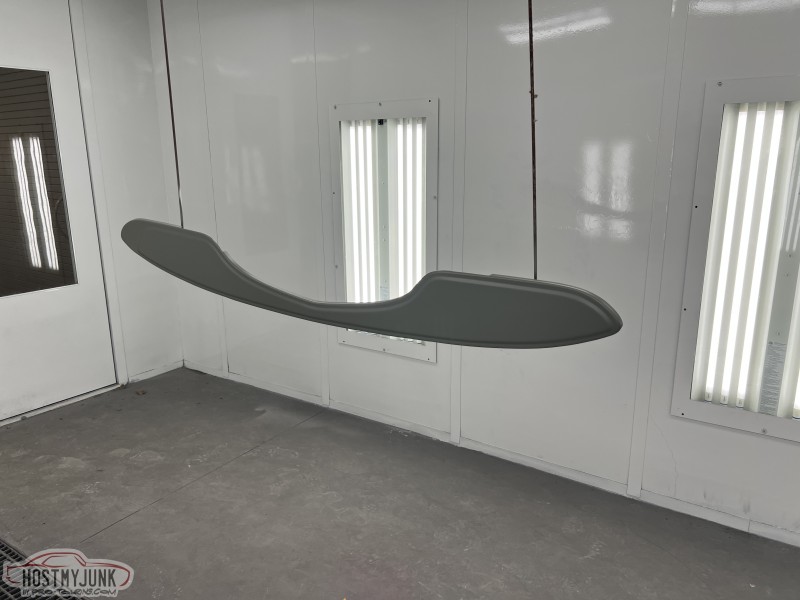 I moved the boards to a stand to lay flat so I could apply only the higher-build primer to the top surfaces. Having them this way allows me a better chance to spray them how I want. 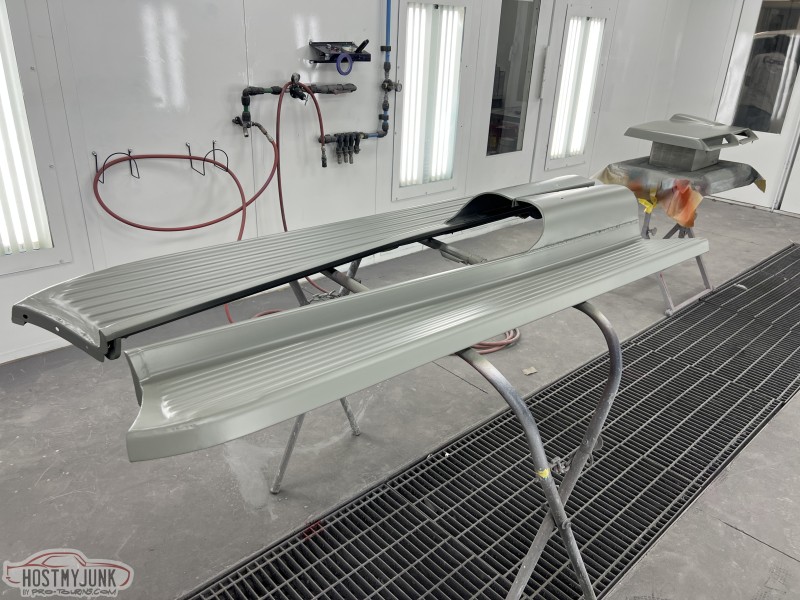
__________________
Glenn 1951 3100, Area51 1955 BelAir, 4EVER17 1987 R10, Ethel Copper Hill Rod & Custom http://67-72chevytrucks.com/vboard/s...d.php?t=829856 |
|
|
|
|
01-11-2026, 07:42 PM
|
#481 |
|
Registered User
Join Date: Jan 2022
Location: Conn.
Posts: 297
|
Re: Long Time Coming......
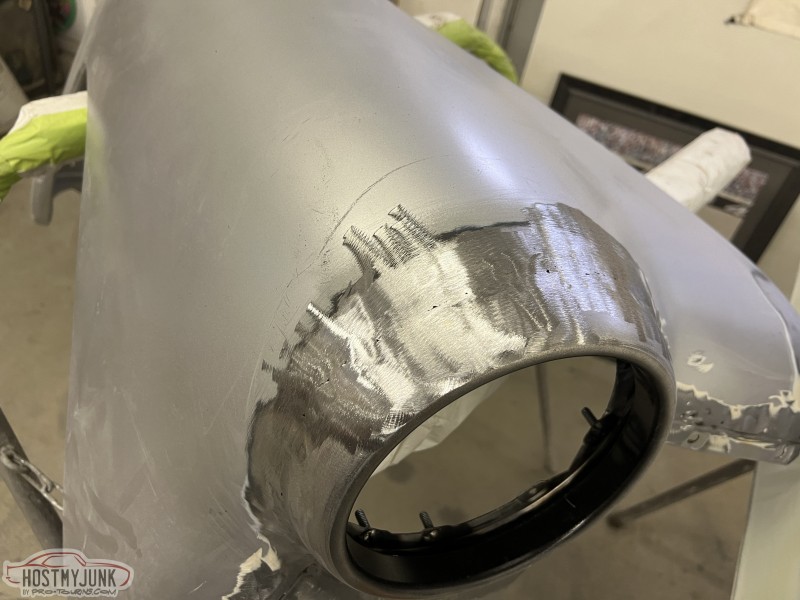
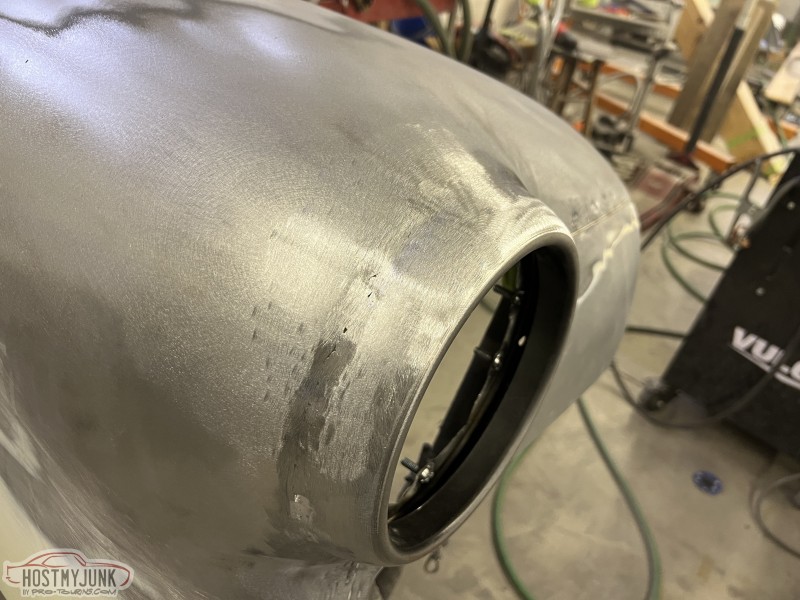
Progress this weekend. I removed both front fenders and got the final welding done on the headlight frenching rings. Tomorrow morning I will take them to school and have my students strip them to bare metal so we can get them in epoxy and surfacer this week.
   I am also working on the rear bumper and making my own bumper brackets that will tuck the bumper closer in. I have going pretty well but ran out of the steel I am using for the brackets. More later when I have it done and can share it all the way through. .
__________________
Glenn 1951 3100, Area51 1955 BelAir, 4EVER17 1987 R10, Ethel Copper Hill Rod & Custom http://67-72chevytrucks.com/vboard/s...d.php?t=829856 |
|
|
|
|
01-12-2026, 10:47 AM
|
#482 |
|
Senior Member
Join Date: Sep 2017
Location: Bryan, Texas
Posts: 2,522
|
Re: Long Time Coming......
The welding/finishing looks good. I think your labor pool is much deeper than mine.
__________________
8man-aka Robert 1948 on a S10 Frame, small block with a carb 1954 Cab, 53 Front and Bed, 50 Doors, S10 Frame, Power TBD Build thread: "]http://67-72chevytrucks.com/vboard/showthread.php?t=746899&highlight=wife%27s+48[/URL] [/URL]http://67-72chevytrucks.com/vboard/showthread.php?t=840204 |
|
|
|
|
01-12-2026, 04:59 PM
|
#483 | |
|
Registered User
Join Date: Jan 2022
Location: Conn.
Posts: 297
|
Re: Long Time Coming......
Quote:
__________________
Glenn 1951 3100, Area51 1955 BelAir, 4EVER17 1987 R10, Ethel Copper Hill Rod & Custom http://67-72chevytrucks.com/vboard/s...d.php?t=829856 |
|
|
|
|
|
01-15-2026, 05:11 PM
|
#484 |
|
Registered User
Join Date: Jan 2022
Location: Conn.
Posts: 297
|
Re: Long Time Coming......
I brought the fenders to school Monday. With the help of my students, we got them stripped to bare metal, cleaned, and hung in the booth.
 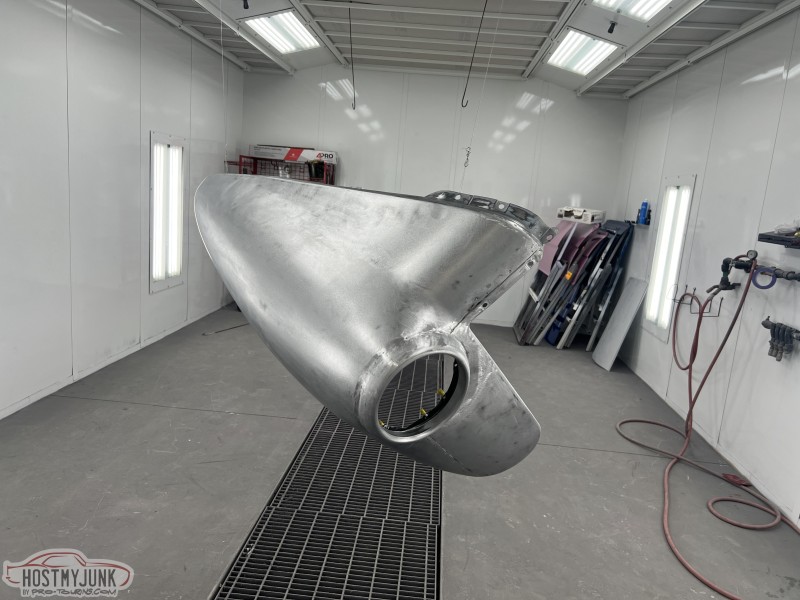 I then sprayed two coats of black epoxy inside and out. 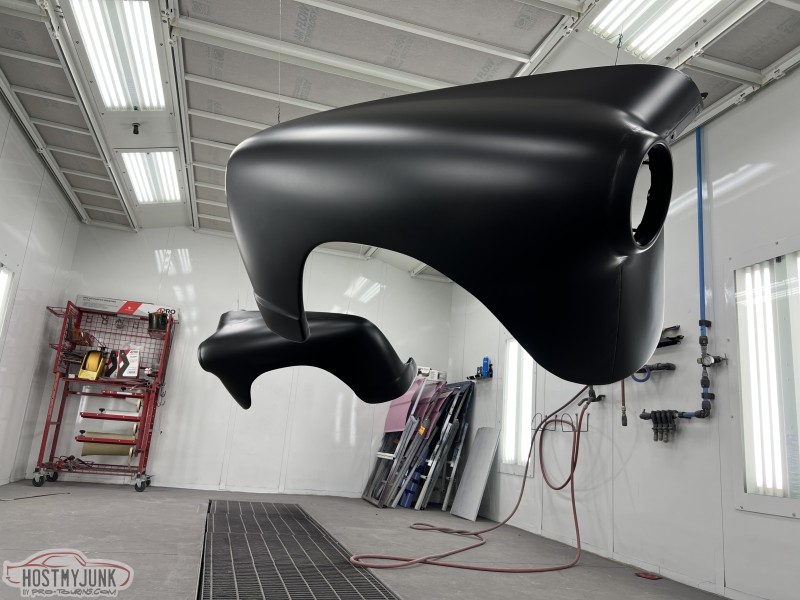 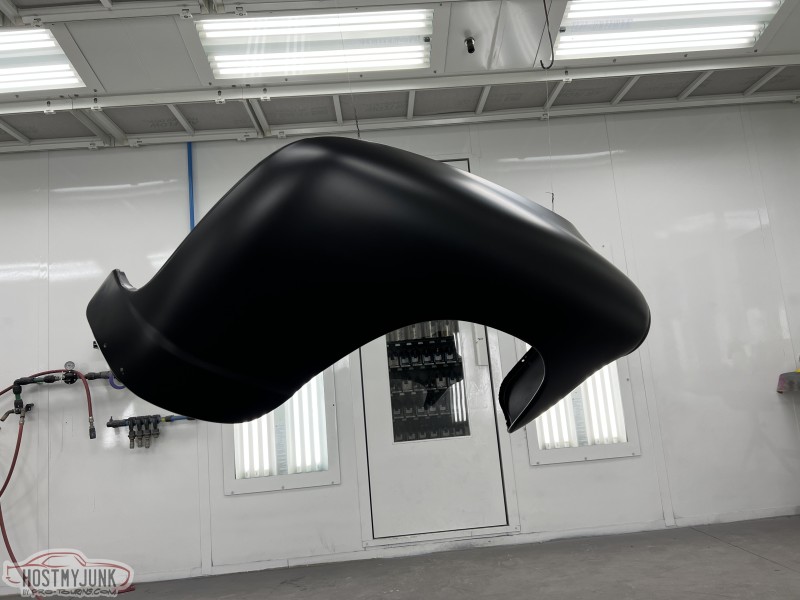 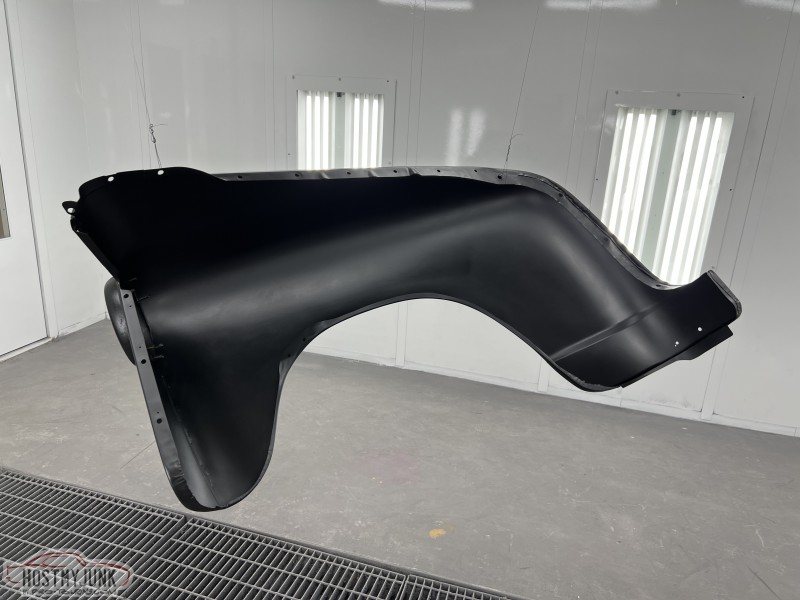 The next day, I took them down and mounted them on a stand to spray 3 coats of primer surfacer on the outside only. 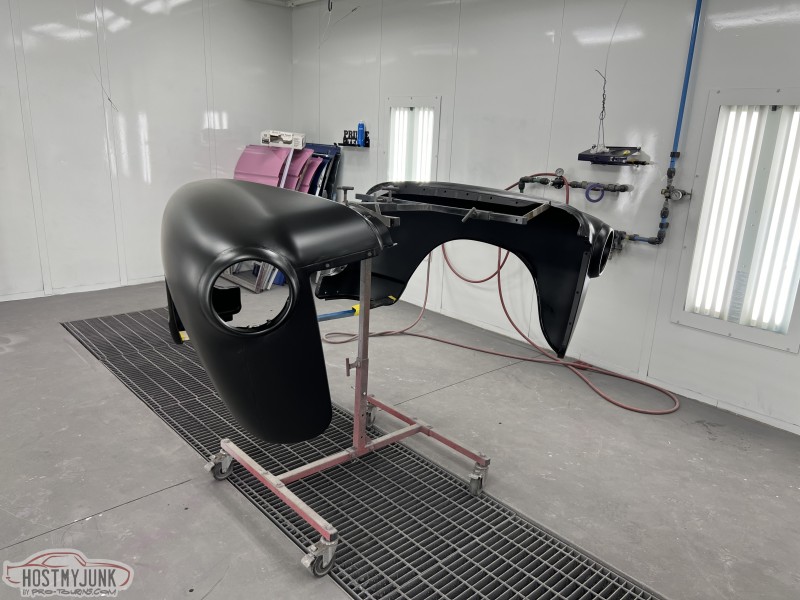 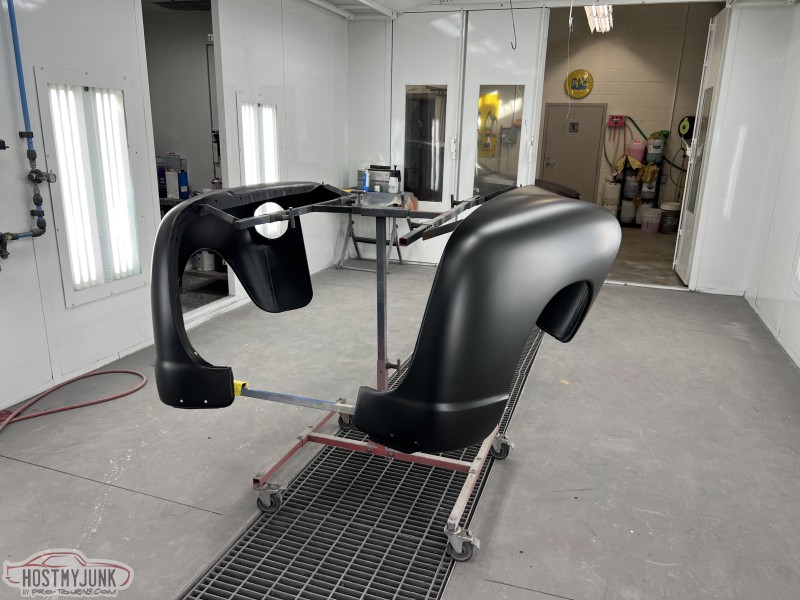  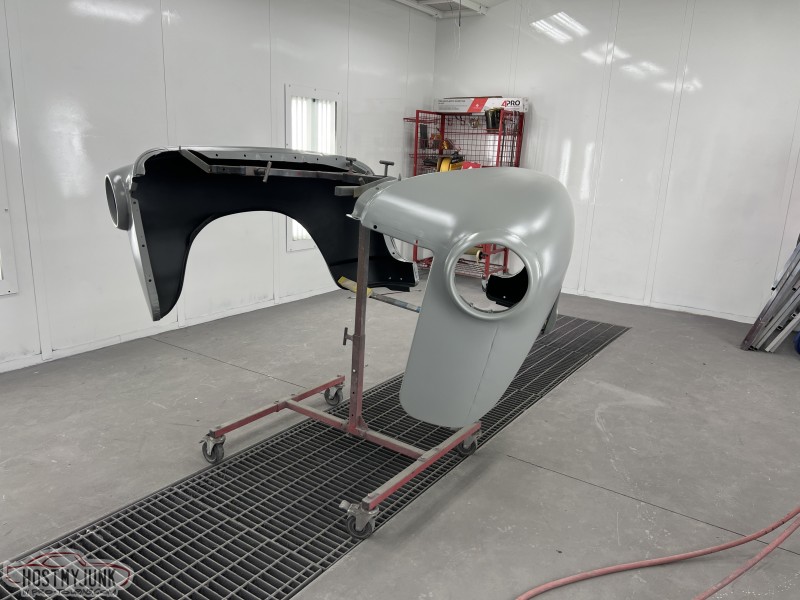 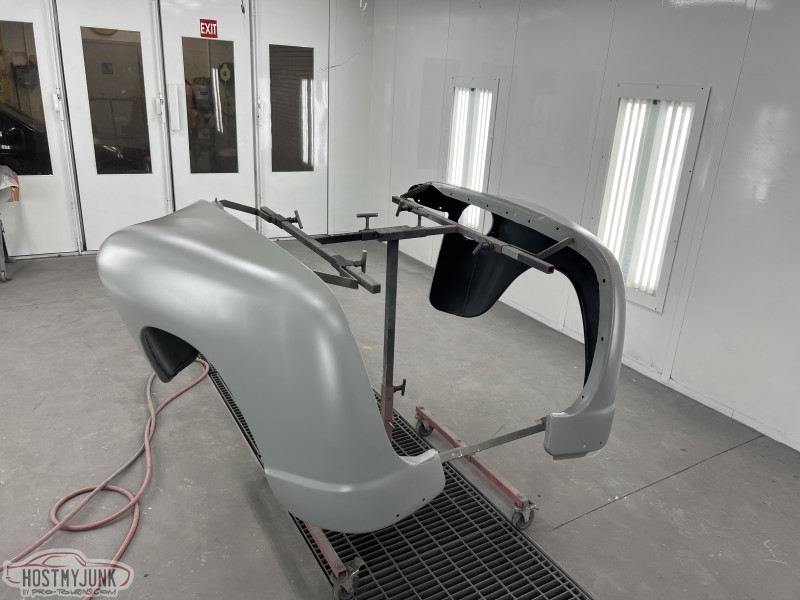 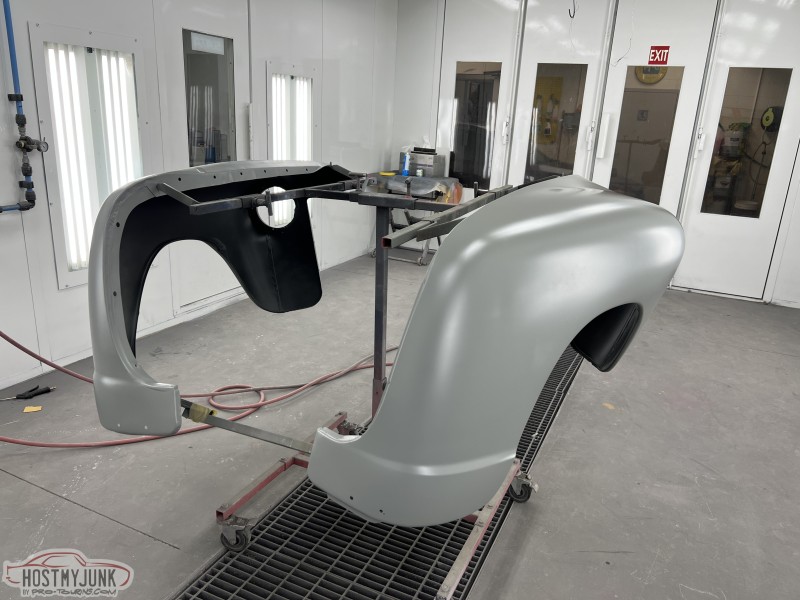
__________________
Glenn 1951 3100, Area51 1955 BelAir, 4EVER17 1987 R10, Ethel Copper Hill Rod & Custom http://67-72chevytrucks.com/vboard/s...d.php?t=829856 |
|
|
|
|
01-19-2026, 03:10 PM
|
#485 |
|
Registered User
Join Date: Jan 2022
Location: Conn.
Posts: 297
|
Re: Long Time Coming......
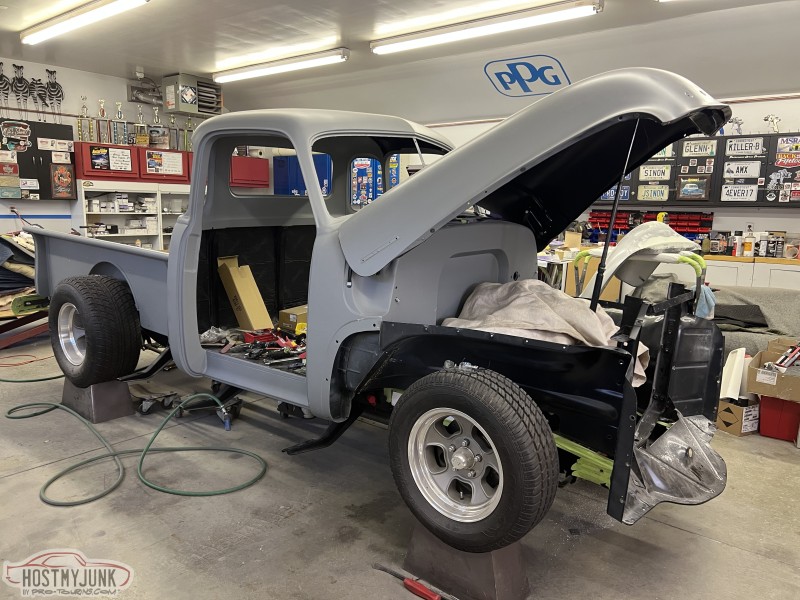
Even though I had a three day weekend I only got a few hours in the shop. I hung the passenger door, not latched here yet, then moved to hanging the front fenders so they are nice and stable for doing body filler work.
I also got it down off the blocks to see how it looks as it is now in one color, and I wanted to check the stance. 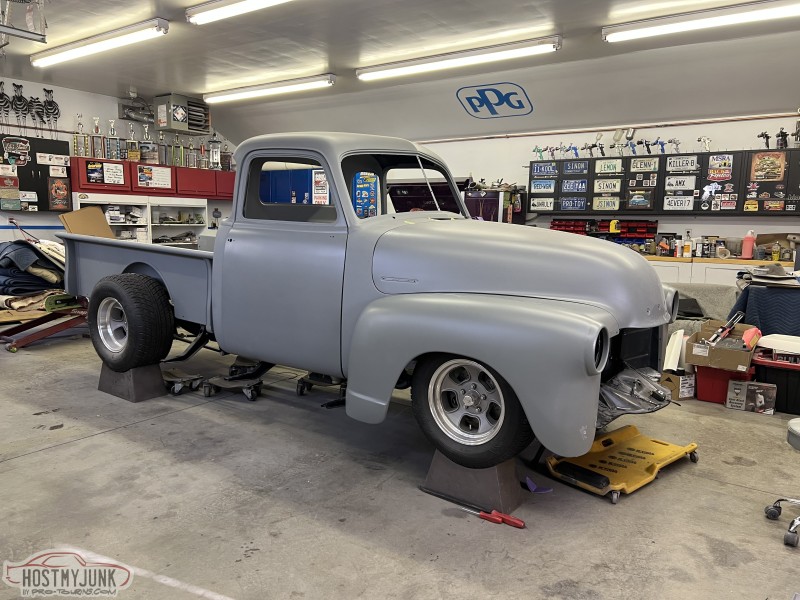 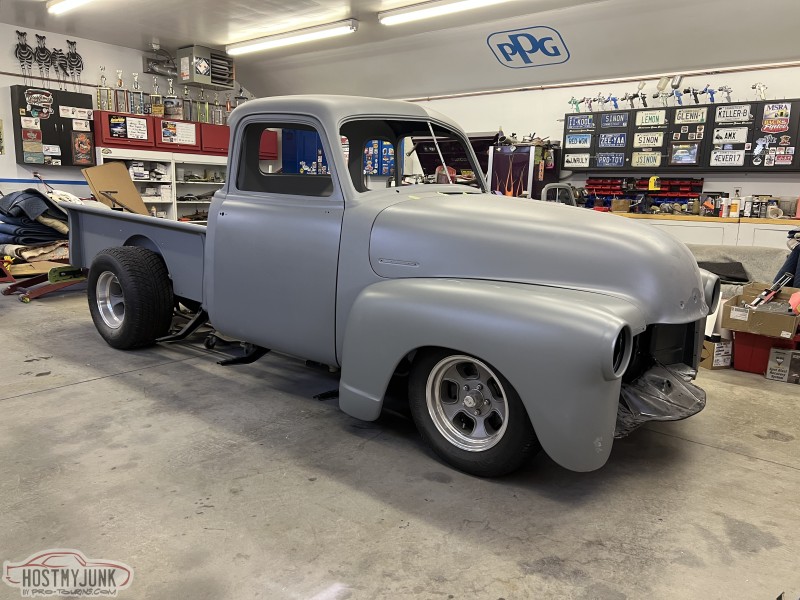 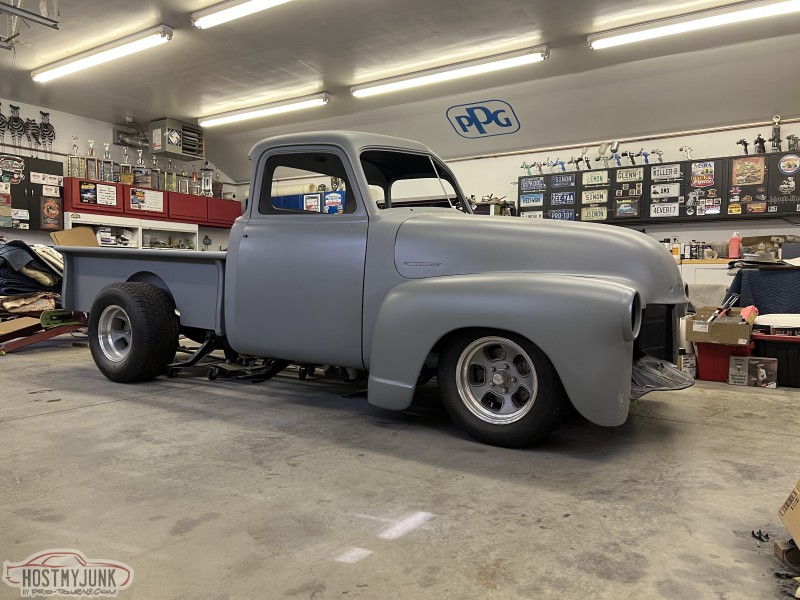 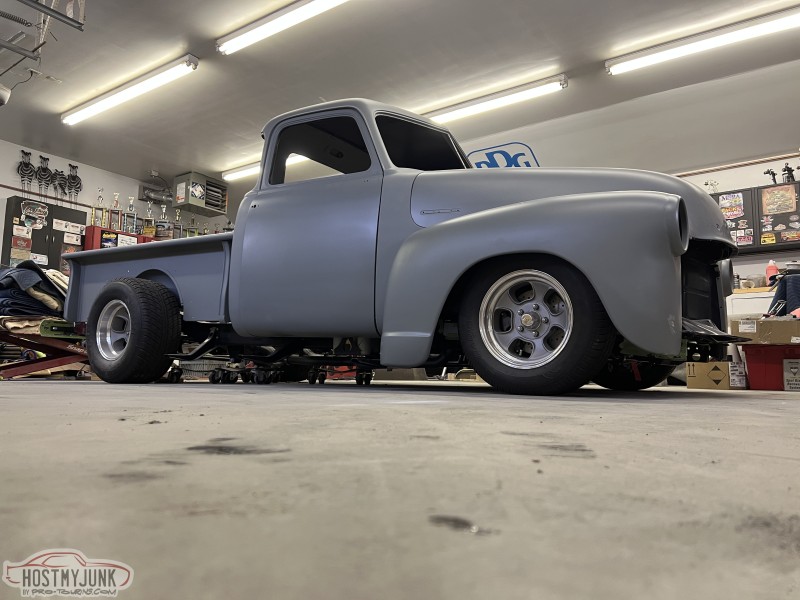 Also, I have been working on making new rear bumper brackets for a flipped 54-55 rear bumper. I also made a new bracket to hold the license plate. More on this later, sneak pics here. 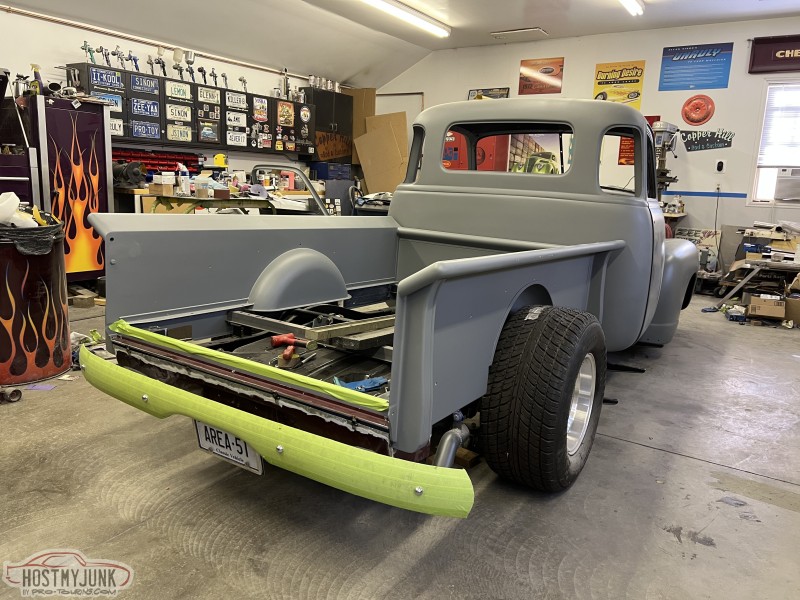 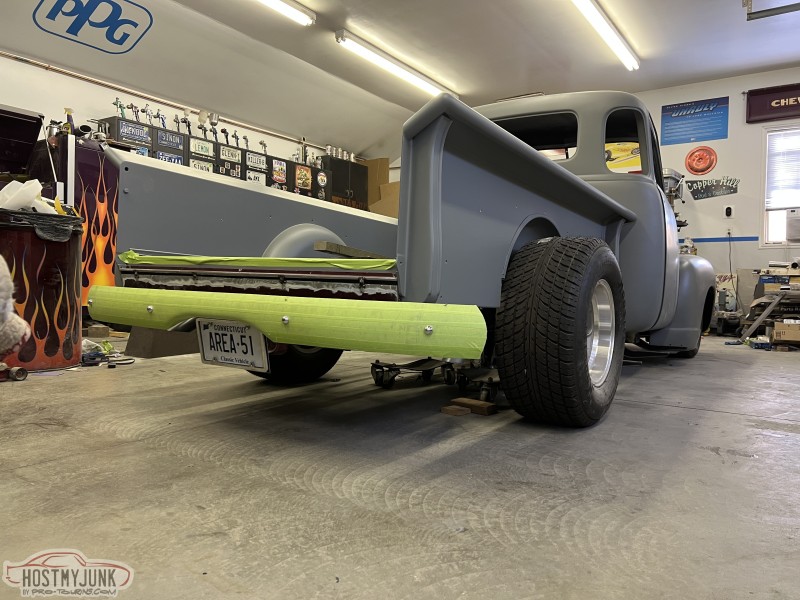
__________________
Glenn 1951 3100, Area51 1955 BelAir, 4EVER17 1987 R10, Ethel Copper Hill Rod & Custom http://67-72chevytrucks.com/vboard/s...d.php?t=829856 |
|
|
|
|
01-25-2026, 02:02 PM
|
#486 |
|
Registered User
Join Date: Jan 2022
Location: Conn.
Posts: 297
|
Re: Long Time Coming......
The steel I was waiting for finally arrived so I could finish the rear bumper brackets.
I started by making the straight lengths that the bumper bolts go through. I formed the ends so they would lay flat on the mildly curved bumper. I then took a straight length of bar, measured and cut it, and drilled mounting holes for the frame. I welded nuts on the inside of the forward holes because I had the frame boxed and would not be able to reach in with the nuts later on. Once those pieces were tacked together, I measured up to the side supports, and then bent them to shape. Happy with how everything fit I ground the metal down and welded everything solid, then ground the welds smooth. These will get powder-coated black later on, along with the front ones I made. 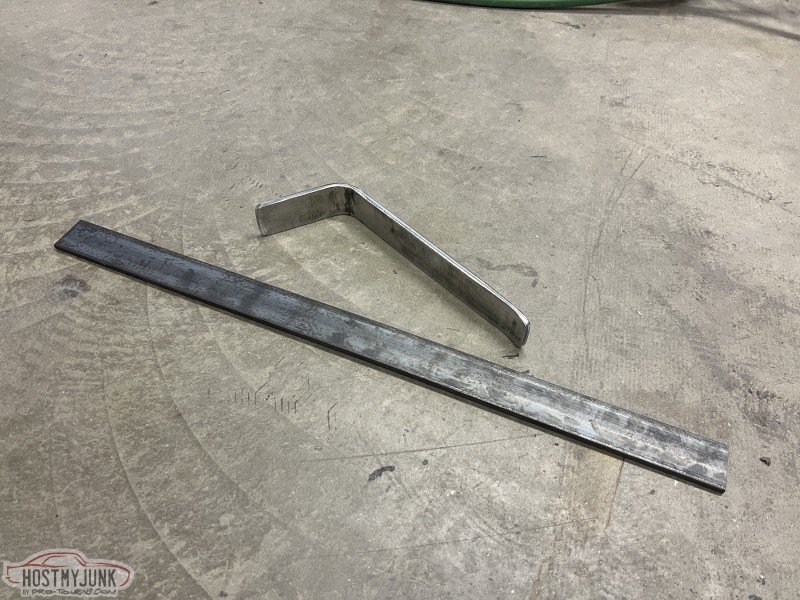  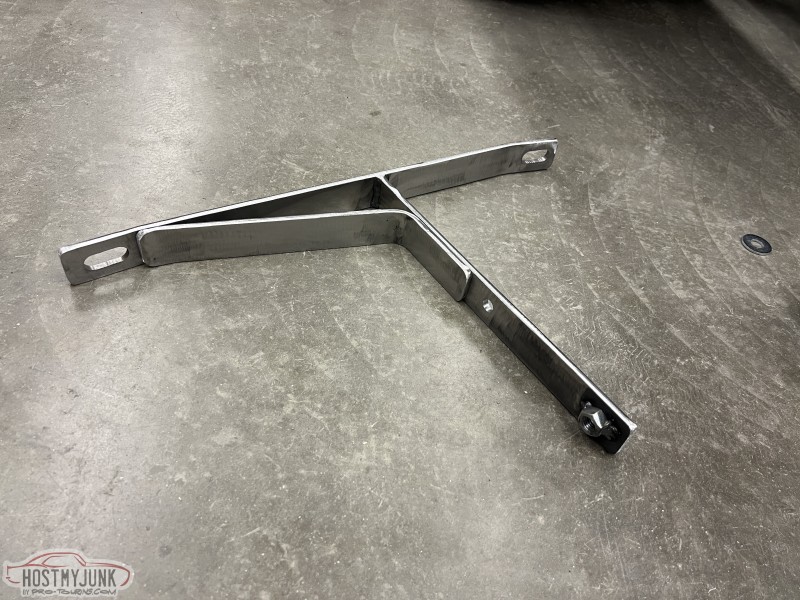 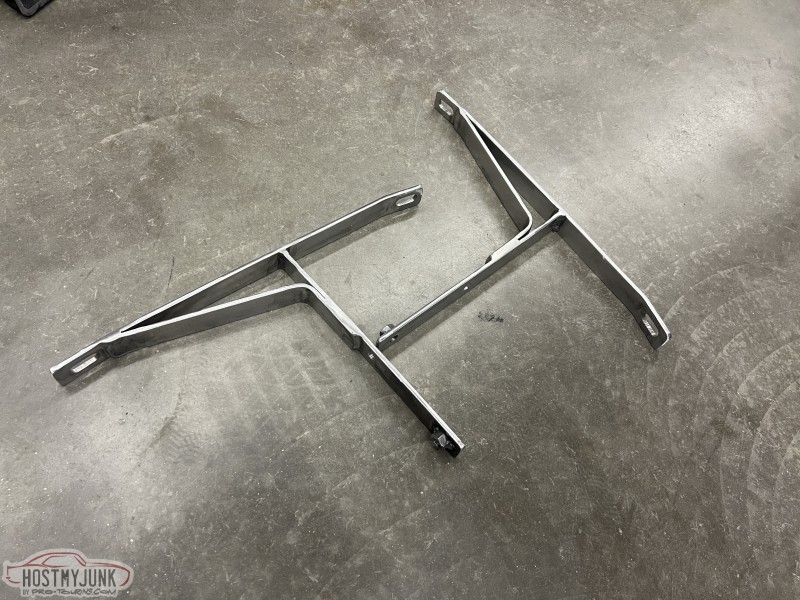 With the bumper off temporarily ow was a good time to show you the license plate bracket I made. This is sheetmetal that is fairly thick, 16g, so it would flex. I still have to finish welding the edge, but for the most part, this will be how it will look when done. To mount this, I drilled two holes in it and the bumper to be able to nut and bolt it together. The bumper is a 54-55 flipped upside down so the plate will hang below. Also, this will be powder-coated black when done. 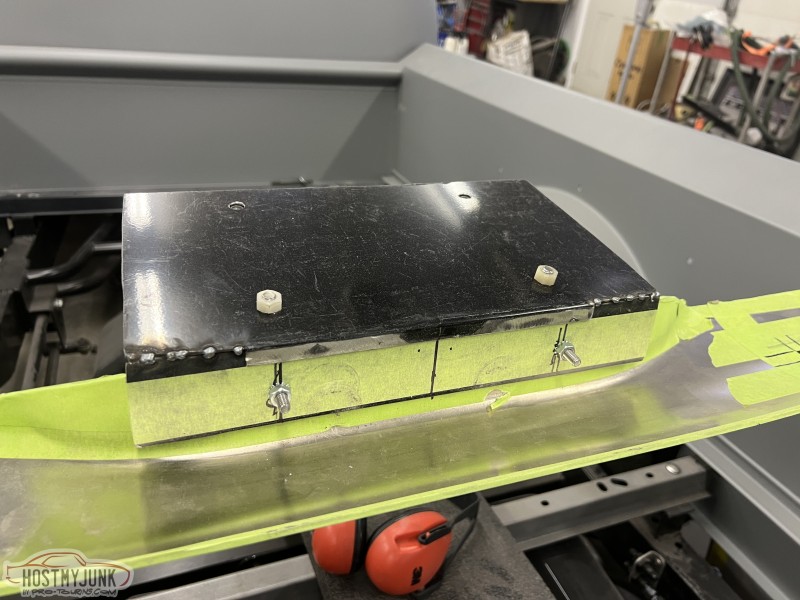 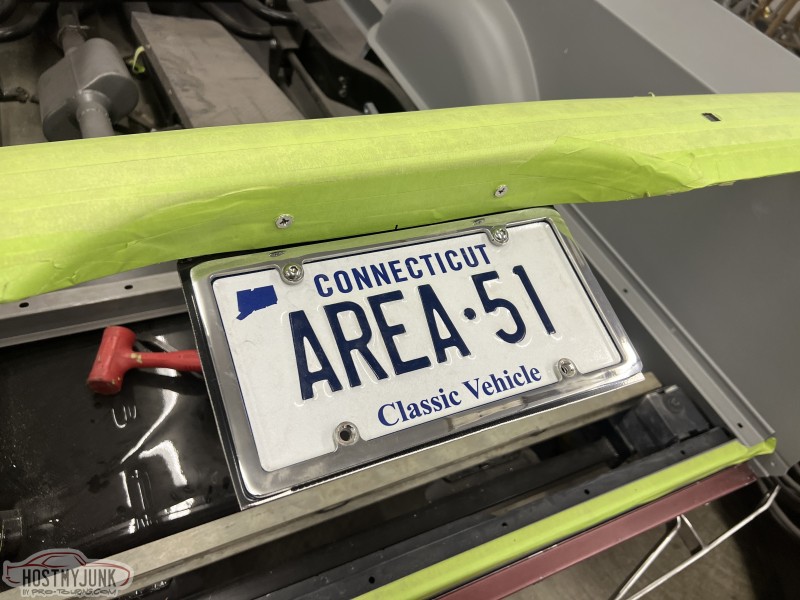 With the brackets and bumper back on the truck, here are a few picks of it all together. 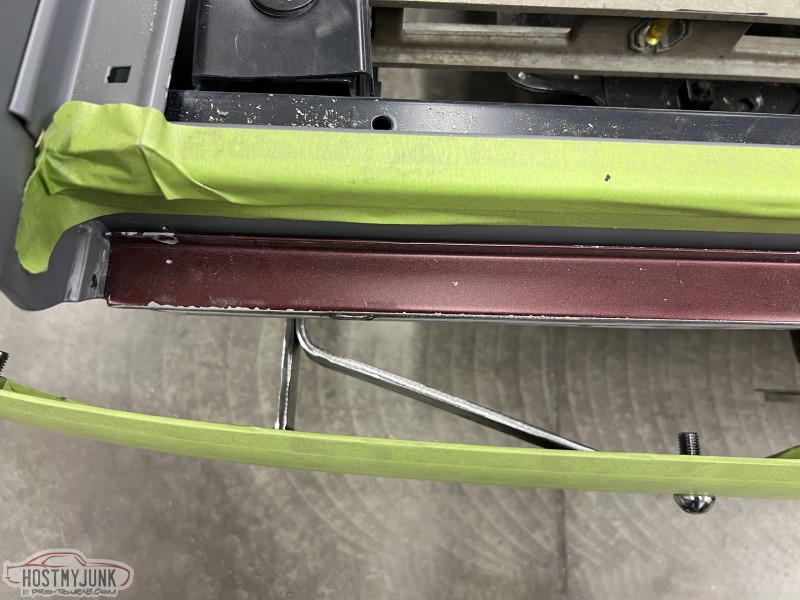 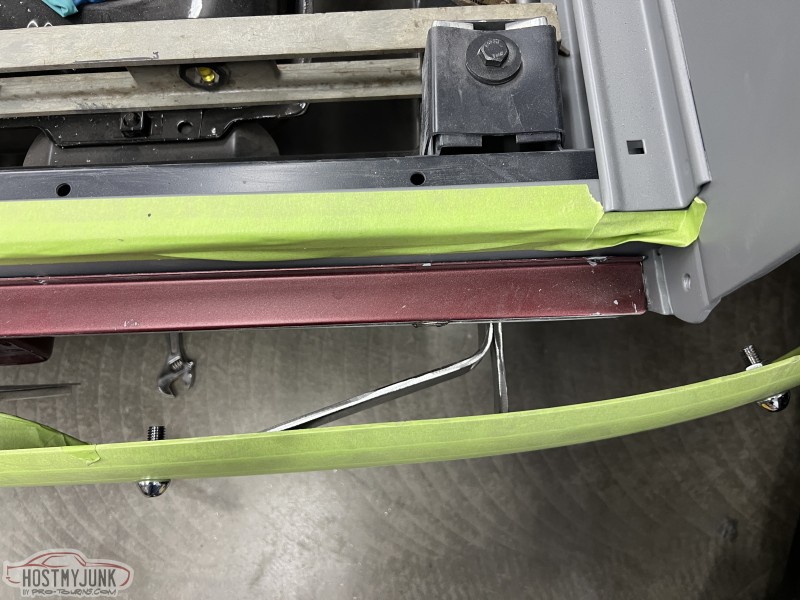 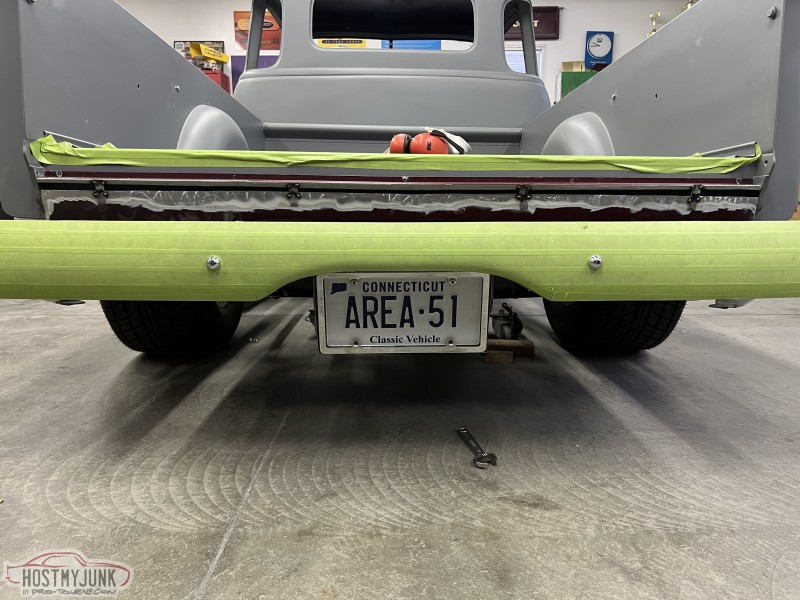 While in the shop I took a few minutes and bolted the rear fenders on as well. The first time they have been on the truck in about two years. 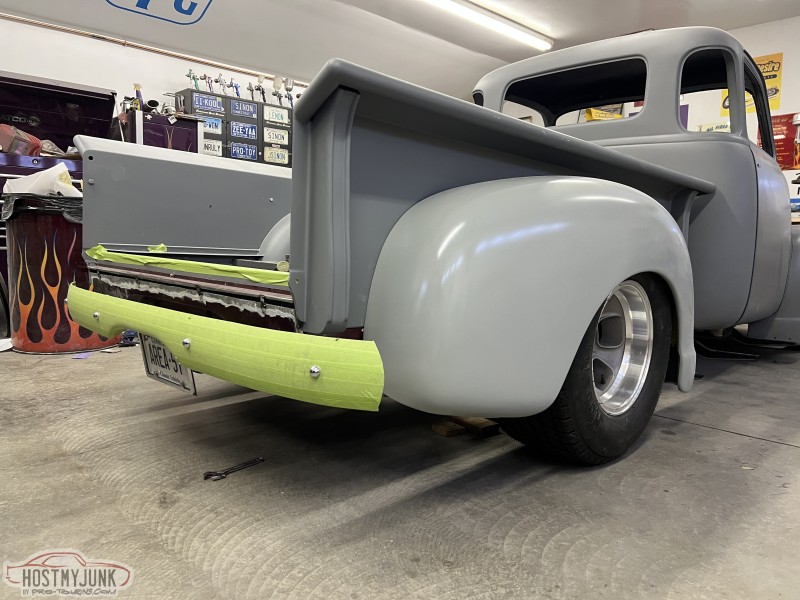 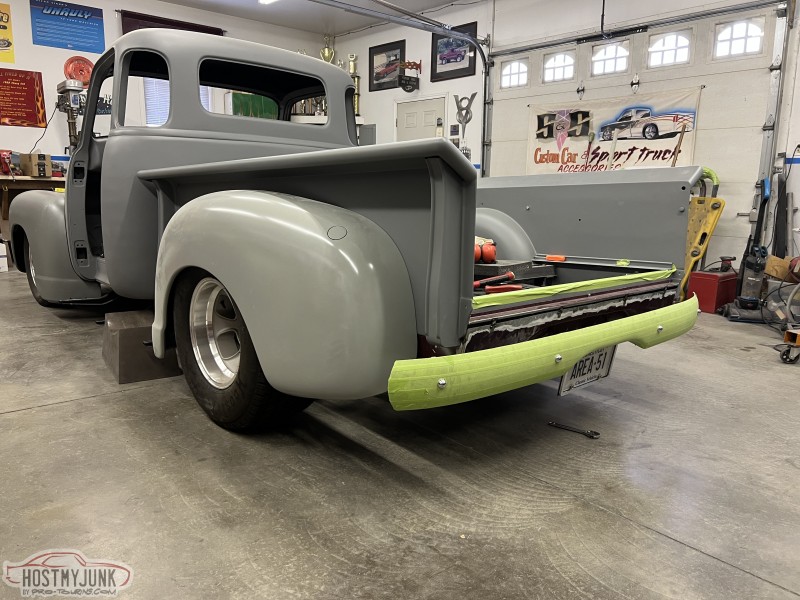 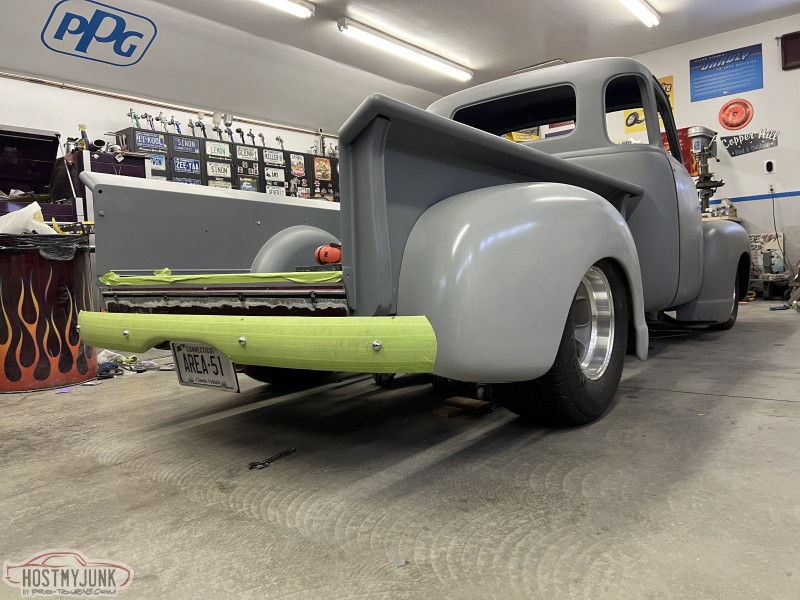 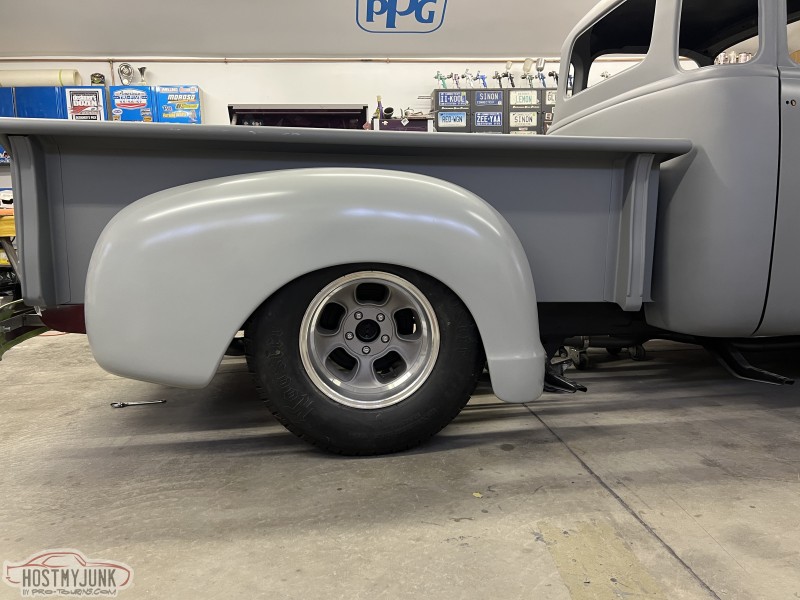
__________________
Glenn 1951 3100, Area51 1955 BelAir, 4EVER17 1987 R10, Ethel Copper Hill Rod & Custom http://67-72chevytrucks.com/vboard/s...d.php?t=829856 |
|
|
|
|
01-26-2026, 10:39 AM
|
#487 |
|
Senior Member
 Join Date: Oct 2014
Location: Eagle, ID
Posts: 3,406
|
Re: Long Time Coming......
Nicely done! The rear tire size looks good too.
|
|
|
|
|
01-26-2026, 01:40 PM
|
#488 |
|
Registered User
Join Date: Jul 2019
Location: Calgary, Alberta
Posts: 97
|
Re: Long Time Coming......
The bumper looks real nice tucked up and in like that. Looking good!
|
|
|
|
|
01-26-2026, 05:25 PM
|
#489 |
|
Registered User
Join Date: Dec 2018
Location: Oregon
Posts: 80
|
Re: Long Time Coming......
I really like how the bumper looks on there. I may have to steal that idea and make my own brackets to suck it in closer to the bed like that. Looks GREAT!!
|
|
|
|
|
01-27-2026, 11:00 AM
|
#490 |
|
Registered User
Join Date: Mar 2017
Location: Western Colorado
Posts: 42
|
Re: Long Time Coming......
That truck looks great even in primer! Like what you did with the bumpers.
|
|
|
|
|
01-27-2026, 01:42 PM
|
#491 |
|
Junior Member
Join Date: May 2022
Location: Trout Creek, Montana
Posts: 89
|
Re: Long Time Coming......
The stance looks just about perfect to me!
|
|
|
|
|
01-27-2026, 02:55 PM
|
#492 | |||||
|
Registered User
Join Date: Jan 2022
Location: Conn.
Posts: 297
|
Re: Long Time Coming......
Quote:
Quote:
Quote:
Quote:
Quote:
__________________
Glenn 1951 3100, Area51 1955 BelAir, 4EVER17 1987 R10, Ethel Copper Hill Rod & Custom http://67-72chevytrucks.com/vboard/s...d.php?t=829856 |
|||||
|
|
|
|
01-29-2026, 02:17 PM
|
#493 |
|
Registered User
Join Date: Feb 2021
Location: WestCentral MN,
Posts: 50
|
Re: Long Time Coming......
I don't currently have a rear bumper on my 51. I may steal your idea.... Now to find a nice patina subject.
|
|
|
|
|
01-29-2026, 04:29 PM
|
#494 | |
|
Registered User
Join Date: Jan 2022
Location: Conn.
Posts: 297
|
Re: Long Time Coming......
Quote:
One of my main purposes of this thread is to share ideas and how I did things. By all means, if you see something you like use the it and have fun.
__________________
Glenn 1951 3100, Area51 1955 BelAir, 4EVER17 1987 R10, Ethel Copper Hill Rod & Custom http://67-72chevytrucks.com/vboard/s...d.php?t=829856 |
|
|
|
|
|
01-30-2026, 08:44 AM
|
#495 | |
|
Registered User
Join Date: Nov 2014
Location: somewhere, PA
Posts: 1,183
|
Re: Long Time Coming......
Quote:

|
|
|
|
|
|
01-30-2026, 10:46 AM
|
#496 |
|
Registered User
Join Date: Nov 2010
Location: calgary alberta
Posts: 9,039
|
Re: Long Time Coming......
have you decided on tail light options? high mount brake light?
|
|
|
|
|
01-30-2026, 01:12 PM
|
#497 | |
|
Registered User
Join Date: Jan 2022
Location: Conn.
Posts: 297
|
Re: Long Time Coming......
Quote:
I am using factory replacement, but LED, taillights. However they will mount using 3D printed brackets with the wiring hidden within. I should be getting to that soon, so stay tuned. For the high mount, I am using the 3rd brake light that I flushed into that 30's accessory trunk that will be bolted in the bed.
__________________
Glenn 1951 3100, Area51 1955 BelAir, 4EVER17 1987 R10, Ethel Copper Hill Rod & Custom http://67-72chevytrucks.com/vboard/s...d.php?t=829856 |
|
|
|
|
|
02-01-2026, 04:55 PM
|
#498 |
|
Registered User
Join Date: Jan 2022
Location: Conn.
Posts: 297
|
Re: Long Time Coming......
Since I was asked about my taillight plans I figured today was as good a day as any to finally take them out of the box and mount them.
I found a guy in Instagram that had made these 3D printed taillight stems that mount from the back side of the stake pocket, and have a hollowed out passage for hidden wiring. So I reached out to see if he would make me a set. He agreed and we talked a bit about them, and in the end I had him make two sets. I will body work and paint both pair just in case something happens to one of them, I will have another ready to go. These use reproduction stock taillights, although these are LED rather then the 1157 bulb. 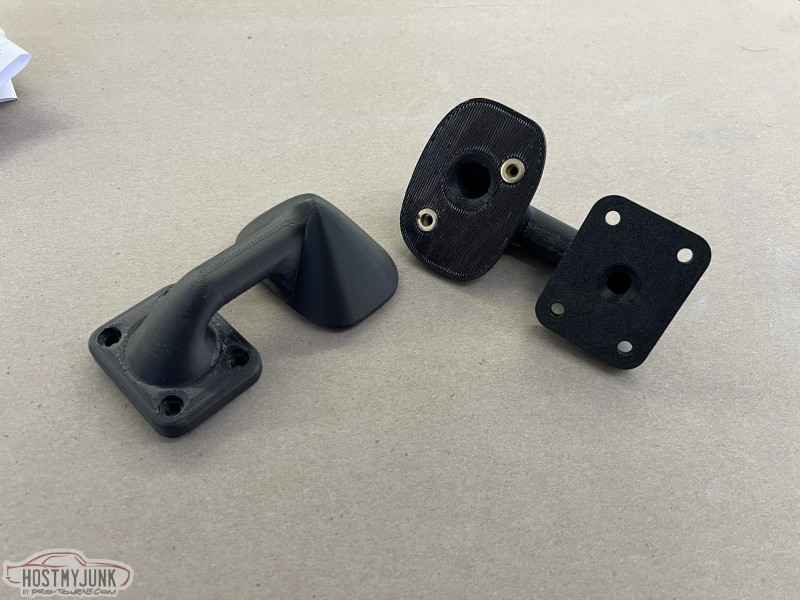 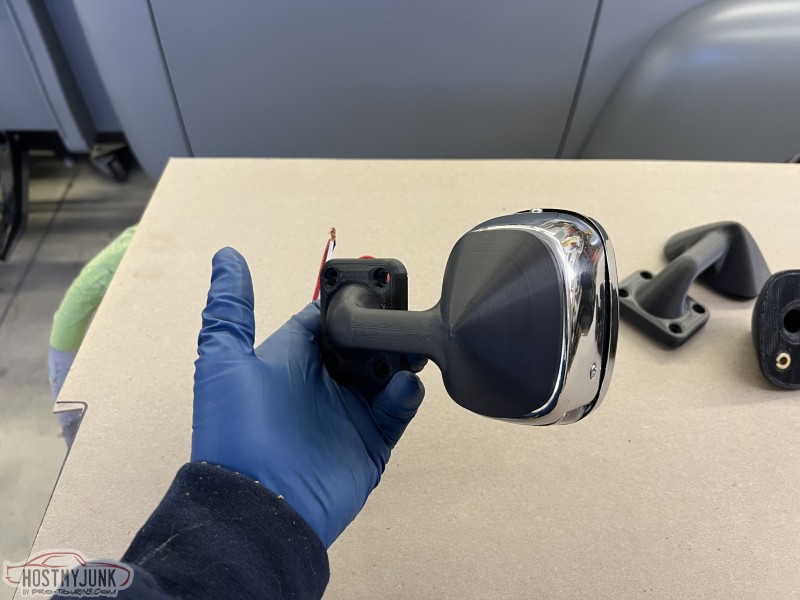 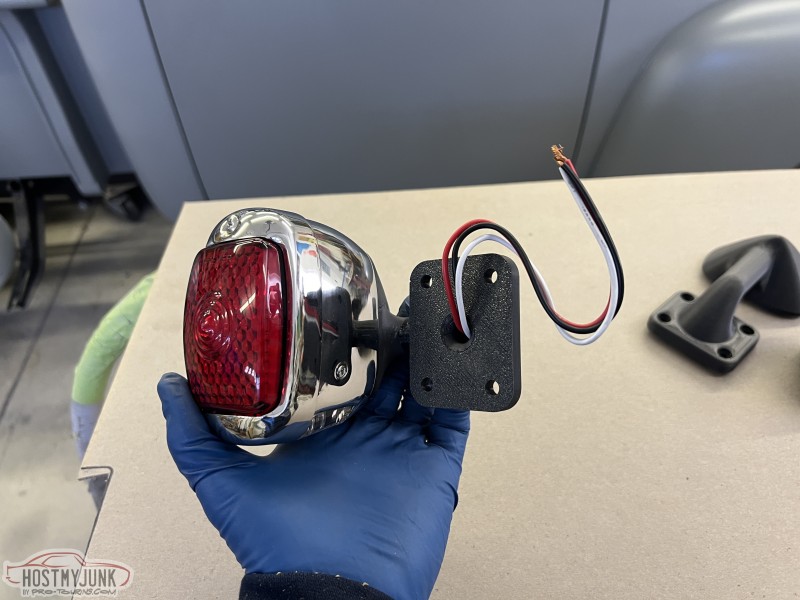 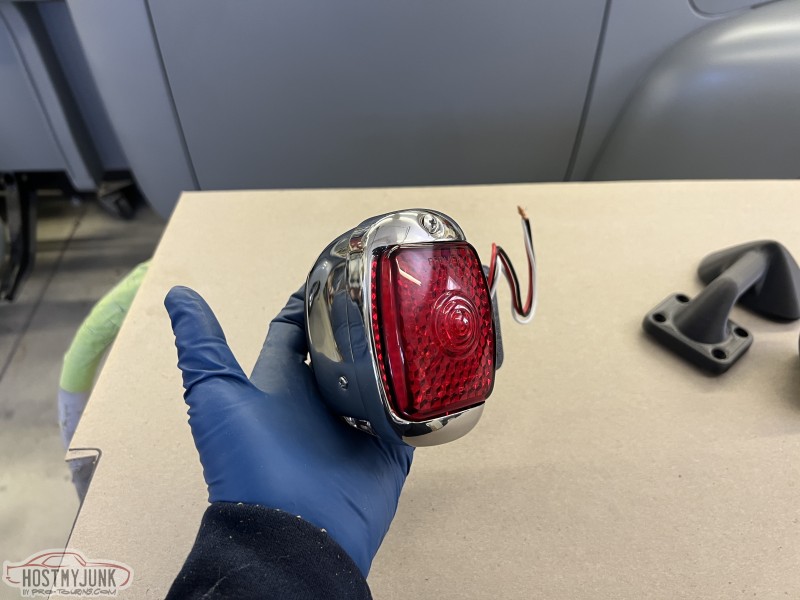 I figured out where I wanted them and put making tape down, then marked my center and bottom line so as to make sure both sides matched. I then center punched the holes and drilled. Right now they are being held on with sheet metal screws, but soon I will drill out the holes and install nut certs and use stainless button head machine screws. 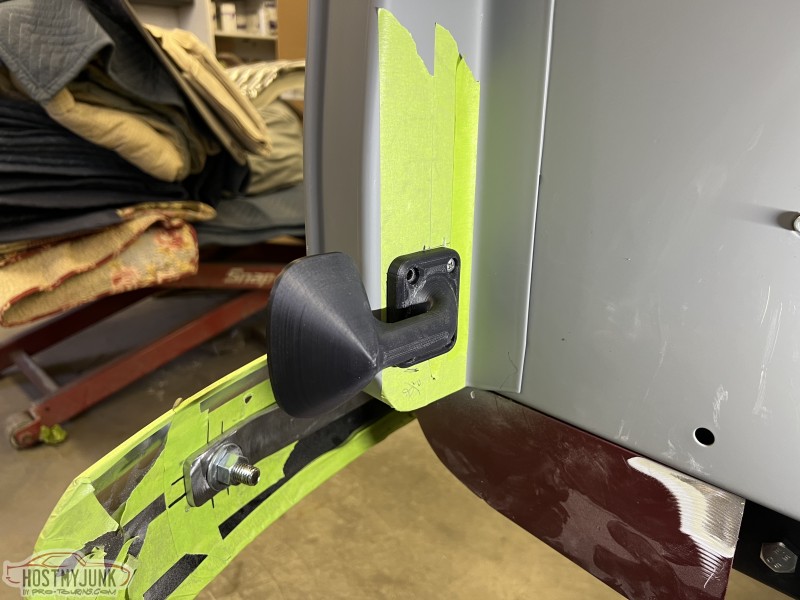  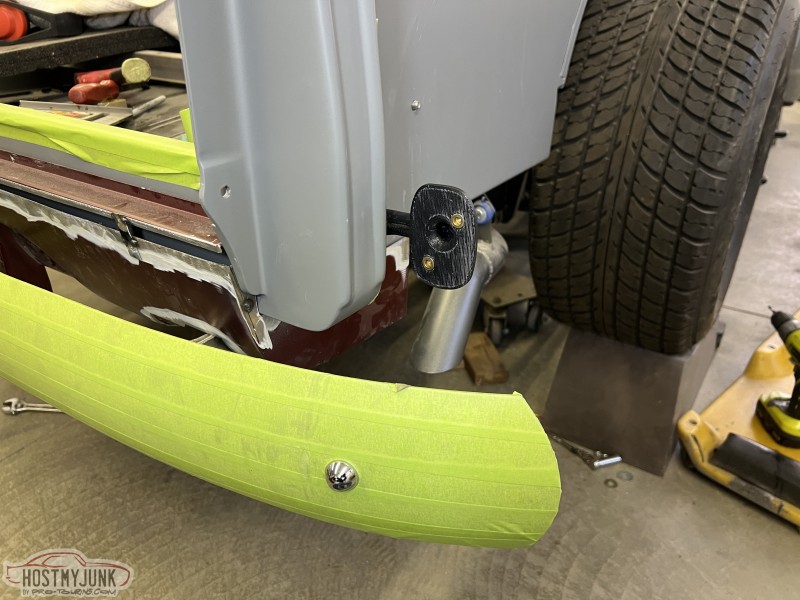 With that out of the way, I removed the bracket and marked the center hole for the wires to pass through. Here is with all tape removed. 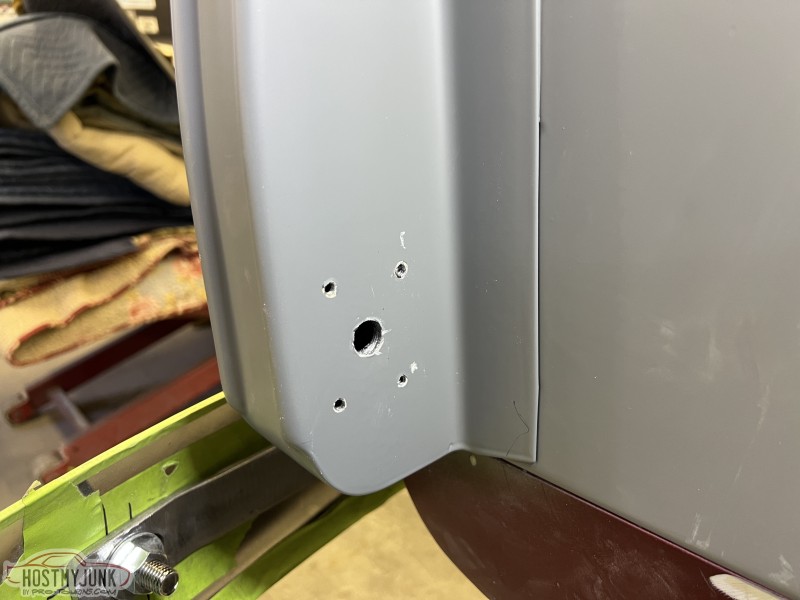 And with the bracket and light installed...I was able to reinstall the rear fender to see how it would look. 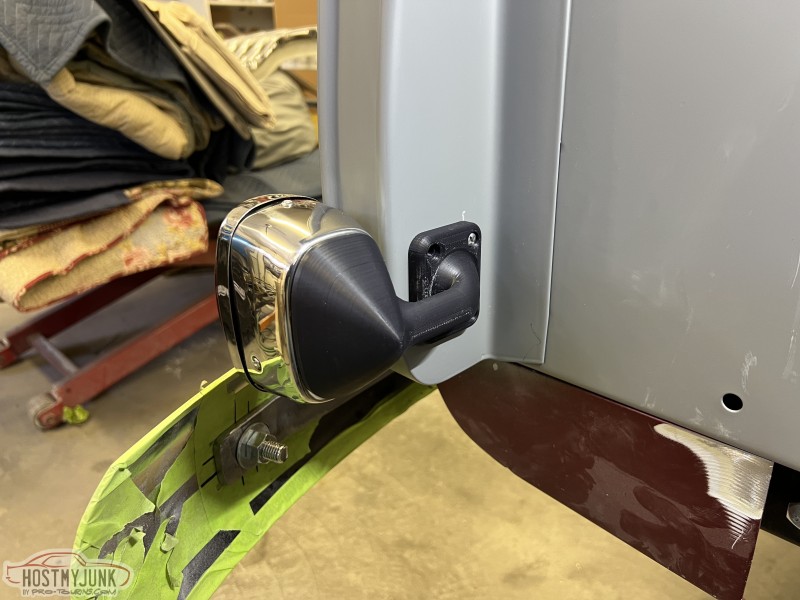 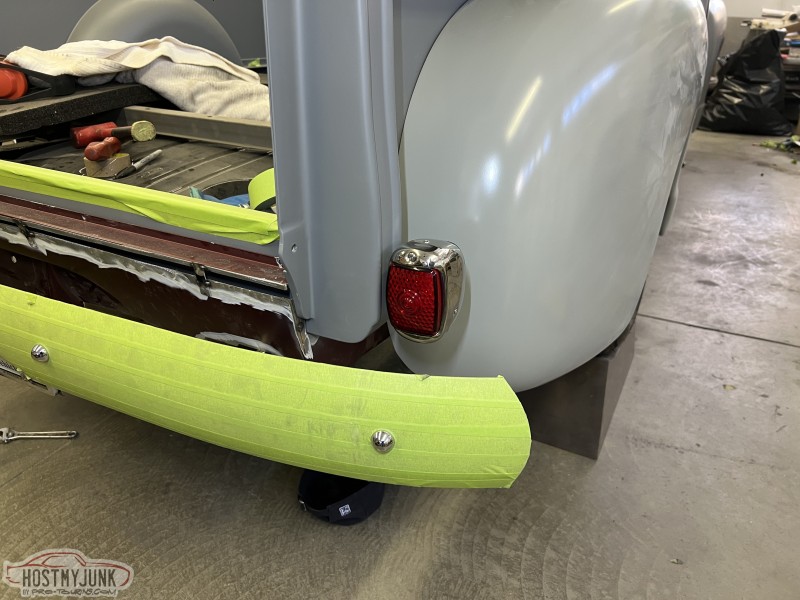 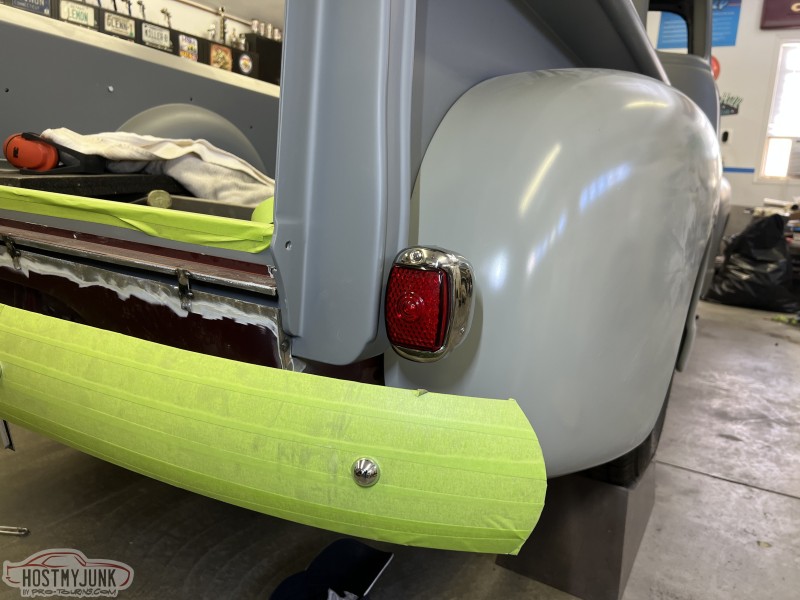 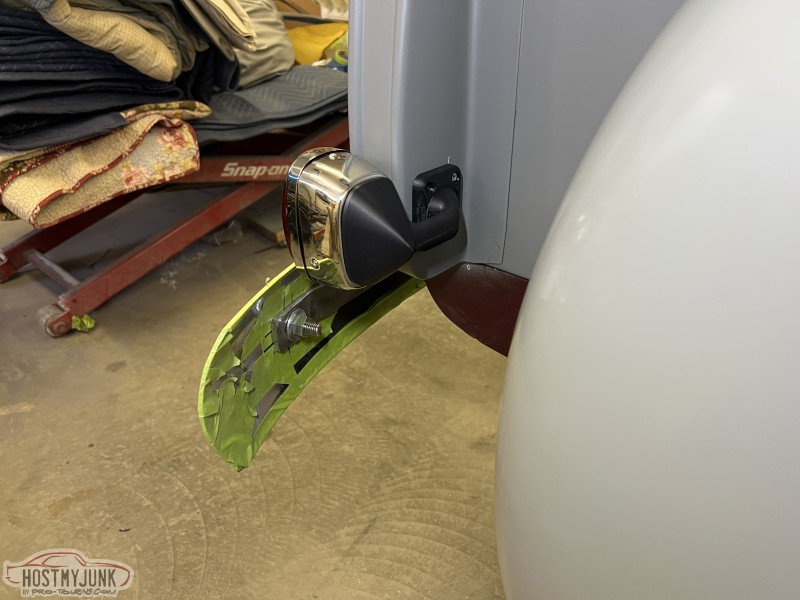 Both sides are now done, I only showed the one side with the driver side being redundancy. After that I started using some cardboard I have to think about making a filler panel that will go between the rear pan and bumper. If you scroll back up to me making bumper brackets you will see how looking down you would see right through the brackets to the ground. I'm thinking something like this in steel would close the area nicely, as the front stone gaurd does. 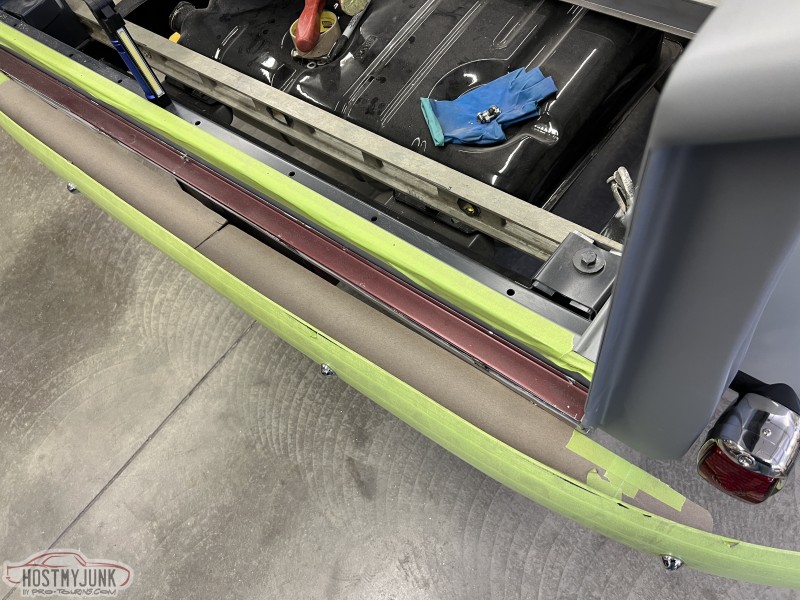 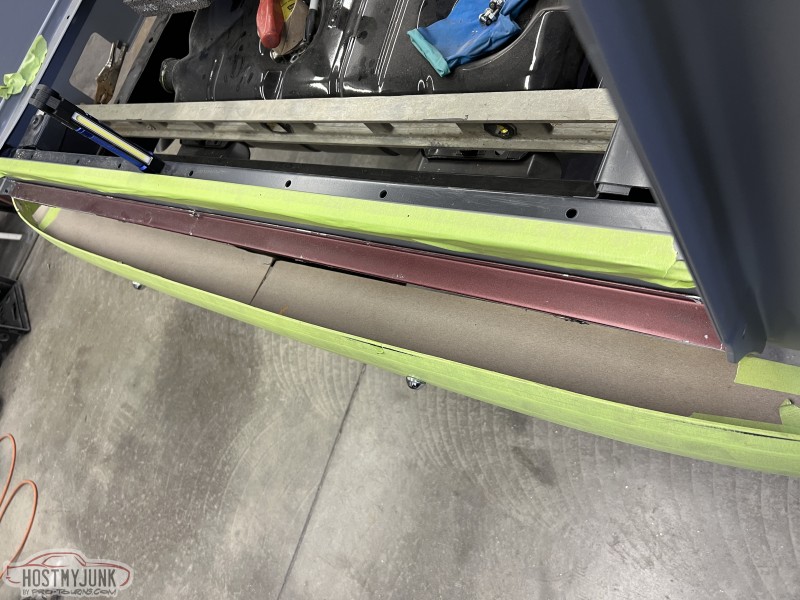 .
__________________
Glenn 1951 3100, Area51 1955 BelAir, 4EVER17 1987 R10, Ethel Copper Hill Rod & Custom http://67-72chevytrucks.com/vboard/s...d.php?t=829856 |
|
|
|
|
02-01-2026, 05:05 PM
|
#499 |
|
Senior Member
Join Date: Sep 2017
Location: Bryan, Texas
Posts: 2,522
|
Re: Long Time Coming......
That light bracket is a very clean look for what you are doing.
__________________
8man-aka Robert 1948 on a S10 Frame, small block with a carb 1954 Cab, 53 Front and Bed, 50 Doors, S10 Frame, Power TBD Build thread: "]http://67-72chevytrucks.com/vboard/showthread.php?t=746899&highlight=wife%27s+48[/URL] [/URL]http://67-72chevytrucks.com/vboard/showthread.php?t=840204 |
|
|
|
|
02-01-2026, 07:29 PM
|
#500 |
|
Registered User
Join Date: Nov 2010
Location: calgary alberta
Posts: 9,039
|
Re: Long Time Coming......
Very nice, clean, professionally done look. As expected from you. Nice work and forward thought/planning process.
|
|
|
|
 |
| Bookmarks |
|
|


 Linear Mode

